
7
Nothing Left but the Typing – Implementing the Wheelchair Project
In the previous chapter, we learned about the advantages of creating a set of diagrams as a design plan for our next coding project. The whole point is to get the design in a format that can be discussed, argued, pondered, socialized, and changed. After the design is completed, the last step is to implement the diagrams as code. Our trio of software engineers has done just that with an ambitious new project designed to make a difference in the lives of potentially thousands of people who could benefit from access to a high-quality, low-cost wheelchair.
I’ve often compared UML with sheet music. A good UML design can be handed off to a developer the same way a musical composer can hand off a score to a competent orchestra. In music, the orchestra will often make changes and improvisational improvements to the sheet music. Sometimes they do this to make the music fit the skill of the performers. Other times, they might need to change or adapt the music to fit the performance itself. Classical composer Johann Sebastian Bach was prolific. Among his most popular works are The Brandenburg Concertos. Bach assembled the collection in 1721. In 1968, a different composer, Wendy Carlos, arranged The Brandenburg Concertos to be played entirely on analog synthesizers in her work Switched on Bach. The music didn’t change as much as the implementation details. It isn’t a stretch to think of programming as being a lot like playing music. It requires creativity and improvisation. A talented architect who has created a good diagram can be reasonably sure a competent development team will be able to implement the diagram and, if required, make some improvisations.
In this chapter, we are going to hand off Tom’s UML design diagrams for implementation. There is a big difference between designing the classes and implementing them. First, the diagrams leave some areas vague on purpose. This is done to allow the developer to make decisions about details that don’t really matter to the diagram. As an example, there are many diagrams in this book that leave out class details. Look at a diagram from the previous chapter in Figure 7.1:
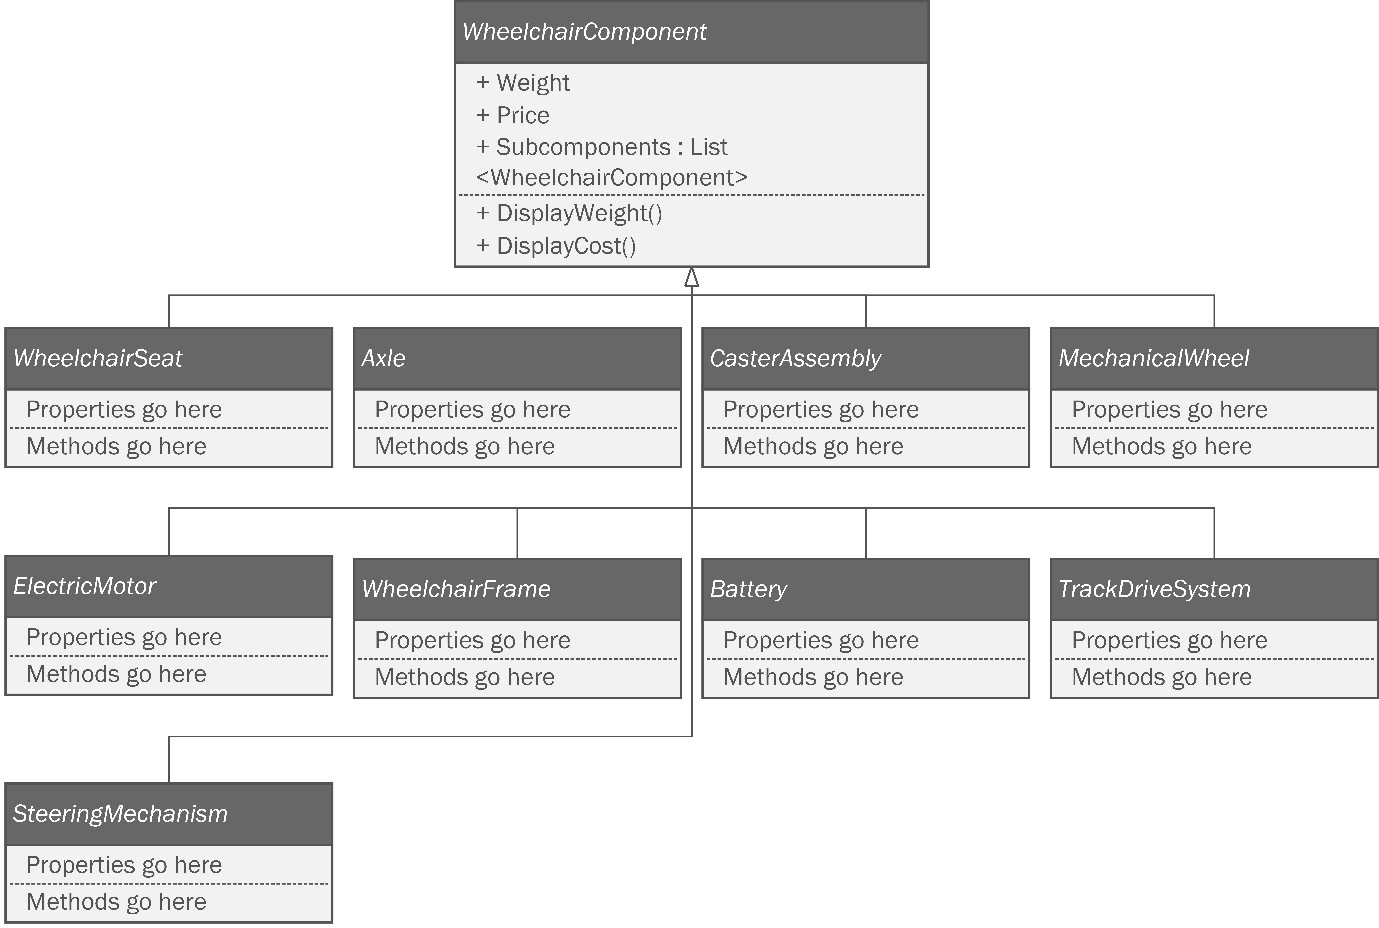
Figure 7.1: The composite diagram from the last chapter leaves a lot of details up to the developer.
This isn’t done because the architect is lazy. It is done because those details don’t really matter to the structure of the design. Imagine building a house from a blueprint. The blueprint will probably specify where the walls go. It might even specify the materials to be used, the same way we sometimes dictate a particular type for an instance variable or return type. However, the smaller details, such as what kind of paint to use on the walls or the brand of shingles used on the roof, are all implementation details. The builder can make those decisions independently of the blueprint.
While focusing on the design from Chapter 6, Step Away from the IDE! Designing with Patterns Before You Code, we’ll cover the following:
- Creating a new command -line project. So far, I have stayed away from IDE mechanics. I won’t be going into depth here either. It just feels right to start the chapter this way. If you’re new to C# development, and you haven’t noticed Appendix 1 at the end of the book, you should check that out because I show you some of these mechanics that might not be second nature to you
- We’ll start by adding our base classes just like Tom did, but we don’t really need a two-pass system since we did all the organization work in the design phase.
- We’ll implement the Builder pattern.
- We’ll convert the Builder pattern implementation to a Singleton.
- We’ll implement the Composite pattern.
- We’ll implement the Bridge pattern.
- We’ll implement the Command pattern.
Throughout the book, I assume you know how to create new C# projects in your favorite integrated development environment (IDE). I do not usually spend any time on the mechanics of setting up and running projects. This chapter is a mild exception since the whole chapter really is an example of one big project. If you need more details, or you want to use an IDE other than Rider, and you’re not sure how to set up the projects, please see Appendix 1 of this book. Should you decide to try any of this out, you’ll need the following:
- A computer running the Windows operating system. I’m using Windows 10. Since the projects are simple command-line projects, I’m pretty sure everything here would also work on a Mac or Linux, but I haven’t tested the projects on those operating systems.
- A supported IDE such as Visual Studio, JetBrains Rider, or Visual Studio Code with C# extensions. I’m using Rider 2021.3.3.
- Any version of the .NET SDK. Again, the projects are simple enough that our code shouldn’t be reliant on any particular version. I happen to be using the .NET Core 6 SDK.
You can find the completed project files for this chapter on GitHub at https://github.com/Kpackt/Real-World-Implementation-of-C-Design-Patterns/tree/main/chapter-7.
The crack of noon
Having spent the previous day and well into the night diagramming their project, Tom, Kitty, and Phoebe arrived at Bumble Bikes. At high noon the next day, the energy in the room was palpable.
Kitty walked in with a box under her arm. She had ordered a new keyboard, the kind with the loud blue clicky switches. She loved these keyboards because they reminded her of her father’s IBM Model M keyboard. She used to play with it when she was little. Kitty wanted to remember the inspiration for this project.
A short time ago, she and her sister, Phoebe, had started a successful bicycle manufacturing company. Their outlook was optimistic until their father was diagnosed with a rare degenerative muscular disease called dermatomyositis and he was newly confined to a wheelchair. Kitty and Phoebe’s mother had fought a long legal battle with their medical insurance provider, who refused to pay for the expensive wheelchair their father needed to cope with his disease. Phoebe took matters into her own hands and decided, nearly singlehandedly, that she could make a wheelchair for their father and everyone else who needed one. Naturally, Kitty followed her younger sister’s lead because she knew Phoebe was right. “Today is the day,” Kitty thought, “we change the world.” The new keyboard would keep her focus on her father and all the people she could help just by doing a little typing.
Tom showed up to the lab wearing his finest nerdy T-shirt; it bore a famous XKCD cartoon featuring two developers sword fighting with the lettering on the shirt stating that Tom was not slacking off; he was merely waiting for his code to compile. Phoebe arrived with a stack of pizzas and a palette of fizzy water. The advantage to starting work at noon is that it’s easy to get the supplies needed. As we all know, a programmer is merely a biological machine that converts pizza and caffeine into code.
The trio got set up and Phoebe turned off the harsh overhead fluorescent lights. After a quick scrum session, they decided on a part of the application where they would get started. With any luck, they could have this done in a few days and this code might be the most important code the sisters, with Tom’s help, might ever write.
Setting up the project
Kitty, Phoebe, and Tom hunker down in front of Kitty’s new keyboard. The three are intent on using pair programming. Pair programming occurs when two or more developers work together and one keyboard is shared. One person types as the others watch. The developers trade positions every so often. The developers who are not typing are responsible for watching and helping with research. Pair programming negates the need for code reviews and is shown to dramatically increase developer productivity. If you’re not familiar with the practice of pair programming, check out the book Practical Remote Pair Programming listed in the Further reading section of this chapter. Tom is intimately familiar with the design, but Kitty and Phoebe can type faster. Tom’s ability to type with his toes is truly amazing, but he accepted a long time ago that typing speed is not a value he brings to a team. Kitty and Phoebe have far less coding experience, but having spent the last few years writing research papers at separate universities, their typing has become quite fast. Kitty decides to take the keyboard first while Phoebe fuels up on pizza and fizzy water. Kitty opens her favorite IDE and creates a new Console Application project as shown in Figure 7.2.

Figure 7.2: Creating a new command-line project.
If you’re following along with a different IDE, and you’re not sure how to create a command-line project, check out Appendix 1 of this book. In it, I cover project creation mechanics for Visual Studio, Rider, and Visual Studio Code. I used Rider for this book because it has exceptional tools for cleaning and formatting code that come in handy when you’re writing a book.
Once Kitty had created the project, she put Visio on one of the other monitors so she could see the UML diagrams for the project. The first diagram she opened was actually the very last diagram they had worked on. You can see it in Figure 7.3. Tom had added a change to a central interface called IManufacturable. This is a very good place to start since everything else flows from this one interface.
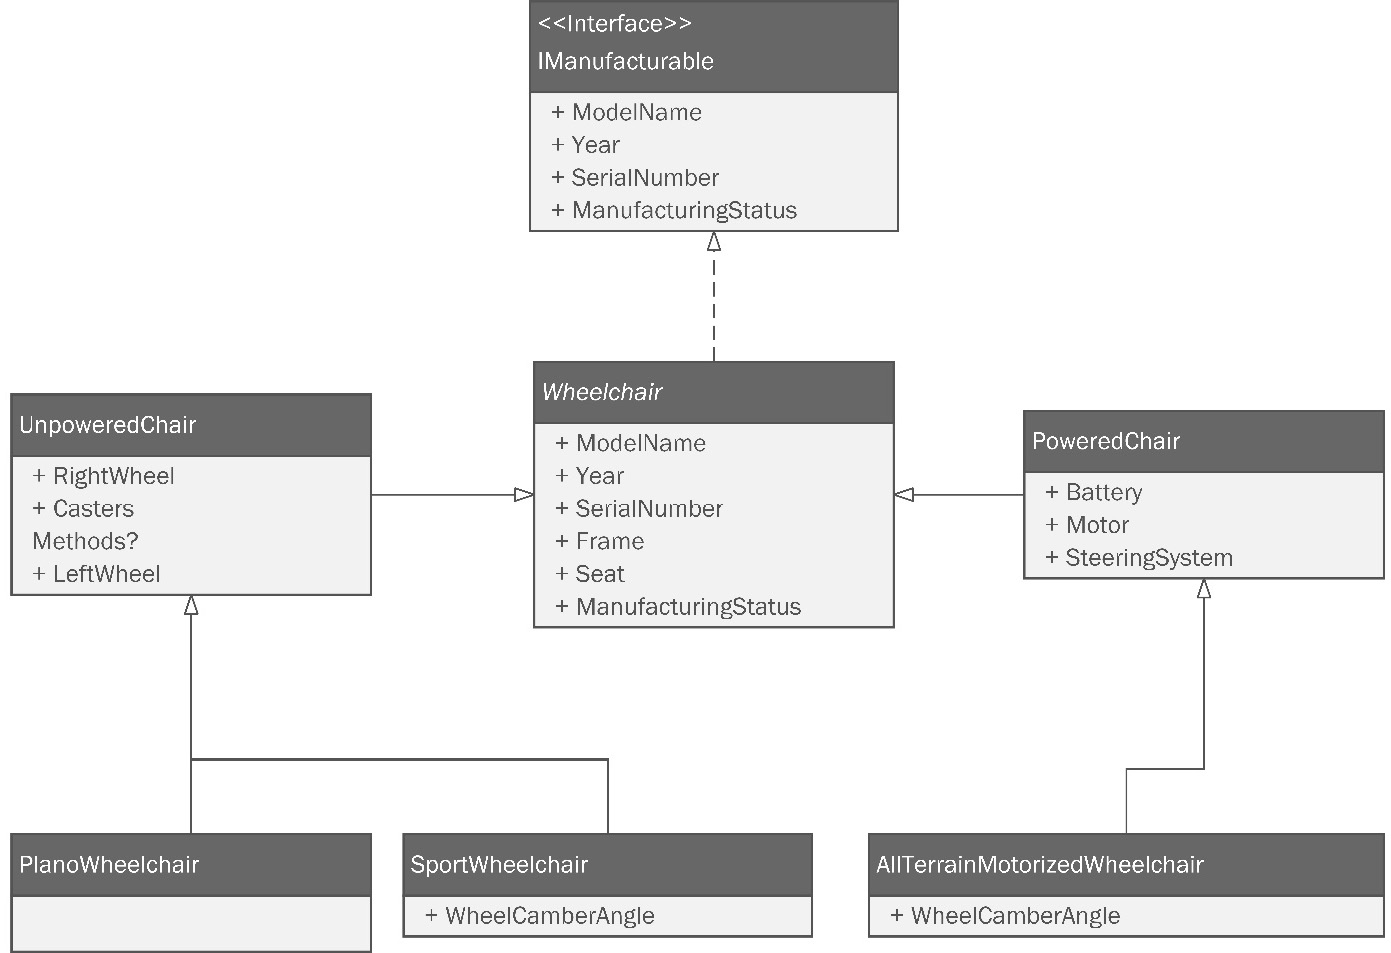
Figure 7.3: The IManufacturable interface and a class structure that implements make the perfect place to start.
Kitty adds a new file called IManufacturable and types the code indicated by the diagram:
public interface IManufacturable
{
    public string ModelName { get; set; }
    public int Year { get; }
    public string SerialNumber { get; }
    public string BuildStatus { get; set; }
}
We’ve seen these properties before in the bicycle project. The Year and SerialNumber properties are going to be set automatically by the constructor in the implementing class, so only a get method is needed.
Next, Kitty adds the abstract Wheelchair class:
public abstract class Wheelchair : IManufacturable
{
The class is marked as abstract as per the diagram. Don’t forget that in UML, abstract classes display the class title in italics. This can be difficult to see with some of the fonts in UML modeling tools. The Wheelchair class implements the IManufacturable interface Kitty made a moment ago. Most IDEs can generate the missing members specified by the interface. Kitty generated the following code. She made BuildStatus nullable by adding the question mark next to the type definition:
    public string ModelName { get; set; }
    public int Year { get; }
    public string SerialNumber { get; }
    public string? BuildStatus { get; set; }
The constructor is almost identical to those used in the bicycle project. Since the class is abstract, it makes sense to expose the constructor as protected. Within the constructor, Kitty initializes everything she can:
    protected Wheelchair()
    {
        ModelName = string.Empty;
        SerialNumber = Guid.NewGuid().ToString();
        Year = DateTime.Now.Year;
    }
}
The SerialNumber attribute is a GUID. This is a system-generated string that is guaranteed to be unique. This makes it perfect for a serial number. The Year attribute is initialized to the current year.
“Let’s wait on the frame and seat properties for now. They’re not primitives and we haven’t created classes for them yet,” Tom said.
Tom’s design split wheelchairs into two types: unpowered chairs and powered chairs. Kitty adds the UnpoweredChair class next:
public abstract class UnpoweredChair : Wheelchair
{

}
She doesn’t make it very far. Like most class diagrams, the types needed for the RightWheel, LeftWheel, and Casters properties aren’t specified. “We need the composite diagram for the types,” Tom reminded her. That particular diagram can be seen in Figure 7.4:

Figure 7.4: The Composite structure.
Tom’s design for the Composite pattern makes each part of the wheelchair out of an abstract class called WheelchairComponent. The wheels and casters in our current model need this abstract class defined before we can get the types correct. Kitty adds a new class called WheelchairComponent:
public abstract class WheelchairComponent
{
In order to use the Composite pattern, we need a few properties. The point of the Composite pattern is to use a tree-like structure to process lists. Kitty and Phoebe want to be able to iterate recursively over their wheelchair model instance to report on the weight and cost for each component. These numbers can be summed at any level to determine the weight and cost of a single part or a subset of the chair. For example, it might be useful to know the weight and cost of the assembled frame. When we are working with bicycles, weight and cost are typical trade-offs. Cheaper components are heavier. Competitive cyclists are willing to pay more to shave grams off their total weight. Doing this can reduce the time of a long ride by a few seconds, which might be enough to win a race.
Lightweight components for a wheelchair have the same concerns as bicycles; however, the motivation is driven by a different purpose. Kitty and Phoebe’s dad has a degenerative muscle disease. He specifically needs something lightweight if he’s going to be using an unpowered chair. Some wheelchair users have very strong upper bodies; others are not as strong. Lightweight materials are still balanced against cost, and the Composite pattern will help the engineering team analyze and improve the cost-to-weight ratio for the wheelchairs.
Since this class is abstract, its members are going to be protected, unless there’s a good reason for them to not be protected. Kitty adds properties for Weight and Price as floats:
    protected float Weight { get; set; }
    protected float Price { get; set; }
Next, Kitty adds the crucial part of the class. The Composite pattern needs a Subcomponents collection. Remember, components in the composite are either leaves or containers. Containers are nodes in the tree that have other nodes within them. During the design phase, Kitty and Tom drew a diagram of the composite’s tree structure on a whiteboard. You can see that again in Figure 7.5, with Tom’s design written on the left side and Kitty’s on the right.
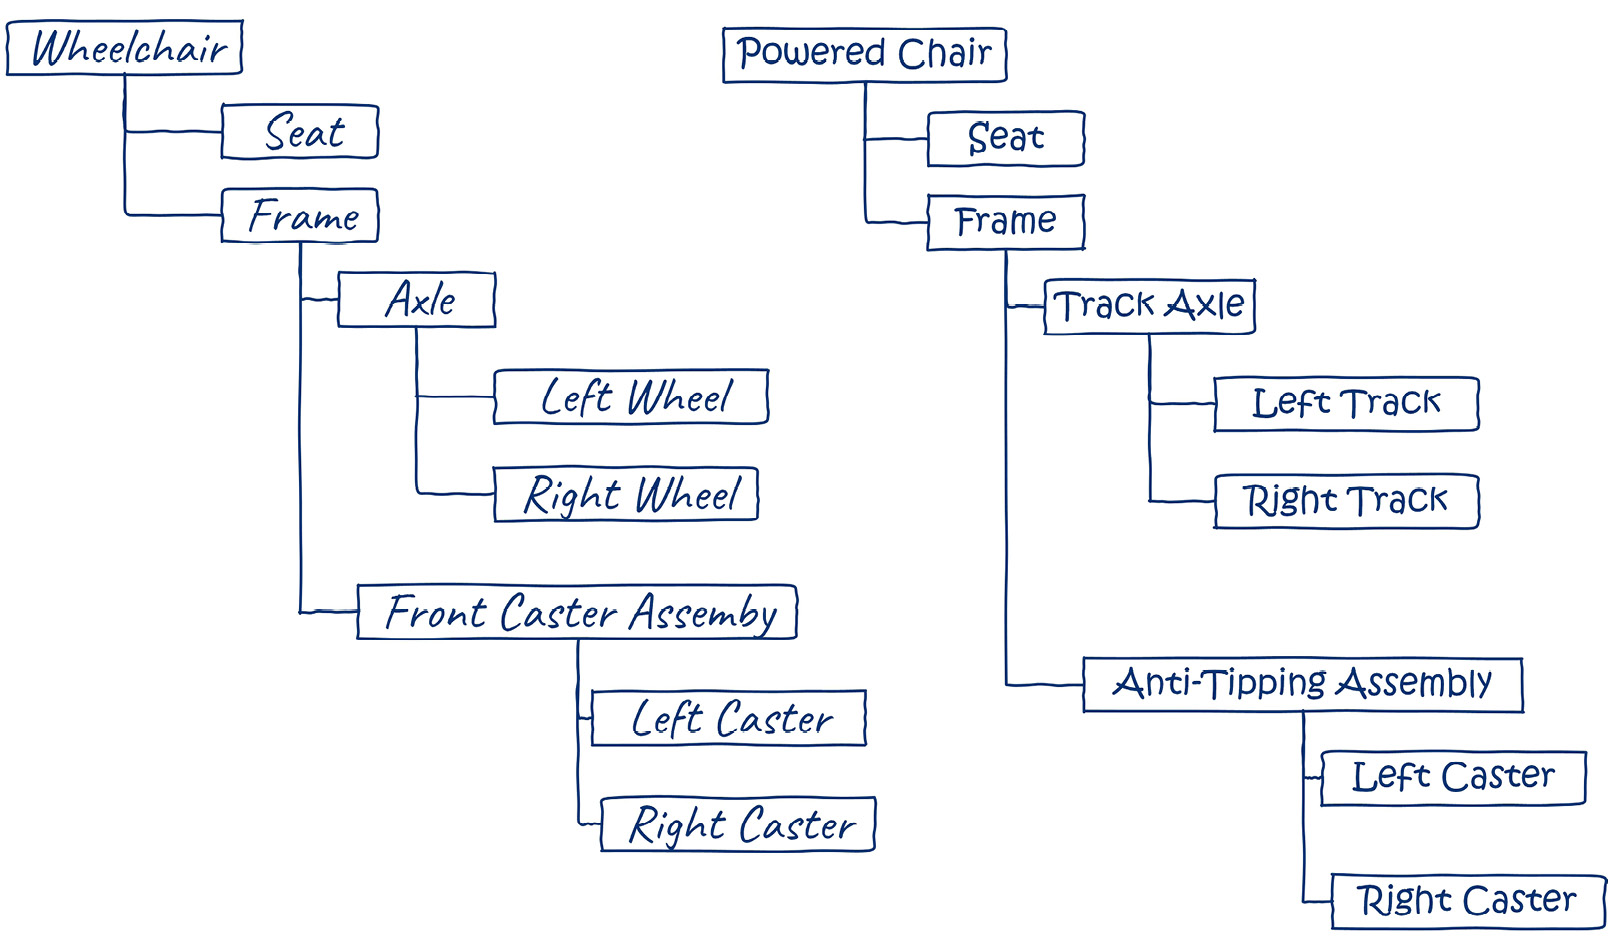
Figure 7.5: Tree-like structure for powered and unpowered chairs.
If you look at the axle on the unpowered chair, you will see that it has components within it. The axle is a container. The right caster, on the other hand, doesn’t contain any other components, so it is a leaf.
Regardless of whether they are a container or a leaf, all classes in the structure use the same base class, which contains a collection to hold other components. In effect, everything has the potential to be a container, even if it is merely a leaf. Kitty adds the collection:
protected List<WheelchairComponent> Subcomponents { get; set; }Note: the collection type is the very class she’s writing. This allows the composite to be iterable. We will rely on Liskov substitution heavily by requiring this base class for our types, but will supply concrete classes when we actually implement the Builder pattern later.
Next, Kitty adds a constructor and initializes all the properties:
    protected WheelchairComponent()
    {
        Subcomponents = new List<WheelchairComponent>();
        Weight = 0.0f;
        Price = 0.0f;
    }
The diagram in Figure 7.4 indicates a couple of methods. Kitty isn’t far enough along yet to worry about the specifics of these methods. For now, she just adds a line that throws NotImplementedException should anything try to access these methods. This is a very common placeholder:
    protected void DisplayWeight()
    {
        throw new NotImplementedException();
    }
    protected void DisplayCost()
    {
        throw new NotImplementedException();
    }

}
With this done, Kitty can return to defining the UnpoweredChair class. She switches to the UnpoweredChair.cs file in her IDE. This time, she gets a little further. She adds the three properties required by the class diagram (Figure 7.3):
public abstract class UnpoweredChair : Wheelchair
{
    protected WheelchairComponent RightWheel { get; set; }
    protected WheelchairComponent LeftWheel { get; set; }
    protected WheelchairComponent Casters { get; set; }
}
Kitty’s IDE indicates a problem with a yellow wavy line beneath each property. She hasn’t initialized any of them. This isn’t a huge problem because she knows she’s going to be using the Builder pattern later to fill in these details based on which chair model is being built.
It was right about then that Kitty was startled by a loud voice behind her. “PEEE-EW! That’s some smelly code you got there!” Phoebe exclaimed. Apparently, having downed a few slices of pizza and a few cans of caffeinated fizzy water, she was ready to be tagged in.
“What?” Kitty asked sheepishly. Tom chimed in, “I think she’s upset because you used the WheelchairComponent base class for your types.”
“I thought that’s what we were doing,” Kitty replied.
“Look again, Sis. The composite diagram has classes under the WheelchairComponent class that are more specific,” Phoebe said. Kitty got up and Phoebe took her place.
Wheelchair components
Phoebe sat down and made a show of stretching her neck and cracking her knuckles. If this were a fight scene in an action movie, this would be her opponent’s cue to be intimidated. Instead, the cursor blinked unafraid in the IDE. “This is a good spot for me to fill in because I know a little bit more about the actual components,” said Phoebe. She was right. Phoebe had spent many hours sourcing parts and figuring out how to make what she couldn’t buy while building bikes. In Figure 7.4, we can see there is a set of abstract components that all inherit from WheelchairComponent. The WheelchairComponent base class gives us the Weight and Price fields used in the composite pattern to help us iteratively compute the weight and price of a set of components. The diagram lists nine such components:
- WheelchairSeat
- Axle
- CasterAssembly
- MechanicalWheel
- ElectricMotor
- WheelchairFrame
- Battery
- TrackDriveSystem
- SteeringMechanism
Phoebe will need to make a class for each item on the list. “That’s a lot of components,” Phoebe said. “Can we focus on a minimum viable product here?”
A minimum viable product (MVP) is a term from agile development. Agile development is a project management paradigm Kitty had learned in one of her product development courses. Agile methodologies are popular in software companies because they allow you to get a product to market quickly by focusing on the smallest product the company can sell. It then uses iterative development to build that product in a series of small bursts of effort. In this case, we have two wheelchair designs. The Texas Tank is seriously cool, but it will also be seriously expensive to make. The trio realizes they can make a huge impact by building the simple unpowered chair: the Plano Wheelchair. The faster this chair goes to market, the more people they can help. The team decides to focus on just making that chair. This cuts down her list to just these components:
- WheelchairSeat
- Axle
- CasterAssembly
- MechanicalWheel
- WheelchairFrame
“Why don’t you make a folder for those? It will make them easier to find later and our code will be a little less cluttered,” Tom suggested. A focused expression settled over Phoebe’s countenance. She added a folder to her project called WheelchairComponents.
Next, Phoebe added a class within the folder called WheelchairSeat. She also added the remaining classes from the list, each one being empty for now. At this point, her project resembles Figure 7.6:

Figure 7.6: The folder structure for the abstract wheelchair components.
“It probably makes sense to move the WheelchairComponent.cs file into that folder as well,” Tom advised. Phoebe dragged the file from the project’s root folder into the subfolder with the other nine class files she had just created.
“Hey, open that file real quick. Let’s make sure the IDE changed the namespace for you,” said Tom. “Some IDEs do this and some don’t,” he continued. Phoebe double-clicked the file in Rider. The IDE, in fact, did not change the code. Namespaces in C# are like packages in Java. Their job is to help you keep your code organized and to prevent name collisions in complicated projects. Tom doubted this project would be complicated enough to have such a name collision. A name collision occurs when you want to name two classes with the same name. This is illegal in C# if the classes are in the same namespace. The project’s namespace is usually created automatically when the project is created in your IDE.
Changing the namespace in the WheelchairComponent.cs file isn’t crucial to the operation of the program. Since Tom and Phoebe have chosen to organize their code into folders, it is conventional to have the namespace match the folder structure. Phoebe modifies the WheelchairComponent class code to reflect the new folder location. This is done at the top of the file. The code before the operation reads as follows:
namespace WheelchairProject;
public abstract class WheelchairComponent
{
Phoebe corrects it to the following:
namespace WheelchairProject.WheelchairComponents;
public abstract class WheelchairComponent
{
After she did this, her IDE immediately colored her UnpoweredChair class with red underlines alerting her to a syntax problem. It used WheelchairComponent, and we just changed the namespace. Fixing this is error is easy. We just need to add a using statement to the top of the file. However, doing so right now is pointless. Phoebe intends for this class to use the class files she just created instead of the abstract WheelchairComponent class, which is too generic to represent an actual component.
Phoebe switches her focus back to the MechanicalWheel component she created a moment ago. Right now, the class merely contains the boilerplate added by the IDE:
namespace WheelchairProject.WheelchairComponents;
public class MechanicalWheel
{

}
Phoebe goes to work on it:
namespace WheelchairProject.WheelchairComponents;
public abstract class MechanicalWheel : WheelchairComponent
{
    protected float Radius { get; set; }
    protected int SpokeCount { get; set; }
    protected bool IsPneumatic { get; set; }
}
Phoebe adds three properties to describe an abstract wheel. “Why are we making this class abstract?” Kitty asked. Kitty was sitting off to the side, but the group had set up a monitor so that whoever was sitting out from typing could see all the action. Phoebe answered, “We’ll later define more concrete wheels, but having this abstract is a smart defense against future change. We don’t want to tightly couple our UnpoweredChair class to a particular wheel. Instead, just about any type of mechanical wheel you can imagine can be implemented as a subclass to this one. Unless we come up with a radically new type of wheel, all wheels will have a radius. Most wheelchair wheels have spokes, but even if you had one that didn’t, you could set the spoke count to zero. Finally, most wheelchairs have some sort of tire. Some are solid and some use air. The ones that use air are called pneumatic tires and are similar to typical bicycle tires.”
“I get it!” Kitty exclaimed. “You’re going to use this class and the others like it from our list to define the structure of the UnpoweredChair class. Then you’re going to define concrete classes for the actual wheels we’ll be using. When the builder class constructs the wheelchair object, it can specify the concrete classes. The Liskov substitution allows us to substitute a parent class for a subclass, thus our design remains flexible.”
“You’ve got it!” Tom said. “Now we need to do the same thing with the rest of the components.”
I need to break the fourth wall here for a minute: I am what you might call a detail junkie. I’m the kind of guy that likes to point out mistakes in TV shows and movies. I think it’s a safe assumption, given you are reading this book, that you have likely seen the TV show Star Trek, The Next Generation. If that was before your time, you now have a binge-watching assignment after you complete this book. Here are a few things I noticed in that show. In Season 1, Episode 13, the android Data drinks spiked champagne, falling backward, and in the very next scene, he is face down. In Season 1, Episode 25, Riker orders Geordi to increase the speed of the starship Enterprise to Warp 6. Geordi replies, “Aye sir, full impulse.” In Star Trek, “warp” refers to a logarithmic scale relative to the speed of light, while “impulse” refers to sublight speed. As I said, things like that bother me. I realize, having said that, I will probably be inundated with emails regarding my own inconsistencies within this book. Here’s my rule about that: you’re only allowed to do this if you tell all your friends to buy the book so you can have a nice chuckle over my errors. If all your friends buy the book, we’ll sell enough to do a second printing, and I can fix all the continuity mistakes. Of course, I’ll probably introduce some new ones during the revision process, so the cycle will continue. I’m okay with that if you are.
Here, I’m trying to spare you the tedium of making this so realistic that there are hundreds of classes. Don’t forget that our focus is patterns. This isn’t an attempt to build a real wheelchair model that would pass muster with a mechanical engineer. I’ll be doing more of this as the chapter progresses. Direct your focus to the structure of the objects, not their contents. The parts important to the patterns are always going to be there; the rest just makes for a good story. Now that we’ve gotten that out of the way, let’s fast-forward a bit. All of the classes in the WheelchairComponents folder are going to be abstract classes that subclass WheelchairComponent. The other properties don’t affect the Composite pattern or any other part of our program.
We now return you to your story already in progress.
Phoebe continues filling out the remaining classes in the components list. We’ll go in alphabetical order focusing only on the components needed in an unpowered chair. The first class is the Axle class. Remember that in the Component pattern, each element is either a container or a leaf. Containers contain other containers and leaves. A leaf cannot contain anything. According to Figure 7.5, the Axle is a container which holds the left and right wheels.
using WheelchairProject.WheelchairComponents.Wheels;
namespace WheelchairProject.WheelchairComponents.Axles;
public abstract class Axle : WheelchairComponent
{
I’ll add the two wheels as private fields.
  private MechanicalWheel _leftWheel;
  private MechanicalWheel _rightWheel;
These next two properties define the axle, which is just a cylinder.
  protected float Radius { get; set; }
  protected float Length { get; set; }
Next, Phoebe adds accessor methods for the _leftWheel and _rightWheel fields. First comes the left wheel. Note the FixComposite() method. This implements Tom’s original idea of having the Composite pattern baked directly into the object structure, in contrast with Kitty and Phoebe’s implementation in the bicycle project which used a separate object graph. We’ll create the FixComposite() method in just a moment.
  public MechanicalWheel LeftWheel
  {
    get => _leftWheel;
    set
    {
      _leftWheel = value;
      FixComposite();
    }
  }
Then comes the right wheel.
  public MechanicalWheel RightWheel
  {
    get => _rightWheel;
    set
    {
      _rightWheel = value;
      FixComposite();
    }
  }
Next, with Tom’s guidance, Phoebe creates a method called FixComposite(). “You need to put this on the abstract components.”, Tom said. Phoebe added the following code:
  private void FixComposite()
  {
    Subcomponents.Clear();
    Subcomponents.Add(_leftWheel);
    Subcomponents.Add(_rightWheel);
  }
}
“I see what you’re doing!”, Kitty said from her chair behind Phoebe. “Each component manages the subcomponents inside it. Instead of making a separate object graph, you’re having the accessor methods rebuild the composite every time the left and right wheels change.”
“Why aren’t we putting it in the WheelchairComponent base class?”, asked Phoebe. “There are two reasons.”, Tom said. “First, this method is specific to the Axle. It contains these two specific components” Phoebe interrupted, “But we could make it abstract, and override it in the subclasses.”
“Let me finish, Phoebe”, said Tom. He continued, “The second reason is the interface segregation principle from SOLID. Only containers need this method. The leaves don’t have any sub-components, and so have no need to fix the list of subcomponents on the WheelchairComponent base class. The interface segregation principle holds that no class should be forced to implement an interface it doesn’t use, nor should it depend on a method it doesn’t need. If we make this an abstract method in the base class, the leaf classes will have to implement it. Any implementation we add with be contrived, and it will introduce a code smell to those classes.”
“Who is writing smelly code, now Phoebe?”, Kitty chided as she enjoyed sweet revenge on her sister.
Phoebe shrugged off her sisters jab and continued working. Based on Figure 7.5, she knows these classes need a FixComponent() method because they are containers:
- Axle (already written)
- CasterAssembly
- Wheelchair
- WheelchairFrame
Wheelchair is the base class for all wheelchairs. It needs to inherit from WheelchairComponent because we need a top-level container. Phoebe makes extensive modifications to the Wheelchair class. When she’s finished, it looks like this:
using WheelchairProject.WheelchairComponents.Frames;
using WheelchairProject.WheelchairComponents.Seats;
Phoebe has added the frame and the seat namespaces so we can specify the two components that go into the wheelchair. She continues by adding the WheelchairComponents reference right below the namespace.
namespace WheelchairProject;
using WheelchairComponents;
Next, she adds the WheelchairComponent as the base class:
public abstract class Wheelchair : WheelchairComponent, IManufacturable
{
Next, she adds the private fields for the seat and frame:
    private WheelchairSeat _seat;
    private WheelchairFrame _frame;
  public string ModelName { get; set; }
  public int Year { get; }
  public string SerialNumber { get; }
Then she adds the accessor methods just like before with the Axle class:
  public WheelchairSeat Seat
  {
    get => _seat;
    set
    {
      _seat = value;
      FixComposite();
    }
  }
  public WheelchairFrame Frame
  {
    get => _frame;
    set
    {
      _frame = value;
      FixComposite();
    }
  }
Next, Phoebe adds the magical FixComposite() method which clears out the subcomponent list and adds the _seat and _frame fields. This is called from the accessor methods, so anytime these get changed, the composite is updated. Truthfully, since we’ll be using the Builder pattern to create these objects, there likely won’t be much call for changing the object once it gets created, but its nice to know you can.
  private void FixComposite()
  {
    Subcomponents.Clear();
    Subcomponents.Add(_frame);
    Subcomponents.Add(_seat);
  }
The rest of the class remains unchanged. Rather than cover every class Phoebe created, I encourage you to review her finished code in the chapter-7 project in the book’s sample code. You’ll find most of this in the WheelchairComponents folder.
Finishing the wheelchair base classes
“Nice work, Phoebe. All that’s left is to clean up Kitty’s mess,” Tom chided. Kitty stuck out her tongue. Phoebe giggled and opened the UnpoweredChair class. She now had all the types she needed to model the abstract classes. She updated the class code like so:
using WheelchairComponents;
Here, the using statement is needed because we moved the component classes into the WheelchairComponents namespace. The next few lines remain unchanged:
public abstract class UnpoweredChair : Wheelchair
{
Phoebe’s next change is to set the correct types for the RightWheel, LeftWheel, and CasterAssembly properties:
    protected MechanicalWheel RightWheel { get; set; }
    protected MechanicalWheel LeftWheel { get; set; }
    protected CasterAssembly Casters { get; set; }
Finishing up the composite
“We should take a break soon,” Phoebe said. “We’ve got a lot done. We’ve got most, if not all, of our abstract base classes written. Those classes are the most important parts of our patterns. We’ve also almost finished the composite pattern. We just need to add the methods that recursively compute the weight and cost of each component.”
“To do that,” Tom said, “we just need to make two small adjustments. Open the WheelchairComponent class.”
Phoebe complied. She remembered that Kitty had left the DisplayCost and DisplayWeight methods for later. They presently read as follows:
protected void DisplayWeight()
    {
        throw new NotImplementedException();
    }
    protected void DisplayCost()
    {
        throw new NotImplementedException();
    }
Phoebe adds the implementation:
protected void DisplayWeight()
{
As with the BicycleComponent implementation, first, we check to see whether there are any subcomponents. If not, we simply return:
if (!Subcomponents.Any()) return;
If there are, we print the name and weight:
    foreach (var component in Subcomponents)
    {
        Console.WriteLine(component.GetType().Name + " weighs "        + component.Weight);
Then, we call the DisplayWeight method recursively:
        component.DisplayWeight();
    }
}
We do the same thing with Price:
protected void DisplayCost()
{
    if (!Subcomponents.Any()) return;
    foreach (var component in Subcomponents)
    {
        Console.WriteLine(component.GetType().Name + " costs $"         + component.Price + " USD");
        component.DisplayCost();
    }
}
Phoebe slumped in her chair. “Phew! That was a lot of work,” said Phoebe. “I know. We have the structure for the Composite pattern, but we still need a builder to populate it,” said Tom. “Yeah,” said Kitty. “This structure is complicated. We can’t just make a Wheelchair object and add the chair, the frame, and some wheels like we can with simple composition. We need a way to assemble the hierarchy we drew on the board earlier (Figure 7.5). The three took a break and rested up. They knew the next pattern they needed to make was the Builder pattern.
Implementing the Builder pattern
Kitty had called Karina, their mother, and asked her to stop by, in order to give her a break from the non-stop hospital vigil. Phoebe shared some pizza and the four played a little Mario Kart on the Nintendo Switch to get their minds off their problems. After a few races, Tom, Kitty, and Phoebe were ready to get back to work. Karina returned to the hospital
“This is going to be the hard part,” Tom said. “The Builder pattern implementation is going to be doing a lot of work. It needs to assemble the wheelchair object, assemble the composite, and ultimately handle the wheelchair’s paint job with the Bridge pattern.”
“We should review our diagram,” said Kitty. It was her turn to type. She brought up the diagram they had drawn of the builder pattern. You can review it in Figure 7.7:

Figure 7.7: The Builder pattern design with everything on it, including the Composite and Bridge pattern elements.
“I think I’ll make a folder to hold all the builder classes and interfaces. It seems like there are going to be a few of them,” Kitty said. “Good idea,” said Tom. Kitty created a folder called Builders. Next, Kitty added the IWheelchairBuilder interface to the Builders folder:
namespace WheelchairProject.Builders;
Kitty implemented the code specified in the UML design:
public interface IWheelchairBuilder
{
    public void Reset();
    public void BuildFrame();
    public void BuildWheels();
    public void BuildSeat();
    public Wheelchair GetProduct();
}
Aside from the interface, the Builder pattern needs a director class. That is, it needs an abstract builder that implements the interface, and one or more concrete builder subclasses to build the concrete products. You can see each of these in Figure 7.4.
Kitty adds the director class next. She decides to call it WheelchairBuilderDirector:
namespace WheelchairProject.Builders;
public class WheelchairBuilderDirector
{
The director holds a private instance of any class implementing IWheelchairBuilder:
private IWheelchairBuilder _builder;
Kitty adds a constructor that specifies the builder she wants to use on instantiation:
    public WheelchairBuilderDirector(IWheelchairBuilder     builder)
    {
        _builder = builder;
    }
The Build method specified in the diagram is designed to call the various methods on the builder class specified in IWheelchairBuilder. Remember, the director’s job is to call these in order. The complex logic behind building the object is controlled here in the director class:
    public Wheelchair Build()
    {
       _builder.BuildSeat();
       _builder.BuildFrame();
       _builder.BuildAxleAssembly();
       _builder.BuildCasterAssembly();
Finally, the director returns the built object using the GetProduct method:
        return _builder.GetProduct();
    }
}
“So far, so good!” said Tom. “Let’s make a concrete builder for the Plano Wheelchair.”
Kitty added a class called PlanoWheelchairBuilder. It looked like this:
namespace WheelchairProject.Builders;
public class PlanoWheelchairBuilder : IWheelchairBuilder
{
The pattern requires us to have a private field to hold the Wheelchair object as it is built:
private PlanoWheelchair _wheelchair;
The pattern also requires a Reset method, which essentially re-initializes the _wheelchair field. In order to keep the class DRY (Don’t Repeat Yourself), you can create the Reset method, then call it from the constructor, which you also need. Kitty prefers to make sure the constructor is always the first method in the class, so it comes first:
    Public PlanoWheelchairBuilder()
    {
        Reset();
    }
Then, she adds the Reset method:
    public void Reset()
    {
        _wheelchair = new PlanoWheelchair();

    }
Since this class implements the IWheelchairBuilder interface, we need the remainder of the required methods. Most IDEs will generate this for you. Kitty is using Rider, so she clicks her cursor into the class name line near the top of the class. It has some angry-looking red squiggly lines beneath it because she hasn’t implemented the methods required by the interface. She presses Ctrl + . (control-period) and she sees the option to generate the missing members with placeholder code. You can see what this looks like in Figure 7.8:

Figure 7.8: Rider, like most IDEs, will autogenerate placeholder code for any missing members required by the interface.
The code generated looks like this:
    public void BuildFrame()
    {
       throw new NotImplementedException();
    }
    public void BuildWheels()
    {
        throw new NotImplementedException();
    }
public void BuildAxleAssembly()
    {
        throw new NotImplementedException();
    }
    public void BuildCasterAssembly()
    {
        throw new NotImplementedException();
    }
    public void BuildSeat()
    {

        throw new NotImplementedException();
    }
    public void BuildComposite()
    {
        throw new NotImplementedException();
    }
    public void BuildFramePainter()
    {
        throw new NotImplementedException();
    }
    public Wheelchair GetProduct()
    {
        return _wheelchair;
    }
}
This code is long and uneventful, but it saves a lot of typing! Kitty just needs to fill in the implementation for each method. She can’t really do that yet. She needs concrete implementations of the various abstract wheelchair component classes, and those have yet to be created.
Another refactor
“That’s a whole lot of placeholder code,” Tom said. “Maybe it’s time to add some concrete classes for the wheelchair components so we build a real wheelchair?”
“OK,” Kitty agreed. She started to think about structuring the concrete classes. There is going to be at least one concrete component for each of the abstract component classes. Assuming the wheelchair project is wildly successful, the list of concrete implementations is likely to grow, making the WheelchairComponents folder very crowded.
“Tom, why don’t we split up the WheelchairComponents folder a little more? As we add concrete classes, I think it will be easier to find everything if we do it that way,” Kitty said. “Good idea,” Tom replied.
Kitty added a series of folders beneath the WheelchairComponents folder:
- Axles
- Casters
- Frames
- Seats
- Wheels
Next, she moved the abstract classes for each component into their respective folder. In each case, she corrected the namespace for the class she moved.
The Axle class goes in the Axles folder. The namespace code should be adjusted to this:
namespace WheelchairProject.WheelchairComponents.Axles;
The Caster Assembly class goes in the Casters folder. The namespace code should be adjusted to this:
namespace WheelchairProject.WheelchairComponents.Casters;
The WheelchairFrame class goes in the Frames folder. The namespace code should be adjusted to this:
namespace WheelchairProject.WheelchairComponents.Frames;
The WheelchairSeat class goes in the Seats folder. The namespace code should be adjusted to this:
namespace WheelchairProject.WheelchairComponents.Seats;
Finally, the MechanicalWheel class is moved to the Wheels folder and its namespace is adjusted like so:
namespace WheelchairProject.WheelchairComponents.Wheels;
When this refactor is over, the code’s folder structure looks like Figure 7.6.
Adding concrete component classes
Kitty’s next job is going to be adding component classes for each component type. We’ve established a base class and structure for each component. Next, we simply need to add the concrete classes that extend the base classes.
Axles
She starts in the Axles folder by adding a class called StandardAxle. The parts for the Plano Wheelchair are mechanically simple and common. Phoebe has provided a bill of materials (BOM) listing the components, along with the data required by the Composite pattern implementation. In the world of manufacturing, this is a list of parts normally exported to an Excel spreadsheet. Kitty and Tom can simply reference the spreadsheet to get the values needed in the concrete classes.
The StandardAxle class looks like this:
using WheelchairProject.WheelchairComponents.Wheels;
namespace WheelchairProject.WheelchairComponents.Axles;
public class StandardAxle : Axle
{
    public StandardAxle(MechanicalWheel leftWheel,
    MechanicalWheel rightWheel)
    {
        Price = 4.33f;
        Weight = 0.335f;
        Radius = 0.24f;
        Length = 28.5f;
        LeftWheel = leftWheel;
        RightWheel = rightWheel;
    }
}
Casters
Next, Kitty adds a concrete class for the caster assembly to be used on the Plano Wheelchair. Unsurprisingly, she calls it PlanoCasterAssembly. Its contents are as follows:
using WheelchairProject.WheelchairComponents.Wheels;
namespace WheelchairProject.WheelchairComponents.Casters;
public class PlanoCasterAssembly : CasterAssembly
{
    public PlanoCasterAssembly(MechanicalWheel wheel)
    {
        LoadCapacity = 300.0f;
        MountingType = "STEM";
        Weight = 0.443f;
        Price = 4.32f;
        Wheel = wheel;
    }
}
Frames
It’s time to add a concrete class for the Plano Wheelchair’s frame. It’s called PlanoWheelchairFrame:
namespace WheelchairProject.WheelchairComponents.Frames;
public class PlanoWheelchairFrame : WheelchairFrame
{
    public PlanoWheelchairFrame()
    {
        Price = 75.92f;
        Weight = 16.34f;
    }
}
Seats
A wheelchair wouldn’t be very useful without a place to sit. Kitty adds a class she calls PlanoSeat:
namespace WheelchairProject.WheelchairComponents.Seats;
public class PlanoSeat : WheelchairSeat
{
    public PlanoSeat()
    {
        Price = 27.48f;
        Weight = 3.22f;
        Width = 22;
        BackHeight = 30;
        SeatThickness = 2.4f;
    }
}
Wheels
Equally important to the construction of a wheelchair, beyond the seat, are the wheels. There are two of these. The large wheels on the side of the wheelchair are specified by a class called StandardWheel:
namespace WheelchairProject.WheelchairComponents.Wheels;
public class StandardWheel : MechanicalWheel
{
    public StandardWheel()
    {
        Price = 11.34f;
        Weight = 1.3f;
        Radius = 16f;
        IsPneumatic = true;
        SpokeCount = 48;
    }
}
The second type of wheel we need is the smaller set that attaches to the swiveling casters on the front of the chair. Kitty called these CasterWheel:
namespace WheelchairProject.WheelchairComponents.Wheels;
public class CasterWheel : MechanicalWheel
{
    public CasterWheel()
    {
        Price = 5.21f;
        Weight = 0.753f;
        Radius = 6f;
        IsPneumatic = true;
        SpokeCount = 24;
    }
}
Now, Kitty’s folder structure resembles Figure 7.9:

Figure 7 .9: The WheelchairComponents folder after Kitty added all the concrete classes.
Now that all the concrete classes for the Plano Wheelchair are in place, we can set up the Builder pattern code to build a full Wheelchair object.
Wrapping up the Builder pattern
At this point, Kitty needs to finish the PlanoWheelchairBuilder class. If you recall, this was the class where she generated all that placeholder code earlier. She needs to replace the placeholder code with code using her new concrete classes.
Kitty starts with the frame because the frame is the foundation for all the other parts of the wheelchair. She changes the code in the BuildFrame method generated by the IDE:
public void BuildFrame()
{
    wheelchair.Frame = new PlanoWheelchairFrame();
}
There’s not much to the BuildFrame method. All it does is instantiate PlanoWheelchairFrame and set the _wheelchair frame property.
Next, Kitty replaced the BuildAxleAssembly method. An Axle object, such as the StandardAxle class, per the Composite pattern, is a container. The team specified this in Figure 7.5. The Axle contains the left and right wheels, which are the StandardWheel type. As such, the code looks like this:
public void BuildAxleAssembly()
{
    var leftWheel = new StandardWheel();
    var rightWheel = new StandardWheel();
    var axle = new StandardAxle(leftWheel, rightWheel);
    _wheelchair.Frame.Axle = axle;
}
Here, we’ve instantiated two StandardWheel objects and set them into Axle using the StandardAxle constructor. Lastly, we set the _wheelchair’s Axle, which is a property of the Frame property. This mirrors real life because an axle would be attached to the wheelchair’s frame, and the wheels, in turn, would be affixed to the axle.
In her mind’s eye, all Kitty sees is a wheelchair with two wheels awkwardly rocking back and forth. With the main wheels attached, Kitty decides to do the casters next. She alters the BuildCasterAssembly method like this:
public void BuildCasterAssembly()
{
    var planoCasterWheel = new CasterWheel();
    var casterAssembly = new     PlanoCasterAssembly(planoCasterWheel);
    _wheelchair.Frame.LeftCaster = casterAssembly;
    _wheelchair.Frame.RightCaster = casterAssembly;
}
PlanoCasterAssembly consists of CasterWheel, which is passed into the PlanoCasterAssembly constructor. The assembly is then mounted to the frame on the left and right sides. As I review Kitty’s code, I can’t tell whether she’s cutting a corner here or not. She used the same instance of PlanoCasterAssembly on both sides. I’m sure it’s probably right. If it isn’t, I’m sure Phoebe would have let her know.
We have four wheels and a frame. We’re missing a seat. Kitty updates the BuildSeat method:
public void BuildSeat()
{
    _wheelchair.Seat = new PlanoSeat();
}
Like the frame, this one is straightforward. Just instantiate the PlanoSeat object and attach it to the frame. Kitty needs one more easy change. GetProduct should not return an instantiation of PlanoWheelchair. Instead, it should return the one we’ve built:
public Wheelchair GetProduct()
{
    return _wheelchair;
}“Wow, that’s really neat!” Phoebe said. Phoebe had been wandering in and out of the lab, but all of a sudden, showed a renewed interest. “I see what you mean by hiding the Composite pattern complexity inside the builder. Anyone working with the object can use normal composition, but we also get the benefit of the recursive price and weight functions,” Phoebe said.
“Are we still going to make it a singleton?” Tom asked.
“I think we should try,” Kitty said. “It would be interesting to write some tests to see whether we gain any benefit from making this a singleton. But for now, let’s go ahead and turn the builder into a singleton.”
Adding the Singleton pattern
“Tag! I’m in!” Phoebe exclaimed, as she nudged Kitty out of the typing chair and sat down at the keyboard. Phoebe made a show of cracking her knuckles and popping her neck. They were in the home stretch and Phoebe knew it.
“The Singleton is pretty easy,” Tom said. “I remember it,” said Phoebe. She continued, “It seems like all I need to do is change the director class in the Builder pattern.” Phoebe located the director class in the Builders folder and opened it in her IDE:
public class WheelchairBuilderDirector
{
    private IWheelchairBuilder _builder;
Phoebe adds this line to create a field to hold the current instance. She makes it nullable because if the field is null, we need to create a new instance of this class and place it in the _instance field. The field is marked static to ensure it is unique in memory:
private static WheelchairBuilderDirector? _instance;
Next, Phoebe changes the constructor’s accessor to private. It should not be possible to instantiate the director directly. To use the class, you have to use the hallmark GetInstance method, which she’ll write next:
    private WheelchairBuilderDirector(IWheelchairBuilder     builder)
    {
        _builder = builder;
    }
The last step to converting the builder’s director class is to add a public static method called GetInstance. We still need the IWheelchairBuilder parameter to be passed in just as we did on the original constructor. This method checks to see whether the _instance field is null. If it is, then this method will invoke the private constructor and set the _instance field to the result. If the _instance field is not null, the GetInstance method will simply return the instance it already has:
    public static WheelchairBuilderDirector? GetInstance(IWheelchairBuilder builder)
    {
        if (_instance == null)
        {
            _instance = new WheelchairBuilderDirector(builder);
        }
        return _instance;
    }
The rest of the class remains unchanged.
“That wasn’t so tough,” Phoebe said. “I can imagine this object being expensive in terms of memory once the factories are producing wheelchairs as well as bicycles,” Tom said. “I’m on the fence,” Phoebe replied. “I’m not totally sure we need this, but I don’t think it will hurt anything. There’s just one thing left, and it’s my favorite!” said Kitty, watching from behind Phoebe’s chair. “You’re proud of your paint system, aren’t you Sis?” asked Phoebe. Kitty just grinned and sat down behind her sister.
Painting the chairs with the Bridge pattern
The last pattern we need to complete our wheelchair project is the Bridge pattern. Remember, the Bridge pattern is used when you have two related systems of complex classes. The bridge allows you to join the classes using composition. It gives you the benefit of being able to vary the complexity and maintain these complicated classes independently. Kitty and Phoebe used this system to add the ability to create custom paint jobs for their bicycles. They did this late in the game though, and the changes they had to make to accommodate those changes were problematic. They had to violate the open-closed principle.
This time, with experience behind them, they can integrate the Bridge pattern for painting wheelchairs early in the implementation. The ability to specify colors for wheelchairs will be a big differentiator for Bumble Bikes since most manufacturers only sell black and gray chairs. This is fine for the loaner chair at your local hospital, but for people who use wheelchairs every day to get around in life, it’s nice to have a little fashion in the mix.
Kitty created the paint system for the bicycles to work in a similar fashion as an inkjet printer works. She devised a system that could mix any color using cyan, magenta, yellow, and black paint. This is called the CMYK color model, and it’s a standard in the printing industry.
Tom, who works with disabled children at a local pediatric hospital, had taken an informal survey on what the most popular colors might be for a wheelchair. Then he asked the kids to pick just one color for the initial product release. After some animated discussion, the kids decided on a shade of green. There was a woman who worked with the kids, named Judy. Everyone loved her, and she had sparkling green eyes. They decided to honor her by naming the color Green Eyed Judy.
Phoebe got to work on implementing the Bridge pattern. In real life, it might be possible to reuse the bridge interfaces and classes from the bicycle package. The only downside is that you’d create a dependency between two products that don’t necessarily have anything to do with each other besides being two products made by the same company. For the purposes of this book, we’re just going to make a new set of classes in order to keep the wheelchair project self-contained.
Phoebe starts by creating a new directory called Painters. Next, she adds an interface called IFramePainter. This is the key to the Bridge pattern. This interface defines a complex system of classes that specify a color painting system. This is one side of the bridge.
On the other side of the bridge is the wheelchair class. We can freely expand and modify either side of the bridge without affecting the other side.
The IFramePainter interface looks like this:
namespace WheelchairProject.Painters;
public interface IFramePainter
{
The interface requires five properties. PaintColorName allows you to give a name to the color combination. The remaining four are the values for Cyan, Magenta, Yellow, and Black:
    public string PaintColorName { get; set; }
    public int Cyan { get; set; }
    public int Magenta { get; set; }
    public int Yellow { get; set; }
    public int Black { get; set; }
Next, Phoebe adds the requirements for two methods. This is for the benefit of the robotic machinery that will assemble and paint the wheelchair. The system needs to first mix the paint color, then apply it:
    public void MixPaint();
    public void PaintFrame();
}
The next thing we need is a concrete class to implement the interface. Phoebe remains focused on the Plano Wheelchair, and so makes a class called PlanoWheelchairPainter:
namespace WheelchairProject.Painters;
public class PlanoWheelchairPainter : IFramePainter
{
Phoebe leaves the five properties mentioned earlier as auto-properties:
    public string PaintColorName { get; set; }
    public int Cyan { get; set; }
    public int Magenta { get; set; }
    public int Yellow { get; set; }
    public int Black { get; set; }
The MixPaint method is complicated and highly proprietary. Kitty and Phoebe’s lawyer won’t let me show you the real code. So, we’ll have to settle for some placeholder code:
    public void MixPaint()
    {
        Console.WriteLine("Mixing in Cyan: "         + Cyan.ToString() );
        Console.WriteLine("Mixing in Magenta: " + Magenta.                         ToString() );
        Console.WriteLine("Mixing in Yellow: " + Yellow.        ToString() );
        Console.WriteLine("Mixing in Black: " + Black.        ToString() );
        Console.WriteLine("Mixing complete!  The color is: " +         PaintColorName);
    }
Likewise, the PaintFrame method refers to some proprietary robotics APIs, so once again, we’ll keep it simple by way of an example:
    public void PaintFrame()
    {
        Console.WriteLine("Applying " + PaintColorName);
    }
}
The next change we need to make is to add the interface through composition to the Wheelchair class. Phoebe opens the Wheelchair class and adds a property:
public abstract class Wheelchair : WheelchairComponent, IManufacturable
{
    public IFramePainter FramePainter { get; set; }
There’s just one thing left to do. We need to add the bridge implementation to the builder so that when the builder builds a wheelchair, it gets painted in the same process. The builder really ties everything together!
The first change will be to the IWheelchairBuilder interface. Phoebe just adds one new method definition:
public interface IWheelchairBuilder
{
    public void Reset();
    public void BuildFrame();
    public void BuildAxleAssembly();
    public void BuildCasterAssembly();
    public void BuildSeat();
She adds the definition here:
public void BuildFramePainter();
The rest of the code hasn’t changed:
    public Wheelchair GetProduct();
}
The interface updates, and suddenly Phoebe sees some red squiggly lines indicating a problem. Since she changed the interface, the PlanoWheelchairBuilder class is wrong because it doesn’t have the new method. Phoebe opens up the PlanoWheelchairBuilder class and adds the missing method:
    public void BuildFramePainter()
    {
Phoebe instantiates a concrete PlanoWheelchairPainter class and sets it up with the new wheelchair paint color:
        var painter = new PlanoWheelchairPainter
        {
            PaintColorName = "Green-Eyed Judy",
            Cyan = 79,
            Magenta = 22,
            Yellow = 100,
            Black = 8
        };
Next, she sets the property on the _wheelchair instance inside the builder. After that, she calls the methods to mix the paint color and paint the frame:
        _wheelchair.FramePainter = painter;
        _wheelchair.FramePainter.MixPaint();
        _wheelchair.FramePainter.PaintFrame();
    }
SLAP!
A loud sound echoed through the lab as Kitty and Phoebe high-fived each other. Tom let out a good old-fashioned Texan “Yee haw!”
Over the next week, the team would test, debug, and refactor the code. If everything went to plan, Bumble Bikes could be shipping their high-quality, low-cost wheelchairs to rehabilitation centers and pediatric hospitals all over the world.
Summary
Kitty, Phoebe, and Tom were delighted at their progress. There is no doubt they would continue to refine their software over the coming weeks to make the system product-ready. They managed to get a lot done in a short time because they planned their software by designing first and implementing second.
You might have noticed a huge gap between the project proposed and what was delivered. We only worked on the Plano Wheelchair because the team decided this chair represented the minimum viable product. Neither the Maverick nor the flagship product, the Texas Tank, were built in this chapter. I left this as a challenge for you. Practice what you’ve learned and try implementing the Maverick and powered chair diagrams on your own.
We also saw a lot of interplay between patterns. The Builder was leveraged in conjunction with the Bridge, Singleton, and Composite patterns. This resulted in all the complexity being handled in one place. When these patterns were introduced, they were presented one at a time. Now we see them fitting together like interlocking pieces of a puzzle.
Questions
- What was the point of making the Builder pattern’s director class a Singleton? Do you agree with the design decision? Why, or why not?
- What is the advantage of embedding the composite structure into the normal object graph of the wheelchair versus making a separate object graph as we did in Chapter 4 with the bicycle project?
- What is the process in your favorite IDE for generating missing members for an interface?
Further reading
Practical Remote Pair Programming by Adrian Bolboacă: https://www.packtpub.com/product/practical-remote-pair-programming/9781800561366
Be sure to check out this book’s companion website at https://csharppatterns.dev.