
Chapter 2. Page Layout
Now that you know what’s what, and what’s where, in InDesign, it’s time to create an InDesign publication and set up some pages. As you work your way through the process of defining the page size, margins, column layout, and master pages for your new publication, think ahead. How will the publication be printed? How will it be bound? Will you need to create a different version of the publication for a different paper size (such as switching from US Letter to A4 for an international edition)? Will you need to create a different version of the publication for online distribution?
We know that having to think about these things and make design decisions early in the process can be boring. And InDesign makes it relatively easy to make changes to your layout late in the production process. Easy, but not without a certain amount of trouble. How high is your threshold of pain? Will it decrease as your deadline approaches? You decide.
Creating a New Publication
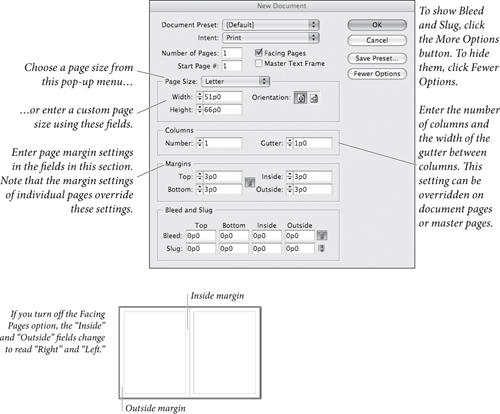
When you choose New Document from the New submenu on the File menu, InDesign displays the New Document dialog box (see Figure 2-1). You use the controls in this dialog box to set up the basic layout of the pages in your publication. Don’t worry—you’re not locked into anything; you can change these settings at any time, or override any of them for any page or page spread in your publication.
• Intent. Choose Web if you’re creating an interactive document and want to use more appropriate settings for the web, such as using a landscape orientation and non-facing pages.
• Number of Pages. How many pages do you want? We tend to start with one page and add pages as we go along, but you might want to think ahead and add a bunch at once.
• Start Page #. Type the starting number of the page. If you type an even number for Start Page #, the publication begins with a two-page spread—much easier than in previous versions. In InDesign, odd numbers always start on the right-hand page (recto) page.
• Facing Pages. If you’re creating a single-sided document—like an advertisement, poster, or handbill—leave Facing Pages turned off. Turn it on for books and magazines, which usually have both left- (verso) and right-hand (recto) pages.
• Master Text Frame. Should InDesign create a text frame on the master page? If so, turn the Master Text Frame option on. The width and height of this “automatic” text frame are defined by the area inside the page margins; its column settings correspond to the column settings for the page.
• Page Size. Pick a page size according to the final size of your document. If this is a print document, that means the size after trimming, not the paper you’re printing on. The Page Size pop-up menu lists most of the standard sizes—including common screen resolutions for interactive documents—but you can always enter your own page width and height (when you do this, the Page Size pop-up menu changes to “Custom”). To create a new page size, choose Custom Page Size, specify the settings you want, and click OK. Presto! The page size appears in the list—much easier than editing the New Doc Sizes.txt, which you had to do in previous versions.
• Columns. When you specify that a document should have more than one column, InDesign adds column guides. Next, enter the amount of space to leave between columns in the Gutter field. Column guides can be overridden on both document pages and master pages.
• Margins. Use the fields in the Margins section of the dialog box to specify the size of the margins on all four sides of a page. When you turn on the Facing Pages option, “Left” and “Right” change to “Inside” and “Outside.” You can always change your margin guides later, on a specific page or for a master page.
Figure 2-1 The New Document Dialog Box
Bleed and Slug
If you can’t see the Bleed and Slug fields, click the More Options button. These fields let you define guides on the pasteboard and effectively extend the print area of your document.
What’s the difference between the bleed and the slug? Usually, people put things in the bleed area that have to do with their design (typically objects that bleed off the edge of the page), and put job tracking and other document information in the slug area. But the real difference, from an InDesign point of view, is that they have independent printing controls. You might choose to include the slug area when printing proofs and then omit the slug when printing your final version. (Here in rainy Seattle, we are very familiar with slugs.)
Document Presets
Do you find that you frequently have to change the settings in the New Document dialog box? If you have particular page sizes and margin settings that you use all of the time, consider making a document preset. The easiest way to make one is to type all the values (page size, margin, bleed and slug settings, and so on) into the New Document dialog box, click the Save Preset button, and give your preset a name.
The next time you want to create a document based on that preset, you can select the name from the Document Preset pop-up menu at the top of the New Document dialog box. You can also make, delete, or edit document presets by choosing Define from the Document Presets submenu (under the File menu). The Define Document Presets dialog box also lets you save presets to disk or load presets from disk—very helpful if you need to send a document preset to someone else in your workgroup.
By the way, for those who care about terminology, the difference between a preset and a style has to do with how InDesign behaves when you later change the preset or style. Let’s say you save a Document Preset, make three new documents based on that preset, and then change the definition of the preset. InDesign doesn’t change the documents you already made. Now let’s say you define a paragraph style in a document, apply it to three paragraphs, and then go back and change the style definition. InDesign applies the change to all of the paragraphs formatted using that style. (We cover paragraph styles in Chapter 4, “Type.”)
Skip the dialog box. If you use a specific document preset all of the time, why in the world should you have to look at the New Document dialog box every time you create a layout? You don’t. You can bypass the dialog box by holding down the Shift key while selecting the preset name from the Document Presets submenu (under the File menu). Or, instead of pressing Command-N/Ctrl-N to create a new document, press Command-Option-N/Ctrl-Alt-N. This creates a new document using the settings you used most recently.
Setting New Document Defaults
The Document Preset feature is great, but some people create the same kind of document day in and day out. If you’re one of those folks, you should probably change the values in the default New Document dialog box (the way it first opens). You can do this by choosing Define from the Document Presets submenu (under the File menu) and editing the Default preset.
But wait, there’s more! If you always want your new documents to have certain paragraph styles, character styles, and colors, create them while no documents are open. Every new document you build from then on will have these settings.
Opening Publications
When you choose Open from the File menu, or press Command-O/Ctrl-O, InDesign displays the Open a File dialog box (see Figure 2-2). Locate and select the InDesign document you want to open, then click the Open button and InDesign opens the selected document in a new window.
Figure 2-2 The Open a File Dialog Box

There are two “twists” InDesign adds to the standard process. The first has mainly to do with publications you’ve saved as templates (also known as “stationery” on the Macintosh), or documents you want to treat as templates (later in the chapter, we’ll describe templates). To open a copy of the file, turn on the Open Copy option. InDesign opens an untitled copy of the file you selected. To open a template file for editing, turn on the Open Original option.
The second twist has to do with opening files created in previous versions of InDesign. Unlike most programs, InDesign doesn’t just open earlier version’s files—rather, it actually converts them to InDesign CS5 files. It takes longer than you might expect (though usually not too long), and the file opens with “[Converted]” in the title bar. You can’t save converted files; you have to use Save As.
In fact you may find your files open as [Converted] even after installing a minor InDesign update or an update to a plug-in. Again, the theory is that this is all for your safety, so you won’t accidentally replace an earlier version, but it can be frustrating at times.
QuarkXPress and PageMaker Files. InDesign can also open some PageMaker or QuarkXPress files. Select the file you want to convert, and then click the Open button. (To do this in Windows, choose the file type you want to open from the Files of Type pop-up menu, or choose All Documents.) InDesign converts the file and opens it as a new, untitled InDesign publication. However, before you convert a file, we strongly encourage you to open it in QuarkXPress or PageMaker, make sure the images are all linked properly and available on a local hard drive, and perform a Save As to save a clean copy of the file for conversion. And after you open it in InDesign, clean it up by exporting it to IDML format.
How well does this conversion process work? That depends on the publication you’re trying to open, but you should never expect the conversion process to be perfect. There are simply too many differences in the capabilities of the different products.
InDesign also does a good job of converting text formatting, though line endings may change. The following sections provide more detail on what you can expect to see when you convert publications from other page layout programs.
QuarkXPress Files
InDesign can open QuarkXPress 3.3-4.11 documents and templates, including multi-language QuarkXPress Passport files. This useful ability is subject to a number of terms and conditions, which we’ll outline in this section. First, InDesign cannot open:
• QuarkXPress files from version 5, 6, 7, or 8. You can, of course, open a QuarkXPress 4.x document saved from version 5.x.
• QuarkXPress documents (any version) created using XTensions that require you have the XTension to open the document (the infamous Pasteboard XT, for example)
• QuarkXPress book or library documents
Provided the document you want to convert does not fall into one of the above accursed categories, InDesign will convert the document setup, pages, and page items into their InDesign equivalents as best it can. However, as you might expect, there are still a number of details you need to be aware of.
If you need more details about QuarkXPress conversion issues, please download this file for more information: http://www.indesignsecrets.com/rwid/quark.pdf
PageMaker Files
As you convert, or prepare to convert, publications from PageMaker to InDesign, a few odd things happen for reasons that seem odd but make sense when you consider the differences between the two programs. For example, all pasteboard objects from PageMaker are placed on the pasteboard of the first spread in InDesign, and all master page items are assigned to a layer named “Master.”
If you need details about PageMaker conversion issues, please download this file for more information: http://www.indesignsecrets.com/rwid/pagemaker.pdf
Problems with Converted Files?
You may experience odd problems with a document converted from a previous InDesign version or from QuarkXPress or PageMaker. For example, you may not be able to export to PDF or do other tasks that you don’t have trouble doing in a different document.
Here’s the cure-all—export the file to IDML format, and then open that IDML file and save it. IDML is a purifier of sorts, like the waters of Lake Minnetonka.
Saving Publications
To save a publication, choose Save from the File menu (or press Command-S/Ctrl-S). To save a publication under a different name, choose Save As (or press Command-Shift-S/Ctrl-Shift-S), and InDesign will display the Save File As dialog box. Use this dialog box to set a location for the new file, assign a file name, and decide whether the file should be saved as a publication file or as a template.
If you’re trying to save the file in a format other than an InDesign file, use the “Export” command. For more on exporting publications or parts of publications in file formats other than InDesign’s native format, see Chapter 7, “Importing and Exporting.”
Save with an Extension. Windows users always save files with filename extensions because Windows requires these in order to figure out what files are associated with which applications. InDesign publications, for example, have the four-letter .indd file name extension. InDesign templates (see below) use .indt. We want to encourage Mac OS users to use these suffixes, too. In today’s multi-platform world, you just never know when your Mac OS InDesign file will need to be opened on a Windows machine. File-name extensions are ugly, but they’re a fact of life.
Saving As a Template
If you need to base a new publication on the design of a publication you’ve already laid out, and want to make sure you don’t save over the original file, create a template.
When you try to open a file that was saved as a template, InDesign automatically opens a copy of the file. If, at that point, you try to save the file, InDesign will display the Save As dialog box. Which means you can proceed with your plan to save the publication under a new name. Remember? Your plan?
To save an InDesign publication as a template, choose Save As from the File menu. In the Save As dialog box, enter a name for the template file and then choose InDesign CS5 Template from the Format pop-up menu (on the Macintosh) or the Save As Type pop-up menu (in Windows). Click the Save button to save the template file.
You can also create a template by locking the file. On the Macintosh, select the file in the Finder, choose Get Info from the File menu (or press Command-I), and then turn on either the Locked or the StationeryPad checkbox in the Get Info dialog box. In Windows, right-click on the file’s icon, choose Properties, and turn on the Read-Only feature in the Properties dialog box.
Actually, any InDesign file can act as a template, no matter how you’ve saved it. When you open any publication via the Open dialog box and turn on the Open Copy option, InDesign opens it in a new, untitled publication, just as though it were a template.
Saving for Earlier Versions of InDesign
InDesign CS5 gives you a way to “save back” to InDesign CS4. To do this, you export a file using the InDesign Markup format, or IDML, and then open that file in InDesign CS4. You should make sure you’re using the most recent version of CS4 by choosing Updates from the Help menu or by downloading the file from adobe.com.
Want to save back to an even earlier version? Sorry. You have to play a leapfrog game of opening the file in each lower version and exporting as IDML (or INX, if you need to go farther back).
To export a file as IDML, choose Export from the File menu, select the InDesign Markup format, and then export the file. For more on the IDML file format, see Chapter 7, “Importing and Exporting.”
Crash Recovery
It will happen. At some point, your computer will suddenly stop working. Or the software we jokingly refer to as the “operating system” will fail for some unknown reason.
At this point, it’s natural to assume you’ve lost work—and maybe that you’ve lost the file forever. That is, after all, the way things work in most other programs.
But it’s not true for InDesign. InDesign keeps track of the changes you’ve made to a document—even for an untitled document you haven’t yet saved. When you restart InDesign after a system, the program uses the contents of a folder named “InDesign Recovery” to reconstruct the publication or publications that were open when you crashed—even if you hadn’t saved them yet. Because of this automatic “backup” system, you’ll be right back where you left off.
If you don’t want to recover the most recent changes you made to a publication before a crash (which you might want to do if you felt that your changes caused the crash), delete the files in the folder. This folder appears in different places on different operating systems, so the best way to find it is to use your operating system’s Search utility to find a folder called “InDesign Recovery.”
You should also delete these files if InDesign is crashing on startup as it tries to read the recovery information (this is pretty rare). In this case, a file has been damaged and cannot be opened—you’ll have to try opening the original document (or rebuild the document from scratch, if you hadn’t saved the file).
Setting Basic Layout Options
You can always change the margins, columns, page size, and page orientation of a publication. You do this using the Margins and Columns dialog box, and you can apply these changes to any page, page spread, or master page in a publication.
Changing Page Size and Orientation
Page size and page orientation affect the entire document (you can’t mix page sizes and page orientations in a file), and you use the Document Setup dialog box (press Command-Option-P/Ctrl-Alt-P to display this dialog box, or choose Document Setup from the File menu) to change these settings. To change the page size, choose a new page size for the publication from the Page Size pop-up menu (or enter values in the Width and Height fields); to change the page orientation, click the button corresponding to the orientation you want.
Usually, InDesign centers the page items on the new page size—that is, each page grows equally on all four sides. However, if you have turned on the layout adjustment feature (from the Layout menu), InDesign moves objects and guides on your pages when you change the page size or page orientation, sometimes in unexpected ways. See “Adjusting Layouts,” later in this chapter, for more on this topic.
Specifying Margins and Columns
You aren’t stuck with the margin and column setup you specified in the New Document dialog box—you can change margin and column settings for any page, at any time. To change margin and column settings, navigate to the page you want to change, then choose Margins and Columns from the Layout menu (see Figure 2-3). Click the OK button to close the dialog box, and InDesign applies the new margin and column settings. While you can make these changes to any page, it’s likely that you’ll most often be making changes to master pages. Keep in mind that these margin and column settings affect the page, but not text frames. Use the Text Frame Options dialog box to change columns within frames.
Figure 2-3 Margins and Columns Dialog Box
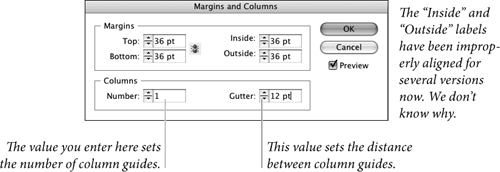
You can create columns of unequal width by dragging the column guides (see “Adjusting Column Guides,” later in this chapter).
What happens to the objects on a page when you change the margin and column settings for that page? Do they reposition themselves relative to the new margins? Or do they stay put? That depends on the settings in the Layout Adjustment dialog box. See “Adjusting Layouts,” later in this chapter, for more on adjusting layouts.
Pages and Spreads
When you work with a document, you construct the document out of pages and spreads. You won’t get far in InDesign without mastering the Pages panel, the primary tool for creating, arranging, deleting pages, and applying master pages. It’s also a great way to navigate from one page to another.
Pages Panel Options
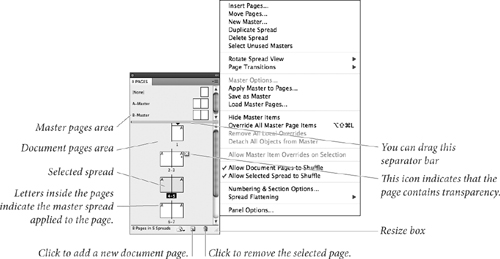
The following are brief descriptions of the controls found in the Pages panel (see Figure 2-4).
• Spread and page icons. These icons represent the document pages and master pages in your publication. You can drag these pages around in the Pages panel to change the page order, or apply master pages to document pages (or other master pages), or create new master pages (by dragging document pages into the master page area of the panel).
• Edit page size button. Click this button to apply a different page size to the selected page.
• New page button. Click this button to create a new document page. Hold down Command/Ctrl and click this button to create a new master spread.
• Delete page button. Click this button to delete the selected page or pages.
• Master/Document page separator. This bar separates the master pages in your publication from the “normal” document pages. You can drag the separator up or down.
• Resize box. Drag this icon to resize the Pages panel.
To change the appearance of the panel (and you really should), choose Panel Options from the panel menu (see Figure 2-5). The options in the Panel Options dialog box can be used for good or evil.
• Icon Size. The options on this pop-up menu define the size of the page icons (from Extra Small to Extra Large). in the Pages panel. The Small option remains our perennial favorite.
• Show Vertically. Turn on Show Vertically to arrange the spreads in the Pages panel vertically, centered around the spine. This is similar to the appearance of the corresponding panel in QuarkXPress, but it’s also one of the least efficient arrangements available in InDesign. If you want to use the Pages panel for navigation (and you do, believe us), avoid this option.
• Show Thumbnails. You can show little pictures of the stuff on your pages by turning on the Show Thumbnails option. There is a slight performance penalty to pay for having this turned on, so we usually leave it off.
• Pages/Masters On Top. This option controls the arrangement of the document/master spreads areas in the panel. If you prefer having the master spreads at the top of the panel (as in QuarkXPress), choose Masters on Top; we prefer Pages on Top since we manage pages far more often than master pages.
• Resize. Choose Pages Fixed to prevent the document area from resizing, or Masters Fixed (our favorite) to do the same for the masters area of the panel. Choose Proportional to resize both areas by the same amount.
Figure 2-5 Pages Panel Options

Adding Color Labels
You can apply a little color bar to the page thumbnails in the Pages panel (see Figure 2-6). For example, you can use different color labels for master pages and the layout pages they’re applied to.
• In the Pages panel, select the pages to which you want to apply color labels. From the Pages panel menu, choose Color Label, and then pick a color.

If you apply a color to a master page, all pages to which the master is applied will have the same color by default. If you don’t want master color labels to be applied to document pages, choose Color Label from the Pages panel menu, and then uncheck Use Master Color.
Selecting Pages and Spreads
InDesign makes a distinction between targeting a page or spread and selecting a page or spread (see Figure 2-7):
• A page (or spread) is targeted if it is the page onto which the next new objects will be placed.
• A page (or spread) is selected if the next page action—such as duplicating the spread or changing its margins—will affect it.
Figure 2-7 Selecting Pages and Spreads

The target page and the selected page can be different pages—you can be viewing one page while your actions affect another. By default, the page you are looking at is the one that is targeted. But if you’re zoomed back so that more than one page or spread is visible on screen, you can target and select any page or spread by clicking on it.
To select a page, click the page icon in the Pages panel. To select a spread, click the numbers beneath the page icons.
To select more than a single page at a time, select the first spread, then hold down Shift as you select the other pages. Hold down Command/Ctrl as you click pages to select non-contiguous pages.
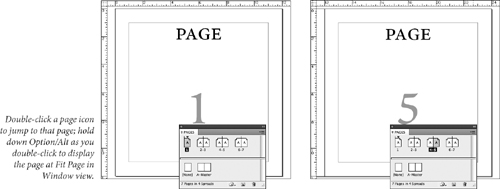
Double-click a page icon (or the page numbers beneath the spread) to select that page or spread, display it in the publication window, and target it. You can hold down Option/Alt as you double-click a page icon, and InDesign changes the page view to the Fit Page in Window view (see Figure 2-8).
Figure 2-8 Navigating with the Pages Panel
The same goes for master pages. If you’re looking at document pages, you can select a master page in the Pages panel (click on it once), open the Margins and Columns dialog box (from the Layout menu) and make changes. The changes are applied to the master page, which then ripple through to the document pages that you see.
Adding Pages
To add a page to your publication, do any of the following.
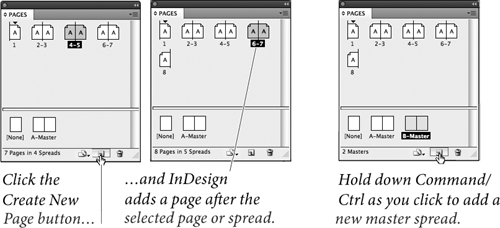
Click the Add Page button. InDesign adds a page to the publication and displays the new page in the publication window (see Figure 2-9). At the same time, InDesign applies the most recently applied master page to the new page. If you hold down Option/Alt as you click the Add Page button, InDesign displays the Insert Pages dialog box (see below). If you press Command/Ctrl as you click the Add Page button, InDesign adds a new master page.
Figure 2-9 The Add Page Button
Choose Insert Pages from the Pages panel menu. InDesign displays the Insert Pages dialog box (see Figure 2-10). Enter the number of pages you want to add in the Pages field. Use the Insert pop-up menu to select the position at which you want the inserted pages to appear. If you want to apply a master page or spread to the pages, choose that master page from the Master pop-up menu. Click the OK button to add the pages. If you hold down Option/Alt, InDesign turns the Cancel button into the Reset button. Click the Reset button, and the controls will be set back to the state they were in when you opened the dialog box.
Figure 2-10 Using the Insert Pages Dialog Box

Drag a master spread icon into the document pages area of the Pages panel. This creates a new document page or page spread and applies the master page to it. To create a page without applying a master page to it, drag and drop the None master page in the document pages area.
Hold down Option/Alt as you drag a page or page spread icon. Just as you can copy an object on a page by Option/Alt-dragging it on the page, you can duplicate document or master pages by Option/Alt-dragging them in the Pages panel (see Figure 2-11).
Figure 2-11 Drag and Drop Duplication

Choose Duplicate Spread from the Pages panel’s menu. This duplicates the selected spread (including any page objects on the spread’s pages) and adds it to the current section.
Arranging Pages
Ordinarily, the pages in your publication are arranged into spreads according to the state of the Facing Pages option in the New Document and Document Setup dialog boxes. If you’ve turned the Facing Pages option on, InDesign arranges the majority of pages into two-page spreads (the first page is a single page spread). If the Facing Pages option is off, InDesign makes each page in the publication into a single page spread.
But you’re not limited to these arrangements of pages and spreads. At any point, in any section of your publication, you can create a spread—also called an “island spread”—containing anything from one to ten pages.
An island spread pays no attention to the default arrangement of pages, but follows its own whim. It doesn’t matter what you do—you can add or remove pages that precede the island spread in a section, and the island spread will remain unchanged.
To create an island spread, select a spread and then turn off Allow Selected Pages to Shuffle from the Pages panel menu. InDesign displays brackets around the name of the spread to indicate that it’s an island spread (see Figure 2-12). Selecting more than a single spread before you choose this option converts all of the spreads to separate island spreads; it does not join them into a single island spread.
Figure 2-12 Creating an “Island Spread”

When you drag a page or spread into an island spread, InDesign adds the pages of the spread to the island spread. When you drag a page out of an island spread, InDesign does not set the page as an island spread (that is, the pages of the island spread do not inherit the spread’s “island” quality).
Shuffling Pages
Usually, when you drag pages around in the Pages panel, InDesign shuffles all the pages around to accommodate the change. That is, if you add a page in a facing pages document between pages 3 and 4, the left-hand page 4 gets shuffled over to become a right-hand page 5, which pushes page 5 over, and so on. However, you can cause all kinds of curious mayhem if you turn off the Allow Document Pages to Shuffle feature in the Pages panel menu. When this is off, InDesign won’t shuffle the pages; rather it just moves and adds pages. For example, in the scenario above, the new page would be added to the spread of either pages 2 and 3, or the spread of 4 and 5 (creating a three-page spread).
Which spread gets the page is subtle: As you drag a page between two spreads in the Pages panel, you’ll see a dark vertical line. If you move the cursor a little closer to the spread on the left, the dark line will jog to the left a pixel or two. Move the cursor to the right, and the line jogs to the right. That’s the only indication as to which spread (the one to the left or to the right) the page will be added.
Perhaps you want the first page of your facing-pages publication to begin on a left-hand page? Turn off Allow Document Pages to Shuffle, then drag the first page to the left until you see a tiny black arrow pointing to the left. When you let go, the page moves over.
Here’s one more time you might want to turn off the Allow Document Pages to Shuffle feature: If you have a facing pages document and you want to bleed an object into the inside of a spread (that is, the object looks like it’s bleeding into the binding), you’ll need to separate the left- and right-pages in the spread. Turn off Allow Document Pages to Shuffle, then drag one of the pages away from the spread until you see a dark vertical bar. When you let go, the pages will be separated. Of course, if you’re going to bleed into the binding, you first need to make sure your printer and their imposition software can handle this correctly.
While dragging pages around in the Pages panel is fun, it’s faster and more precise to choose Move Pages from the Pages submenu (under the Layout menu) or from the Pages panel menu. This displays the Move Pages dialog box, which you can use to move pages in the current document, or to other documents (see Figure 2-13).
Figure 2-13 Move Pages Dialog Box

Creating pages of different sizes
InDesign now offers a feature that people have been requesting for years—the ability to use multiple page sizes in the same document.
Should you use different page sizes in a document? That all depends on what you’re trying to do. To avoid potential printing complexity, you’re sometimes better off keeping different page sizes in different documents and using the Books feature to synchronize styles, swatches, and other common design elements. But there are other situations in which having different page sizes in a document saves time and effort. Examples:
Book cover with a spine. You may not know the exact width of the spine until late in the process. Keeping the spine in the same document as the front and back covers allows you to alter the spine width up to the last minute while still sharing the design with the cover pages (see Figure 2-14).
Figure 2-14 Multiple Page Sizes in Same Document

Company stationery. Use the same logo and address block for a letterhead, envelope, and a business card.
Gate fold for a magazine. Does your magazine require a little foldout flap for the cover? Or a centerfold? Instead of using a separate document for extra wide pages, apply a different page size and use the new widgets in the Print dialog box to print them separately.
Use either of these methods to apply a different page size to pages:
• To create a different page size quickly, select the page in the Pages panel. Then choose a preset from the Edit Page Size menu at the bottom of the pages panel.
• To take a more advanced approach, use the Page tool to click a page in the layout window (or double-click the selected page in the Pages panel). Then use the options in the Control panel to determine the page dimensions (see Figure 2-15).
Figure 2-15 Multiple Page Sizes

As a rule, you should create a master page with a different size, and then apply the master to the document page. That way, you’ll avoid a sticky situation in which a master is applied to a document page with different dimensions.
In some cases, you may want one master page to apply to different page sizes. For example, you may want a company logo to appear on a master page, and you want that same logo to appear on an envelope and a business card. In that case, you can use the Master Page Overlay to position the logo properly on the page (see Figure 2-16).
Figure 2-16 Master Page Overlay

If you try to apply a master to a page that doesn’t have its same page dimensions, you have the choice of keeping the custom page size or overriding it with the master’s page size.
When you select a page using the Page tool, the Control panel displays options for creating a different page size. Adjust the Y value to determine where the page appears vertically in relation to the rest of the spread.
To create the new page size, specify Height and Width values, or select a preset from the menu. You can also change the orientation by clicking the Portrait or Landscape icon. The Control panel has three check boxes that need their own explanation.
Enable Layout Adjustment. Keeps objects aligned to margins when you change page size. See “Adjusting Layouts” later in this chapter.
Show Master Page Overlay. When the page has a different size than its master page, turning on Master Page Overlay will let you move the master page items.
Objects Move with Page. Select this option if you want the objects to move along with the page when you change the X and Y values or drag the page to move it within the spread. Option/Alt-drag the page using the Page tool to move the page with or without moving objects on the page—the opposite of this option’s selection status.
When you send a job to the printer, make sure you let the printer know your document has multiple page sizes. If you need the print the document yourself, the Print dialog box includes a set of icons that lets you select and print all the matching page sizes. We’ll talk more about this in Chapter 11, “Printing.”
Rotating Spreads
When your design calls for rotated pages or graphics, you can either rotate the page, which we just covered above, or you can use Rotate Spreads feature to rotate only the view of the page. You can rotate any spread (or individual page, in a non-facing pages document) by selecting it in the Pages panel and choosing 90°CW, 90°CCW, or 180° from the Rotate Spread View submenu (in the Pages panel menu, or the Context menu, if you right-click or Control-click on a spread in the panel; see Figure 2-17). In case you’re wondering, those “CW” abbreviations stand for “clockwise” and “counter-clockwise.”
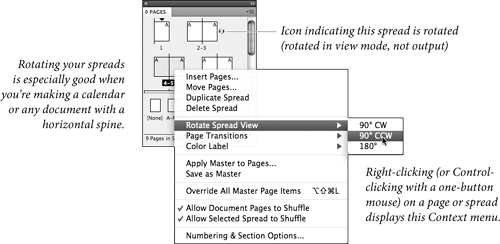
Rotating the spread only affects the view; this has no effect on printing or exporting your document. You can save the rotation with your document, but if you plan on handing the document off to someone else, you might consider removing the rotation, just so you don’t freak them out—to do that, choose Clear Rotation from the Rotate Spread View submenu. On the other hand, it’s a wonderful practical joke to rotate one spread in the middle of a document 180 degrees.
When a spread is rotated, InDesign places a special icon next to it in the Pages panel (unless your icons are set to “Small”).
Defining Sections
Sections define ranges of pages in a document, and give you a way to use multiple page numbering styles in a single document. Using sections, you can combine front matter numbered using lowercase roman numerals (i, ii, iii) followed by regular pages numbered using Arabic numerals (1, 2, 3).
Sections can also add a page numbering prefix or define section marker text—the sort of thing you’d see in a magazine layout containing a special advertising section.
InDesign’s sections features makes setting up these sorts of variations easy. You can have multiple sections in an InDesign document, and each section can have its own starting page number, page numbering system, page numbering prefix, and section marker text. Every InDesign file has one section, beginning on the first page.
To define a new section, follow these steps (see Figure 2-18).
Figure 2-18 Defining Section Options

1. Select the page icon in the Pages panel that represents the first spread in the section.
2. Choose Numbering & Section Options from the panel’s menu or from the Context menu. InDesign displays the Numbering & Section Options dialog box.
3. Make sure the Section Start option is on, and then use the controls in the New Section dialog box (see descriptions below) to specify the page numbering options of your new section, then click OK. InDesign adds a little black triangle above the page icon in the Pages panel to indicate a section start.
When you want to edit a section, you can repeat the process above or just double-click the black triangle icon in the Pages panel.
Page Numbering. If you want InDesign to continue the page numbering from the previous section, choose the Automatic Page Numbering option. Otherwise, turn on the Start Page Numbering At option and enter a starting page number in the associated field.
Section Prefix. You can enter a label for your section in the Section Prefix field (you can enter up to eight characters). This is primarily helpful when you have multiple sections with the same page numbering. For example, you might have page 1 in Section A and another page 2 in Section B. You could type “A-” and “B-” in the Section Prefix fields. You then have to type the prefix when using the Go To Page feature, or when printing or exporting specific pages.
If you want your prefix to also show up on your documents when you use the automatic page number feature, turn on the Include Prefix when Numbering Pages checkbox.
In some earlier versions of InDesign, the program automatically added the baffling “Sec1:” prefix, which we found incredibly annoying; we’re pleased to report that it doesn’t do that anymore. Note that this means that you can have both the section prefix text and the section marker text appear on the page (see “Section Marker,” below).
Style. Choose the page numbering style you want (roman numerals, Arabic numerals, or upper- or lower-case letters).
Section Marker. If you want InDesign to enter text on some or all of the pages of the section (such as the chapter name) automatically, enter that text in this field. Most of the time, you use this field for the name of the section itself—but you can enter anything (up to around 100 characters). See “Adding Section Marker Text,” below.
Numbering Pages
While you can always type the page number of a page into a text frame, there’s an easier way to number a page. By entering a page number marker, you can have InDesign automatically number the page for you. If you move the page, or change the page numbering for the section containing the page, InDesign updates the page number.
To enter a page number marker, click the Type tool in a text frame and do one of the following (see Figure 2-19):
• Display the Context menu, then choose Auto Page Number from the Insert Special Character submenu.
• Choose Auto Page Number from the Insert Special Character submenu of the Type menu.
• Press Command-Shift-Option-N/Ctrl-Shift-Alt-N.
Figure 2-19 Inserting Page Numbers

If you’re on a master page, you’ll see the master page prefix (if you’re on master page “A,” for example, you’ll see an “A”); if you’re on a document page, you’ll see the page number itself.
Adding Section Marker Text
To have InDesign automatically “type” the section marker text that you specified in the Section Marker field of the Numbering & Section Options dialog box, click the Type tool in a text frame and choose Section Name from the Insert Special Characters submenu (under the Type menu or the context menu; see Figure 2-20). If you’re on a master page, however, you’ll just see the word “Section.” Later, when you change the contents of the Section Marker field, InDesign changes the text on the document pages.
Figure 2-20 Inserting Section Marker Text

One common use for section markers is running heads at the top or bottom of the page. For example, you could create a single InDesign document with 10 sections—one for each chapter. Instead of creating 10 master pages—each one identical except for the running head that indicates the section name—you could insert a Section marker on a single master page and then simply update the Section field (in the Section & Numbering dialog box) for each section.
To be honest, however, our use of the section marker character has diminished since InDesign added text variables, which can “pull” the text from a heading or a chapter opener and put it in the header even more easily. We cover text variables in Chapter 3, “Text.”
Most of the time, you’ll probably want to enter automatic page number and section marker characters on your master pages—but you can also enter them directly on document pages.
Working with Master Pages
Master pages (more accurately called master spreads) are the background on which you lay out your publication’s pages. When you assign a master spread to a document page, InDesign applies the margin and column settings of the master spread to the page. Any page items on the master spread also appear on the document page, on the layers they occupy on the master spread. Master page items cannot be edited on document pages unless you choose to override the items from the master pages (see “Overriding Master Items”).
InDesign Is Not QuarkXPress
If you’re a long-time QuarkXPress user, you’re probably familiar with the technique of putting items on master pages to use as a “template” for document pages. However, in QuarkXPress, each master page object is immediately accessible (“clickable”) on the document page. Therefore, some people used master pages in XPress as a kind of alternative to the Clipboard. That doesn’t work very well in InDesign, because InDesign protects master page items so you don’t accidentally change them. We cover that in more detail in “Overriding Master Items,” later in this chapter.
However, in general, you should put items on master pages that you do not expect to override on document pages. In fact, because InDesign can flow text into the area defined by the margins (a feature QuarkXPress lacks), even master text frames are rarely needed.
Creating Master Spreads
To create a new master spread, use any of the following techniques:
• Hold down Command/Ctrl as you click the Add Page button at the bottom of the Pages panel. InDesign adds a new master spread to the publication. You can display the New Master dialog box by holding down Command-Option/Ctrl-Alt while you click.
• Choose New Master from the Pages panel menu. InDesign displays the New Master dialog box (see Figure 2-21).
Figure 2-21 Choose New Master to Create a Master Spread

• Drag a spread from the document pages section of the Pages panel into the master pages section (see Figure 2-22). If you’ve already laid out a document page using the layout you’d like to use as a master page, this is the easiest way to transfer that layout to a master page. When you do this, InDesign creates a new master page with the margins, column guides, ruler guides, and content of that document page. The new master spread is based on the master spread applied to the example document pages (see “Basing One Master Spread on Another”).
Figure 2-22 Basing a Master Spread on a Document Spread

• To duplicate a master page you’ve already created, hold down Option/Alt as you drag and drop the existing master spread icon in the master pages area of the Pages panel. InDesign creates a copy of the master spread. Alternately, choose Duplicate Master Spread from the Pages panel menu.
Importing Master Spreads
You can also import master spreads from another InDesign document. To do this, choose Load Master Pages from the Pages panel menu. InDesign displays the Open A File dialog box. Locate and select an InDesign document, and click the OK button.
If the document includes master pages with the same name as master pages in the current document, InDesign displays the Load Master Pages Alert dialog box. You can replace the existing master spreads, or rename the incoming master spreads.
If you re-import master spreads from the same document at a later date, InDesign will update the master spreads. This gives you a way to “synchronize” master spreads between documents without having to use the Book feature. (However, if you are using a book panel, using the Synchronize feature may be even easier. We discuss that in Chapter 8, “Long Documents.”)
Copying Master Spreads Between Documents. To copy selected master spreads from one document to another, you can use drag and drop. Select the source document and drag the master page icon from the Pages panel into the other document. Drop the icon, and the master page is copied over.
Alternatively, you can select the master pages and choose Move Pages from the Pages panel menu. This displays the Move Pages dialog box, where you can specify the destination for the pages.
When you copy document pages between documents, InDesign also copies any master pages that were applied to those document pages. If the two documents have master spreads with the same name, the master spread isn’t copied.
Basing One Master Spread on Another
Imagine that you produce a catalog, and that, over the course of a year, you produce seasonal issues of the catalog. The basic design elements—the section, margins, columns, and page numbering—remain the same throughout the year, but the colors used, and the page footers change with each issue. Do you have to create a new set of master spreads for each issue? Not when you have InDesign’s ability to base a master spread on another master spread, you don’t.
When you base a new master spread on an existing master spread, the new master inherits the properties of the existing master spread. We refer to the relationship between the original style and the new style as a “parent/child” relationship. Once you’ve applied a master spread to another master spread, you can add to it or override page elements on the pages of the “child” spread, just as you can from any document page (see “Overriding Master Items,” below).
Here’s how inheritance works: When you change any of the attributes defined by the “parent” spread, those changes appear in the “child” spread. When the attributes between a “child” spread and its “parent” spread differ, those attributes are controlled by the “child” spread. Take a look at the (somewhat overwrought) example in Figure 2-23 on the next page, and you’ll see what we mean.
Figure 2-23 Basing One Master Spread on Another

You can base one master page on another by picking a master page from the Based on Master pop-up menu in the New Master dialog box. Or drag the parent master on top of the child master in the Pages panel.
Applying Master Pages and Master Spreads
To apply a master page or master spread to a document page (or even to another master page), do one of the following.
• Drag and drop the master page spread icon or master page icon on a page icon. Usually, this just affects a single page, but if you move the cursor carefully around the icons until a thick black line appears around the whole spread, the master page is applied to all pages in the spread. This is a slow and tedious process which you’ll perform once and then never do again.
• Select a master page in the Pages panel and then choose Apply Master to Pages from the Pages panel menu (see Figure 2-24). Enter the page, or pages, to which you want to apply the master spread. To enter non-contiguous pages, enter commas between the page numbers (“1, 3, 10, 12, 22”), or enter page ranges (“55-73”), or mix ranges and individual pages (“1, 3, 7-13, 44”).
Figure 2-24 Applying Master Spreads Using the Apply Master to Pages Option

• Select a page or pages and then Option/Alt-click on the master page. This is the fastest method, period.
Editing Master Spreads
To edit the items on a master spread, display the master spread. There are several ways to do this, but the two easiest methods are either to double-click the master spread’s label in the Pages panel or press Command/Ctrl-J (to jump to the Page field), type the prefix (such as typing “B” for the “B-Master”) and press Enter.
Once you’re viewing a master page, you can edit the master spread’s margins guides, ruler guides, and page items just as you would any items and attributes of a document spread.
Master Options. You can also select a master page and then choose Master Options from the Pages panel menu to change the master page’s prefix, name, or based-on status. Shortcut: click on the master page in the Pages panel, not the icon (to select it) and then Option/Alt-click on the master page’s label to open the same dialog box.
Deleting Master Spreads
To remove a master spread from a document, select the master spread in the Pages panel, then choose Delete Master Spread from the Pages panel menu. You can also drag the master page to the Delete button at the bottom of the Pages panel.
Hiding Master Items
Are the items from your master page too distracting? No problem: Select Hide Master Items from the View menu. Later, when you want to see the completed page, select Show Master Items.
Overriding Master Items
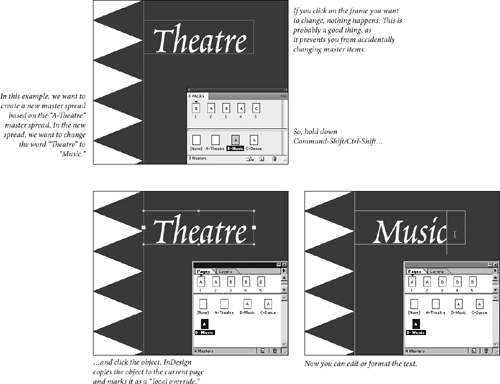
Want to modify or delete a master page item from a document page, but leave all of the other master pages items alone? Wait! Don’t cover the master page item with a white box! There’s a better way. InDesign calls it “overriding” a master page item.
To override a master page item, hold down Command-Shift/Ctrl-Shift and click the master page item (or, if you’re using the Type tool, click inside the master page item). InDesign “unlinks” the master page item, so you can select it, format it, or delete it as you would any other page item (see Figure 2-25). You can also override everything on any page(s) selected in the Pages panel by choosing Override All Master Page Items from the panel menu.
Figure 2-25 Overriding a Master Item
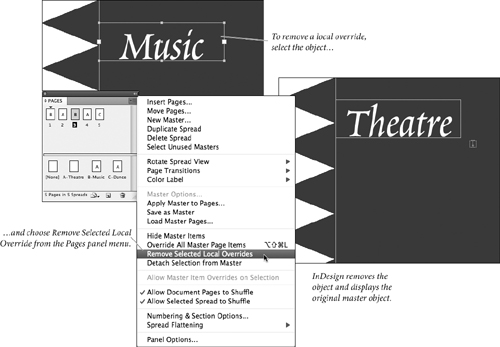
Notice that we put “unlink” in quotation marks above, indicating that the objects aren’t really unlinked from their master page. You can return an overridden master page item to its original state by selecting the object and choosing Remove Selected Local Overrides from the Pages panel menu (see Figure 2-26). If you’ve made some terrible mistake, you can return one or more pages’ worth of overridden objects by selecting the pages in the Pages panel and choosing Remove All Local Overrides from the panel menu.
Figure 2-26 Removing Local Overrides
Maintaining Some Links. Overridden items are not entirely free of the influence of their master page counterpart. If you override a frame and then move it on the document page, the position of that item is no longer linked to the position of the master page item. However, if you change the fill of the master page item, those changes do flow through to the overridden master page.
If you want to totally unlink an object from the master page, so that nothing you do on the master will affect the item on the document page, first override the item, and then—while it’s still selected—choose Detach Selection from Master from the Pages panel menu or deselect everything and select Detach All Objects from Master.
Reapplying Master Pages. When you reapply the master page to a document page containing overridden or detached items, the original master page items reappear on the document page, but the overridden page items are not deleted. This isn’t usually a good thing—it’s easy to end up with stacks of duplicated objects.
Adjusting Layouts
What happens when you change the margins of a page, or apply a different master page? Should the items on the affected pages move or resize to match the new page geometry? Or should they stay as they are? You decide. Choose Layout Adjustment from the Layout menu to see the Layout Adjustment dialog box (see Figure 2-27). Here’s a quick walk-through of the controls here.

Enable Layout Adjustment. Turn this option on, and InDesign adjusts the position and size of the objects on the affected pages according to the settings in this dialog box. With this option off, InDesign does not change object positions or sizes when you apply master pages, change page size, or otherwise change page geometry.
Layout Adjustment can change your file in ways you may not expect. For instance, let’s say you have a single-column document with a master text frame. If you change the number of columns to three while Layout Adjustment is enabled, InDesign replaces the single text frame with three threaded frames.
Snap Zone. How close to a guide does an object have to be to be affected by layout adjustment? That’s what you’re telling InDesign by the value you enter in this field. Objects within the specified distance will move or resize; objects outside that range won’t.
Allow Graphics and Groups to Resize. When this option is turned off, InDesign will not resize graphic frames or groups of objects while adjusting layouts. When it’s on, InDesign resizes graphic frames and groups when they extend to the edges of the column or margin. Note that InDesign never scales text in a text frame; it may resize the frame itself, but not the text inside it. It will, however, scale graphics. This is quite powerful, but also quite dangerous. If you have a picture that spans from the left margin to the right margin in a single-column document, and you use Margins and Columns to split the page into two or more columns, this option will scale that picture down into the left-most column—probably not what you were hoping for.
Allow Ruler Guides to Move. Should ruler guides move when you change the layout of the page or spread? If you’d like the ruler guides to move, turn this option on; if not, turn it off. How far guides move when you make a layout change depends on a host of issues. (We’ve tried to figure it out and we’re baffled. The best we can say is that InDesign tries to maintain the general look and feel of the page, so if you increase the left margin, the guides all move a bit to the right.)
Ignore Ruler Guide Alignments. When this option is off, InDesign moves and resizes objects to match the positions of ruler guides in the new page layout. When it’s on, InDesign does not consider the locations of ruler guides when resizing or moving objects—only the location of margin guides and page edges. The effect of this option also depends on the state of the Allow Ruler Guides to Move option.
Ignore Object and Layer Locks. What should InDesign do while adjusting your layout when it encounters a locked object, or an object on a locked layer? When you turn this option on, InDesign will treat the objects as if they were unlocked. To leave locked objects alone, turn this option off.
It’s All in the Guides. The key thing to remember is that InDesign bases all layout adjustment decisions on the positions of margin guides, ruler guides, column guides, and page edges. InDesign cannot know that you want an object to change its size or position unless you somehow associate the object with a guide or a page edge.
Selecting and Deselecting
Before you can act on an object, you have to select it (see Figure 2-28). Sounds simple, but in InDesign you can quickly get in a messy situation if you don’t pay attention to what, exactly, is selected on your page and how you selected it. That’s why we recommend that even experienced users read through this carefully.
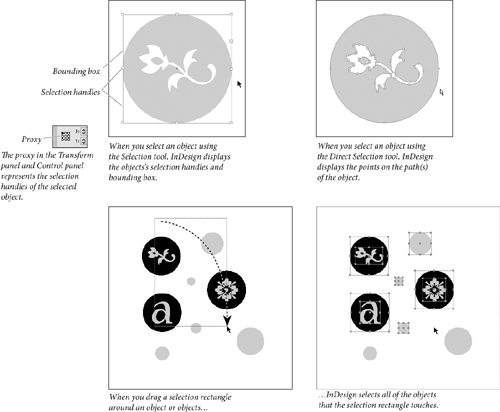
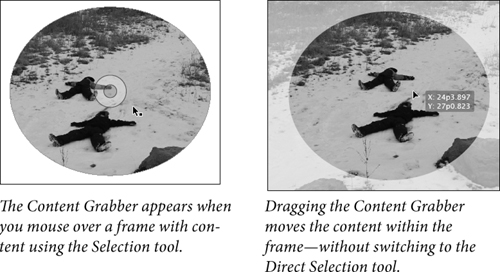
The Selection Tool. The Selection tool is the swiss-army knife of the Tools panel. Use the Selection tool to select, rotate, resize, reposition, crop, and scale frames and frame content. The Content Grabber—the donut that appears when you mouse over a graphic—lets you quickly reposition content within a frame, just by clicking and dragging (see Figure 2-29).
You select objects or groups of objects with the Selection tool by clicking on them, dragging the selection rectangle (marquee) over the objects, or by Shift-selecting (select one object, hold down Shift, and select another object). When you mouse over an object, InDesign highlights the object that will be selected when you click. The selected object’s selection handles and the object’s bounding box—the smallest rectangular area capable of enclosing the selection. The selection handles on the bounding box also correspond to the points on the proxy in the Transform panel.
You can also select everything on the current spread by choosing Select All from the Edit menu (or pressing Command/Ctrl-A) while using either selection tool.
The Direct Selection Tool. As we noted in “Using the Tools Panel” in Chapter 1, “Workspace,” when you click an object using the Direct Selection tool, InDesign displays the points on the object’s path—whether it’s a line or a frame. You can also use the Direct Selection tool to select objects nested inside other objects (see “Selecting Inside Objects,” below). The most common example is selecting a picture inside a graphic frame—the frame and the picture are two separate objects in InDesign, and you can use the Direct Selection tool to select the frame (by clicking on its edge) or the picture (by clicking anywhere inside the frame). You can also select frame contents by clicking the Content Grabber using the Selection tool.
You can drag a selection marquee using the Direct Selection tool, too, just as you can with the Selection tool—InDesign selects the points on the objects within the selection, even if they’re in more than one object. To select all the points on a line or frame, hold down Option/Alt while you click the path with the Direct Selection tool.
Deselecting. To deselect all selected objects, click an uninhabited area of the page or pasteboard, or, better yet, press Command-Shift-A/Ctrl-Shift-A. We’ve developed this keyboard shortcut into something of a nervous tic; there are so many times you need to make sure everything is deselected. For example, when you create a new color, InDesign applies that color to whatever you have selected. If you don’t want this, you’d better deselect everything first!
Selecting Through Objects
Sometimes, you have to select an object that’s behind another object. You might, for example, need to select and edit a background graphic behind a text frame. Do you need to drag the text frame out of the way? Or hide the layer containing the text frame? There’s a better way: Click the Selection tool on the object on top of the stack, then press Command/Ctrl and click again. InDesign selects the next object in the stack. Each successive click selects the next object down in the stack (see Figure 2-30). If you click too far, you can move back up the stack by Command-Option/Ctrl-Alt-clicking.
Figure 2-30 Selecting Through Objects

When overlapping objects are exactly or nearly the same in size, it can be difficult to see which object in a stack is selected. Don’t start dragging objects out of the way—look for clues. The color of the selection handles, the state of the Fill and Stroke buttons in the Toolbox, and the Stroke panel all provide information that can help you determine which object is selected.
Keyboard Selections
InDesign also has menu items and keyboard shortcuts for selecting objects on your page. The menu items live in the Select submenu, under the Object menu, but we only use them if we forget the keyboard shortcuts (below). Note that these features differ from the click-through method; Command/Ctrl-click selects through an object to one directly beneath it. The Select features select from among all the objects on a spread. For example, if you have four small frames, one in each corner of a page (whether they’re overlapping or not), you can select among them with these shortcuts.
• To select the topmost object beneath the current selection, based on the stacking order on the page (see “Stacking Objects,” later in this chapter) press Command-Option-Shift-] / Ctrl-Alt-Shift-] or choose First Object Above from the Select submenu.
• To select the object behind the currently selected object in a stack of objects, press Command-Option-[ / Ctrl-Alt-[ or choose Next Object Below from the Select submenu. Pressing the keyboard shortcut again once you reach the bottom of the stack will select the topmost object.
• To select the object above the currently selected object in a stack of objects, press Command-Option-] / Ctrl-Alt-] or choose Next Object Above from the Select submenu.
• To select the bottommost object below the selected object, press Command-Option-Shift-[ / Ctrl-Alt-Shift-[ or choose Last Object Below from the Select submenu.
Selecting Inside Objects
Sometimes, you need to select an object that you’ve pasted inside another object, or to select an object inside a group. The Direct Selection tool, as you might expect, is the tool you’ll usually use to do this, and the process is called “subselection.” (When Ole selects an object that’s inside another object, he actually says the object is “subselected.” David, who felt subselected through much of his childhood, prefers the term “select-challenged.”)
It’s important to note that InDesign treats groups and page items that happen to contain other items in the same way. You don’t have to ungroup a group, or remove objects from their containing object to select and edit them—you can select them, and then work with them just as you would any other object. To select an object inside another object, you can use any of the following approaches.
• Using the Selection tool, click an object to select the group. Double-click an object to select the object (see Figure 2-31). To direct-select the object, press A. Note that in previous versions, double-clicking an object switches to the Direct Selection tool.
Figure 2-31 Subselecting Objects Inside Groups

• Select the Direct Selection tool, and click the element that you want to edit. InDesign temporarily highlights the object as you mouse over it, making it easy to see what will be selected when you click.
• Select the group or containing object with the Selection tool, then choose Content from the Select submenu of the Context menu. This selects an object. If necessary, choose Next Object or Previous Object from the Select submenu of the Context menu until the object you want is selected.
• Select the group or containing object with the Selection tool, then click the Select Content button in the Control panel. If necessary, click the Select Next Object and Select Previous Object buttons until the object you want is selected (see Figure 2-32).
Figure 2-32 Control Panel Selection Buttons

Guides
InDesign can display four types of guides: margin guides, column guides, ruler guides, and Smart Guides. Guides are nonprinting guidelines you can use for positioning objects on the pages and pasteboard of an InDesign publication. Margin guides appear inside the page margins for a particular page. Column guides are actually pairs of guides that move as a unit. The space between the two guides making up the column guide is the gutter, or column spacing. This built-in spacing makes these guides good for—you guessed it—setting up columns. A ruler guide is a horizontal or vertical guideline you can use as an aid to aligning or positioning page items. A Smart Guide is a guide that temporarily appears on page to help you position an object while you place or move it.
You use guides to mark a position on the page or pasteboard. The most important thing about guides is not just that they give you a visual reference for aligning objects to a specific location, but that they can exert a “pull” on objects you’re moving or creating. To turn on that “pull,” choose Snap to Guides from the from the Grids & Guides submenu of the View menu. When this option is on (it’s on by default), and you drag an object within a certain distance of a guide, InDesign snaps the object to the guide.
This is one of our favorite psychocybernetic illusions—as an object snaps to a guide, your nervous system tells you that your hand can feel the “snap” as you drag the mouse. Turning on Snap to Guides can’t physically affect the movement of your mouse, of course, but the illusion is very useful.
When you want to drag an object freely, without having it snap to any guides it encounters on its path across the publication window, turn Snap to Guides off. Do not try to align an object to a guide while Snap to Guides is turned off, however—there aren’t enough pixels available on your screen to allow you to do a good job of this at any but the highest magnifications (see Figure 2-33).
Figure 2-33 Don’t Trust Your Screen

Objects do not snap to guides when guides are hidden. This includes guides that are on a hidden layer. However, they do snap to guides that are invisible due to being in Preview mode.
Also, on the Mac OS, you can disable Snap to Guides temporarily by holding down the Control key while you’re dragging—unless Smart Guides is enabled (see “Smart Guides,” later in this chapter).
Hiding and Displaying Guides
Tired of looking at all of the guides? To hide all guides, choose Hide Guides from the Grids & Guides submenu of the View menu (press Command-;/Ctrl-;). To display the guides again, choose Show Guides (or press the keyboard shortcut again).
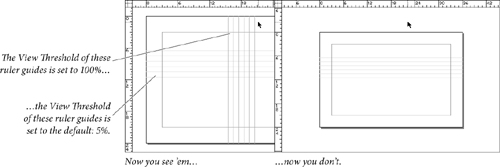
You can also make guides disappear by changing the view threshold (see Figure 2-34). For the document grid, baseline grid, margin guides, and column guides, you set the view threshold using the Grids panel of the Preferences dialog box (see Chapter 1, “Workspace”). For individual ruler guides, use the View Threshold field in the Ruler Guides dialog box (select a guide and choose Ruler Guides from the Layout menu or the Context menu).
Figure 2-34 Guide View Threshold
Adjusting Column Guides
While column guides are very similar to ruler guides, they have an important distinction: they can affect text flow. When you click the text place icon in a column created by column guides, InDesign flows the text into the column. By contrast, ruler guides have no effect on text flow. For more on flowing text, see Chapter 3, “Text.”
The method you use to adjust the position of column guides depends on what you’re trying to do. If you’re trying to divide the area inside the page margins into equal columns, select the page and enter a new value in the Number field in the Columns section of the Margins and Columns dialog box (from the Layout menu).
If, on the other hand, you’re trying to get columns of unequal width, you can start by adding evenly-spaced column guides, and then adjust each one by dragging them to the left or right on the page (see Figure 2-35). You might have to unlock the column guides first; see “Locking and Unlocking Column Guides,” below.
Figure 2-35 Creating Columns of Unequal Width

You can’t adjust the distance between the column guides (the “gutter”) by dragging—instead, you’ll have to go to the Margins and Columns dialog box. To change the gutter width, enter a new value in the Gutter field (see Figure 2-36). When you open the Margins and Columns dialog box after you’ve set up a custom column guide arrangement, InDesign displays “Custom” in the Number field. Do not enter a number in this field, or InDesign will move your column guides so that they again evenly divide the space between the margins. If you change the gutter width without touching the Number field, InDesign leaves your column guides in their original positions, but changes the space inside each guide.
Figure 2-36 Adjusting Gutter Width

You should also bear in mind that text frames can, by themselves contain multiple columns of equal width, independent of the Margins and Columns setting. For more on this topic, see Chapter 3, “Text.” Sometimes it’s easier to work with a single multi-column text frame than with multiple single-column text frames.
Locking and Unlocking Column Guides
You can lock and unlock column guides, just as you can ruler guides. To lock the column guides, choose Lock Column Guides from the Grids & Guides submenu of the View menu; to unlock the guides, choose Unlock Column Guides.
Creating a New Ruler Guide
To create a new ruler guide, position the cursor over one of the rulers (for a horizontal ruler guide, move the cursor to the vertical ruler; for a vertical ruler guide, use the horizontal ruler), then click-and-drag. As you drag, InDesign creates a new ruler guide at the location of the cursor. When you’ve positioned the ruler guide where you want it, stop dragging (see Figure 2-37). Hold down the Shift key while dragging a guide to make it snap to the nearest increment in the ruler.
Figure 2-37 Creating a Ruler Guide

Ruler guides can spread across a single page or the entire pasteboard. Release the mouse button while the cursor is over the page, you get a page guide; if the cursor is over the pasteboard, you get a pasteboard guide. You can hold down Command/Ctrl as you drag the guide to force the guide to cross the whole pasteboard. To adjust this type of ruler guide, drag the guide on the pasteboard or with the Command/Ctrl key held down—if you drag it on a page or without the modifier key, InDesign will limit the guide to that page.
You can also double-click a ruler to create a new ruler guide—InDesign creates a guide at the point at which you clicked. While this sounds appealing, we actually find it quite difficult to double-click exactly where we want the guide to be; it’s often more precise to drag.
Using Create Guides
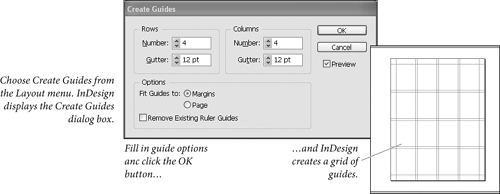
Want to add a regular grid of ruler guides to your page? Try the Create Guides option on the Layout menu (see Figure 2-38). The options in the Create Guides dialog box are pretty straightforward—enter the number of rows and columns you want, and enter the distance you want between the rows and columns. You can also choose to create the guides within the page margins, which is a nice touch. In addition, you can choose to remove all existing ruler guides from the page as you create the new guides.
Figure 2-38 Using Create Guides
Snapping Guides to Objects
You can snap a guide to any control handle of an object. To do this, select the object with the Selection or Direct Selection tool, and then drag a guide out and drag the cursor on top of any side or corner handle—the guide will snap to the handle.
Adding Ruler Guides Around an Object
Another way to position ruler guides around a selected object is to use the AddGuides script—one of the sample scripts that come with InDesign. Run the script by double-clicking the script name in the Scripts panel. The script displays a dialog box you can use to set the positions of the ruler guides. Click the OK button, and InDesign adds guides around the selected object or objects. This script is especially useful when you’re setting up a publication for use with InDesign’s layout adjustment features.
Selecting Ruler Guides
To select a ruler guide, click on the guide using one of the selection tools, or drag a selection rectangle over the guide. This differs from PageMaker and QuarkXPress, where you cannot select a ruler guide as you would any other object. You can select multiple ruler guides at once by dragging a selection rectangle (a marquee) over them or Shift-clicking on each guide. If the selection marquee touches an object, InDesign selects the object—you cannot select both ruler guides and objects in the same selection. When a ruler guide is selected, it displays in the layer color of the layer it’s on. You can select a locked ruler guide only if the Prevent Selection of Locked Objects is turned off.
You can also select all the guides on a spread with a keyboard shortcut: Command-Option-G/Ctrl-Alt-G.
Editing Ruler Guides
To change the location of a ruler guide, do one of the following.
• Drag the guide (using the Selection or Direct Selection tool).
• Select the ruler guide and then enter a new position in the X field (for a vertical guide) or in the Y field (for a horizontal guide) of the Transform panel or Control panel.
• Select the guide and press an arrow key to “nudge” the guide one direction or another.
You can also select more than one ruler guide at a time, and use the techniques above to move them, as a unit, to a new location (see Figure 2-39).
Figure 2-39 Moving Multiple Guides

Moving a Ruler Guide to a Specific Layer
You can assign a ruler guide to a layer as you would any other selected object—drag the Proxy that appears in the Layers panel up or down, then drop it on the layer to which you want to send the guide (see Figure 2-40). The guide will appear on top of other objects. To move the guides behind other objects on the layer, turn on the Guides in Back option in the Guides & Pasteboard panel of the Preferences dialog box.

Setting Guide Options
When you create a ruler guide, InDesign applies the default guide color (specified in the Guides & Pasteboard panel of the Preferences dialog box) and a default view threshold (usually 5%) to the guide, but you can change these options if you want (see Figure 2-41).
1. Select the ruler guide (or guides).
2. Choose Ruler Guides from the Layout menu or the context menu to display the Ruler Guides dialog box.
3. Choose one of InDesign’s preset colors from the Color pop-up menu, or (if you’re really finicky) select Custom to create a custom guide color.
4. You can also change the view threshold of the selected ruler guide by entering a new value in the View Threshold field. The percentage you enter is the percentage magnification at and above which you want the ruler guide to appear. Enter 5% to make the guide visible at all magnifications. If you change this to 100%, the guide will be visible at 100-percent view or higher (closer), but will be invisible at anything less than 100-percent view.
5. Click the OK button to close the Ruler Guides dialog box. InDesign displays the guide (or guides) in the color you chose.
Figure 2-41 Setting Guide Options

Why would you want to assign different colors to guides? Guides are such useful tools that we find we use lots of them. Color coding guides for different tasks makes it easier for us to see what’s going on. One set of guides, for example, might be used for aligning captions in one illustration; another set might be used in a different illustration. Applying colors, changing view thresholds, and assigning guides to layers helps control the way that InDesign draws the guides in the publication window.
Note that guides always take on the layer selection color of their layer when they’re selected.
Locking Ruler Guides
To lock the position of a selected ruler guide, choose Lock from the Object menu (or press Command-L/Ctrl-L), or display the Context menu and choose Lock. Once you’ve locked the position of a ruler guide, you can change the color of the guide, move the guide to another layer, change its view threshold, or copy the guide, but you can’t change its position.
To unlock the guide, select the guide and choose Unlock from the Context menu. Of course, you can also lock the position of guides by locking the layer containing the guides.
To lock all guides, press Command-Option-;/Ctrl-Alt-; (or choose Lock Guides from the Grids & Guides submenu of the View menu or the Context menu). When you do this, you’re locking more than guide position—you won’t be able to select a guide until you choose Unlock Guides (from the Grids & Guides submenu of the View menu or from the Context menu) or press the keyboard shortcut again.
Deleting Ruler Guides
To delete a ruler guide (or guides), select the guide (or guides) and press the Delete key. Trying to drag the guide onto a ruler or out of the publication window (the technique used in PageMaker and QuarkXPress) simply scrolls your view of the publication window. So don’t bother dragging the guide; just press Delete.
If you need to delete all the guides on a spread, choose Delete All Guides on Spread from the Grids & Guides submenu of the View menu.
Copying Ruler Guides
You can also copy selected ruler guides and paste them into other spreads or publications. When you paste, the guides appear in the positions they occupied in the original spread provided the page sizes are the same. If the page sizes are not the same, InDesign gets as close to the original positions as it can.
But wait! It gets better! You can use InDesign’s Step and Repeat feature to duplicate ruler guides. For more on Step and Repeat, see Chapter 9, “Transforming.” This is a great way to create custom grids, though the Document Grid feature (see below) is even better.
Smart Guides and Cursors
When you’re dragging objects around your page, trying to line them up in just the right position, it’s sure nice to get a little help. Smart Cursors and Smart Guides to the rescue! The Smart Cursors feature displays measurements alongside your cursor whenever you create a frame (even when placing an image) move an object, or transform it (resize, scale, or skew it; see Figure 2-42).

The Smart Guides feature displays temporary guides as you drag objects around your page (see Figure 2-43). For example, if you drag an object so that its left edge aligns with the left edge of another object on your page, a smart guide suddenly appears, indicating the relationship. Smart guides act as though the Snap to Grid feature is always on, so if you see a smart guide, you can let go of the mouse button confident that the object you were dragging has snapped to the proper alignment.
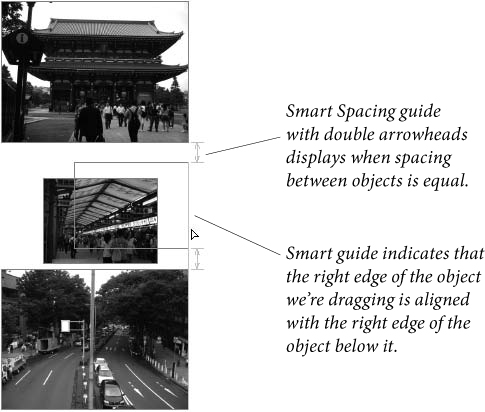
Note that smart guides only pay attention to objects on the same spread, and only those you can see in the document window. So, if you zoom in so that you can only see objects on the lower half of your page, the Smart Guides feature ignores objects on the top half. Similarly, it ignores objects on hidden layers.
Smart Guides also treats the center of each page as an object—as you drag an object, smart guides will appear when it’s horizontally or vertically centered on the page. These guides are a different color than normal smart guides; they match your margin guide color.
Smart Spacing. Not only does Smart Guides pay attention to aligning the edges and centers of objects, it also watches the amount of space between objects. For example, if you have three objects on a page and start dragging the second one, you’ll see smart guides appear when the space between the first two objects is equivalent to the space between the second two. These “Smart Spacing” guides have small arrowheads on them.
Smart Transformations. Smart Guides also watches for similar transformations—what Adobe calls “Smart Dimensions.” For instance, let’s say you have an object rotated on your page. Then you select another object and start rotating it (we discuss the Rotation tool and other ways to transform objects in Chapter 9, “Transforming”). Smart Dimensions sees the first rotated object and snaps to the same rotation value. Curiously, this works even if the other object is on another page (as long as you’re zoomed out
Smart Preferences. Like so many other features in InDesign, you can customize several aspects of Smart Guides so that it better works for you. First, if you don’t like the default lime-green color, you can change that in the Guides & Pasteboard pane of the Preferences dialog box (press Command/Ctrl-K).
In the same place, you’ll find four checkboxes: Align to Object Center, Align to Object Edges, Smart Dimensions, Smart Spacing. The first two control what parts of objects InDesign takes into consideration when displaying smart guides. Note that even if you turn off Align to Object Center, objects will still align to the horizontal and vertical centerpoint of each page.
The second two checkboxes enable or disable Smart Dimensions and Smart Space, as described above.
Disabling Smart Guides. As cool as the Smart Guides feature is, it often just drives us batty, kicking in at times we just don’t want it to. Fortunately, you can enable or disable it with a quick Command/Ctrl-U. (Or you can do it the slow way and choose Smart Guides from the Grids & Guides submenu, under the View menu.)
When you disable Smart Guides, you may wonder why the X and Y values still appear when you move objects. InDesign doesn’t consider that little gray box part of Smart Guides. To get rid of it, turn off the Show Transformation Values in Interface preferences.
Grids
InDesign can display two different grids: the document grid and the baseline grid. Both grids are arrangements of guides spaced a specified distance apart. (The baseline grid is not truly a grid, as it has no vertical guidelines.) You’ll find the settings for both grids in the Grids Preferences dialog box, as described in Chapter 1, “Workspace.”
To display a grid, choose the corresponding option (Show Document Grid or Show Baseline Grid) from the Grids & Guides submenu of the View menu, or from the Context menu (when nothing is selected, and when a tool other than the Type tool is active). You can also hide or show the document grid by pressing Command-’/Ctrl-’.
If the magnification of the current publication window is below the view threshold of the baseline grid (again, this setting is in the Grids Preferences dialog box), you’ll have to zoom in to see the grid (see Figure 2-44).
Figure 2-44 Setting the View Threshold of the Baseline Grid
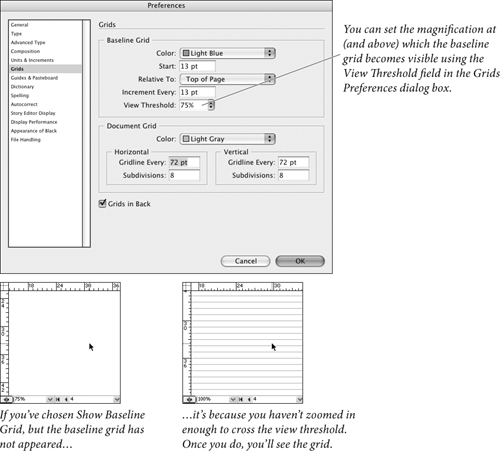
As we mentioned earlier, the grids aren’t very useful without the relevant “snap.” The regular Snap to Guides option (from the Grids & Guides submenu of the View menu) affects the baseline grid guides when they’re visible, but not the document grid—you’ll need to use the Snap to Document Grid feature (on the Grids & Guides submenu of the View menu) for that. In fact, when the Snap to Document Grid option is turned on, objects snap to the document grid even when the grid is not visible. (David likes this because the document grid is useful for aligning objects but distracting to his eye.)
Normally, only frames and lines snap to the baseline grid, but the feature’s name implies that you can also snap the baselines of text to these guides—a very useful typesetting feature. We discuss working with text leading grids and the baseline grid in Chapter 4, “Type.”
Stacking Objects
Page items on an InDesign page can be arranged in front of or behind each other. You can imagine that every object exists on an invisible plane that it cannot share with other objects, if you like. These planes can be shuffled to place one object above another, or behind another.
Simple stacking isn’t the only way to control the front-to-back order of objects on a page—layers are another, and usually better, method (we cover layers in the next section). Arranging objects on a single layer, however, is very similar to tasks we perform every day as we stack and sort physical objects (our lives, for example, seem to revolve around stacks of paper).
Each layer in InDesign has its own stacking order and you can move an object to the front, or send an object to the back of the layer it occupies (see Figure 2-45). To bring an object to the front, Choose Bring to Front from the Arrange submenu (under the Object menu or the context menu). Or you can press Command-Shift-] / Ctrl-Shift-]. To send an object to the back, choose Send to Back from the Arrange submenu. Alternately, you can press Command-Shift-[ / Ctrl-Shift-[.
Figure 2-45 Bring to Front and Send to Back
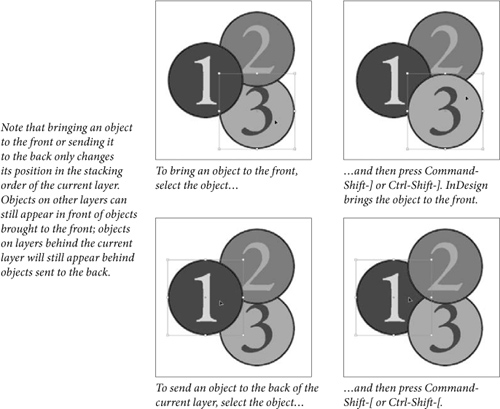
You can also choose to bring objects closer to the front or send them farther to the back in the stacking order of objects on a layer (see Figure 2-46). To bring an object closer to the front (in front of the next higher object in the stacking order), choose Bring Forward from the Arrange submenu (under the Object menu or the context menu) or press Command-] / Ctrl-]. To send an object backward, choose Send Backward or press Command-[ / Ctrl-[.
Figure 2-46 Bring Forward and Send Backward

Text Wrap and Stacking Order
In QuarkXPress, text wrap is affected by the stacking order of objects on the page. If a text box is above a wrapped object, the text avoids the text wrap area; if it’s behind/below the wrapped object, the text ignores the text wrap. While there is nothing inherently logical or intuitively obvious about this behavior, many people have gotten used to it.
To make InDesign behave this way, turn on the Text Wrap Only Affects Text Beneath option in the Composition panel of the Preferences dialog box. Once you’ve done this, the stacking order of objects on the page will have an effect on text wrap (see Figure 2-47).
Figure 2-47 Stacking Order and Text Wrap

For more on working with text wrap, see Chapter 6, “Where Text Meets Graphics.”
Layers
InDesign’s layers are transparent planes on which you place page items. You’ve probably heard that layers are a way to organize your publication (that’s what all the marketing materials say, after all). But there’s far more to InDesign’s layers than just organization—layers give you control over what parts of your publication display and print, and whether they can be edited or not.
Layers Basics
InDesign’s layers have a few characteristics you should understand before you start using them. First, layers affect an entire document—not individual pages or page spreads. Next, layers created in one document do not affect layers in another document. As far as we can tell, there’s no technical limit to the number of layers you can have in a publication; it’s possible to make hundreds or more of them if you have enough memory. But just because you can do that doesn’t mean that you should. Too many layers can make a publication difficult to manage.
Layers are especially useful when you’re working with pages containing slow-drawing graphics, when your publication features complicated stacks of objects, or when you want to add a nonprinting layer of comments or instructions to a publication. Layers are also helpful when you want to create “conditional” layers containing differing text or graphics (you could create multiple versions of the publication in different languages, for example, and store all of the versions in a single publication).
The Layers Panel
You use the Layers panel to create, edit, rearrange, and delete layers (see Figure 2-49). You can also use the Layers panel to hide, lock, and arrange objects on a layer, and to move objects in and out of groups. To display the Layers panel, choose Layers from the Window menu (or press F7). The Layers panel is chock full o’ features; let’s look at them one at a time.
New Layer. To create a new layer, click the New Layer button at the bottom of the panel or select New Layer from the Layers panel menu (see Figure 2-48). InDesign normally adds new layers above the layer selected in the Layers panel, but you can tell the program to add the layer immediately beneath the currently selected layer by holding down Command/Ctrl as you click the New Layer button. Hold down Command/Ctrl+Shift as you click the New Layer button to create new layers at the top of the panel.

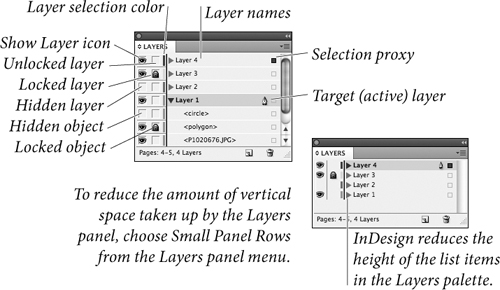
If you want to name the layer (we think you should) or change any other options, hold down the Option/Alt key when you click this button to display the New Layer dialog box. (You can also get to this dialog box by double-clicking the layer after creating it.) We cover the controls in this dialog box in “Layer Options,” below.
Delete Layer. Click the Delete Layer button to delete the selected layer or layers (to select more than one layer, hold down Command/Ctrl as you click each layer). If the layer you have selected contains objects, InDesign warns you that deleting the layer will delete the objects.
Collapse/expand arrows. Click the down arrow next to a layer to display the objects that are on that layer and on the current spread. You can hide, lock, and arrange objects on layers (see Figure 2-50).
Figure 2-50 Arranging, Hiding, and Locking Objects within a Layer

You can also click the down arrow next to a group of objects to display the objects that make up that group. You can drag other objects into that group to make it part of the group, and you can drag objects out of the group.
Show/Hide column. When you see an “eye” icon in the left-most column of the Layers panel, that layer or object is visible. When there’s no icon next to a layer in this column, all of the objects on the layer are hidden (invisible). If there’s no icon next to an object, that object is hidden. Click once in this column to change from one state to another. You can’t select or edit objects on hidden layers, and objects on hidden layers don’t print.
Often, you want to hide all the layers in a publication except one. It’s easy: hold down Option/Alt as you click in that layer’s Show/Hide column (or choose Hide Others from the Layers panel menu). Clicking again in the column while holding down Option/Alt will show all layers, which is equivalent to choosing Show All Layers from the Layers panel menu (see Figure 2-51). Use the same Option/Alt trick to show or hide all the objects in a layer except one.
Figure 2-51 Showing and Hiding Other Layers

Lock/Unlock column. Click in the second column to lock a layer or object. InDesign displays the “lock” icon in that column. To unlock the layer or object, click the icon.
You can’t select objects on locked layers (so you can’t move or format them, either), and you can’t assign objects to locked layers. When you want to lock all of the layers in a publication except one, hold down Option/Alt and click in the lock/unlock column (or choose Lock Others from the Layers panel menu). To unlock every layer, hold down Option/Alt and click the lock/unlock column (this is the same as choosing Unlock All Layers from the panel menu).
Target layer icon. The target layer icon (it looks like a little fountain pen nib) shows you which layer is the “target layer”—the layer on which InDesign will place any objects you create, import, or paste. Making a layer the target layer does not assign any currently selected objects to that layer.
Selection Proxy. When you select an object on your page, InDesign highlights the name of the layer containing the object and sets that layer as the target layer. In addition, InDesign displays a small square to the right of the layer name. This square is the Selection Proxy, which represents the layer or layers containing the selected objects (just as the proxy in the Transform panel “stands in” for the bounding box of the selection). To move objects from one layer to another, drag the Selection Proxy to another layer (see Figure 2-52).
Figure 2-52 Moving an Object to a Layer

While this method of moving objects from one layer to another makes it difficult to accidentally move objects, it also makes it difficult to move objects from multiple layers to a single layer. To accomplish this, you’ll have to make multiple trips up and down the Layers panel, selecting and moving the proxy for each layer in the selection.
Note that you can also copy an object from one layer to another by holding down Option/Alt and dragging the Selection proxy. Plus, you can even move objects to a locked or hidden layer—to do this, press Command/Ctrl as you drag the selection proxy to the layer. To copy objects as you move them to a hidden or locked layer, hold down Command-Option/Ctrl-Alt as you drag.
Layer Options
Here’s a quick rundown of each of the controls in the New Layer and Layer Options dialog boxes.
Layer name. InDesign assigns a default name to each layer you create, but we think it’s better to enter a layer name that means something in the context of your publication. It’s far easier to remember that the enormous, slow drawing image of grazing Herefords is on the layer you’ve named “Big Slow Cows” than it is to remember that you’ve placed the image on the layer named “Layer 51.”
Layer color. Each layer has its own color that helps you see which objects are on which layers. When Show Frame Edges (in the View menu) is turned on, InDesign uses the layer color for the outlines of frames and other objects. When you select an object, its selection handles appear in the selection color of that layer. If you don’t pick a color yourself, the program picks one for you automatically. To change a color later, either double-click a layer in the Layers panel, or select a layer and choose Layer Options from the Layers panel menu. We have never felt the need to change a layer’s selection color in an actual project, but it’s nice to know that you can.
Show Layer. Should the layer be visible, or hidden? This option performs the same task as the show/hide column in the Layers panel.
Lock Layer. Should the layer be locked or unlocked? This option performs the same task as the lock/unlock column.
Show Guides. Remember that you can put ruler guides on layers. But should those guides be visible or hidden? If you want to hide just this layer’s guides, turn off the Show Guides option.
Lock Guides. Should the guides on this layer be locked or unlocked? By default they’re unlocked; turn this option on to lock ’em.
Suppress Text Wrap When Layer is Hidden. People complained to high heaven because InDesign 2 couldn’t turn off the text wrap on objects that were on hidden layers. Fortunately, now you can. This is helpful if you’re trying out a number of different designs, each on its own layer. As you hide a layer, you don’t want its graphics to affect the other layers!
Paste Remembers Layers. This option doesn’t appear in the Layer Options dialog box; rather it’s in the Layers panel menu. The Paste Remembers Layers option takes care of a question: “If I copy objects from several layers and then paste, where should the pasted objects end up?” Should they be placed on the target layer (in a stack corresponding to their layer order)? Or should they be placed on the layers they originally came from?
We think you’ll turn this option on and leave it on. If you do this, you’ll be able to copy layers between publications. To do this, select objects on different layers in one publication, then copy them, and then switch to another publication and paste. When you paste, the layers will appear in the publication’s Layers panel.
If layers with the same names already exist in the publication, InDesign moves the incoming objects to the corresponding layers, which is why you might want to turn the Paste Remembers Layers option off. If you don’t, and if the layer stacking order is not the same as it was in the publication you copied the objects out of, the appearance of the pasted objects might change.
Deleting Layers
To delete a layer, select the layer and choose Delete Layer from the Layers panel menu or click the Delete Layer button. As we noted earlier, if there are any objects on the layer, InDesign warns you first (because deleting a layer also deletes its objects). To delete all of the unused layers (layers that have no objects assigned to them) in a publication, choose Delete Unused Layers from the Layers panel menu.
Changing Layer Stacking Order
To change the stacking order of layers, drag the layer up (to bring the layer closer to the front) or down (to send the layer farther to the back) in the Layers panel. As you drag, InDesign displays a horizontal bar showing the position of the layer. When the layer reaches the point in the list at which you want it to appear, stop dragging and InDesign moves the layer (and all the objects on it) to a new location (see Figure 2-53).
Figure 2-53 Changing Layer Stacking Order

Merging Layers
To combine a series of layers into a single layer, select the layers and then choose Merge Layers from the Layers panel menu. InDesign merges the layers into a single layer—the first layer you selected (see Figure 2-54). Note that merging layers sometimes changes the stacking order of objects on the merged layers.
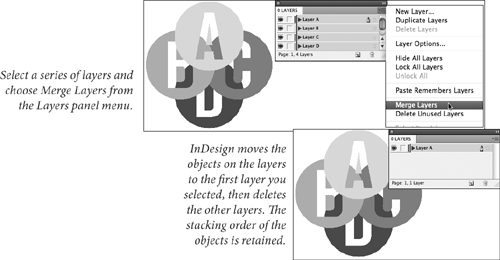
Moving Layers from One Publication to Another
To move a layer from one publication into another publication, make sure you’ve turned on the Paste Remembers Layers option (on the Layers panel menu), then copy an object from that layer and paste it into the publication that lacks that layer. When you paste, InDesign adds the layer to the list of layers.
Here’s a bonus tip: You can select all the objects on a layer by Option/Alt-clicking on the layer in the Layers panel. Now you can copy and paste these objects to copy the contents of the layer to another document.
Layers and Master Pages
In older page layout software (such as QuarkXPress or PageMaker), objects on master pages are always displayed behind document page objects. This means that page numbers often end up being hidden by items on your document pages, and that you may have to copy the master page item to your document page to get it to display or print.
In InDesign, objects on master pages are arranged according to their layer. This means that you can put page numbers on the uppermost layer without worrying about them being obscured by images or other page items on the document pages.
Grouping Objects
What does it mean to “group” objects in a page layout program? When you group objects, you’re telling the application to treat the objects as a single object. The objects in the group move and transform (scale, skew, and rotate) as a unit.
To group the objects in a selection, press Command-G/Ctrl-G (or choose Group from either the Object menu or the context menu). Note that you can’t have objects in a group when they’re each on different layers, so when you group the objects, the group moves to the top-most layer of the selection (see Figure 2-55). To ungroup a selected group, press Command-Shift-G/Ctrl-Shift-G (or choose Ungroup from the Context menu or the Object menu).
Figure 2-55 Grouping and Ungrouping Objects

To select (or “subselect”) an object inside a group, double-click the object using the Selection tool. By the way, don’t forget that you can group together groups—each group acting as a single object in the larger group.
An easy way to add objects to an existing group is using the Layers panel. Use the Layers panel to drag items into and out of groups. You can’t group objects from different layers.
Locking Object Positions
When you want to keep somebody from changing the location of an object, you can lock it by selecting it and then pressing Command-L/Ctrl-L (or choose Lock from the context menu or the Object menu). When an object is locked, the Prevent Selection of Locked Objects option in General preferences determines whether you can select it. If this option is turned on, you can’t select locked objects. Just click the lock icon to unlock it, or choose Unlock All on Spread from the Object menu. If the option is turned off, you can select an object, but you can’t change its position on the page or pasteboard. You can, however, move the object to another layer (we’re not sure why; perhaps it’s a bug). When you try to drag a locked object, the cursor turns into a “padlock” icon (see Figure 2-56).
Figure 2-56 Locking and Unlocking Objects

You can also lock the layer that contains the object (see “Layers,” earlier in this chapter). Unfortunately, even graphics and text on locked layers can still be changed if you try hard enough: changes made with the Find/Change panel and the Links panel can still affect locked objects and layers (which is usually what you want, anyway).
Deleting Objects
Deleting objects on your page is simple: Just select one or more items with the Selection or Direct Selection tools and press the Delete key. If you want a slower method, choose Clear from the Edit menu instead. If you’re really trying to kill time, and you’re using the Mac OS, you can drag the object from the page into the operating system’s Trash icon. Why? Because you can.
Finding and Changing Objects
Have you ever had a client/boss/whatever look at your near-final layout and express a need to make vast, far-reaching changes in the color, stroke weight, or other attributes of the graphic elements on the pages? Have you ever spent the night clawing your way through a document, changing fills and strokes to meet their unreasonable requests?
We have, so we’re very happy that InDesign can now find and change objects by their formatting (and other) attributes, just as we can find and change text. (Actually, we now make extensive use of object styles, so our threshold of pain is a little higher than it once was, but the addition of object find/change is still welcome.)
To find and change objects by their attributes, follow these steps (see Figure 2-57).
1. Press Command-F/Ctrl-F to display the Find and Change panel. Click the Object tab if it is not already active.
2. Click the Specify Attributes to Find button to display the Find Object Format Options dialog box. Work your way through the various panels of this dialog box to define the attributes of the object you want to find. Click the OK button to close the dialog box.
3. Click the Specify Attributes to Change button to display the Change Object Format Options dialog box. Work your way through the various panels of this dialog box to set the formatting you want to apply to the objects you find. Click the OK button to close the dialog box.
4. At this point, you can do either of the following:
• You can choose to have InDesign change the formatting of all of the qualifying objects by clicking the Change All button.
• You can find each occurrence of the formatting you specified and decide whether to replace it or not. To do this, click the Find button, view the found object, and then click the Find Next, Change, or Change/Find button. The Find Next button moves on to the next instance of the formatting without making any changes; the Change button replaces the formatting of the found object and waits to see what you’ll do next. The Change/Find button replaces the object, then finds the next instance.
Figure 2-57 Finding and Changing Object Formatting
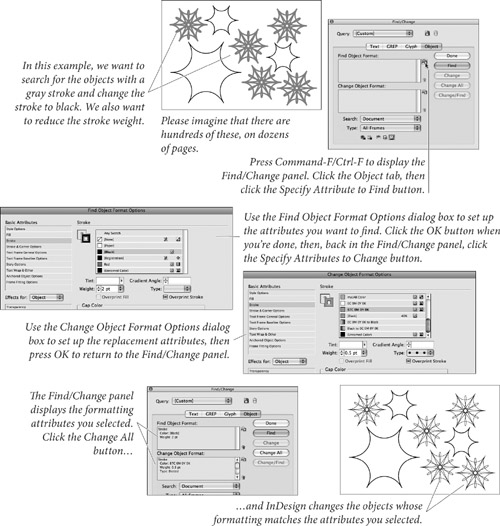
A Good Foundation
Being methodical every now and then can save a lot of trouble later. Setting up master pages, defining layers, creating layout grids and ruler guides are not the most glamorous parts of InDesign, but they’re a good place to spend a little organizational energy. Far from cramping your creative style, paying attention to basic layout options—at the very beginning of the production process, if possible—sets the stage on which you produce and direct the play of your publications.