
In the previous chapter, we discussed a recipe to develop a visualization extension in Qlik Sense by writing the code manually in the .js and .qext files. One of the easier methods to develop extension visualization in Qlik Sense is using Extension editor in Qlik Dev Hub.
A Qlik Dev Hub is an integrated development toolbox used for building visualizations and mashup websites. It does not come with a separate installation package, but the editor and the API libraries are provided with Qlik Sense Desktop.
The previous recipe has explained all the basics of the Dev Hub. This recipe will introduce the user to the process of building a basic chart extension using Extension editor in Qlik Dev Hub. The extension workbench supports the .js, .qext, .css, and .html formats.
For the purpose of this recipe,we will make use of an inline data load which gives the sales information for four countries:
- Create a new Qlik Sense application and call it
QS_DevHub_Extensions. - Load the following script in the application:
Sales:
LOAD * INLINE [
Country, Sales
USA, 1000
UK, 2000
France, 3000
Germany, 4000
];
- Save the application at this point and move on to build the visualization using Extension editor.
- Before starting Extension editor, make sure you have Qlik Sense Desktop running in the background.
- Open Qlik Dev Hub using the following URL:
http://localhost:4848/dev-hub
- Click on the
 button available in the left-hand side pane of Qlik Dev Hub.
 - A new Extension editor window opens. Click on the menu dropdown
 on the toolbar.
 - Now, click on
 to create a new project.
 - Name the new visualization as
QlikDevHub_Extension. - Under Template, select Chart template and click on
 :
:

- This opens up the tabs for the JavaScript,
.qext, and other related files for the extension. If we want to get added functionalities in the extension, we can modify the JavaScript code here as per requirements. - As seen, the editor has automatically created the mandatory files and the script required for the extension.
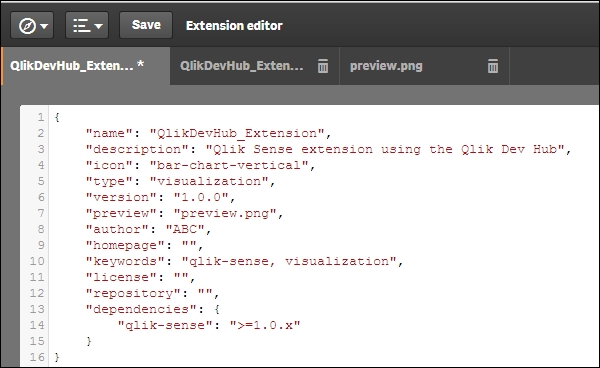
- Edit the script on the
QlikDevHub_Extension.qexttab as follows:"description": "Qlik Sense extension using the Qlik Dev Hub", "author": "<User Name>"
- The result of the preceding code will look like this:
- The
QlikDevHub_Extension.jstab contains the JavaScript required for rendering the visualization. One can edit this tab if required to do so. - Save and close the window.
- Open the
QS_DevHub_Extensionsapplication we created in step 1 of the Getting ready section in Qlik Sense Desktop. - Create a new sheet and enter the Edit mode by clicking on
 .
. - The
QlikDevHub_Extensionextension object is now available in the Assets panel on the left. Drag the extension onto the sheet. - Add Country as a dimension.
- Add the following measure:
Sum (Sales)
- Name the chart as
Sales by Country. - The resultant chart would be as follows:

The Qlik Sense Extension editor provides JavaScript APIs, which consist of a number of methods and properties to build the custom visualizations. The editor autogenerates the mandatory files required for the extension to work.
If we want to define custom styles for our visualization, we can do so by using one or more CSS files. The content for the CSS files first need to be loaded to the document's header or alternatively added as a link to a style sheet to the document's header. Styles can also be defined using the RequireJS CSS plugin.
Additional files such as .css, .js, and .html can be added using the ![]() button located at the top-right hand corner of the Extension editor workspace:
button located at the top-right hand corner of the Extension editor workspace:
