As you have already seen in numerous examples in this book, to create applications of any degree of complexity, a computer program needs a way of evaluating different values in order to determine a logical direction in which to proceed. This is done through the use of conditional programming statements that use mathematical, comparison, and logical operators in order to compare different values and decide upon a course of action. By implementing conditional logic, you can create applications that react differently based on the data they are presented with. This will not only provide an interactive user experience but also results in programs that are adaptive enough to handle different types of situations. In addition to learning the fundamentals of conditional programming logic, this chapter also steps you through the development of your next computer game, the Rock, Paper, Scissors game.
Specifically, you will learn how to
Use the
if...thenstatement to set up different types of logical testsUse
if...thenstatements within one another in order to create more complex logicUse the
select casestatement to compare one condition against a range of possible valuesUse mathematical operators to perform arithmetic calculations
Use logical operators to combine comparison operations
In this chapter you will learn how to create a new computer game called the Rock, Paper, Scissors game. This game is a computerized implementation of a classic children’s game. In this game, the player is pitted against the computer. Valid moves are Rock, Paper, and Scissors. The player chooses her move by choosing a selection from a combobox control and then clicking on a button control labeled Go. As soon as the player’s turn has been completed, the game generates the computer’s move by randomly generating a number between 1 and 3 and then associating that number with a move. The winner of each game is determined according to the following set of rules.
Rock crushes scissors to win the game
Paper covers rock to win the game
Scissors cut paper to win the game
Matching moves result in a tied game
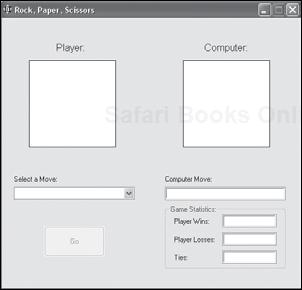
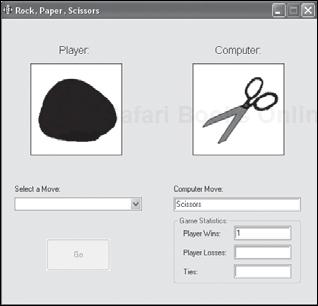
Figure 5.1 shows how the game appears when first started. The game is played on a single window containing two graphicbox controls and a combobox control, as well as three textbox controls and a button control.
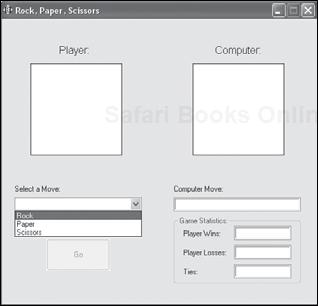
The player moves by selecting one of three choices from the game’s combobox control, as demonstrated in Figure 5.2. Notice that the Go button is disabled. The game will enable it as soon as the player selects a move.
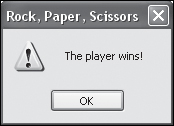
As soon as the player completes her move, the game generates the computer’s move and then analyzes and displays the result of the game in a popup dialog, as demonstrated in Figure 5.3.
As you can see in Figure 5.4, graphic images are displayed that visually identify both the player’s and the computer’s move each time a new game is played.
In Chapter 3, when you developed the Legend of Mighty Molly game, every programming statement in that game’s program file was executed sequentially, starting with the first statement in the program and ending with the last statement. This worked well for that game because there was no complex logic involved. The game simply asked the player a few questions and then plugged whatever input was provided into text strings that were then displayed a screen at a time as the story was told. While appropriate for simple programs, sequential processing is insufficient for applications that have any level of complexity or which need to interact with the user.
Most applications require some level of conditional execution. For example, a program that displays a graphical user interface and accepts user input may need to analyze that input and validate it. If the data is good, the program would then execute a given set of programming statements. However, if there was something wrong with the data input, a totally different set of programming statements might be executed. Another example of how conditional logic might be applied is a program that retrieves data from a file and then processes that data in some way. The program statements that are executed after the file is opened might vary based on whether the file had any data in it as well as the different types of data found inside the file.
Conditional logic is a relatively easy concept to understand, since we use it all the time in our everyday lives. For example, any time you visit the grocery store and consider which of two types of peanut butter to purchase, you are deciding between two distinct courses of action, as depicted in Figure 5.5.
Based on the value of the condition being tested (e.g., whether or not to buy plain peanut butter), either of two possible courses of action is outlined. Fundamentally, this same type of logic can be applied to a computer program, as demonstrated in Figure 5.6
Hint

Figures 5.5 and 5.6 are examples of simple flowcharts. A flowchart is a graphical depiction of all or part of a program’s logical flow. Programmers often use flowcharts to outline the overall design of the logic involved in designing a computer program. This provides them with a high-level overview of the overall logic involved and provides an opportunity to discover potential logical errors before any mistakes are made in writing program code.
Flowcharts are also useful for large projects that involve more than one programmer because they can be used to identify different parts of an application which can then be more easily divided up, with each programmer having a good understanding of the work that is expected of him.
Here, either of two distinct courses of action is outlined based on the user’s decision of whether or not to quit the application. This flowchart view of the logic behind the decision of whether or not to terminate a computer programmer can be directly translated into program code, as demonstrated here:
confirm "Are you sure you want to quit?"; answer$

  if answer$ = "yes" then 'The player clicked on Yes

    close #play 'Close the #play window
    end 'Terminate the game

  else

    noOfTurns = 0
    call startNewGame

  end if
Here, the confirm command is used to display a text message in a popup dialog window that prompts the player for confirmation before terminating the application. The player indicates her decision to keep playing by clicking on the Yes button, in which case the close and end commands are then executed. Alternatively, the player can click on the No button, in which case the application would continue to execute.
The key to understanding how programming languages apply conditional logic when analyzing data and determining which particular course of action should be taken is that at its core, conditional logic involves an evaluation as to whether a condition is true or not. Based on the result of this analysis, conditional logic results in the execution of either of two possible outcomes (one for true and one for false).
Just BASIC provides programmers with access to two different conditional logic statements, listed next, each of which is designed to address specific types of situations.
if...then—. This statement tests a condition and then alters the execution flow of an application based on the result of its analysis.select case—. This statement is used to set up a series of conditional tests, each of which is compared to a single value. The programming statements associated with a test that evaluates as being true are executed while the programming statements associated with tests that evaluate as being false are not processed.
The if...then statement is so fundamental to the development of software programs that it is virtually impossible to write any but the most simple program without using it. In fact, you have already seen assorted variations of the if...then statement at work in the computer games that you have developed in this book. To get a good understanding of the mechanics involved in the application of the if...then statement, consider the following example.
if The big game comes on at 8pm then
 I'll stay up and watch it
else
  I'll read for a while
  I'll try to get to sleep by 9pm
end if
This pseudo code (English-like outline) shows how the if...then statement can be applied to analyzing a typical every day situation. Here, the opening statement defines the condition being evaluated. The second statement shows the action to be taken in the event the condition evaluates as being true. The statements following the else keyword outline the actions that will be taken in the event that the condition evaluates as false.
Hint
Pseudo code is a term that refers to an English-like outline of all or part of the programming logic that makes up a computer program. By outlining the high-level programming logic required in pseudo code, programmers develop an outline that can be followed when writing actual program code. As such, it gives programmers the chance to focus on the logic required to solve a problem without having to worry about the specific programming statements required to implement it. When used this way, a pseudo code outline can simplify application development and help to reduce programming logic errors.
The if...then statement has a very flexible syntax that allows programmers to implement it in many different formats. The syntax of the if...then statement, as implemented in Just BASIC, is outlined here:
if condition then
     statements
else
   statements
end if
condition represents the expression to be tested. statements represents one or more code statements that will be executed based on the truth or falseness of the test. else is an optional keyword that allows programmers to specify an alternate set of programming statements to be executed when the condition being tested evaluates as being false. The if...then statement can be used in many different variations, including:
Single line
if...thenstatementsMultiple line
if...thenblocksif...then...elseblocks
In its most basic form, the if...then statement can be written on a single line, as demonstrated here:
x = 10
if x = 10 then notice "We have a match."
Here a numeric variable named x is assigned a value of 10. Next, an if...then statement is set up that checks to see if x equals 10, which of course it does. Therefore, the notice command is executed. If the value of x were changed prior to the if...then statement to something other than a value of 10, then the if...then statement would evaluate as being false and the notice command would not be executed.
You have already seen the single-line version of the if...then statement used in this book. For example, back in Chapter 3 when you created the BASIC Crazy 8 Ball game, you used a series of single-line if...then statements to analyze the value of the game’s randomly generated number, as shown here:
RandomNumber = int(rnd(1)*3) + 1

if RandomNumber = 1 then answer$ = "YES"
if RandomNumber = 2 then answer$ = "MAYBE"
if RandomNumber = 3 then answer$ = "NO"
Here a random value was assigned to a variable name RandomNumber. Three if...then statements were then executed in order to determine whether the value assigned to RandomNumber was 1, 2, or 3. Only one of these three statements will result in a value of true. The matching test results in the assignment of a value to a variable named answer$.
Trap
Take note that the closing end if keywords are not included at the end of each of these three if...then statements shown above. This is because in the single-line version of the if...then statement, adding the closing end if keywords results in an error.
An advantage of using the single-line if...then statement is that it allows you to set up simple conditional tests that do not require the specification of an action in the event they evaluate as being false. This helps to streamline your program code and make it easier to read.
The single-line version of the if...then statement is good for writing streamlined code that only needs to perform a single action when a given conditional evaluates as being true. However, the multi-line version of the if...then statement allows you to define a code block made up of as many code statements as you want that will be executed in the event the condition being evaluated proves true, as demonstrated here:
x = 10
if x = 10 then
     x = x + 1
     notice "x equals "; x
end if
Here, two programming statements are executed when x evaluates as being equal to 10. The first statement increments the value of x by 1 and the second statement displays x’s new value in a popup dialog.
Hint
Instead of identifying the code block associated with an if...then statement using the then and end if keywords, some programming languages, such as Perl and C++, use curly braces, as demonstrated here:
if (x = 10) {
  Code block statements go here
}
You have seen other examples of the multi-line if...then statement in action already in this book. For example, in Chapter 4 when you developed the Ask Mustafa game, you used a multiline if...then statement to conditionally display a hint. The hint was displayed only after the confirm command was used to prompt the player to click on the Yes button in order to re-confirm the request to display the game’s hint, as shown here:
confirm "Hints are for wimps! Are you sure you want one?"; answer$

if answer$ = "yes" then 'The player clicked on Yes

  notice "Ask Mustafa" + chr$(13) + "Mustafa hates repetition. Ask " _
    + "him the same question over again and he'll start giving you " _
    + "the information you want."

end ifThe single and multi-line versions of the if...then statements that were just examined were set up to only execute code statements in the event that the tested conditions evaluated as being true. However, the if...then statement becomes even more useful when you add the optional else keyword, thus specifying an alternative set of code statements to be executed when the tested conditional evaluates as being false. An example of this type of if...then statement is provided here:
prompt "How old are you?"; age

if age < 18 then
  notice "You must have you parent's permission to play."
  end
else
  notice "Thanks for choosing to play this game!"
 'Insert additional programming statements here
end if
Here, the prompt command has been used to query the user for her age. If the user responds by entering a number less than 18, she is informed that she needs her parent’s permission to play. Once the user closes the popup dialog, the end command is executed, terminating the application. If, on the other hand, the player responds by entering a value of 18 or more, a thank you message is displayed.
Unfortunately, not every situation can adequately be addressed using the various combinations of the if...then statement that you have just examined. Sometimes you’ll need to perform one test and, based on the results of that test, perform another test and so on. Fortunately programming languages easily accommodate this need by letting you embed or nest one loop inside another, as demonstrated here:
if x = 10 then
  if y = 20 then
    if z = 30 then
      notice "All the stars are aligned! "
    end if
  end if
end if
In this example, a series of three conditional if...then statements have been set up. If the first statement evaluates as being false, the nested if...then statements are skipped. If the second if...then statement evaluates as being false, the third if...then statement is skipped.
Trap
You might be wondering if there is any limitation to the number of conditional statements that you can nest within one another. The answer is no. However, the deeper you nest statements within one another, the more difficult your application will be to read, understand, and maintain.
Nested if...then statements are really quite common. In fact, you have already used them in this book back in Chapter 1 when you developed the Knock Knock Joke game. As shown next, the Knock Knock Joke game used an embedded if...then...else statement to conditionally execute the display or error messages based on whether or not the player provided an expected response.
if response$ = "" then

  notice "Knock Knock Joke Game" + chr$(13) + _
    "Error: You must respond by entering 'Who is there?'"

else

  response$ = "Disease who?"

  prompt "Knock Knock Joke Game" + chr$(13) + "Disease!"; response$

  if response$ = "" then

    notice "Knock Knock Joke Game" + chr$(13) + _
      "Error: You must respond by entering 'Disease who?'"

  else

    notice "Knock Knock Joke Game" + chr$(13) + _
      "Disease this joke seem funny to you?"

  end if

end ifIn addition to the if...then statement, Just BASIC also supports the use of the select case statement. Although you can accomplish the same thing through the use of multiple if...then statements, the select case statement is better suited to situations in which you want to compare a single value or condition to a whole range of possible matching values. The syntax for the select case statement is shown here:
select case expression
  case value
    statements
         .
         .
         .
  case value
    statements
 case else
    statements
end select
As you can see, the select...case statement is used to create a code block that includes one or more case statements. The condition to be tested is specified at the end of the opening select case statement and each case statement specifies a unique value against which the select case statement’s expression is compared. If a match occurs in one of the case statements, the statements associated with that case statement are then executed. In the event that none of the case statements match the expression or value being evaluated, any statements associated with an optional case else statement are executed, if this statement was included.
Hint
Some programming languages like C and C++ don’t support the use of the select case statement, instead providing a switch statement. Some programming languages, including Perl and AppleScript, do not have an equivalent statement and instead rely solely on variations of the if...then statement to implement conditional logic.
To get a feel for the logic behind a typical select...case statement, take a look at the following pseudo code example.
select case game-time
 case If the big game comes on at 8pm, stay up and watch it
 case If the big game comes on at 9pm, stay up and watch the first half
 case If the big game comes on at 9pm, stay up and just watch the pre-game show

 case else Read for a while and get to sleep by 9pm
end select
In this pseudo code example, you can see that three case statements have been set up to evaluate different conditions against a single value (game-time). If one of the case statements proves to be true, its associated code block is executed. In the event that none of the case statements results in a match, the case else statement executes.
Typically, you will find that you’ll need fewer code statements to lay out a select case statement than you will to lay out the equivalent series of tests using if...then statements. As a result, your program code will be easier to understand and maintain.
You will get the opportunity to work with the select case statement again in this chapter when you develop the Rock, Paper, Scissors game. Specifically, you will use three case select statements to analyze the game’s results and determine a winner. As a sneak peak, take a look at the following statements, which analyze the results of a game in which the player selects Rock as her move.
if playerMove$ = "Rock" then
    select case
    case computerMove$ = "Rock"
        result$ = "Tie!"
        ties = ties + 1
        print #play.textbox4, ties
    case computerMove$ = "Paper"
        result$ = "The computer wins!"
        losses = losses + 1
        print #play.textbox3, losses
    case computerMove$ = "Scissors"
        result$ = "The player wins!"
        wins = wins + 1
        print #play.textbox2, wins
    end select
  end if
As you can see, the select case statement has been set up inside an if...then statement that executes only when the player’s move is a Rock. This select case statement has been set up a little differently this time. Instead of specifying an expression or value at the end of the select case statement, each case statement has been set up to evaluate its own expression. This example demonstrates the versatility of the select case command. If you prefer, you could rewrite the above code statements as shown next and achieve exactly the same result.
if playerMove$ = "Rock" then
    select case computerMove$
    case "Rock"
        result$ = "Tie!"
        ties = ties + 1
        print #play.textbox4, ties
    case "Paper"
        result$ = "The computer wins!"
        losses = losses + 1
        print #play.textbox3, losses
    case "Scissors"
        result$ = "The player wins!"
        wins = wins + 1
        print #play.textbox2, wins
    end select
  end if
Here, the variable computerMove$ has been added to the end of the select case statement, and each case statement has been rewritten to check for a specific string match.
So far, I have restricted all of the comparison operations that you have seen in this book to equality tests using the = operator. Like all programming languages, Just BASIC provides a number of different comparison operators, providing programmers with the ability to set up comparisons for ranges of data. For example, rather than set up a test to determine if the value of x was equal to the value of y, you might instead want to check and see if the value of x was greater than y. This type of comparison is achieved through the use of comparison operators. Just BASIC supports a number of different comparison operators, as outlined in Table 5.1.
Table 5.1. Just BASIC Comparison Operators
Operator | Description |
|---|---|
= | Equal |
< | Less than |
> | Greater than |
<= | Less than or equal to |
>= | Greater than or equal to |
<> | Not equal |
Hint
Most programming languages, including Just BASIC, use the equals (=) sign to perform an equals comparison. However, some programming languages, including C++ and Perl, use two equals signs (==).
To see a few examples of how you might use the different comparison operators listed in Table 5.1, take a look at the following examples.
x = 10
y = 20

if x = y then notice "x equals y"                      'false
if x > y then notice "x is greater than y"             'false
if x <= y then notice "x is less than or equal to y"   'true
if x <> y then notice "x and y are not equal"          'true
Here, two numeric variables have been defined and assigned values. Next, four if...then statements have been set up that perform a number of different comparisons.
Like other programming languages, Just BASIC supplies programmers with a collection of mathematic operators, which can be used to perform calculations on numeric data. For example, using the + operator you can add any two numbers together, as demonstrated here:
x = 5 + 10 'x now equals 15
You can also use Just BASIC’s mathematic operators to work with numeric variables just as easily as literal numeric data, as shown here:
x = 5
y = 10
z = y – 5 'z now equals 15
Anyone who has ever worked with a calculator should easily recognize Just BASIC’s mathematical operators, which are outlined in Table 5.2.
Hint
Just BASIC only supports binary operators. However, many programming languages such as C++ and Visual Basic also support unary operators. A unary operator is an operator that works with a single value. For example, two of the most commonly used unary variables are the ++ and -- operators. These operators are used to decrement and increment the value of a numeric variable by one. For example, in Just BASIC you would increment the value assigned to a numeric variable using the + binary operator, as demonstrated here:
x = x + 1
While you could increment the value assigned to a variable in the exact same way in a Visual Basic application, it’s more common to instead use the ++ unary operator, as shown here:
x = x++
Like all programming languages, Just BASIC evaluates numeric expressions based on a predefined set of rules, often referred to as order of precedence. Table 5.3 outlines the order of precedence followed by Just BASIC.
Table 5.3. Just BASIC Order of Precedence
Operator | Description |
|---|---|
^ | Exponentiation occurs first |
*, / | Multiplication and division occur second |
+, – | Addition and subtraction occur last |
Just BASIC calculates operators starting from left to right when cases of equal precedence occur. To help you understand how Just BASIC’s operator precedence works, consider the following statement.
x = 5 + 10 * 3 / 2 – 4 * 5
When executed, Just BASIC processes this statement as shown here:
Working from left to right, all multiplication and division operations are completed, so 10 is multiplied by 3 yielding a value of 30. This value is then divided by 2 yielding a value of 15. Next, 4 is multiplied by 2 yielding a value of 8.
At this point, based on the calculations already performed by Just BASIC, the statement has been processed and simplified as shown here:
x = 5 + 15 – 8
Next, addition and subtraction occur, so 5 is added to 15 yielding 20, from which 8 is then subtracted. The final result is that
xis assigned a value of 12.
Sometimes programmers need to be able to control the order in which expressions are evaluated in a manner that is contrary to a programming language’s pre-defined order of precedence. Using parentheses to identify portions of an expression that you want to be calculated first does this. To see how this works, take a look at the following statement.
x = (5 + 10) * 3 / (2 – 4 * 2)
As you can see, this statement is almost identical to the previous example, except that two sets of parentheses have been added. As a result, the expression is evaluated differently, resulting in a completely different answer, as explained below.
Working from left to right, anything embedded inside parentheses is calculated first. So 5 is added to 10 yielding 15, and then 4 is multiplied by 2 and subtracted from 2 yielding –6.
At this point, based on the calculations just performed, the statement has been processed and simplified as shown here:
x = 15 * 3 / (–6)
Once everything within parentheses has been calculated, multiplication and division are performed on a left to right basis. As a result, 15 is multiplied by 3 yielding 45, which is then divided by –6, yielding a final value of –7.5.
In addition to comparison and mathematic operators, most computer languages also support a group of operators known as logical operators. Just BASIC supports four logical operators, as outlined in Table 5.4.
Table 5.4. Just BASIC Logical Operators
Operator | Type | Example |
|---|---|---|
and | Both comparisons must be true in order for the evaluation to be True | x > 5 and x < 10 |
or | One or both comparisons must be true for the comparison to be True | x = 5 or x = 10 |
xor | To evaluate as being true, only one comparison can evaluate as being True | x = 5 xor x = 10 |
not | Reverses the value of a comparison | not (x > 5) |
The first three operators listed in Table 5.4 provide programmers with the ability to combine different comparison operations. For example, the following set of comparison operations uses two if...then statements.
if x = 1000000 then
  if y = 2000000 then
    notice "We are rich!"
  end if
end if
Using the and comparison operator, you could rewrite the above example as shown here:
if x = 10000000 and y = 2000000 then
  notice "We are rich!"
end if
As a result of using the logical and operator, two lines of code have been removed and the overall logic being implemented is easier to read and understand.
Hint
Different programming languages may use different characters to represent logical operators. For example, in C and C++ the && characters are equivalent to the and operator in BASIC. Perl, on the other hand, works with both the && and and operators.
The fourth logical operator supported by Just BASIC allows programmers to set up logical comparison operators that reverse the test being performed, as demonstrated here:
if not  (x = 1000000)  then
  notice  "I  need a job."
end  if
Here, instead of checking to see if x is equal to 1000000, the if...then statement has been modified to reverse the condition being tested to looking to see if x is not equal to 1000000.
Okay. Now it is time to turn your attention back to the development of this chapter’s game project, the Rock, Paper, Scissors game. In this game you will develop a player versus computer version of the Rock, Paper, Scissors game. In doing so, you will get your first opportunity to put the combobox and groupbox controls to use. You will also make ample use of both the if...then and select case statements.
The design of the Rock, Paper, Scissors game will follow the same basic pattern we have been using for all preceding games. Namely, we’ll build it in a series of steps. This game will make use of several bitmap images representing different moves that the computer and player can make. Figure 5.7 shows what these three bitmap images look like. You will find copies of them available as part of the source code download file on this book’s companion website at www.courseptr.com/downloads.

Figure 5.7. Bitmap images used in the generation of the graphics displayed in the Rock, Paper, Scissors game.
You will create the development of the Rock, Paper, Scissors game in five steps, as outlined here:
The first step in creating the Rock, Paper, Scissors game is to create a new Just BASIC file and add the following statements to it. The first 11 lines shown next are comments that document the name of the application, its author’s name, and the creation date, as well as provide a brief description of the game. The last statement executes the nomainwin command in order to suppress the display of the mainwin window, which is not needed by the Rock, Paper, Scissors game.
' *************************************************************************
'
' Script Name: RockPaperScissors.bas (The Rock, Paper, Scissors Game)
' Version:     1.0
' Author:      Jerry Lee Ford, Jr.
' Date:        March 1, 2007
'
' Description: This game is a Just BASIC version of the classic children's
'              Rock, Paper, Scissors game.
'
' *************************************************************************

nomainwin 'Suppress the display of the default text window
The next step in the development of the Rock, Paper, Scissors game is the set up of a few global variables followed by the design of the game’s user interface. The code to accomplish this is shown next and should be added to the end of the script file.
'Declare three global variables used to keep track of game statistics
global wins, losses, ties

WindowWidth = 500 'Set the width of the window to 500 pixels
WindowHeight = 480 'Set the height of the window to 480 pixels

'The following array contains a list of valid game moves that will be
'displayed in the game's combobox control
moves$(0) = "Rock"


moves$(1) = "Paper"
moves$(2) = "Scissors"

'Load rock, paper, and scissors bitmap files into memory
loadbmp "rockImage", "C:images
ock.bmp"
loadbmp "paperImage", "C:imagespaper.bmp"
loadbmp "scissorsImage", "C:imagesscissors.bmp"

'Add a graphicbox controls in order to graphically represent the player's
'and computer's moves graphicbox #play.gboxPlayer, 45, 70, 144, 144
graphicbox #play.gboxComputer, 300, 70, 144, 144

'Use variables to store text strings displayed in the window
Instructions1$ = "Player:"
Instructions2$ = "Computer:"
Instructions3$ = "Select a Move:"
Instructions4$ = "Computer Move:"

'Define the format of statictext controls displayed on the window
statictext #play.statictext1, Instructions1$, 90, 40, 80, 20
statictext #play.statictext2, Instructions2$, 335, 40, 80, 20
statictext #play.statictext3, Instructions3$, 20, 260, 80, 20
statictext #play.statictext4, Instructions4$, 270, 260, 80, 20

'Add a combobox control to the window and load the contents of the
'moves$() array into it
combobox #play.combobox, moves$(), doubleClick, 20, 280, 200, 80

'Add a button control to the window
button #play.button1 "Go", PlayHand, UL, 70, 345, 100, 50

'Add a textbox control to the window (to display the computer's move)
textbox #play.textbox, 270, 280, 200, 22

'Add a groupbox control to the window (to group a collection of
'textbox controls)
groupbox #play.groupbox, "Game Statistics:", 270, 310, 200, 105
'Define the format of statictext controls displayed inside the groupbox
'control
statictext #play.statictext5, "Player Wins:", 285, 330, 70, 14
statictext #play.statictext6, "Player Losses:", 285, 360, 70, 14
statictext #play.statictext7, "Ties:", 285, 390, 70, 14

'Add three textbox controls and place them inside the groupbox control
textbox #play.textbox2, 365, 325, 90, 22
textbox #play.textbox3, 365, 355, 90, 22
textbox #play.textbox4, 365, 385, 90, 22

'Open the window with no frame and a handle of #play
open "Rock, Paper, Scissors" for window_nf as #play

'Set up the trapclose event for the window
print #play, "trapclose ClosePlay"

'Disable the button control to prevent the player from clicking on it
'until the player has selected a valid move
print #play.button1, "!disable"

'Set the font type and size for the specified statictext controls
print #play.statictext1, "!font Arial 12" 'Player label
print #play.statictext2, "!font Arial 12" 'Computer label

'Pause the application to wait for the player's instruction
wait
The first statement shown above defines three global variables, wins, losses, and ties. These variables are used throughout the application to keep track of and display game statistics. Next, the special variables WindowWidth and WindowHeight are set in order to specify the dimension of the game window. An array named moves$(), made up of three items, is then defined. The contents of this array will be used later in the application to populate the contents of the game’s combobox control.
Next, three bitmap image files are loaded into memory using the loadbmp command. These image files are stored in the computer’s C:Images folder. You will need to modify this file path if you decide to store them elsewhere. These image files will be displayed in either of two graphicbox controls when the game is run. The statements required to add the graphicbox controls are followed by the specification of four string variables that are then used by four statictext controls, which serve as labels for other interface controls.
The user interface’s combobox control is added next. Note that it has been set up to load the contents of the moves$() array and to call on a subroutine named doubleClick whenever the player selects a combobox item. A button control is then added and assigned a label of Go and an event handler of PlayHand. When clicked, this button’s event handler will generate the computer’s move and then compare it to the player’s move and determine who won the game.
Next, a textbox control is added that will be used to display a text string identifying the computer’s moves. A graphicbox control is then added to the user interface. It will be used to store three statictext controls, which are defined next. These controls will display win, loss, and tie game statistics while the game is running. The open command is then used to display the game’s window, displaying a title bar string of Rock, Paper, Scissors. The window has no frame, meaning that the player will not be able to resize it, and it is assigned a handle of #play.
The next statement sets up a trapclose event for the window, which will execute whenever the player tries to close the game. A print command is then used to disable the game’s button control. This control will remain disabled until the player selects a move from the combobox control in order to prevent the player from attempting to make a move without first selecting Rock, Paper, or Scissors. The print command is used to set the font type and size of the statictext controls over the two graphicbox controls (which graphically display images representing the player and computer turns). Lastly, the wait command is executed in order to pause application execution and give the player the chance to make a move.
In order to make a move, the player must select Rock, Paper, or Scissors from the combobox control dropdown list and then click on the Go button. In order to prevent the player from clicking on the button control without first making a valid move selection, the button control is disabled when the user interface is first loaded. It remains in this state until the player selects a move from the combobox, at which time the combobox control’s doubleClick event handler executes, calling on the doubleClick subroutine to execute. The code statements for this subroutine are shown next and should be added to the end of the program file.
'This subroutine enables the button control labeled Go when whenever the
'player selects a valid move
sub doubleClick handle$
  'Enable the game's button control
  print #play.button1, "!enable"

end sub
When called, this subroutine uses the print command to enable the button control, thus allowing the player to submit a move. Once the player’s move is made, the PlayHand subroutine is called (by the button control’s event handler). This handler is responsible for again disabling the button control, thus preventing the player from clicking on it until a new move is selected.
The code statements that comprise the PlayHand subroutine are shown next and should be added to the end of the program file. This subroutine is responsible for retrieving the player’s move, generating a move on behalf of the computer, and then analyzing the result.
Hint
The PlayHand subroutine is a rather large subroutine. To help make it more understandable, I have embedded comments liberally throughout the subroutine. In Chapter 7, “Improving Program Organization with Functions and Subroutines,” you will learn all about subroutines and functions, after which you will learn how to further organize programming logic into more manageable chunks of related programming logic.
'This subroutine is called when the player clicks on the Go button
sub PlayHand handle$

  'Retrieve the player's move
  #play.combobox "selection? playerMove$"

  'Use the flush command to prevent graphic images from being overridden
  print #play.gboxPlayer, "flush"
  print #play.gboxComputer, "flush"

  'Display a bitmap image representing the player's move
  if playerMove$ = "Rock" then
    print #play.gboxPlayer, "drawbmp rockImage 1 1"
  end if
  if playerMove$ = "Paper" then
    print #play.gboxPlayer, "drawbmp paperImage 1 1"
  end if

  if playerMove$ = "Scissors" then
     print #play.gboxPlayer, "drawbmp scissorsImage 1 1"
  end if

  'Use the rnd() function to retrieve a random number between 1 and 3 and
  'assign the result to a variable named RandomNumber
  RandomNumber = int(rnd(1)*3) + 1

  'Select the computer's move based on the value assigned to the
  'RandomNumber variable and display the appropriate bitmap image
  if RandomNumber = 1 then
    computerMove$ = "Rock"
    print #play.gboxComputer, "drawbmp rockImage 1 1"
  end if

  if RandomNumber = 2 then
    computerMove$ = "Paper"
    print #play.gboxComputer, "drawbmp paperImage 1 1"
  end if

  if RandomNumber = 3 then
    computerMove$ = "Scissors"
    print #play.gboxComputer, "drawbmp scissorsImage 1 1"
  end if

  'Use the flush command to prevent graphic images from being overridden
  print #play.gboxPlayer, "flush"
  print #play.gboxComputer, "flush"

  'Display a text string identifying the computer's move in the textbox
  'control
  print #play.textbox, computerMove$
  'See who won if the player picked Rock
  if playerMove$ = "Rock" then
    select case
    case computerMove$ = "Rock"
        result$ = "Tie!"
        ties = ties + 1
        print #play.textbox4, ties
    case computerMove$ = "Paper"
        result$ = "The computer wins!"
        losses = losses + 1
        print #play.textbox3, losses
    case computerMove$ = "Scissors"
        result$ = "The player wins!"
        wins = wins + 1
        print #play.textbox2, wins
    end select
  end if

  'See who won if the player picked Paper
  if playerMove$ = "Paper" then
    select case
    case computerMove$ = "Rock"
        result$ = "The player wins!"
        wins = wins + 1
        print #play.textbox2, wins
    case computerMove$ = "Paper"
        result$ = "Tie!"
        ties = ties + 1
        print #play.textbox4, ties
    case computerMove$ = "Scissors"
        result$ = "The computer wins!"
        losses = losses + 1
        print #play.textbox3, losses
    end select
  end if

  'See who won if the player picked Scissors
  if playerMove$ = "Scissors" then
    select case
    case computerMove$ = "Rock"
        result$ = "The computer wins!"
        losses = losses + 1
        print #play.textbox3, losses
    case computerMove$ = "Paper"
        result$ = "The player wins!"
        wins = wins + 1
        print #play.textbox2, wins
    case computerMove$ = "Scissors"
        result$ = "Tie!"
        ties = ties + 1
        print #play.textbox4, ties
    end select
  end if

  'Announce the winner
  notice "Rock, Paper, Scissors" + chr$(13) + result$

  print #play.button1, "!disable"  'Disable the button labeled Go

  print #play.combobox, "selectindex 0"  'Clear out the previous move

end sub
The PlayHand subroutine begins by retrieving the player’s move. This is done using the following command, which assigns the currently selected combobox item (string) to a variable named playerMove$.
#play.combobox "selection? playerMove$"
Now that the game knows the player’s move, it is time to generate the computer’s move and to display graphics representing both moves. These next two statements use the print command to execute the flush command for the game’s graphicbox controls, in order to prevent the image from being overwritten in the event the player moves another application window over the game’s window.
In order to determine which bitmap image to display to represent the player’s move, the game must analyze the player’s move. This is accomplished using a series of three if...then statements, each of which checks for a different move. Only one of these if...then statements will execute, displaying the appropriate bitmap image.
A random number between 1 and 3 is then generated and assigned to a variable named RandomNumber. A series of three if...then statements is then executed that examines the value assigned to RandomNumber and assigns a string to a variable named computerMove$, identifying the computer-assigned move. If RandomNumber equals 1, the computer is assigned a move of Rock. If RandomNumber equals 2, the computer is assigned a move of Paper. If RandomNumber equals 3, the computer is assigned a move of Scissors. In addition, the corresponding bitmap image is loaded using the print statement and the drawbmp command. To make sure that the graphic images representing the player’s and the computer’s move stick, the flush command is executed again for each graphicbox control. Also, the value assigned to the computerMove$ variable is displayed in a textbox control, thus explicitly identifying the computer’s assigned move.
At this point, both the player’s and the computer’s moves have been displayed. It is time to compare the two moves and determine a result. This analysis is accomplished using three if...then statements, each of which contains a select case statement. The first if...then statement is responsible for performing an analysis in the event the player’s move was Rock. The second if...then statement is responsible for performing an analysis in the event the player’s move was Paper, and the third if...then statement is responsible for performing an analysis in the event the player’s move was Scissors. The select case statements located within each if...then statement are responsible for comparing the computer’s assigned move against the player’s move in order to determine a winner. The following set of rules is applied when performing this analysis.
Rock crushes scissors to win the game
Paper covers rock to win the game
Scissors cut paper to win the game
Matching moves result in a tied game
Each time a win, loss, or tie occurs, the appropriate global variable is incremented (wins, losses, or ties) and the print statement is used to update the appropriate textbox control. Finally, the notice command is used to display a popup dialog that informs the player of the results of the game. The Go button is again disabled and the combobox control is reset by setting its index to zero, setting the game up for a new round of play.
The last set of statements that need to be added to the program file are those associated with the application’s trapclose event. These statements comprise the ClosePlay subroutine, which is executed whenever the player attempts to close the application window.
'This subroutine is called when the player closes the #play window
'and is responsible for ending the game
sub ClosePlay handle$

  'Get confirmation before terminating program execution
  confirm "Are you sure you want to quit?"; answer$

  if answer$ = "yes" then 'The player clicked on Yes

    close #play 'Close the #play window
    end 'Terminate the game

  end if

end sub
As you can see, the purpose of the ClosePlay subroutine is to get confirmation from the player before terminating the game. The confirm command is used to display a message requiring confirmation. If the player clicks on the popup dialog’s Yes button, the close command is used to close the #play window and the application is terminated using the end command. Otherwise, if the player clicks on the popup dialog’s No button, game play continues.
All right, if you have followed along with all the steps, then your copy of the Rock, Paper, Scissors game should be ready to go. Go ahead and test it out. As you play, make sure that the game correctly displays the appropriate graphics for both the player’s and computer’s moves. In addition, make sure that the data displayed in the groupbox control is being correctly tabulated. Once you are 100 percent confident that everything is working as it should, build a distribution package for your latest creation and give it to a few friends. Ask them to test it as well and to provide you with feedback as to what you might be able to do to make the game more enjoyable.
In this chapter you learned how to work with different variations of the if statement and the select case statement in order to implement conditional programming logic. You learned how to nest conditional statements within one another in order to develop more complex programming logic. You learned how to use mathematic operators in order to perform numeric calculations. You learned how to use comparison operators in order to perform conditions tests based on different types of equality. You also learned how to work with logical operators in order to set up programming logic that evaluates the combined results of different comparison operations before taking an action.
Before moving on to Chapter 6, “Using Loops to Process Data,” why don’t you take a little extra time to work on the Rock, Paper, Scissors game by tackling the following list of challenges.