Many programming languages like C++, Visual Basic, and REALbasic support the development of graphical user interfaces that provide users with a stimulating interactive experience. In addition, these programming languages provide programmers with the ability to take things a step further by integrating sound and graphics into desktop applications. Just BASIC also provides this same basic set of capabilities. In this chapter you will learn how to incorporate wave and MIDI sounds into your Windows applications. You will also learn how to draw custom graphics.
Specifically, you will learn how to
Work with the pen to draw lines and shapes
Configure pen color and size
Add text to your drawings
Play wave and MIDI files
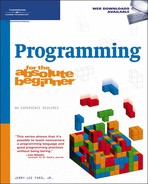
In this chapter you will learn how to create a new game that imitates the operation of a Las Vegas slot machine. Instead of putting coins into a slot and pulling on a lever, the player is assigned a bank account with a $20 balance and the virtual slot machine is played by clicking on a button labeled Spin. Figure 9.1 shows how the BASIC Slot Machine game looks when first started.
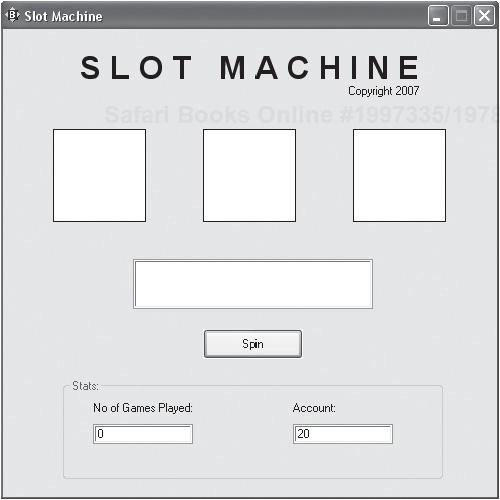
As you can see, the player’s account balance is displayed in a textbox control located at the bottom-right corner of the window. Each time the player clicks on the Spin button, the slot machine runs a brief animation sequence simulating the mechanical spinning of dials in the game’s three graphicbox controls. At the end of each spin, a random selection of three fruit is displayed, as demonstrated in Figure 9.2.
The result of the spin is then analyzed and the player’s account is adjusted accordingly. A jackpot wins the player $3. Two of a kind wins $1. A spin with no matches will cost the player $5.
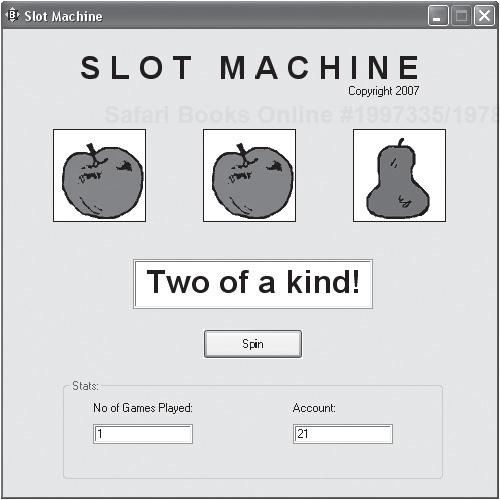
Figure 9.3 shows an example of how the game looks when the player gets a jackpot.
Figure 9.4 provides an example of a losing spin.
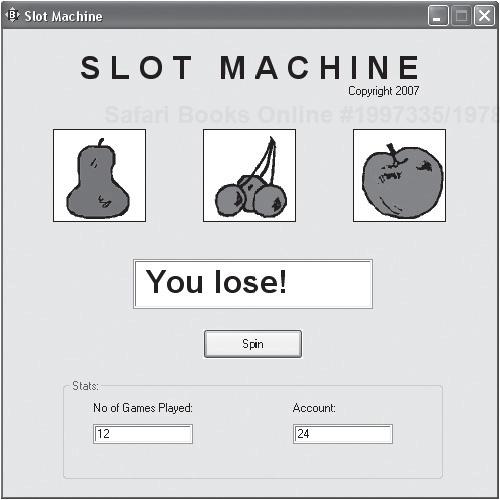
Figure 9.4. Five dollars is deducted from the player’s account if a spin ends with no matching fruit.
Game play can potentially last forever as long as the player continues to grow the balance in her account. However, play is immediately halted if the player goes broke.
In programming languages like Visual Basic and REALbasic, access to graphics commands is provided through the instantiation of a graphic object (these are object-oriented programming languages). Using methods (functions) and properties (attributes) associated with the graphic object and other related objects, programmers can incorporate custom graphics and animation into their applications. In the same manner, these programming languages provide programmers with the ability to instantiate objects whose methods and properties provide the ability to play sounds. For example, REALbasic applications are capable of playing audio files, generating musical notes, and even pronouncing speech using the operating system speach synthesizer.
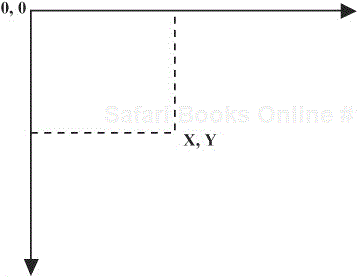
Just BASIC manages the display of graphics using a coordinate system that uses pixels to set the location and size of drawn images. This system of coordinates begins at 0, 0, which is located in the upper-left corner of the graphics window or graphicbox control, as depicted in Figure 9.5.
Hint

The term pixel, which stands for picture element, is the smallest addressable area on a control or window.
Just BASIC implements graphic support in the form of graphic commands that can be used in conjunction with the graphics window and the graphicbox control. In addition, Just BASIC provides a number of commands specifically tailored to playing and controlling the execution of wave and MIDI files.
You have already seen numerous examples of how to use the graphicbox control to display graphic bitmap files on Windows applications. This is accomplished by pre-loading any images that are to be displayed into the computer’s memory using the loadbmp command, as demonstrated here:
loadbmp "Star", "C:imagesStar.bmp"
Here a bitmap file named Star.bmp is loaded into memory and assigned a reference of Star.
Once loaded into memory, bitmap files can be displayed using graphicbox controls, as shown here:
graphicbox #play.Star, 100, 80, 93, 93
Here, the previously loaded bitmap file is displayed in a graphicbox control by referencing the file’s handle and specifying the starting coordinates (100, 80) and then its size in pixels (93, 93).
You have also learned that to make a graphic image stick after it has been displayed, you must execute the flush command.
print #play.Star, "flush"
In Just BASIC, drawing occurs in segments. A segment is a collection of drawing operations that have been executed since the last flush command. Once flushed, a segment can be redrawn in the event that a graphics window or graphicbox control needs to be repainted, as is the case when a window is minimized and later restored or when a window or control is temporarily overlaid by another window. Segments accumulate over time. Each time the flush command is executed, a new segment is generated. The first segment generated is assigned a segment ID of 1 and the segment ID assigned to each subsequent segment is incremented by 1.
You can retrieve the segment ID of the current segment using the segment command, as shown here:
print #handle "segment"; segmentID
Here, the segment ID of the current segment is retrieved and stored in a variable named segmentID. Once this command has been executed, you can delete the previously drawn segments using the delsegment command, as demonstrated here:
print #handle "delsegment"; segmentID - 1
By periodically removing unnecessary segments from computer memory, you can prevent any needless loss of resources and help keep the computer running efficiently.
Just BASIC supports a number of different types of drawing options, including:
Turtle Graphics. This type of graphic involves the creation of custom images drawn using Just BASIC graphic commands. These commands move a virtualized image around a graphics window or graphicbox control.
Shapes. This type of graphic involves the drawing of shapes by calling on Just BASIC’s graphic commands and passing them command coordinates representing the shape’s location and dimensions.
Text. This type of graphic involves the drawing of text on a graphics window or graphicbox control.
Turtle graphics, shapes, and text are all drawn using a pen. A pen has two states, up or down. When down, any drawing operations result in the generation of a graphic. When up, drawing commands may still be executed but no drawing will occur. The pen has two attributes that can be programmatically set: size and color. In addition to specifying pen size and color, Just BASIC allows you to specify the background color displayed on the graphics window and graphicbox control.
In order to draw in a Just BASIC application, you need a surface upon which to draw. In Just BASIC, either the graphics window or the graphicbox control provides this surface. You also need to be familiar with the many graphic commands provided by Just BASIC.
Just BASIC’s collection of graphic commands is extensive. Table 9.1 provides a list of commonly used graphic commands and provides a brief description of each command’s purpose. Note that while most commands are applicable to both the graphics window and the graphicbox control, some commands only work with one of these resources.
Table 9.1. Just BASIC Drawing Commands
Description | |
|---|---|
| Sets a control to resize if its window is resized. |
| Sets the background color of the window or graphicbox control. |
| Draws a box from the pen’s current position to x, y. |
| Draws a filled-in box from the pen’s current position x, y. |
| Draws a circle using the specified radius. |
| Draws a filled-in circle using the specified radius. |
| Clears the graphicbox or window. |
| Sets the pen’s color |
| Deletes the specified segment number. |
| Deletes the specified segment name. |
| Disables the control (graphicbox only). |
| Discards anything drawn in the last flush. |
| Places the pen in drawing mode. |
| Draws the specified bitmap file. |
| Draws an ellipse using the specified width and height. |
| Draws a filled-in ellipse using the specified width and height. |
| Enables the control (graphicbox only). |
| Fills the window or graphicbox control with the specified color. |
| Ensures a drawing is redrawn if a window is resized or temporarily overlaid. |
| Flushes the window or control and assigns a segment name. |
| Specifies the pen’s type and size. |
| Creates a bitmap copy of a portion of a graphics window using the specified coordinates. |
| Advances the pen the specified distance. |
| Moves the pen to the specified coordinates. |
| Centers the pen in the graphicbox control or graphics window. |
| Enables or disables the horizontal scrollbar. |
| Draws a line between two points. |
| Repositions the graphicbox control in its window (graphicbox only). |
| Sets the current direction (north = to 270, south = 90, east = 0, west = 180). |
Draws a ple slice. | |
| Positions the pen at the specific location. |
| Sets the pen’s position to x, y. |
| Prints the graphics window. |
| Redraws a previously flushed segment. |
| Assigns a variable representing the current segment ID. |
| Draws a point at x, y. |
| Sets focus to the control (graphicbox only). |
| Sets the pen size. |
| Draws text at the current pen position. |
| Sets up the trapclose event (graphic window only). |
| Turns the pen to the specified angle. |
| Turns off the pen’s drawing mode. |
| Enables or disables the vertical scrollbar. |
| Instructs the window to respond to the specified event handler. |
Hint
Note that the double quotation marks are a required part of each command listed in Table 9.1 because graphic commands are formatted as strings.
As you can see from the list of commands in Table 9.1, Just BASIC supplies you with commands that can be used to draw points, lines, circles, boxes (squares and rectangles), pie shapes, and so on. In addition, there are commands that allow you to draw filled-in shapes. Other commands are used to control the movement and availability of the pen and to set up event handlers.
To draw in the graphics window, you must first open the window using the open command, as demonstrated here:
open "Drawing Demo" for graphics as #canvas
Once opened, you can use the print statement to submit drawing commands to the window, as shown here:
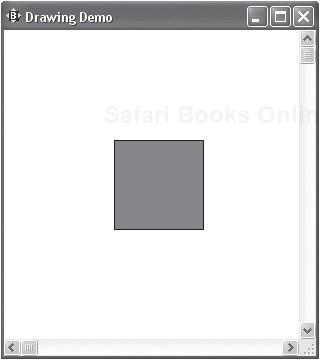
nomainwin

open "Drawing Demo" for graphics as #canvas

print #canvas, "backcolor red"
print #canvas, "place 110, 110"
print #canvas, "down"
print #canvas, "boxfilled 200, 200"
print #canvas, "flush"

wait
Here, five graphic commands are applied to the graphics window. The first command uses the backcolor command to specify a color of red. The second command moves the pen to a location of 110 pixels down and 110 pixels to the right of the upper-left corner of the graphic-box control. Next, the down command is executed, which places the pen in a down position, readying it for drawing. The boxfilled command is executed next, drawing a filled-in box shape that starts at the current pen location and ends at coordinates 200, 200. The last command flushes the drawing, ensuring that it sticks. Figure 9.6 shows the resulting graphic that is generated when this example is executed.
Working with the graphicbox control is just as easy as working with the graphic window. To do so you must first add an instance of the control to a window and then open the window using the open command. Once this has been accomplished, you can send graphic commands to the graphicbox control using the print command, as shown here:
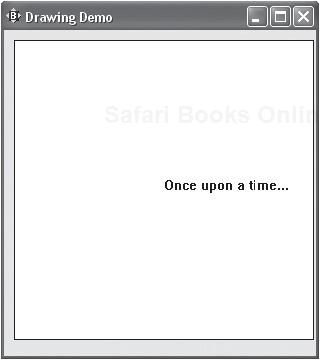
nomainwin

graphicbox #main.canvas, 10, 10, 300, 300

open "Drawing Demo" for window as #main

print #main.canvas, "home"
print #main.canvas, "down"
print #main.canvas, "Once upon a time..."
print #main.canvas, "flush"

wait
Here, the home command is used to move the pen to the center of the graphicbox control. Next, the pen is put into a down position and a text string is drawn using the ext command. With the ext command, any text that is entered after the character is drawn starting at the current pen position. Figure 9.7 shows the resulting graphic that is generated when this example is executed.
As you saw in the previous example where a red square was drawn, you can specify different colors to be used in drawing operations. By default, Just BASIC sets the pen’s color to black and the surface area of the graphics window and the graphicbox control to white. However, you can specify any of the colors listed in Table 9.2 when setting background and pen color attributes.
open "Drawing Demo" for graphics as #canvas
print #canvas, "home"
print #canvas, "down"
print #canvas, "box 100, 100"
print #canvas, "flush"
wait
You can clear out any drawing in a graphics window or graphicbox control using the cls command, which has the following syntax:
print #handle, "cls"
Clearing out a graphics window or graphicbox control removes a drawing from the computer’s memory and prepares the drawing area to be used again.
By setting up event handlers that respond to mouse and keyboard input, you can create applications that allow the user to provide input that can be used in drawing operations. Just BASIC supports a large number of mouse and keyboard events for which event handlers can be set up, as shown in Table 9.3.
Table 9.3. Just BASIC Events
Event | Description |
|---|---|
| Executes when a key is pressed while the graphics window or graphicbox control has focus |
| Executes when the left mouse button is double-clicked |
| Executes when the left mouse button is pressed |
| Executes when the mouse is moved while the left button is pressed |
| Executes when the left mouse button is released |
| Executes when the middle mouse button is double-clicked |
| Executes when the middle mouse button is pressed |
| Executes when the mouse is moved while the middle button is pressed |
| Executes when the middle mouse button is released |
| Executes when the mouse is moved |
| Executes when the right mouse button is double-clicked |
| Executes when the right mouse button is pressed |
| Executes when the mouse is moved while the right button is pressed |
| Executes when the right mouse button is released |
By taking advantage of Just BASIC’s ability to intercept and react to different mouse and keyboard events, you can, for example, create an interactive drawing application, as demonstrated in the next section.
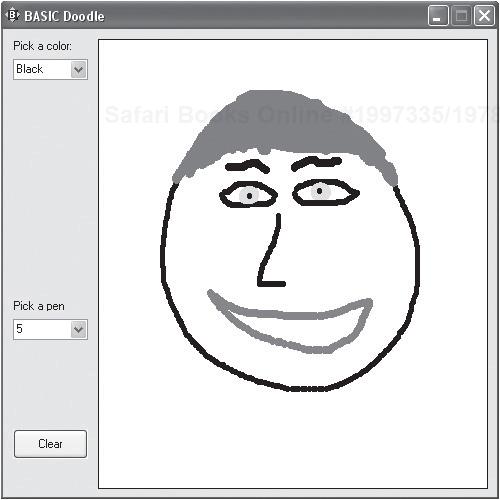
As an example of how to work with various drawing commands, as well as how to set up an event handler to process mouse input, let’s take a look at how to create a small drawing application called BASIC Doodle. The code for this application is shown here:
nomainwin

WindowWidth = 500
WindowHeight = 500

dim colors$(15)
colors$(0) = "Red"
colors$(1) = "Blue"
colors$(2) = "Yellow"
colors$(3) = "Brown"
colors$(4) = "Pink"
colors$(5) = "Green"
colors$(6) = "Cyan"
colors$(7) = "White"
colors$(8) = "Black"
colors$(9) = "Darkred"
colors$(10) = "Darkblue"
colors$(11) = "Darkpink"
colors$(12) = "Darkgreen"
colors$(13) = "Darkcyan"
colors$(14) = "Darkgray"
colors$(15) = "Lightgray"

dim pensize$(5)
pensize$(0) = "1"
pensize$(1) = "3"
pensize$(2) = "5"
pensize$(3) = "7"
pensize$(4) = "9"
statictext #main.statictext1, "Pick a color:", 10, 10, 60, 12
statictext #main.statictext1, "Pick a pen size:", 10, 270, 60, 12

combobox #main.combobox1, colors$(), SetColor, 10, 30, 75, 70
combobox #main.combobox2, pensize$(), SetPenSize, 10, 290, 75, 50

graphicbox #main.graphicbox1, 95, 10, 390, 450

button #main.button1, "Clear", ClearArea, UL, 10, 400, 75, 30

open "BASIC Doodle" for window_nf as #main

print #main.combobox1, "select Blue"
print #main.combobox2, "select 7"

print #main.graphicbox1, "color Blue"
print #main.graphicbox1, "size 7"
print #main.graphicbox1, "down"
print #main.graphicbox1, "when leftButtonMove draw"

wait

sub draw handle$, x, y
    #handle$, "set "; x; " "; y
end sub

sub SetColor handler$
  print #main.combobox1, "selection? selected$"
  print #main.graphicbox1, "color " + selected$
end sub

sub SetPenSize handler$
  print #main.combobox2, "selection? selected$"
  print #main.graphicbox1, "size " + selected$
end sub

sub ClearArea handle$
  #main.graphicbox1, "cls"
end sub
Here, a window has been set up that is 500 pixels wide by 500 pixels tall. The window contains two statictext controls, which provide labels for the window’s two combobox controls. The first combobox control is loaded with a list of colors stored in the colors$() array and the second combobox control is loaded with a list of values (saved as strings) from the pensize$() array. Each of the pen size values corresponds to a different pen size. By clicking on entries stored in these two comboboxes, the user will be able to specify the color and pen size used in drawing operations.
The next control added to the window is a graphicbox control, which will provide the virtu-alized canvas upon which the user will draw. The last control added to the window is a button control labeled Clear that when clicked calls upon a subroutine named ClearArea.
Default selections are made for both combobox controls. These color and pen specifications are also assigned to the graphicbox control. This is accomplished using the print command in order to execute the color blue and size 7 graphic commands. Next, the pen is set up to draw by executing the down graphic command and an event handler is set up to call upon a subroutine named Draw whenever the user holds down the left mouse button.
Take note of the construction of the draw subroutine. It consists of a single statement that executes the set graphic command. The set command takes two arguments that are automatically passed to it by the leftButtonMove event. These arguments are used to draw a point at the specified coordinates (e.g., x and y specify the location of the pointer when the left mouse button is depressed). If the user continues to hold down the left mouse button and move the mouse around the graphicbox control, the draw subroutine is repeatedly executed and will draw whatever freehand design the user wants.
Hint
The set command works with strings. It can be passed a pair of literal values, as demonstrated here:
#handle "set 50 100"
However, when passed variable data, you just reformat the set command as shown here:
x = 50
y = 100
#handle "set "; x" " "; y
This format of the set command ensures that a string is processed as required by the command.
The SetCol or subroutine, which follows the draw subroutine, is called whenever the user clicks on a value in the first combobox control and uses the col or graphic command to assign a color to the pen. Likewise, the SetPenSize subroutine is called whenever the user clicks on an item in the second combobox control. This subroutine uses the size graphic command to set the pen’s size.
The last procedure in the application is the ClearArea subroutine. It is called whenever the user clicks on the Clear button and executes the cls graphic command. This clears out the graphicbox control, allowing the user to begin a new drawing.
Figure 9.8 demonstrates how this application looks when running.
Applications often use sound when communicating with users. For example, some applications use sound to indicate when a long running process has finished running or to signal when an error has occurred. Like other programming languages, Just BASIC provides programmers with the ability to make noise in several different ways, including:
Making a beep sound
Playing wave files
Playing MIDI files
To facilitate the playing of each of these different types of sounds and sound files, Just BASIC provides you with access to the following commands and functions.
beep—. A command used to play the operating system’s default wave file, which usually makes a “ding” sound.
playwave—. A command used to play, stop, and loop while playing wave audio files.
stopmidi—. A command used to stop the playback of MIDI music files.
midipos()—. A function used to determine the current location of a MIDI file that is being played.
The simplest way to add a sound to a Just BASIC application is with the beep command, which has the following syntax:
beep
When executed, the beep command plays the operating system’s default wave file, which unless you have changed it, will make a “ding” sound.
A wave file is a digital audio file that stores uncompressed raw audio data. To play a wave file, you need to work with the playwave command, which has the following syntax.
playwave "file" [, mode]
file is a placeholder representing the name and path of the wave file to be played, and mode is one of the following options.
async—. Continues execution without waiting for the wave file to finish playing.
sync—. Waits for the wave file to finish playing.
loop—. Repeats the playback of a wave file.
The following statements demonstrate how to use different forms of the playwave command.
playwave "ding.wav", async  'Continues program execution
playwave "ding.wav", synch   'Waits for the wave file to finish
playwave "ding.wav", loop    'Repeatedly plays the wave file
playwave ""                  'Stops wave file playback
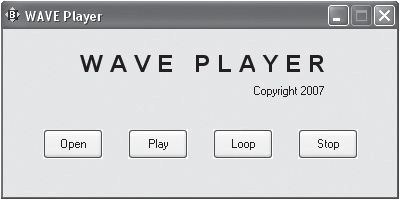
Take note of the last statement shown above. It passes an empty string to the playwave command. This stops the playback of any wave file that might be currently playing. To get a better idea of how to work with the playwave command, take a look at the following application.
nomainwin

global selectedFile$
WindowWidth = 400
WindowHeight = 200

statictext #play.statictext1, "W A V E   P L A Y E R", 77, 20, 440, 30
statictext #play.statictext2, "Copyright 2007", 250, 55, 80, 20

button #play.button1 "Open", GetWaveFile, UL, 40, 100, 60, 30
button #play.button1 "Play", PlayWaveFile, UL, 125, 100, 60, 30
button #play.button1 "Loop", LoopWaveFile, UL, 210, 100, 60, 30
button #play.button1 "Stop", StopWaveFile, UL, 295, 100, 60, 30

open "WAVE Player" for window_nf as #play

print #play.statictext1, "!font Arial 18 bold"

wait

sub GetWaveFile handle$
  filedialog "Open a File", "c:Windowsmedia*.wav", selectedFile$
end sub

sub PlayWaveFile handle$
  playwave selectedFile$, async
end sub

sub LoopWaveFile handle$
  playwave selectedFile$, loop
end sub

sub StopWaveFile handle$
  playwave ""
end sub
When executed, this application displays a window with four button controls labeled Open, Play, Loop, and Stop. Each of these button controls has been set up to execute a subroutine. The GetWaveFile subroutine uses the filedialog command to display a list of wave files from which the user can select. The PlayWaveFile subroutine plays the wave file selected by the user. The LoopWaveFile subroutine repeatedly plays the selected wave file and the StopWaveFile subroutine stops the currently playing wave file. If no wave file is being played, clicking on the Stop button has no effect. Figure 9.9 shows how this application looks when executed.
Trick
A number of wave files are supplied as part of Windows. For example, you will find a large collection of wave files on a computer running Windows XP in C:WindowsMedia. You can also find any number of wave files on the Internet. On top of all this, you can create your own wave files using the Sound Recorder utility supplied with Microsoft Windows. You can find the Sound Recorder by clicking on Start > All Programs > Accessories > Entertainment > Sound Recorder.
In addition to playing wave files, Just BASIC also allows programmers to play MIDI files. MIDI (musical instrument digital interface) is a communications protocol that provides the ability for electronic musical instruments and computers to communicate. MIDI files are music files that store MIDI music. Just BASIC provides programmers with the following commands for playing MIDI files.
playmidi—. Plays the specified MIDI file.stopmidi—. Stops the currently playing MIDI file.midipos()—. Returns the current position of the MIDI file being played.
To see how to work with each of these commands and functions, take a look at the following example. Here, a small program has been written that plays a specified MIDI file and then ends once the file has finished playing.
nomainwin

playmidi "c:SoundsOneMoreTime.mid", duration

timer 1000, CheckForDone

wait
sub CheckForDone

  if duration = midipos()  then
    stopmidi
    timer 0
    end
  end if

end sub
This example begins by using the playmidi command to play a specific MIDI file. The timer command is then used to run a subroutine every second. This subroutine uses the midipos() function to retrieve a value representing the current playback location in the MIDI file. This value is then compared against the value stored in duration. These two values will become equal once the end of the MIDI file has been reached, in which case the stopmidi command is executed and the timer command is turned off.
Okay, now it is time to turn your attention back to the development of the BASIC Slot Machine game. This game will simulate a Las Vegas slot machine in which the player initiates a virtual pull of the slot machine’s lever by clicking on the game’s Spin button. During each spin, an animated simulation is executed that imitates the spinning of mechanical dials in the slot machine. The end of the animation sequence is followed by the selection and display of three values, representing the slot machine’s final result. Based on this result, the amount of money in the player’s account is increased or decreased.
The design of the Slot Machine game will rely on three global variables and a subroutine that is responsible for generating the game’s GUI. Interaction with the player occurs when the player clicks on the Spin button, at which time a series of additional subroutine calls are made that analyze the results of the spin and adjust the player’s account balance accordingly.
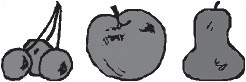
The Slot Machine game uses an apple, a cherry, and a pear image, as depicted in Figure 9.10. Copies of the bitmap image files are available for download on this book’s companion website located at www.courseptr.com/downloads.
In total, you will create the Slot Machine game in eight steps, as outlined here:
Create a new BASIC file and document it.
Define global variables and initiate game play.
Create the
ManageGamePlaysubroutine.Create the
AnimateDisplaysubroutine.Create the
DisplayImagessubroutine.Create the
UpdateDisplaysubroutine.Create the
RandomSelectionsubroutine.Create the
ClosePlaysubroutine.
The first step in the creation of the Slot Machine game is to create a new basic file named SlotMachine.bas and add the following statements to it.
' *************************************************************************
'
' Script Name: SlotMachine.bas (The Slot Machine Game)
' Version:     1.0
' Author:      Jerry Lee Ford, Jr.
' Date:        March 1, 2007
'
' Description: This game is a simulation of a Las Vegas-style slot
'              machine. The objective of the game is for the player to
'              win as much money as possible and not go broke.
'
' *************************************************************************

nomainwin   'Suppress the display of the default text window
In addition to documenting the overall purpose of the application using comment statements, the nomainwin command is executed, suppressing the display of the window.
The next step in the development of the Slot Machine game is to define and assign starting values for a few global variables and to make a call to the subroutine responsible for displaying the game’s user interface. This is accomplished by adding the following statements to the end of the program file.
'Assign default values to global variables
global iteration, account, gamesPlayed

iteration = 0    'Used to control the display of animation
account = 20     'Represents the amount of money in the player's account
gamesPlayed = 0  'Keeps track of the total number of games played

call ManageGamePlay 'Call the subroutine responsible for managing game play

wait  'Pause the application and wait for the player's instruction
The Slot Machine game will utilize three global variables to manage the game’s animation sequence and to track the amount of money in the player’s account and the number of games played. Game play is controlled by the ManageGamePlay subroutine, which is called next. This subroutine is responsible for displaying the window representing the game’s slot machine and for calling on other subroutines.
The code statements that make up the ManageGamePlay subroutine are shown next and should be added to the end of the program file.
'This subroutine displays the game board and controls interaction with the
'player
sub ManageGamePlay

  WindowWidth = 500   'Set the width of the window to 500 pixels
  WindowHeight = 500  'Set the height of the window to 500 pixels

  loadbmp "Cherry", "C:imagesCherry.bmp"  'Load the specified bitmap
                                            'file into memory
  loadbmp "Apple", "C:imagesApple.bmp"    'Load the specified bitmap
                                            'file into memory
  loadbmp "Pear", "C:imagesPear.bmp"      'Load the specified bitmap
                                            'file into memory
  'Define the format of statictext controls displayed on the window
  statictext #play.statictext1, "S L O T   M A C H I N E", 77, 20, 440, 30
  statictext #play.statictext2, "Copyright 2007", 345, 55, 80, 20

  'Add the controls used to graphically display slot machine values
  graphicbox #play.pic1, 50, 100, 93, 93
  graphicbox #play.pic2, 200, 100, 93, 93
  graphicbox #play.pic3, 350, 100, 93, 93

  'Add a control that will be used to announce the results of each play
  textbox #play.textbox1 130, 230, 240, 50

  'Add a button control to operate the slot machine
  button #play.button1 "Spin", AnimateDisplay, UL, 200, 300, 100, 30

  'Add a groupbox control at the bottom of the window
  groupbox #play.groupbox1 "Stats:", 60, 350, 380, 100

  'Use statictext controls to display 2 labels inside the groupbox control
  statictext #play.statictext3, "No of Games Played:", 90, 372, 105, 20
  statictext #play.statictext4, "Account:", 290, 372, 50, 20

  'Add 2 textbox controls inside the groupbox control for displaying
  'game statistics
  textbox #play.textbox2 90, 395, 100, 20
  textbox #play.textbox3 290, 395, 100, 20

  'Open the window with no frame and a handle of #play
  open "Slot Machine" for window_nf as #play

  'Set up the trapclose event for the window
  print #play, "trapclose ClosePlay"

  'Set the font type, size, and attributes
  print #play.statictext1, "!font Arial 24 bold"
  print #play.textbox1, "!font Arial 24 bold"

  'Display the initial values representing the number of games played and
  'the value of the player's account
  print #play.textbox3, str$(account)
  print #play.textbox2, str$(gamesPlayed)

  print #play.button1, "!setfocus";  'Set focus to the button control

  'Pause the application and wait for the player's instruction
  wait

end sub
This subroutine begins by specifying the dimensions of the game window. Next, three bitmap image files, containing images representing a cherry, an apple, and a pear, are preloaded into memory using the loadbmp command. Two statictext controls are then added that display the game’s name and copyright statement. Three graphicbox controls are added next and will be used to represent the dials displayed on the slot machine. A textbox control is added and will be used to display status information at the end of each spin. Spins are initiated when the player clicks on the button control labeled Spin, which is defined next. When clicked, this control will call upon a subroutine named AnimateDisplay. As the name implies, the AnimateDisplay subroutine simulates the spinning of mechanical dials that display slot machine values. Finally, a groupbox control is added to the bottom of the window, into which two statictext and two textbox controls are added. The textbox controls will be used to display information regarding the number of games played and the current amount of money in the player’s account.
With all its graphic controls now specified, the #play window is opened as a regular window with the string “Slot Machine” displayed in its title bar. A series of print statements are executed next. These statements set font type, size, and attributes for various statictext and textbox controls as well as display the starting values in the two textbox controls located at the bottom of the window. The last print statement assigns focus to the Spin button and then the wait command is executed, pausing the application in order to give the player the chance to begin playing the game.
The AnimateDisplay subroutine, shown here, is called whenever the player clicks on the game’s Play button. Its purpose is to call on the DisplayImages subroutine every 1/3 of a second. When called, the DisplayImages subroutine displays a different set of bitmap image files, thus simulating the spinning of slot machine dials.
'This subroutine is responsible for controlling the timing involved in
'displaying the slot machine's animation
sub AnimateDisplay handle$

  timer 333, DisplayImages 'Call the DisplayImages subroutine every
                           '.333 seconds
end subThe code statements that make up the DisplayImages subroutine are shown next and should be added to the end of the program file.
'This subroutine displays a different set of bitmap image files in the
'game's 3 bmpbutton controls each time it is called.
sub DisplayImages

  iteration = iteration + 1  'Keep track of how many times this subroutine
                             'has been called

  'Display a different set of bitmap images upon each call
  if iteration = 1 then call UpdateDisplay "Apple", "Cherry", "Pear"
  if iteration = 2 then call UpdateDisplay "Cherry", "Pear", "Cherry"
  if iteration = 3 then call UpdateDisplay "Pear", "Apple", "Pear"
  if iteration = 4 then call UpdateDisplay "Apple", "Pear", "Cherry"
  if iteration = 5 then call UpdateDisplay "Pear", "Cherry", "Apple"

  'Turn the timer control off on the 6th iteration
  if iteration = 6 then
    timer 0               'Turn the timer off
    iteration = 0         'Reset this value to zero
    call RandomSelection  'Call the subroutine that generates the slot
  end if                  'machine's 6th spin

end sub
Each time this subroutine is called upon to execute, it increments the value of a variable named iteration by 1. iteration is a global variable, thus allowing its value to be maintained across different executions of the subroutine. As you can see, depending on the value assigned to iteration, the UpdateDisplay subroutine is called and passed different sets of arguments representing different slot machine values. Since this subroutine is called every 1/3 of a second, the net effect of its execution is to simulate the spinning of values in the slot machine’s three dials.
Upon the sixth execution of the subroutine, the timer is turned off and the value of iteration is reset to zero. Finally, the RandomSelection subroutine is called. The RandomSelection subroutine is responsible for generating and displaying a random set of three slot machine values, thus ending the spin animation sequence.
The code statements for the UpdateDisplay subroutine, shown next, take three arguments and use them along with the drawbmp command to display bitmap images representing different slot machine values. After being drawn, the flush command is used to make the images stick and then the Window’s ding.wav file is played using the playwave command.
'This subroutine loads the specified bitmap files into the game's 3
'bmpbutton controls
sub UpdateDisplay x$, y$, z$

  print #play.pic1, "drawbmp " + x$ + " 1 1" 'Load first image
  print #play.pic2, "drawbmp " + y$ + " 1 1" 'Load second image
  print #play.pic3, "drawbmp " + z$ + " 1 1" 'Load third image

  'Use the flush command to make sure the images stick
  print #play.pic1, "flush"
  print #play.pic2, "flush"
  print #play.pic3, "flush"

  'Let's make a little noise at the end of each spin
  playwave "ding.wav", asynch

end sub
The RandomSelection subroutine, shown here, is responsible for generating the sixth and final iteration of the slot machine’s spin animation sequence.
'This subroutine is responsible for determining which bitmap images
'be displayed for the slot machine's 6th and final spin
sub RandomSelection

  RandomNumber = int(rnd(1)*3) + 1  'Retrieve a number between 1 and 3

  'Select the image to be displayed on the first bmpbutton control
  SELECT CASE RandomNumber
    CASE 1
      print #play.pic1, "drawbmp Cherry 1 1" 'Display the Cherry bitmap
      firstPic = 1  'Set a numeric value representing the selection
    CASE 2
      print #play.pic1, "drawbmp Apple 1 1"  'Display the Apple bitmap
      firstPic = 2  'Set a numeric value representing the selection
    CASE 3
      print #play.pic1, "drawbmp Pear 1 1"    'Display the Pear bitmap
      firstPic = 3  'Set a numeric value representing the selection
  END SELECT

  RandomNumber = int(rnd(1)*3) + 1  'Retrieve a number between 1 and 3

  'Select the image to be displayed on the second bmpbutton control
  SELECT CASE RandomNumber
    CASE 1
      print #play.pic2, "drawbmp Cherry 1 1" 'Display the Cherry bitmap
      secondPic = 1  'Set a numeric value representing the selection
    CASE 2
      print #play.pic2, "drawbmp Apple 1 1"  'Display the Apple bitmap
      secondPic = 2  'Set a numeric value representing the selection
    CASE 3
      print #play.pic2, "drawbmp Pear 1 1"    'Display the Pear bitmap
      secondPic = 3  'Set a numeric value representing the selection
  END SELECT

  RandomNumber = int(rnd(1)*3) + 1  'Retrieve a number between 1 and 3

  'Select the image to be displayed on the third bmpbutton control
  SELECT CASE RandomNumber

    CASE 1
      print #play.pic3, "drawbmp Cherry 1 1" 'Display the Cherry bitmap
      thirdPic = 1  'Set a numeric value representing the selection
    CASE 2
      print #play.pic3, "drawbmp Apple 1 1"  'Display the Apple bitmap
      thirdPic = 2  'Set a numeric value representing the selection
    CASE 3
      print #play.pic3, "drawbmp Pear 1 1"   'Display the Pear bitmap
      thirdPic = 3  'Set a numeric value representing the selection
  END SELECT

  'Let's make a little noise and display the results of the game
  playwave "ding.wav", asynch

  'Tabulate the value representing the results of the 6th spin
  result = firstPic + secondPic + thirdPic

  'Look to see if 3 cherries or 3 pears were displayed
  if (result = 3) or (result = 9) then
    print #play.textbox1, "Jackpot!"
    account = account + 3  'Add 3 dollars to the player's account
  end if

  'A value of 6 means either 3 apples were displayed or 3 separate
  'values were displayed
  if result = 6 then
    if firstPic = secondPic then   'Look for three apples
      print #play.textbox1, "Jackpot!"
      account = account + 3  'Add 3 dollars to the player's account
    else
      'A cherry, apple, and pear were displayed
      print #play.textbox1, "You lose!"
      account = account - 5  'Subtract 5 dollars from the player's account
    end if
  end if

  'A value other than 3, 6, or 9 means that 2 of a kind was displayed
  if (result <> 3) and (result <> 6) and (result <> 9) then
    print #play.textbox1, "Two of a kind!"
    account = account + 1  'Add 1 dollar to the player's account
  end if

  if account < 0 then  'End the game if the player goes broke
    notice "You have gone broke. Game Over!"  'Tell the player first
    close #play  'Close the window
    end  'Terminate the game
  end if

  'Keep track of the total number of games played
  gamesPlayed = gamesPlayed + 1

  'Update the display of game statistics
  print #play.textbox2, str$(gamesPlayed)
  print #play.textbox3, str$(account)

end sub
As you can see, the subroutine starts off by generating a random number between 1 and 3. Next, the select...case statement is used to set up a code block that determines the value assigned to the slot machine’s first dial. A random value of 1 equates to a cherry, a value of 2 equates to an apple, and a value of 3 equates to a pear. Note that a numeric value is added to the firstPic variable representing the value assigned to the first dial. A new random number is then generated and processed by another select...case statement in order to generate and assign a value to the slot machine’s second dial. Note that a numeric value is added to the secondPic variable representing the value assigned to the second dial. This process is repeated a third time in order to generate a value for the slot machine’s third dial. This time a numeric value is added to a thirdPic variable representing the value assigned to the third dial.
Once values have been assigned to all the dials, the playwave command is used to play the ding.wav file, thus notifying the user that her spin has been completed. The rest of the subroutine tabulates the results of the spin in order to determine how much to add or deduct from the player’s account. This is accomplished by adding the value of firstPic, secondPic, and thirdPic together to establish the total value for the spin and then using a series of conditional tests to analyze the result.
Table 9.4 lists every possible outcome that can be generated by the lottery machine. If you look closely at the Total column, you will see that the only time a value of 3 or 9 is generated is when three of a kind has been selected. In addition, the only time a value of 6 is generated is when either 3 of a kind has been generated or when no matches have occurred. To determine which situation applies when a total value of 6 is generated, all you have to do is compare the value of any two dials and determine if they match. If they do then a jackpot occurred. Otherwise, a set with no matches has to have been generated.
Table 9.4. Slot Machine Values and Results
1st Value | 2nd value | 3rd Value | Total | Results | Transaction |
|---|---|---|---|---|---|
1 | 1 | 1 | 3 | Jackpot | + 3 dollars |
2 | 2 | 2 | 6 | Jackpot | + 3 dollars |
3 | 3 | 3 | 9 | Jackpot | + 3 dollars |
1 | 1 | 2 | 4 | Two of a kind | + 1 dollar |
1 | 1 | 3 | 5 | Two of a kind | + 1 dollar |
2 | 2 | 1 | 5 | Two of a kind | + 1 dollar |
2 | 2 | 3 | 7 | Two of a kind | + 1 dollar |
3 | 3 | 1 | 7 | Two of a kind | + 1 dollar |
3 | 3 | 2 | 8 | Two of a kind | + 1 dollar |
1 | 2 | 1 | 4 | Two of a kind | + 1 dollar |
1 | 3 | 1 | 5 | Two of a kind | + 1 dollar |
2 | 1 | 2 | 5 | Two of a kind | + 1 dollar |
2 | 3 | 2 | 7 | Two of a kind | + 1 dollar |
3 | 1 | 3 | 7 | Two of a kind | + 1 dollar |
3 | 2 | 3 | 8 | Two of a kind | + 1 dollar |
1 | 2 | 3 | 6 | No match | - 5 dollars |
1 | 3 | 2 | 6 | No match | - 5 dollars |
2 | 3 | 1 | 6 | No match | - 5 dollars |
2 | 1 | 3 | 6 | No match | - 5 dollars |
3 | 1 | 2 | 6 | No match | - 5 dollars |
3 | 2 | 1 | 6 | No match | - 5 dollars |
In addition to analyzing the results of each spin, the conditional code blocks are also responsible for adding or deducting money as appropriate from the player’s account and for displaying a text message informing the player of the result of each spin. In addition, one last if...then statement is used to check on the amount of money left in the player’s account and if the player has run out of money, the player is informed that she has gone broke and the game is immediately terminated.
The last few statements in the subroutine increment the value of gamesPlayed by 1 and then update the display of the statistics being tracked by the game (e.g., the total number of games played and the value of the player’s account).
The final subroutine in the Slot Machine game is the ClosePlay subroutine, which is responsible for getting player confirmation before terminating the execution of the game.
'This subroutine is called when the player closes the #play window
'and is responsible for ending the game
sub ClosePlay handle$

  'Get confirmation before terminating program execution
  confirm "Are you sure you want to quit?"; answer$

  if answer$ = "yes" then  'The player clicked on Yes

    close #play  'Close the #play window

    end  'Terminate the game

  end if

end subThat’s everything! Assuming that you followed along carefully and did not leave anything out or make any typos along the way, your version of the BASIC Slot Machine game should be ready to go. As with previous games, you’ll be well served to spend a little time playing the game yourself before sharing it with others. As you play, keep an eye on the game’s statistics and make sure that they are being correctly tabulated. In addition, make sure that the game is consistently analyzing the results of each spin.
In this chapter you learned how spruce up your Windows applications by incorporating sound and graphics. This included learning how to play wave and MIDI files and learning how to work with Just BASIC’s pen in order to draw lines and shapes. Using the information provided, you learned how to create a wave file player and a small drawing application. In developing the drawing program, you demonstrated your ability to configure pen size and color and to control pen availability by moving it up and down. You also learned how to add drawn text to your graphics.
Before moving on to Chapter 10, “Debugging Your Applications,” consider setting aside a little extra time to improve the BASIC Slot Machine game by tackling the following list of challenges.