Chapter 10. GUI Coding Techniques
“Building a Better Mousetrap”
This chapter continues our look at building GUIs with Python and the tkinter library by presenting a collection of more advanced GUI programming patterns and techniques. In the preceding three chapters, we explored all the fundamentals of tkinter itself. Here, our goal is to put them to work to add higher-level structures that will be useful in larger programs. That is, our focus shifts here to writing code of our own which implements utility above and beyond the basic tkinter toolkit—utility that we’ll actually find useful in more complete examples later in the book.
Some of the techniques we will be studying in this chapter are as follows:
Providing common GUI operations in “mixin” classes
Building menus and toolbars from data structure templates
Adding GUI interfaces to command-line tools
Redirecting input and output streams to GUI widgets
Reloading GUI callback handlers on the fly
Wrapping up and automating top-level window interfaces
Using threads and queues to avoiding blocking in GUIs
Popping up GUI windows on demand from non-GUI programs
Adding GUIs as separate programs with sockets and pipes
As with other chapters in this book, this chapter has a dual agenda—not only will we be studying GUI programming, but we’ll also be learning more about general Python development concepts such as object-oriented programming (OOP) and code reuse. As we’ll see, by coding GUI tools in Python, it’s easy to apply them in a wide variety of contexts and programs.
As a segue to the next chapter, this one also closes with a look at the PyDemos and PyGadgets launcher toolbars—GUIs used to start larger GUI examples. Although most of their code is external to this book, we’ll explore enough of their structure to help you study them in the examples distribution package.
Two notes before we begin: first, be sure to read the code listings in this chapter for details we won’t present in the narrative. Second, although small examples that apply in this chapter’s techniques will show up along the way, more realistic application will have to await more realistic programs. We’ll put these techniques to use in the larger examples in the next chapter and throughout the rest of the book. In fact, we’ll be reusing the modules we develop here often, as tools in other programs in this book; reusable software wants to be reused. First, though, let’s do what our species does best and build some tools.
GuiMixin: Common Tool Mixin Classes
If you read the last three chapters, you probably noticed that the code used to construct nontrivial GUIs can become long if we make each widget by hand. Not only do we have to link up all the widgets manually, but we also need to remember and then set dozens of options. If we stick to this strategy, GUI programming often becomes an exercise in typing, or at least in cut-and-paste text editor operations.
Widget Builder Functions
Instead of performing each step by hand, a better idea is to wrap or automate as much of the GUI construction process as possible. One approach is to code functions that provide typical widget configurations, and automate the construction process for cases to which they apply. For instance, we could define a button function to handle configuration and packing details and support most of the buttons we draw. Example 10-1 provides a handful of such widget builder calls.
"""
###############################################################################
wrap up widget construction in functions for easier use, based upon some
assumptions (e.g., expansion); use **extras fkw args for width, font/color,
etc., and repack result manually later to override defaults if needed;
###############################################################################
"""

from tkinter import *

def frame(root, side=TOP, **extras):
    widget = Frame(root)
    widget.pack(side=side, expand=YES, fill=BOTH)
    if extras: widget.config(**extras)
    return widget

def label(root, side, text, **extras):
    widget = Label(root, text=text, relief=RIDGE)        # default config
    widget.pack(side=side, expand=YES, fill=BOTH)        # pack automatically
    if extras: widget.config(**extras)                   # apply any extras
    return widget

def button(root, side, text, command, **extras):
    widget = Button(root, text=text, command=command)
    widget.pack(side=side, expand=YES, fill=BOTH)
    if extras: widget.config(**extras)
    return widget

def entry(root, side, linkvar, **extras):
    widget = Entry(root, relief=SUNKEN, textvariable=linkvar)
    widget.pack(side=side, expand=YES, fill=BOTH)
    if extras: widget.config(**extras)
    return widget

if __name__ == '__main__':
    app = Tk()
    frm = frame(app, TOP)               # much less code required here!
    label(frm, LEFT, 'SPAM')
    button(frm, BOTTOM, 'Press', lambda: print('Pushed'))
    mainloop()
This module makes some assumptions about its clients’ use cases, which allows it to automate typical construction chores such as packing. The net effect is to reduce the amount of code required of its importers. When run as a script, Example 10-1 creates a simple window with a ridged label on the left and a button on the right that prints a message when pressed, both of which expand along with the window. Run this on your own for a look; its window isn’t really anything new for us, and its code is meant more as library than script—as we’ll see when we make use of it later in Chapter 19’s PyCalc.
This function-based approach can cut down on the amount of code required. As functions, though, its tools don’t lend themselves to customization in the broader OOP sense. Moreover, because they are not methods, they do not have access to the state of an object representing the GUI.
Mixin Utility Classes
Alternatively, we can implement common methods in a class and inherit
them everywhere they are needed. Such classes are commonly called
mixin classes because their methods are “mixed
in” with other classes. Mixins serve to package generally useful
tools as methods. The concept is almost like importing a module, but
mixin classes can access the subject instance, self, to utilize both per-instance state
and inherited methods. The script in Example 10-2 shows
how.
"""
###############################################################################
a "mixin" class for other frames: common methods for canned dialogs,
spawning programs, simple text viewers, etc; this class must be mixed
with a Frame (or a subclass derived from Frame) for its quit method
###############################################################################
"""

from tkinter import *
from tkinter.messagebox import *
from tkinter.filedialog import *
from PP4E.Gui.Tour.scrolledtext import ScrolledText     # or tkinter.scrolledtext
from PP4E.launchmodes import PortableLauncher, System   # or use multiprocessing

class GuiMixin:
    def infobox(self, title, text, *args):              # use standard dialogs
        return showinfo(title, text)                    # *args for bkwd compat

    def errorbox(self, text):
        showerror('Error!', text)

    def question(self, title, text, *args):
        return askyesno(title, text)                    # return True or False

    def notdone(self):
        showerror('Not implemented', 'Option not available')

    def quit(self):
        ans = self.question('Verify quit', 'Are you sure you want to quit?')
        if ans:
            Frame.quit(self)                            # quit not recursive!

    def help(self):
        self.infobox('RTFM', 'See figure 1...')         # override this better

    def selectOpenFile(self, file="", dir="."):         # use standard dialogs
        return askopenfilename(initialdir=dir, initialfile=file)

    def selectSaveFile(self, file="", dir="."):
        return asksaveasfilename(initialfile=file, initialdir=dir)

    def clone(self, args=()):              # optional constructor args
        new = Toplevel()                   # make new in-process version of me
        myclass = self.__class__           # instance's (lowest) class object
        myclass(new, *args)                # attach/run instance to new window

    def spawn(self, pycmdline, wait=False):
        if not wait:                                     # start new process
            PortableLauncher(pycmdline, pycmdline)()     # run Python progam
        else:
            System(pycmdline, pycmdline)()               # wait for it to exit

    def browser(self, filename):
        new  = Toplevel()                                # make new window
        view = ScrolledText(new, file=filename)          # Text with Scrollbar
        view.text.config(height=30, width=85)            # config Text in Frame
        view.text.config(font=('courier', 10, 'normal')) # use fixed-width font
        new.title("Text Viewer")                         # set window mgr attrs
        new.iconname("browser")                          # file text added auto

    """
    def browser(self, filename):                         # if tkinter.scrolledtext
        new  = Toplevel()                                # included for reference
        text = ScrolledText(new, height=30, width=85)
        text.config(font=('courier', 10, 'normal'))
        text.pack(expand=YES, fill=BOTH)
        new.title("Text Viewer")
        new.iconname("browser")
        text.insert('0.0', open(filename, 'r').read() )
    """

if __name__ == '__main__':

    class TestMixin(GuiMixin, Frame):      # standalone test
        def __init__(self, parent=None):
            Frame.__init__(self, parent)
            self.pack()
            Button(self, text='quit',  command=self.quit).pack(fill=X)
            Button(self, text='help',  command=self.help).pack(fill=X)
            Button(self, text='clone', command=self.clone).pack(fill=X)
            Button(self, text='spawn', command=self.other).pack(fill=X)
        def other(self):
            self.spawn('guimixin.py')  # spawn self as separate process

    TestMixin().mainloop()
Although Example 10-2 is geared toward
GUIs, it’s really about design concepts. The GuiMixin class implements common
operations with standard interfaces that are immune to changes in
implementation. In fact, the implementations of some of this class’s
methods did change—between the first and second editions of this
book, old-style Dialog calls were
replaced with the new Tk standard dialog calls; in the fourth
edition, the file browser was updated to use a different scrolled
text class. Because this class’s interface hides such details, its
clients did not have to be changed to use the new techniques.
As is, GuiMixin provides
methods for common dialogs, window cloning, program spawning, text
file browsing, and so on. We can add more methods to such a mixin
later if we find ourselves coding the same methods repeatedly; they
will all become available immediately everywhere this class is
imported and mixed. Moreover, GuiMixin’s methods can be inherited and
used as is, or they can be redefined in subclasses. Such are the
natural advantages of classes over functions.
There are a few details worth highlighting here:
The
quitmethod serves some of the same purpose as the reusableQuitterbutton we used in earlier chapters. Because mixin classes can define a large library of reusable methods, they can be a more powerful way to package reusable components than individual classes. If the mixin is packaged well, we can get a lot more from it than a single button’s callback.The
clonemethod makes a new in-process copy, in a new top-level window, of the most specific class that mixes in aGuiMixin(self.__class__is the class object that the instance was created from). Assuming that the class requires no constructor arguments other than a parent container, this opens a new independent copy of the window (pass in any extra constructor arguments required).The
browsermethod opens theScrolledTextobject we wrote in Chapter 9 in a new window and fills it with the text of a file to be viewed. As noted in the preceding chapter, there is also aScrolledTextwidget in standard library moduletkinter.scrolledtext, but its interface differs, it does not load a file automatically, and it is prone to becoming deprecated (though it hasn’t over many years). For reference, its alternative code is included.The
spawnmethod launches a Python program command line as a new independent process and waits for it to end or not (depending on the default Falsewaitargument—GUIs usually shouldn’t wait). This method is simple, though, because we wrapped launching details in thelaunchmodesmodule presented at the end of Chapter 5.GuiMixinboth fosters and practices good code reuse habits.
The GuiMixin class is meant
to be a library of reusable tool methods and is essentially useless
by itself. In fact, it must generally be mixed with a Frame-based class to be used: quit assumes it’s mixed with a Frame, and clone assumes it’s mixed with a widget
class. To satisfy such constraints, this module’s self-test code at
the bottom combines GuiMixin with
a Frame widget.
Figure 10-1 shows the scene created by the module’s self-test after pressing “clone” and “spawn” once each, and then “help” in one of the three copies. Because they are separate processes, windows started with “spawn” keep running after other windows are closed and do not impact other windows when closed themselves; a “clone” window is in-process instead—it is closed with others, but its “X” destroys just itself. Make sure your PYTHONPATH includes the PP4E directory’s container for the cross-directory package imports in this example and later examples which use it.

We’ll see GuiMixin show up
again as a mixin in later examples; that’s the whole point of code
reuse, after all. Although functions are often useful, classes
support inheritance and access to instance state, and provide an
extra organizational structure—features that are especially useful
given the coding requirements of GUIs. For instance, many of
GuiMixin’s methods could be
replaced with simple functions, but clone and quit could not. The next section carries
these talents of mixin classes even further.
GuiMaker: Automating Menus and Toolbars
The last section’s mixin class makes common tasks simpler, but it still doesn’t address the complexity of linking up widgets such as menus and toolbars. Of course, if we had access to a GUI layout tool that generates Python code, this would not be an issue, at least for some of the more static interfaces we may require. We’d design our widgets interactively, press a button, and fill in the callback handler blanks.
Especially for a relatively simple toolkit like tkinter, though, a programming-based approach can often work just as well. We’d like to be able to inherit something that does all the grunt work of construction for us, given a template for the menus and toolbars in a window. Here’s one way it can be done—using trees of simple objects. The class in Example 10-3 interprets data structure representations of menus and toolbars and builds all the widgets automatically.
"""
###############################################################################
An extended Frame that makes window menus and toolbars automatically.
Use GuiMakerFrameMenu for embedded components (makes frame-based menus).
Use GuiMakerWindowMenu for top-level windows (makes Tk8.0 window menus).
See the self-test code (and PyEdit) for an example layout tree format.
###############################################################################
"""

import sys
from tkinter import *                     # widget classes
from tkinter.messagebox import showinfo

class GuiMaker(Frame):
    menuBar    = []                       # class defaults
    toolBar    = []                       # change per instance in subclasses
    helpButton = True                     # set these in start() if need self

    def __init__(self, parent=None):
        Frame.__init__(self, parent)
        self.pack(expand=YES, fill=BOTH)        # make frame stretchable
        self.start()                            # for subclass: set menu/toolBar
        self.makeMenuBar()                      # done here: build menu bar
        self.makeToolBar()                      # done here: build toolbar
        self.makeWidgets()                      # for subclass: add middle part

    def makeMenuBar(self):
        """
        make menu bar at the top (Tk8.0 menus below)
        expand=no, fill=x so same width on resize
        """
        menubar = Frame(self, relief=RAISED, bd=2)
        menubar.pack(side=TOP, fill=X)

        for (name, key, items) in self.menuBar:
            mbutton  = Menubutton(menubar, text=name, underline=key)
            mbutton.pack(side=LEFT)
            pulldown = Menu(mbutton)
            self.addMenuItems(pulldown, items)
            mbutton.config(menu=pulldown)

        if self.helpButton:
            Button(menubar, text    = 'Help',
                            cursor  = 'gumby',
                            relief  = FLAT,
                            command = self.help).pack(side=RIGHT)

    def addMenuItems(self, menu, items):
        for item in items:                     # scan nested items list
            if item == 'separator':            # string: add separator
                menu.add_separator({})
            elif type(item) == list:           # list: disabled item list
                for num in item:
                    menu.entryconfig(num, state=DISABLED)
            elif type(item[2]) != list:
                menu.add_command(label     = item[0],         # command:
                                 underline = item[1],         # add command
                                 command   = item[2])         # cmd=callable
            else:
                pullover = Menu(menu)
                self.addMenuItems(pullover, item[2])          # sublist:
                menu.add_cascade(label     = item[0],         # make submenu
                                 underline = item[1],         # add cascade
                                 menu      = pullover)

    def makeToolBar(self):
        """
        make button bar at bottom, if any
        expand=no, fill=x so same width on resize
        this could support images too: see Chapter 9,
        would need prebuilt gifs or PIL for thumbnails
        """
        if self.toolBar:
            toolbar = Frame(self, cursor='hand2', relief=SUNKEN, bd=2)
            toolbar.pack(side=BOTTOM, fill=X)
            for (name, action, where) in self.toolBar:
                Button(toolbar, text=name, command=action).pack(where)

    def makeWidgets(self):
        """
        make 'middle' part last, so menu/toolbar
        is always on top/bottom and clipped last;
        override this default, pack middle any side;
        for grid: grid middle part in a packed frame
        """
        name = Label(self,
                     width=40, height=10,
                     relief=SUNKEN, bg='white',
                     text   = self.__class__.__name__,
                     cursor = 'crosshair')
        name.pack(expand=YES, fill=BOTH, side=TOP)

    def help(self):
        "override me in subclass"
        showinfo('Help', 'Sorry, no help for ' + self.__class__.__name__)

    def start(self):
        "override me in subclass: set menu/toolbar with self"
        pass


###############################################################################
# Customize for Tk 8.0 main window menu bar, instead of a frame
###############################################################################

GuiMakerFrameMenu = GuiMaker           # use this for embedded component menus

class GuiMakerWindowMenu(GuiMaker):    # use this for top-level window menus
    def makeMenuBar(self):
        menubar = Menu(self.master)
        self.master.config(menu=menubar)

        for (name, key, items) in self.menuBar:
            pulldown = Menu(menubar)
            self.addMenuItems(pulldown, items)
            menubar.add_cascade(label=name, underline=key, menu=pulldown)

        if self.helpButton:
            if sys.platform[:3] == 'win':
                menubar.add_command(label='Help', command=self.help)
            else:
                pulldown = Menu(menubar)  # Linux needs real pull down
                pulldown.add_command(label='About', command=self.help)
                menubar.add_cascade(label='Help', menu=pulldown)


###############################################################################
# Self-test when file run standalone: 'python guimaker.py'
###############################################################################

if __name__ == '__main__':
    from guimixin import GuiMixin            # mix in a help method

    menuBar = [
        ('File', 0,
            [('Open',  0, lambda:0),         # lambda:0 is a no-op
             ('Quit',  0, sys.exit)]),       # use sys, no self here
        ('Edit', 0,
            [('Cut',   0, lambda:0),
             ('Paste', 0, lambda:0)]) ]
    toolBar = [('Quit', sys.exit, {'side': LEFT})]

    class TestAppFrameMenu(GuiMixin, GuiMakerFrameMenu):
        def start(self):
            self.menuBar = menuBar
            self.toolBar = toolBar

    class TestAppWindowMenu(GuiMixin, GuiMakerWindowMenu):
        def start(self):
            self.menuBar = menuBar
            self.toolBar = toolBar

    class TestAppWindowMenuBasic(GuiMakerWindowMenu):
        def start(self):
            self.menuBar = menuBar
            self.toolBar = toolBar    # guimaker help, not guimixin

    root = Tk()
    TestAppFrameMenu(Toplevel())
    TestAppWindowMenu(Toplevel())
    TestAppWindowMenuBasic(root)
    root.mainloop()
To make sense of this module, you have to be familiar with the
menu fundamentals introduced in Chapter 9. If you are, though, it’s
straightforward—the GuiMaker class
simply traverses the menu and toolbar structures and builds menu and
toolbar widgets along the way. This module’s self-test code includes a
simple example of the data structures used to lay out menus and
toolbars:
- Menu bar templates
Lists and nested sublists of
(label,underline,handler)triples. If ahandleris a sublist rather than a function or method, it is assumed to be a cascading submenu.- Toolbar templates
List of
(label,handler,pack-options)triples.pack-optionsis coded as a dictionary of options passed on to the widgetpackmethod; we can code these as{'k':v}literals, or with thedict(k=v)call’s keyword syntax.packaccepts a dictionary argument, but we could also transform the dictionary into individual keyword arguments by using Python’sfunc(**kargs)call syntax. As is, labels are assumed to be text, but images could be supported too (see the note under BigGui: A Client Demo Program).
For variety, the mouse cursor changes based upon its location: a hand in the toolbar, crosshairs in the default middle part, and something else over Help buttons of frame-based menus (customize as desired).
Subclass Protocols
In addition to menu and toolbar layouts, clients of this class can also tap into and customize the method and geometry protocols the class implements:
- Template attributes
Clients of this class are expected to set
menuBarandtoolBarattributes somewhere in the inheritance chain by the time thestartmethod has finished.- Initialization
The
startmethod can be overridden to construct menu and toolbar templates dynamically, sinceselfis available when it is called;startis also where general initializations should be performed—GuiMixin’s__init__constructor must be run, not overridden.- Adding widgets
The
makeWidgetsmethod can be redefined to construct the middle part of the window—the application portion between the menu bar and the toolbar. By default,makeWidgetsadds a label in the middle with the name of the most specific class, but this method is expected to be specialized.- Packing protocol
In a specialized
makeWidgetsmethod, clients may attach their middle portion’s widgets to any side ofself(aFrame) since the menu and toolbars have already claimed the container’s top and bottom by the timemakeWidgetsis run. The middle part does not need to be a nested frame if its parts are packed. The menu and toolbars are also automatically packed first so that they are clipped last if the window shrinks.- Gridding protocol
The middle part can contain a grid layout, as long as it is gridded in a nested
Framethat is itself packed within theselfparent. (Remember that each container level may usegridorpack, not both, and thatselfis aFramewith already packed bars by the timemakeWidgetsis called.) Because theGuiMaker Framepacks itself within its parent, it is not directly embeddable in a container with widgets arranged in a grid, for similar reasons; add an intermediate griddedFrameto use it in this context.
GuiMaker Classes
In return for conforming to GuiMaker protocols
and templates, client subclasses get a Frame that knows how to automatically
build up its own menus and toolbars from template data structures.
If you read the preceding chapter’s menu examples, you probably know
that this is a big win in terms of reduced coding requirements.
GuiMaker is also clever enough to
export interfaces for both menu styles that we met in Chapter 9:
GuiMakerWindowMenuImplements Tk 8.0-style top-level window menus, useful for menus associated with standalone programs and pop ups.
GuiMakerFrameMenuImplements alternative
Frame/Menubutton-based menus, useful for menus on objects embedded as components of a larger GUI.
Both classes build toolbars, export the same protocols, and
expect to find the same template structures; they differ only in the
way they process menu templates. In fact, one is simply a subclass
of the other with a specialized menu maker method—only top-level
menu processing differs between the two styles (a Menu with Menu cascades rather than a Frame with Menubuttons).
GuiMaker Self-Test
Like GuiMixin, when
we run Example 10-3 as a top-level
program, we trigger the self-test logic at the bottom of its file;
Figure 10-2 shows the windows we
get. Three windows come up, representing each of the self-test
code’s TestApp classes. All three
have a menu and toolbar with the options specified in the template
data structures created in the self-test code: File and Edit menu
pull downs, plus a Quit toolbar button and a standard Help menu
button. In the screenshot, one window’s File menu has been torn off
and the Edit menu of another is being pulled down; the lower window
was resized for effect.

GuiMaker can be mixed in
with other superclasses, but it’s primarily intended to serve the
same extending and embedding roles as a tkinter Frame widget class (which makes sense,
given that it’s really just a customized Frame with extra construction protocols).
In fact, its self-test combines a GuiMaker frame with the prior section’s
GuiMixin tools package
class.
Because of the superclass relationships coded, two of the
three windows get their help
callback handler from GuiMixin;
TestAppWindowMenuBasic gets
GuiMaker’s instead. Notice that
the order in which these two classes are mixed can be important:
because both GuiMixin and
Frame define a quit method, we need to list the class
from which we want to get it first in the mixed class’s header line
due to the left-to-right search rule of multiple inheritance. To
select GuiMixin’s methods, it
should usually be listed before a superclass derived from real
widgets.
We’ll put GuiMaker to more
practical use in instances such as the PyEdit example in Chapter 11. The next section shows another
way to use GuiMaker’s templates
to build up a sophisticated interface, and serves as another test of
its functionality.
BigGui: A Client Demo Program
Let’s look at a program that makes better use of the two automation classes we just
wrote. In the module in Example 10-4, the Hello class inherits from both GuiMixin and GuiMaker. GuiMaker provides the link to the Frame widget, plus the menu/toolbar
construction logic. GuiMixin
provides extra common-behavior methods. Really, Hello is another kind of extended Frame widget because it is derived from
GuiMaker. To get a menu and
toolbar for free, it simply follows the protocols defined by
GuiMaker—it sets the menuBar and toolBar attributes in its start method, and overrides makeWidgets to put a custom label in the
middle.
"""
GUI demo implementation - combines maker, mixin, and this
"""

import sys, os
from tkinter import *                        # widget classes
from PP4E.Gui.Tools.guimixin import *        # mix-in methods: quit, spawn, etc.
from PP4E.Gui.Tools.guimaker import *        # frame, plus menu/toolbar builder

class Hello(GuiMixin, GuiMakerWindowMenu):   # or GuiMakerFrameMenu
    def start(self):
        self.hellos = 0
        self.master.title("GuiMaker Demo")
        self.master.iconname("GuiMaker")
        def spawnme(): self.spawn('big_gui.py')        # defer call vs lambda

        self.menuBar = [                               # a tree: 3 pull downs
          ('File', 0,                                  # (pull-down)
              [('New...',  0, spawnme),
               ('Open...', 0, self.fileOpen),          # [menu items list]
               ('Quit',    0, self.quit)]              # label,underline,action
          ),

          ('Edit', 0,
              [('Cut',    −1, self.notdone),           # no underline|action
               ('Paste',  −1, self.notdone),           # lambda:0 works too
               'separator',                            # add a separator
               ('Stuff',  −1,
                   [('Clone', −1, self.clone),         # cascaded submenu
                    ('More',  −1, self.more)]
               ),
               ('Delete', −1, lambda:0),
               [5]]                                    # disable 'delete'
          ),

          ('Play', 0,
              [('Hello',     0, self.greeting),
               ('Popup...',  0, self.dialog),
               ('Demos',     0,
                  [('Toplevels', 0,
                       lambda: self.spawn(r'..Tour	oplevel2.py')),
                   ('Frames',    0,
                       lambda: self.spawn(r'..TourdemoAll-frm-ridge.py')),
                   ('Images',    0,
                       lambda: self.spawn(r'..Touruttonpics.py')),
                   ('Alarm',     0,
                       lambda: self.spawn(r'..Touralarm.py', wait=False)),
                   ('Other...', −1, self.pickDemo)]
               )]
          )]

        self.toolBar = [                                     # add 3 buttons
          ('Quit',  self.quit,     dict(side=RIGHT)),        # or {'side': RIGHT}
          ('Hello', self.greeting, dict(side=LEFT)),
          ('Popup', self.dialog,   dict(side=LEFT, expand=YES)) ]

    def makeWidgets(self):                                   # override default
        middle = Label(self, text='Hello maker world!',      # middle of window
                       width=40, height=10,
                       relief=SUNKEN, cursor='pencil', bg='white')
        middle.pack(expand=YES, fill=BOTH)

    def greeting(self):
        self.hellos += 1
        if self.hellos % 3:
            print("hi")
        else:
            self.infobox("Three", 'HELLO!')    # on every third press

    def dialog(self):
        button = self.question('OOPS!',
                               'You typed "rm*" ... continue?',  # old style
                               'questhead', ('yes', 'no'))       # args ignored
        [lambda: None, self.quit][button]()

    def fileOpen(self):
        pick = self.selectOpenFile(file='big_gui.py')
        if pick:
            self.browser(pick)     # browse my source file, or other

    def more(self):
        new = Toplevel()
        Label(new,  text='A new non-modal window').pack()
        Button(new, text='Quit', command=self.quit).pack(side=LEFT)
        Button(new, text='More', command=self.more).pack(side=RIGHT)

    def pickDemo(self):
        pick = self.selectOpenFile(dir='..')
        if pick:
            self.spawn(pick)    # spawn any Python program

if __name__ == '__main__':  Hello().mainloop()   # make one, run one
This script lays out a fairly large menu and toolbar
structure, and also adds callback methods of its own that print
stdout messages, pop up text file
browsers and new windows, and run other programs. Many of the
callbacks don’t do much more than run the notDone method inherited from GuiMixin, though; this code is intended
mostly as a GuiMaker and GuiMixin demo.
When big_gui is run as a
top-level program, it creates a window with four menu pull downs on
top and a three-button toolbar on the bottom, shown in Figure 10-3 along with some
of the pop-up windows its callbacks create. The menus have
separators, disabled entries, and cascading submenus, all as defined
by the menuBar template used by
GuiMaker, and Quit invokes the
verifying dialog inherited from GuiMixin—some of the many tools we’re
getting for free here.

Figure 10-4 shows
this script’s window again, after its Play pull down has been used
to launch three independently running demos that we wrote in
Chapters 8 and 9. These demos are ultimately
started by using the portable launcher tools we wrote in Chapter 5, and acquired from the GuiMixin class. If you want to run other
demos on your computer, select the Play menu’s Other option to pop
up a standard file selection dialog instead and navigate to the
desired program’s file. One note: I copied the icon bitmap used by
the top-levels demo in the Play menu to this script’s directory;
later, we’ll write tools that attempt to locate one
automatically.

Finally, I should note that GuiMaker could be redesigned to use trees
of embedded class instances that know how to apply themselves to the
tkinter widget tree being constructed, instead of branching on the
types of items in template data structures. In the interest of
space, though, we’ll banish that extension to the land of suggested
exercises in this edition.
Note
Speaking of suggested enhancements, in Chapter 9, I showed you a first-cut way to use images instead of text for buttons in toolbars at the bottom of windows. Adding this option to the GUI maker class as a subclass which redefines its toolbar construction method would be both a great way to experiment with the code and a useful utility. If I added every cool feature imaginable, though, this book could easily become big enough to be gravitationally significant…
ShellGui: GUIs for Command-Line Tools
Demos are fun, but to better show how things like the GuiMixin class can be of practical use, we
need a more realistic application. Here’s one: suppose you’ve written
a set of command-line system administration scripts, along the lines
of those we studied in Part II. As we
saw, such scripts work well from a command line, but require you to
remember all their options each time they are run; if you’re like me,
this usually implies having to pore over the source code after a
period of nonuse.
Instead of requiring users of such tools (including yourself) to type cryptic commands at a shell, why not also provide an easy-to-use tkinter GUI interface for running such programs? Such a GUI can prompt for command-line inputs, instead of expecting users to remember them. While we’re at it, why not generalize the whole notion of running command-line tools from a GUI, to make it easy to support future tools too?
A Generic Shell-Tools Display
Examples 10-5 through 10-11—seven files, spanning two command-line scripts, one GUI utility module, two GUI dialogs, and a main GUI and its options specification module—comprise a concrete implementation of these artificially rhetorical musings. Because I want this to be a general-purpose tool that can run any command-line program, its design is factored into modules that become more application-specific as we go lower in the software hierarchy. At the top, things are about as generic as they can be, as shown in Example 10-5.
#!/usr/local/bin/python
"""
################################################################################
tools launcher; uses guimaker templates, guimixin std quit dialog;
I am just a class library: run mytools script to display the GUI;
################################################################################
"""

from tkinter import *                               # get widgets
from PP4E.Gui.Tools.guimixin import GuiMixin        # get quit, not done
from PP4E.Gui.Tools.guimaker import *               # menu/toolbar builder

class ShellGui(GuiMixin, GuiMakerWindowMenu):       # a frame + maker + mixins
    def start(self):                                # use GuiMaker if component
        self.setMenuBar()
        self.setToolBar()
        self.master.title("Shell Tools Listbox")
        self.master.iconname("Shell Tools")

    def handleList(self, event):                    # on listbox double-click
        label = self.listbox.get(ACTIVE)            # fetch selection text
        self.runCommand(label)                      # and call action here

    def makeWidgets(self):                          # add listbox in middle
        sbar = Scrollbar(self)                      # cross link sbar, list
        list = Listbox(self, bg='white')            # or use Tour.ScrolledList
        sbar.config(command=list.yview)
        list.config(yscrollcommand=sbar.set)
        sbar.pack(side=RIGHT, fill=Y)                     # pack 1st=clip last
        list.pack(side=LEFT, expand=YES, fill=BOTH)       # list clipped first
        for (label, action) in self.fetchCommands():      # add to listbox
            list.insert(END, label)                       # and menu/toolbars
        list.bind('<Double-1>', self.handleList)          # set event handler
        self.listbox = list

    def forToolBar(self, label):                          # put on toolbar?
        return True                                       # default = all

    def setToolBar(self):
        self.toolBar = []
        for (label, action) in self.fetchCommands():
            if self.forToolBar(label):
                self.toolBar.append((label, action, dict(side=LEFT)))
        self.toolBar.append(('Quit', self.quit, dict(side=RIGHT)))

    def setMenuBar(self):
        toolEntries  = []
        self.menuBar = [
            ('File',  0, [('Quit', −1, self.quit)]),    # pull-down name
            ('Tools', 0, toolEntries)                   # menu items list
            ]                                           # label,underline,action
        for (label, action) in self.fetchCommands():
            toolEntries.append((label, −1, action))     # add app items to menu

################################################################################
# delegate to template type-specific subclasses
# which delegate to app tool-set-specific subclasses
################################################################################

class ListMenuGui(ShellGui):
    def fetchCommands(self):             # subclass: set 'myMenu'
        return self.myMenu               # list of (label, callback)
    def runCommand(self, cmd):
        for (label, action) in self.myMenu:
            if label == cmd: action()

class DictMenuGui(ShellGui):
    def fetchCommands(self):
        return self.myMenu.items()
    def runCommand(self, cmd):
        self.myMenu[cmd]()
The ShellGui class in this
module knows how to use the GuiMaker and GuiMixin interfaces to construct a
selection window that displays tool names in menus, a scrolled list,
and a toolbar. It also provides a forToolBar method that you can override
and that allows subclasses to specify which tools should and should
not be added to the window’s toolbar (the toolbar can become crowded
in a hurry). However, it is deliberately ignorant about both the
names of tools that should be displayed in those places and about
the actions to be run when tool names are selected.
Instead, ShellGui relies on
the ListMenuGui and DictMenuGui subclasses in this file to
provide a list of tool names from a fetchCommands method and dispatch actions
by name in a runCommand method.
These two subclasses really just serve to interface to application-specific tool sets laid
out as lists or dictionaries, though; they are still naïve about
what tool names really go up on the GUI. That’s by design,
too—because the tool sets displayed are defined by lower subclasses,
we can use ShellGui to display a
variety of different tool sets.
Application-Specific Tool Set Classes
To get to the actual tool sets, we need to go one level down. The
module in Example 10-6
defines subclasses of the two type-specific ShellGui classes, to provide sets of
available tools in both list and dictionary formats (you would
normally need only one, but this module is meant for illustration).
This is also the module that is actually run to
kick off the GUI—the shellgui
module is a class library only.
#!/usr/local/bin/python
"""
################################################################################
provide type-specific option sets for application
################################################################################
"""

from shellgui import *                 # type-specific option gui
from packdlg  import runPackDialog     # dialogs for data entry
from unpkdlg  import runUnpackDialog   # they both run app classes

class TextPak1(ListMenuGui):
    def __init__(self):
        self.myMenu = [('Pack  ', runPackDialog),      # simple functions
                       ('Unpack', runUnpackDialog),    # use same width here
                       ('Mtool ', self.notdone)]       # method from guimixin
        ListMenuGui.__init__(self)
    def forToolBar(self, label):
        return label in {'Pack  ', 'Unpack'}           # 3.x set syntax

class TextPak2(DictMenuGui):
    def __init__(self):
        self.myMenu = {'Pack  ': runPackDialog,        # or use input here...
                       'Unpack': runUnpackDialog,      # instead of in dialogs
                       'Mtool ': self.notdone}
        DictMenuGui.__init__(self)

if __name__ == '__main__':                           # self-test code...
    from sys import argv                             # 'menugui.py list|^'
    if len(argv) > 1 and argv[1] == 'list':
        print('list test')
        TextPak1().mainloop()
    else:
        print('dict test')
        TextPak2().mainloop()
The classes in this module are specific to a particular tool set; to display a different set of tool names, simply code and run a new subclass. By separating out application logic into distinct subclasses and modules like this, software can become widely reusable.
Figure 10-5 shows
the main ShellGui window created
when the mytools script is run
with its list-based menu layout class on Windows 7, along with menu
tear-offs so that you can see what they contain. This window’s menu
and toolbar are built by GuiMaker, and its Quit and Help buttons
and menu selections trigger quit and help methods inherited from
GuiMixin through the ShellGui module’s superclasses. Are you
starting to see why this book preaches code reuse so often?

Adding GUI Frontends to Command Lines
So far, we’ve coded a general shell tools class library, as well as an application-specific tool set module that names callback handlers in its option menus. To complete the picture, we still need to define the callback handlers run by the GUI, as well as the scripts they ultimately invoke.
Non-GUI scripts
To test the shell GUI’s ability to run command-line scripts, we need a few command-line scripts, of course. At the bottom of the hierarchy, the following two scripts make use of system tools and techniques from Part II to implement a simple text file archive utility. The first, Example 10-7, simply concatenates the contents of multiple text files into a single file, with predefined separator lines between them.
# pack text files into a single file with separator lines (simple archive)

import sys, glob
marker = ':' * 20 + 'textpak=>'      # hopefully unique separator

def pack(ofile, ifiles):
    output = open(ofile, 'w')
    for name in ifiles:
        print('packing:', name)
        input = open(name, 'r').read()        # open the next input file
        if input[-1] != '
': input += '
'   # make sure it has endline
        output.write(marker + name + '
')    # write a separator line
        output.write(input)                   # and write the file's contents

if __name__ == '__main__':
    ifiles = []
    for patt in sys.argv[2:]:
        ifiles += glob.glob(patt)             # not globbed auto on Windows
    pack(sys.argv[1], ifiles)                 # pack files listed on cmdline
The second script, Example 10-8, scans archive files created by the first, to unpack into individual files again.
# unpack files created by packer.py (simple textfile archive)

import sys
from packer import marker             # use common separator key
mlen = len(marker)                    # filenames after markers

def unpack(ifile, prefix='new-'):
    for line in open(ifile):                # for all input lines
        if line[:mlen] != marker:
            output.write(line)              # write real lines
        else:
            name = prefix + line[mlen:-1]   # or make new output
            print('creating:', name)
            output = open(name, 'w')

if __name__ == '__main__': unpack(sys.argv[1])
These scripts are fairly basic, and this GUI part of the book assumes you’ve already scanned the system tools chapters, so we won’t go into their code in depth. Variants of these scripts appeared in the first edition of this book in 1996; I actually used them early on in my Python career to bundle files before I could rely on tools like tar and zip to be present on all the machines I used (and before Python grew tar and zip support modules in its standard library). Their operation is straightforward—consider these three text files:
C:...PP4EGuiShellGui>type spam.txtspam Spam SPAM C:...PP4EGuiShellGui>type eggs.txteggs C:...PP4EGuiShellGui>type ham.txth a m
When run from the command line, the packer script combines them into a single text file, and the unpacker extracts them from there; the packer must take care to glob (expand) filename patterns, because this isn’t done by default in Windows:
C:...PP4EGuiShellGui>packer.py packed.txt *.txtpacking: eggs.txt packing: ham.txt packing: spam.txt C:...PP4EGuiShellGui>unpacker.py packed.txtcreating: new-eggs.txt creating: new-ham.txt creating: new-spam.txt
The result files have a unique name by default (with an added prefix to avoid accidental overwrites, especially during testing), but you otherwise get back what you packed:
C:...PP4EGuiShellGui>type new-spam.txtspam Spam SPAM C:...PP4EGuiShellGui>type packed.txt::::::::::::::::::::textpak=>eggs.txt eggs ::::::::::::::::::::textpak=>ham.txt h a m ::::::::::::::::::::textpak=>spam.txt spam Spam SPAM
These scripts don’t do anything about binary files,
compression, or the like, but they serve to illustrate
command-line scripts that require arguments when run. Although
they can be launched with shell commands as above (and hence
Python tools like os.popen and
subprocess), their logic is
also packaged to be imported and called. For running them from a
GUI, we’ll use the latter direct call interface.
GUI input dialogs
One final piece remains. As is, the packing and unpacking scripts function well as command-line tools. The callback actions named in Example 10-6’s mytools.py GUI, though, are expected to do something GUI-oriented. Because the original file packing and unpacking scripts live in the world of text-based streams and shells, we need to code wrappers that accept input parameters from more GUI-minded users. In particular, we need dialogs that prompt for the command-line arguments required.
First, the module in Example 10-9 and its client script in Example 10-10 use the custom modal dialog techniques we studied in Chapter 8 to pop up an input display to collect pack script parameters. The code in Example 10-9 was split off to a separate module because it’s generally useful, In fact, we will reuse it, in both the unpack dialog and again in PyEdit in Chapter 11.
This is yet another way to automate GUI construction—using it to build a form’s rows trades 7 or more lines of code per row (6 without a linked variable or browse button) for just 1. We’ll see another even more automatic form building approach in Chapter 12’s form.py. The utility here, though, is sufficient to shave dozens of lines of code for nontrivial forms.
""""
create a label+entry row frame, with optional file open browse button;
this is a separate module because it can save code in other programs too;
caller (or callbacks here): retain returned linked var while row is in use;
"""

from tkinter import *                                # widgets and presets
from tkinter.filedialog import askopenfilename       # file selector dialog

def makeFormRow(parent, label, width=15, browse=True, extend=False):
    var = StringVar()
    row = Frame(parent)
    lab = Label(row, text=label + '?', relief=RIDGE, width=width)
    ent = Entry(row, relief=SUNKEN, textvariable=var)
    row.pack(fill=X)                                  # uses packed row frames
    lab.pack(side=LEFT)                               # and fixed-width labels
    ent.pack(side=LEFT, expand=YES, fill=X)           # or use grid(row, col)
    if browse:
        btn = Button(row, text='browse...')
        btn.pack(side=RIGHT)
        if not extend:
            btn.config(command=
                 lambda: var.set(askopenfilename() or var.get()) )
        else:
            btn.config(command=
                 lambda: var.set(var.get() + ' ' + askopenfilename()) )
    return var
Next, Example 10-10’s runPackDialog function is the actual
callback handler invoked when tool names are selected in the main
ShellGui window. It uses the
form row builder module of Example 10-9 and applies
the custom modal dialog techniques we studied earlier.
# popup a GUI dialog for packer script arguments, and run it

from glob import glob                           # filename expansion
from tkinter import *                           # GUI widget stuff
from packer import pack                         # use pack script/module
from formrows import makeFormRow                # use form builder tool

def packDialog():                               # a new top-level window
    win = Toplevel()                            # with 2 row frames + ok button
    win.title('Enter Pack Parameters')
    var1 = makeFormRow(win, label='Output file')
    var2 = makeFormRow(win, label='Files to pack', extend=True)
    Button(win, text='OK', command=win.destroy).pack()
    win.grab_set()
    win.focus_set()                  # go modal: mouse grab, keyboard focus, wait
    win.wait_window()                # wait till destroy; else returns now
    return var1.get(), var2.get()    # fetch linked var values

def runPackDialog():
    output, patterns = packDialog()                  # pop-up GUI dialog
    if output != "" and patterns != "":              # till ok or wm-destroy
        patterns = patterns.split()                  # do non-GUI part now
        filenames = []
        for sublist in map(glob, patterns):          # do expansion manually
            filenames += sublist                     # Unix shells do this auto
        print('Packer:', output, filenames)
        pack(ofile=output, ifiles=filenames)         # should show msgs in GUI too

if __name__ == '__main__':
    root = Tk()
    Button(root, text='popup', command=runPackDialog).pack(fill=X)
    Button(root, text='bye',   command=root.quit).pack(fill=X)
    root.mainloop()
When run standalone, the “popup” button of script in Example 10-10 creates the
input form shown in Figure 10-6;
this is also what we get when its main function is launched by the
mytools.py shell tools GUI.
Users may either type input and output filenames into the entry
fields or press the “browse” buttons to pop up standard file
selection dialogs. They can also enter filename patterns—the
manual glob call in this script
expands filename patterns to match names and filters out
nonexistent input filenames. Again, the Unix command line does
this pattern expansion automatically when running the packer from
a shell, but Windows does not.

When the form is filled in and submitted with its OK button, parameters are finally passed along to the main function of the non-GUI packer script listed earlier to perform file concatenations.
The GUI interface to the unpacking script is simpler because there is only one input field—the name of the packed file to scan. We also get to reuse the form row builder module developed for the packer’s dialog, because this task is so similar. The script in Example 10-11 (and its main function run by the mytools.py shell tool GUI’s selections) generates the input form window shown in Figure 10-7.

# popup a GUI dialog for unpacker script arguments, and run it

from tkinter import *                             # widget classes
from unpacker import unpack                       # use unpack script/module
from formrows import makeFormRow                  # form fields builder

def unpackDialog():
    win = Toplevel()
    win.title('Enter Unpack Parameters')
    var = makeFormRow(win, label='Input file', width=11)
    win.bind('<Key-Return>', lambda event: win.destroy())
    win.grab_set()
    win.focus_set()                  # make myself modal
    win.wait_window()                # till I'm destroyed on return
    return var.get()                 # or closed by wm action

def runUnpackDialog():
    input = unpackDialog()                    # get input from GUI
    if input != '':                           # do non-GUI file stuff
        print('Unpacker:', input)             # run with input from dialog
        unpack(ifile=input, prefix='')

if __name__ == "__main__":
    Button(None, text='popup', command=runUnpackDialog).pack()
    mainloop()
The “browse” button in Figure 10-7 pops up a file selection
dialog just as the packdlg form
did. Instead of an OK button, this dialog binds the Enter
key-press event to kill the window and end the modal wait state
pause; on submission, the name of the packed file is passed to the
main function of the unpacker script shown earlier to perform the
actual file scan process.
Room for improvement
All of this works as advertised—by making command-line tools available in graphical form like this, they become much more attractive to users accustomed to the GUI way of life. We’ve effectively added a simple GUI front-end to command-line tools. Still, two aspects of this design seem prime for improvement.
First, both of the input dialogs use common code to build
the rows of their input forms, but it’s tailored to this specific
use case; we might be able to simplify the dialogs further by
importing a more generic form-builder module instead. We met
general form builder code in Chapters 8 and 9, and we’ll meet more later—see
the form.py module in Chapter 12 for pointers on further
genericizing form construction.
Second, at the point where the user submits input data in either form dialog, we’ve lost the GUI trail—the GUI is blocked, and messages are routed back to the console. The GUI is technically blocked and will not update itself while the pack and unpack utilities run; although these operations are fast enough for my files as to be negligible, we would probably want to spawn these calls off in threads for very large files to keep the main GUI thread active (more on threads later in this chapter).
The console issue is more blatant: packer and unpacker messages still show up in the
stdout console window, not in
the GUI (all the filenames here include full directory paths if
you select them with the GUI’s Browse buttons, courtesy of the
standard Open dialog):
C:...PP4EGuiShellGui	emp> python ..mytools.py list
PP4E scrolledtext
list test
Packer: packed.all ['spam.txt', 'ham.txt', 'eggs.txt']
packing: spam.txt
packing: ham.txt
packing: eggs.txt
Unpacker: packed.all
creating: spam.txt
creating: ham.txt
creating: eggs.txt
This may be less than ideal for a GUI’s users; they may not
expect (or even be able to find) the command-line console. We can
do better here, by redirecting stdout to an object that throws text up
in a GUI window as it is received. You’ll have to read the next
section to see how.
GuiStreams: Redirecting Streams to Widgets
On to our next GUI coding technique: in response to the challenge posed at the end of the last section, the script in Example 10-12 arranges to map input and output sources to pop-up windows in a GUI application, much as we did with strings in the stream redirection topics in Chapter 3. Although this module is really just a first-cut prototype and needs improvement itself (e.g., each input line request pops up a new input dialog—not exactly award winning ergonomics!), it demonstrates the concepts in general.
Example 10-12’s
GuiOutput and GuiInput objects define methods that allow
them to masquerade as files in any interface that expects a real file.
As we learned earlier in Chapter 3,
this includes both the print and
input built-in functions for
accessing standard streams, as well as explicit calls to the read and write methods of file objects. The two
top-level interfaces in this module handle common use cases:
The
redirectedGuiFuncfunction uses this plug-and-play file compatibility to run a function with its standard input and output streams mapped completely to pop-up windows rather than to the console window (or wherever streams would otherwise be mapped in the system shell).The
redirectedGuiShellCmdfunction similarly routes the output of a spawned shell command line to a pop-up window. It can be used to display the output of any program in a GUI—including that printed by a Python program.
The module’s GuiInput and
GuiOutput classes can also be used
or customized directly by clients that need to match a more direct
file method interface or need more fine-grained control over the
process.
"""
###############################################################################
first-cut implementation of file-like classes that can be used to redirect
input and output streams to GUI displays; as is, input comes from a common
dialog pop-up (a single output+input interface or a persistent Entry field
for input would be better); this also does not properly span lines for read
requests with a byte count > len(line); could also add __iter__/__next__ to
GuiInput to support line iteration like files but would be too many popups;
###############################################################################
"""

from tkinter import *
from tkinter.simpledialog import askstring
from tkinter.scrolledtext import ScrolledText    # or PP4E.Gui.Tour.scrolledtext

class GuiOutput:
    font = ('courier', 9, 'normal')              # in class for all, self for one
    def __init__(self, parent=None):
        self.text = None
        if parent: self.popupnow(parent)         # pop up now or on first write

    def popupnow(self, parent=None):             # in parent now, Toplevel later
        if self.text: return
        self.text = ScrolledText(parent or Toplevel())
        self.text.config(font=self.font)
        self.text.pack()

    def write(self, text):
        self.popupnow()
        self.text.insert(END, str(text))
        self.text.see(END)
        self.text.update()                       # update gui after each line

    def writelines(self, lines):                 # lines already have '
'
        for line in lines: self.write(line)      # or map(self.write, lines)

class GuiInput:
    def __init__(self):
        self.buff = ''

    def inputLine(self):
        line = askstring('GuiInput', 'Enter input line + <crlf> (cancel=eof)')
        if line == None:
            return ''                            # pop-up dialog for each line
        else:                                    # cancel button means eof
            return line + '
'                   # else add end-line marker

    def read(self, bytes=None):
        if not self.buff:
            self.buff = self.inputLine()
        if bytes:                                # read by byte count
            text = self.buff[:bytes]             # doesn't span lines
            self.buff = self.buff[bytes:]
        else:
            text = ''                            # read all till eof
            line = self.buff
            while line:
                text = text + line
                line = self.inputLine()          # until cancel=eof=''
        return text

    def readline(self):
        text = self.buff or self.inputLine()     # emulate file read methods
        self.buff = ''
        return text

    def readlines(self):
        lines = []                               # read all lines
        while True:
            next = self.readline()
            if not next: break
            lines.append(next)
        return lines

def redirectedGuiFunc(func, *pargs, **kargs):
    import sys
    saveStreams = sys.stdin, sys.stdout          # map func streams to pop ups
    sys.stdin   = GuiInput()                     # pops up dialog as needed
    sys.stdout  = GuiOutput()                    # new output window per call
    sys.stderr  = sys.stdout
    result = func(*pargs, **kargs)               # this is a blocking call
    sys.stdin, sys.stdout = saveStreams
    return result

def redirectedGuiShellCmd(command):
    import os
    input  = os.popen(command, 'r')
    output = GuiOutput()
    def reader(input, output):                   # show a shell command's
        while True:                              # standard output in a new
            line = input.readline()              # pop-up text box widget;
            if not line: break                   # the readline call may block
            output.write(line)
    reader(input, output)

if __name__ == '__main__':                       # self test when run
    def makeUpper():                             # use standard streams
        while True:
            try:
                line = input('Line? ')
            except:
                break
            print(line.upper())
        print('end of file')

    def makeLower(input, output):                # use explicit files
        while True:
            line = input.readline()
            if not line: break
            output.write(line.lower())
        print('end of file')

    root = Tk()
    Button(root, text='test streams',
           command=lambda: redirectedGuiFunc(makeUpper)).pack(fill=X)
    Button(root, text='test files  ',
           command=lambda: makeLower(GuiInput(), GuiOutput()) ).pack(fill=X)
    Button(root, text='test popen  ',
           command=lambda: redirectedGuiShellCmd('dir *')).pack(fill=X)
    root.mainloop()
As coded here, GuiOutput
attaches a ScrolledText (Python’s
standard library flavor) to either a passed-in parent container or a
new top-level window popped up to serve as the container on the first
write call. GuiInput pops up a new
standard input dialog every time a read request requires a new line of
input. Neither one of these policies is ideal for all scenarios (input
would be better mapped to a more long-lived widget), but they prove
the general point intended.
Figure 10-8
shows the scene generated by this script’s self-test code, after
capturing the output of a Windows shell dir listing command (on the left) and two
interactive loop tests (the one with “Line?” prompts and uppercase
letters represents the makeUpper
streams redirection test). An input dialog has just popped up for a
new makeLower files interface
test.

This scene may not be spectacular to look at, but it reflects file and stream input and output operations being automatically mapped to GUI devices—as we’ll see in a moment, this accomplishes most of the solution to the prior section’s closing challenge.
Before we move on, we should note that this module’s calls to a
redirected function as well as its loop that reads from a spawned
shell command are potentially blocking—they won’t
return to the GUI’s event loop until the function or shell command
exits. Although GuiOutput takes
care to call tkinter’s update
method to update the display after each line is written, this module
has no control in general over the duration of functions or shell
commands it runs.
In redirectedGuiShellCmd, for
example, the call to input.readline
will pause until an output line is received from the spawned program,
rendering the GUI unresponsive. Because the output object runs an
update call, the display is still updated during the program’s
execution (an update call enters the Tk event loop momentarily), but
only as often as lines are received from the spawned program. In
addition, because of this function’s loop, the GUI is committed to the
shell command in general until it exits.
Calls to a redirected function in redirectedGuiFunc are similarly blocking in
general; moreover, during the call’s duration the display is updated
only as often as the function issues output requests. In other words,
this blocking model is simplistic and might be an issue in a larger
GUI. We’ll revisit this later in the chapter when we meet threads. For
now, the code suits our present purpose.
Using Redirection for the Packing Scripts
Now, finally, to use such redirection tools to map command-line script output back to a GUI, we simply run calls and command lines with the two redirected functions in this module. Example 10-13 shows one way to wrap the packing operation dialog of the shell GUI section’s Example 10-10 to force its printed output to appear in a pop-up window when generated, instead of in the console.
# wrap command-line script in GUI redirection tool to pop up its output

from tkinter import *
from packdlg import runPackDialog
from PP4E.Gui.Tools.guiStreams import redirectedGuiFunc

def runPackDialog_Wrapped():            # callback to run in mytools.py
    redirectedGuiFunc(runPackDialog)    # wrap entire callback handler

if __name__ == '__main__':
    root = Tk()
    Button(root, text='pop', command=runPackDialog_Wrapped).pack(fill=X)
    root.mainloop()
You can run this script directly to test its effect, without
bringing up the ShellGui window.
Figure 10-9 shows the
resulting stdout window after the
pack input dialog is dismissed. This window pops up as soon as
script output is generated, and it is a bit more GUI user friendly
than hunting for messages in a console. You can similarly code the
unpack parameters dialog to route its output to a pop-up. Simply
change mytools.py in Example 10-6 to register code
like the function wrapper here as its callback handlers.
In fact, you can use this technique to route the output of any function call or command line to a pop-up window; as usual, the notion of compatible object interfaces is at the heart of much of Python code’s flexibility.

Reloading Callback Handlers Dynamically
Our next GUI programming technique is all about changing a GUI while it is
running—the ultimate in
customization. The Python imp.reload function lets you dynamically
change and reload a program’s modules without stopping the program.
For instance, you can bring up a text editor window to change the
source code of selected parts of a system while it is running and see
those changes show up immediately after reloading the changed
module.
This is a powerful feature, especially for developing programs
that take a long time to restart. Programs that connect to databases
or network servers, initialize large objects, implement long-running
services, or travel through a long series of steps to retrigger a
callback are prime candidates for reload. It can shave substantial time from
the development cycle and make systems more flexible.
The catch for GUIs, though, is that because callback handlers
are registered as object references rather than
module and object names, reloads of callback handler functions are
ineffective after the callback has been registered. The Python
imp.reload operation works by
changing a module object’s contents in place. Because tkinter stores a
pointer to the registered handler object directly, though, it is
oblivious to any reloads of the module that the handler came from.
That is, tkinter will still reference a module’s old objects even
after the module is reloaded and changed.
This is a subtle thing, but you really only need to remember that you must do something special to reload callback handler functions dynamically. Not only do you need to explicitly request reloading of the modules that you change, but you must also generally provide an indirection layer that routes callbacks from registered objects to modules so that reloads have impact.
For example, the script in Example 10-14 goes the extra mile to indirectly dispatch callbacks to functions in an explicitly reloaded module. The callback handlers registered with tkinter are method objects that do nothing but reload and dispatch again. Because the true callback handler functions are fetched through a module object, reloading that module makes the latest versions of the functions accessible.
# reload callback handlers dynamically

from tkinter import *
import radactions           # get initial callback handlers
from imp import reload      # moved to a module in Python 3.X

class Hello(Frame):
    def __init__(self, master=None):
        Frame.__init__(self, master)
        self.pack()
        self.make_widgets()

    def make_widgets(self):
        Button(self, text='message1', command=self.message1).pack(side=LEFT)
        Button(self, text='message2', command=self.message2).pack(side=RIGHT)

    def message1(self):
        reload(radactions)         # need to reload actions module before calling
        radactions.message1()      # now new version triggered by pressing button

    def message2(self):
        reload(radactions)         # changes to radactions.py picked up by reload
        radactions.message2(self)  # call the most recent version; pass self

    def method1(self):
        print('exposed method...')       # called from radactions function

Hello().mainloop()
When run, this script makes a two-button window that triggers
the message1 and message2 methods. Example 10-15 contains the
actual callback handler code. Its functions receive a self argument that gives access back to the
Hello class object, as though these
were real methods. You can change this file any number of times while
the rad script’s GUI is active;
each time you do so, you’ll change the behavior of the GUI when a
button press occurs.
# callback handlers: reloaded each time triggered

def message1():                 # change me
    print('spamSpamSPAM')       # or could build a dialog...

def message2(self):
    print('Ni! Ni!')            # change me
    self.method1()              # access the 'Hello' instance...
Try running rad and editing
the messages printed by radactions
in another window; you should see your new messages printed in the
stdout console window each time the
GUI’s buttons are pressed. This example is deliberately simple to
illustrate the concept, but the actions reloaded like this in practice
might build pop-up dialogs, new top-level windows, and so on.
Reloading the code that creates such windows would also let us
dynamically change their appearances.
There are other ways to change a GUI while it’s running. For
instance, we saw in Chapter 9
that appearances can be altered at any time by calling the widget
config method, and widgets can be
added and deleted from a display dynamically with methods such as
pack_forget and pack (and their grid manager relatives). Furthermore,
passing a new command=action
option setting to a widget’s config
method might reset a callback handler to a new action object on the
fly; with enough support code, this may be a viable alternative to the
indirection scheme used earlier to make reloads more effective in
GUIs.
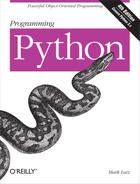
Of course, not all GUIs need to be so dynamic. Imagine a game which allows character modification, though—dynamic reloads in such a system can greatly enhance their utility. (I’ll leave the task of extending this example with a massively multiplayer online role-playing game server as suggested exercise.)
Wrapping Up Top-Level Window Interfaces
Top-level window interfaces were introduced in Chapter 8. This section picks up where that introduction left off and wraps up those interfaces in classes that automate much of the work of building top-level windows—setting titles, finding and displaying window icons, issuing proper close actions based on a window’s role, intercepting window manager close button clicks, and so on.
Example 10-16 provides wrapper classes for the most common window types—a main application window, a transient pop-up window, and an embedded GUI component window. These window types vary slightly in terms of their close operations, but most inherit common functionality related to window borders: icons, titles, and close buttons. By creating, mixing in, or subclassing the class for the type of window you wish to make, you’ll get all its setup logic for free.
"""
###############################################################################
Classes that encapsulate top-level interfaces.
Allows same GUI to be main, pop-up, or attached; content classes may inherit
from these directly, or be mixed together with them per usage mode; may also
be called directly without a subclass; designed to be mixed in after (further
to the right than) app-specific classes: else, subclass gets methods here
(destroy, okayToQuit), instead of from app-specific classes--can't redefine.
###############################################################################
"""

import os, glob
from tkinter import Tk, Toplevel, Frame, YES, BOTH, RIDGE
from tkinter.messagebox import showinfo, askyesno

class _window:
    """
    mixin shared by main and pop-up windows
    """
    foundicon = None                                       # shared by all inst
    iconpatt  = '*.ico'                                    # may be reset
    iconmine  = 'py.ico'

    def configBorders(self, app, kind, iconfile):
        if not iconfile:                                   # no icon passed?
            iconfile = self.findIcon()                     # try curr,tool dirs
        title = app
        if kind: title += ' - ' + kind
        self.title(title)                                  # on window border
        self.iconname(app)                                 # when minimized
        if iconfile:
            try:
                self.iconbitmap(iconfile)                  # window icon image
            except:                                        # bad py or platform
                pass
        self.protocol('WM_DELETE_WINDOW', self.quit)       # don't close silent

    def findIcon(self):
        if _window.foundicon:                              # already found one?
            return _window.foundicon
        iconfile  = None                                   # try curr dir first
        iconshere = glob.glob(self.iconpatt)               # assume just one
        if iconshere:                                      # del icon for red Tk
            iconfile = iconshere[0]
        else:                                              # try tools dir icon
            mymod  = __import__(__name__)                  # import self for dir
            path   = __name__.split('.')                   # poss a package path
            for mod in path[1:]:                           # follow path to end
                mymod = getattr(mymod, mod)                # only have leftmost
            mydir  = os.path.dirname(mymod.__file__)
            myicon = os.path.join(mydir, self.iconmine)    # use myicon, not tk
            if os.path.exists(myicon): iconfile = myicon
        _window.foundicon = iconfile                       # don't search again
        return iconfile

class MainWindow(Tk, _window):
    """
    when run in main top-level window
    """
    def __init__(self, app, kind='', iconfile=None):
        Tk.__init__(self)
        self.__app = app
        self.configBorders(app, kind, iconfile)

    def quit(self):
        if self.okayToQuit():                                # threads running?
            if askyesno(self.__app, 'Verify Quit Program?'):
                self.destroy()                               # quit whole app
        else:
            showinfo(self.__app, 'Quit not allowed')         # or in okayToQuit?

    def destroy(self):                                       # exit app silently
        Tk.quit(self)                                        # redef if exit ops

    def okayToQuit(self):                                    # redef me if used
        return True                                          # e.g., thread busy

class PopupWindow(Toplevel, _window):
    """
    when run in secondary pop-up window
    """
    def __init__(self, app, kind='', iconfile=None):
        Toplevel.__init__(self)
        self.__app = app
        self.configBorders(app, kind, iconfile)

    def quit(self):                                        # redef me to change
        if askyesno(self.__app, 'Verify Quit Window?'):    # or call destroy
            self.destroy()                                 # quit this window

    def destroy(self):                                     # close win silently
        Toplevel.destroy(self)                             # redef for close ops

class QuietPopupWindow(PopupWindow):
    def quit(self):
        self.destroy()                                     # don't verify close

class ComponentWindow(Frame):
    """
    when attached to another display
    """
    def __init__(self, parent):                            # if not a frame
        Frame.__init__(self, parent)                       # provide container
        self.pack(expand=YES, fill=BOTH)
        self.config(relief=RIDGE, border=2)                # reconfig to change

    def quit(self):
        showinfo('Quit', 'Not supported in attachment mode')

    # destroy from Frame: erase frame silent               # redef for close ops
So why not just set an application’s icon and title by calling protocol methods directly? For one thing, those are the sorts of details that are easy to forget (you will probably wind up cutting and pasting code much of the time). For another, these classes add higher-level functionality that we might otherwise have to code redundantly. Among other things, the classes arrange for automatic quit verification dialog pop ups and icon file searching. For instance, the window classes always search the current working directory and the directory containing this module for a window icon file, once per process.
By using classes that encapsulate—that is, hide—such details, we inherit powerful tools without having to think about their implementation again in the future. Moreover, by using such classes, we’ll give our applications a standard look-and-feel and behavior. And if we ever need to change that appearance or behavior, we have to change code in only one place, not in every window we implement.
To test this utility module, Example 10-17 exercises its classes in a variety of modes—as mix-in classes, as superclasses, and as calls from nonclass code.
# must import windows to test, else __name__ is __main__ in findIcon

from tkinter import Button, mainloop
from windows import MainWindow, PopupWindow, ComponentWindow

def _selftest():

    # mixin usage
    class content:
        "same code used as a Tk, Toplevel, and Frame"
        def __init__(self):
            Button(self, text='Larch', command=self.quit).pack()
            Button(self, text='Sing ', command=self.destroy).pack()

    class contentmix(MainWindow, content):
        def __init__(self):
            MainWindow.__init__(self, 'mixin', 'Main')
            content.__init__(self)
    contentmix()

    class contentmix(PopupWindow, content):
        def __init__(self):
            PopupWindow.__init__(self, 'mixin', 'Popup')
            content.__init__(self)
    prev = contentmix()

    class contentmix(ComponentWindow, content):
        def __init__(self):                               # nested frame
            ComponentWindow.__init__(self, prev)          # on prior window
            content.__init__(self)                        # Sing erases frame
    contentmix()

    # subclass usage
    class contentsub(PopupWindow):
        def __init__(self):
            PopupWindow.__init__(self, 'popup', 'subclass')
            Button(self, text='Pine', command=self.quit).pack()
            Button(self, text='Sing', command=self.destroy).pack()
    contentsub()

    # non-class usage
    win = PopupWindow('popup', 'attachment')
    Button(win, text='Redwood', command=win.quit).pack()
    Button(win, text='Sing   ', command=win.destroy).pack()
    mainloop()

if __name__ == '__main__':
    _selftest()
When run, the test generates the window in Figure 10-10. All generated windows get a blue “PY” icon automatically, and intercept and verify the window manager’s upper right corner “X” close button, thanks to the search and configuration logic they inherit from the window module’s classes. Some of the buttons on the test windows close just the enclosing window, some close the entire application, some erase an attached window, and others pop up a quit verification dialog. Run this on your own to see what the examples’ buttons do, so you can correlate with the test code; quit actions are tailored to make sense for the type of window being run.

We’ll use these window protocol wrappers in the next chapter’s PyClock example, and then again later in Chapter 14 where they’ll come in handy to reduce the complexity of the PyMailGUI program. Part of the benefit of doing OOP in Python now is that we can forget the details later.
GUIs, Threads, and Queues
In Chapter 5, we learned about threads and the queue mechanism that threads typically use to communicate with one another. We also described the application of those ideas to GUIs in the abstract. In Chapter 9, we specialized some of these topics to the tkinter GUI toolkit we’re using in this book and expanded on the threaded GUI model in general, including thread safety (or lack thereof) and the roles of queues and locks.
Now that we’ve become fully functional GUI programmers, we can finally see what these ideas translate to in terms of code. If you skipped the related material in Chapter 5 or Chapter 9, you should probably go back and take a look first; we won’t be repeating the thread or queue background material in its entirety here.
The application to GUIs, however, is straightforward. Recall that long-running operations must generally be run in parallel threads, to avoid blocking the GUI from updating itself or responding to new user requests. Long-running operations can include time-intensive function calls, downloads from servers, blocking input/output calls, and any task which might insert a noticeable delay. In our packing and unpacking examples earlier in this chapter, for instance, we noted that the calls to run the actual file processing should generally run in threads so that the main GUI thread is not blocked until they finish.
In the general case, if a GUI waits for anything to finish, it
will be completely unresponsive during the wait—it can’t be resized,
it can’t be minimized, and it won’t even redraw itself if it is
covered and uncovered by other windows. To avoid being blocked this
way, the GUI must run long-running tasks in parallel, usually with
threads that can share program state. That way, the main GUI thread is
freed up to update the display and respond to new user interactions
while threads do other work. As we’ve also seen, the tkinter update call can help in some contexts, but
it only refreshes the display when it can be called; threads fully
parallelize long-running operations and offer a more general
solution.
However, because, as we learned in Chapter 9, only the main thread should generally update a GUI’s display, threads you start to handle long-running tasks should not update the display with results themselves. Rather, they should place data on a queue (or other mechanism), to be picked up and displayed by the main GUI thread. To make this work, the main thread typically runs a timer-based loop that periodically checks the queue for new results to be displayed. Spawned threads produce and queue data but know nothing about the GUI; the main GUI thread consumes and displays results but does not generate them.
Because of its division of labor, we usually call this a producer/consumer model—task threads produce data which the GUI thread consumes. The long-running task threads are also sometimes called workers, because they handle the work of producing results behind the scenes, for the GUI to present to a user. In some sense, the GUI is also a client to worker thread servers, though that terminology is usually reserved for more specific process-based roles; servers provide data sources which are longer-lived and more loosely coupled (though a GUI can also display data from independent servers). Whatever we call it, this model both avoids blocking the GUI while tasks run and avoids potentially parallel updates to the GUI itself.
As a more concrete example, suppose your GUI needs to display telemetry data sent in real time from a satellite over sockets (an IPC tool introduced in Chapter 5). Your program has to be responsive enough to not lose incoming data, but it also cannot get stuck waiting for or processing that data. To achieve both goals, spawn threads that fetch the incoming data and throw it on a queue, to be picked up and displayed periodically by the main GUI thread. With such a separation of labor, the GUI isn’t blocked by the satellite, nor vice versa—the GUI itself will run independently of the data streams, but because the data stream threads can run at full speed, they’ll be able to pick up incoming data as fast as it’s sent. GUI event loops are not generally responsive enough to handle real-time inputs. Without the data stream threads, we might lose incoming telemetry; with them, we’ll receive data as it is sent and display it as soon as the GUI’s event loop gets around to picking it up off the queue—plenty fast for the real human user to see. If no data is sent, only the spawned threads wait, not the GUI itself.
In other scenarios, threads are required just so that the GUI remains active during long-running tasks. While downloading a reply from a web server, for example, your GUI must be able to redraw itself if covered or resized. Because of that, the download call cannot be a simple function call; it must run in parallel with the rest of your program—typically, as a thread. When the result is fetched, the thread must notify the GUI that data is ready to be displayed; by placing the result on a queue, the notification is simple—the main GUI thread will find it the next time it checks the queue in its timer callback function. For example, we’ll use threads and queues this way in the PyMailGUI program in Chapter 14, to allow multiple overlapping mail transfers to occur without blocking the GUI itself.
Placing Data on Queues
Whether your GUIs interface with satellites, websites, or something else, this
thread-based model turns out to be fairly simple in terms of code.
Example 10-18 is the GUI
equivalent of the queue-based threaded program we met earlier in
Chapter 5 (compare this with Example 5-14). In the context of a
GUI, the consumer thread becomes the GUI itself, and producer
threads add data to be displayed to the shared queue as it is
produced. The main GUI thread uses the tkinter after method to check the queue for
results instead of an explicit loop.
# GUI that displays data produced and queued by worker threads

import _thread, queue, time
dataQueue = queue.Queue()    # infinite size

def producer(id):
    for i in range(5):
        time.sleep(0.1)
        print('put')
        dataQueue.put('[producer id=%d, count=%d]' % (id, i))

def consumer(root):
    try:
        print('get')
        data = dataQueue.get(block=False)
    except queue.Empty:
        pass
    else:
        root.insert('end', 'consumer got => %s
' % str(data))
        root.see('end')
    root.after(250, lambda: consumer(root))    # 4 times per sec

def makethreads():
    for i in range(4):
        _thread.start_new_thread(producer, (i,))

if __name__ == '__main__':
    # main GUI thread: spawn batch of worker threads on each mouse click
    from tkinter.scrolledtext import ScrolledText
    root = ScrolledText()
    root.pack()
    root.bind('<Button-1>', lambda event: makethreads())
    consumer(root)                       # start queue check loop in main thread
    root.mainloop()                      # pop-up window, enter tk event loop
Observe how we fetch one queued data item per timer event here. This is on purpose; although we could loop through all the data items queued on each timer event, this might block the GUI indefinitely in pathological cases where many items are queued quickly (imagine a fast telemetry interface suddenly queueing hundreds or thousands of results all at once). Processing one item at a time ensures that the GUI will return to its event loop to update the display and process new user inputs without becoming blocked. The downside of this approach is that it may take awhile to work through very many items placed on the queue. Hybrid schemes, such as dispatching at most N queued items per timer event callback, might be useful in some such scenarios; we’ll see an example like this later in this section (Example 10-20).
When this script is run, the main GUI thread displays the data
it grabs off the queue in the ScrolledText window captured in Figure 10-11. A new batch of four
producer threads is started each time you left-click in the window,
and threads issue “get” and “put” messages to the standard output
stream (which isn’t synchronized in this example—printed messages
might overlap occasionally on some platforms, including Windows).
The producer threads issue sleep calls to simulate long-running
tasks such as downloading mail, fetching a query result, or waiting
for input to show up on a socket (more on sockets later in this
chapter). I left-clicked multiple times to encourage thread overlap
in Figure 10-11.
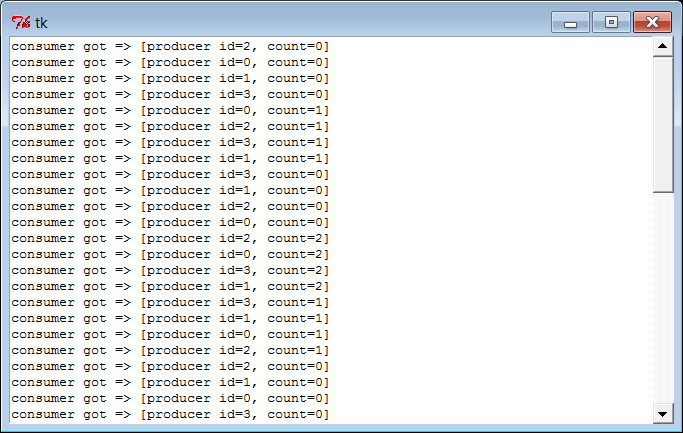
Recoding with classes and bound methods
Example 10-19 takes the model one small step further and migrates it to a class to allow for future customization and reuse. Its operation, window, and output are the same as the prior non-object-oriented version, but the queue is checked more often, and there are no standard output prints. Notice how we use bound methods for button callbacks and thread actions here; because bound methods retain both instance and method, the threaded action has access to state information, including the shared queue. This allows us to move the queue and the window itself from the prior version’s global variables to instance object state.
# GUI that displays data produced and queued by worker threads (class-based)

import threading, queue, time
from tkinter.scrolledtext import ScrolledText       # or PP4E.Gui.Tour.scrolledtext

class ThreadGui(ScrolledText):
    threadsPerClick = 4

    def __init__(self, parent=None):
        ScrolledText.__init__(self, parent)
        self.pack()
        self.dataQueue = queue.Queue()              # infinite size
        self.bind('<Button-1>', self.makethreads)   # on left mouse click
        self.consumer()                             # queue loop in main thread

    def producer(self, id):
        for i in range(5):
            time.sleep(0.1)
            self.dataQueue.put('[producer id=%d, count=%d]' % (id, i))

    def consumer(self):
        try:
            data = self.dataQueue.get(block=False)
        except queue.Empty:
            pass
        else:
            self.insert('end', 'consumer got => %s
' % str(data))
            self.see('end')
        self.after(100, self.consumer)    # 10 times per sec

    def makethreads(self, event):
        for i in range(self.threadsPerClick):
            threading.Thread(target=self.producer, args=(i,)).start()

if __name__ == '__main__':
    root = ThreadGui()      # in main thread: make GUI, run timer loop
    root.mainloop()         # pop-up window, enter tk event loop
Watch for this thread, timer loop, and shared queue technique to resurface later in this chapter, as well as in Chapter 11’s more realistic PyEdit program example. In PyEdit, we’ll use it to run external file searches in threads, so they avoid blocking the GUI and may overlap in time. We’ll also revisit the classic producer/consumer thread queue model in a more realistic scenario later in this chapter, as a way to avoid blocking a GUI that must read an input stream—the output of another program.
Thread exits in GUIs
Example 10-19
also uses Python’s threading module
instead of _thread. This would
normally mean that, unlike the prior version, the program would
not exit if any producer threads are still running, unless they
are made daemons manually by setting their daemon flag to True. Remember that under threading, programs exit when only
daemonic threads remain; the producer threads here inherit a
False daemon value from the
thread that creates them, which prevents program exit while they
run.
However, in this example the spawned threads finish too
quickly to noticeably defer program exit. Change this script’s
time.sleep call to 2.0 seconds
to simulate longer-lived worker threads and witness this effect in
action—closing the window after a left-click erases the window,
but the program itself then does not exit for roughly 10 seconds
(e.g., its shell window is paused). If you do the same to the
prior _thread version, or set
this version’s threads’ daemon
flags to True, the program
exits immediately instead.
In more realistic GUIs, you’ll want to analyze exit policies
in the context of running threads, and code accordingly; both
nondaemonic threading threads
and thread locks in general can be used to defer exits if needed.
Conversely, a perpetually running threading thread might preclude a
desired shutdown if nondaemonic. See Chapter 5 for more on program exits and
daemonic threads (and other scary topics!).
Placing Callbacks on Queues
In the prior section’s examples, the data placed on the queue is always a string. That’s sufficient for simple applications where there is just one type of producer. If you may have many different kinds of threads producing many different types of results running at once, though, this can become difficult to manage. You’ll probably have to insert and parse out some sort of type or action information in the string so that the GUI knows how to process it.
Imagine an email client, for instance, where multiple sends and receives may overlap in time; if all threads share the same single queue, the information they place on it must somehow designate the sort of event it represents—a downloaded mail to display, a progress indicator update, a successful send completion, and so on. This isn’t entirely hypothetical: we’ll confront this exact issue in Chapter 14’s PyMailGUI.
Luckily, queues support much more than just strings—any type of Python object can be placed on a queue. Perhaps the most general of these is a callable object: by placing a function or other callable object on the queue, a producer thread can tell the GUI how to handle the message in a very direct way. The GUI simply calls the objects it pulls off the queue. Since threads all run within the same process and memory space, any type of callable object works on a queue—simple functions, lambdas, and even bound methods that combine a function with an implied subject object that gives access to state information and methods. Any updates performed by the callback object update state shared across the entire process.
Because Python makes it easy to handle functions and their
argument lists in generic fashion, this turns out to be easier than
it might sound. Example 10-20, for instance,
shows one way to throw callbacks on a queue that we’ll be using in
Chapter 14 for PyMailGUI. This module
comes with a handful of tools. Its ThreadCounter class can be used as a
shared counter and Boolean flag (for example, to manage operation
overlap). The real meat here, though, is the queue interface
functions—in short, they allow clients to launch threads which queue
their exit actions, to be dispatched in the main thread by a timer
loop.
In some ways this example is just a variation on those of the prior section—we still run a timer loop here to pull items off the queue in the main thread. For both responsiveness and efficiency, this timer loop pulls at most N items on each timer event, not just one (which may take too long or incur overheads for a short timer delay), and not all queued (which may block indefinitely when many items are produced quickly). We’ll leverage this per-event batching feature to work through many progress updates in PyMailGUI without having to devote CPU resources to quick timer events that are normally unnecessary.
The main difference to notice here, though, is that we call the object pulled off the queue, and the producer threads have been generalized to place a success or failure callback on the queue in response to exits and exceptions. Moreover, the actions that run in producer threads receive a progress status function which, when called, simply adds a progress indicator callback to the queue to be dispatched by the main thread. We can use this, for example, to show progress in the GUI during network downloads.
"""
#################################################################################
System-wide thread interface utilities for GUIs.

Implements a single thread callback queue and checker timer loop shared by
all the windows in a program; worker threads queue their exit and progress
actions to be run in the main thread; this doesn't block the GUI - it just
spawns operations and manages and dispatches exits and progress; worker
threads can overlap freely with the main thread, and with other workers.

Using a queue of callback functions and arguments is more useful than a
simple data queue if there can be many kinds of threads running at the
same time - each kind may have different implied exit actions.

Because GUI API is not completely thread-safe, instead of calling GUI
update callbacks directly after thread main action, place them on a shared
queue, to be run from a timer loop in the main thread, not a child thread;
this also makes GUI update points less random and unpredictable; requires
threads to be split into main action, exit actions, and progress action.

Assumes threaded action raises an exception on failure, and has a 'progress'
callback argument if it supports progress updates;  also assumes callbacks
are either short-lived or update as they run, and that queue will contain
callback functions (or other callables) for use in a GUI app - requires a
widget in order to schedule and catch 'after' event loop callbacks; to use
this model in non-GUI contexts, could use simple thread timer instead.
#################################################################################
"""

# run even if no threads                 # in standard lib now
try:                                     # raise ImportError to
    import _thread as thread             # run with GUI blocking
except ImportError:                      # if threads not available
    import _dummy_thread as thread       # same interface, no threads

# shared cross-process queue
# named in shared global scope, lives in shared object memory
import queue, sys
threadQueue = queue.Queue(maxsize=0)              # infinite size


#################################################################################
# IN MAIN THREAD - periodically check thread completions queue; run implied GUI
# actions on queue in this main GUI thread; one consumer (GUI), and multiple
# producers (load, del, send); a simple list may suffice too: list.append and
# pop atomic?; 4E: runs at most N actions per timer event: looping through all
# queued callbacks on each timer event may block GUI indefinitely, but running
# only one can take a long time or consume CPU for timer events (e.g., progress);
# assumes callback is either short-lived or updates display as it runs: after a
# callback run, the code here reschedules and returns to event loop and updates;
# because this perpetual loop runs in main thread, does not stop program exit;
#################################################################################

def threadChecker(widget, delayMsecs=100, perEvent=1):       # 10x/sec, 1/timer
    for i in range(perEvent):                                # pass to set speed
        try:
            (callback, args) = threadQueue.get(block=False)  # run <= N callbacks
        except queue.Empty:
            break                                            # anything ready?
        else:
            callback(*args)                                  # run callback here

    widget.after(delayMsecs,                                 # reset timer event
        lambda: threadChecker(widget, delayMsecs, perEvent)) # back to event loop


#################################################################################
# IN A NEW THREAD - run action, manage thread queue puts for exits and progress;
# run action with args now, later run on* calls with context; calls added to
# queue here are dispatched in main thread only, to avoid parallel GUI updates;
# allows action to be fully ignorant of use in a thread here; avoids running
# callbacks in thread directly: may update GUI in thread, since passed func in
# shared memory called in thread; progress callback just adds callback to queue
# with passed args; don't update in-progress counters here: not finished till
# exit actions taken off queue and dispatched in main thread by threadChecker;
#################################################################################

def threaded(action, args, context, onExit, onFail, onProgress):
    try:
        if not onProgress:            # wait for action in this thread
            action(*args)             # assume raises exception if fails
        else:
            def progress(*any):
                threadQueue.put((onProgress, any + context))
            action(progress=progress, *args)
    except:
        threadQueue.put((onFail, (sys.exc_info(), ) + context))
    else:
        threadQueue.put((onExit, context))

def startThread(action, args, context, onExit, onFail, onProgress=None):
    thread.start_new_thread(
        threaded, (action, args, context, onExit, onFail, onProgress))


#################################################################################
# a thread-safe counter or flag: useful to avoid operation overlap if threads
# update other shared state beyond that managed by the thread callback queue
#################################################################################

class ThreadCounter:
    def __init__(self):
        self.count = 0
        self.mutex = thread.allocate_lock()     # or use Threading.semaphore
    def incr(self):
        self.mutex.acquire()                    # or with self.mutex:
        self.count += 1
        self.mutex.release()
    def decr(self):
        self.mutex.acquire()
        self.count -= 1
        self.mutex.release()
    def __len__(self): return self.count        # True/False if used as a flag


#################################################################################
# self-test code: split thread action into main, exits, progress
#################################################################################

if __name__ == '__main__':                      # self-test code when run
    import time                                 # or PP4E.Gui.Tour.scrolledtext
    from tkinter.scrolledtext import ScrolledText

    def onEvent(i):                             # code that spawns thread
        myname = 'thread-%s' % i
        startThread(
            action     = threadaction,
            args       = (i, 3),
            context    = (myname,),
            onExit     = threadexit,
            onFail     = threadfail,
            onProgress = threadprogress)

    # thread's main action
    def threadaction(id, reps, progress):       # what the thread does
        for i in range(reps):
            time.sleep(1)
            if progress: progress(i)            # progress callback: queued
        if id % 2 == 1: raise Exception         # odd numbered: fail

    # thread exit/progress callbacks: dispatched off queue in main thread
    def threadexit(myname):
        text.insert('end', '%s	exit
' % myname)
        text.see('end')

    def threadfail(exc_info, myname):
        text.insert('end', '%s	fail	%s
' % (myname, exc_info[0]))
        text.see('end')

    def threadprogress(count, myname):
        text.insert('end', '%s	prog	%s
' % (myname, count))
        text.see('end')
        text.update()   # works here: run in main thread

    # make enclosing GUI and start timer loop in main thread
    # spawn batch of worker threads on each mouse click: may overlap

    text = ScrolledText()
    text.pack()
    threadChecker(text)                 # start thread loop in main thread
    text.bind('<Button-1>',             # 3.x need list for map, range ok
              lambda event: list(map(onEvent, range(6))) )
    text.mainloop()                     # pop-up window, enter tk event loop
This module’s comments describe its implementation, and its self-test code demonstrates how this interface is used. Notice how a thread’s behavior is split into main action, exit actions, and optional progress action—the main action runs in the new thread, but the others are queued to be dispatched in the main thread. That is, to use this module, you will essentially break a modal operation into thread and post-thread steps, with an optional progress call. Generally, only the thread step should be long running.
When Example 10-20
is run standalone, on each button click in a ScrolledTest, it starts up six threads,
all running the threadaction
function. As this threaded function runs, calls to the passed-in
progress function place a callback on the queue, which invokes
threadprogress in the main
thread. When the threaded function exits, the interface layer will
place a callback on the queue that will invoke either threadexit or threadfail in the main thread, depending
upon whether the threaded function raised an exception. Because all
the callbacks placed on the queue are pulled off and run in the main
thread’s timer loop, this guarantees that GUI updates occur in the
main thread only and won’t overlap in parallel.
Figure 10-12 shows part of the output generated after clicking the example’s window. Its exit, failure, and progress messages are produced by callbacks added to the queue by spawned threads and invoked from the timer loop running in the main thread.

Study this code for more details and try to trace through the
self-test code. This is a bit complex, and you may have to make more
than one pass over this code to make sense of its juggling act. Once
you get the hang of this paradigm, though, it provides a general
scheme for handling heterogeneous overlapping threads in a uniform
way. PyMailGUI, for example, will do very much the same as onEvent in the self-test code here,
whenever it needs to start a mail transfer.
Passing bound method callbacks on queues
Technically, to make this even more flexible, PyMailGUI in Chapter 14 will queue bound methods with this module—callable objects that, as mentioned, pair a method function with an instance that gives access to state information and other methods. In this mode, the thread manager module’s client code takes a form that looks more like Example 10-21: a revision of the prior example’s self-test using classes and methods.
# tests thread callback queue, but uses class bound methods for action and callbacks

import time
from threadtools import threadChecker, startThread
from tkinter.scrolledtext import ScrolledText

class MyGUI:
    def __init__(self, reps=3):
        self.reps = reps                        # uses default Tk root
        self.text = ScrolledText()              # save widget as state
        self.text.pack()
        threadChecker(self.text)                # start thread check loop
        self.text.bind('<Button-1>',            # 3.x need list for map, range ok
              lambda event: list(map(self.onEvent, range(6))) )

    def onEvent(self, i):                       # code that spawns thread
        myname = 'thread-%s' % i
        startThread(
            action     = self.threadaction,
            args       = (i, ),
            context    = (myname,),
            onExit     = self.threadexit,
            onFail     = self.threadfail,
            onProgress = self.threadprogress)

    # thread's main action
    def threadaction(self, id, progress):       # what the thread does
        for i in range(self.reps):              # access to object state here
            time.sleep(1)
            if progress: progress(i)            # progress callback: queued
        if id % 2 == 1: raise Exception         # odd numbered: fail

    # thread callbacks: dispatched off queue in main thread
    def threadexit(self, myname):
        self.text.insert('end', '%s	exit
' % myname)
        self.text.see('end')

    def threadfail(self, exc_info, myname):     # have access to self state
        self.text.insert('end', '%s	fail	%s
' % (myname, exc_info[0]))
        self.text.see('end')

    def threadprogress(self, count, myname):
        self.text.insert('end', '%s	prog	%s
' % (myname, count))
        self.text.see('end')
        self.text.update()   # works here: run in main thread

if __name__ == '__main__': MyGUI().text.mainloop()
This code both queues bound methods as thread exit and progress actions and runs bound methods as the thread’s main action itself. As we learned in Chapter 5, because threads all run in the same process and memory space, bound methods reference the original in-process instance object, not a copy of it. This allows them to update the GUI and other implementation state directly. Furthermore, because bound methods are normal objects which pass for callables interchangeably with simple functions, using them both on queues and in threads this way just works. To many, this broadly shared state of threads is one of their primary advantages over processes.
Watch for the more realistic application of this module in Chapter 14’s PyMailGUI, where it will serve as the core thread exit and progress dispatch engine. There, we’ll also run bound methods as thread actions, too, allowing both threads and their queued actions to access shared mutable object state of the GUI. As we’ll see, queued action updates are automatically made thread-safe by this module’s protocol, because they run in the main thread only. Other state updates to shared objects performed in spawned threads, though, may still have to be synchronized separately if they might overlap with other threads, and are made outside the scope of the callback queue. A direct update to a mail cache, for instance, might lock out other operations until finished.
More Ways to Add GUIs to Non-GUI Code
Sometimes, GUIs pop up quite unexpectedly. Perhaps you haven’t learned GUI programming yet; or perhaps you’re just pining for non-event-driven days past. But for whatever reason, you may have written a program to interact with a user in an interactive console, only to decide later that interaction in a real GUI would be much nicer. What to do?
Probably the real answer to converting a non-GUI program is to
truly convert it—restructure it to initialize widgets on startup, call
mainloop once to start event
processing and display the main window, and move all program logic
into callback functions triggered by user actions. Your original
program’s actions become event handlers, and your original main flow
of control becomes a program that builds a main window, calls the
GUI’s event loop once, and waits.
This is the traditional way to structure a GUI program, and it
makes for a coherent user experience; windows pop up on request,
instead of showing up at seemingly random times. Until you’re ready to
bite the bullet and perform such a structural conversion, though,
there are other possibilities. For example, in the ShellGui section earlier in this chapter, we
saw how to add windows to file packing scripts to collect inputs
(Example 10-5 and
beyond); later, we also saw how to redirect such scripts’ outputs to
GUIs with the GuiOutput class
(Example 10-13). This
approach works if the non-GUI operation we’re wrapping up in a GUI is
a single operation; for more dynamic user interaction, other
techniques might be needed.
It’s possible, for instance, to launch GUI windows from a
non-GUI main program, by calling the tkinter mainloop each time a window must be
displayed. It’s also possible to take a more grandiose approach and
add a completely separate program for the GUI portion of your
application. To wrap up our survey of GUI programming techniques,
let’s briefly explore each scheme.
Popping Up GUI Windows on Demand
If you just want to add a simple GUI user interaction to an existing non-GUI
script (e.g., to select files to open or save), it is possible to do
so by configuring widgets and calling mainloop from the non-GUI main program
when you need to interact with the user. This essentially makes the
program GUI-capable, but without a persistent main window. The trick
is that mainloop doesn’t return
until the GUI main window is closed by the user (or quit method calls), so you cannot retrieve
user inputs from the destroyed window’s widgets after mainloop returns. To work around this, all
you have to do is be sure to save user inputs in a Python object:
the object lives on after the GUI is destroyed. Example 10-22 shows one way to
code this idea in Python.
"""
demo running two distinct mainloop calls; each returns after the main window is
closed; save user results on Python object: GUI is gone; GUIs normally configure
widgets and then run just one mainloop, and have all their logic in callbacks; this
demo uses mainloop calls to implement two modal user interactions from a non-GUI
main program; it shows one way to add a GUI component to an existing non-GUI script,
without restructuring code;
"""

from tkinter import *
from tkinter.filedialog import askopenfilename, asksaveasfilename

class Demo(Frame):
    def __init__(self,parent=None):
        Frame.__init__(self,parent)
        self.pack()
        Label(self, text ="Basic demos").pack()
        Button(self, text='open', command=self.openfile).pack(fill=BOTH)
        Button(self, text='save', command=self.savefile).pack(fill=BOTH)
        self.open_name = self.save_name = ""
    def openfile(self):                         # save user results
        self.open_name = askopenfilename()      # use dialog options here
    def savefile(self):
        self.save_name = asksaveasfilename(initialdir='C:\Python31')

if  __name__ == "__main__":
    # display window once
    print('popup1...')
    mydialog = Demo()                # attaches Frame to default Tk()
    mydialog.mainloop()              # display; returns after windows closed
    print(mydialog.open_name)        # names still on object, though GUI gone
    print(mydialog.save_name)
    # Non GUI section of the program uses mydialog here

    # display window again
    print('popup2...')
    mydialog = Demo()              # re-create widgets again
    mydialog.mainloop()            # window pops up again
    print(mydialog.open_name)      # new values on the object again
    print(mydialog.save_name)
    # Non GUI section of the program uses mydialog again
    print('ending...')
This program twice builds and displays a simple two-button main window that launches file selection dialogs, shown in Figure 10-13. Its output, printed as the GUI windows are closed, looks like this:
C:...PP4EGuiTools> mainloopdemo.py
popup1...
C:/Users/mark/Stuff/Books/4E/PP4E/dev/Examples/PP4E/Gui/Tools/widgets.py
C:/Python31/python.exe
popup2...
C:/Users/mark/Stuff/Books/4E/PP4E/dev/Examples/PP4E/Gui/Tools/guimixin.py
C:/Python31/Lib/tkinter/__init__.py
ending...
Notice how this program calls mainloop twice, to implement two modal
user interactions from an otherwise non-GUI script. It’s OK to call
mainloop more than once, but this
script takes care to re-create the GUI’s widgets before each call
because they are destroyed when the previous mainloop call exits (widgets are destroyed
internally inside Tk, even though the corresponding Python widget
object still exists). Again, this can make for an odd user
experience compared to a traditional GUI program structure—windows
seem to pop up from nowhere—but it’s a quick way to put a GUI face
on a script without reworking its code.
Note that this is different from using nested (recursive)
mainloop calls to implement modal
dialogs, as we did in Chapter 8. In that mode, the nested
mainloop call returns when the
dialog’s quit method is called,
but we return to the enclosing mainloop layer and remain in the realm of
event-driven programming. Example 10-22 instead runs
mainloop two different times,
stepping into and out of the event-driven model twice.
Finally, note that this scheme works only if you don’t have to
run any non-GUI code while the GUI is open, because your script’s
mainline code is inactive and blocked while mainloop runs. You cannot, for example,
apply this technique to use utilities like those in the guiStreams module we met earlier in this
chapter to route user interaction from non-GUI code to GUI windows.
The GuiInput and GuiOutput classes in that example assume
that there is a mainloop call
running somewhere (they’re GUI-based, after all). But once you call
mainloop to pop up these windows,
you can’t return to your non-GUI code to interact with the user or
the GUI until the GUI is closed and the mainloop call returns. The net effect is
that these classes can be used only in the context of a fully GUI
program.
But really, this is an artificial way to use tkinter. Example 10-22 works only
because the GUI can interact with the user independently, while the
mainloop call runs; the script is
able to surrender control to the tkinter mainloop call and wait for results. That
scheme won’t work if you must run any non-GUI code while the GUI is
open. Because of such constraints, you will generally need a
main-window-plus-callbacks model in most GUI programs—callback code
runs in response to user interaction while the GUI remains open.
That way, your code can run while GUI windows are active. For an
example, see earlier in this chapter for the way the non-GUI packer
and unpacker scripts were run from a GUI so that their results
appear in a GUI; technically, these scripts are run in a GUI
callback handler so that their output can be routed to a widget.
Adding a GUI As a Separate Program: Sockets (A Second Look)
As mentioned earlier, it’s also possible to spawn the GUI part of
your application as a completely separate program. This is a more
advanced technique, but it can make integration simple for some
applications because of the loose coupling it implies. It can, for
instance, help with the guiStreams issues of the prior section, as
long as inputs and outputs are communicated to the GUI over
Inter-Process Communication (IPC) mechanisms, and the widget after method (or similar) is used by the
GUI program to detect incoming output to be displayed. The non-GUI
script would not be blocked by a mainloop call.
For example, the GUI could be spawned by the non-GUI script as
a separate program, where user interaction results can be
communicated from the spawned GUI to the script using pipes,
sockets, files, or other IPC mechanisms we met in Chapter 5. The advantage to this approach
is that it provides a separation of GUI and non-GUI code—the non-GUI
script would have to be modified only to spawn and wait for user
results to appear from the separate GUI program, but could otherwise
be used as is. Moreover, the non-GUI script would not be blocked
while an in-process mainloop call
runs (only the GUI process would run a mainloop), and the GUI program could
persist after the point at which user inputs are required by the
script, leading to fewer pop-up windows.
In other scenarios, the GUI may spawn the non-GUI script instead, and listen for its feedback on an IPC device connected to the script’s output stream. In even more complex arrangements, the GUI and non-GUI script may converse back and forth over bidirectional connections.
Examples 10-23, 10-24, and 10-25 provide a simple example of these techniques in action: a non-GUI script sending output to a GUI. They represent non-GUI and GUI programs that communicate over sockets—the IPC and networking device we met briefly in Chapter 5 and will explore in depth in the next part of the book. The important point to notice as we study these files is the way the programs are linked: when the non-GUI script prints to its standard output, the printed text is sent over a socket connection to the GUI program. Other than the import and call to the socket redirection code, the non-GUI program knows nothing at all about GUIs or sockets, and the GUI program knows nothing about the program whose output it displays. Because this model does not require existing scripts to be entirely rewritten to support a GUI, it is ideal for scripts that otherwise run on the world of shells and command lines.
In terms of code, we first need some IPC linkage in between
the script and the GUI. Example 10-23 encapsulates the
client-side socket connection used by non-GUI code for reuse. As is,
it’s a partial work in progress (notice the ... ellipses operator in its last few
functions—Python’s notion of “To be decided,” and equivalent to a
pass in this context). Because
sockets are covered in full in Chapter 12,
we’ll defer other stream redirection modes until then, when we’ll
also flesh out the rest of this module. The version of this module
here implements just the client-side connection of the standard
output stream to a socket—perfect for a GUI that wants to intercept
a non-GUI script’s printed text.
"""
[partial] Tools for connecting streams of non-GUI programs to sockets
that a GUI (or other) can use to interact with the non-GUI program;
see Chapter 12 and PP4ESocketsInternet for a more complete treatment
"""

import sys
from socket import *
port = 50008
host = 'localhost'

def redirectOut(port=port, host=host):
    """
    connect caller's standard output stream to a socket for GUI to listen;
    start caller after listener started, else connect fails before accept
    """
    sock = socket(AF_INET, SOCK_STREAM)
    sock.connect((host, port))                # caller operates in client mode
    file = sock.makefile('w')                 # file interface: text, bufferred
    sys.stdout = file                         # make prints go to sock.send

def redirectIn(port=port, host=host): ...               # see Chapter 12
def redirectBothAsClient(port=port, host=host): ...     # see Chapter 12
def redirectBothAsServer(port=port, host=host): ...     # see Chapter 12
Next, Example 10-24 uses Example 10-23 to redirect its prints to a socket on which a GUI server program may listen; this requires just two lines of code at the top of the script, and is done selectively based upon the value of a command-line argument (without the argument, the script runs in fully non-GUI mode):
# non-GUI side: connect stream to socket and proceed normally

import time, sys
if len(sys.argv) > 1:                            # link to gui only if requested
    from socket_stream_redirect0 import *        # connect my sys.stdout to socket
    redirectOut()                                # GUI must be started first as is

# non-GUI code
while True:                                      # print data to stdout:
    print(time.asctime())                        # sent to GUI process via socket
    sys.stdout.flush()                           # must flush to send: buffered!
    time.sleep(2.0)                              # no unbuffered mode, -u irrelevant
And finally, the GUI part of this exchange is the program in
Example 10-25. This
script implements a GUI to display the text printed by the non-GUI
program, but it knows nothing of that other program’s logic. For the
display, the GUI program prints to the stream redirection object we
met earlier in this chapter (Example 10-12); because this
program runs a GUI mainloop call,
this all just works.
We’re also running a timer loop here to detect incoming data on the socket as it arrives, instead of waiting for the non-GUI program to run to completion. Because the socket is set to be nonblocking, input calls don’t wait for data to appear, and hence, do not block the GUI.
# GUI server side: read and display non-GUI script's output

import sys, os
from socket import *                         # including socket.error
from tkinter import Tk
from PP4E.launchmodes import PortableLauncher
from PP4E.Gui.Tools.guiStreams import GuiOutput

myport = 50008
sockobj = socket(AF_INET, SOCK_STREAM)       # GUI is server, script is client
sockobj.bind(('', myport))                   # config server before client
sockobj.listen(5)

print('starting')
PortableLauncher('nongui', 'socket-nongui.py -gui')()  # spawn non-GUI script

print('accepting')
conn, addr = sockobj.accept()                # wait for client to connect
conn.setblocking(False)                      # use nonblocking socket (False=0)
print('accepted')

def checkdata():
    try:
        message = conn.recv(1024)            # don't block for input
        #output.write(message + '
')        # could do sys.stdout=output too
        print(message, file=output)          # if ready, show text in GUI window
    except error:                            # raises socket.error if not ready
        print('no data')                     # print to sys.stdout
    root.after(1000, checkdata)              # check once per second

root = Tk()
output = GuiOutput(root)                     # socket text is displayed on this
checkdata()
root.mainloop()
Start Example 10-25’s file to launch
this example. When both the GUI and the non-GUI processes are
running, the GUI picks up a new message over the socket roughly once
every two seconds and displays it in the window shown in Figure 10-14. The GUI’s
timer loop checks for data once per second, but the non-GUI script
sends a message every two seconds only due to its time.sleep calls. The printed output in
the terminal windows is as follows—“no data” messages and lines in
the GUI alternate each second:
C:...PP4EGuiTools> socket-gui.py
starting
nongui
accepting
accepted
no data
no data
no data
no data
...more...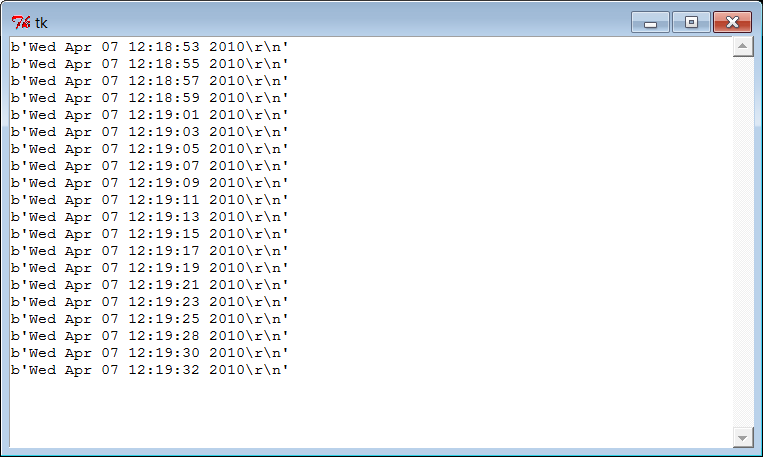
Notice how we’re displaying bytes strings in Figure 10-14—even though
the non-GUI script prints text, the GUI script reads it with the raw
socket interface, and sockets deal in binary byte strings in Python
3.X.
Run this example by yourself for a closer look. In high-level
terms, the GUI script spawns the non-GUI script and displays a
pop-up window that shows the text printed by the non-GUI script (the
date and time). The non-GUI script can keep running linear,
procedural code to produce data, because only the GUI script’s
process runs an event-driven mainloop call.
Moreover, unlike our earlier stream redirection explorations which simply connected the script’s streams to GUI objects running in the same process, this decoupled two-process approach prevents the GUI from being blocked while waiting for the script to produce output; the GUI process remains fully and independently active, and simply picks up new results as they appear (more on this in the next section). This model is similar in spirit to our earlier thread queue examples, but the actors here are separate programs linked by a socket, not in-process function calls.
Although we aren’t going to get into enough socket details in this chapter to fully explain this script’s code, there are a few fine points worth underscoring here:
This example should probably be augmented to detect and handle an end-of-file signal from the spawned program, and then terminate its timer loop.
The non-GUI script could also start the GUI instead, but in the socket world, the server’s end (the GUI) must be configured to accept connections before the client (the non-GUI) can connect. One way or another, the GUI has to start before the non-GUI connects to it or the non-GUI script will be denied a connection and will fail.
Because of the buffered text nature of the
socket.makefileobjects used for streams here, the client program is required to flush its printed output withsys.stdout.flushto send data to the GUI—without this call, the GUI receives and displays nothing. As we’ll learn in Chapter 12, this isn’t required for command pipes, but it is when streams are reset to wrapped sockets as done here. These wrappers don’t support unbuffered modes in Python 3.X, and there is no equivalent to the-uflag in this context (more on-uand command pipes in the next section).
Stay tuned for much more on this example and topic in Chapter 12. Its socket client/server model works well and is a general approach to connecting GUI and non-GUI code, but there are other coding alternatives worth exploring in the next section before we move on.
Adding a GUI As a Separate Program: Command Pipes
The net effect of the two programs of the preceding section is similar to a GUI
program reading the output of a shell command over a pipe file with
os.popen (or the subprocess.Popen interface upon which it is
based). As we’ll see later, though, sockets also support independent
servers, and can link programs running on remote machines across a
network—a much larger idea we’ll be exploring in Chapter 12.
Perhaps subtler and more significant for our GUI exploration
here is the fact that without an after timer loop and nonblocking input
sources of the sort used in the prior section, the GUI may become
stuck and unresponsive while waiting for data from the non-GUI
program and may not be able to handle more than one data
stream.
For instance, consider the guiStreams call we wrote in Example 10-12 to redirect the
output of a shell command spawned with os.popen to a GUI window. We could use
this with simplistic code like that in Example 10-26 to capture the
output of a spawned Python program and display it in a separately
running GUI program’s window. This is as concise as it is because it
relies on the read/write loop and GuiOutput class in Example 10-12 to both manage
the GUI and read the pipe; it’s essentially the same as one of the
options in that example’s self-test code, but we read the printed
output of a Python program here.
# GUI reader side: route spawned program standard output to a GUI window

from PP4E.Gui.Tools.guiStreams import redirectedGuiShellCmd       # uses GuiOutput
redirectedGuiShellCmd('python -u pipe-nongui.py')                 # -u: unbuffered
Notice the -u Python
command-line flag used here: it forces the spawned program’s
standard streams to be unbuffered, so we get
printed text immediately as it is produced, instead of waiting for
the spawned program to completely finish.
We talked about this option in Chapter 5, when discussing deadlocks and
pipes. Recall that print writes
to sys.stdout, which is normally
buffered when connected to a pipe this way. If we don’t use the
-u flag here and the spawned
program doesn’t manually call sys.stdout.flush, we won’t see any output
in the GUI until the spawned program exits or until its buffers fill
up. If the spawned program is a perpetual loop that does not exit,
we may be waiting a long time for output to appear on the pipe, and
hence, in the GUI.
This approach makes the non-GUI code in Example 10-27 much simpler: it
just writes to standard output as usual, and it need not be
concerned with creating a socket interface. Compare this with its
socket-based equivalent in Example 10-24—the loop is the
same, but we don’t need to connect to sockets first (the spawning
parent reads the normal output stream), and don’t need to manually
flush output as it’s produced (the -u flag in the spawning parent
prevents buffering).
# non-GUI side: proceed normally, no need for special code

import time
while True:                          # non-GUI code
    print(time.asctime())            # sends to GUI process
    time.sleep(2.0)                  # no need to flush here
Start the GUI script in Example 10-26: it launches the
non-GUI program automatically, reads its output as it is created,
and produces the window in Figure 10-15—it’s similar to
the socket-based example’s result in Figure 10-14, but displays
the str text strings we get from
reading pipes, not the byte strings of sockets.

This works, but the GUI is odd—we never call mainloop ourselves, and we get a default
empty top-level window. In fact, it apparently works at all only
because the tkinter update call
issued within the redirect function enters the Tk event loop
momentarily to process pending events. To do better, Example 10-28 creates an
enclosing GUI and kicks off an event loop manually by the time the
shell command is spawned; when run, it produces the same output
window (Figure 10-15).
# GUI reader side: like pipes-gui1, but make root window and mainloop explicit

from tkinter import *
from PP4E.Gui.Tools.guiStreams import redirectedGuiShellCmd

def launch():
    redirectedGuiShellCmd('python -u pipe-nongui.py')

window = Tk()
Button(window, text='GO!', command=launch).pack()
window.mainloop()
The -u unbuffered flag is
crucial here again—without it, you won’t see the text output window.
The GUI will be blocked in the initial pipe input call indefinitely
because the spawned program’s standard output will be queued up in
an in-memory buffer.
On the other hand, this -u
unbuffered flag doesn’t prevent blocking in the prior section’s
socket scheme, because that example resets
streams to other objects after the spawned program starts; more on
this in Chapter 12. Also remember that the
buffering argument in os.popen
(and subprocess.Popen) controls
buffering in the caller, not in the spawned
program; -u pertains to the
latter.
The specter of blocking input calls
Either way we code them, however, when the GUIs of Example 10-26 and Example 10-28 are run they
become unresponsive for two seconds at a time while they read data
from the os.popen pipe. In
fact, they are just plain sluggish—window moves, resizes, redraws,
raises, and so on, are delayed for up to two seconds, until the
non-GUI program sends data to the GUI to make the pipe read call
return. Perhaps worse, if you press the “GO!” button twice in the
second version of the GUI, only one window updates itself every
two seconds, because the GUI is stuck in the second button press
callback—it never exits the loop that reads from the pipe until
the spawned non-GUI program exits. Exits are not necessarily
graceful either (you get multiple error messages in the terminal
window).
Because of such constraints, to avoid blocked states, a
separately running GUI cannot generally read data directly if its
appearance may be delayed. For instance, in the socket-based
scripts of the prior section (Example 10-25), the after timer loop allows the GUI to
poll for data instead of
waiting, and display it as it arrives.
Because it doesn’t wait for the data to show up, its GUI remains
active in between outputs.
Of course, the real issue here is that the read/write loop
in the guiStreams utility
function used is too simplistic; issuing a read call within a GUI
is generally prone to blocking. There are a variety of ways we
might try to avoid this.
Updating GUIs within threads…and other nonsolutions
One candidate fix is to try to run the redirection loop call in a thread—for
example, by changing the launch
function in Example 10-28 as follows
(this is from file pipe-gui2-thread.py on the examples
distribution):
def launch():
    import _thread
    _thread.start_new_thread(redirectedGuiShellCmd, ('python -u pipe-nongui.py',))
But then we would be updating the GUI from a spawned thread, which, as we’ve learned, is a generally bad idea. Parallel updates can wreak havoc in GUIs.
If fact, with this change the GUI fails spectacularly—it hangs immediately on the first “GO!” button press on my Windows 7 laptop, becomes unresponsive, and must be forcibly closed. This happens before (or perhaps during) the creation of the new pop-up scrolled-text window. When this example was run on Windows XP for the prior edition of this book, it also hung on the first “GO!” press occasionally and always hung eventually if you pressed the button enough times; the process had to be forcibly killed. Direct GUI updates in threads are not a viable solution.
Alternatively, we could try to use the Python select.select call (described in Chapter 12) to implement polling for data on
the input pipe; unfortunately, select works only on sockets in Windows
today (it also works on pipes and other file descriptors in
Unix).
In other contexts, a separately spawned GUI might also use
signals to inform the non-GUI program when points of interaction
arise, and vice versa (the Python signal module and os.kill call were introduced in Chapter 5). The downside with this
approach is that it still requires changes to the non-GUI program
to handle the signals.
Named pipes (the fifo files introduced in Chapter 5) are sometimes an alternative
to the socket calls of the original Examples 10-23 through 10-25, but sockets work on standard
Windows Python, and fifos do not (os.mkfifo is not available in Windows in
Python 3.1, though it is in Cygwin Python). Even where they do
work, we would still need an after timer loop in the GUI to avoid
blocking.
We might also use tkinter’s createfilehandler to register a callback
to be run when input shows up on the input pipe:
def callback(file, mask):
    ...read from file here...

import _tkinter, tkinter
_tkinter.createfilehandler(file, tkinter.READABLE, callback)
The file handler creation call is also available within
tkinter and as a method of a
Tk instance object.
Unfortunately again, as noted near the end of Chapter 9, this call is not
available on Windows and is a Unix-only alternative.
Avoiding blocking input calls with non-GUI threads
As a far more general solution to the blocking input delays of the prior section, the GUI process might instead spawn a thread that reads the socket or pipe and places the data on a queue. In fact, the thread techniques we met earlier in this chapter could be used directly in such a role. This way, the GUI is not blocked while the thread waits for data to show up, and the thread does not attempt to update the GUI itself. Moreover, more than one data stream or long-running activity can overlap in time.
Example 10-29
shows how. The main trick this script employs is to split up the
input and output parts of the original redirectedGuiShellCmd of the guiStreams module we met earlier in
Example 10-12. By so
doing, the input portion can be spawned off in a parallel thread
and not block the GUI. The main GUI thread uses an after timer loop as usual, to watch for
data to be added by the reader thread to a shared queue. Because
the main thread doesn’t read program output itself, it does not
get stuck in wait states.
"""
read command pipe in a thread and place output on a queue checked in timer loop;
allows script to display program's output without being blocked between its outputs;
spawned programs need not connect or flush, but this approaches complexity of sockets
"""

import _thread as thread, queue, os
from tkinter import Tk
from PP4E.Gui.Tools.guiStreams import GuiOutput
stdoutQueue = queue.Queue()                        # infinite size

def producer(input):
    while True:
        line = input.readline()                    # OK to block: child thread
        stdoutQueue.put(line)                      # empty at end-of-file
        if not line: break

def consumer(output, root, term='<end>'):
    try:
        line = stdoutQueue.get(block=False)        # main thread: check queue
    except queue.Empty:                            # 4 times/sec, OK if empty
        pass
    else:
        if not line:                               # stop loop at end-of-file
            output.write(term)                     # else display next line
            return
        output.write(line)
    root.after(250, lambda: consumer(output, root, term))

def redirectedGuiShellCmd(command, root):
    input  = os.popen(command, 'r')                # start non-GUI program
    output = GuiOutput(root)
    thread.start_new_thread(producer, (input,))    # start reader thread
    consumer(output, root)

if __name__ == '__main__':
    win = Tk()
    redirectedGuiShellCmd('python -u pipe-nongui.py', win)
    win.mainloop()
As usual, we use a queue here to avoid updating the GUI
except in the main thread. Note that we didn’t need a thread or
queue in the prior section’s socket example, just because we’re
able to poll a socket to see whether it has data without blocking;
an after timer loop was enough.
For a shell-command pipe, though, a thread is an easy way to avoid
blocking.
When run, this program’s self-test code creates a ScrolledText window that displays the
current date and time sent from the
pipes-nongui.py script in Example 10-27. In fact, its
window is identical to that of the prior versions (see Figure 10-15). The window is
updated with a new line every two seconds because that’s how often
the spawned pipes-nongui script
prints a message to stdout.
Note how the producer thread calls readline() to load just one line at a
time. We can’t use input calls that consume the entire stream all
at once (e.g., read(), readlines()), because such calls would
not return until the program exits and sends end-of-file. The
read(N) call would work to grab
one piece of the output as well, but we assume that the output
stream is text here. Also notice that the -u unbuffered stream flag is used here
again, to get output as it is produced; without it, output won’t
show up in the GUI at all because it is buffered in the spawned
program (try it yourself).
Sockets and pipes: Compare and contrast
Let’s see how we’ve done. This script is similar in spirit to what we did in Example 10-28. Because of the way its code is structured, though, Example 10-29 has a major advantage: because input calls are spawned off in a thread this time, the GUI is completely responsive. Window moves, resizes, and so forth, happen immediately because the GUI is not blocked while waiting for the next output from the non-GUI program. The combination of a pipe, thread, and queue works wonders here—the GUI need not wait for the spawned program, and the spawned thread need not update the GUI itself.
Although it is more complex and requires thread support,
Example 10-29’s lack
of blocking makes this redirectedGuiShellCmd much more
generally useful than the original pipe version we coded. Compared
to the sockets of the prior section, though,
this solution is a bit of a mixed bag:
Because this GUI reads the spawned program’s standard output, no changes are required in the non-GUI program. Unlike the socket-based example in the prior section, the non-GUI program here needs no knowledge of the GUI that will display its results—it need not connect to a socket and need not flush its input stream, as required for the earlier socket-based option.
Although it requires no changes to the programs whose output is displayed, the GUI code’s complexity begins to approach that of the socket-based alternative, especially if you strip away the boilerplate code required for all socket programs.
It does not directly support running the GUI and non-GUI programs separately, or on remote machines. As we’ll see in Chapter 12, sockets allow data to be passed between programs running on the same machine or across networks.
Sockets apply to more use cases than displaying a program’s output stream. If the GUI must do more than display another program’s output, sockets become a more general solution—as we’ll also learn later, because sockets are bidirectional data streams, they allow data to be passed back and forth between two programs in more arbitrary ways.
Other uses for threaded pipe GUIs
Despite its tradeoffs, the thread/queue/pipe-based approach for GUIs has fairly wide applicability. To illustrate, here’s another quick usage example. The following runs a simple script normally from a shell/terminal window; it prints one successively longer output line every two seconds:
C:...PP4EGuiTools>type spams.pyimport time for i in range(1, 10, 2): time.sleep(2) # print to standard output print('spam' * i) # nothing GUI about this, eh? C:...PP4EGuiTools>python spams.pyspam spamspamspam spamspamspamspamspam spamspamspamspamspamspamspam spamspamspamspamspamspamspamspamspam
Let’s wrap this up in a GUI, with code typed at the
interactive prompt for variety. The following imports the new GUI
redirection function as a library component and uses it to create
a window that displays the script’s five lines, appearing every
two seconds just as in the terminal window, followed by a final
line containing <end>
reflecting the spawned program’s exit. The resulting output window
is captured in Figure 10-16:
C:...PP4EGuiTools>python>>>from tkinter import Tk>>>from pipe_gui3 import redirectedGuiShellCmd>>>root = Tk()>>>redirectedGuiShellCmd('python -u spams.py', root)

If the spawned program exits, Example 10-29’s producer
thread detects end-of-file on the pipe and puts a final empty line
in the queue; in response the consumer loop displays an <end> line in the GUI by default
when it detects this condition. In this case, program exit is
normal and silent; in other cases, we may need to add shutdown
logic to suppress error messages. Note that here again, the
sleep call in the spawned
program simulates a long-running task, and we really need the
-u unbuffered streams
flag—without it, no output appears in the GUI for eight seconds,
until the spawned program is completely finished. With it, the GUI
receives and displays each line as it is printed, one every two
seconds.
This is also, finally, the sort of code you could use to display the output of a non-GUI program in a GUI, without sockets, changes in the original program, or blocking the GUI. Of course, in many cases, if you have to work this hard to add a GUI anyhow, you might as well just make your script a traditional GUI program with a main window and event loop. Furthermore, the GUIs we’ve coded in this section are limited to displaying another program’s output; sometimes the GUI may have to do more. For many programs, though, the general separation of display and program logic provided by the spawned GUI model can be an advantage—it’s easier to understand both parts if they are not mixed together.
We’ll learn more about sockets in the next part of the book, so you should consider parts of this discussion something of a preview. As we’ll see, things start to become more and more interesting when we start combining GUIs, threads, and network sockets.
Before we do, though, the next chapter rounds out the purely GUI part of this book by applying the widgets and techniques we’ve learned in more realistically scaled programs. And before that, the next section wraps up here with a preview of some of the larger GUI examples coming up, with a quick look at scripts that launch them automatically, and allow you to sample some of what is possible with Python and tkinter.
The PyDemos and PyGadgets Launchers
To close out this chapter, let’s explore the implementations of the two GUIs used to run major book examples. The following GUIs, PyDemos and PyGadgets, are simply GUIs for launching other GUI programs. In fact, we’ve now come to the end of the demo launcher story—both of the new programs here interact with modules that we met earlier in Part II:
- launchmodes.py
Starts independent Python programs portably.
- Launcher.py
Finds programs, and ultimately runs both PyDemos and PyGadgets when used by the self-configuring top-level launcher scripts.
- LaunchBrowser.pyw
Spawns web browsers portably to open local or remote pages.
See Part II (especially the ends of Chapter 5 and Chapter 6) for links to the code for these modules. The programs introduced here add the GUI components to the program-launching system—they simply provide easy-to-use pushbuttons that spawn most of the larger examples in this text when pressed.
Both of these scripts also assume that they will be run with the
current working directory set to their directory (they hardcode paths
to other programs relative to that). Either click on their names in a
file explorer or run them from a command-line shell after a cd to the top-level
PP4E examples root directory. These scripts could
allow invocations from other directories by prepending an environment
variable’s value to program script paths, but they were really
designed to be run only out of the PP4E
root.
Because these demo launchers are long programs, in the interest of space and time only their crucial and representative parts are listed in this book; as usual, see the examples package distribution for the portions omitted here.
PyDemos Launcher Bar (Mostly External)
The PyDemos script constructs a bar of buttons that run programs in demonstration mode, not for day-to-day use. I use PyDemos to show off Python programs—it’s much easier to press its buttons than to run command lines or fish through a file explorer GUI to find scripts.
You can use PyDemos (and PyGadgets) to start and interact with
examples presented in this book—all of the buttons on this GUI
represent examples we will meet in later chapters. Unlike when using
the Launch_PyDemos and
Launch_PyGadgets_bar scripts at
the top of the examples package, though, make sure your PYTHONPATH system variable is set to
include the directory containing the PP4E examples root directory if you wish
to run the scripts here directly; they don’t attempt to
automatically configure your system or module import search
paths.
To make this launcher bar even easier to run, drag it out to your desktop to generate a clickable Windows shortcut (do something similar on other systems). Since this script hardcodes command lines for running programs elsewhere in the examples tree, it is also useful as an index to major book examples. Figure 10-17 shows what PyDemos looks like when run on Windows, along with some of the demos it launches—PyDemos is the vertical button bar on the right; it looks slightly different but works the same on Linux.

The source code that constructs this scene is listed in Example 10-30 (its first page may differ slightly from that shown being edited in Figure 10-17 due to last minute tweaks which engineers can’t seem to avoid). Because PyDemos doesn’t present much that’s new in terms of GUI interface programming, though, much of it has been removed here; again, see the examples package for the remainder.
In short, its demoButton
function simply attaches a new button to the main window,
spring-loaded to spawn a Python program when pressed. To start
programs, PyDemos calls an instance of the launchmodes.PortableLauncher object we met
at the end of Chapter 5—its role as a
tkinter callback handler here is why a function-call operation is
used to kick off the launched program.
As pictured in Figure 10-17, PyDemos also constructs two pop-up windows when buttons at the bottom of the main window are pressed—an Info pop up giving a short description of the last demo spawned, and a Links pop up containing radio buttons that open a local web browser on book-related sites when pressed:
The Info pop up displays a simple message line and changes its font every second to draw attention to itself; since this can be a bit distracting, the pop up starts out iconified (click the Info button to see or hide it).
The Links pop up’s radio buttons are much like hyperlinks in a web page, but this GUI isn’t a browser: when the Links pop up is pressed, the portable
LaunchBrowserscript mentioned in Part II is used to find and start a web browser used to connect to the relevant site, assuming you have an Internet connection. This in turn uses Python’swebbrowsermodules today.The
windowsmodule we coded earlier in this chapter (Example 10-16) is used to give this GUI’s windows a blue “PY” icon, instead of the standard red “Tk.”
The PyDemos GUI also comes with “code” buttons to the right of each demo’s button, which open the source files that implement the associated example. These files open in pop-up versions of the PyEdit text editor that we’ll meet in Chapter 11. Figure 10-18 captures some of these code viewer windows in action, resized slightly for display here.
For the web-based examples opened by the last two demo buttons in the launcher, this GUI also attempts to spawn a locally running web server for web-based demos not shown running here (we’ll meet the server in Chapter 15). For this edition, the web servers are spawned only when the corresponding web demo button is first selected (not on PyDemos startup), and the web servers generate a pop-up command prompt window on Windows to monitor server status.

PyDemos runs on Windows, Macs, and Linux, but that’s largely due to the inherent portability of both Python and tkinter. For more details, consult the source, which is shown in part in Example 10-30.
"""
################################################################################
PyDemos.pyw
Programming Python, 2nd, 3rd, and 4th Editions (PP4E), 2001--2006--2010

Version 2.1 (4E), April '10: updated to run under Python 3.X, and spawn
local web servers for web demos only on first demo button selection.

Version 2.0 (3E), March '06: add source-code file viewer buttons; add new
Demos (PyPhoto, PyMailGUI); spawn locally running web servers for the
browser-based Demos; add window icons; and probably more I've forgotten.

Launch major Python+Tk GUI examples from the book, in a platform-neutral way.
This file also serves as an index to major program examples, though many book
examples aren't GUI-based, and so aren't listed here.  Also see:

- PyGadgets.py, a simpler script for starting programs in non-demo mode
  that you wish to use on a regular basis
- PyGadgets_bar.pyw, which creates a button bar for starting all PyGadgets
  programs on demand, not all at once
- Launcher.py for starting programs without environment settings--finds
  Python, sets PYTHONPATH, etc.
- Launch_*.pyw for starting PyDemos and PyGadgets with Launcher.py--run these
  for a quick look
- LaunchBrowser.pyw for running example web pages with an automatically
  located web browser
- README-PP4E.txt, for general examples information

Caveat: this program tries to start a locally running web server and web
Browser automatically, for web-based demos,  but does not kill the server.
################################################################################
"""

...code omitted: see examples package...

################################################################################
# start building main GUI windows
################################################################################

from PP4E.Gui.Tools.windows import MainWindow    # a Tk with icon, title, quit
from PP4E.Gui.Tools.windows import PopupWindow   # same but Toplevel, diff quit
Root = MainWindow('PP4E Demos 2.1')

# build message window
Stat = PopupWindow('PP4E demo info')
Stat.protocol('WM_DELETE_WINDOW', lambda:0)      # ignore wm delete

Info = Label(Stat, text = 'Select demo',
             font=('courier', 20, 'italic'), padx=12, pady=12, bg='lightblue')
Info.pack(expand=YES, fill=BOTH)

################################################################################
# add launcher buttons with callback objects
################################################################################

from PP4E.Gui.TextEditor.textEditor import TextEditorMainPopup

# demo launcher class
class Launcher(launchmodes.PortableLauncher):    # use wrapped launcher class
    def announce(self, text):                    # customize to set GUI label
        Info.config(text=text)

def viewer(sources):
    for filename in sources:
        TextEditorMainPopup(Root, filename,      # as pop up in this process
                            loadEncode='utf-8')  # else PyEdit may ask each!

def demoButton(name, what, doit, code):
    """
    add buttons that runs doit command-line, and open all files in code;
    doit button retains state in an object, code in an enclosing scope;
    """
    rowfrm = Frame(Root)
    rowfrm.pack(side=TOP, expand=YES, fill=BOTH)

    b = Button(rowfrm, bg='navy', fg='white', relief=RIDGE, border=4)
    b.config(text=name, width=20, command=Launcher(what, doit))
    b.pack(side=LEFT, expand=YES, fill=BOTH)

    b = Button(rowfrm, bg='beige', fg='navy')
    b.config(text='code', command=(lambda: viewer(code)))
    b.pack(side=LEFT, fill=BOTH)

################################################################################
# tkinter GUI demos - some use network connections
################################################################################

demoButton(name='PyEdit',
           what='Text file editor',                            # edit myself
           doit='Gui/TextEditor/textEditor.py PyDemos.pyw',    # assume in cwd
           code=['launchmodes.py',
                 'Tools/find.py',
                 'Gui/Tour/scrolledlist.py',          # show in PyEdit viewer
                 'Gui/ShellGui/formrows.py',          # last = top of stacking
                 'Gui/Tools/guimaker.py',
                 'Gui/TextEditor/textConfig.py',
                 'Gui/TextEditor/textEditor.py'])

demoButton(name='PyView',
           what='Image slideshow, plus note editor',
           doit='Gui/SlideShow/slideShowPlus.py Gui/gifs',
           code=['Gui/Texteditor/textEditor.py',
                 'Gui/SlideShow/slideShow.py',
                 'Gui/SlideShow/slideShowPlus.py'])

...code omitted: see examples package...

################################################################################
# toggle info message box font once a second
################################################################################

def refreshMe(info, ncall):
    slant = ['normal', 'italic', 'bold', 'bold italic'][ncall % 4]
    info.config(font=('courier', 20, slant))
    Root.after(1000, (lambda: refreshMe(info, ncall+1)) )

################################################################################
# unhide/hide status box on info clicks
################################################################################

Stat.iconify()
def onInfo():
    if Stat.state() == 'iconic':
        Stat.deiconify()
    else:
        Stat.iconify()  # was 'normal'

################################################################################
# finish building main GUI, start event loop
################################################################################

def onLinks():
    ...code omitted: see examples package...

Button(Root, text='Info',  command=onInfo).pack(side=TOP, fill=X)
Button(Root, text='Links', command=onLinks).pack(side=TOP, fill=X)
Button(Root, text='Quit',  command=Root.quit).pack(side=BOTTOM, fill=X)
refreshMe(Info, 0)  # start toggling
Root.mainloop()
PyGadgets Launcher Bar
The PyGadgets script runs some of the same programs as PyDemos, but
for real, practical use, not as demonstrations. Both scripts use
launchmodes to spawn other
programs, and display bars of launcher buttons, but PyGadgets is a
bit simpler because its task is more focused. PyGadgets also
supports two spawning modes—it can either start a canned list of
programs immediately and all at once, or display a GUI for running
each program on demand. Figure 10-19 shows the launch bar GUI
made in on-demand mode when it first starts; PyDemos and PyGadgets
can be run at the same time, and both grow with their window if
resized (try it on your own to see how).

Because of its different role, PyGadgets takes a more
data-driven approach to building the GUI: it stores program names in
a list and steps through it as needed instead of using a sequence of
precoded demoButton calls. The
set of buttons on the launcher bar GUI in Figure 10-19, for example, depends
entirely upon the contents of the programs list.
The source code behind this GUI is listed in Example 10-31. It’s not much
because it relies on other modules we wrote earlier to work most of
its magic: launchmodes for
program spawns, windows for
window icons and quits, and LaunchBrowser for web browser starts.
PyGadgets gets a clickable shortcut on my desktop and is usually
open on my machines. I use to gain quick access to Python tools that
I use on a daily basis—text
editors, calculators, email and photo tools, and so on—all of which
we’ll meet in upcoming chapters.
To customize PyGadgets for your own use, simply import and
call its functions with program command-line lists of your own or
change the mytools list of
spawnable programs near the end of this file. This is Python, after
all.
"""
##############################################################################
Start various examples; run me at start time to make them always available.
This file is meant for starting programs you actually wish to use; see
PyDemos for starting Python/Tk demos and more details on program start
options.  Windows usage note: this is a '.py' to show messages in a console
window when run or clicked (including a 10 second pause to make sure it's
visible while gadgets start if clicked).  To avoid Windows console pop up,
run with the 'pythonw' program (not 'python'), rename to '.pyw' suffix,
mark with 'run minimized' window property, or spawn elsewhere (see PyDemos).
##############################################################################
"""

import sys, time, os, time
from tkinter import *
from launchmodes import PortableLauncher           # reuse program start class
from Gui.Tools.windows import MainWindow           # reuse window tools: icon, quit

def runImmediate(mytools):
    """
    launch gadget programs immediately
    """
    print('Starting Python/Tk gadgets...')         # msgs to stdout (poss temp)
    for (name, commandLine) in mytools:
        PortableLauncher(name, commandLine)()      # call now to start now
    print('One moment please...')
    if sys.platform[:3] == 'win':                  # windows: keep console 10 secs
        for i in range(10):
            time.sleep(1); print('.' * 5 * (i+1))

def runLauncher(mytools):
    """
    pop up a simple launcher bar for later use
    """
    root = MainWindow('PyGadgets PP4E')            # or root = Tk() if prefer
    for (name, commandLine) in mytools:
        b = Button(root, text=name, fg='black', bg='beige', border=2,
                   command=PortableLauncher(name, commandLine))
        b.pack(side=LEFT, expand=YES, fill=BOTH)
    root.mainloop()

mytools = [
    ('PyEdit',   'Gui/TextEditor/textEditor.py'),
    ('PyCalc',   'Lang/Calculator/calculator.py'),
    ('PyPhoto',  'Gui/PIL/pyphoto1.py Gui/PIL/images'),
    ('PyMail',   'Internet/Email/PyMailGui/PyMailGui.py'),
    ('PyClock',  'Gui/Clock/clock.py -size 175 -bg white'
                          ' -picture Gui/gifs/pythonPowered.gif'),
    ('PyToe',    'Ai/TicTacToe/tictactoe.py'
                          ' -mode Minimax -fg white -bg navy'),
    ('PyWeb',    'LaunchBrowser.pyw'
                          ' -live index.html learning-python.com')]
                         #' -live PyInternetDemos.html localhost:80')]
                         #' -file')] # PyInternetDemos assumes local server started

if __name__ == '__main__':
    prestart, toolbar = True, False
    if prestart:
        runImmediate(mytools)
    if toolbar:
        runLauncher(mytools)
By default, PyGadgets starts programs immediately when it is run. To run PyGadgets in launcher bar mode instead, Example 10-32 simply imports and calls the appropriate function with an imported program list. Because it is a .pyw file, you see only the launcher bar GUI it constructs initially, not a DOS console streams window—nice for regular use, but not if you want to see error messages (use a .py).
"""
run a PyGadgets toolbar only, instead of starting all the gadgets immediately;
filename avoids DOS pop up on Windows: rename to '.py' to see console messages;
"""

import PyGadgets
PyGadgets.runLauncher(PyGadgets.mytools)
This script is the file my desktop shortcut invokes, because I prefer to run gadget GUIs on demand. On many platforms, you can drag this out as a shortcut on your desktop for easy access this way. You can also run a script like this at your system’s startup to make it always available (and to save a mouse click). For instance, on Windows, such a script might be automatically started by adding it to your Startup folder, and on Unix and its kin you can automatically start such a script by spawning it with a command line in your system startup scripts after X Windows has been started.
Whether run via a shortcut, a file explorer click, a typed command line, or other means, the PyGadgets launcher bar near the center of Figure 10-20 appears.

Of course, the whole point of PyGadgets is to spawn other programs. Pressing on its launcher bar’s buttons starts programs like those shown in the rest of Figure 10-20, but if you want to know more about those, you’ll have to turn the page and move on to the next chapter.