Chapter 9. Databases
PHP has support for over 20 databases, including the most popular commercial and open source varieties. Relational database systems such as MariaDB, MySQL, PostgreSQL, and Oracle are the backbone of most modern dynamic websites. In these are stored shopping-cart information, purchase histories, product reviews, user information, credit card numbers, and sometimes even web pages themselves.
This chapter covers how to access databases from PHP. We focus on the built-in PHP Data Objects (PDO) library, which lets you use the same functions to access any database, rather than on the myriad database-specific extensions. In this chapter, you’ll learn how to fetch data from the database, store data in the database, and handle errors. We finish with a sample application that shows how to put various database techniques into action.
This book cannot go into all the details of creating web database applications with PHP. For a more in-depth look at the PHP/MySQL combination, see Web Database Applications with PHP and MySQL, Second Edition (http://oreil.ly/web_db_apps_PHP_MySQL), by Hugh Williams and David Lane (O’Reilly).
Using PHP to Access a Database
There are two ways to access databases from PHP. One is to use a database-specific extension; the other is to use the database-independent PDO library. There are advantages and disadvantages to each approach.
If you use a database-specific extension, your code is intimately tied to the database you’re using. For example, the MySQL extension’s function names, parameters, error handling, and so on are completely different from those of the other database extensions. If you want to move your database from MySQL to PostgreSQL, it will involve significant changes to your code. PDO, on the other hand, hides the database-specific functions from you with an abstraction layer, so moving between database systems can be as simple as changing one line of your program or your php.ini file.
The portability of an abstraction layer like the PDO library comes at a price, however, as code that uses it is also typically a little slower than code that uses a native database-specific extension.
Keep in mind that an abstraction layer does absolutely nothing when it comes to making sure your actual SQL queries are portable. If your application uses any sort of nongeneric SQL, you’ll have to do significant work to convert your queries from one database to another. We will be looking briefly at both approaches to database interfaces in this chapter and then look at alternative methods to managing dynamic content for the web.
Relational Databases and SQL
A Relational Database Management System (RDBMS) is a server that manages data for you. The data is structured into tables, where each table has a number of columns, each of which has a name and a type. For example, to keep track of science fiction books, we might have a “books” table that records the title (a string), year of release (a number), and the author.
Tables are grouped together into databases, so a science fiction book database might have tables for time periods, authors, and villains. An RDBMS usually has its own user system, which controls access rights for databases (e.g., “user Fred can update database authors”).
PHP communicates with relational databases such as MariaDB and Oracle using the Structured Query Language (SQL). You can use SQL to create, modify, and query relational databases.
The syntax for SQL is divided into two parts. The first, Data Manipulation Language (DML), is used to retrieve and modify data in an existing database. DML is remarkably compact, consisting of only four actions or verbs: SELECT, INSERT, UPDATE, and DELETE. The set of SQL commands used to create and modify the database structures that hold the data is known as Data Definition Language, or DDL. The syntax for DDL is not as standardized as that for DML, but as PHP just sends any SQL commands you give it to the database, you can use any SQL commands your database supports.
Note
The SQL command file for creating this sample library database is available in a file called library.sql.
Assuming you have a table called books, this SQL statement would insert a new row:
INSERT INTO books VALUES (null, 4, 'I, Robot', '0-553-29438-5', 1950, 1);
This SQL statement inserts a new row but specifies the columns for which there are values:
INSERT INTO books (authorid, title, ISBN, pub_year, available)
 VALUES (4, 'I, Robot', '0-553-29438-5', 1950, 1);
To delete all books that were published in 1979 (if any), we could use this SQL statement:
DELETE FROM books WHERE pub_year = 1979;
To change the year for Roots to 1983, use this SQL statement:
UPDATE books SET pub_year=1983 WHERE title='Roots';
To fetch only the books published in the 1980s, use:
SELECT * FROM books WHERE pub_year > 1979 AND pub_year < 1990;
You can also specify the fields you want returned. For example:
SELECT title, pub_year FROM books WHERE pub_year > 1979 AND pub_year < 1990;
You can issue queries that bring together information from multiple tables. For example, this query joins together the book and author tables to let us see who wrote each book:
SELECT authors.name, books.title FROM books, authors
 WHERE authors.authorid = books.authorid;
You can even short-form (or alias) the table names like this:
SELECT a.name, b.title FROM books b, authors a WHERE a.authorid = b.authorid;
For more on SQL, see SQL in a Nutshell (http://oreil.ly/SQL_Nutshell3), Third Edition, by Kevin Kline (O’Reilly).
PHP Data Objects
The PHP website (http://php.net) has this to say about PDO:
he PHP Data Objects (PDO) extension defines a lightweight, consistent interface for accessing databases in PHP. Each database driver that implements the PDO interface can expose database-specific features as regular extension functions. Note that you cannot perform any database functions using the PDO extension by itself; you must use a database-specific PDO driver to access a database server.
Among its other unique features, PDO:
Is a native C extension.
Takes advantage of the latest PHP 7 internals.
Uses buffered reading of data from the result set.
Provides common database features as a base.
Is still able to access database-specific functions.
Can use transaction-based techniques.
Can interact with LOBS (Large Objects) in the database.
Can use prepared and executable SQL statements with bound parameters.
Can implement scrollable cursors.
Has access to
SQLSTATEerror codes and has very flexible error handling.
Since there are a number of features here, we will touch on only a few of them to illustrate just how beneficial PDO can be.
First, a little about PDO. It has drivers for almost all database engines in existence, and those drivers that PDO does not supply should be accessible through PDO’s generic ODBC connection. PDO is modular in that it has to have at least two extensions enabled to be active: the PDO extension itself and the PDO extension specific to the database to which you will be interfacing. See the online documentation (http://ca.php.net/pdo) to set up the connections for the database of your choice. As an example, for establishing PDO on a Windows server for MySQL interaction, simply enter the following two lines into your php.ini file and restart your server:
extension=php_pdo.dll
extension=php_pdo_mysql.dll
The PDO library is also an object-oriented extension (as you will see in the code examples that follow).
Making a connection
The first requirement for PDO is to make a connection to the database in question and hold that connection in a connection handle variable, as in the following code:
$db = new PDO($dsn, $username, $password);
The $dsn stands for data source name, and the other two parameters are self-explanatory. Specifically, for a MySQL connection, you would write the following code:
$db = new PDO("mysql:host=localhost;dbname=library", "petermac", "abc123");
Of course, you could (should) maintain variable-based username and password parameters for code reuse and flexibility reasons.
Interacting with the database
Once you have connected to your database engine and the database that you want to interact with, you can use that connection to send SQL commands to the server. A simple UPDATE statement would look like this:
$db->query("UPDATE books SET authorid=4 WHERE pub_year=1982");
This code simply updates the books table and releases the query. This allows you to send simple SQL commands (e.g., UPDATE, DELETE, INSERT) directly to the database.
Using PDO and prepared statements
More typically, you’ll use prepared statements, issuing PDO calls in stages or steps. Consider the following code:
$statement = $db->prepare("SELECT * FROM books");
$statement->execute();

// handle row results, one at a time
while($row = $statement->fetch()) {
 print_r($row);
 // ... or probably do something more meaningful with each returned row
}

$statement = null;
In this code, we “prepare” the SQL code and then “execute” it. Next, we cycle through the result with the while code and, finally, we release the result object by assigning null to it. This may not look all that powerful in this simple example, but there are other features that can be used with prepared statements. Now, consider this code:
$statement = $db->prepare("INSERT INTO books (authorid, title, ISBN, pub_year)"
 . "VALUES (:authorid, :title, :ISBN, :pub_year)");

$statement->execute(array(
 'authorid' => 4,
 'title' => "Foundation",
 'ISBN' => "0-553-80371-9",
 'pub_year' => 1951),
);
Here, we prepare the SQL statement with four named placeholders: authorid, title, ISBN, and pub_year. In this case, these happen to be the same names as the columns in the database, but this is done only for clarity—the placeholder names can be anything that is meaningful to you. In the execute call, we replace these placeholders with the actual data that we want to use in this particular query. One of the advantages of prepared statements is that you can execute the same SQL command and pass in different values through the array each time. You can also do this type of statement preparation with positional placeholders (not actually naming them), signified by a ?, which is the positional item to be replaced. Look at the following variation of the previous code:
$statement = $db->prepare("INSERT INTO books (authorid, title, ISBN, pub_year)"
 . "VALUES (?, ?, ?, ?)");

$statement->execute(array(4, "Foundation", "0-553-80371-9", 1951));
This accomplishes the same thing but with less code, as the value area of the SQL statement does not name the elements to be replaced, and therefore the array in the execute statement needs to send in only the raw data and no names. You just have to be sure about the position of the data that you are sending into the prepared statement.
Handling transactions
Some RDBMSs support transactions, in which a series of database changes can be committed (all applied at once) or rolled back (discarded, with none of the changes applied to the database). For example, when a bank handles a money transfer, the withdrawal from one account and deposit into another must happen together—neither should happen without the other, and there should be no time lag between the two actions. PDO handles transactions elegantly with try...catch structures like this one in Example 9-1.
Example 9-1. The try...catch code structure
try {
 // connection successful
 $db = new PDO("mysql:host=localhost;dbname=banking_sys", "petermac", "abc123");
} catch (Exception $error) {
 die("Connection failed: " . $error->getMessage());
}

try {
 $db->setAttribute(PDO::ATTR_ERRMODE, PDO::ERRMODE_EXCEPTION);
 $db->beginTransaction();

 $db->exec("insert into accounts (account_id, amount) values (23, '5000')" );
 $db->exec("insert into accounts (account_id, amount) values (27, '-5000')" );

 $db->commit();
} catch (Exception $error) {
 $db->rollback();
 echo "Transaction not completed: " . $error->getMessage();
}
If the entirety of the transaction can’t be completed, none of it will be, and an exception will be thrown.
If you call commit() or rollback() on a database that doesn’t support transactions, the methods return DB_ERROR.
Note
Be sure to check your underlying database product to ensure that it supports transactions.
Debugging statements
The PDO interface provides a method for showing details about a PDO statement, which can be useful for debugging if something goes wrong.
$statement = $db->prepare("SELECT title FROM books WHERE authorid = ?)";

$statement->bindParam(1, "12345678", PDO::PARAM_STR);
$statement->execute();

$statement->debugDumpParams();
Calling the debugDumpParams() method on the statement object prints a variety of information about the call:
SQL: [35] SELECT title
 FROM books
 WHERE authorID = ?
Sent SQL: [44] SELECT title
 FROM books
 WHERE authorid = "12345678"
Params: 1
Key: Position #0:
paramno=0
name[0] ""
is_param=1
param_type=2
The Sent SQL section is displayed only after the statement is executed; prior to that, only the SQL and Params sections are available.
MySQLi Object Interface
The most popular database platform used with PHP is the MySQL database. If you look at the MySQL website (www.mysql.com), you’ll discover that there are a few different versions of MySQL you can use. We will look at the freely distributable version known as the community server. PHP has a number of different interfaces to this database tool as well, so we will look at the object-oriented interface known as MySQLi, a.k.a. the MySQL Improved extension.
Recently, MariaDB (http://mariadb.com) has started overtaking MySQL as the database of choice for PHP developers. By design, MariaDB is client language–, connection tool–, and binary file–compatible with MySQL; this means that you can install MariaDB, uninstall MySQL, and point your PHP configuration to MariaDB instead, and likely need no other changes.
If you are not overly familiar with OOP interfaces and concepts, be sure to review Chapter 6 before you get too far into this section.
Since this object-oriented interface is built into PHP with a standard installation configuration (you simply activate the MySQLi extension in your PHP environment), all you have to do to start using it is instantiate its class, as in the following code:
$db = new mysqli(host, user, password, databaseName);
In this example, we have a database named library, and we will use the fictitious username of petermac and the password of 1q2w3e9i8u7y. The actual code that would be used is:
$db = new mysqli("localhost", "petermac", "1q2w3e9i8u7y", "library");
This gives us access to the database engine itself within the PHP code; we will specifically access tables and other data later. Once this class is instantiated into the variable $db, we can use methods on that object to do our database work.
A brief example of generating some code to insert a new book into the library database would look something like this:
$db = new mysqli("localhost", "petermac", "1q2w3e9i8u7y", "library");

$sql = "INSERT INTO books (authorid, title, ISBN, pub_year, available)
 VALUES (4, 'I, Robot', '0-553-29438-5', 1950, 1)";

if ($db->query($sql)) {
 echo "Book data saved successfully.";
} else {
 echo "INSERT attempt failed, please try again later, or call tech support" ;
}

$db->close();
First, we instantiate the MySQLi class into the variable $db. Next, we build our SQL command string and save it to a variable called $sql. Then we call the query method of the class and at the same time test its return value to determine if it was successful (TRUE), and then comment to the screen accordingly. You may not want to echo out to the browser at this stage, as again this is only an example. Last, we call the close() method on the class to tidy up and destroy the class from memory.
Retrieving Data for Display
In another area of your website, you may want to draw out a listing of your books and show who their authors are. We can accomplish this by employing the same MySQLi class and working with the result set that is generated from a SELECT SQL command. There are many ways to display the information in the browser, and we’ll look at one example of how this can be done. Notice that the result returned is a different object than the $db that we first instantiate. PHP instantiates the result object for you and fills it with any returned data.
$db = new mysqli("localhost", "petermac", "1q2w3e9i8u7y", "library");
$sql = "SELECT a.name, b.title FROM books b, authors a WHERE a.authorid=b.authorid";
$result = $db->query($sql);

while ($row = $result->fetch_assoc()) {
 echo "{$row['name']} is the author of: {$row['title']}<br />";
}

$result->close();
$db->close();
Here, we are using the query() method call and storing the returned information into the variable called $result. Then we are using a method of the result object called fetch_assoc() to provide one row of data at a time, and we are storing that single row into the variable called $row. This continues as long as there are rows to process. Within that while loop, we are dumping content out to the browser window. Finally, we are closing both the result and the database objects.
The output would look like this:
J.R.R. Tolkien is the author of: The Two Towers
J.R.R. Tolkien is the author of: The Return of The King
J.R.R. Tolkien is the author of: The Hobbit
Alex Haley is the author of: Roots
Tom Clancy is the author of: Rainbow Six
Tom Clancy is the author of: Teeth of the Tiger
Tom Clancy is the author of: Executive Orders...
Note
One of the most useful methods in MySQLi is multi_query(), which allows you to run multiple SQL commands in the same statement. If you want to do an INSERT and then an UPDATE statement based on similar data, you can do it all in one method call—one step.
We have, of course, just scratched the surface of what the MySQLi class has to offer. If you review its documentation (www.php.net/mysqli), you’ll see the extensive list of methods that are part of this class, as well as each result class documented within the appropriate subject area.
SQLite
SQLite is a compact, highly performant (for small data sets), and—as its name suggests—lightweight database. SQLite is ready to go right out of the box when you install PHP, so if it sounds like a good fit for your database needs, be sure to read up on it.
All the database storage in SQLite is file-based, and therefore accomplished without the use of a separate database engine. This can be very advantageous if you are trying to build an application with a small database footprint and no product dependencies other than PHP. All you have to do to start using SQLite is to reference it in your code.
There is an OOP interface to SQLite, so you can instantiate an object with the following statement:
$db = new SQLiteDatabase("library.sqlite");
The neat thing about this statement is that if the file is not found at the specified location, SQLite creates it for you. Continuing with our library database example, the command to create the authors table and insert a sample row within SQLite would look something like Example 9-2.
Example 9-2. SQLite library authors table
$sql = "CREATE TABLE 'authors' ('authorid' INTEGER PRIMARY KEY, 'name' TEXT)";

if (!$database->queryExec($sql, $error)) {
 echo "Create Failure - {$error}<br />";
} else {
 echo "Table Authors was created <br />";
}

$sql = <<<SQL
INSERT INTO 'authors' ('name') VALUES ('J.R.R. Tolkien');
INSERT INTO 'authors' ('name') VALUES ('Alex Haley');
INSERT INTO 'authors' ('name') VALUES ('Tom Clancy');
INSERT INTO 'authors' ('name') VALUES ('Isaac Asimov');
SQL;

if (!$database->queryExec($sql, $error)) {
 echo "Insert Failure - {$error}<br />";
} else {
 echo "INSERT to Authors - OK<br />";
}
Table Authors was createdINSERT to Authors - OK
Note
In SQLite, unlike MySQL, there is no AUTO_INCREMENT option. SQLite instead makes any column that is defined with INTEGER and PRIMARY KEY an automatically incrementing column. You can override this default behavior by providing a value to the column when an INSERT statement is executed.
Notice that the data types are quite different from what we have seen in MySQL. Remember that SQLite is a trimmed-down database tool and therefore it is “lite” on its data types; see Table 9-1 for a listing of the data types that it uses.
| Data type | Explanation |
|---|---|
| Text | Stores data as NULL, TEXT, or BLOB content. If a number is supplied to a text field, it is converted to text before it is stored. |
| Numeric | Can store either integer or real data. If text data is supplied, SQLite attempts to convert the information to numerical format. |
| Integer | Behaves the same as the numeric data type. However, if data of the real type is supplied, it is stored as an integer. This may affect data storage accuracy. |
| Real | Behaves the same as the numeric data type, except that it forces integer values into floating-point representation. |
| None | This is a catchall data type; it does not prefer one base type to another. Data is stored exactly as supplied. |
Run the following code in Example 9-3 to create the books table and insert some data into the database file.
Example 9-3. SQLite library books table
$db = new SQLiteDatabase("library.sqlite");

$sql = "CREATE TABLE 'books' ('bookid' INTEGER PRIMARY KEY,
 'authorid' INTEGER,
 'title' TEXT,
 'ISBN' TEXT,
 'pub_year' INTEGER,
 'available' INTEGER,
)";

if ($db->queryExec($sql, $error) == FALSE) {
 echo "Create Failure - {$error}<br />";
} else {
 echo "Table Books was created<br />";
}

$sql = <<<SQL
INSERT INTO books ('authorid', 'title', 'ISBN', 'pub_year', 'available')
VALUES (1, 'The Two Towers', '0-261-10236-2', 1954, 1);

INSERT INTO books ('authorid', 'title', 'ISBN', 'pub_year', 'available')
VALUES (1, 'The Return of The King', '0-261-10237-0', 1955, 1);

INSERT INTO books ('authorid', 'title', 'ISBN', 'pub_year', 'available')
VALUES (2, 'Roots', '0-440-17464-3', 1974, 1);

INSERT INTO books ('authorid', 'title', 'ISBN', 'pub_year', 'available')
VALUES (4, 'I, Robot', '0-553-29438-5', 1950, 1);

INSERT INTO books ('authorid', 'title', 'ISBN', 'pub_year', 'available')
VALUES (4, 'Foundation', '0-553-80371-9', 1951, 1);
SQL;

if (!$db->queryExec($sql, $error)) {
 echo "Insert Failure - {$error}<br />";
} else {
 echo "INSERT to Books - OK<br />";
}
Notice that we can execute multiple SQL commands at the same time. We could also do this with MySQLi, but you’d have to remember to use the multi_query() method; with SQLite, it’s available with the queryExec() method. After loading the database with some data, run the code in Example 9-4.
Example 9-4. SQLite select books
$db = new SQLiteDatabase("c:/copy/library.sqlite");

$sql = "SELECT a.name, b.title FROM books b, authors a WHERE a.authorid=b.authorid";
$result = $db->query($sql);

while ($row = $result->fetch()) {
 echo "{$row['a.name']} is the author of: {$row['b.title']}<br/>";
}
The preceding code produces the following output:
J.R.R. Tolkien is the author of: The Two Towers
J.R.R. Tolkien is the author of: The Return of The King
Alex Haley is the author of: Roots
Isaac Asimov is the author of: I, Robot
Isaac Asimov is the author of: Foundation
SQLite can do almost as much as the “bigger” database engines—the “lite” refers not to its functionality but to its demand for system resources. You should always consider SQLite when you require a database that’s more portable and less demanding of resources.
Note
If you are just getting started with the dynamic aspect of web development, you can use PDO to interface with SQLite. In this way, you can start with a lightweight database and grow into a more robust database server like MySQL when you are ready.
Direct File-Level Manipulation
PHP has many little hidden features within its vast toolset. One of these features (which is often overlooked) is its uncanny ability to handle complex files. Sure, everyone knows that PHP can open a file, but what can it really do with that file? Consider the following example highlighting the true range of its possibilities. One of this book’s authors was contacted by a prospective client who had “no money” but wanted a dynamic web survey developed. Of course, the author initially offered the client the wonders of PHP and database interaction with MySQLi. Upon hearing the monthly fees from a local ISP, however, the client asked if there was any other (cheaper) way to accomplish the work. It turns out that if you don’t want to use SQLite, an alternative is to use files to manage and manipulate small amounts of text for later retrieval. The functions we’ll discuss here are nothing out of the ordinary when taken individually—in fact, they’re really part of the basic PHP toolset everyone is probably familiar with, as you can see in Table 9-2.
| Function name | Description of use |
|---|---|
mkdir() |
Used to make a directory on the server. |
file_exists() |
Used to determine if a file or directory exists at the supplied location. |
fopen() |
Used to open an existing file for reading or writing (see detailed options for correct usage). |
fread() |
Used to read in the contents of a file to a variable for PHP use. |
flock() |
Used to gain an exclusive lock on a file for writing. |
fwrite() |
Used to write the contents of a variable to a file. |
filesize() |
When reading in a file, this is used to determine how many bytes to read in at a time. |
fclose() |
Used to close the file once its usefulness has passed. |
The interesting part is in tying all the functions together to accomplish your objective. For example, let’s create a small web form survey that covers two pages of questions. Users can enter some opinions and return at a later date to finish the survey, picking up right where they left off. We’ll scope out the logic of our little application and, hopefully, you will see that its basic premise can be expanded to a full production-type employment.
The first thing that we want to do is allow users to return to this survey at any time to provide additional input. To do this, we need to have a unique identifier to differentiate one user from another. Generally, a person’s email address is unique (other people might know it and use it, but that is a question of website security and/or controlling identity theft). For the sake of simplicity, we’ll assume honesty here in the use of email addresses and not bother with a password system. So, once we have the user’s email address, we need to store that information in a location that is distinct from that of other site visitors. For this purpose, we will create a directory folder for each visitor on the server (this, of course, assumes that you have access and proper rights to a location on the server that permits the reading and writing of files). Since we have the relatively unique identifier in the visitor’s email address, we will simply name the new directory location with that identifier. Once we’ve created a directory (testing to see if the user has returned from a previous session), we will read in any file contents that are already there and display them in a <textarea> form control so that the visitor can see what (if anything) he or she has written previously. We then save the visitor’s comments upon the submission of the form and move on to the next survey question. Example 9-5 shows the code for the first page (the <?php tags are included here because there are places where they are turned on and off throughout the listing).
Example 9-5. File-level access
session_start();

if (!empty($_POST['posted']) && !empty($_POST['email'])) {
 $folder = "surveys/" . strtolower($_POST['email']);

 // send path information to the session
 $_SESSION['folder'] = $folder;

 if (!file_exists($folder)) {
 // make the directory and then add the empty files
 mkdir($folder, 0777, true);
 }

 header("Location: 08_6.php");
} else { ?>
 <html>
 <head>
 <title>Files & folders - On-line Survey</title>
 </head>

 <body bgcolor="white" text="black">
 <h2>Survey Form</h2>

 <p>Please enter your e-mail address to start recording your comments</p>

 <form action="<?php echo $_SERVER['PHP_SELF']; ?>" method="POST">
 <input type="hidden" name="posted" value="1">
 <p>Email address: <input type="text" name="email" size="45" /><br />
 <input type="submit" name="submit" value="Submit"></p>
 </form>
 </body>
 </html>
<?php }
Figure 9-1 shows the web page that asks the visitor to submit an email address.

Figure 9-1. Survey login screen
As you can see, the first thing that we do is open a new session to pass the visitor’s information on to subsequent pages. Then we test to confirm that the form further down in the code has indeed been submitted and that there is something entered in the email address field. If this test fails, the form is simply redisplayed. Of course, the production version of this functionality would send out an error message telling the user to enter valid text.
Once this test has passed (assuming the form has been submitted correctly) we create a $folder variable that contains the directory structure where we want to save the survey information and append the user’s email address to it; we also save the contents of this newly created variable ($folder) into the session for later use. Here we simply take the email address and use it (again, if this were a secure site, we would protect the data with proper security measures).
Next, we want to see if the directory already exists. If it does not, we create it with the mkdir() function. This function takes the argument of the path and the name of the directory we want to create and attempts to create it.
Note
In a Linux environment, there are other options on the mkdir() function that control access levels and permissions on the newly created directory, so be sure to look into those options if this applies to your environment.
After we verify that the directory exists, we simply direct the browser to the first page of the survey.
Now that we are on the first page of the survey (see Figure 9-2), the form is ready for use.

Figure 9-2. The first page of the survey
This, however, is a dynamically generated form, as you can see in Example 9-6.
Example 9-6. File-level access, continued
<?php
session_start();
$folder = $_SESSION['folder'];
$filename = $folder . "/question1.txt";

// open file for reading then clean it out
$file_handle = fopen($filename, "a+");

// pick up any text in the file that may already be there
$comments = file_get_contents($filename) ;
fclose($file_handle); // close this handle

if (!empty($_POST['posted'])) {
 // create file if first time and then
 //save text that is in $_POST['question1']
 $question1 = $_POST['question1'];
 $file_handle = fopen($filename, "w+");

 // open file for total overwrite
 if (flock($file_handle, LOCK_EX)) {
 // do an exclusive lock
 if (fwrite($file_handle, $question1) == FALSE) {
 echo "Cannot write to file ($filename)";
 }

 // release the lock
 flock($file_handle, LOCK_UN);
 }

 // close the file handle and redirect to next page ?
 fclose($file_handle);
 header( "Location: page2.php" );
} else { ?>
 <html>
 <head>
 <title>Files & folders - On-line Survey</title>
 </head>

 <body>
 <table border="0">
 <tr>
 <td>Please enter your response to the following survey question:</td>
 </tr>
 <tr bgcolor=lightblue>
 <td>
 What is your opinion on the state of the world economy?<br/>
 Can you help us fix it ?
 </td>
 </tr>
 <tr>
 <td>
 <form action="<?php echo $_SERVER['PHP_SELF']; ?>" method="POST">
 <input type="hidden" name="posted" value="1"><br/>
 <textarea name="question1" rows=12 cols=35><?= $comments ?></textarea>
 </td>
 </tr>

 <tr>
 <td><input type="submit" name="submit" value="Submit"></form></td>
 </tr>
 </table>
<?php } ?>
Let’s highlight a few of the lines of code here, because this is where the file management and manipulation really takes place. After taking in the session information that we need and appending the filename to the $filename variable, we are ready to start working with the files. Keep in mind that the point of this process is to display any information that may already be saved in the file and allow users to enter information (or alter what they have already entered). So, near the top of the code you see this command:
$file_handle = fopen($filename, "a+");
Using the file opening function, fopen(), we ask PHP to provide us with a handle to that file and store it in the aptly named variable $file_handle. Notice that there is another parameter passed to the function here: the a+ option. The PHP site (http://php.net) provides a full listing of these option letters and what they mean. The a+ option causes the file to open for reading and writing, with the file pointer placed at the end of any existing file content. If the file does not exist, PHP will attempt to create it. Looking at the next two lines of code, you’ll see that the entire file is read (using the file_get_contents() function) into the $comments variable, and then it is closed:
$comments = file_get_contents($filename);
fclose($file_handle);
Next, we want to see if the form portion of this program file has been executed and, if so, we have to save any information that was entered into the text area. This time, we open the same file again, but we use the w+ option, which causes the interpreter to open the file for writing only—creating it if it doesn’t exist, or emptying it if it does. The file pointer is then placed at the beginning of the file. Essentially, we want to empty out the current contents of the file and replace it with a totally new volume of text. For this purpose, we employ the fwrite() function:
// do an exclusive lock
if (flock($file_handle, LOCK_EX)) {
 if (fwrite($file_handle, $question1) == FALSE){
 echo "Cannot write to file ($filename)";
 }
 // release the lock
 flock($file_handle, LOCK_UN);
}
We have to be sure that this information is indeed saved into the designated file, so we wrap a few conditional statements around our file-writing operations to make sure everything will go smoothly. First, we attempt to gain an exclusive lock on the file in question (using the flock() function); this will ensure that no other process can access the file while we’re operating on it. After the writing is complete, we release the lock on the file. This is merely a precaution, since the file management is unique to the entered email address on the first web page form and each survey has its own folder location, so usage collisions should never occur unless two people happen to be using the same email address.
As you can see, the file write function uses the $file_handle variable to add the contents of the $question1 variable to the file. Then we simply close the file when we are finished with it and move on to the next page of the survey, as shown in Figure 9-3.

Figure 9-3. Page 2 of the survey
As you can see in Example 9-7, the code for processing this file (called question2.txt) is identical to the previous one except for its name.
Example 9-7. File-level access, continued
<?php
session_start();
$folder = $_SESSION['folder'];
$filename = $folder . "/question2.txt" ;

// open file for reading then clean it out
$file_handle = fopen($filename, "a+");

// pick up any text in the file that may already be there
$comments = fread($file_handle, filesize($filename));
fclose($file_handle); // close this handle

if ($_POST['posted']) {
 // create file if first time and then save
 //text that is in $_POST['question2']
 $question2 = $_POST['question2'];

 // open file for total overwrite
 $file_handle = fopen($filename, "w+");

 if(flock($file_handle, LOCK_EX)) { // do an exclusive lock
 if(fwrite($file_handle, $question2) == FALSE) {
 echo "Cannot write to file ($filename)";
 }

 flock($file_handle, LOCK_UN); // release the lock
 }

 // close the file handle and redirect to next page ?
 fclose($file_handle);

 header( "Location: last_page.php" );
} else { ?>
 <html>
 <head>
 <title>Files & folders - On-line Survey</title>
 </head>

 <body>
 <table border="0">
 <tr>
 <td>Please enter your comments to the following survey statement:</td>
 </tr>

 <tr bgcolor="lightblue">
 <td>It's a funny thing freedom. I mean how can any of us <br/>
 be really free when we still have personal possessions.
 How do you respond to the previous statement?</td>
 </tr>

 <tr>
 <td>
 <form action="<?php echo $_SERVER['PHP_SELF']; ?>" method=POST>
 <input type="hidden" name="posted" value="1"><br/>
 <textarea name="question2" rows="12" cols="35"><?= $comments ?></textarea>
 </td>
 </tr>

 <tr>
 <td><input type="submit" name="submit" value="Submit"></form></td>
 </tr>
</table>
<?php } ?>
This kind of file processing can continue for as long as you like, and therefore your surveys can be as long as you like. To make it more interesting, you can ask multiple questions on the same page and simply give each question its own filename. The only unique item here to point out is that once this page is submitted and the text is stored, it is directed to a PHP file called last_page.php. This page is not included in the code samples, as it is merely a page thanking users for filling out the survey.
Of course, after a few pages, with as many as five questions per page, you may find yourself with a large volume of individual files needing management. Fortunately, PHP has other file-handling functions that you can use. The file() function, for example, is an alternative to the fread() function that reads the entire contents of a file in an array, one element per line. If your information is formatted properly—with each line delimited by the end of line sequence,
—you can store multiple pieces of information in a single file very easily. Naturally, this would also entail the use of the appropriate looping controls for handling the creation of the HTML form, as well as recording the entries into that form.
When it comes to file handling, there are still many more options that you can look at on the PHP website. If you go to the section “Filesystem” in the appendix, you will find a list of over 70 functions—including, of course, the ones discussed here. You can check to see if a file is either readable or writable with the is_readable() or is_writable() functions, respectively. You can check on file permissions, free disk space, or total disk space, and you can delete files, copy files, and much more. When you get right down to it, if you have enough time and desire, you can even write an entire web application without ever needing or using a database system.
When the day comes, and it most likely will, that you have a client who does not want to pay big bucks for the use of a database engine, you will have an alternative approach to offer them.
MongoDB
The last database type that we will look at is a NoSQL database. NoSQL databases are rising in popularity because they are also quite lightweight in terms of system resources, but more importantly, they work outside the typical SQL command structure. NoSQL databases are also becoming more popular with mobile devices like tablets and smartphones for the same two reasons.
One of the frontrunners in the NoSQL database world is known as MongoDB. We’ll only be touching the surface of MongoDB here, just to give you a taste of what is possible with its use. For more detailed coverage of this topic, please refer to MongoDB and PHP (http://bit.ly/MongoDB_PHP) by Steve Francia (O’Reilly).
The first thing to get your head around with MongoDB is that it is not a traditional database. It has its own setup and terminology. Getting used to how to work with it will take some time for the traditional SQL database user. Table 9-3 attempts to draw some parallels with “standard” SQL terminology.
| Traditional SQL terms | MongoDB terms |
|---|---|
| Database | Database |
| Tables | Collections |
| Rows | Documents. No correlation, not like database “rows”; rather, think of arrays. |
There’s not an exact equivalent of a database row within the MongoDB paradigm. One of the best ways to think of the data within a collection is like that of a multidimensional array, as you’ll see shortly when we revamp our library database example.
If you just want to try MongoDB out on your own localhost (recommended for getting familiar with it), you can use an all-in-one tool like Zend Server CE (http://zend.com) to set up a local environment with the Mongo drivers all installed. You’ll still have to download the server itself from the MongoDB website (www.mongodb.org) and follow the instructions for setting up the database server engine for your own local environment.
One very useful web-based tool for browsing MongoDB data and manipulating the collections and documents is Genghis (http://genghisapp.com/). Simply download the project and drop it into its own folder in the localhost and call genghis.php. If the database engine is running, it will be picked up and displayed to you (see Figure 9-4).

Figure 9-4. Genghis MongoDB web interface sample
Now let’s get into some sample code. Take a look at Example 9-8 to see the beginnings of a Mongo database taking shape.
Example 9-8. MongoDB library
$mongo = new Mongo();
$db = $mongo->library;
$authors = $db->authors;

$author = array('authorid' => 1, 'name' => "J.R.R. Tolkien");
$authors->insert($author);

$author = array('authorid' => 2, 'name' => "Alex Haley");
$authors->insert($author);

$author = array('authorid' => 3, 'name' => "Tom Clancy");
$authors->save($author);

$author = array('authorid' => 4, 'name' => "Isaac Asimov");
$authors->save($author);
The first line creates a new connection to the MongoDB engine, and creates an object interface to it as well. The next line connects to the library “collection”; if this collection does not exist, Mongo creates it for you (so there is no need to precreate a collection in Mongo). We then create an object interface with the $db connection to the library database and create a collection where we will store our author data. The next four groupings of code add documents to the authors collection in two different ways. The first two samples use the insert() method, and the last two use the save() method. The only difference between these two methods is that save() will update a value if it is already in the document and has an existing _id key (more on _id shortly).
Execute this code within a browser, and you should see the sample data shown in Figure 9-5.

Figure 9-5. Sample Mongo document data for authors
As you can see in Figure 9-5, an entity called _id is created with the inserted data. This is the automatic primary key that is assigned to all created collections. If we wanted to depend on that key—and there is no reason why we shouldn’t (other than its obvious complexity)—we wouldn’t have had to add in our own authorid information in the preceding code.
Retrieving Data
Once the data is stored, we can now start looking at ways in which to access it. Example 9-9 shows one option.
Example 9-9. MongoDB data selection example
$mongo = new Mongo();
$db = $mongo->library;
$authors = $db->authors;

$data = $authors->findone(array('authorid' => 4));

echo "Generated Primary Key: {$data['_id']}<br />";
echo "Author name: {$data['name']}";
The first three lines of code are the same as before, since we still want to connect to the same database and make use of the same collection (library) and document (authors). After that, we use the findone() method, passing it an array containing a unique piece of data that can be used to find the information that we want—in this case, the authorid for Isaac Asimov, 4. We store the returned information into an array called $data.
Note
As a good oversimplification, you can think of information within a Mongo document as array-based.
Then we can use that array as we wish to display the returned data from the document. The following is the resulting output from the previous code. Notice the size of the primary key that Mongo has created.
Generated Primary Key: 4ff43ef45b9e7d300c000007
Author name: Isaac Asimov
Inserting More Complex Data
Next we want to continue our library example database by adding some books to the document in relation to a particular author. Here is where the analogy of different tables within a database can collapse. Consider Example 9-10, which adds four books to the authors document, essentially as a multidimensional array.
Example 9-10. MongoDB simple data update/insert
$mongo = new Mongo();
$db = $mongo->library;
$authors = $db->authors;

$authors->update(
 array('name' => "Isaac Asimov"),
 array('$set' =>
 array('books' =>
 array(
 "0-425-17034-9" => "Foundation",
 "0-261-10236-2" => "I, Robot",
 "0-440-17464-3" => "Second Foundation",
 "0-425-13354-0" => "Pebble In The Sky",
 )
 )
 )
);
Here, after making the needed connections, we use the update() method and use the first element of the array (the first parameter of the update() method) as the unique lookup identifier, and a defined operator called $set as the second parameter to attach the book data to the provided key of the first parameter.
Note
You should research and fully understand the special operators $set and $push (not covered here) before using them in a production environment. See the MongoDB documentation (http://bit.ly/12YY646) for more information and a full listing of these operators.
Example 9-11 provides another approach to accomplishing the same goal, except that we are preparing the array to be inserted and attached ahead of time and using the Mongo-created _id as the location key.
Example 9-11. MongoDB data update/insert
$mongo = new Mongo();
$db = $mongo->library;
$authors = $db->authors;

$data = $authors->findone(array('name' => "Isaac Asimov"));

$bookData = array(
 array(
 "ISBN" => "0-553-29337-0",
 "title" => "Foundation",
 "pub_year" => 1951,
 "available" => 1,
 ),
 array(
 "ISBN" => "0-553-29438-5",
 "title" => "I, Robot",
 "pub_year" => 1950,
 "available" => 1,
 ),
 array(
 "ISBN" => "0-517-546671",
 "title" => "Exploring the Earth and the Cosmos",
 "pub_year" => 1982,
 "available" => 1,
 ),
 array(
 "ISBN' => "0-553-29336-2",
 'title" => "Second Foundation",
 "pub_year" => 1953,
 "available" => 1,
 ),
);

$authors->update(
 array("_id" => $data["_id"]),
 array("$set" => array("books" => $bookData))
);
In both of our two previous code examples, we did not add any keys to the array of book data. We could do this, but it’s just as easy to allow Mongo to manage that data as if it were a multidimensional array. Figure 9-6 shows how the data from Example 9-11 will look when it is displayed in Genghis.
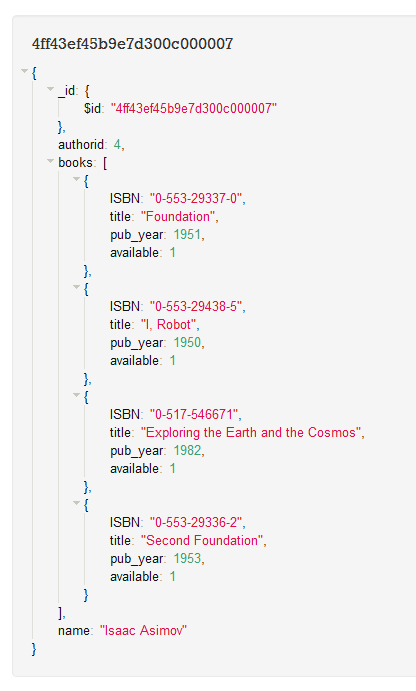
Figure 9-6. Book data added to an author
Example 9-12 shows a little more of what data is stored in our Mongo database. It adds just a few more lines of code to Example 9-9; here we are referencing the automatic natural keys generated in the previous code that inserted the book detail information.
Example 9-12. MongoDB data find and display
$mongo = new Mongo();
$db = $mongo->library;
$authors = $db->authors;

$data = $authors->findone(array("authorid" => 4));

echo "Generated Primary Key: {$data['_id']}<br />";
echo "Author name: {$data['name']}<br />";
echo "2nd Book info - ISBN: {$data['books'][1]['ISBN']}<br />";
echo "2nd Book info - Title: {$data['books'][1]['title']<br />";
The generated output of the preceding code looks like this (remember that arrays are zero-based):
Generated Primary Key: 4ff43ef45b9e7d300c000007
Author name: Isaac Asimov
2nd Book info - ISBN: 0-553-29438-5
2nd Book info - Title: I, Robot
For more information on how MongoDB can be used and manipulated within PHP, see the documentation on the PHP website (http://ca2.php.net/manual/en/book.mongo.php).
What’s Next
In the next chapter, we’ll explore various techniques for including graphics media within pages generated by PHP, as well as dynamically generating and manipulating graphics on your web server.