
Chapter 11
jQuery Templates
WHAT’S IN THIS CHAPTER?
- Why Use Templates?
- The Past, Present, and Future of jQuery Templates
- Creating and Using Templates
In this chapter, you learn about the jQuery Template plugin. jQuery Templates are a standard way of marrying data and markup snippets. If you’re familiar with template engines like Freemarker or Mustache, you’ll recognize a lot of what jQuery Templates try to accomplish. If you’ve done any Ajax-based development, you’ve had to build blocks of HTML for insertion into the document based on the result of an Ajax request or other user interaction. Typically, this has meant concatenating strings or building elements using native DOM methods and then inserting them into the DOMr. jQuery Templates simplify and standardize this common task.
In this chapter, you learn about the two ways to create templates: using specially crafted script tags to define them and using pure JavaScript to define them using JavaScript strings. You’ll also explore the template tags available for greater control over content and you learn strategies for implementing templates in the most efficient way possible. You also get a look at the planned roadmap for the new version of the Template plugin.
If you’ve done JavaScript development for any length of time, you’ve run into code similar to the following sample. In it, a collection of data about a comic book series is looped through to build out new content to be appended to the document.
<!doctype html>
<html>
<head>
<meta charset=”utf-8”>
</head>
<body>
<div id=”main”> </div>
<script src=”http://code.jquery.com/jquery-1.7.1.min.js”></script>
<script src=”//ajax.aspnetcdn.com/ajax/jquery.templates/beta1/jquery.tmpl.min.js”>
</script>
<script>
  $(function(){
    var comics = [
      {
        imgSrc : “cover1.jpg”,
        title : “Captain Templates”,
        year : “2010”,
        number : “1”
      },
      {
        imgSrc : “cover2.jpg”,
        title : “Captain Templates”,
        year : “2011”,
        number : “2”
      },
      {
        imgSrc : “cover3.jpg”,
        title : “Captain Templates”,
        year : “2012”,
        number : “3”
      }
    ]
    for( var i=0; I < comics.length; i++ ){
      $( “#main” ).append( '<div class=”comic”><img src='
        + comics[i].imgSrc
        + '/><div class=”details”><div class=”title”><h3>'
        + comics[i].title
        + '</h3></div><div class=”year”>'
        + comics[i].year
        + '</div><div class=”number”>'
        + comics[i].number
        + '</div></div></div>'
      );
    }
  }
);
</script>
</body>
</html>
Code snippet is from no-templates.txt
The preceding code takes the comics array, iterates through its members, and builds blocks of HTML to add to the document. This is done by simply concatenating strings of HTML with data references. Although this is a common solution, jQuery Templates improve on the pattern in some important ways.
Separation of Content and Behavior
jQuery Templates allow for a further separation of content and behavior.
One of the central tenets of modern web development is the separation of code that describes the structure and content of the page (the HTML) from the code that defines the style (CSS) and code that manages the behavior (JavaScript). Historically, this separation has most often been in the context of moving from style-based HTML elements like font and patterns like table-based layouts to pure CSS layouts. Secondarily, it’s also been seen as a movement away from using inline CSS and JavaScript in HTML files. Though these are positive steps, the trend toward more dynamic sites and applications has introduced a new battlefront. As more and more developers rely on JavaScript to drive sites, more and more style, content, and structure are starting to work their way into JavaScript files.
This is acceptable when you’re working on a small codebase, but once your application gets into the thousands or tens of thousands of lines, and more and more developers are expected to be able to manage them, this can quickly cause issues as the question “Where is this markup coming from?” becomes more frequent.
As you’ll see, the jQuery Template plugin allows for a complete break between structure and program logic. This is a key to writing maintainable code.
Code Reuse
With the capability to define templates once and to apply them multiple times, including mixing and matching with other templates, you have many more opportunities to create reusable markup patterns with a template engine.
Aesthetics and Clarity
A good template system is simply easier to read. Instead of focusing on balancing quotation marks, plus signs, and data references, the focus with jQuery Templates is once again on creating clean, consistent markup.
The Past, Present, and Future of jQuery Templates
Before you get into the nuts and bolts, a little background is in order.
jQuery Templates started out in March 2010, when John Resig posted a prototype. Starting in May 2010, Boris Moore started working on a fork of the plugin. His fork was eventually merged into the main branch and branded a jQuery Official Plugin. Work continued on it, eventually reaching beta stage.
As of April 2011, activity on the jQuery Template plugin stopped, leaving it permanently in that beta state. In the blog post announcing the change (http://blog.jquery.com/2011/04/16/official-plugins-a-change-in-the-roadmap/), it was noted that development of a new Template plugin was being initiated under the aegis of the jQuery UI project.
The Future
The driving force behind the original jQuery Template plugin, Boris Moore, has continued working on the problem of templates along with the jQuery UI team. In October 2011, Moore wrote a blog post (http://www.borismoore.com/2011/10/jquery-templates-and-jsviews-roadmap.html), updating the community on the new plugin’s progress. In it, he stated the solution will eventually be in two parts:
- JsRender templates are described as “Next-generation jQuery Templates, optimized for high-performance pure string-based rendering, without DOM or jQuery dependency.”
- JsViews are described as “Interactive data-driven views, built on top of JsRender templates.”
This new solution promises speed improvements, greater flexibility, and a better separation of presentation and behavior.
The Present
Although we have confidence in this newer effort, having a sane templating system is vital right now to modern web development. It’s therefore sensible to leverage the existing plugin until the newer effort is mature enough to supplant it.
Creating Templates
You can use two basic methods for creating jQuery Templates. Which one you use depends on the nature of your project, the makeup of your team, and the performance demands on your site or application.
Creating Inline Templates
The cleanest way to create templates is through the use of a specially crafted script tag:
<script id=”comics” type=”text/x-jquery-tmpl”>
  <div class=”comic”><img src=”${imgSrc}” />
    <div class=”details”>
      <div class=”title”>
        <h3>${title}</h3>
      </div>
      <div class=”year”>
        ${year}
      </div>
      <div class=”number”>
        ${number}
      </div>
    </div>
  </div>
</script>
Code snippet is from script-tag-template.txt
This example creates a jQuery Template with the name comics. The id is tied to the name of the template in the templating engine. The special type indicates to jQuery that it’s a template script block. The browser itself ignores that script block because it doesn’t know what to do with a script of type text/x-jquery-tmpl. This example also introduced the first template tag, ${}, which exposes variables to the template structure.
This is the cleaner of the two patterns, representing a pretty full break between structure and behavior. This the recommended pattern if you don’t have many templates or if you need to expose templates to team members who may not spend a lot of time poking around JavaScript files.
As a note, it’s also possible to create templates in any element (a DIV with display:none as a CSS rule, for example), but such markup might cause unexpected errors.
Creating Templates with the $.template() Method
Alternatively, you can create templates directly in your JavaScript files using the $.template() method:
$.template('comics' , '<div class=”comic”>
<img src=”${imgSrc}” /><div class=”details”><div class=”title”>
<h3>${title}</h3></div><div class=”year”>${year}</div>
<div class=”number”>${number}</div></div></div>'),
Code snippet is from template-method.txt
Both examples use the same template format, with variables encapsulated in ${} blocks. The difference here is that the template string passed as the second of a pair of arguments to the $.template() method. The first argument is the id of the template, analogous to the id attribute of the script tag in the first example.
Because it’s not as clean a separation, this method is suggested only if you have many templates in your site or application and want to leverage browser caching for the template definitions. Because the previously illustrated specially formatted script blocks are included inline in the markup, they’re downloaded and parsed each time a page is loaded.
Placing your templates in a script file enables them to be downloaded once and then retrieved from memory on each subsequent page view, saving network connection and download time. This may not matter if your templates are focused on individual pages or site sections in a single-page application, but if you have many templates spread across a large site, it might be preferable to have them served in a cacheable manner.
Making the $.template() Method Maintainable
If you find yourself needing to use the $.template() method, we suggest looking at something similar to the following pattern. It uses a single function to initialize all templates for the site or application. This way, while the markup being kept in JavaScript files is not the best possible solution, it’s at least kept in a single, more maintainable location. You always know where your templates are. The following code illustrates this pattern. The basic pattern should be familiar from Chapter 10’s discussion of the Garber-Irish implementation. In it you have a common object which holds code common to all pages. One piece of that code is a method called init. init, a mong any other functions it needs to call to start up your app, also initializes all the templates for your site by firing the myApp.common.templates() method.
var MyApp = {
  common :
    init : function(){

      myApp.common.templates();

  },
    templates: function(){
      $.template('comics' ,
'<div class=”comic”><img src=”${imgSrc}” /></div><div class=”details”>
<div class=”title”><h3>${title}</h3></div><div class=”year”>${year}</div>
<div class=”number”>${number}</div></div></div>'),
      $.template('author' , '<div class=”author”>
<div class=”name”><h3>${author}</h3></div><div class=”bio”>
<p>${authorBio}</p></div></div>'),
    },
  }
}
Code snippet is from template-maintenance.txt
Applying Templates with $.tmpl()
Once you’ve created your site’s templates, it’s time to start using them in your pages. You have two different contexts from which to apply templates.
If you’ve created your templates inline, you can pass a selector representing the script tag holding your template. This is illustrated in the following code sample. In it, you have a template tag with the id #comics. To apply it, you get a reference to it using the id selector and then you call the $.tmpl() method, passing the comics array as an argument. Then it’s simply a matter of calling $.appendTo() to insert it into the document.
<!DOCTYPE html>
<html>
<head>
<meta charset=”utf-8”>
</head>
<body>
<div id=”main”> </div>
<script src=”http://code.jquery.com/jquery-1.7.1.min.js”></script>
<script src=”//ajax.aspnetcdn.com/ajax/jquery.templates/beta1/jquery.tmpl.min.js”>
</script>
<script>
  $(function(){
    var comics = [{
      imgSrc : “cover1.jpg”,
      title : “Captain Templates”,
      year : “2010”,
      number : “1”
    },
    {
      imgSrc : “cover2.jpg”,
      title : “Captain Templates”,
      year : “2011”,
      number : “2”
    },
    {
      imgSrc : “cover3.jpg”,
      title : “Captain Templates”,
      year : “2012”,
      number : “3”
    }];
    $(“#comics”).tmpl(comics).appendTo(“#main”);
  }
);
</script>
<script id=”comics” type=”text/x-jquery-tmpl”>
  <div class=”comic”><img src=”${imgSrc}” />
    <div class=”details”>
      <div class=”title”>
        <h3>${title}</h3>
      </div>
      <div class=”year”>
        ${year}
      </div>
      <div class=”number”>
        ${number}
      </div>
    </div>
  </div>
</script>
</body>
</html>
Code snippet is from inline.html
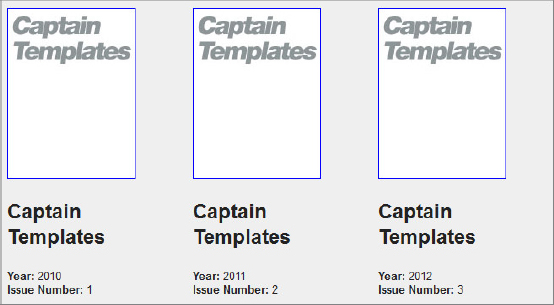
This page produces the output shown in Figure 11-1.
The second method is to use compiled templates. Pass the name of a template created with $.template() into jQuery.tmpl() along with a data object, and it will be applied in exactly the same way.
<!DOCTYPE html>
<html>
<head>
<meta charset=”utf-8”>
</head>
<body>
<div id=”main”> </div>
<script src=”http://code.jquery.com/jquery-1.7.1.min.js”></script>
<script src=” //ajax.aspnetcdn.com/ajax/jquery.templates/beta1/jquery.tmpl.min.js”>
</script>
<script>
  $(function(){
    var comics = [{
      imgSrc : “cover1.jpg”,
      title : “Captain Templates”,
      year : “2010”,
      number : “1”
    },
    {
      imgSrc : “cover2.jpg”,
      title : “Captain Templates”,
      year : “2011”,
      number : “2”
    },
    {
      imgSrc : “cover3.jpg”,
      title : “Captain Templates”,
      year : “2012”,
      number : “3”
    }];
    $.template( 'comics' , '<div class=”comic”>
<img src=”${imgSrc}” /><div class=”details”><div class=”title”>
<h3>${title}</h3></div><div class=”year”>${year}</div>
<div class=”number”>${number}</div></div></div>' );
    $.tmpl( “comics”,comics ).appendTo( “#main” );
);
</script>
</body>
</html>
Code snippet is from template-method.txt
Applying Templates Using Remote Data
Most of the examples in this chapter illustrate a JavaScript array defined in a script block for clarity, and the ability to run the examples in the browser without firing up a web server. However, most of the time, you’ll be applying templates to dynamic data retrieved from an Ajax request.
Although the template patterns are the same, it’s useful to walk through a simple example using an Ajax request to illustrate the way it might be handled.
In this example, you’ll be working with a data.json file with the following structure:
 {
  “comics” : [
    {
      “imgSrc”:”cover1.jpg”,
      “title”:”Captain Templates”,
      “year”:”2010”,
      “number”:”1”
    },
    {
      “imgSrc”:”cover2.jpg”,
      “title”:”Captain Templates”,
      “year”:”2011”,
      “number”:”2”
    },
    {
      “imgSrc”:”cover3.jpg”,
      “title”:”Captain Templates”,
      “year”:”2012”,
      “number”:”3”
    }
  ]
}
Code snippet is from data.json
In your script file, you simply grab the data using $.ajax and then pass the data to the success function, populate, which is set up to handle the data with .tmpl():
<!DOCTYPE html>
<html>
<head>
<meta charset=”utf-8”>
</head>
<body>
<div id=”main”> </div>
<script src=”http://code.jquery.com/jquery-1.7.1.min.js”></script>
<script src=” //ajax.aspnetcdn.com/ajax/jquery.templates/beta1/jquery.tmpl.min.js”>
</script>
<script>
  $(function(){
    var populate = function( data ){
      $( “#comics” ).tmpl(data.comics).appendTo( “#main” );
    }
    $.ajax({
      type : 'get',
      url : 'data.json',
      success : populate,
      dataType : “json”
    });
    }
  );
</script>
<script id=”comics” type=”text/x-jquery-tmpl”>
  <div class=”comic”><img src=”${imgSrc}” />
    <div class=”details”>
      <div class=”title”>
        <h3>${title}</h3>
      </div>
      <div class=”year”>
        <strong>Year:</strong> ${year}
      </div>
      <div class=”number”>
        <strong>Issue Number:</strong> ${number}
      </div>
    </div>
  </div>
</script>
</body>
</html>
Code snippet is from ajax.txt
Template Tags
With the basics of templates out of the way, it’s time to look at some of the further features available with the Template plugin. Simply mapping data to markup in a consistent way is useful, but several other features are available that allow for greater control.
Adding Simple Logic to Your Templates with {{if}} {{else}}
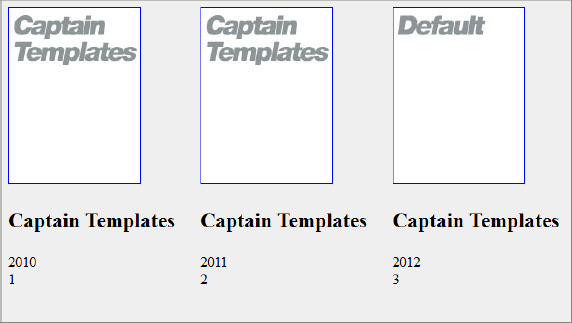
{{if}} and {{else}} provide conditional inclusion of content in templates. It renders content between the {{if}} and closing {{/if}} tag only if a provided value is not null. {{else}} indicates alternative content to be rendered if the provided expression is false. The following example illustrates using {{if}} and {{else}} to conditionally include a thumbnail image. If the thumbnail isn’t set in the data source, a default image will be included.
<!DOCTYPE html>
<html>
<head>
<meta charset=”utf-8”>
</head>
<body>
<div id=”main”> </div>
<script src=”http://code.jquery.com/jquery-1.7.1.min.js”></script>
<script src=” //ajax.aspnetcdn.com/ajax/jquery.templates/beta1/jquery.tmpl.min.js”>
</script>
<script>
  $(function(){
    var comics = [{
      imgSrc : “cover1.jpg”,
      title : “Captain Templates”,
      year : “2010”,
      number : “1”
    },
    {
      imgSrc : “cover2.jpg”,
      title : “Captain Templates”,
      year : “2011”,
      number : “2”
    },
    {
      title : “Captain Templates”,
      year : “2012”,
      number : “3”
    }];
    $( “#comics” ).tmpl(comics).appendTo(“#main”);
  }
);
</script>
<script id=”comics” type=”text/x-jquery-tmpl”>
  <div class=”comic”>
    {{if imgSrc}}
      <img src=”${imgSrc}” />
    {{else}}
      <img src=”default.jpg” />
    {{/if}}
    <div class=”details”>
      <div class=”title”>
        <h3>${title}</h3>
      </div>
      <div class=”year”>
        ${year}
      </div>
      <div class=”number”>
        ${number}
      </div>
    </div>
  </div>
</script>
</body>
</html>
Code snippet is from if.txt
Applying the template to the data produces the output shown in Figure 11-2.
Iterate Over Data Objects with {{each}}
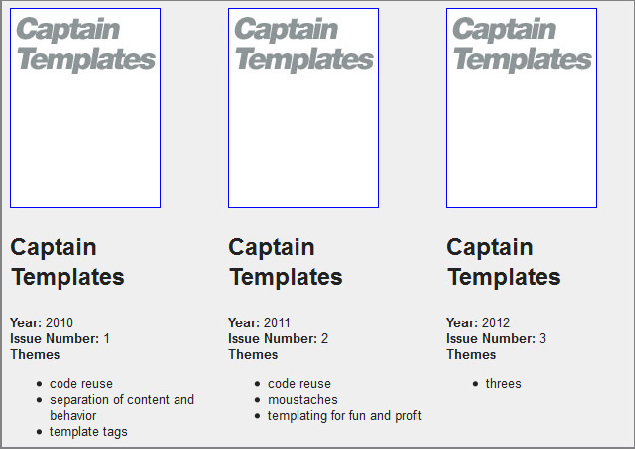
Like $.each(), {{each}} is used to iterate over a data array. It renders content between the opening and closing template tags once for each data item. As the following code sample shows, the data structure exposes an array of “themes” for each comic. The associated inline template uses {{each}} to list out a series of one or more themes for every template element. Each theme is wrapped in a list item.
<!DOCTYPE html>
<html>
<head>
<meta charset=”utf-8”>
</head>
<body>
<div id=”main”> </div>
<script src=”http://code.jquery.com/jquery-1.7.1.min.js”></script>
<script src=” //ajax.aspnetcdn.com/ajax/jquery.templates/beta1/jquery.tmpl.min.js”>
</script>
<script>
  $(function(){
    var comics = [{
      imgSrc : “cover1.jpg”,
      title : “Captain Templates”,
      themes : [
        “code reuse” ,
        “separation of content and behavior” ,
        “template tags”
      ],
      year : “2010”,
      number : “1”
    },
    {
      imgSrc : “cover2.jpg”,
      title : “Captain Templates”,
      themes : [
        “code reuse” ,
        “moustaches” ,
        “templating for fun and profit”
      ],
      year : “2011”,
      number : “2”
    },
    {
      imgSrc : “cover3.jpg”,
      title : “Captain Templates”,
      themes : [ “threes” ],
      year : “2012”,
      number : “3”
    }];
    $( “#comics” ).tmpl( comics ).appendTo( “#main” );

  }
);
</script>
<script id=”comics” type=”text/x-jquery-tmpl”>
  <div class=”comic”><img src=”${imgSrc}” />
    <div class=”details”>
      <div class=”title”>
        <h3>${title}</h3>
      </div>
      <div class=”year”>
        <strong>Year:</strong> ${year}
      </div>
      <div class=”number”>
        <strong>Issue Number:</strong> ${number}
      </div>
      <div class=”themes”>
        <strong>Themes</strong>
        <ul>
          {{each themes}}
            <li>${$value}</li>
          {{/each}}
        </ul>
      </div>
    </div>
  </div>
</script>
</body>
</html>
Code snippet is from each.txt
Applying the template to the data with $.tmpl() generates the output shown in Figure 11-3.
Additionally, {{each}} exposes an index, which allows for the integration of a counter in the template itself. The following variation of the previous template illustrates this:
<!DOCTYPE html>
<html>
<head>
<meta charset=”utf-8”>
</head>
<body>
<div id=”main”> </div>
<script src=”http://code.jquery.com/jquery-1.7.1.min.js”></script>
<script src=” //ajax.aspnetcdn.com/ajax/jquery.templates/beta1/jquery.tmpl.min.js”>
</script>
<script>
  $(function(){
    var comics = [{
      imgSrc : “cover1.jpg”,
      title : “Captain Templates”,
      themes : [
        “code reuse” ,
        “separation of content and behavior” ,
        “template tags”
      ],
      year : “2010”,
      number : “1”
    },
    {
      imgSrc : “cover2.jpg”,
      title : “Captain Templates”,
      themes : [
        “code reuse” ,
        “moustaches” ,
        “templating for fun and profit”
      ],
      year : “2011”,
      number : “2”
    },
    {
      imgSrc : “cover3.jpg”,
      title : “Captain Templates”,
      themes : [ “threes” ],
      year : “2012”,
      number : “3”
    }];
    $( “#comicsIndex” ).tmpl( comics ).appendTo( “#main” );

  }
);
</script>
<script id=”comicsIndex” type=”text/x-jquery-tmpl”>
  <div class=”comic”><img src=”${imgSrc}” />
    <div class=”details”>
      <div class=”title”>
        <h3>${title}</h3>
      </div>
      <div class=”year”>
        <strong>Year:</strong> ${year}
      </div>
      <div class=”number”>
        <strong>Issue Number:</strong> ${number}
      </div>
      <div class=”themes”>
        <strong>Themes</strong>
        {{each themes}}
          <strong>${$index + 1}</strong>. ${$value}
        {{/each}}
      </div>
    </div>
  </div>
</script>
</body>
</html>
Code snippet is from each-index.txt
Applying the template with $.tmpl() produces the output shown in Figure 11-4.

Nesting Templates with {{tmpl}}
The {{tmpl}} template tag enables you to nest templates. This allows for much greater code reuse. If, for example, you had a common structure for displaying thumbnails and titles across several separate templates, you could define the thumbnail and title as one template and reference it wherever needed.
Following are the three inline templates. The first, headerTemplate, defines a common header used in the other two templates, comicsConcise and comicsExtended.
<!DOCTYPE html>
<html>
<head>
<meta charset=”utf-8”>
</head>
<body>
<div id=”main”> </div>
<script src=”http://code.jquery.com/jquery-1.7.1.min.js”></script>
<script src=” //ajax.aspnetcdn.com/ajax/jQuery.templates/beta1/jQuery.tmpl.min.js”>
</script>
<script>
  $(function(){
    var comics = [{
      imgSrc : “cover1.jpg”,
      title : “Captain Templates”,
      themes : [
        “code reuse” ,
        “separation of content and behavior” ,
        “template tags”
      ],
      year : “2010”,
      number : “1”
    },
    {
      imgSrc : “cover2.jpg”,
      title : “Captain Templates”,
      themes : [
        “code reuse” ,
        “moustaches” ,
        “templating for fun and profit”
      ],
      year : “2011”,
      number : “2”
    },
    {
      imgSrc : “cover3.jpg”,
      title : “Captain Templates”,
      themes : [ “threes” ],
      year : “2012”,
      number : “3”
    }];
    $( “#comicsConcise” ).tmpl( comics ).appendTo( “#main” );
    $( “#comicsExtended” ).tmpl( comics ).appendTo( “#main” );
  }
);
</script>
<script id=”headerTemplate” type=”text/x-jquery-tmpl”>
  <header>
    <h1>${title}</h1>
    <img src=”${imgSrc}” />
  </header>
</script>
<script id=”comicsConcise” type=”text/x-jquery-tmpl”>
  <section class=”comic”>
    {{tmpl “#headerTemplate”}}
    <div class=”details”>
      <div class=”year”>
        <strong>Year:</strong> ${year}
      </div>
      <div class=”number”>
        <strong>Issue Number:</strong> ${number}
      </div>
    </div>
  </section>
</script>
<script id=”comicsExtended” type=”text/x-jquery-tmpl”>
  <section class=”comic extended”>
    {{tmpl “#headerTemplate”}}
    <div class=”details”>
      <div class=”year”>
        <strong>Year:</strong> ${year}
      </div>
      <div class=”number”>
        <strong>Issue Number:</strong> ${number}
      </div>
      <div class=”themes”>
        <strong>Themes</strong>
        <ul>
          {{each themes}}
            <li>${$value}</li>
          {{/each}}
        </ul>
      </div>
    </div>
  </section>
</script>
</body>
</html>
Code snippet is from tmpl.txt
Taking advantage of this ability to piece templates together with smaller chunks of code makes your code much more maintainable. Identify the common elements, break them out into their own templates, and then you’re able to update a single template instead of poking around multiple templates looking for markup to change.
Embed HTML Into Your Templates with {{html}}
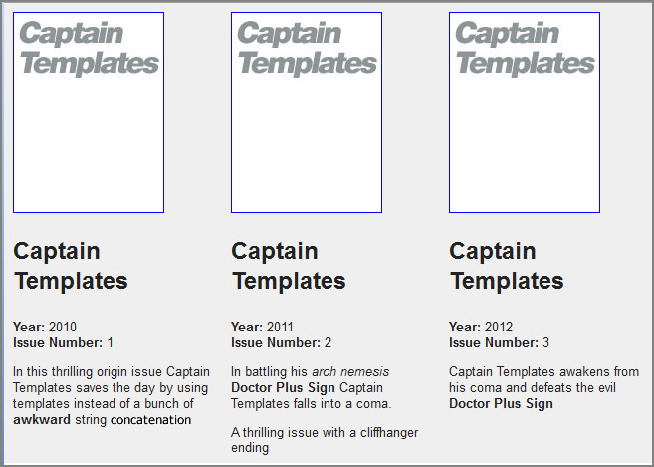
Occasionally, entire sections of HTML are included in data returned from a web service. Using the {{html}} template tag enables you to insert this prerendered HTML directly into your templates. Without {{html}}, then text like <a href='http://jquery.com'>jquery.com</a> would appear literally, e.g. >a href=..., and thus would not have the intended effect.
In the following code, the data includes a description field that contains HTML text. Areas where HTML is to be output directly are bracketed by {{html}} template tags.
<!DOCTYPE html>
<html>
<head>
<meta charset=”utf-8”>
</head>
<body>
<div id=”main”> </div>
<script src=”http://code.jquery.com/jquery-1.7.1.min.js”></script>
<script src=” //ajax.aspnetcdn.com/ajax/jquery.templates/beta1/jquery.tmpl.min.js”>
</script>
<script>
  $(function(){
    var comics = [{
      imgSrc : “cover1.jpg”,
      title : “Captain Templates”,
      themes : [
        “code reuse” ,
        “separation of content and behavior” ,
        “template tags”
      ],
      year : “2010”,
      number : “1”,
      description : “<p>In this thrilling origin issue Captain
Templates saves the day by using templates instead of a bunch of
<strong>awkward</strong> string concatenation</p>”
    },
    {
      imgSrc : “cover2.jpg”,
      title : “Captain Templates”,
      themes : [
        “code reuse” ,
        “moustaches” ,
        “templating for fun and profit”
      ],
      year : “2011”,
      number : “2”,
      description : “<p>In battling his <em>arch nemesis</em>
 <strong>Doctor Plus Sign</strong> Captain Templates falls into
 a coma. </p><p>A thrilling issue with a cliffhanger ending</p>”
      },
      {
        imgSrc : “cover3.jpg”,
        title : “Captain Templates”,
        themes : [ “threes” ],
        year : “2012”,
        number : “3”,
        description : “<p>Captain Templates awakens from his coma
 and defeats the evil <strong>Doctor Plus Sign</strong></p>”
      }];
    $( “#comics” ).tmpl( comics ).appendTo( “#main” );
  }
);
  </script>
<script id=”comics” type=”text/x-jquery-tmpl”>
  <section class=”comic”>
    <header>
      <img src=”${imgSrc}” />
      <h3>${title}</h3>
    </header>
    <div class=”details”>
      <div class=”year”>
        <strong>Year:</strong> ${year}
      </div>
      <div class=”number”>
        <strong>Issue Number:</strong> ${number}
      </div>
      <div class=”description”>
        {{html description}}
      </div>
    </div>
  </section>
</script>
</body>
</html>
Code snippet is from html.txt
This produces the output shown in Figure 11-5.
Now you should have an understanding of the benefits of using a templating system to separate content and behavior. You should also have a good understanding of how to implement templates in jQuery with the existing jQuery Template plugin and be able to leverage template tags to render data more accurately.
This chapter also explained the current state of the Template plugin and gave you an idea of the direction of the feature moving forward, so you’ll be ready for the transition whenever the new plugins are ready for prime time.