
AUDIO IS HALF YOUR PROGRAM
You may be wondering why we start our discussion of web video by talking about audio. That's easy. If you have good audio, people can still listen to your video (even if the video quality isn't great). On the other hand, even if you have great visuals, people will stop watching if they can't understand what's being said.
Video professionals often say that audio is more than half your picture, and that is true on many levels. If you dispute this statement, try this: the next time you are watching TV, turn down the audio and see how much of your favorite program you understand. Then turn the audio up and close your eyes. You will most likely understand much more when you can hear what is happening versus when you can only see what is happening.

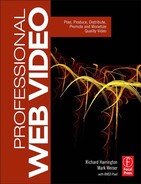
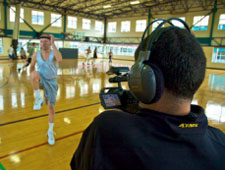
Great productions need great sound. Two mics are used to capture audio in this scene, a boom mic overhead and a lapel microphone on the interviewee.
The Limitations of Web Audio
The problem with audio on the web is that it suffers from a long chain-reaction effect. Web video producers often cut corners, such as using low-quality microphones or not hiring a dedicated audio person. Then video editors, many who don't know how to use filters to improve their audio, edit the material.
Of course, things get worse, because the video has to be smashed down for web delivery. It's common practice to throw away 99% of the file size in order to stream video over the web. Audio, of course, suffers. Making things worse is that people are using low-quality speakers or even built-in speakers for playback on their computers. Although those using portable media players may have decent headphones, they're often watching in noise-polluted environments like public transportation, airplanes, or crowded rooms.
Seems like a recipe for failure doesn't it? The solution is to start with the cleanest, highest-quality audio signal you can get. Great audio will compress well and sound significantly better under challenging situations.
Capturing Good Audio
Recording high-quality audio is essential for web video. When shooting video, people have a tendency to spend the entire effort focusing on the images and leave little time or resources dedicated to ensuring that good audio is recorded.
This is a mistake that many come to regret once they start the editing process. Despite how good your video looks, in the end if your audio is bad, the whole production will come off as amateurish and fail to retain the viewers you worked so hard to attract.
Essential Equipment
Odds are that the camera you are using to record your web video has a built-in microphone. Although using the onboard camera mic works well when you are shooting run-and-gun style in the field, the audio quality of what you are recording is most likely poor. This is largely due to the quality of the microphone and the distance of the microphone from the audio source.
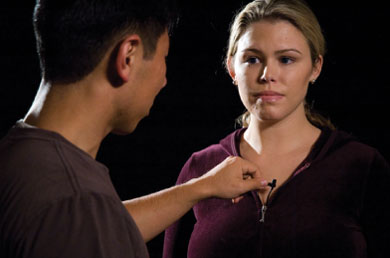
When recording web videos, you should use one or more professional-quality microphones. One thing you will need to understand about professional mics is that different types of microphones have different pickup patterns or directionality. That is, the area from which the microphone is designed to record varies depending on the type of microphone you use.
Microphones that have an “omnidirectional” pattern pick up sound from all directions, and those that are “unidirectional” pick up sound from a specific direction. Unidirectional microphones are subcategorized based on their specific pickup pattern: cardioid (narrow), supercardioid (very narrow), and hypercardioid (extremely narrow).
Lavalier
Keep a lavalier microphone within a few inches of a person's mouth for the best sound. A lavalier microphone (or lav) is the small microphone you often see attached to the lapel, tie, or blouse of news anchors. These small microphones are ideal for recording audio from a single individual during an interview or a presentation. The pickup pattern of a lav is generally omnidirectional, but because it is placed so close to the speaker's mouth, nominal background noise will generally be unnoticed once the levels are set on the recording device.
If you are using a lav mic and the interviewee is to be seated or is stationary during the taping, then running a cable (or hard wire) from the lav to the mixer or camera doesn't present a problem. However, if you are taping a presenter who is moving around, you will want to attach your lav to a wireless transmitter. This will convert the audio signal into radio waves on a specific frequency that are then collected by a receiver attached either to the mixer or directly to the camera.

When attaching a lav mic, you will want to keep a few things in mind:
- Place the mic about 12 inches below the person's mouth, and try to keep the mic as close to the center of the person's body as possible.
- If you are going to try to hide the microphone inside of the person's clothing, you will need to do it so that the mic does not rub against the person's body or clothes. This is tricky and usually requires some practice and the use of some strategically placed gaffer tape. Be sure to listen closely when monitoring the audio to ensure you are not recording rubbing sounds.
- Even if you are not concerned about hiding the mic, you should be sure to run the cable inside of the person's jacket or shirt so there is no unsightly cord running down the talent's chest when you switch to wide shot.
Shotgun
Shotgun microphones are typically attached to either a camera or a boom/fish pole. A shotgun mic is ideal when a talent is moving while talking. The pickup pattern of a shotgun mic is unidirectional and ranges from cardioid to hypercardioid, depending on the specific model of the microphone.

Although a shotgun mic can be used for recording stationary interviews, it is most useful when carried by a boom operator who positions the microphone as close to the talent as possible while keeping it just outside the camera's frame. While this sounds simple, it requires a person with good coordination who can focus on the action and withstand the physical challenges of holding an extended pole above the talent for long periods of time. Often shotguns are used instead of or in conjunction with a lav mic during stationary interviews. Ideally you would use a stand with a boom holder in these situations.
Here are some other things to keep in mind when using a shotgun mic:

- Although a shotgun mic is great for recording sound from a particular person, it can pick up unwanted sound. When other noise is present, remember that anything inside of the pickup pattern of the mic will also be recorded.
- When using a shotgun mic on a camera, the audio from whomever you are shooting will be recorded along with whatever noise there is behind the person you are shooting. On lower-quality cameras, the mic may also pick up the sound of the camera running (such as tape moving through the camera). This is why it is a good idea to have a boom operator who places the mic above the talent with the mic pointed at the ground. This way the talent's voice will be in the pickup pattern and that pattern then continues straight to the ground (where substantial background noise is less likely).
- Shotgun mics are very susceptible to wind noise. Be sure to attach a blimp or fuzzy to the mic when recording outdoors. These can be purchased from the same store that the microphone comes from.
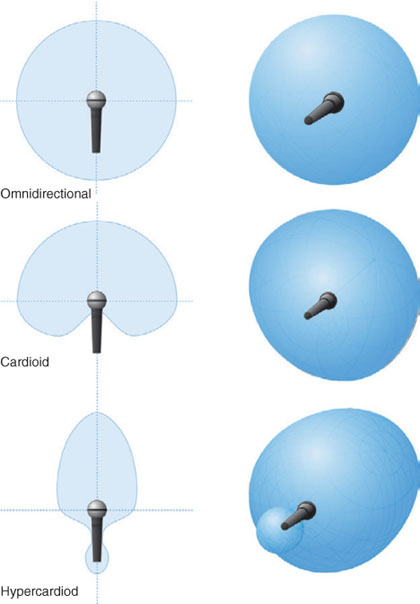
Røde makes affordable shotgun microphones that can run on 9-volt batteries.
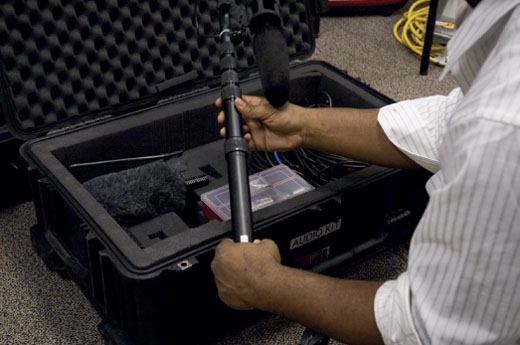
Wireless Microphones
A wireless microphone goes a long, long way toward a flexible production. This setup also makes it easier for a small or one-person crew where the camera operator is also running audio. It's much easier to work with moving talent than to have to chase after them with cables connecting you—less tripping and more recording.

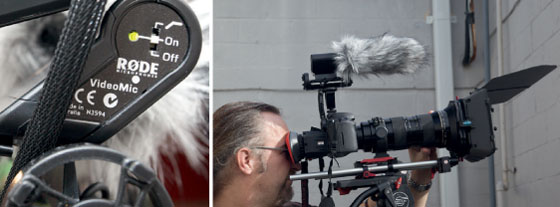
Three wireless receivers are in use, one per actor. A boom microphone is also in use as a safety. Photos courtesy of the National Foundation for Credit Counseling, www.debtAdvice.org.
There is potential of radio interference when working with wireless microphones, so be sure to get a unit that offers the ability to use different frequencies. Most kits include a lavaliere microphone, an XLR adapter for other microphones, and a wireless receiver to plug into the camera.
You need to be aware of a recent development regarding the use of wireless RF microphones. As of June 12, 2010, the Federal Communications Commission (FCC) has made it illegal to use any equipment that operates in the 700 MHz band. This set of frequencies has been reassigned for use by emergency personnel only. Many wireless mics previously on the market operated in this frequency range and must be replaced. More information about this ruling can be found on the FCC website at www.fcc.gov/cgb/wirelessmicrophones.
Be certain to actively monitor your audio with headphones. Besides interference, there are a few common problems. One is that batteries can wear out, which can introduce dropouts and noise. The most common problem, though, is human error. With two off switches (one on the microphone and one on the receiver), it's easy to leave the microphone turned off. Remember, you plug into the camera and listen to what the camera is recording to know you are getting good audio.
Cables
The next step in successfully recording good audio is to hook your mics up to your mixer or recording device. To do so, you will need the proper cables. Just as a chain is only as strong as its weakest link, your audio recording system is only as good as its cables. Be sure to buy professional-grade cables with the proper connectors (this doesn't necessarily mean the most expensive ones in the fancy packaging).
Most audio cables come with one of four types of connectors: mini, phono, RCA, and XLR. The first three are considered unbalanced connections, whereas the XLR is a balanced connection. You will need a balanced connection if your cable run is going to exceed more than 20 feet.
Most lower-end camcorders will have unbalanced audio inputs, whereas more expensive cameras will be equipped with balanced audio connections. Be sure to check out the particular audio connections of the equipment you are using and make sure you have the proper cables and adaptors. We'll explore camera connections in the next chapter.
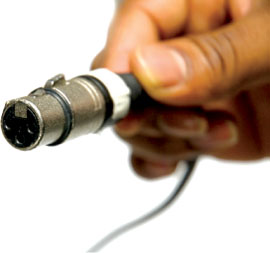
Professional XLR audio cables are essential.
Multichannel Mixers
If you are using multiple microphones on your shoot, you will want to use a field audio mixer to combine your audio sources into one or two channels, which is probably all that your camera is capable of recording (some newer HD cameras can record four channels of audio). A mixer will also boost your audio from mic level, which is a relatively weak audio signal, to line level, which is capable of traveling greater distances.
Most portable field mixers will allow you to combine between two and four audio sources. Many of these mixers have visible VU meters that will allow you to visually monitor the strength of the audio signal and if necessary increase or decrease the signal to optimum recording levels. If you are taping something like a panel discussion with more than four sources of audio, you will need a mixer capable of handling as many as 24 channels. These mixers are not portable (in that you can't carry them on your person), but they can easily be set up in a location such as a hotel ballroom. Although not required, the use of a mixer allows you a lot of control.

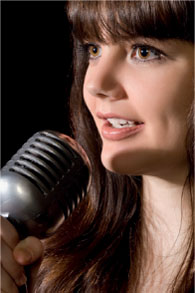
Field Interviews with a Stick Microphone
A lot of web videos use the “roving reporter” style of interview where the host holds a “stick” microphone and points it toward the interviewee. This style of web video is reminiscent of field reporting in broadcast news. So let's take a few pointers from our television friends:

- If your show has a graphic identity, carry it forward by placing your show logo on the microphone. Broadcasters often have microphone flags bearing the logo right on the mic. A quick web search will give you several choices. We usually get ours from www.markertek.com; simply print the logo out onto glossy adhesive, and carefully cut it out with a X-Acto knife and mount it. If you're doing a man-on-the-street video, strongly consider having one. That little piece of plastic has gotten us taken more seriously, more quickly, because people think, “Oh, this is going to be on television.”
- Be careful with your microphone position. Common mistakes we see are interviewers shoving a microphone up someone's nose because they've never done an interview before. The proper distance is that from an extended thumb to an extended pinky finger on your hand (around 10 inches).
- Joking aside, it's like you are sharing an ice cream cone. You take a lick. The interviewee takes a lick. Repeat. You can learn how to hold a microphone by watching broadcast television news.
- Don't lose yourself in the moment. We often see inexperienced interviewers who remember to hold out the microphone for the first time but then continue to hold it by their own mouth for subsequent questions. It's important that the cameraperson (or audio person if you have one) is paying attention. Make sure someone on the crew is wearing good headphones and can clearly hear the sound that is being recorded.
In most cases, if you are shooting a web video you will also be recording your audio on the camera. Most camcorders and prosumer video cameras will allow you to record two channels of audio. Therefore, you can use the second channel as a safety. Some people choose to put the shotgun microphone here. Others recommend feeding the mixer's audio, but recording it at a slightly lower volume in case your subjects suddenly talk louder. This will let you avoid microphone clipping at a loud volume.
The final benefit of a mixer is consistency. You can feed audio with good levels and signal strength into a camera that lacks XLR audio connections. You can also loop the audio into multiple cameras if you have a multicamera shoot.
External Audio Recorder
This small audio recorder from Tascam can be discretely hidden near your subject for cleaner audio.

A great way to record audio in problem situations is to use an external audio recorder. Popular manufacturers include Zoom, Tascam, and M-Audio. These hard drive or removable media units can record audio at even higher-quality rates than top professional cameras.
Here's when we turn to them:
- As a backup recording device, when we know audio is going to be a challenge.
- On multicamera shoots of long performances (such as concerts or plays). This way you have a reference audio source for the entire production that stays at a consistent volume.
- When using cameras that lack professional audio inputs (such as HDSLR cameras from Canon or Nikon).
Sync Sound Workflow
![]()
The folks at Singular Software offer some great tools that make it easy to sync video and audio (www.singularsoftware.com). Whether you're recording to an external audio recorder or have multiple cameras to sync, they have you covered. PluralEyes is a plug-in available for Final Cut Pro, Premiere Pro, and Vegas Pro. They also offer a standalone product for syncing video and audio clips called DualEyes.
These units can run for a very long time. Some can even power microphones through phantom power. Although these units can run on battery, we recommend picking up an external power supply. Nothing ruins a recording like the battery running out and corrupting all your files.
What about Flip Cameras and Smart Phones?
Sure, we'll admit that it's convenient to have an HD camera in your pocket. Especially with a long-lasting battery and no need for tape. We own an iPhone and a Droid, and we regularly use them for cute video of the kids and cool little insert shots.
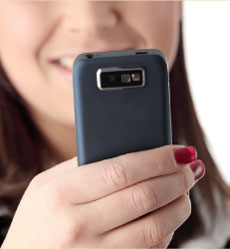
© Piotr marcinski—Fotolia.com.
But we stop there.
Why? Because the audio from these cameras is beyond terrible. It's impossible to record good sound through a pinhole microphone that's 30 feet away from your subject. We've seen more than our share of videos made with these cameras, and the black mark on them is clear to hear.
If you have to use one of these cameras, consider either of these methods to get good sound:
- Use a second video camera with real microphone inputs. You can then use a handclap or other sound to synchronize the two sources.
- Use a dedicated audio recorder. There are many solid-state or card-based recorders that can be placed near (or even worn) by your subject. Just synchronize during editing.
- Don't use the audio. Just use these tiny cameras for extra footage that you cut into another production.
Headphones
Perhaps the single most important thing you can do while recording a web video is to be sure someone on the crew is wearing a good set of headphones. Using over-the-ear (earmuff) style headphones is very important (especially if you have to be your own sound person).
You'll plug these headphones directly into the camera to monitor the audio being recorded. Be sure to listen if the audio gets too loud or too soft, as both will cause problems (over-modulation and hiss, to be specific).
Over-the-ear headphones help isolate the audio you're monitoring.
We often favor noise-canceling headsets, as they make it easier to hear your sound. We know that some audio purists say they're a bad idea, but we find that the noise-canceling models are just cleaner. We've used models from Skullcandy, Bose, and Able Planet. They are all nice options that let you actually hear what you're recording. over-the-ear headphones help isolate the audio you're monitoring.
Common Errors
Remember, it is much easier to add additional sounds to what you've recorded than it is to remove unwanted sound. So if the kid across the street starts to mow his lawn during the middle of your shoot, you may want to try greasing his palm with a twenty rather than going with the assumption that you can use a filter to remove this sound during postproduction. Besides making bad assumptions, here are a few more things to look out for.

© Pavel losevsky—Fotolia.com.
Mic/Line Level
If you're plugging microphones into a professional camera, you are usually presented with a switch labeled “mic/line.” If you are running your microphones through a mixer, you generally set it to line level. If the microphones are going directly to the camera, you set it to mic level. What is important here is testing. If your switches have been set incorrectly, you will likely get distorted audio that can be unusable. Be sure to check both ends of the cable (that is to say, the mixer and the camera).

milosluz—Fotolia.com.
Dead Batteries
Many microphones and mixers require power sources. A battery is the most likely power source. These might be AA, AAA, or watch battery style. Whichever your microphone or mixer uses, have extra (lots of extra) batteries. On nearly every shoot we've ever had, the field mixer burns through a battery. Also, the microphones seem to cut out at the least convenient time. If you are using wireless equipment, you'll go through batteries even faster. Investing in a spare package of batteries is much cheaper than delaying your shoot or missing a shot. We keep a compartment just for batteries and make sure it is refilled every time before leaving our shop for a shoot.
Mic Placement
Microphones are great, but only if you use them correctly. Be sure you know the pickup patterns of your microphones, and then position them to capture the speaker. Another common mistake we see is forgetting how people may move on a set. For example, a person doing a technical demonstration may need to look over his or her right shoulder. If the mic is on the left shoulder, things are going to get pretty quiet. When placing microphones, always think about the likely movement of your subject and the pickup capabilities on the mic.

Crossing Wires
Wise men were right to say, “Don't cross the streams.” When microphone cables cross power cables, you can get a lot of electromagnetic hum. Audio cables can be shielded to help minimize this, but it's a good idea to run your audio cables so they do not cross or tangle with other equipment cables. In fact, be sure to tape things down, both for safety and to prevent cables from getting mixed throughout the production.
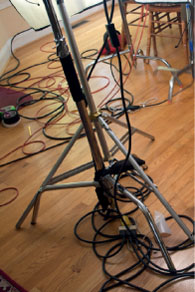
This mixture of audio, video, and power cables can cause signal interference and ruin your audio track.
Other Audio to Acquire
While we've focused on recording great audio in the field or studio, there are still a few audio sources left to consider. Not every production will need more sound than you capture during your principal shoot. But many others may need a little enhancement.
Narration
Whether you're making a new report, documentary, or how-to video, the use of a narrator is common practice. Even videos that are primarily driven by sound bites may need a narration bridge to fill in gaps.
The script is often written in conjunction or after the edit occurs. This approach allows for editing efficiency and ensures great synchronicity between picture and sound.
Some producers favor using professional narrators. For simplicity's sake, these fall into two categories: union and nonunion. The American Federation of Television and Radio Artists or the Screen Actors Guild usually represent union talent. Going this route ensures a wide range of talent, but it typically involves licensing fees based on your video's distribution path. The good news though is that fees are generally clear and well documented.
Other producers favor nonunion talent. This option typically does not require additional fees and can be secured with a buyout agreement. Several websites are available that allow you to audition possible talent and even set up your recording time and negotiate fees.
If you decide to use your own voice (or that of a friend or coworker), that's an option too. Be sure to pick up a USB desk microphone. We're big fans of the microphones from Blue Microphones (www.bluemic.com) and Shure (www.shure.com). Consider plugging the microphone to a laptop and searching for a quiet room that's free from air conditioning and environmental noise. If you have to record into a desktop computer, get a long cable and move the mic as far away from the computer as possible. Be sure to wear headphones in either case to ensure you're hearing what you are recording.
© Pavel losevsky—Fotolia.com.
Our Standard Audio Kit for Web Video Productions
2 |
Headphones |
1 |
Sound Devices two-channel mixer |
1 |
7-foot boom pole |
1 |
Sennheiser shotgun microphone with cover |
1 |
Shock mount (connected to pole) |
1 |
Mathews grip head |
1 |
Boom pole mounts |
3 |
Sennheiser wireless mic gear |
1 |
Breakaway XLR mic cable |
2 |
10-Feet XLR cable |
2 |
20-Feet XLR cable |
6 |
Spare batteries |
1 |
Box of audio adapters |
2 |
Tram lavaliere microphone set |
1 |
Zoom H4N digital recorder |
Sound Effects
The proper use of sound effects can really enhance your video. No, we don't mean cartoon effects like in a Tom and Jerry episode. Rather, we're referring to environmental noises that help engage the viewers in what they're seeing. Consider the sound of the ocean crashing, the hum of traffic rushing by, or the wind blowing through the trees.
The good news is that sound effects are fairly easy to come by. If you're using Final Cut Pro or iMovie on a Mac, then you have an extensive sound library to draw on (with Soundtrack Pro and GarageBand, respectively). Adobe Creative Suite users can turn to the bundled Soundbooth application, which can connect to Resource Central for a large sound library. Of course, there are extensive sound effects libraries online where you can purchase individual sounds. You can even grab a digital audio recorder and give your own hand a try at gathering sound effects.

A professional USB microphone, like the Blue Yeti, makes recording high-quality narration possible.
Music for Web Video
© SSilver—Fotolia.com.
When it comes to music, there are a lot of misperceptions. Let us tackle the biggest one head on. Just because you bought a CD or purchased a music track as a download does not mean you can edit your video to it. There are hundreds of misperceptions about fair use, student use, limited use, and more. Even if you do qualify under the very limited rights of fair use, you'll need to be prepared to defend yourself in a court of law. Our simplest advice is don't do it, there are many easier options available.
Want More on Sound?
![]()
Several excellent books and DVDs focus on sound techniques for video. Here are two we recommend:
- Producing Great Sound for Film and Video by Jay Rose
- Now Hear This! Superior Sound for Digital Video by Douglas Spotted Eagle and VASST
Licensed Music
There are extensive music library services designed for video producers. These companies make original music in a variety of styles. Fees vary greatly, but two principal methods exist. If you create a lot of web video, you can subscribe to a library with an annual fee (often only a few thousand dollars per year). Additionally, many libraries allow you to license individual tracks for one-time use for a fixed fee.
If you have your heart set on using popular music, then you need to get a license. You can try contacting the artist and label directly (and don't take a lack of a response as permission. A great overview of the process is available at www.clearance.com/get_yourself.htm.
Sound Effects
![]()
Our favorite site for purchasing individual sound effects is Sounddogs (www.sounddogs.com). This site offers a huge library and royalty-free licensing.
It also has a massive library of stock music and audio loops.
Royalty-Free Music
Several music libraries and musicians make their music available royalty-free. It's important to note that royalty-free does not mean free. It just means that once you've bought it, you don't have to pay any additional royalties.
There are a ton of options out there, just do a web search based on “royalty-free music.” We often buy themed CDs for about $100 that give us unlimited clearance to use the tracks on any video production. You'll also find download services that typically charge $20 to $65 per song.
Stealing Is Bad

We're not kidding when we say don't use copyrighted music. Criminal penalties for first-time offenders can be as high as five years in prison and $250,000 in fines.
Podsafe and Creative Commons Music
Many musicians do welcome the exposure of their music being used in web videos. A search for the term “podsafe music” will generate several hits. These artists typically allow their music to be used free of charge (as long as proper credit is given). This is one of the best ways to find high-quality music and find fresh-sounding tunes that aren't overplayed. Even some well-known artists have released their music in limited-use cases. Be sure to read the rights or disclaimers and make sure you follow them.
More on Copyright
![]()
For more information on fair use and copyright, see these resources:
Loop-Based Music
Another option for music is loop-based composing. Many editing tools are available (and even come bundled with video editing tools). Be sure to explore options like Apple GarageBand or Soundtrack Pro, Adobe Soundbooth, and Sony Acid.

These programs work by letting you browse a large collection of musical loops (such as drum beats, guitar riffs, and more). They can then be assembled, looped, and modified. This is an easy way to create custom music that is free from copyright.
Pro Loops
![]()
One of our favorite sources for audio loops is Advanced Media Group (www.amguk.co.uk). This service offers several loops in many genres. We like its pro line too, which includes musical building blocks from Norman Cook (Fatboy Slim) and Vince Clarke (Yaz, Erasure).
Original Music
If you want to be 100% unique (as well as free from copyright issues), then record original music. This might be the time to revisit your musical talent. If not, you can also utilize the talents of a local musician. There are also many musicians who advertise their composing services online. Costs vary greatly, but we've purchased original music for affordable rates.