Chapter 3
The Git Promotion Model
Whenever you are learning a new system or process, it's convenient to think about it in terms of something you already know or have some familiarity with. In this chapter, you will take a tour of the various levels that make up a Git system. You will also relate them to a common model that almost everyone who works in an IT-related field will recognize. This model also provides a convenient way of thinking about how you get content through the levels, and introduces you to the basic Git commands for a workflow.
In addition, I'll focus in on one level that is not typically found in other source management systems, but which plays a key role when interacting with Git and some of its advanced functionality. Understanding this level early on is a prerequisite to really understanding any Git workflow.
THE LEVELS OF GIT
So far, I have introduced Git and discussed its history, good points, and not-so-good points. I've also presented some concepts to help you understand its internal functioning. It's now time to look at the different levels that users encounter when working with Git. These levels represent the stages that content moves through, as it makes it way from the local development directory to the server-side (remote) repository. One way to think about and understand these levels is to compare them to another well-known model, a dev-test-prod environment.
Dev-Test-Prod and Git
Figure 3.1 shows a simple block diagram representing a dev-test-prod environment. Most organizations employ some version of this model in their software development and release processes.

Figure 3.1 A simple dev-test-prod environment
You can think of this environment as a sort of promotion model where content moves up through the levels as it matures. Each movement can be initiated by someone or some process when it is deemed ready. At any point, different levels may contain the same or different versions of some particular piece of content, depending on which levels it has been promoted to and whether any additional changes have been made at a lower level.
To give you a better understanding of this environment, I'll briefly describe the purpose of each of the levels in my reference model.
At the bottom, you start with a Dev area (a development workspace) where content is created, edited, deleted, and so on. Some other names that might be used for this level include sandbox, playpen, workspace, and working directory.
When the code is deemed adequate, it can be moved to the Test area (the testing level). Not all of the code has to be moved to Test at the same time. This is an area where different pieces can be brought together to ensure that everything is ready for production.
Once a set of code has passed the testing phase, it can be promoted to the Prod (or production) area; this is where it is considered ready and officially released.
Then, for my purposes here, you add another level, Public, which represents an area where the production code is put, to be shared with others. An example might be a website where content is deployed so that others can see it and access it.
Given this reference of a dev-test-prod(-public) model, let's look at the different levels that Git uses as an analogy to this model, and how they relate to each other. Figure 3.2 shows a similar way of thinking about the Git levels.

Figure 3.2 The levels of a Git system
Starting at the bottom is the working directory where content is created, edited, deleted, and so on. Any new content must exist here before it can be put into (tracked by) Git. This serves the same purpose as the Dev area in the dev-test-prod-public model.
Next is the staging area. This serves as a holding area to accumulate and stage changes from the working directory before they are committed into the next level—the local repository. You can think of this process as being similar to how you might move content to the testing stage in your dev-test-prod-public model. It is a place to build up a set of content to then promote. I'll go into more detail about this area shortly.
After the staging area comes the local repository. This is the actual source repository where content that Git manages is stored. Once content is committed to the local repository, it becomes a version in the repository and can be retrieved later.
The combination of the working directory, staging area, and local repository make up your local environment. These are the parts of the Git system that exist on your local machine—actually, within a special subdirectory of the root (top-level) directory of your working directory. This local environment exists for users to create and update content and get it in the form they want before making it available or visible to others, in the remote repository.
The remote repository is a separate Git repository intended to collect and host content pushed to it from one or more local repositories. Like the Public level in the dev-test-prod model, its main purpose is to be a place to share and access content from multiple users. There are various forms of hosting and protocols for access that I'll talk more about in Chapter 12. I'll refer to this as your remote environment.
Figure 3.3 adds the local versus remote environments encapsulation to the model. Let's examine each of these areas in more detail.

Figure 3.3 The local versus remote environments
The Working Directory
Any directory or directory tree on your local system can be a working directory for a Git repository. A working directory can have any number of subdirectories that form an overall workspace. (You might also hear this referred to by similar names such as “working tree” or “worktree.” In a tree structure, the higher-level directory where you initiated work with Git becomes the top level or root of your workspace. All subdirectories are considered part of the working directory's scope, unless Git is specifically told to ignore them via a .gitignore file (discussed in Chapter 10) or they are part of a Git submodule (discussed in Chapter 14).
When you connect Git to a local directory tree, by default Git creates a repository skeleton in a special subdirectory at the top level of the tree. That repository skeleton is the local repository. The physical subdirectory is named .git by default. This is a similar convention that many open source projects use, storing metadata in a directory starting with a period (.) followed by the name of the tool or application. Thus, your repository and all of your source management information is located within a subdirectory of your working directory.
As I discussed in Chapter 2, it's important to consider how much content you're trying to manage in any one Git repository, and thus in your working directory. Your repository structure, content, and scope are based on the structure, content, and scope of your workspace, and so similar guidelines apply. When developing code, a workspace should most likely consist of the structure needed to create a single deliverable—a JAR file or DLL, and so on. For other kinds of content, consider what makes sense as a logical unit that can be managed separately and maintained by a small number of users to reduce the occurrence of merge conflicts.
If you have content in your working directory that should not be tracked or managed by Git, then those files and directories should be listed in a .gitignore file at the top level of your tree. The .gitignore file is just a text file containing a list of files, directories, or regular expression patterns. Git understands that if this file exists, then Git should not add or track those files and directories listed in it. Common examples of types of files to have Git ignore would be very large files (especially binary files) and files that are generated from content already being tracked. (Refer to Chapter 2 for the reasons behind this.) The .gitignore file is discussed in detail in Chapter 10.
The Staging Area
The staging area is one of the concepts in Git that many new users have difficulty understanding and appreciating. At first glance, it may seem like an unnecessary intermediate level that gets in the way of trying to promote content from the working directory to the local repository. In fact, it plays a significant role in several parts of Git's functionality.
What's the Point of the Staging Area?
As its name implies, the staging area provides a place to stage changes before they are committed (promoted) into the local repository. The staging area can hold any set of content that has been promoted from the working directory and is a candidate for going into the local repository—from a single file to all of the eligible files. The staging area provides a place to collect or assemble individual changes into the set of things that will be committed. It allows finer-grained control over the set of things that make up a change. Now let's look at the common use cases for it.
There are two ways of viewing the utility of the staging area: user-initiated and Git-initiated. Both ways offer benefits to the user; the difference is in which actions or processes place content into the level. You'll first look at the use cases or scenarios that originate with the user moving content into the staging area.
The Prepare Scenario
The first use case for the staging area can be thought of as the Prepare scenario. In this scenario, as a user completes changes in their workspace, they move files that are ready into the staging area. In the simplest case, this is a single promotion of all eligible content (any new or changed files that Git is not told to ignore). However, it can also be done at any granularity of files that the user chooses, meaning the user could even choose to promote each of the files one at a time into the staging area as work is completed.
Think of it like this: suppose you have a large checklist of files to modify in order to create a feature or fix a bug. As you complete changes on a subset of the files, you want to go ahead and promote that subset to ensure the changes are persisted, outside of your workspace, on your way to building up the full set for the change. As pieces of the larger change are done, you move those pieces to the staging area and check them off your list.
With other source management systems, you typically only have the workspace and the repository. And putting a subset that's an incomplete change into a repository can cause confusion, failed builds, and so on. That's because in those systems, committing changes means they go directly into a public/server-side repository where they are immediately visible and accessible by users and processes, rather than going into a local area first, as they do in Git. To avoid having those changes go directly into the public repository in other source management systems, you might resort to saving those changes off into another local directory—or just leaving everything in the workspace until you get the entire set of changes completed.
However, a more useful and elegant model would allow you to stage parts of changes outside of your workspace until you have a complete change built up and ready to commit into the repository. This is what Git allows you to do. Of course, there's no requirement to stage the change as separate pieces. You can promote everything as a unit from the working directory. However, as you become more familiar with Git, and start to work with larger changes, you'll likely find more value in being able to break them up in this way. As well, Git allows for some interesting advanced functionality such as staging only selected changes from a file. You'll explore this workflow in more detail in Chapter 5.
The Repair Scenario
A second use case for the staging area can be referred to as the Repair scenario. In actuality, you might call it the amend scenario as it relies on an option by that name when doing a commit.
As I noted in the previous chapter, one of the interesting things that Git allows users to do is to rewrite history. That is, they can modify previous commits in the repository. The simplest way to do this is by using the amend option when doing a commit. This operation allows the user to pull back the last commit from the repository, update its contents, and put the updated commit back in place of the previous one. Effectively, it provides a do-over, or an opportunity to repair the last commit.
So where does the staging area come in for this mode? When the previous commit is amended, it is amended with any content that is in the staging area. The workflow is essentially as follows:
- Make any updates in the working directory.
- Put the updates into the staging area.
- Run the commit with the option to amend.
The last operation will cause the previous commit to be updated with whatever is in the staging area and then place the updated commit back into the local repository, overwriting the previous version. (If there are no updated contents in the staging area, then only the message that is attached to the commit can be updated.)
This is a powerful feature that gives users a lot of flexibility. As you may have gathered, one of Git's aims is to allow users to easily create and change things as many times as needed in their local environment before actually updating content (on the remote side) that others will see, or that could affect production processes. You'll work through an example of using the amend option in Chapter 5.
When Is the Staging Area Used by Git?
In addition to users performing actions that directly cause content to be moved into the staging area, Git also uses the staging area itself on certain occasions, notably for dealing with merge conflicts. This case most closely aligns with the prepare scenario I outlined previously.
Merging is significant enough functionality in Git that it gets a full treatment in Chapter 9. For my purposes here, I'll describe how it works at a high level and particularly how it uses the staging area.
When you merge in Git, you are generally merging together two or more branches. In a best-case scenario (not too uncommon), the merge may have no conflicts and everything merges cleanly. In that case, Git both completes the merge locally (in your working directory), and promotes the merged content automatically into the local repository—and you're done.
However, in a case where there are merge conflicts that Git cannot automatically resolve, Git puts those files in your working directory for you to fix, and stages any files that merged cleanly. What it is doing is starting to create a set of merged content to be committed once everything is resolved.
From here, the idea is that the user goes into the working directory and edits the files with conflicts in order to fix them. Then those fixed files are added into the staging area with the ones that were automatically merged. After this, the staging area will contain the full set of resolved files and a single commit can be done to complete the merge.
There is another side benefit of this arrangement. After the merge has been attempted, if there are conflicts, the merged files are grouped together in the staging area. Separately, the files with merge conflicts are grouped together in the working directory. This offers a very easy way to see which files fall into which category, and thus an easy way for the user to understand what is merged and what needs to be manually resolved.
Can I Bypass the Staging Area?
While the staging area is very useful for the situations outlined previously, outside of those situations, most users still want to know if they can bypass it in normal use. The answer is … usually. Git provides a shortcut method to promote files to the staging area and then to the local repository with one operation. The caveat, though, is that this only works for files that Git is already tracking, meaning that the first time a file is added to Git, it has to go through the staging process. Afterward, for normal commit operations, you can use the shortcut if you choose to simplify updating revisions. The shortcut is explained in Chapter 5.
Other Names for the Staging Area
One other note about the staging area is that it has a couple of other names in Git. It is sometimes referred to by the terms index or cache. In fact, some Git commands will have variations of index or cache as options for operations that work on content in the staging area. For purposes of what you're doing in this book, you can think of all of these terms as meaning the same thing.
The Local Repository
The local repository is the final piece of the set of Git levels that exist on a user's local machine (the local environment). Once content has been created or updated and then staged, it is ready to be committed into the local repository. As mentioned earlier, this repository is physically stored inside a separate (normally hidden) subdirectory normally within the root of the working directory. It is created in one of two ways: via a clone (copy) of a repository from a remote, or through telling Git to initialize a new environment locally.
The nice thing about the local repository is that it is a source repository exclusively for the use of the current user. Modifications can be done until the user is satisfied with the content, and then the content can be sent to the remote repository where it is available to others. As noted before, because everything is local, source control operations can be done to the local repository without network overhead, and even when the machine is not connected to a network.
Of course, there are always tradeoffs. Having everything local means that content is lost if the working directory is accidentally wiped out and content has not been synched to the remote repository. It also implies that the longer the time between when content is synched to the remote repository, the higher the chance of merge issues if others are continuing to update that particular remote repository.
The Remote Repository
The remote repository is the level of Git that hosts and serves up content for wider consumption. It's the place where multiple Git users sync up the changes from their respective local repositories. It corresponds to what you would traditionally think of as the server in other source management systems. I will go into more detail on remote repositories in later chapters, but there are a few general points that are useful to understand up front about remote repositories:
- A remote repository is unique. There can be many remote repositories for many different projects managed with Git, but Git does not make or use multiple copies of the remote repository on the server.
- A remote repository can be cloned as many times as needed to separate local repositories. Related to the section in Chapter 2 where I discussed the differences between centralized and distributed source management systems, multiple different users can get copies of the remote repository as their own local repositories to work with. Then, when they push changes from their local repositories, they are pushing them into the single corresponding remote repository that the local repositories were copied from.
- A remote repository does not make user-facing modifications to content, such as resolving conflicts for merging. It is primarily concerned with synching changes to and from the local repositories of individual users. If there are conflicts that need resolution at the time content is pushed over to the remote, that content has to be pulled back to the local environment, resolved there, and then synched up to the remote.
The Core Git Commands for Moving Content
Now that you understand the different levels in the Git model, it's a good time to introduce the core Git commands for moving content between them. Some of these commands have already been mentioned in context. I'll just note them briefly here to help fill out an overall picture of the system. Chapter 5 will explain the local workflow in more detail, and later chapters will explain the workflow when working with the remote environment. I'll characterize these commands by which levels they interact with.
Working Directory to Staging Area
The add command stages content from the working directory to the staging area. Contrary to what the name implies, you always use the add command to stage anything, even content that is not new and that has been staged before.
Staging Area to Local Repository
The command that is used to promote things from the staging area to the local repository is the commit command. Think of it as making a commitment to put your changes into the official source management repository. This is most similar to what you might see as check-in in other source management systems, but note that it only takes content from the staging area.
Local Repository to Remote Repository
To synchronize changes from a local repository to the corresponding remote repository, the command is push. Unlike commits into the local repository, merge conflicts from content pushed by other users can be encountered here. Also, being able to push to a particular remote repository assumes appropriate access and permissions via whatever protocol and permissions checking is being used.
Local Repository to Working Directory
The checkout command is used to retrieve content (as flat files) from the local repository into the working directory. This is usually done by supplying a branch name and telling Git to get the latest copy of content from that branch. Checkout also tells Git to switch the branch that you are currently working with.
Remote Repository to Local Environment
When moving content from the remote repository to the local environment, there are several ways the local repository and the working directory can receive content from the remote repository.
The clone command is used to create a new local environment from an existing remote repository. Essentially, it makes a local copy of the specified remote repository onto the local disk and checks out a flat copy of the files from a branch (typically master, although this is configurable) into the working directory.
The fetch command is used to update the local repository from the remote repository. More specifically, it is updating reference copies of the remote branches (reference branches) that are maintained in the local repository. This allows for comparison between what you have in your local repository and what the remote repository had the last time you connected to it. A merge or rebase (merge with history) can then be done to update local branches as desired.
The pull command does a fetch followed by the merge or rebase (merge with history) operation. This one command then results in not only updating the reference branches in the local repository from the remote side, but also merging that content into the local branch or branches. It also updates any of the corresponding files in the working directory if the current branch is one that had updates merged from the remote side.
Table 3.1 summarizes the levels and commands.
Table 3.1 Core Commands for Moving Content between Levels in Git
| From | To | Command | Notes |
| Working Directory | Staging Area | Add | Stages local changes |
| Staging Area | Local Repository | Commit | Commits only content in staging area |
| Local Repository | Remote Repository | Push | Syncs content at time of push |
| Local Repository | Working Directory | Checkout | Switches current branch |
| Remote Repository | Local Environment | Clone | Creates local repository and working directory |
| Remote Repository | Local Repository | Fetch | Updates references for remote branches |
| Remote Repository | Local Repository and Working Directory | Pull | Fetches and merges to local branch and working directory |
Putting this table into a visual representation, you can add the commands to the previous picture of the Git model. This provides a representation of Git in one picture, as shown in Figure 3.4.
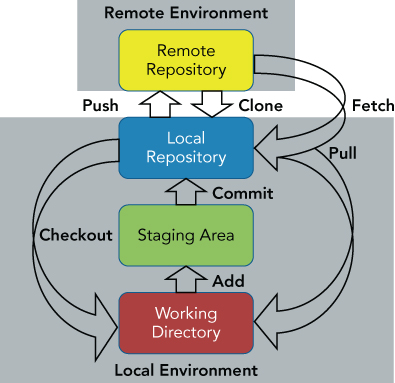
Figure 3.4 Git in one picture
SUMMARY
In this chapter, you looked at the Git promotion model, a way of thinking about the different levels of Git and how content is moved between them. These levels include the remote repository, the local repository, the staging area, and the working directory. The last three levels make up what I refer to as your local environment, where you develop content and do source management locally before making it more widely available by pushing to the remote.
I dove in to explain why the staging area exists, and some of the different uses and functionality it provides. These include gathering up changes for a commit (prepare), updating the last commit (repair), and providing separation between files that merge cleanly and files that don't when doing a merge.
I concluded by giving a brief summary of the commands that you use with Git to move between the different levels, leading to a single-picture representation of the Git model.
In the next chapter, you'll look at how to configure Git's various options and settings and actually start using Git to work through the model.
About Connected Lab 1: Installing Git
Before going to the next chapter though, this is a good point to work through Connected Lab 1: Installing Git. Having an installation of Git will be a prerequisite for the rest of the Connected Labs in the book. I highly encourage you to work through the labs if you are not familiar with the topics. This will provide you with hands-on experience with Git and help to internalize the concepts we discuss in the text. Enjoy!