
Chapter 11
Doing More with Git
So far, most of this book has centered around the Git workflow and the more common source management operations you need to be able to work with it. In this chapter, I cover some less common—but nonetheless, very useful—commands that are available in Git. These are commands that you may not use very often, but when you need them for a specific purpose, it's good to understand how to use them. I begin with some commands for working with file and directory organization in your local environment.
MODIFYING THE LAYOUT OF FILES AND DIRECTORIES IN YOUR LOCAL ENVIRONMENT
When working with your OS, there are basic applications and commands for simple workflows, such as creating and locating files, seeing what's in the file system, and switching between directories. However, there are also supporting commands for doing things like copying, renaming, and deleting content.
Git also provides these commands for content that it manages. In this section, you'll look at some of these layout commands in Git, with a focus on three commands in particular: stash, mv, and rm. These commands also introduce new interaction with the staging area. I discuss how this interaction works and what it means for the user.
stash
Imagine you are a developer working on a new set of code for a feature or bug fix in a very specific environment that you have set up just for this purpose. You are in the middle of making changes when your boss tells you to drop everything and start working on a higher-priority change that requires the same environment.
To manage this change in direction, you might create a backup directory somewhere and copy your changes that are in progress to that backup area, with the idea of retrieving them later. You could then set your environment back to the way it was before you started working on those changes, so that you could focus on the new task.
Chances are, you've probably encountered some variant of this scenario in your working life, even if you aren't a developer. When working in a Git environment, the Git stash command is your best option in a situation like this. The syntax for the Git stash command is as follows:
git stash list [<options>]
git stash show [<stash>]
git stash drop [-q|--quiet] [<stash>]
git stash ( pop | apply ) [--index] [-q|--quiet] [<stash>]
git stash branch <branchname> [<stash>]
git stash [save [-p|--patch] [-k|--[no-]keep-index] [-q|--quiet]
            [-u|--include-untracked] [-a|--all] [<message>]]
git stash clear
git stash create [<message>]
git stash store [-m|--message <message>] [-q|--quiet] <commit>
Saving Uncommitted Changes
The stash command saves a copy of your uncommitted changes in a queue, off to the side of your project. By uncommitted changes, I mean items in either the staging area or the working directory that have been modified but not committed to the local repository. This state could be due to a couple of reasons, but most commonly it would be because either
- files have been modified since the last commit; or
- the last commit specified a subset of files or directories to commit rather than all eligible ones.
In either case, the repository does not have the current version of those remaining files. The most current version is in the working directory or staging area. As such, they are uncommitted.
Each time the stash command is invoked and there is uncommitted content (since the last stash command), Git creates a new element on the queue to save that content. That content can be in the staging area, in the working directory, or both.
What's Left in Your Local Environment?
One of the questions that comes up quickly when using the stash command is what state the local environment is in after running a stash. The short answer is that it's set back to the state it was in immediately after the last commit (pointing to HEAD). After creating the stash and saving the uncommitted content, Git is basically doing a git reset --hard HEAD operation. However, because you have the stash, you haven't lost your uncommitted changes.
Stashing Changes
The default syntax for creating a stash in Git is git stash <options>.
Figures 11.1 and 11.2 show a visual representation of doing a default stash (without any options).
In Figure 11.1, you have the local environment model that I am using throughout the book. In this case, the asterisk (*) denotes a change that has been made in the working directory and staged in the staging area since the last time you did a commit.

Figure 11.1 Local environment with an uncommitted change

Figure 11.2 After the initial stash
Now, you run your stash command:
$ git stashFigure 11.2 shows what happens conceptually. Git creates a stash of the staging area and working directory with the uncommitted change. It also resets the local environment back to the last commit (HEAD).
Now you have your in-progress changes stored in the stash, and your local environment is clean (in sync with the last commit). This is the basic operation. Now, let's look at a couple of options for stash that can be helpful.
Including Untracked Files
Recall from the discussion on git status in Chapter 6 that when talking about a file's relationship with Git, you can broadly say it's either tracked (added to Git and being managed by it) or untracked (not yet added to Git).
When stashing content with Git, by default, it ignores untracked files. In order for Git to stash untracked files, it is necessary to include the -u (--include-untracked) option. This option includes untracked files from the working directory in the stash.
Building on the current example, suppose that you've made another set of changes and staged them, as indicated by the double asterisks (**) in Figure 11.3. Along with that change, you have a new file that you've created, as indicated by the number sign (#).

Figure 11.3 Another change in your local environment with an untracked file
If you want to stash these changes, you include the -u option.
$ git stash -uFigure 11.4 shows what things look like after this command. The first element on your stash queue is moved to stash@{1}. The stashed changes from this operation are also added to the queue as the new stash@{0}. Again, your local environment is reset back to the state of the current HEAD.

Figure 11.4 After stashing, including the untracked file
Stashing with a Description
Normally when Git stashes something, it has a generated comment associated with the element, of the following form:
stash@{#}: WIP on <branch>: <SHA1 of last commit> <last commit message>Here, WIP stands for work in progress.
However, if you'd like to have a more meaningful message attached to the element, you can supply it when you do the stash. This functionality can be used to capture some quick context for future reference such as Changes for issue #123456 or Test 1 failed. Note that this is intended only as a description—visible when listing the elements of a queue—not as a handle or identifier that can be used to select or retrieve an element.
Suppose you have another change in your local environment, as shown in Figure 11.5.
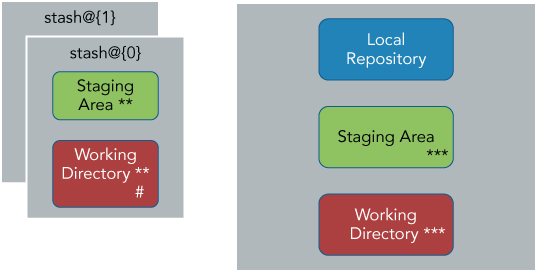
Figure 11.5 Another change in your local environment
To do a custom comment, you also need to specify the save command as part of the invocation string.
$ git stash save "changes in progress for issue #12345"After this command, you have another new element on the queue and your local environment is again reset, as shown in Figure 11.6.

Figure 11.6 The third element on the queue
Seeing What's in the Stash
Once you have your changes stashed, you can look at what you have in the queue. To do this, you use the list option of the stash command. So, given the sequence you just went through, if you run the following command
$ git stash listyou see something that looks like this:
stash@{0}: On master: changes in progress for issue #12345
stash@{1}: WIP on master: 1d9df4f first commit
stash@{2}: WIP on master: 1d9df4f first commit
In the default output, I have the name of the stash element listed (stash@{#}), followed by information about the branch that was current when the stash was made, and then the last commit that the stash was based on.
This information is useful to a point, but what if you want to see more detail about an item in the stash? As it turns out, stash supports options like those you use with the git log command. Knowing this, you have different ways to get additional information. For example, you can start by using the --oneline option, as in
$ git stash list --onelinewhich shows you the abbreviated SHA1 values for each stash element.
8f2728f refs/stash@{0}: On master: changes in progress for issue #12345
cc7b784 refs/stash@{1}: WIP on master: 1d9df4f first commit
12cd281 refs/stash@{2}: WIP on master: 1d9df4f first commit
From there, you can use the show subcommand and pass it the SHA1 value to see a quick summary of the changes that were in progress, as in
$ git stash show cc7b784

 file1.c | 1 +
 1 file changed, 1 insertion(+)
For even more information, you can add the -p (patch) option to see the patch-style differences that were in the change:
$ git stash show -p cc7b784

diff --git a/file1.c b/file1.c
index f2e4113..a359806 100644
--- a/file1.c
+++ b/file1.c
@@ -1 +1,2 @@
 stuff
+new
You now know how to stash uncommitted content and view it in the stash. Next, I discuss how to restore the content from the stash into your local environment.
Restoring Changes
When getting stored changes out of the stash, Git attempts to reapply the stashed changes from the staging area back into your local environment's staging area and the stashed changes from your working directory back into your local environment's working directory. There are two options for doing this: apply and pop. These options can be used on any branch, not just the branch that the original stash was performed on.
The Apply Option
The apply option attempts to put your changes back while leaving a copy of the items as an element still in the queue. Note that you can apply from any element at any position in the queue by referencing the name in the stash (stash@{#}). Unlike a more formal queue, you do not have to do pull elements only from the first or last positions in the queue. An example usage would be
$ git stash apply stash@{1}If the command is successful, your staging area and working directory are updated with the contents of the element from the stash and Git runs a git status command to show you the updated status. (Note that there is also a git apply command that is used to apply patches, so be careful not to confuse these two commands.)
The Pop Option
The pop option works like the apply option, but it removes the element from the queue after updating your environment. Like the apply option, you can pop an element from any position in the queue. An example would be
$ git stash pop stash@{2}After an apply and pop operation in my example, your local environment and queue might look like Figure 11.7.

Figure 11.7 Queue and local environment after an apply and pop from the stash
Notice that on the queue, because you did the pop on element 2, you are now down to two elements (0 and 1). Also, in your local environment's staging area and working directory, you have the combination of apply and pop. In this situation, you didn't have any merge issues or conflicts, but that isn't always the case. Let's look at what can happen when you do.
Merge Considerations When Performing a Pop or Apply
When you're ready to bring content back from the queue into your local environment, chances are that you may have other updates in your local environment that weren't there when you originally performed the stash. If there are potential merge conflicts between what you are trying to apply or pop and what's currently in your local environment, what Git does depends on the circumstances.
As an example, if you still have untracked files in your working directory that would be overwritten by an apply or a pop, Git warns you and stops trying to populate from the queue, as shown here:
$ git stash apply stash@{1}

error: The following untracked working tree files would be overwritten by merge:
        file2.c
Please move or remove them before you can merge.
Aborting
Suppose you then stage file2.c (making it tracked) and try the stash again. This time (assuming there are no other untracked files), Git tries to merge the stash in. In this case, though, if file2.c is different, you can get merge conflicts that you have to resolve manually.
$ git add file2.c

$ git stash apply stash@{1}
Auto-merging file2.c
CONFLICT (add/add): Merge conflict in file2.c
Note that regardless of what you have staged, if you try to do a commit, Git does not allow it because there are unmerged files locally. The solution is to fix the merge issues first and then stage the fixed files.
Staging Commands
In previous chapters, you got used to the idea of staging new content or updates into the staging area before committing the new content into the local repository. As it turns out, Git employs this model not only for file content, but also for operations that manipulate the layout of content it controls.
Examples where this model would be applied are the commands to rename, move, or delete content. For each of these commands, when you execute the corresponding Git command, two things happen:
- The change in name or structure is made in the working directory.
- The change in name or structure is staged into the staging area.
At this point, if you do a git status command, you see a status corresponding to the operation being done and the files involved.
When you are ready to have the change applied to the local repository, you then do a git commit, just as you do to commit content changes. You can think of this as committing to making the change that's staged for the local repository. This is a slightly different way to think about using the staging area and committing operational changes. However, it makes sense in the context of the Git model if you think about it.
Take a look at the following sections to get a better idea of how this model works.
mv
The next command to consider is the mv command. You may have noticed that this command has the same name as the Linux operating system command mv. It essentially does the same thing: it allows you to rename a file or move it to a different location. The syntax is as follows:
git mv <options>… <args>…Renaming Content
In its simplest form, the mv command is just doing a rename of a file. Git does not track metadata about renames, but instead infers this metadata via the stored SHA1 values. This means that regardless of the name or path in which a file is stored in a structure, it has the same internal SHA1 value inside the Git repository. If the destination file that you are trying to use as the new name exists, Git reports this back as an error. If that occurs and you want to rename the file anyway, you can use the -f option to force the rename. The syntax is as follows:
$ git mv [old filename] [new filename]Suppose you issue the following command in your working directory:
$ git mv file1 file2If you now look in that directory, you see file2 instead of file1 as expected. If you do a git status command, you see the staged operation:
renamed: file1 -> file2The change has been made in the working directory and is staged. At this point, no changes for this operation have been made in the local repository. To complete the operation and have the change take effect in the local repository, you just need to do a commit operation:
$ git commit -m "renaming file1"Now your file has been renamed at all of the local levels.
Moving Content
In the case of moving a file, the primary difference from renaming is that the second argument to the mv command contains a directory.
$ git mv [old filename] [directory[new filename]]Moving is still considered a rename in Git, but it is renaming to a different path and not just a filename. Again, the -f option is available to force the rename if needed. As an example of this version of the command, suppose you have a subdirectory subdir1 and you issue the following command in your working directory:
$ git mv file2 subdir1/file3If you now look in subdir1, you see file3 there, as expected.
If you do a git status command, you see the staged operation, ready to be committed:
renamed: file2 -> subdir1/file3Once again, the change has been made in the working directory and is staged. At this point, no changes for this operation have been made in the local repository. To complete the operation and have the change take effect in the local repository, you just need to do a commit operation.
$ git commit -m "moving file2 to subdir1"rm
Like the mv command, the rm command has the same name as the Unix command. Also like the Unix command, the purpose of the rm command is to delete (remove) content, from Git. The syntax for the rm command is as follows:
git rm [-f | --force] [-n] [-r] [--cached] [--ignore-unmatch] [--quiet] [--] <file>… The rm command can accept either filenames or directory names as arguments. If directory names are passed or a pattern is used, only those files under Git control are affected.
This command also operates with the staging and commit workflow that Git uses. Like the mv command, when you do a git rm command, it makes the change locally and stages it in the staging area. An example status at this point would look like this:
deleted: filenameWith the rm command, Git checks first to see if you have an updated version of content in the working directory. If you do, then it stops. The idea here is that you have local changes that you may have intended to put into Git.
If you want to override Git and remove the content, you can use the -f option to force the removal. If you have a staged version and want to just remove it from the staging area, you can use the --cached option. (Recall from my discussion on git diff that the term cache is another [historical] name for the staging area.) Here again, you would do a git commit to finalize this change in the local repository.
COMMANDS FOR SEARCHING
In this section, I cover a couple of ways you can use commands in Git to search for things. The first way is to use a specialized command that bears the same name as an operating system command, and the second way is to use a specialized form of a command that I've already covered.
grep
The grep command in Git provides a convenient (and probably familiar) way to search for regular expressions in your local environment. The syntax for git grep is as follows:
      git grep [-a | --text] [-I] [--textconv] [-i | --ignore-case] [-w | --word-regexp]
           [-v | --invert-match] [-h|-H] [--full-name]
           [-E | --extended-regexp] [-G | --basic-regexp]
           [-P | --perl-regexp]
           [-F | --fixed-strings] [-n | --line-number]
           [-l | --files-with-matches] [-L | --files-without-match]
           [(-O | --open-files-in-pager) [<pager>]]
           [-z | --null]
           [-c | --count] [--all-match] [-q | --quiet]
           [--max-depth <depth>]            [--color[=<when>] | --no-color]
           [--break] [--heading] [-p | --show-function]
           [-A <post-context>] [-B <pre-context>] [-C <context>]
           [-W | --function-context]
           [--threads <num>]
           [-f <file>] [-e] <pattern>
           [--and|--or|--not|(|)|-e <pattern>…]
           [ [--[no-]exclude-standard] [--cached | --no-index | --untracked] | <tree>…]
           [--] [<pathspec>…]
You will probably recognize some of these options as looking the same as their operating system grep command counterparts (such as -v, -E, -F, -c, and so on). In fact, much of the functionality of this grep command can be understood by using it the same way as the operating system grep command—with an indication of which levels in the local environment you want to search.
By default, this command searches for the requested expressions across all tracked files in the working directory. Here's an example:
$ git grep database -- *.java
api/src/main/java/com/demo/pipeline/status/status.java:      @Path("/database")
dataaccess/src/main/java/com/demo/dao/MyDataSource.java:                   logger.log(Level.SEVERE, "Could not access database via connect string jdbc:mysql://"+strMySQLHost+":"+strMySQLPort+"/"+strMySQLDatabase,e);
These options simply tells the command to search for all instances of the expression (database) in files with the .java extension. Notice the use of the double hyphen (--) separator here. As with other Git commands, the double hyphen separates the command from path-limiting options. The part before the double hyphen is the actual command, and the part after the double hyphen is the selected set for the command to operate against.
Git provides several useful options to provide additional information for the grep command. One is the -p option, which tries to show the header of the method or function where a match occurs.
$ git grep -p database -- *.java
api/src/main/java/com/demo/pipeline/status/V1_status.java=public class V1_status {
api/src/main/java/com/demo/pipeline/status/V1_status.java:      @Path("/database")
dataaccess/src/main/java/com/demo/dao/MyDataSource.java=public class MyDataSource {
dataaccess/src/main/java/com/demo/dao/MyDataSource.java:                   logger.log(Level.SEVERE, "Could not access database via connect string jdbc:mysql://"+strMySQLHost+":"+strMySQLPort+"/"+strMySQLDatabase,e);
You can also use the standard git config command to configure several options to be on by default when running the git grep command. For example, to see line numbers when running the command, you normally need to pass the -n option. However, if you want this to always be the default option, you can configure the git config setting of git.lineNumbertrue
$ git grep -n database -- *.javaor
$ git config grep.lineNumber true

$ git grep database -- *.java
api/src/main/java/com/demo/pipeline/status/status.java:31:   @Path("/database")
dataaccess/src/main/java/com/demo/dao/MyDataSource.java:64:                logger.log(Level.SEVERE, "Could not access database via connect string jdbc:mysql://"+strMySQLHost+":"+strMySQLPort+"/"+strMySQLDatabase,e);
See the help page for the Git grep command for a complete list of settings that you can configure.
To make the output easier to read, you can use the --break option, which prints a separator line between matches from different files, and the --heading option, which prints the filename as a header above the matches for a file instead of on each line. Incorporating these options back into my example with the -p (and the -n configured as a default), you get the following output, which is much easier to digest:
$ git grep -p --break --heading database -- *.java

api/src/main/java/com/demo/pipeline/status/status.java
13=public class V1_status {
31:     @Path("/database")

dataaccess/src/main/java/com/demo/dao/MyDataSource.java
18=public class MyDataSource {
64:                logger.log(Level.SEVERE, "Could not access database via connect string jdbc:mysql://"+strMySQLHost+":"+strMySQLPort+"/"+strMySQLDatabase,e);
You can also use Boolean operators to specify how to grep for multiple instances. For example, to require that two expressions are found in the same line, you can use the --and option.
$ git grep -e 'database' --and -e 'access' -- *.java
dataaccess/src/main/java/com/demo/dao/MyDataSource.java:64:                logger.log(Level.SEVERE, "Could not access database via connect string jdbc:mysql://"+strMySQLHost+":"+strMySQLPort+"/"+strMySQLDatabase,e);
When you do use Boolean operators, you need to meet a couple of requirements:
- The expressions must be surrounded with quotes.
- The expressions must have the -e option in front of them.
These requirements help to avoid confusion with filenames and other parts of the command.
The or option is just --or, with the same requirements and syntax as for and.
$ git grep -e 'database' --or -e 'access' -- *.java
api/src/main/java/com/demo/pipeline/status/status.java:31:   @Path("/database")
dataaccess/src/main/java/com/demo/dao/MyDataSource.java:64:                logger.log(Level.SEVERE, "Could not access database via connect string jdbc:mysql://"+strMySQLHost+":"+strMySQLPort+"/"+strMySQLDatabase,e);
Because the --or option is the default Boolean option, the following command returns the same output as the previous one:
$ git grep -e 'database' -e 'access' -- *.javaSo far, the examples you've looked at have scanned the working directory. The advantages that the git grep command has over a standard utility like grep are that it is (relatively) faster, and that it allows you to search in the standard levels of Git. For example, you can tell Git to grep in the HEAD revision or in one further back.
$ git grep -e 'database' HEAD  -- *.java
$ git grep -e 'database' b2e575a  -- *.java
There is also an option to tell Git to search in the index (staging area), --cached. Here's an example:
$ git add config.txt

$ rm config.txt

$ git status config.txt
On branch master
Your branch is up-to-date with 'origin/master'.
Changes to be committed:
  (use "git reset HEAD <file>…" to unstage)

        new file:   config.txt

Changes not staged for commit:
  (use "git add/rm <file>…" to update what will be committed)
  (use "git checkout -- <file>…" to discard changes in working directory)

        deleted:    config.txt

$ git grep -e 'config' -- '*.txt'

$ git grep -e 'config' --cached -- '*.txt'
config.txt:1:testing config
As suggested in the usage information for the command, grep has a lot of other options and ways to take advantage of this search tool. See the help page for the grep command for more details.
Git Log Searches
The git log command also includes some very useful search options. When using this facility of the log command, you are primarily searching for when something was introduced or changed.
The first option is the -S option. By default, this option takes a string (not a regular expression) and searches the commit history for commits that add or delete that string. (Another way to think of this is that it searches for commits that change the number of occurrences of the string.)
The -S option is often referred to as the pickaxe option. There are various reasons why it has this name. For example, you can think of it as a pickaxe that's used to dig into things as you're digging into the history for a Git repository. It could also represent the shape of the -S option specification, which, if you use a little imagination, looks similar to a pickaxe.
As an example of the -S or pickaxe option, suppose that you start with the following file:
$ cat lines.txt
This is line 1.
This is line 2.
This is line 3.
In this line you should have line 4.
And then line 5.
You then make a series of changes.
$ git log --oneline
584832a Editorial comments
a39b87e Change wording on line 4.
f6d279d Delete line 5.
a0c6caa Initial commit of lines.txt
Finally, you arrive at the following version:
$ cat lines.txt
This is line 1.
This is line 2.
This is line 3.
Line 4 should be on this line.
This file is just a bunch of lines.
Do not add any more lines.
If you now use the pickaxe option to look for the string line 5, you get the following output:
f6d279d Delete line 5.
a0c6caa Initial commit of lines.txt
The reason for this is that commit a0c6caa introduced line 5, and commit f6d279d removed it. The other commits did not add or delete that string.
If you want to use the pickaxe option but supply a regular expression, you can add the -pickaxe-regex option. As the name suggests, this allows you to pass a regular expression for the argument to the pickaxe (-S) option.
$ git log --oneline --pickaxe-regex -S "line [1-3]"
a0c6caa Initial commit of lines.txt
In this case, you use the git log command to find the commits that added or deleted occurrences of line 1, line 2, and line 3.
A similar option that Git provides with the log command is -G. This option takes a regular expression and searches for commits that have added or removed lines in their patch containing the search text.
This may sound just like the definition for the -S -pickaxe-regex option. However, consider the idea that the patch for a commit can change the text surrounding the search string but not the actual search string. In that case, the number of occurrences of the search string does not change. Thus, the --pickaxe-regex -S option does not detect a change that added or deleted the search string and does not flag it, whereas the -G option does.
As an example, let's look at the wording change I made for line 4.
commit a39b87e2112d48f561a9042f213865a76b6c27a8
Author: Brent Laster <[email protected]>
Date:   Tue Jul 5 15:04:26 2016 -0400

    Change wording on line 4.

diff --git a/lines.txt b/lines.txt
index ecba54a..1cd123c 100644
--- a/lines.txt
+++ b/lines.txt
@@ -1,4 +1,4 @@
 This is line 1.
 This is line 2.
 This is line 3.
-In this line we should have line 4.
+Line 4 should be on this line.
You have a definite change, but there are still two occurrences of “[Ll]ine 4” in the file. So, if you use the pickaxe regular expression option, you don't see this commit.
$ git log --oneline -S "[Ll]ine 4" --pickaxe-regex
a0c6caa Initial commit of lines.txt
However, if you use the -G option, you do.
$ git log --oneline -G "[Ll]ine 4"
a39b87e Change wording on line 4.
a0c6caa Initial commit of lines.txt
This is because the changes in the line do not change the number of occurrences (add to or delete from) of the search string in that line, although there is a change around the search string.
Another useful option here is the one for tracing the changes for a set of lines or a function within a file. This is invoked by the -L option and has two different forms:
-L <start>,<end>:<file>
-L :<funcname>:<file>
These forms are pretty self-explanatory. The first form takes a starting and ending line number and a file path. If you take an example from the file you've been working with to just look at lines 4 and 5, it looks like this:
$ git log -L4,5:lines.txt
commit 584832a9379e6f67b188a04caf2ad16d89fbeb43
Author: Brent Laster <[email protected]>
Date:   Tue Jul 5 15:10:44 2016 -0400

    Editorial comments

diff --git a/lines.txt b/lines.txt
--- a/lines.txt
+++ b/lines.txt
@@ -4,1 +4,2 @@
 Line 4 should be on this line.
+This file is just a bunch of lines.

commit a39b87e2112d48f561a9042f213865a76b6c27a8
Author: Brent Laster <[email protected]>
Date:   Tue Jul 5 15:04:26 2016 -0400

    Change wording on line 4.

diff --git a/lines.txt b/lines.txt
--- a/lines.txt
+++ b/lines.txt
@@ -4,1 +4,1 @@
-In this line we should have line 4.
+Line 4 should be on this line.
WORKING WITH PATCHES AND ARCHIVES FOR CHANGES
On many open-source projects where developers may be geographically scattered, generating patches and sharing those patches via mechanisms such as e-mail is one option for collaboration. Individual Git users are less likely to do this today, but it is still good to know how to leverage this functionality in case you need to create a patch or archive to share with someone (such as a co-worker who doesn't have Git). This section covers various commands related to generating and sharing patches, including via e-mail.
archive
The git archive command allows you to create an external packaged version of commits suitable for distribution to users or processes that may not have Git. The syntax is as follows:
       git archive [--format=<fmt>] [--list] [--prefix=<prefix>/] [<extra>]
                         [-o <file> | --output=<file>] [--worktree-attributes]
                         [--remote=<repo> [--exec=<git-upload-archive>]] <tree-ish> [<path>…]
A couple of simple examples here should give you a general idea of how to use this command. For example, to create a zip file, you can use this command:
$ git archive master --format=zip --output=../my_archive_as_of_date.zipTo create a tarball, you can use a command like this:
$ git archive master --format=tar --output=../my_archive_as_of_date.tarThis command creates an archive of the latest snapshot from master as a compressed file of the given format. This acts like an export command in many other source management applications, creating a compressed copy of the flat files from the repository for the given branch without the repository metadata (without the .git directory). This archive is then suitable for sharing with others, even those who don't have Git.
A few points about this command:
- Although I use master in the example, you can use any branch, HEAD, tag, or revision.
- In this case, master can be before or after the options.
- You can also specify subdirectories to archive.
- You can specify the desired level of compression by supplying a numeric option, in the range of -0 to -9, where -0 effectively says don't compress at all and -9 is the highest level of compression.
The following example incorporates some of these points:
$ git archive --format=zip mytag subdir -9 > ../myarchive.zipIn this example, you are archiving in a zip format, against a tag that you have put on a repository, using only the subdir subdirectory, with the highest compression level, and redirecting the output into a file rather than using the --output option.
bundle
Like the archive command, the bundle command in Git can be used to create a separate package of files associated with the repository. The primary difference here is twofold:
- The resulting bundle includes the underlying repository (the .git directory).
- The resulting bundle file can be used like a remote repository.
The primary intention for the bundle command is to allow for sharing repositories to systems where a direct connection (and thus connecting via the standard Git protocols [SSH, HTTP, and so on]) isn't possible or practical. Bundling allows you to store the repository into a file that you can then share to other locations in any of the typical ways (USB drive, e-mail, and so on).
The syntax for the bundle command is as follows:
git bundle create <file> <git-rev-list-args>
git bundle verify <file>
git bundle list-heads <file> [<refname>…]
git bundle unbundle <file> [<refname>…]
Note that this is another Git command that uses subcommands. Let's take a quick look at how this command can be used.
Suppose you have a local repository in directory myrepo, and you want to bundle up the master branch. (See the “filter-branch” section for information about git rev-list arguments.) You can use the following command:
$ git bundle create ../myrepo.bundle masterThen, you can transfer the bundle file to another system and clone a repository from it.
$ git clone -b master ../myrepo.bundle myrepoThe cloning operation here creates myrepo as your local repository and establishes the bundle file as your remote repository, just as if you had cloned from a remote repository on a server somewhere.
There is a command you can use to look at which remote repository is associated with a local repository: git remote -v. If you change into the myrepo area and run that command, you see that the bundle file is being used as your remote repository.
$ git remote -v
origin  C:/Users/bcl/bundle-demo/../myrepo.bundle (fetch)
origin  C:/Users/bcl/bundle-demo/../myrepo.bundle (push)
You can also use commands similar to the log options to store a subset of commits in the bundle. For example, the following command stores the last five commits:
$ git bundle create ../myrepo.bundle -5 masterOr, you can store the changes from the last five days:
$ git bundle create ../myrepo.bundle --since=5.daysAs another example, to create an update from the last time you bundled, you can use a range starting with a relative commit from the past or with a tag that you applied in the past (perhaps the first time you did the bundle):
$ git bundle create ../myrepo.bundle master˜5..masteror
$ git bundle create ../myrepo.bundle firstBundleTag..masterYou can then take this incremental bundle file that you created with the recent range of commits and copy it to the same location where you put the original bundle (c:/users/bcl/bundle-demo/../myrepo.bundle). After that, because that is where the remote reference points, you can use the bundle like an updated remote repository. This means that you use commands such as git pull (which I cover in more detail in Chapter 12).
Sharing Patches through E-mail
So far in this section, I've talked about packaging up files and repositories to share with others. Since its early days, Git has provided tight integration with the simpler mailing tools and formats to share patches. (Patches here refer to a set of changes extracted from a Git system that can be applied to another Git system to re-create the same changes.)
Although e-mail isn't commonly used anymore to distribute patches, it can still have value in sharing patches with someone who doesn't have direct access to a repository. Git is set up to support one patch per e-mail, and it sets up the subject line in the form [PATCH #/total] plus the first line of the commit message. The [PATCH #/total] subject line provides a way of sequencing the patches together from the e-mails.
To e-mail a patch, you need to first create a patch file. The Git command for this is format-patch. Its syntax is shown here:
          git format-patch [-k] [(-o|--output-directory) <dir> | --stdout]
                       [--no-thread | --thread[=<style>]]
                       [(--attach|--inline)[=<boundary>] | --no-attach]
                       [-s | --signoff]
                       [--signature=<signature> | --no-signature]
                       [--signature-file=<file>]
                       [-n | --numbered | -N | --no-numbered]
                       [--start-number <n>] [--numbered-files]
                       [--in-reply-to=Message-Id] [--suffix=.<sfx>]
                       [--ignore-if-in-upstream]
                       [--subject-prefix=Subject-Prefix] [(--reroll-count|-v) <n>]
                       [--to=<email>] [--cc=<email>]
                       [--[no-]cover-letter] [--quiet] [--notes[=<ref>]]
                       [<common diff options>]
                       [ <since> | <revision range> ]
Let's look at an example of how to use this functionality. Suppose you have the following history in your Git repository:
$ git log --oneline
ef15dca Removing test subdir on master
f3b05f9 update test case
2f2ea1e Add in testing example files
dadd160 initial commit of simple java file
You want to create patch files to share for the last three commits. You use the -3 argument to tell Git to create the patch files for the last three commits, and you just use HEAD as your starting revision.
$ git format-patch -3 HEAD
0001-Add-in-testing-example-files.patch
0002-update-test-case.patch
0003-Removing-test-subdir-on-master.patch
The names that are the output of the command list the patch files that Git created for each of the respective commits.
Before I discuss e-mailing these patches, let's look at the two commands that you can use to re-create the changes in your local environment using the patch.
apply
The git apply command allows you to re-create the changes specified in a patch file to the working directory and, optionally, the staging area. It does not update the local repository. The format for the apply command is as follows:
     git apply [--stat] [--numstat] [--summary] [--check] [--index] [--3way]
                [--apply] [--no-add] [--build-fake-ancestor=<file>] [-R | --reverse]
                [--allow-binary-replacement | --binary] [--reject] [-z]
                [-p<n>] [-C<n>] [--inaccurate-eof] [--recount] [--cached]
                [--ignore-space-change | --ignore-whitespace ]
                [--whitespace=(nowarn|warn|fix|error|error-all)]
                [--exclude=<path>] [--include=<path>] [--directory=<root>]
                [--verbose] [--unsafe-paths] [<patch>…]
The apply command is pretty straightforward. You use the following form
$ git apply <name of file in patch format>to make the changes just in the working directory, or
$ git apply --cached|--index <name of file in patch format>to make the changes in the working directory and in the staging area (meaning to stage the updates). You can use either the --cached or --index option for this.
am
Here, am stands for apply mailbox, with the original idea being to apply patches that were in the legacy mbox format. If you take a look at the first line of one of the patch files created via format-patch, you see that Git puts a dummy line in the file to make it look like the expected format.
$ cat 0001-Add-in-testing-example-files.patch
From 2f2ea1e30fe4630629477338a0ab8618569f0f5e Mon Sep 17 00:00:00 2001
So, you can use this command to apply the patch to your environment without having to read from an actual mail source. The syntax for am is as follows:
      git am [--signoff] [--keep] [--[no-]keep-cr] [--[no-]utf8]
             [--[no-]3way] [--interactive] [--committer-date-is-author-date]
             [--ignore-date] [--ignore-space-change | --ignore-whitespace]
             [--whitespace=<option>] [-C<n>] [-p<n>] [--directory=<dir>]
             [--exclude=<path>] [--include=<path>] [--reject] [-q | --quiet]
             [--[no-]scissors] [-S[<keyid>]] [--patch-format=<format>]
             [(<mbox> | <Maildir>)…]
      git am (--continue | --skip | --abort)
Notice in the last part of the syntax description that, like rebase or merge, am is a command that puts Git into a state. In fact, am uses similar mechanisms to rebase when you run it. If the am operation fails to complete, you need to correct the issues and use the --continue option, or either skip that part (--skip) or use --abort to stop the am operation and get out of the state. Using the basic am command is just like using the apply command:
$ git am <name of file in patch format>The key difference or value in using am versus apply is that, assuming the patch applies cleanly, am commits the changes to the local repository. The apply command stops at the working directory or staging area (if the appropriate option is applied).
So, use am if you want to merge patches into the local repository and apply if you only want to make the changes in the working directory and, optionally, the staging area.
Mailing Patch Files
If you want to e-mail patch files, you can use the git send-email command. The syntax is as follows:
git send-email [options] <file|directory|rev-list options>…
git send-email --dump-aliases
The send-email command actually has a lot of options to specify e-mail configuration values, but in most cases, you can just configure a couple of values. The values you need to configure are sendemail.from and sendemail.smtpserver.
$ git config --global sendemail.from  <your email address>
$ git config --global sendemail.smtpserver <your email smtp server>
Having specified these values, you should be ready to send the patch files.
$ git send-email --to [email protected] *.patch
0001-Add-in-testing-example-files.patch
0001-Removing-test-subdir-on-master.patch
0002-update-test-case.patch
0003-Removing-test-subdir-on-master.patch
(mbox) Adding cc: Brent Laster <[email protected]> from line 'From: Brent Laster <[email protected]>'

From: [email protected]
To: [email protected]
Subject: [PATCH 1/3] Add in testing example files
Date: Thu, 30 Jun 2016 16:22:04 -0400
Message-Id: <[email protected] >
X-Mailer: git-send-email 2.8.1.windows.1

    The Cc list above has been expanded by additional
    addresses found in the patch commit message. By default
    send-email prompts before sending whenever this occurs.
    This behavior is controlled by the sendemail.confirm
    configuration setting.

    For additional information, run 'git send-email --help'.
    To retain the current behavior, but squelch this message,
    run 'git config --global sendemail.confirm auto'.

Send this email? ([y]es|[n]o|[q]uit|[a]ll):The patch files arrive in the mailbox looking something like this:
-----Original Message-----
From: [email protected] [mailto:[email protected]]
Sent: Thursday, June 30, 2016 4:22 PM
To: Brent Laster <[email protected]>
Subject: [PATCH 2/3] update test case

From: Brent Laster <[email protected]>

---
 src/test/java/TestExample1.java | 2 +-
 1 file changed, 1 insertion(+), 1 deletion(-)

diff --git a/src/test/java/TestExample1.java b/src/test/java/TestExample1.java index 2aa568e..bc84162 100644
--- a/src/test/java/TestExample1.java
+++ b/src/test/java/TestExample1.java
@@ -3,7 +3,7 @@
 import org.junit.Assert;
 import org.junit.Test;

-public class TestExample {
+public class TestExample1 {

   @Test public void example1() {

--
2.8.1.windows.1
You can then save the text from the message and use apply or am to incorporate the patches into your Git environment, as shown in the previous section.
COMMANDS FOR CLEANING UP
As you work with Git over time, you will probably build up some unneeded and untracked content in your working directory, as well as some content that is no longer used or referenced in your local repository.
While there is no specific requirement that you clean up these areas, Git provides two commands to help with cleanup: clean for the working directory and gc (garbage collection) for the local repository.
clean
You can use the git clean command to clean up untracked files from your working directory. The syntax for this command is as follows:
git clean [-d] [-f] [-i] [-n] [-q] [-e <pattern>] [-x | -X] [--] <path>… One of the first things to note about this command is that it tries very hard to keep you from accidentally deleting things you didn't really want to delete. If you just run the command without any arguments, you see the following:
$ git clean
fatal: clean.requireForce defaults to true and neither -i, -n, nor -f given; refusing to clean
So, Git refuses to clean the working directory even though you told it to do so. Because Git considers this command destructive and there isn't a good way to recover from it, Git requires additional options or configuration that indicate you really want to do this. One way that Git controls this is through the configuration setting for clean.requireForce. If you haven't specifically set this value to false, then it defaults to true and, as the name implies, it requires the force option for the clean operation to proceed.
Suppose you have a couple of untracked files in your working directory. An example of clean with the force option to remove these files would be as follows:
$ git clean -f
Removing untracked1.txt
Removing untracked2.txt
If you set the configuration value to false, you are telling Git not to require the force option for the command to proceed. You do this with the following command:
$ git config --global clean.requireForce falseNow, if you execute a similar command, you do not need the -f option.
$ git clean
Removing untracked1.txt
Removing untracked2.txtNotice that you can also clean a particular path or file, as follows:
$ git clean untracked1.txt
Removing untracked1.txt
Now, suppose you have a subdirectory named sub that contains two files—ignored1.txt and ignored2.txt—and you have also created a .gitignore file that contains sub as a subdirectory to ignore. The help page for the clean command tells you that the -d option should be used to remove untracked subdirectories. Let's try that option:
$ git clean -d

$ git clean -d sub
The lack of output in both cases indicates that nothing was cleaned. That is because this subdirectory was listed as something for Git to ignore in the associated .gitignore file.
The clean command provides two options for working with the .gitignore file: -x and -X. Both of these options tell clean to also clean the items in the .gitignore file. This can be useful, for example, to clean out build or other output.
The difference between -x and -X is that -x allows for cleaning out everything, including what's ignored, and -X only allows for cleaning out what's ignored. To illustrate this, consider running these commands on my earlier directory example. This example has two untracked files (untracked1.txt and untracked2.txt) in the main directory, and two files (ignored1.txt and ignored2.txt) in the subdirectory (sub). The following output shows the results of running the clean command with the two different options:
$ cat .gitignore
sub

$ git clean -X -d
Removing sub/

$ git clean -x -d
Removing sub/
Removing untracked1.txt
Removing untracked2.txt
Notice that in the first command (with -X), only the contents noted in the .gitignore file are cleaned. In the second command, the other eligible files are also removed, in addition to the content indicated by the .gitignore file. Without the -x or -X, the content indicated by the .gitignore file is ignored.
The clean command also has an interactive interface, similar to the interactive add and commit commands I discuss in Chapter 5. To get into that mode, you can add the -i (interactive) option when you invoke the clean command.
$ git clean --interactive -x -d
Would remove the following items:
  sub/            untracked1.txt  untracked2.txt
*** Commands ***
    1: clean                2: filter by pattern    3: select by numbers
    4: ask each             5: quit                 6: help
What now>
Very briefly, here's what each of the first four options does:
- clean—executes the clean command to do the actual cleaning
- filter by pattern—prompts the user for patterns to exclude from deletion
- select by numbers—provides a list of the items to be deleted, identified by unique numbers, and allows the user to specify items by entering the desired number
- ask each—interactively prompts whether to delete specific items
Other options for the clean command include -e <pattern> to add additional patterns to exclude from deletion, and -n for a dry run to show what would be done without actually making changes.
gc
One other command for cleaning up Git content is git gc. Here, gc stands for garbage collection and, unlike the clean command, which cleans up files in your working directory, gc cleans up internal content in the repository. It has two main functions:
- To compress revisions of files to save space and increase performance
- To remove objects that are no longer reachable by any connection in Git
The syntax for gc is as follows:
git gc [--aggressive] [--auto] [--quiet] [--prune=<date> | --no-prune] [--force]I'll briefly cover a few of the options here:
- --aggressive—tells gc to do a more thorough job of cleaning up and optimizing the repository. This option usually requires significantly longer for the process to run.
- --auto—checks to see if anything needs to be done, in terms of cleaning up the repository. If nothing is to be done, it just exits. Some Git commands may run this option automatically.
- --quiet—executes with less output.
- --prune | --no-prune—specifies whether or not to prune loose objects in the repository that are older than the default timeframe of two weeks.
- --force—starts up another gc operation, even if one is already running
For the best disk space use and overall performance, you should run git gc on a regular basis. Note that, as I have mentioned, Git tries very hard not to lose any commits or otherwise clean them up. So, any references that remain to an object through indexes, branches, reflogs, and so on, will keep an item from being cleaned. There are various configuration values (listed in the gc help page) that you can set to tell Git when something should expire or be redone.
notes
The notes command can be very useful, but it doesn't fit into any of the other groupings, so I include it separately here.
At some point after making a commit, you may decide that there are additional comments or other non-code information that you'd like to add with the commit. If this is the most recent commit, you can use the git amend functionality and update the commit message. Or, if this is later in the cycle, you can use the interactive rebase functionality that I described in Chapter 9 and use the reword option. Both of these functionalities have the downside of changing the SHA1 hash of the commit. For a recent change that has not been pushed to the remote repository, that may be acceptable. However, as I've consistently warned throughout this book, changing the SHA1 values of something that is already pushed to the remote repository where others may be consuming it is problematic. Also, this could potentially be a high cost for just updating comments or messaging around the change.
This is where git notes comes in. The notes command allows you to add notes to existing commits in Git. The syntax is as follows:
git notes [list [<object>]]
git notes add [-f] [--allow-empty] [-F <file> | -m <msg> | (-c | -C) <object>] [<object>]
git notes copy [-f] ( --stdin | <from-object> <to-object> )
git notes append [--allow-empty] [-F <file> | -m <msg> | (-c | -C) <object>] [<object>]
git notes edit [--allow-empty] [<object>]
git notes show [<object>]
git notes merge [-v | -q] [-s <strategy> ] <notes-ref>
git notes merge --commit [-v | -q]
git notes merge --abort [-v | -q]
git notes remove [--ignore-missing] [--stdin] [<object>…]
git notes prune [-n | -v]
git notes get-ref
Here's a quick example. Suppose you have a set of commits in your repository like the following:
$ git log --oneline
ef15dca Removing test subdir on master
f3b05f9 update test case
2f2ea1e Add in testing example files
dadd160 initial commit of simple java file
You can add a note to any of the existing commits by passing their SHA1 value as the reference at the end.
$ git notes add -m "This is an example of a note" 2f2ea1eNotice that you can pass the -m option to provide a note, just as you can use that option to pass a commit message. If the -m option isn't passed, Git starts up the default editor, as it does if no -m option is passed to a commit.
If you want to look at a specific note, you can use the show subcommand.
$ git notes show 2f2ea1e
This is an example of a note
With an additional option, you can create notes in a custom namespace. For example, if you want to create a notes namespace for reviews of previous commits, you can supply that namespace to the --ref option.
$ git notes --ref=review add -m "Looks ok to me" f3b05f9The simplest way to see notes is to use git log. By default, this command shows notes in the default namespace. To see other namespaces, you can use the --show-notes=<namespace> or --show-notes=* option to see all of them.
$ git log --show-notes=*
commit 80e224b24e834aaa8915e3113ec4fc635b060771
Author: Brent Laster <[email protected]>
Date:   Fri Jul 1 13:01:58 2016 -0400

commit ef15dca5c6577d077e38a05b80670024e1d92c0a
Author: unknown <[email protected]>
Date:   Fri Apr 24 12:32:50 2015 -0400

    Removing test subdir on master

commit f3b05f9c807e197496ed5d7cd25bb6f3003e8d35
Author: Brent Laster <[email protected]>
Date:   Sat Apr 11 19:56:39 2015 -0400

    update test case

Notes (review):
    Looks ok to me

commit 2f2ea1e30fe4630629477338a0ab8618569f0f5e
Author: Brent Laster <[email protected]>
Date:   Sat Apr 11 17:34:57 2015 -0400

    Add in testing example files

Notes:
    This is an example of a note

commit dadd160cf432df7a8db454bcc0eeb22988615ed9
Author: Brent Laster <[email protected]>
Date:   Sat Jan 5 22:45:26 2013 -0500

    initial commit of simple java file
ADVANCED TOPICS
In the advanced topics for this chapter, I include an eclectic mix of specialized Git commands. These are not commands you would use every day (or even every month), but you will likely need each of them at some point. The three commands I'll cover are filter-branch, bisect, and rerere.
- filter-branch is for splitting or tweaking repositories (sometimes using another command, rev-list).
- bisect is for quickly finding where a problem or change was introduced.
- rerere is for teaching Git how to automatically resolve custom merge situations and having it remember and execute the solution if the situation is encountered again.
filter-branch
In most cases throughout this book, you've been dealing with user-friendly porcelain commands that are focused on typical user operations rather than utility commands. However, one of the plumbing commands can prove very useful and is worth covering at a high level with some simple examples: filter-branch.
The syntax for filter-branch is as follows:
git filter-branch [--env-filter <command>] [--tree-filter <command>]
       [--index-filter <command>] [--parent-filter <command>]
       [--msg-filter <command>] [--commit-filter <command>]
       [--tag-name-filter <command>] [--subdirectory-filter <directory>]
       [--prune-empty]
       [--original <namespace>] [-d <directory>] [-f | --force]
       [--] [<rev-list options>…]
There are a couple of things worth pointing out about the syntax. First, notice that a number of different types of filters can be supplied to the command. You can think of these filters as being like domains—that is, operating against messages, commits, subdirectories, and so on. In some cases, this is the area the command works against, and in other cases, it's the area the command uses to do its work.
Notice that most of these filters take an additional <command>. The idea here is that filter-branch is traversing the commits and file hierarchies for the specified domains and executing the specified commands against those objects in the domains as it goes.
The exception to this flow for a filter is the subdirectory filter, which takes a subdirectory as an argument instead of a command. This filter is used primarily to split subdirectories out into separate repositories.
rev-list
Notice the <rev-list options> in the last line on the command line in the previous section. Git rev-list is another plumbing command. Its main use is to list a set of commits bounded by some range or criteria. It's pretty straightforward to use, so I'll just share the syntax here. You can use the rev-list help page to find out more details on specifying ranges if you're interested.
        git rev-list [ --max-count=<number> ]
                    [ --skip=<number> ]
                    [ --max-age=<timestamp> ]
                    . . . (lots of other omitted options)
                    [ --count ]
                    [ --use-bitmap-index ]
                    <commit>…  [ -- <paths>…
So what does rev-list have to do with filter-branch? Rev-list options can be used to bound the set of things for filter-branch to operate against. In most cases, if you need to supply an option for rev-list, you can just use the --all option to indicate all commits.
Note, however, that when using filter-branch, you have to use the revision separator, the double hyphen (--), before options intended specifically for rev-list. This is to avoid confusion with options intended specifically for filter-branch.
Precautions
If the following section is not clear, refer to Chapter 12, where I discuss remotes.
When pushing the results of a filter branch to a new destination remote repository, take care not to use the existing remote name in the push command and overwrite the old repository (unless that's your intent). Some people recommend removing the reference to the old remote to avoid accidentally overwriting things. However, if you do that, and you have remote tracking branches that you have not branched locally (that is, origin/foo versus foo), you will lose those references when you remove the remote reference. In those cases, it's a good idea to create the local branch first via git branch <foo> before removing the reference.
To remove the reference, assuming you have a remote named origin that can be disconnected, you can use the command - git remote rm origin.
Also, if you have other changes in the repository, you may want to make a copy of the repository before running a filter-branch. I talk later about how to undo a filter branch.
Examples
Let's take a look at a couple of examples of how you can use filter-branch. Note that while these are simple examples, it is possible to do much more complicated things because you can pass any executable script, program, or command as a <command> (for the filters that take <command> arguments).
Example 1: Splitting a Subdirectory Out into a Separate Repository
In the first example, you'll use the subdirectory filter. This filter does not take a command but rather a subdirectory. The most common use for this filter is to split out an entire subdirectory into a separate repository. For that, the syntax is straightforward.
Suppose you have created or cloned a structure into a local repository that looks like this:
$ ls
agents.sql           db.properties            sonar-project.properties
api/                 debug.save               tree.out
build.gradle         gradle.properties        util/
build.gradle.jetty   gradle.properties.admin  web/
build.gradle.tomcat  gradle.properties.safe
dataaccess/          settings.gradle
You are interested in splitting the web subdirectory tree out into its own repository. First, you note what the structure looks like under web, as well as the log, for a reference point.
$ ls -la web
total 36
drwxr-xr-x 1 bcl 1049089     0 Jun 16 14:25 ./
drwxr-xr-x 1 bcl 1049089     0 Jun 16 18:21 ../
-rw-r--r-- 1 bcl 1049089 18905 Jun 16 14:25 .classpath
-rw-r--r-- 1 bcl 1049089  1112 Jun 16 14:25 .project
drwxr-xr-x 1 bcl 1049089     0 Jun 16 14:25 .settings/
drwxr-xr-x 1 bcl 1049089     0 Jun 16 14:25 src/


$ git log --oneline
7ae0228 adding some initial testing examples
4758f9e fix conflicts
d8a1065 adding updates
f64bd2c update for latest changes to make web server generic and compatible with tomcat
0c191a4 update for retrieving artifact from artifactory
1e8173e add in sample tests and jacoco configuration
c228ad7 Update gradle and remove tmp files
82b07c9 Adding sonar properties file
845bf97 update script
4a4fe0e updated to publish to artifactory
b2e575a sql to recreate db
c6b5cbd update for db.properties
be42303 initial add of files from gradle build

$ git log --oneline web
4758f9e fix conflicts
d8a1065 adding updates
f64bd2c update for latest changes to make web server generic and compatible with tomcat
c228ad7 Update gradle and remove tmp files
c6b5cbd update for db.properties
be42303 initial add of files from gradle build
Now, you can run the actual filter-branch command.
$ git filter-branch -f --subdirectory-filter web -- --all
Rewrite be42303ffb9356b8e27804ce3762afdeea624c64 (1/6) (0 seconds passed, remainRewrite c6b5cbd8805bc7b1b411a89be66adccc037df553 (2/6) (1 seconds passed, remainRewrite f64bd2ce520e9a3df4259152a139d259a763bc31 (2/6) (1 seconds passed, remainRewrite d8a1065e9709d2c5ee20f62fd4e338fe35666c65 (2/6) (1 seconds passed, remainRewrite c228ad75ef060707ef2905f8bd46012ed67e718b (5/6) (5 seconds passed, remainRewrite 4758f9e7a9cbeb8dfea0a37a416b46d823ffa95a (5/6) (5 seconds passed, remaining 1 predicted)
Ref 'refs/heads/master' was rewritten
Notice the messages about rewriting SHA1 values. This is Git performing the operations it needs to in the SHA1s in the repository that have to do with the subdirectory web. At the end is the message that refs/heads/master was rewritten. This is what you're looking for to indicate something was done. If it wasn't rewritten, that would mean it was still pointing to the old structure. You can now do an ls command and a git log command to see what the repository looks like.
$ ls -la
total 100
drwxr-xr-x 1 bcl 1049089     0 Jun 16 18:26 ./
drwxr-xr-x 1 bcl 1049089     0 Jun 16 13:20 ../
-rw-r--r-- 1 bcl 1049089 18905 Jun 16 18:26 .classpath
drwxr-xr-x 1 bcl 1049089     0 Jun 16 18:26 .git/
-rw-r--r-- 1 bcl 1049089  1112 Jun 16 18:26 .project
drwxr-xr-x 1 bcl 1049089     0 Jun 16 18:26 .settings/
drwxr-xr-x 1 bcl 1049089     0 Jun 16 18:26 src/


$ git log --oneline
88975c2 fix conflicts
30bb02b adding updates
80233a6 update for latest changes to make web server generic and compatible with tomcat
eea95f7 Update gradle and remove tmp files
5172f34 update for db.properties
e5a264f initial add of files from gradle build
Notice that your repository now consists of only the web pieces, as intended.
Undoing a filter-branch
While the current HEAD of this repository now only points to the web subtree, the commits that make up the remaining structure are still there—just not accessible in this chain. This is one of the reasons that a filter-branch to split or remove content doesn't necessarily make the repository any smaller. (The online help page for filter-branch discusses the remaining steps that you have to follow to actually remove content and shrink the repository.)
However, this is good news for you because it means that, as with nearly any other repository modification, you can undo the operation by just using a reset to a point before the operation. Git does keep a backup of the previous reference pointed to by HEAD before the filter-branch. Assuming you were working in the master branch, that SHA1 value can be found in the following path:
$ cat .git/refs/original/refs/heads/master
7ae022891d25aa46b86cf8df3c66204f0272f447
So, you can simply run the command, git reset --hard 7ae02289. Or, you can use the git reflog command to find the relative reference before the operation and then run the command, git reset --hard HEAD@{<relative offset>}.
Example 2: Deleting a File from All of the History
Suppose that you realize a file with sensitive data was committed into a repository weeks or months ago. A git rm command will remove the current instance of the file, but the previous versions will still be in the repository.
To remove a file from the history, you can use either the tree-filter or the index-filter option. Because the index-filter option can use the index instead of the working tree (think removing in the staging area versus checking out and removing), this option will be faster. Like most other filters, the index-filter option takes a command as an argument to apply when it encounters an instance of the thing you are trying to filter out. For your purposes, you can use the git rm command here to simplify the task. You add the --cached option because you're working in the index.
There's one additional problem you can run into, though. Stuck within the help page for filter-branch is this line: “If any evaluation of <command> returns a non-zero exit status, the whole operation will be aborted.” This means that if you are trying to apply a command like git rm to a commit that doesn't have it, the non-zero status for that commit will cause the operation to abort. So, to ensure that doesn't happen, you need to add the --ignore-unmatched option to the git rm command. This tells the command to exit with a zero return code even if none of the files match. So, your command to remove a file becomes
$ git filter-branch --index-filter 'git rm --cached --ignore-unmatch <relative path to file>' <branch name>Suppose you had a branch in your repository where a file with a temporary password named tmp_pass.txt had inadvertently been introduced to the repository at some point in the past. This was done on a branch named fix_secure before that branch was merged into master. This is discovered late in the cycle and you need to remove it from the repository.
To handle this situation, you need to run a similar command for each branch.
$ git filter-branch -f --index-filter 'git rm --cached --ignore-unmatch tmp_pass.txt' fix_secure
Rewrite 50789669c4d4a4609ce06840f354eb6119884843 (1/6) (0 seconds passed, remainRewrite 298f4ac9c3a56b1e7e85a0af3fb9ba6738f4c4c2 (2/6) (1 seconds passed, remainRewrite 2c3a1194fb5fe190c1f81bb6e807e83be2732146 (2/6) (1 seconds passed, remainRewrite a9528538a9dc6bc5f2955f0ed556fe2d7b0c8f79 (2/6) (1 seconds passed, remainRewrite b8d05eea4509d98d39729c682a891da037c861ee (5/6) (4 seconds passed, remaining 0 predicted)    rm 'tmp_pass.txt'
Rewrite 6ca7f0a69701bdb0412e5840676ad0b4c682eb85 (5/6) (4 seconds passed, remaining 0 predicted)
Ref 'refs/heads/fix_secure' was rewritten
In this second command, you add the -f parameter for filter-branch. This is because there is already an internal backup file that says what the branch pointed to before you ran this command. Git is storing that backup from the last run. Git only stores one backup reference, so it needs to be told that it's okay to overwrite that reference.
$ git filter-branch -f --index-filter 'git rm --cached --ignore-unmatch tmp_pass.txt' HEAD
Rewrite 50789669c4d4a4609ce06840f354eb6119884843 (1/8) (0 seconds passed, remainRewrite 298f4ac9c3a56b1e7e85a0af3fb9ba6738f4c4c2 (2/8) (1 seconds passed, remainRewrite 2c3a1194fb5fe190c1f81bb6e807e83be2732146 (2/8) (1 seconds passed, remainRewrite a9528538a9dc6bc5f2955f0ed556fe2d7b0c8f79 (2/8) (1 seconds passed, remainRewrite b8d05eea4509d98d39729c682a891da037c861ee (5/8) (4 seconds passed, remaining 2 predicted)    rm 'tmp_pass.txt'
Rewrite 295070e1e2e7748b4f1c753d6d16b3de4c25fc55 (5/8) (4 seconds passed, remaining 2 predicted)    rm 'tmp_pass.txt'
Rewrite bbe20a408cc413a949e6eaef2d9631fd7c81b22b (7/8) (6 seconds passed, remaining 0 predicted)    rm 'tmp_pass.txt'
Rewrite e36eb926872bbf54d58d8ea0934f684771a30b3a (7/8) (6 seconds passed, remaining 0 predicted)
Ref 'refs/heads/master' was rewritten
In the second example, you can use HEAD because you were currently on master.
Let's look at one more use case. Suppose that instead of just being in the current directory, the tmp_pass.txt file was recently moved into a temp directory. The approach is similar for this situation, except that, on each branch where this situation exists, you need to change the path to be the directory name and add the -r option to the command.
$ git filter-branch -f --index-filter 'git rm -r --cached --ignore-unmatch temp' fix_secure
Rewrite 50789669c4d4a4609ce06840f354eb6119884843 (1/6) (0 seconds passed, remainRewrite 298f4ac9c3a56b1e7e85a0af3fb9ba6738f4c4c2 (2/6) (1 seconds passed, remainRewrite 2c3a1194fb5fe190c1f81bb6e807e83be2732146 (2/6) (1 seconds passed, remainRewrite a9528538a9dc6bc5f2955f0ed556fe2d7b0c8f79 (2/6) (1 seconds passed, remainRewrite 887f5b38c4aa7831feb7af1b5d122df686aa26f6 (5/6) (4 seconds passed, remainRewrite a9b79bbf6951abcd89130ef578cbb6fc31c65cfd (5/6) (4 seconds passed, remaining 0 predicted)    rm 'temp/tmp_pass.txt'

Ref 'refs/heads/fix_secure' was rewrittenHere are a few things to consider when removing files:
- The filter-branch's rm command needs to specify the file or directory path to the item you want to remove. This may involve multiple paths if the file has been moved or renamed.
- The filter-branch needs to be run against each branch where you want to do the removal.
- The filter-branch will rewrite affected SHA1s, so the SHA1 values in the chain will be different.
- The original SHA1s are still there for the time being, so you can reset back to them to undo the filter-branch.
- Because the original SHA1s are still there, this will not immediately shrink the size of the repository. The help page for filter-branch contains more information about what has to be done to shrink the repository.
Example 3: Changing the E-mail of a Set of Commits
The last example shows how to change the e-mail for a set of commits. This example illustrates using another filter, the environment filter, as well as only operating against a subset of commits in the current branch.
Suppose that you want to change the last three commits in your history to indicate that they were done at your business instead of on your personal system. Currently, your history looks like this (using a formatted log output to show the e-mail):
$ git log --pretty=format:"%h %ae | %s %d"
f713a23 [email protected] | update  (HEAD -> master, refs/original/refs/heads/master)
1d60e15 [email protected] | prepare for release
11e90d5 [email protected] | create license file
6aa64e2 [email protected] | needed to fix another place
fe41715 [email protected] | fix for secure
b7b59f2 [email protected] | update for support code
7e0e17f [email protected] | update core
e1214d9 [email protected] | add initial files
To change the e-mail portion here, you can use the environment filter for filter-branch. Environment variables can then be used and set by the commands that you pass in. This updated environment is then used in the course of redoing the chosen commits.
In this case, you update the author e-mail by setting the environment variable GIT_AUTHOR_EMAIL. One key point here is that you have to be sure to export the new value after you modify it so that it will be set for the commit operation that is updating things. Your command looks like this if you only want to change the last three commits:
$ git filter-branch -f --env-filter '[email protected]; export GIT_AUTHOR_EMAIL' -- HEAD˜3..HEAD
Rewrite 11e90d549c65da2a2c60d790f87bd1ddc1831dfa (1/3) (0 seconds passed, remaining 0 predicted)
Rewrite 1d60e1557b33ea181066df85f3f6b9e633d9e325 (2/3) (1 seconds passed, remaining 0 predicted)
Rewrite f713a23ae271e9f261f4dc25ef15a00d95c9ee41 (2/3) (1 seconds passed, remaining 0 predicted)
Ref 'refs/heads/master' was rewritten
Notice that you pass the -f option to override the last backup again, and for the rev-list range option you are passing a range from the oldest to the newest for what you want to change. The first value in the range is not changed. Read this as “Everything after HEAD˜3 up to the current HEAD”, which would translate into HEAD˜2, HEAD˜1, and HEAD.
If you look at the log before you did the filter-branch, you can see that the SHA1 values noted as Rewrite are the most recent three values in your log. And if you look at the log after the filter-branch (the following code), you can see that the most recent three entries in your log have different SHA1 values since they were rewritten (and have the updated e-mail), while the remaining entries in your log have the same SHA1 values as before.
$ git log --pretty=format:"%h %ae | %s %d"                                                  2b92751 [email protected] | update  (HEAD -> master)
bd56c6a [email protected] | prepare for release
bb0bbce [email protected] | create license file
6aa64e2 [email protected] | needed to fix another place
fe41715 [email protected] | fix for secure
b7b59f2 [email protected] | update for support code
7e0e17f [email protected] | update core
e1214d9 [email protected] | add initial files
bisect
Another useful tool that Git provides is bisect. The bisect command provides a mechanism for quickly locating where a problem or change was introduced in a range of commits.
The bisect command effectively implements an automated binary search across commits in Git. Starting from an initial range specified between a known bad revision and a known good revision, Git proceeds to keep dividing the remaining revisions roughly in half each time until the user can narrow down that a particular revision was the first time a change was introduced. Most commonly, this is used for debugging a problem—for example, when a bug first started occurring—so that developers can hone in on what code change caused the issue.
The bisect command is a git command that is really an application in itself. It takes a series of subcommands as arguments to initiate, end, and manage the process. The syntax looks like this:
git bisect start [--term-{old,good}=<term> --term-{new,bad}=<term>]
         [--no-checkout] [<bad> [<good>…]] [--] [<paths>…]
git bisect (bad|new) [<rev>]
git bisect (good|old) [<rev>…]
git bisect terms [--term-good | --term-bad]
git bisect skip [(<rev>|<range>)…]
git bisect reset [<commit>]
git bisect visualize
git bisect replay <logfile>
git bisect log
git bisect run <cmd>…
git bisect help
I won't dive into all of these subcommands, but I will touch on the core components needed to use the command.
It's also useful to understand, when starting out, that bisect is another one of the Git state commands, meaning that once you start this command, you are in the bisecting state in Git until you complete the workflow or end it. This is similar to other state commands that I have discussed, such as merging, rebasing, and cherry-picking. Unlike those commands, though, bisect does not have an --abort subcommand. To end a bisect, you do a reset, as follows:
$ git bisect resetor
$ git bisect reset HEADThere are two ways to get started with bisect. One way is to start with a current revision that is known to be bad, then start the operation, check out a known previous good revision to identify the starting range, and go from there. A second way to start the operation is to pass a starting and ending range to the command invocation, such as this:
$ git bisect start HEAD HEAD˜10Here, HEAD represents a known bad revision and HEAD˜10 represents a known good revision—ten commits before current HEAD. This establishes your starting range and starts the operation in one command.
Once the starting range is specified, the bisect good or bisect bad subcommand is used to indicate the state of the currently selected commit as the process continues. Git relies on the user to tell it whether the current commit it selected is good or bad. Armed with that information, Git then selects a commit roughly in the middle of the remaining range of candidates and makes it available for the user to test next. This process continues until the remaining range becomes small enough that Git and the user can zero in on the first commit where the problem occurred.
Let's look at an example. Figure 11.9 shows a series of commits in the local repository and a working directory. You are trying to figure out where a problem was introduced in the code. First, you check out the current version—version 10—and try it. As suggested by the X in the figure, this version doesn't work.

Figure 11.9 Starting state for bisect
From there, you can begin the bisect process to find the first bad revision. You can do that the simple way using
$ git bisect startThen, you indicate that the current revision is bad:
$ git bisect badThis tells Git to note this revision as bad, as indicated by the X next to the block in the repository.
Now, you need to identify a revision that is working, for the beginning of the range. To do this, you check out an earlier version. You can supply the version using a reference relative to HEAD or an explicit SHA1 from the log. You use the relative reference here.
$ git checkout HEAD˜10This puts version 1 in the working directory, so now you can try that code. In this case, version 1 works.

Because that version works, you can tell the bisect command that the revision is good. This causes bisect to mark that revision as good and then return a commit roughly halfway in between the good and bad revisions to try and see if it works. In this case, that's version 5. You can then try version 5 and see if it works. It does.

You can then mark version 5 as good.
$ git bisect goodSince version 5 is marked as good, this also marks all the versions from 1 to 5 as good. This means that the first bad revision must be in between version 5 and version 10. The bisect command then gives back version 7 and the process continues.

You indicate that version 7 is bad.
$ git bisect badNow, you know that versions 1 to 5 are good as indicated by the checkmarks. You also know that versions 7 to 10 are bad, as indicated by the X's. You have one more version to evaluate—version 6—to determine whether the first bad version is version 6 or version 7. Git checks out the remaining version, version 6. You try it to detect whether it is bad.

From this examination of the last commit, Git can now determine that this was the first bad commit, and it tells you that.
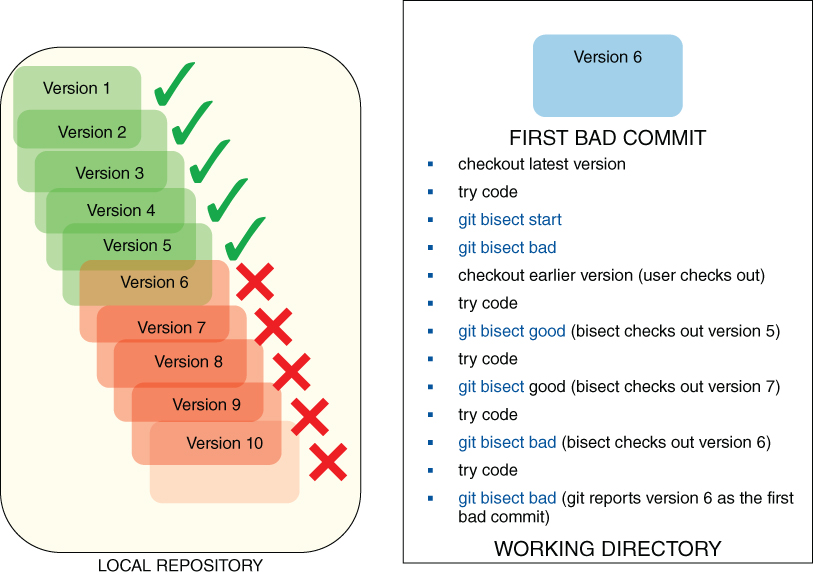
You have additional interfaces to see the steps and results that are associated with this bisect operation. Assuming that gitk is installed and accessible to your path, you can run git bisect visualize and be presented with a view of the bisect operation based on how the pointers have been left in the repository (see Figure 11.15).

Figure 11.15 gitk view of a bisect
You can also generate a log of the operations by using git bisect log.
Finally, there are times when you may want to leverage automation to help you zero in on the first bad commit. If you have a script that you can run against the set of things in your working directory to indicate success or failure, you can use that script to automate the process. The caveat is that the script must return 0 for a good revision and any code from 1 to 127 for a bad revision, except for 125, which indicates that this commit cannot be tested.
To invoke this kind of automated script, you use the bisect run subcommand. A quick example should help to illustrate this. Suppose that you have a simple script that does a test by adding two numbers together. However, you know that somewhere in the various revisions of this script, a bug was introduced that resulted in it subtracting the numbers instead of adding them. By feeding the script to bisect's run subcommand with arguments that should result in a 0, you can find where Git first observes the problem. (If the calculations are correct, Git returns a 0, which indicates to bisect that a commit is okay.) Note that this is not necessarily the same as the first commit where the problem was introduced, but when you have a large set of commits to examine, this process can significantly reduce the search time.
The bisect command also has several other subcommands that are detailed in its help page, including ways to tell it to skip specific commits, and more variations on starting ranges.
$ git bisect log
git bisect start
# bad: [ada1a94bfcbb6ba448ff38265517eb64bc55a93d] Commit of version 12 of sum.sh
git bisect bad ada1a94bfcbb6ba448ff38265517eb64bc55a93d
# good: [aea87ad663b225b8723e9db828883d0e102f3487] Commit of version 1 of sum.sh
git bisect good aea87ad663b225b8723e9db828883d0e102f3487
# good: [3332095f6afe1c1174bdf5e819333b6199bc3335] Commit of version 6 of sum.sh
git bisect good 3332095f6afe1c1174bdf5e819333b6199bc3335
# bad: [0cd39f3c4927aa0316147548ab5480e76db361e1] Commit of version 9 of sum.sh
git bisect bad 0cd39f3c4927aa0316147548ab5480e76db361e1
# bad: [f03c43b40f7e6a367357dceb3e7b2577b8323894] Commit of version 8 of sum.sh
git bisect bad f03c43b40f7e6a367357dceb3e7b2577b8323894
# bad: [9fa38a40e04f55a31cfcc618340b8b2d23645b46] Commit of version 7 of sum.sh
git bisect bad 9fa38a40e04f55a31cfcc618340b8b2d23645b46
# first bad commit: [9fa38a40e04f55a31cfcc618340b8b2d23645b46] Commit of version 7 of sum.sh

$ git bisect run ./sum.sh -2 2
running ./sum.sh -2 2

Sum program - version 2.06

-2 + 2 = 0
Bisecting: 2 revisions left to test after this (roughly 2 steps)
[078e5c123e86bfde3396eb1a8adc823eb940e6b3] new version 2.09
running ./sum.sh -2 2

Sum program - version 2.09

-2 + 2 = -4
bisect run failed:
exit code 252 from './sum.sh -2 2' is < 0 or >= 128
rerere
Although its name may look like a typo, rerere is an actual command in Git. It is short for reuse recorded resolution. There are different schools of thought on how to actually pronounce it; some say ree-ree-ree and others rear-er or re-were. My personal choice is re-3, which refers to re being repeated three times.
With rerere, when you first encounter a conflict from one of the merge-style operations, you resolve the conflict as appropriate, but you tell Git to learn and remember how you resolved that conflict. Afterward, if the same conflict occurs again, and rerere is enabled, Git will resolve the conflict automatically in the same way you did.
In order to use this functionality, you first have to enable it. You do this by setting a special configuration value.
$ git config --global rerere.enabled 1This command is a little different from the other Git commands that you've been working with. The rerere functionality, once enabled, runs automatically. However, there are options that allow you to modify the state of the remembered information and to understand what rerere knows. The syntax is as follows:
git rerere [clear|forget <pathspec>|diff|remaining|status|gc]I'll talk about some of these options as I go along.
So, what's the practical application of the rerere command? After all, if you resolve a conflict, aren't you done? Consider that you have a topic or feature branch where you are iterating over time, but as you make progress, you want to merge back the latest changes periodically into another branch. If you repeatedly encounter the same merge conflicts each time you merge, then rerere can simplify things significantly.
In a related manner, if you have a long-lived branch that you are working with, from time to time, you may want to merge in the latest changes from the production branch with rerere enabled and then reset back to before the merge. This has the effect of teaching Git how to deal with any conflicts from the history of the production branch when it's finally time to fully merge the long-lived branch into the production one. This results in fewer delays and less complication because Git will have learned through the temporary merges how to resolve conflicts along the way.
Let's look at an example from a demo project I use in some of my workshops. This project is called greetings and consists of a single java file that prints out some text. It also has two branches, master and topic1, with the file changed on each branch, so you encounter a conflict when you merge.
You've enabled rerere using the previous command. Now let's try to merge topic1 into master. (Your current branch is already master.)
$ git merge topic1
Auto-merging helloWorkshop.java
CONFLICT (content): Merge conflict in helloWorkshop.java
Recorded preimage for 'helloWorkshop.java'
Automatic merge failed; fix conflicts and then commit the result.
This looks similar to what you've seen before when dealing with conflicts, except for the line about “Recorded preimage …”. Because you have rerere enabled and there's a conflict, Git records what the file looks like before you resolve the conflict.
Let's take a look at the contents of the file with the conflicts, as marked by Git:
$ cat helloWorkshop.java
/* Hello Workshop Java Program */
/* 9-12-12 */
class helloWorkshop  {
    public static void main(String[] args) {
<<<<<<< HEAD
        System.out.println("Greetings Workshop!");
=======
        System.out.println("Greetings People!");
>>>>>>> topic1
        System.out.println("This is an example file");
        System.out.println("for use in workshop exercises.");
        System.out.println("This is on the topic1 branch");
        System.out.println("This file is written in Java.");
        System.out.println("Isn't this exciting?");
<<<<<<< HEAD
        System.out.println("Maybe?");
=======
        System.out.println("Really?");
>>>>>>> topic1
        System.out.println("Okay then.");
        System.out.println("Goodbye Workshop!");
    }
}
In this case, it's easy to see which file is involved. However, what if there were multiple files scattered across directories with conflicts? The rerere command includes a status command, similar to the git status command, to tell you which files have conflicts that rerere will monitor and record the resolution for—just the one file in this instance.
$ git rerere status
helloWorkshop.java
And, as you progress through resolving differences, you can use the diff option to rerere to see the diffs for the current state of the conflict resolution.
$ git rerere diff
--- a/helloWorkshop.java
+++ b/helloWorkshop.java
@@ -2,21 +2,21 @@
 /* 9-12-12 */
 class helloWorkshop  {
     public static void main(String[] args) {
-<<<<<<<
-        System.out.println("Greetings People!");
-=======
+<<<<<<< HEAD
         System.out.println("Greetings Workshop!");
->>>>>>>
+=======
+        System.out.println("Greetings People!");
+>>>>>>> topic1
         System.out.println("This is an example file");
         System.out.println("for use in workshop exercises.");
         System.out.println("This is on the topic1 branch");
         System.out.println("This file is written in Java.");
         System.out.println("Isn't this exciting?");
-<<<<<<<
+<<<<<<< HEAD
         System.out.println("Maybe?");
-=======
+=======
         System.out.println("Really?");
->>>>>>>
+>>>>>>> topic1
         System.out.println("Okay then.");
         System.out.println("Goodbye Workshop!");
     }
Let's assume that you resolve the conflicts manually this first time, and you end up with this version:
$ cat helloWorkshop.java
/* Hello Workshop Java Program */
/* 9-12-12 */
class helloWorkshop  {
    public static void main(String[] args) {
        System.out.println("Greetings Workshop!");
        System.out.println("This is an example file");
        System.out.println("for use in workshop exercises.");
        System.out.println("This is on the topic1 branch");
        System.out.println("This file is written in Java.");
        System.out.println("Isn't this exciting?");
        System.out.println("Really?");
        System.out.println("Okay then.");
        System.out.println("Goodbye Workshop!");
    }
}
Now you can stage and commit the change.
$ git add .
$ git commit -m "fixed"
Recorded resolution for 'helloWorkshop.java'.
[master 8d8bbcb] fixed
Notice the additional message you get from Git during the commit about “Recorded resolution…”. Git is telling you that because the rerere function is enabled, and you have resolved the conflict resolution (as indicated by the commit), it has recorded how the file was changed to resolve the conflict.
As an example of what rerere can do for you after it has recorded a resolution, let's reset back to before the merge and do it again. You'll use the ORIG_HEAD option to go back, as discussed in the main part of this chapter.
$ git reset --hard ORIG_HEAD
HEAD is now at da7a1e2 update for master
Doing the merge again, you get the following output:
$ git merge topic1
Auto-merging helloWorkshop.java
CONFLICT (content): Merge conflict in helloWorkshop.java
Resolved 'helloWorkshop.java' using previous resolution.
Automatic merge failed; fix conflicts and then commit the result.
Notice the line, “Resolved … using previous resolution.” Because rerere is enabled, and you had shown it before how to resolve this particular conflict, Git simply resolves it, in the same way you did manually before. In fact, if you take a look at the contents, you see that they look just like the version you ended up with after the earlier manual editing.
$ cat helloWorkshop.java
/* Hello Workshop Java Program */
/* 9-12-12 */
class helloWorkshop  {
    public static void main(String[] args) {
        System.out.println("Greetings Workshop!");
        System.out.println("This is an example file");
        System.out.println("for use in workshop exercises.");
        System.out.println("This is on the topic1 branch");
        System.out.println("This file is written in Java.");
        System.out.println("Isn't this exciting?");
        System.out.println("Really?");
        System.out.println("Okay then.");
        System.out.println("Goodbye Workshop!");
    }
}
And, if you check the status and diffs that rerere is tracking, you see that there are no additional conflicts it knows about.
$ git rerere status
$ git rerere diff
You may be wondering why, if Git was able to resolve the conflict, it still reported that the automatic merge failed and that you need to fix conflicts. This is just a general message that the merge-style operation provides. There may be other conflicts that rerere hasn't been taught how to resolve. You may also want to review the affected files and make other changes. Or, you may not want the automatic resolution for a particular case after all.
In the case of automatic resolution, you can use one of the other options with rerere to undo the automatic resolving functionality. The forget option with a path tells Git to forget the resolution for that particular file.
$ git rerere forget helloWorkshop.javaThe forget option also allows you a kind of redo if the recorded resolution isn't what you wanted. If you realize that a resolution you did was incorrect or not what you wanted, you can follow this sequence:
- Tell Git to forget the resolution—
git rerere forget <file> - Create the conflict version again—
git checkout --merge <file> - Resolve the conflicts as desired for
<file> - Run rerere again to record the new resolution—
git rerere
The following code is an example of the commands that are involved in updating a resolution that you previously taught rerere:
$ git rerere forget helloWorkshop.java
$ git checkout --merge helloWorkshop.java
<edit and resolve conflicts as desired>
$ git rerere
With these commands, you told Git to forget the previous resolution, re-created the file with conflicts, resolved things the way you wanted, and then told Git to record the new resolution.
There is one other option you can enable for rerere that is a useful shortcut: automatically staging files that rerere was able to resolve successfully. You do this by setting another configuration value.
$ git config --global rerere.autoupdate trueIf you go back and redo the same merge later such that the rerere command can automatically resolve the conflicts, you will see something like this:
$ git merge topic1
Auto-merging helloWorkshop.java
CONFLICT (content): Merge conflict in helloWorkshop.java
Staged 'helloWorkshop.java' using previous resolution.
Automatic merge failed; fix conflicts and then commit the result.
Note the line that says “Staged ‘helloWorkshop.java’ using previous resolution.” This means that because Git was able to resolve the conflicts with rerere, it staged the resolved file for you. And, in fact, if you check the normal Git status, you see your staged file.
$ git status
On branch master
Your branch is up-to-date with 'origin/master'.
All conflicts fixed but you are still merging.

Changes to be committed:

        modified:   helloWorkshop.java
SUMMARY
In this chapter, you explored a set of less-common but useful commands for working with content in Git. I spent some time talking about the git stash command, which allows you to move uncommitted changes from the working tree and staging area into an element in a separate queue. It then resets your local environment back to the state of the last commit. Then, if you need to get those elements back out of the queue, you can apply or pop them back into your local environment.
You also learned about the mv and rm commands for renaming and deleting content. You looked at how these commands make local changes in the working directory, and stage the change. As with file or other content updates, you have to commit to make the change happen in the repository.
You looked at the grep command in Git (which is much like the OS system grep command) that allows you to search through content for strings or regular expressions. I discussed how to search through the Git history log and how to use the -S or pickaxe option for extended searching.
I covered some examples of using commands like bundle and archive to create external packages of Git content to share. I also explained how to share patches through e-mail directly with Git.
Finally, in the main part of the chapter, I covered the notes functionality in Git that allows you to add notes to commits that are already in the repository.
In the advanced topics section, I covered three more complicated commands that provide a lot of power for users. The filter-branch command allows you to re-process content in repositories to do things like split out parts of repositories into their own separate repositories, or change attributes associated with commits.
The bisect command uses a form of binary searching across commits in a repository to help users narrow in on where a particular change was first introduced.
The rerere command allows you to teach Git how to resolve merge situations so it can remember the resolution if you encounter the same situation again, and automatically resolve it for you in the way you want.
In the next chapter, I cover the remote side of the Git environment and talk about remote repositories, remote branches, and interactions with them to complete your overall Git workflow.
About Connected Lab 7: Deleting, Renaming, and Stashing
This lab guides you through some simple examples of using several of the basic commands covered in this chapter. After each of the change steps, you'll look at the status of the files in your working directory to understand what's changed. This will help you to get a feel for these kind of operations as part of an overall workflow using Git.