
Current web applications utilize a wide range of data sources, including flat files, web services, feeds, and databases. Content management systems exist that are based on each of these sources, or combinations of them, but most of them store their content in databases.
The CMS you are developing in this book will use a MySQL database. What MySQL lacks in enterprise features is more than made up for by its simplicity and speed. The vast majority of LAMP [2] hosting packages include at least one MySQL database.
In this chapter, you will learn how to interact with databases using Zend Framework's database abstraction layer, Zend_Db. Zend_Db is an object-oriented interface to SQL database systems. You will add onto the example you created in the previous chapter, saving the bug reports that the previous demo's form submits.
Before you can start working with the database demos, you need to create the CMS database and configure its connection.
First you need to create your database. So, create a new database named zf_cms on your testing server, and create a user who has access to this database. This user will need to have permission to select, insert, update, and delete data from the database.
Next you need to configure your application's database connection. Zend Framework uses adapters to connect to database servers. These adapters provide a standardized interface to a range of commercially available database systems, including the following:
IBM DB2
MySQL
Microsoft SQL Server
Oracle
PostgreSQL
SQLite
This common interface makes it easy to switch from one back-end database server to another. A common use case is where an application starts with a file-based SQLite database but is scaled up to a full RDBMS, such as MySQL, when necessary.
Zend_Application_Resource_Db is one of the default resource plug-ins that ships with Zend Framework. All you need to do is add the database connection properties to the application.ini configuration file; the resource plug-in creates the connection and then registers it with Zend_Db_Table as the default database connection. Add the database settings to your application.ini file, as shown in Listing 4-1.
Example 4.1. The Database Connection Information in application/configs/application.ini
resources.db.adapter = "pdo_mysql"
resources.db.params.host = "localhost"
resources.db.params.username = "your username"
resources.db.params.password = "your password"
resources.db.params.dbname = "zf_cms"
resources.db.isDefaultTableAdapter = true
In the previous chapter, you created a form for the users to submit bug reports. Now that you have created the database, you need to create a table to store these bug reports in. Table 4-1 describes the bugs table that you'll create.
Table 4.1. The bugs Table Description
Field | Type | Length | Notes |
|---|---|---|---|
|
| 11 | This is the primary key for the table. |
|
| 250 | This is the name of the person who is submitting the bug. |
|
| 250 | This is the email address of the person who is submitting the bug. |
|
| 11 | This is the timestamp that the bug was reported on. |
|
| 250 | This is the URL the bug occurred on. |
|
| -- | This is the description of the bug. |
|
| 550 | This is how critical the bug is. |
|
| 50 | This is the current status of the bug. |
To create this table, run the SQL statement shown in Listing 4-2 on your database.
Example 4.2. The SQL Statement to Create the bugs Table
CREATE TABLE `bugs` (
  `id` int(11) unsigned NOT NULL AUTO_INCREMENT,
  `author` varchar(250) DEFAULT NULL,
  `email` varchar(250) DEFAULT NULL,
  `date` int(11) DEFAULT NULL,
  `url` varchar(250) DEFAULT NULL,
  `description` text,
  `priority` varchar(50) DEFAULT NULL,
  `status` varchar(50) DEFAULT NULL,
  PRIMARY KEY (`id`)
)
In Zend Framework's MVC implementation, each table in the database has an associated class that manages it. In this CMS we refer to this class as the model, but note that a model can mean different things in a different context.
The model classes extend the Zend_Db_Table_Abstract class, which provides an object-oriented interface to the database table. It implements the Table Data Gateway pattern; the table data gateway encapsulates all the SQL for managing the underlying table. It provides a number of methods for common database management CRUD (create, read, update, delete) functions:
Create: You can create rows directly with
Zend_Db_Table'sinsert()method, or you can create a new row, add the data to it, and save it.Read: A number of methods exist for reading data, but the two most common are, first, building a select query using the
Zend_Db_Selectobject and passing this to theZend_Db_Tablefetch methods and, second, fetching a row using its primary key withZend_Db_Table'sfind()method.Update: You can update rows using
Zend_Db_Table'supdate()method, or you can make the changes directly to the row and then use theZend_Db_Table_Row'ssave()method.Delete: You can delete rows by passing a
WHEREclause to theZend_Db_Table'sdelete()method, or you can delete a row using theZend_Db_Table_Row'sdelete()method.
All your application's model classes go in the application/models folder. The classes should use the camelCase naming convention and should use the Model_ namespace. This will enable the Zend_Loader autoloader to find and load your classes for you so you don't have to do this manually. To take advantage of the autoloader functionality, you will need to update the _initAutoload() method in the Bootstrap class, adding the Model_ namespace, similar to the change made for autoloading forms (see Listing 4-3).
Example 4.3. The Updated _initAutoload() Method in application/Bootstrap.php
protected function _initAutoload()
{
    // Add autoloader empty namespace
    $autoLoader = Zend_Loader_Autoloader::getInstance();
    $autoLoader->registerNamespace('CMS_'),
    $resourceLoader = new Zend_Loader_Autoloader_Resource(array(
        'basePath'      => APPLICATION_PATH,
        'namespace'     => '',
        'resourceTypes' => array(
            'form' => array(
                'path'      => 'forms/',
                'namespace' => 'Form_',
            ),
            'model' => array(
                'path'      => 'models/',
                'namespace' => 'Model_'
            ),
        ),
    ));
    // Return it so that it can be stored by the bootstrap
    return $autoLoader;
}Create a new file in the application/models folder named Bug.php. Add a class to this file named Model_Bug, which extends Zend_Db_Table_Abstract. Next you need to define the model's table name; this is not completely necessary, because the framework will default to the class name in lowercase characters, but it adds a degree of flexibility to your class naming. You set the table name using the protected property $_name (see Listing 4-4).
Now that you have the database, bugs table, and model set up, you are ready to start managing bug submissions.
The first thing you need to do to manage bugs (as is the case with most data) is insert the bugs into the database. There are several approaches to doing this; some people prefer to put the data management logic in the controller action, using the built-in Zend_Db_Table methods. I, on the other hand, prefer to create specific methods in the model classes for each of these actions. It takes an extra moment but makes managing the code much easier down the road.
To get started, create a new method in the Bug model named createBug() (see Listing 4-5). Note that you must be careful when naming your methods; make sure you don't overload the core Zend_Db_Table methods!
As I mentioned earlier, there are two ways to create a new row in a table using Zend_Db_Table. I prefer to create a new row object, add the data to it, and then save it. This is a matter of preference, but I find it easier to read and work with than array notation.
Once you have created and saved the row, return the ID of the new row.
Example 4.5. The createBug() Method in application/models/Bug.php
public function createBug($name, $email,
                 $date, $url, $description, $priority, $status)
{
    // create a new row in the bugs table
$row = $this->createRow();
// set the row data
$row->author = $name;
$row->email = $email;
$dateObject = new Zend_Date($date);
$row->date = $dateObject->get(Zend_Date::TIMESTAMP);
$row->url = $url;
$row->description = $description;
$row->priority = $priority;
$row->status = $status;
// save the new row
$row->save();
// now fetch the id of the row you just created and return it
$id = $this->_db->lastInsertId();
return $id;
}Now that you have the database and model set up, you are ready to update the bug controller and implement the submit action. In the previous chapter, you created this action but just had it dump the submitted data out onto the page if the form passed its validation. Now you need to update this action and insert the bug into the database (see Listing 4-6).
First you create a new instance of the Bug model in the submit section. Then, once you have this instance, you call the createBug() method, passing it the values that were submitted with the form. If the createBug() method succeeds, it will return the primary key of the bug row that was just inserted. In this case, you should display a confirmation page (which you will create next).
Example 4.6. The Updated submitAction() in application/controllers/BugController.php
public function submitAction()
{
    $bugReportForm = new Form_BugReportForm();
    $bugReportForm->setAction('/bug/submit'),
    $bugReportForm->setMethod('post'),
    if($this->getRequest()->isPost()) {
        if($bugReportForm->isValid($_POST)) {
            $bugModel = new Model_Bug();
            // if the form is valid then create the new bug
            $result = $bugModel->createBug(
                $bugReportForm->getValue('author'),
                $bugReportForm->getValue('email'),
                $bugReportForm->getValue('date'),
                $bugReportForm->getValue('url'),
                $bugReportForm->getValue('description'),
                $bugReportForm->getValue('priority'),
                $bugReportForm->getValue('status')
);
// if the createBug method returns a result
// then the bug was successfully created
if($result) {
$this->_forward('confirm'),
}
}
}
$this->view->form = $bugReportForm;
}Now you need to create the confirmation page. To create this page, you need to create an action as well as a view script. You can do this manually or using Zend_Tool, as shown in Listing 4-7.
This command will create a new action in the bug controller named confirmAction() as well as a view script in application/views/scripts/bug/confirmation.phtml. This view script will render a notice with its location and the action that is rendering it. Open this script, and replace this with the thank-you note in Listing 4-8.
Now that you have created a method to enter bug reports, you need to create a method to manage them, which will query the database for all current bugs and create a list view. Each row in the list will represent one row in the bugs table and will have links to update the row as well as delete it.
First you need to create a method to fetch the current bugs. You could use the fetchAll() method directly, passing it an array of WHERE clauses, but I recommend using the Zend_Db_Select class. This class is used to create a select query programmatically. Then, once you build the query, you pass the select object to Zend_Db_Table's fetchAll() or fetchRow() method. Zend_Db parses the query, runs it, and builds the result object, which is a set of Zend_Db_Table_Row objects (appropriately called Zend_Db_Table_Rowset).
Create a new method in the Bug model named fetchBugs(), as shown in Listing 4-9. For the time being, you are just going to fetch all the bugs, so all you need to do is get the table's select object and then pass this to the fetchAll() method.
Note
The Zend_Db_Select object is an SQL API that is used to programmatically build queries. There are several advantages of using this API rather than writing SQL. Probably the most important is the fact that the Select object will adapt the SQL depending on the database adapter you are using, which makes the code more portable.
Now that you have a method to fetch all the bugs from the database, you are ready to start working with them. So, create a list action in the bug controller. Use the Zend_Tool line in Listing 4-10 to create the action and view.
Now open the bug controller to update this action. For the time being, this will just create a new instance of the Bug model and pass the results of the fetchBugs() method to the view to render, as shown in Listing 4-11.
To create the list view, open application/views/scripts/bug/list.phtml. This view script will render a table with all the current bugs. To render this table, it will use the partialLoop() view helper, which takes a data set and passes each item in the set to the partial script that you specify (see Listing 4-12).
Example 4.12. The List View Script in application/views/scripts/bug/list.phtml
<h2>Current Bugs</h2>
<table class='spreadsheet' cellspacing='0'>
<tr>
<th> </th>
<th>Date</th>
<th>Priority</th>
<th>Status</th>
<th>URL</th>
<th>Submitter</th>
<th>Description</th>
</tr>
<?php echo $this->partialLoop('bug/table-row.phtml', $this->bugs); ?>
</table>Now you need to create the table-row.phtml view script to render the actual row, as shown in Listing 4-13.
Example 4.13. The Bug Table Row application/views/scripts/bug/table-row.phtml
<tr>
<td><a href='/bug/edit/id/<?php echo $this->id;?>'>Edit</a> |
<a href='/bug/delete/id/<?php echo $this->id;?>'>Delete</a></td>
<td><?php echo date('m/d/y', $this->date); ?></td>
<td><?php echo $this->priority; ?></td>
<td><?php echo $this->status; ?></td>
<td><?php echo $this->url; ?></td>
<td><?php echo $this->author; ?></td>
<td><?php echo $this->description; ?></td>
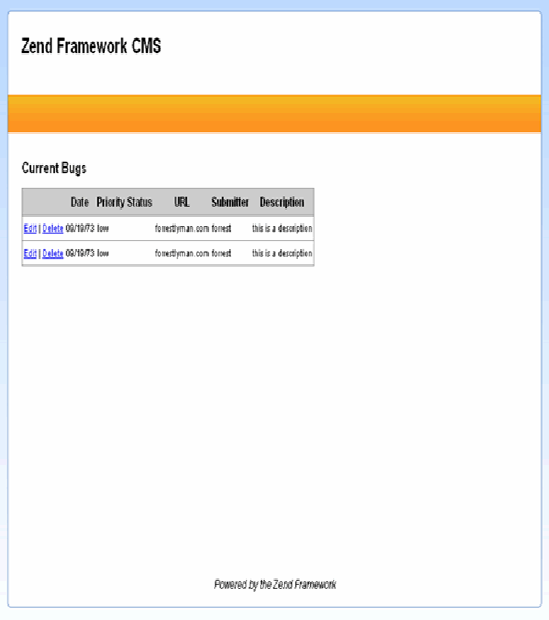
</tr>Next enter a few sample bugs at http://localhost/bug/submit to test the functionality, and then go to http://localhost/bug/list. You should see a list of all your bugs as a simple table. This table is rather difficult to read, but a little CSS will fix that. Update the public/skins/blues/css/form.css file, adding the styles shown in Listing 4-14 for the spreadsheet table.
Example 4.14. The Style Declarations for the Spreadsheet Table in public/skins/blues/css/form.css
table.spreadsheet{
margin:10px 0;
border:#999 1px solid;
}

table.spreadsheet th{
background:#ccc;
font-weight:bold;
font-size:12px;
padding:5px 2px;
}
table.spreadsheet td{
border-top:#999 1px solid;
padding:5px 2px;
}Now the bug list should be much easier to read, like Figure 4-1.
The bug list is currently renders the bugs in the order they were received. In a real-world example, this would quickly become cumbersome, because you might have to search through hundreds or thousands of bug reports.
Next you will update the Bug model's fetchBugs() method to add the ability to filter the reports and sort by different criteria, as shown in Listing 4-15. You will pass the filters as an array, where the key is the bug field and value is the value that you are looking for.
Example 4.15. The Updated fetchBugs() Method in application/models/Bug.php
public function fetchBugs($filters = array(), $sortField = null, $limit = null,
    $page = 1)
{
    $select = $this->select();
    // add any filters which are set
    if(count($filters) > 0) {
        foreach ($filters as $field => $filter) {
            $select->where($field . ' = ?', $filter);
        }
    }
    // add the sort field is it is set
    if(null != $sortField) {
        $select->order($sortField);
    }
    return $this->fetchAll($select);
}Now you need to create a form to filter the bug reports. This form needs to have select controls for each of the available sort criteria and filter fields. It also needs a text control for the filters. Create a new file named BugReportListToolsForm.php in application/forms. Then create the form class named Form_BugReportListToolsForm, adding controls for each of these fields, as shown in Listing 4-16.
Example 4.16. The List Tools Form in application/forms/BugReportListToolsForm.php
<?php
class Form_BugReportListToolsForm extends Zend_Form
{
    public function init()
    {
        $options = array(
            '0'                      => 'None',
            'priority'          => 'Priority',
            'status'                 => 'Status',
            'date'          => 'Date',
            'url'                    => 'URL',
            'author'           => 'Submitter'
        );

        $sort = $this->createElement('select', 'sort'),
$sort->setLabel('Sort Records:'),
$sort->addMultiOptions($options);
$this->addElement($sort);
$filterField = $this->createElement('select', 'filter_field'),
$filterField->setLabel('Filter Field:'),
$filterField->addMultiOptions($options);
$this->addElement($filterField);
// create new element
$filter = $this->createElement('text', 'filter'),
// element options
$filter->setLabel('Filter Value:'),
$filter->setAttrib('size',40);
// add the element to the form
$this->addElement($filter);
// add element: submit button
$this->addElement('submit', 'submit', array('label' => 'Update List'));
}
}
?>Now you need to update the listAction() method in the BugController, loading this form and passing it to the view script to render, as shown in Listing 4-17.
Example 4.17. The Updated listAction() Method in application/controllers/BugController.php
public function listAction()
{
    // fetch the current bugs
    $bugModels = new Model_Bug();
    $this->view->bugs = $bugModels->fetchBugs();
    // get the filter form
    $listToolsForm = new Form_BugReportListToolsForm();
    $listToolsForm->setAction('/bug/list'),
    $listToolsForm->setMethod('post'),
    $this->view->listToolsForm = $listToolsForm;
}
Now that you have the form created and loaded, you can add it to the list page. Open the list.phtml file, and render the filter/sort form between the headline and the list table, as shown in Listing 4-18.
Example 4.18. Adding the Filter/Sort Form to the List View in application/views/scripts/bug/list.phtml
<h2>Current Bugs</h2>
<?php echo $this->listToolsForm;?>
<table class='spreadsheet' cellspacing='0'>
<tr>
<th> </th>
<th>Date</th>
<th>Priority</th>
<th>Status</th>
<th>URL</th>
<th>Submitter</th>
<th>Description</th>
</tr>
<?php echo $this->partialLoop('bug/table-row.phtml', $this->bugs); ?>
</table>This form posts back to BugController's listAction() method. Open this action. You will need to define the sort and filter variables and set them to default to null. Then check to see whether the request is a postback; if it is, then populate the form, and fetch the sort and filter criteria. Next you need to evaluate whether the filters and sort parameters have been set. If they have, then update the sort and/or filter variables. With this data linked up, you are ready to pass these values into the fetchBugs() method, as shown in Listing 4-19.
Example 4.19. The listAction() Method in application/controllers/BugController.php
public function listAction()
{
    // get the filter form
    $ListToolsForm = new Form_BugReportListToolsForm();
    // set the default values to null
    $sort = null;
    $filter = null;
    // if this request is a postback and is valid, then add the sort
    // filter criteria
    if($this->getRequest()->isPost()) {
        if($listToolsForm->isValid($_POST)) {
            $sortValue = $listToolsForm->getValue('sort'),
            if($sortValue != '0') {
                $sort = $sortValue;
            }
            $filterFieldValue = $listToolsForm->getValue('filter_field'),
            if($filterFieldValue != '0') {
                $filter[$filterFieldValue] = $listToolsForm->getValue('filter'),
            }
        }
    }
// fetch the current bugs
$bugModel = new Model_Bug();
$this->view->bugs = $bugModel->fetchBugs($filter, $sort);
$listToolsForm->setAction('/bug/list'),
$listToolsForm->setMethod('post'),
$this->view->listToolsForm = $listToolsForm;
}You can add limit and offset clauses to the Zend_Db_Select object very easily. You set the limit parameter, to which you can pass two arguments: the size of the result set and the offset (see Listing 4-20).
Example 4.20. Example of Adding LIMIT and OFFSET Clauses to a Select Object
$select = $this->select();
$limit = 10;
$offset = 20;
$select->limit($limit, $offset);
This is useful when you are programmatically building a query, but Zend Framework provides another tool to make the entire pagination process easier, Zend_Paginator.
The Zend_Paginator component enables you to paginate ranges of data from a variety of sources, such as an array, a DbSelect object, or an iterator. It handles these with adapters. In this case, you would use the DbTableSelect adapter. The DbTableSelect adapter adds the proper LIMIT and OFFSET clauses to the Zend_Db_Table_Select object to fetch the current page of results, reducing the memory consumption that accompanies fetching large result sets. It also dynamically fetches the count of the rows that the Zend_Db_Table_Select object will return. It uses this information to calculate the number of pages and results per page. You will need to do a few things to update your code to use Zend_Paginator, covered next.
The fetchBugs() method that you wrote earlier creates a Zend_Db_Table_Select object, runs the fetchAll() method, and then returns the results. Things work a little differently with the paginator; since Zend_Paginator runs its own queries, you need to update the fetchBugs() method to return an instance of the DbTableSelect adapter. One other thing—since the method is no longer returning bugs, you should rename the method to fetchPaginatorAdapter(). I always like to name a method so it describes what the method will do and what it will return, as shown in Listing 4-21.
Example 4.21. The Updated and Renamed fetchBugs() Method in application/models/Bug.php
public function fetchPaginatorAdapter($filters = array(), $sortField = null)
{
    $select = $this->select();
    // add any filters which are set
if(count($filters) > 0) {
foreach ($filters as $field => $filter) {
$select->where($field . ' = ?', $filter);
}
}
// add the sort field is it is set
if(null != $sortField) {
$select->order($sortField);
}
// create a new instance of the paginator adapter and return it
$adapter = new Zend_Paginator_Adapter_DbTableSelect($select);
return $adapter;
}Now you need to refactor the BugController's listAction() one more time to fetch the paginator and pass it to the view. Note that as you develop more with the framework, you will see a pattern emerge where you cycle from the model to the controller to the view, working on all three components simultaneously to build and refactor functionality.
You first need to refactor how the controller is handling the request parameters in listAction(). This is because the sort and filter criteria are going to be appended to the page navigation links, so the controller needs to fetch these regardless of whether the request method is a POST.
Now you need to replace the fetchBugs() method call with fetchPaginatorAdapter(). Once you have this adapter, create a new instance of Zend_Paginator, passing the adapter to its constructor. Then you set the page size, which will be statically set to ten rows, and the page number, which you will set by passing the parameter page. Once the paginator is configured, pass it to the view to render, as shown in Listing 4-22.
Example 4.22. The Updated listAction() Method in application/controllers/BugController.php
public function listAction()
{
    // get the filter form
    $listToolsForm = new Form_BugReportListToolsForm();
    $listToolsForm->setAction('/bug/list'),
    $listToolsForm->setMethod('post'),
    $this->view->listToolsForm = $listToolsForm;

    // set the sort and filter criteria. you need to update this to use the request,
    // as these values can come in from the form post or a url parameter
    $sort = $this->_request->getParam('sort', null);
    $filterField = $this->_request->getParam('filter_field', null);
    $filterValue = $this->_request->getParam('filter'),

    if(!empty($filterField)) {
        $filter[$filterField] = $filterValue;
    }else{
        $filter = null;
    }
// now you need to manually set these controls values
$listToolsForm->getElement('sort')->setValue($sort);
$listToolsForm->getElement('filter_field')->setValue($filterField);
$listToolsForm->getElement('filter')->setValue($filterValue);
// fetch the bug paginator adapter
$bugModels = new Model_Bug();
$adapter = $bugModels->fetchPaginatorAdapter($filter, $sort);
$paginator = new Zend_Paginator($adapter);
// show 10 bugs per page
$paginator->setItemCountPerPage(10);
// get the page number that is passed in the request.
//if none is set then default to page 1.
$page = $this->_request->getParam('page', 1);
$paginator->setCurrentPageNumber($page);
// pass the paginator to the view to render
$this->view->paginator = $paginator;
}Once you have the loaded paginator in the view, you need to add a pagination control to let the user navigate through the pages and then update the table to render the data from the paginator.
First you'll render the pagination control. The Zend Framework developers have gone out of their way to keep things as flexible as possible, so the paginator is not tied into any specific pagination control. You create a control and then set the paginator to use it.
To create a pagination control, you are going to need to create a new partial script. Since you want to be able to reuse this control, it makes sense to put it in a common view folder. Create a new folder named partials in application/views/scripts. Then add a new file to this folder named pagination-control.phtml.
The pagination control will need to do several things. It needs to create previous and next links, which should be disabled if you are at the beginning or end of the page set. It also needs to create a direct link to each page. Each of these links will use the url() helper, appending the page parameter and any request parameters to it, as shown in Listing 4-23.
Example 4.23. The Pagination Control Partial Script in application/views/scripts/partials/pagination-control.phtml
<?php if ($this->pageCount){
    // you need to add each of the request parameters to url
    $params = Zend_Controller_Front::getInstance()->getRequest()->getParams();
    // remove the system parameters
    unset($params['module']);
    unset($params['controller']);
    unset($params['action']);
?>
<div class="paginationControl">
<!-- Previous page link -->
<?php if (isset($this->previous)){ ?>
<a href="<?php echo $this->url(array_merge(
$params, array('page' => $this->previous))); ?>">
< Previous
</a> |
<?php } else { ?>
<span class="disabled">< Previous</span> |
<?php } ?>
<!-- Numbered page links -->
<?php foreach ($this->pagesInRange as $page){ ?>
<?php if ($page != $this->current){ ?>
<a href="<?php echo $this->url(array_merge($params,
array('page' => $page))); ?>">
<?php echo $page; ?>
</a> |
<?php } else { ?>
<?php echo $page; ?> |
<?php }}?>
<!-- Next page link -->
<?php if (isset($this->next)){ ?>
<a href="<?php echo $this->url(
array_merge($params, array('page' => $this->next))); ?>">
Next >
</a>
<?php } else { ?>
<span class="disabled">Next ></span>
<?php } ?>
</div>
<?php } ?>Now you need to render the control. You render the pagination control using the Zend_View's paginationControl() helper, which takes three arguments: the paginator instance, the control type, and the partial script to render. Render the pagination control between the filter form and the results table, as shown in Listing 4-24.
Example 4.24. Rendering the Pagination Control in application/views/scripts/bug/list.phtml
<?php echo $this->paginationControl($this->paginator,
     'Sliding',
     'partials/pagination-control.phtml'), ?>
Now all you need to do is update the partialLoop() method that renders the table rows to use the paginator. Since the paginator is using the DbTableSelect adapter, the data is in the same format. You just pass the paginator to the partialLoop() helper in the place of the result set, as shown in Listing 4-25.
Example 4.25. The Updated partialLoop in application/views/scripts/bug/list.phtml
<?php echo $this->partialLoop('bug/table-row.phtml', $this->paginator); ?>Once you have completed this, add a number of test bugs, and then check out http://localhost/bug/list. If everything worked correctly, you should see something like Figure 4-2.

When you created the bug list, you added links to edit and delete bugs. The edit link calls the editAction() method in the bug controller. You need to do a few things to implement this functionality. First, the bug report form does not have any way of identifying the current record, so you need to add a hidden ID field to it. Second, you need to create the edit action and view script to render and process the form.
To add an ID field to the bug report form, open the form, and add the hidden ID control to the beginning of the init() function, as shown in Listing 4-26.
Next, to create the editAction() method in the bug controller, first create the action with Zend_Tool, as shown in Listing 4-27.
The edit action is similar to the submit action, except it needs to open the selected item and then populate the form with its values, as shown in Listing 4-28. Note that Zend_Db_Table_Row has a helpful toArray() method, which makes populating the form with a database row very easy.
Example 4.28. The editAction() Method in application/controllers/BugController.php
public function editAction()
{
    $bugModel = new Model_Bug();
    $bugReportForm = new Form_BugReportForm();
    $bugReportForm->setAction('/bug/edit'),
    $bugReportForm->setMethod('post'),
    $id = $this->_request->getParam('id'),
    $bug = $bugModel->find($id)->current();
    $bugReportForm->populate($bug->toArray());
    //format the date field
    $frmBugReport->getElement('date')->setValue(date('m-d-Y', $bug->date));
    $this->view->bug = $bug;
    $this->view->form = $bugReportForm;
}The edit view script is similar to the submit view script. The only difference is the verbiage; the form handles rendering the different form actions, and so on. Update the edit.phtml file, as shown in Listing 4-29.
Now you need to create a method in the Bug model to update an existing record. It will be virtually identical to the createBug() method except that you are going to pass the method an ID (the primary key), and it is going to find the row to update rather than creating a new one (see Listing 4-30).
Example 4.30. The updateBug() Method in application/models/Bug.php
public function updateBug($id, $name, $email, $date, $url,
    $description, $priority, $status)
{
    // find the row that matches the id
    $row = $this->find($id)->current();

    if($row) {
        // set the row data
        $row->author = $name;
        $row->email = $email;
        $d = new Zend_Date($date);
        $row->date = $d->get(Zend_Date::TIMESTAMP);
        $row->url = $url;
        $row->description = $description;
        $row->priority = $priority;
        $row->status = $status;

        // save the updated row
        $row->save();
    return true;
    } else {
        throw new Zend_Exception("Update function failed; could not find row!");
    }
}
With this method in place, you simply have to update the editAction() method in the bug controller to call this method on a postback (see Listing 4-31). This will function identically to the submitAction() method.
Example 4.31. The Updated editAction() Method in application/controllers/BugController.php
public function editAction()
{
    $bugModel = new Model_Bug();
    $bugReportForm = new Form_BugReportForm();
    $bugReportForm->setAction('/bug/edit'),
    $bugReportForm->setMethod('post'),
    if($this->getRequest()->isPost()) {
        if($bugReportForm->isValid($_POST)) {
            $bugModel = new Model_Bug();
            // if the form is valid then update the bug
            $result = $bugModel->updateBug(
                $bugReportForm->getValue('id'),
                $bugReportForm->getValue('author'),
                $bugReportForm->getValue('email'),
                $bugReportForm->getValue('date'),
                $bugReportForm->getValue('url'),
                $bugReportForm->getValue('description'),
                $bugReportForm->getValue('priority'),
                $bugReportForm->getValue('status')

            );
            return $this->_forward('list'),
        }
    } else {
        $id = $this->_request->getParam('id'),
        $bug = $bugModel->find($id)->current();
        $bugReportForm->populate($bug->toArray());
        //format the date field
        $bugReportForm->getElement('date')->setValue(date('m-d-Y', $bug->date));
    }
    $this->view->form = $bugReportForm;
}Finally, you need delete bugs. This is probably the easiest part of the CRUD functionality. You simply add a method to the model and an action to the controller. It does not need a view because it will redirect to the list once it has deleted the record.
I always create a method in the model to delete records. For a simple example like this, it is not really necessary, but it is a good habit to get into. The reason I always create this method is when you delete items from a relational database, you often have to perform various validation and cleanup tasks. This method gives you a good place to keep them. You also wouldn't want to delete rows outside of the model class for encapsulation reasons.
The deleteBug() method first needs to find the row that is passed to it. If it finds this row, then it needs to delete it. Otherwise, it should throw an exception that the row was not found, as shown in Listing 4-32.
Now create the delete action in the bug controller using Zend_Tool (see Listing 4-33). Since this action does not require a view script, you can delete the script that is generated by the create action command.
The delete action will be very straightforward. It simply needs to take the ID that was passed to it and call the Bug model's deleteBug() method. Once it deletes the record, it forwards back to the list view, as shown in Listing 4-34.
In this chapter, you learned about the basics of data management with Zend Framework and added CRUD functionality to the bug form that you created in the previous chapter. This bug reporting tool served as a simple, real-life example of how Zend Framework handles data; it is not a necessary part of the CMS project, but the skills it introduced are.
[2] LAMP is Linux, Apache, MySQL, and Perl/PHP/Python. See http://en.wikipedia.org/wiki/LAMP_(software_bundle)