
Introducing the WCF Security Features
Microsoft has invested a lot of effort in guaranteeing the security in the Vista platform. Microsoft counterparts viewed its security as a weakness in the early 1990s. Since then, Microsoft has done a commendable job shrugging off that stigma. You may remember the initiative to ensure "secure code" and the "trusted access security" campaigns that Microsoft implemented to address this issue. Microsoft's objective was to educate developers so they will address security needs in the fundamental design.
Windows 2003 Server implemented security as "highest security turned on" by default. You had to downgrade the security privileges to obtain access to resources. WCF is also based on the "guilty until proven innocent" and "all user input is evil" concepts. Any distributed application is prone to many forms of malicious attacks by intruders. The modern distributed software architectures leverage public networks such as the Internet to send business-sensitive information. This information can be compromised at various locations (such as by packet sniffing on the wire, malicious systems administrators at routing destinations, and so on). Therefore, the security model for WCF needs to be comprehensive to handle all these threats. The core of WCF security is to address four important features:
Confidentiality
Is the information confidential between the sender and the receiver? This feature will ensure that "unauthorized" parties do not get the opportunity to view the message. You usually achieve this by utilizing encryption algorithms.
Integrity
This feature ensures that the receiver of the message gets the same information that the sender sends without any data tampering. You usually sign messages using digital signatures to achieve integrity.
Authentication
This is to verify who the sender is and who the receiver is. Are they known to the system or the application?
Authorization
At the authorization stage, you know who the sender or the receiver is. However, you also need to know whether they are authorized to perform the action they are requesting from the application.
These are the key features the WCF security model attempts to address. You achieve the physical implementation of addressing these issues by configuring bindings in WCF. WCF offers a rich set of binding to address these security issues. You also have the flexibility of extending or creating custom bindings to address specific security needs if necessary. In the next section, you'll investigate how to use bindings in WCF to implement security.
Security Features of Bindings
Bindings define one or more WS-* protocols that WCF supports. Every binding addresses two important aspects of messaging. These aspects are the encoding and transport of the message. Encoding defines the way messages are serialized. Transport defines the mechanisms that get the messages from the sender to the receiver. Let's look at the BasicHttpBinding binding as an example. It uses the WS-I Basic Profile XML encoding and HTTP for transport. This binding is designed to support interoperable scenarios with other platforms. Therefore, it does not implement security by default. (However, you can extend this binding to implement security by utilizing custom code.) You need to utilize WsHttpBinding or WsDualHttpBinding to implement security.
NOTE
Please consult Chapter 3 for an extensive discussion of bindings. This chapter will concentrate only on the security implications and extensions of bindings. However, it is important to note that the binary-encoded bindings (that is, Net*Binding) require WCF on both the sender and the receiver ends because of optimization and performance reasons. NetMsmqBinding is used for asynchronous scenarios. NetTcpBinding and NetNamedPipeBinding support reliable sessions and transactions.
You can also build your custom binding by utilizing the System.ServiceModel.Channels namespace. You can define security features, encoding, and serialization options that are suitable to your requirements using the classes available in this namespace. Similarly, you can also utilize the ProtectionLevel binding property to enforce integrity and confidentiality. The options available for the ProtectionLevel property are as follows:
None
Only authenticate the binding.
Sign
Ensure integrity in the transmitted data.
EncryptAndSign
Ensure both confidentially and integrity.
Protection Levels
WCF security encrypts and signs the messages by default. This could lead to "overkill" in some instances. Therefore, you can implement integrity where confidentiality is not a requirement (such as when debugging code by developers). In such cases, WCF provides the facility to set the protection level on the message. The following application file snippet illustrates how to achieve this using configuration files; the messages are required to be signed only before they are sent:
<bindings>
  <wsHttpBinding>
    <binding name="test">
      <security mode="Message">
        <message defaultProtectionLevel="Sign"/>
      </security>
    </binding>
  </wsHttpBinding>
</bindings>
Message exchange patterns (MEPs) determine how the messages are sent from the sender to the receiver. How are these message patterns implemented in WCF? Can you implement security on all these bindings for one-way and request-reply patterns? WCF does implement security support for both the MEPs. However, duplex MEP is available only in WsDuaHttpBinding, NetTcpBinding, and NetNamedPipeBinding.
How do you present your rights to WCF runtime via bindings? What are the mechanisms available in WCF to pass on your requests to access resources? These questions are answered by implementing credentials and claims in WCF. The following section will discuss what these are.
Credentials and Claims
WCF security is based on credentials. What are these credentials? A credential is an XML-compatible entity that assists the Windows runtime in identifying a user. Credentials consist of one or more claims. A claim can be a username, a digital certificate, or a custom token that specifies the holder's right to access the application. This information will assist the Windows runtime in granting or denying access to the WCF application. The Windows runtime will verify the claims by the user. Therefore, if the user is using a certificate, the runtime will inspect the certificate information and verify whether the user is who they say they are. This is the authentication concept discussed earlier. When the user is authenticated, the certificate key could be used to decrypt the data. This will fulfill the integrity feature discussed earlier. This could be followed by an authorization check that will verify whether the user has access to the data and functions of the application. Therefore, we can summarize a set of claims into the user's complete access privileges in WCF.
There are several setup claim sets in WCF (that is, certificates, usernames, Kerberos tickets, and custom tokens). They are mapped to a standard internal claim set in WCF runtime. Therefore, the user can alternate between one claim and another (that is, between the username and the custom token pair) without any issues with the Windows runtime. After the first communication with the server, the user session will commonly use a token to present the claim set information without checking for authentication, authorization, and integrity for subsequent requests. This is designed to improve response times.
NOTE
In WCF, the highest security level is activated by default. Therefore, the user needs to decrease the security levels if they want to accommodate security requirements. Also, the security model facilitates configuration-level changes without any code or runtime modifications (which is the same as reliable messaging, transaction support in WCF, and so on). Therefore, if you alter your MSMQ binding to replace with the WSHttpBinding binding, the application will seamlessly integrate with the same security context.
How do you extract claim information in WCF? How can you investigate the claim information using code? Let's examine this with the assistance of the QuickReturns Ltd. sample application.
NOTE
You will reuse the Chapter 6 code in this example. The service and client functionality will be the same. Specifically, the server will expose a security trading service, and the client will make requests to trade securities. Please consult the code that accompanies this chapter to maximize your learning experience.
The most significant code changes will be in the ExchangeService class. You will modify the code to reflect the claims the client will make to gain access to the service. Here are the steps:
Open Visual Studio 2005 (select Start
 Programs
  MS Visual Studio 2005
  Microsoft Visual Studio 2005).
Select Visual Studio Solutions
 Other Project Types, and choose Blank Solution. Name this solution WCFSecurity, and point to your preferred directory (C:PracticalWcfChapter07 in this example).
Add the ExchangeService project from Chapter 6 (right-click the WCFSecurity solution, and select Add
 Existing Project). The next step is to make some changes to the TradeSecurity code. As shown in Listing 7-1, modify the code to gain access to claim information. The rest of the class is identical to the Chapter 6 code.
Example. Adding Claim Access Code to the ExchangeService Class
public double TradeSecurity(string ticker, int quantity)
        {
            Console.WriteLine("Claim made at " + System.DateTime.Now.TimeOfDay);
									            System.ServiceModel.OperationContext opx;
									            opx = OperationContext.Current;
									            if (opx != null)
									System.IdentityModel.Policy.AuthorizationContext ctx =
									                    opx.ServiceSecurityContext.AuthorizationContext;
									                foreach (System.IdentityModel.Claims.ClaimSet cs in ctx.ClaimSets)
									Console.WriteLine("Claim Issued by : " + cs.Issuer);
									                    foreach (System.IdentityModel.Claims.Claim claim in cs)
									                    {
									                        Console.WriteLine("Claim Type - " + claim.ClaimType);
									                        Console.WriteLine("Claim Resource name - " +
									            claim.Resource);
									                        Console.WriteLine("Claim Right - " + claim.Right);
									                    }

            if (quantity < 1)
                throw new ArgumentException(
                    "Invalid quantity", "quantity");
            switch (ticker.ToLower())
            {
                case "ibm":
                    return quantity * IBM_Price;
case "msft":
                    return quantity * MSFT_Price;
                default:
                    throw new ArgumentException(
                        "Don't know - only MSFT & IBM", "ticker");
            }
        }
Initially you need to gain access to the authorization context, available from the current operation context by utilizing the ServiceSecurityContext.AuthorizationContext property. Then you go through all the ClaimSets the user is presenting to the service. These ClaimSets are comprised of individual claims. These are the claims that the client needs to present to the service to gain access to the QuickReturns Ltd. application. This claim information is printed on the console for you to read. You are printing only the ClaimType, Resource (the claim is for), and Right information for the purpose of this example. The next step is to create the host console application to host this newly modified ExchangeService class.
This example uses the self-hosting option. Create a new console project by right-clicking and selecting Solution
 Add
Add  New Project
  Console Application. Name it ClaimHost, and add it to the WCFSecurity solution. Rename the program.cs file to host.cs. You are creating a WCF self-hosted service on port 8000 on the localhost machine. You display a message to inform the service is functioning after you start the host with the host.Open() method. The code and the config file are identical to the Chapter 6
TradeServiceHost project. You will utilize the WsHttpBinding to communicate with the service endpoints. (Please refer to Listing 6-2 for the host.cs code and Listing 6-4 for the App.config file in Chapter 6 for the code.)
Console Application. Name it ClaimHost, and add it to the WCFSecurity solution. Rename the program.cs file to host.cs. You are creating a WCF self-hosted service on port 8000 on the localhost machine. You display a message to inform the service is functioning after you start the host with the host.Open() method. The code and the config file are identical to the Chapter 6
TradeServiceHost project. You will utilize the WsHttpBinding to communicate with the service endpoints. (Please refer to Listing 6-2 for the host.cs code and Listing 6-4 for the App.config file in Chapter 6 for the code.)Let's concentrate on the client that consumes this service now. Create a new console project called ClaimClient, and add it to the WCFSecurity solution. The code for the client is identical to Listing 6-5 in Chapter 6. You will also use WsHttpBinding to bind with the service endpoint. The App.config file is also identical to Listing 6-5.
Build the solution to create executables for ClaimHost and ClaimClient.
Try to execute your application. Let's run the service first. Your screen should be similar to Figure 7-1.
ClaimHost application running

The next step is to run the client. Let's navigate to the client's directory and execute the client. Your screen should look like Figure 7-2.
ClaimClient application running
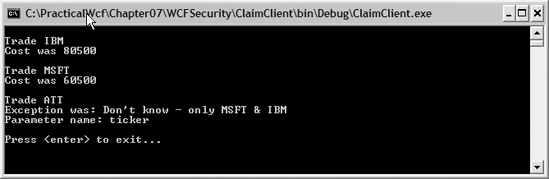
You will notice while the client was running, the ClaimHost window recorded all the claims the client was presenting over WsHttpBinding. The screen will display the Issuer for the ClaimSet and the ClaimType, Resource, and Right information for each claim. Your screen should look like Figure 7-3.
Displaying claim information at the service host console

This screen displays all the claim information to authenticate the client (the ClaimClient instance) to the service (ClaimHost). The issuer of the ClaimSet is Self in this scenario (that is, the services and the client are running on the same machine). Then you loop through all the claims one by one. You first display the ClaimType. Then you display the Resource that the claim is for, and finally, you display the Right for the resource.
You are familiar with the mechanisms the client utilizes to submit claims to WCF services. However, what are the options available to present these claims to the WCF runtime? The next section will answer this question.
Presenting Credentials and Claims to WCF
The user's credentials can be presented to the Windows runtime in one of two ways: by utilizing the transport level or by utilizing the message level. The transport level will provide the credentials as part of the message transport. This is similar to Secure Sockets Layer (SSL) communication. The transport-level protocols will verify the credentials with the Windows runtime and establish a secure session between the client and the service. However, there is no explicit security for the messages that travel utilizing the protected transport layer. Unfortunately, the transport security also terminates at the destination SSL gateway. The messages will be exposed to malicious intruders as soon as the messages exit the destination's SSL gateway. This may not be the actual hosting web server. Many companies implement SSL accelerators on proxy servers in their DMZ. This leaves the message's subject open to possible hijacking in the network between their accelerators and their servers. However, this is a common and proven security feature that the industry has utilized successfully (provided the destination organization takes steps to secure the messages as soon as the messages enter their organization).
The second option is to implement credentials at the message level, where the credentials are embedded in the message. No credentials are transported at the transport layer. The message will not be exposed to malicious hackers until the receiver can decrypt the message using a special key known to the receiver. However, this method is slower than the transport-level credentials because of the extra encryptions with messages. The message size will also be larger than the transport-level messages. The first message between the sender and receiver initiates the authentication and authorization between the two entities. The subsequent messages will have an optimized token to replace the complete credential set to counter the slow response times. This mechanism will attempt to reduce the size limitation and increase the speed of the communication. The credentials of the service and client are specified in the binding information. You can have the following options as the credential types in WCF:
None
No security is provided via the transport level or messaging level. BasicHttpBinding uses this mode by default. The rest of the other bindings do not use it. (In other words, their security mode needs to be specified explicitly.)
Transport
This uses transport-level security (that is, SSL).
Message
This uses SOAP messages to provide authentication, authorization, integrity, and confidentiality. These SOAP messages are WS-Security compliant.
Mixed mode
This uses both transport-level and message-level security. Confidentiality and integrity are delivered by the transport layer. Authentication and authorization are provided by the message level.
Both
This is available only in the NetMsmqBinding binding. This provides authentication at both the message level and the transport level.
Binding Support for Credentials
Table 7-1 lists the most common bindings and whether they support transport, message, or mixed modes.
| Binding | Transport Mode? | Message Mode? | Mixed Mode? |
|---|---|---|---|
| BasicHttpBinding | Yes | Yes | Yes |
| WsHttpBinding | Yes | Yes | Yes |
| WsDualHttpBinding | No | Yes | No |
| NetTcpBinding | Yes | Yes | Yes |
| NetNamedPipeBinding | Yes | No | No |
| NetMsmqBinding | Yes | Yes | No |
| MsmqIntegrationBinding | Yes | No | No |
You are now familiar with bindings and the modes they support. How do you set this mode in code? You change the credentials by setting the binding credentials in the binding's Mode property, which you can find in the Security property of the binding. You can also set them using the bindingCredentials property of the Binding object. Figure 7-4 illustrates the security mode being set using a WsHttpBinding at the message level.
Adding the security mode
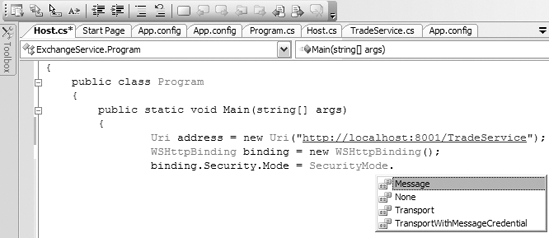
Please note that this TradeService instance is scheduled to run on port 8001. However, all the examples in this chapter will utilize port 8000 as the endpoint. In the next section, you'll look at these credential security levels in more detail with some sample code.
Transport-Level Security
Under the transport-level model, the credentials are applied at the transport level. Therefore, all the messages between the sender and the receiver are not visible to any intruders. They also work effectively on point-to-point scenarios. It is difficult to implement transport-level security when there are multiple routing mechanisms to multiple recipients. Multiple gateways will expose the messages to intruders when the message is transferred from one SSL provider to another. This feature will make the transport-level security unrealistic for non-point-to-point scenarios. However, you can use hardware accelerators to achieve quick response times under this model. Transport-level security is also considered for high throughput and faster response times because of this feature. Transport-level security provides mechanisms to authenticate both the service and the client so they adhere to confidentiality, integrity, and authorization.
CODE VERSUS CONFIGURATION FILES REGARDING SECURITYOne of the most flexible features in WCF is the ability to implement the same task by either coding explicitly or utilizing configuration files. It is helpful to use configuration files regarding WCF security. Configuration files give you the flexibility to alter the security features without recompiling the code. This is common when the security standards get superseded by the latest security offerings. However, for the purposes of the next example, you will use explicit code on the service side. The client is configured using application configuration files. This was intentionally done to illustrate the flexibility of the WCF security model. |
Transport-level security (specifically, SSL) is a proven concept and has wide acceptance in the technical community. Also, SSL hardware accelerators will expedite the message transmission speed. However, SSL supports only a subset of claim types. They are Windows authentication, digest authentication, and certificates. SSL does not support the rich WS-Security or Security Access Markup Language (SAML) token claim types in WCF. SAML tokens are a key element to achieve distributed computing security on multiple platforms. WCF offers several transport credential types:
None
This is for anonymous clients. This setting specifies that the client does not need to present any credentials to the service. This is not recommended.
Basic
This specifies Windows basic authentication. This is implemented according to RFC 2617 (which is available at http://www.rfc-editor.org).
Digest
This specifies digest authentication between the service and the client.
Ntlm
This specifies NTLM authentication.
Windows
This specifies Windows Kerberos authentication.
Certificate
This performs client authentication using an X.509 certificate.
How do you implement transport-level security in WCF? In the following exercise, you will reuse the TradeServiceHost and WcfSimpleClient projects from Chapter 6. Specifically, you will add these two projects to the WCFSecurity solution. Here are the steps:
Add the TradeServiceHost project and the WcfSimpleClient project to the WCFSecurity solution (right-click the WCFSecurity solution, and select Add
 Existing Project).
You need to modify the code for the host.cs file in the TradeServiceHost project. Listing 7-2 shows the code.
Example. Code for host.cs File in the TradeServiceHost Project
using System;
using System.Collections.Generic;
using System.ServiceModel;
using System.Text;
namespace ExchangeService
{
    public class Program
    {
        public static void Main(string[] args)
        {
                Uri address = new Uri("https://localhost:8000/TradeService");
									                WSHttpBinding binding = new WSHttpBinding();
									                binding.Security.Mode = SecurityMode.Transport;
									                // The clients of the service do not need to be
									                // authenticated - since we are running over SSL
									                binding.Security.Transport.ClientCredentialType =
									              HttpClientCredentialType.None;
									                Type contract = typeof(ExchangeService.ITradeService);
									                ServiceHost host = new ServiceHost(typeof(TradeService));
									                host.Open()

                Console.WriteLine("The WCF Management trading
               service is available.");
                Console.ReadKey();
        }
    }
}
Initially you will create a new URI and WsHttpBinding for your endpoint. It is important to know that the URI is an HTTPS endpoint—not an HTTP endpoint. This is to utilize SSL as a transport credential provider. Then you set the binding security credential as Transport. You are not requesting the client to authenticate over SSL. Therefore, you utilize HttpClientCredentialType.None. Finally, you specify the contract and then activate the service. Now you'll work on the client code.
You are not altering any code with the WcfSimpleClient project's program.cs file. You are utilizing the App.config file of the project to enhance the security. Therefore, the App.config file of the WcfSimpleClient project should be similar to Listing 7-3. (Please note that you are altering code only for the TradeService functions. The TradeServiceMonitoring functions are not altered as a result of this exercise. The code is similar, so we won't reiterate the same concepts. Therefore, we have deleted the monitoring code from the sample code for this chapter.)
Example. App.config File for the WcfSimpleClient Project
<?xml version="1.0" encoding="utf-8"?>
<configuration>
  <system.serviceModel>
    <client>
  <endpoint
									address="https://localhost:8000/TradeService"
									        binding="wsHttpBinding"
									        bindingConfiguration="TradeWsHttpBinding"
									        contract="ExchangeService.ITradeService"
									        name="TradeServiceConfiguration" />

    </client>

<bindings>
									<wsHttpBinding>
									        <binding name="TradeWsHttpBinding">
									          <security mode="Transport">
									            <transport clientCredentialType="None"/>
									          </security>
									        </binding>
									      </wsHttpBinding>
									    </bindings>

  </system.serviceModel>
</configuration>
This is similar to the Chapter 6 TradeService configuration file. However, you have altered the binding information to facilitate transport security. You have declared a new TradeWsHttpBinding section to detail the binding information. This section details that you are utilizing Transport as the security mode and you are not requiring the client to authenticate against the service.
Compile and build the TradeServiceHost and WcfSimpleClient projects. Navigate to the service, and start the service first. You will see an image similar to Figure 7-1. Then start the client, and you will be presented with Figure 7-2. You will also view the ClaimSet activity in the service console. (This looks like Figure 7-3. However, the claim data will be different because you are utilizing transport-level security.)
The next step is to examine what message-level security provides in WCF.
Message-Level Security
Message-level security relies on the message itself to secure the communication. The authentication, authorization, integrity, and confidentiality are met using the message data. It does not rely on the transport mechanism to provide any security for it. The message mode provides an end-to-end security context for the enterprise. This also works well with multiple hops and multiple recipients. Since you are not relying on the transport layer, you can expand the message headers to implement multiple security assertions. This is a great tool to build federation services. Persistence of message headers will enable you to utilize integrity and confidentiality checks. You can also have rich claim support (in SAML, Custom Tokens, WS-Trust, and so on) in message-level security. You can utilize multiple authentication mechanisms at different gateways. However, the downside is the message can get considerably larger because of additional header information. Therefore, the throughput will be slower than transport-level security. Message-level security also provides mechanisms to authenticate and authorize both services and clients. You can also implement message-level security as utilizing binding by explicit coding or configuration files. What are the message credential types available in WCF? They are as follows:
None
There is no message-level security with the client and the service. Therefore, the user is anonymous.
Windows
The client uses Windows credentials in SOAP messages to authenticate with the service.
Username
The client needs to be authenticated using the username credentials. However, WCF does not provide any encryption to protect the username credentials.
Certificate
The client needs to be authenticated using an X.509 certificate.
Infocard
The client is required to be authenticated using Windows CardSpace—formally known as Infocard. This is discussed later in the "Windows CardSpace" section.
You'll now learn how to implement message-level security in WCF. You will modify the TradeServiceHost service to utilize a certificate to authenticate the service to the Windows runtime. You will call this certificate localhost. You will also use another certificate called WCFUser to authenticate the client to the service. Therefore, when the message leaves the client, it will be protected until it gets to the service machine's Windows runtime. You will use explicit code (as opposed to configuration files) in both the client and the service for this exercise. Here are the steps:
The first step is to create two certificates for localhost and WCFUser. Let's use makecert.exe to create these certificates:
makecert.exe -sr CurrentUser -ss My -a sha1 -n CN=localhost -sky
exchange  -pe
certmgr.exe -add -r CurrentUser -s My -c -n localhost -r CurrentUser -s
TrustedPeople
This command will make a certificate called localhost in the store location CurrentUser and use the store name My. Then the following command adds the newly created certificate to the TrustedPeople container. These steps will ensure that you have a valid service certificate. The client will also be based on the local machine for the purposes of this example. Therefore, the following command will create the WCFUser certificate for the client to authenticate against the server:
makecert.exe -sr CurrentUser -ss My-a sha1 -n CN=WCFUser -sky
exchange  -pe
certmgr.exe -add -r CurrentUser -s My -c -n WCFUser -r CurrentUser -s
TrustedPeople
You can verify that the certificate is created without any errors by invoking the MMC console for certificates by selecting Start
 Run and typing certmgr.msc and pressing Enter. (Or you can select Start
  Run and type mmc. Then press Enter, and select Add Certificates snap in if the view is not available.) Your screen should look like Figure 7-5.
Verifying certificates for the service and the client authentication

Listing 7-4 shows the code for the host.cs file on TradeServiceHost.
Example. host.cs File of TradeServiceHost Project
using System;
using System.Collections.Generic;
using System.ServiceModel;
using System.Text;
using System.Security.Cryptography.X509Certificates;

namespace ExchangeService
{
    public class Program
    {
        public static void Main(string[] args)
        {
                Uri address = new Uri("http://localhost:8001/TradeService");
                WSHttpBinding binding = new WSHttpBinding();
// Set the security mode
									binding.Security.Mode = SecurityMode.Message;
									                binding.Security.Message.ClientCredentialType =
									                    MessageCredentialType.Certificate
Type contract = typeof(ExchangeService.ITradeService);
									                ServiceHost host = new ServiceHost(typeof(TradeService));
									                host.AddServiceEndpoint(contract, binding, address);
									                //Set the service certificate.
									                host.Credentials.ServiceCertificate.SetCertificate(
									                    StoreLocation.CurrentUser,
									                    StoreName.My,
									                    X509FindType.FindBySubjectName,
									                    "localhost");
									                host.Open()

                Console.WriteLine("The WCF Management trading service
 is available.");
                Console.ReadKey();
        }
    }
}
You need to import System.Security.Cryptography.X509Certificates into the code first. This is mandatory to utilize certificate-related functions. Then you will specify the client credential type as Certificate. Then you set the certificate for the service. You can use this certificate to authenticate against the Windows runtime to validate that the service has access to the business data. Therefore, even if an intruder hacks into the service, the intruder will not be able to access business information without the certificate information. You'll now see how the client is implemented.
Modify the program.cs file in the WcfSimpleClient project according to Listing 7-5.
Example. Client Code to Run TradeServiceHost Service
using System;
using System.ServiceModel.Channels;
using System.ServiceModel;
using System.Security.Cryptography.X509Certificates;

namespace ExchangeService
{
    class Program
    {
        static void Main( string[] args )
        {
            EndpointAddress address =
                new EndpointAddress("http://localhost:8001/TradeService");
            WSHttpBinding binding = new WSHttpBinding();
           binding.Security.Mode = SecurityMode.Message;
									binding.Security.Message.ClientCredentialType =
									                MessageCredentialType.Certificate
System.ServiceModel.ChannelFactory<ITradeService> cf =
                new ChannelFactory<ITradeService>(binding,address);
cf.Credentials.ClientCertificate.SetCertificate(
									                StoreLocation.CurrentUser,
									                StoreName.My,
									                X509FindType.FindBySubjectName,
									                "WCFUser");
									            cf.Credentials.ServiceCertificate.SetDefaultCertificate(
									                StoreLocation.CurrentUser,
									                StoreName.My,
									                X509FindType.FindBySubjectName,
									                "localhost");
            ITradeService proxy = cf.CreateChannel();

        //.... The rest of the code is unchanged.
        }
    }
}
The code is similar to service code. You will initially set the security mode as Message. Then you inform the runtime that the clients will be using certificates to authenticate themselves. Then you set the WCFUser certificate credentials. You use the SetCertificate method that specifies the StoreLocation and StoreName and ask the certificate to be found using the subject name. This certificate will give all the information a client will need to present to the server to authenticate. Then you try to set the server's certificate. Please remember the service needs to authenticate itself to the Windows runtime. This certificate information can be available only to a valid client. Therefore, you minimize the risk of an intruder getting access to the service by presenting a single compromised client certificate under this design (that is, the client needs to know both the client and server certificate information to gain access to the service).
The App.config file for both the service and the client is simple. They have to only define the endpoint of the TradeService since you have implemented the security settings in the code. Compile and build the service and the client. First run the service and then the client. You should view images that are similar to Figure 7-1, Figure 7-2, and Figure 7-3.
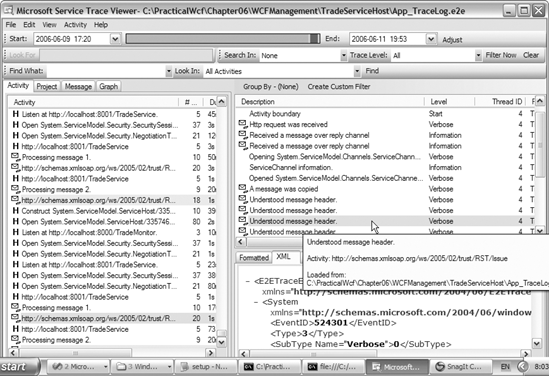
It is also beneficial to analyze the messages that travel between the service and the client. You will be able to view the encrypted message data using SvcTraceView.exe. (Please consult Chapter 6 to learn about SvcTraceViewer.exe, how to implement it, and its location.) This view will enable the user to analyze every message that transfers between the client and the service. This will enhance your knowledge regarding the "under-the-covers" WCF implementation to facilitate message-level security. (Figure 7-6 illustrates how the certificate claim set in the message header was understood by the server authentication system.) The next step is to learn about mixed mode security.
Using SvcTraceView.exe to analyze message-level security
Mixed Mode
Transport mode credentials are faster than message level. However, they have limited credential types (like no SAML tokens). The message-level security has a richer set of credentials. However, because of XML serialization and deserialization, they are slower than transport mode. Will it be possible to have a rich set of claims and at the same time be optimized to the wire? WCF does offer this flexibility, called mixed mode. Mixed mode offers the rich claims and federation advantages message-level offers. It supports multifactor authentication using rich credentials. You can also use custom tokens in mixed mode. Therefore, mixed mode offers a secure and fast option to transmit data between services and clients.
Mixed mode will perform the integrity and confidentiality at the transport level. The authentication and the authorization takes place at the message level. You can use the TransportWithMessageCredential property (refer to Figure 7-4) to specify mixed mode with the binding.Security.Mode setting. It is simple to implement mixed code. The service code will be similar to Listing 7-6.
Example. Implementing Mixed Mode in the Service
using System;
using System.Collections.Generic;
using System.ServiceModel;
using System.Text;
using System.Security.Cryptography.X509Certificates;
namespace ExchangeService
{
public class Program
{
public static void Main(string[] args)
{
Uri address = new Uri("https://localhost:8001/TradeService");
WSHttpBinding binding = new WSHttpBinding();
// Set the security mode
binding.Security.Mode = SecurityMode.TransportWithMessageCredential;
binding.Security.Message.ClientCredentialType =
MessageCredentialType.Certificate;
Type contract = typeof(ExchangeService.ITradeService);
ServiceHost host = new ServiceHost(typeof(TradeService));
host.AddServiceEndpoint(contract, binding, address);
// The rest of the code is the same |
It is important to note that the URL is HTTPS. You are relying on SSL for integrity and confidentiality. Then you set the security mode to TransportWithMessageCredential and dictate that the client must authenticate using a certificate to gain access to the service. The program.cs file of the WcfSimpleClient will look like Listing 7-7.
Example. Client Code for Mixed Mode Security
using System.Net
namespace ExchangeService
{
    class Program
    {
        static void Main( string[] args )
        {
			ServicePointManager.ServerCertificateValidationCallback =
							delegate(Object obj, X509Certificate certificate,
							                X509Chain chain, SslPolicyErrors errors)
							                { return true;
							                    // Need to implement company specific validations
							                }

            EndpointAddress address =
                new EndpointAddress("https://localhost:8001/TradeService");
            WSHttpBinding binding = new WSHttpBinding();
binding.Security.Mode =
							                SecurityMode.TransportWithMessageCredential;
							            binding.Security.Message.ClientCredentialType =
							                MessageCredentialType.Certificate;
System.ServiceModel.ChannelFactory<ITradeService> cf =
new ChannelFactory<ITradeService>(binding,address);
cf.Credentials.ClientCertificate.SetCertificate(
StoreLocation.CurrentUser,
StoreName.My,
X509FindType.FindByThumbprint,
"43 5d 98 05 7b a1 73 87 66 ca 89 a1 ae 0e 3c 76 2c 12 2b 95") |
You need to inform the client to initiate the SSL session with the service first. You do this by utilizing the ServicePointManager.ServerCertificateValidationCallback delegate. This delegate will initialize the SSL connection. The implementation of this delegate can be different from company to company. (That is, every organization will have a different matrix to validate their digital claims. Usually the code will check for a CN=CompanyName entry.) Therefore, you have returned true for the purpose of this example. Then you set the security mode and set the client certificate. This time you are using the FindByThumbprint function (as opposed to FindByName). You can derive the thumbprints from accessing the properties of the certificate. Build the server and client, and your output should be similar to Figures 7-1, 7-2, and 7-3.
Do you need to authenticate and authorize every time you send a SOAP message to the server? Doesn't this consume valuable resources to verify the identity of the sender when the sender has already established their identity using claims? Yes, you can counter this scenario in WCF. It is commonly referred to as secure sessions.
A secure session is established when the first call is made from the client to the server. The client will initially present the credentials to the service to authenticate. The service will create a special token that will be inserted into the SOAP header to keep track of the client's credentials. The subsequent requests from the client will present this special token to the service to gain access to the service. Please view Listing 7-7 in SvcTraceViewer.exe, and navigate through the messages between the client and the server. You will find this token information in the header of the SOAP message.
We have discussed security mainly on point-to-point client and service scenarios. However, large enterprises employ thousands of employees. Certificates are commonly used to authenticate these employees. Does this mean every employee needs to know all the other employees' certificate information to send a message to one of them? What happens when one enterprise merges with another enterprise? Does the enterprise A employee need to know all the enterprise B certificate details? You can use federated credentials to address this issue in WCF.
Federated Security Model in WCF
The concept of federated credentials is important in the modern age of distributed computing. It means you can delegate the "verification" of a claim to a third party. The third party will in return give you a key that you can use to communicate with a service. The third party (commonly referred to as the broker or security token service) has a trust relationship with the service. Therefore, whenever a client comes with a certified credential from the broker, the service will trust the client's credentials. Figure 7-7 explains this scenario further.
Federated credentials in action

You are assuming the client employee is using a certificate in this scenario. The employee may use multiple devices (such as a computer, PDA device, and so on) to make a request of a service that is part of an external enterprise. The employee will first liaise with the certificate broker by providing the employee certificate stating his intentions of consuming the service. The broker will analyze the certificate and confirm its authenticity. Then the broker will issue an SAML-based credential set to the user to communicate with the service. This SAML token is signed with the special key from the broker to validate the token. This key is known only to the service that the employee is attempting to consume.
The client uses the SAML token in the request SOAP message header to send a request to the service. The service will analyze the SAML token and verify it is from a known certificate broker to the service (that is, using the special key from the broker). The service will check the trust relationship between the service and the certificate broker and proceed with the client request.
Federated credentials play a key role in future security implementations. You can use the flexibility of proving one set of credentials to a user (that is, certificate by the client) and converting it to another set of credentials (an SAML token) in many scenarios to add value to the customers. You also have the flexibility of altering your internal security mechanisms. (That is, the client can provide a username password pair to replace the certificate.) However, your external implementation of the claims will not be changed. The broker will still create the same SAML token with the username-password pair. You do this by utilizing WSFederationHttpBinding in WCF. In the next section, you will investigate authorization.
Authorization in WCF
How can you authorize users in WCF? What is the difference between authentication and authorization in the first place? You should also take this opportunity to investigate some of the .NET Framework offerings to handle authentication and authorization. You'll first investigate the fundamentals of the .NET application security model.
NOTE
The .NET Framework offers a rich set of APIs (based in the IPrincipal interface) to manage authentication and authorization. The objective is to create a specialized, static (once only) Principal object after the Active Directory authentication is approved. This Principal object will securely live on the client's desktop and attend authorization requests during the life span of the user session. The authorization and authentication are provided by different providers. This provider information is usually based in configuration files. The objective is to seamlessly transfer the user context from one authorization or authentication provider without any code changes. This is the best practice in the industry. It is important to note that WCF explicitly does not address authentication and authorization. What WCF does is evaluate claims and authenticate and authorize these claim sets utilizing .NET Framework to satisfy the security requirements.
IPrincipal Interface
The cornerstones of the .NET security models are the IPrincipal interfaces. The developers will build an object that extends IPrincipal (usually called Principal) to incorporate the authentication and authorization information regarding a specific user. So, what is the difference between authentication and authorization?
Authentication
This is the process of identifying users. This is commonly performed by requesting a username-password pair or a certificate to verify the authenticity of the user. (Who is the user? Can you identify him as a manager in your system?)
Authorization
Authorization happens after authentication. Authorization addresses the question, what does the user have access to after the authentication? Therefore, the user is already known to the Windows runtime, but what can the user access in the system? For example, does the user have delete access for a purchase order if the user logs in as a Manager role?
Authentication is mainly performed by API calls to Active Directory. Active Directory will return with a confirmation of the identity or deny the access to the system. The authorization details in most cases have to be explicitly coded. Authorization in .NET is based on roles. (For example, the SeniorManager role can delete the purchase orders as opposed to the Manager role, which is not entitled for the same privilege.) Therefore, before you delete a purchase order, you need to check whether the currently logged in user has the SeniorManager role attached to his profile. You do this by utilizing the IsInRole function. The code is similar to the following code. This code queries whether the currently logged in user has the SeniorManager role to proceed to delete the purchase order:
Using System;
Using System.Threading;
if (Thread.CurrentPrincipal.IsInRole("SeniorManager"))
{
    // Code to delete purchase order
}
You can also utilize .NET Framework security to force the runtime to authorize entities at the function level. The following code snippet will demand the permissions you need to check before the user can execute the function. This is an alternative to the IsInRole feature of .NET Framework.
using System.Security.Permissions;
...
[PrincipalPermission(SecurityAction.Demand, Role="SeniorManager")]
public bool DeletePurchaseorder()
{
    // Code to delete purchase order.
}
It is important to understand the basics of authentication and authorization to grasp the security concepts in WCF and the .NET Framework. You'll now learn how to implement authorization in WCF security. Here are the steps:
The first step is to add the authorization information to the ExchangeService module. You have not enforced any authorization check to the code until now. You have relied on the Windows authentication models to authenticate the user. As soon as the authentication is valid, the client has been able to extract the stock prices from the service. Let's tie authorization to the user's Windows credentials. Let's assume you are going to restrict the access to the TradeService function only to administrators for the purposes of this example. Therefore, any other user who is not part of the Administrator group will not be able to access the service. Code this logic into ExchangeService, as illustrated in Listing 7-8. The code explicitly instructs the .NET runtime to check whether the user has the Administrator role.
Example. ExchangeService Code to Include Authorization
using System;
using System.ServiceModel;
using System.Security.Permissions;

namespace ExchangeService
{
// Same code as before

    public class TradeService : ITradeService, ITradeMonitor
    {
        const double IBM_Price = 80.50D;
        const double MSFT_Price = 30.25D;

		// Invokers must belong to the Administrator group.
											[PrincipalPermission(SecurityAction.Demand,
											Role = "Administrators")

        public double TradeSecurity(string ticker, int quantity)
        {
            Console.WriteLine("Claim made at " + System.DateTime.Now.TimeOfDay);
            System.ServiceModel.OperationContext opx;
            opx = OperationContext.Current;
        // Same code as before
Now you'll create the service. Add a new project to the WCFSecurity solution by right-clicking the WCFSecurity solution and then selecting Add
 New Project. Call it AuthAuditHost. (Note that we will use the same project to illustrate auditing in the next section.) The code will be similar to Listing 7-9.
Example. Code for the host.cs File of the AuthAuditHost Project
using System;
using System.ServiceModel;
using System.ServiceModel.Description;

namespace ExchangeService
{
    public class Program
    {
        public static void Main(string[] args)
        {
            Uri address = new Uri("http://localhost:8001/TradeService");
            WSHttpBinding binding = new WSHttpBinding();
            Type contract = typeof(ExchangeService.ITradeService);
            ServiceHost host = new ServiceHost(typeof(TradeService));
            host.AddServiceEndpoint(contract, binding, address);
            host.Open();
            Console.WriteLine("The WCF Management trading service is available.");
            Console.ReadKey();
        }
    }
}
Create the client now. Create a new console application called AuthAuditClient, and add it to the WCFSecurity solution. (Right-click the WCFSecurity solution, and select Add
 New Project.) The code will be similar to Listing 7-10. You have added some exception management code to address the exceptions that arise if the user does not have the Administrator role.
Example. Code for the program.cs File of the AuthAuditClient Project
using System;
using System.ServiceModel.Channels;
using System.ServiceModel;

namespace ExchangeService
{
    class Program
    {
        static void Main( string[] args )
        {
            EndpointAddress address =
               new EndpointAddress("http://localhost:8001/TradeService");
            WSHttpBinding binding = new WSHttpBinding();
            System.ServiceModel.ChannelFactory<ITradeService> cf =
                new ChannelFactory<ITradeService>(binding, address);
            ITradeService proxy = cf.CreateChannel();

            Console.WriteLine("
Trade IBM");
            try
            {
                double result = proxy.TradeSecurity("IBM", 1000);
                Console.WriteLine("Cost was " + result);
                Console.WriteLine("
Trade MSFT");
                result = proxy.TradeSecurity("MSFT", 2000);
                Console.WriteLine("Cost was " + result);
            }
			catch (Exception ex)
            {
                Console.Write("Can not perform task. Error Message -
									                " + ex.Message)

            }
            Console.WriteLine("

Press <enter> to exit...");
            Console.ReadLine();
        }
    }
}
Now execute the service, and then run the application. Your screen should be similar to Figure 7-1. You are currently logged in as an user who is part of the Administrator group. Therefore, when you execute the client, you should get a screen that looks like Figure 7-8.
AuthAuditClient running under an Administrator account

We'll now show how to run this client under a different account without administrator access. We have created a user account called chris without any administrator access. Use the following runas command to run the client:
runas /noprofile /user:localchris AuthAuditClient.exe
This command will execute AuthAuditClient.exe as the chris account. You don't need to load the user profile in this case. Therefore, you use the /noprofile flag. You will be asked to enter the password for the chris account. When the password is validated, the client will run under the new account (chris). Your screen should look like Figure 7-9.
Using the runas command to execute the client under a different account

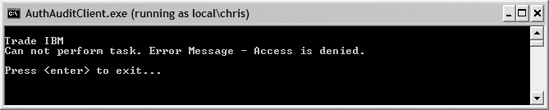
Since the chris account is not part of the Administrator group (and does not have a role to reflect it in his Windows profile), you should see the screenshown in Figure 7-10, which denies access to the service.
Access denied for users who do not have the correct roles
Authorization Options for One-Way Communications
What happens when the message is only one-way? Is there a requirement to authorize the sender at the receiver's end? Does WCF support this functionality? WCF implements mechanisms that do not require any negotiation between the client and service. WCF supports a one-shot, or non-negotiated, security mode for this purpose. To support one-shot security mode, you will set the flag negotiateServiceCredential="false" at the message level. However, you need to provide the valid credentials to authenticate the request. This will ensure the message initiated from a trusted source even when the authorization is ignored at the service end. The following configuration snippet illustrates this feature:
<bindings>
  <wsHttpBinding>
    <binding name="test">
      <security mode="Message">
			<message negotiateServiceCredential="false"
						               clientCredentialType="Certificate"/>

      </security>
    </binding>
  </wsHttpBinding>
</bindings>
<behaviors>
  <behavior name="credentialConfig">
    <clientCredentials>
      <!-- Other configuration not shown. -->
	  <serviceCertificate storeLocation="CurrentUser" storeName="My"
						      x509FindType="FindBySubjectDistinguishedName"
						      findValue="localhost"/>

    </clientCredentials>
  </behavior>
</behaviors>
WCF also implements multiple membership providers to assist developers to integrate to Active Directory, LDAP, and custom directory structures. You can also create your own providers to suit specialized scenarios. WCF also ships with multiple role provider classes that will reduce developer effort.
You have investigated the WCF security model, authentication, and authorization in detail. Is there a way to track these security-related features and their impact? Does WCF offer any "auditing" mechanisms to trace and monitor security activities? You'll investigate this feature in the next section.
Auditing for Security Features in WCF
WCF has a rich set of utilities to address security auditing. It leverages the Event Viewer extensively to record any security-related events. You also have access to a rich set of APIs that will enable you to directly communicate with the Event Viewer. Let's examine how you can leverage Event Viewer now. You will enhance AuthAuditHost to record all the security events to the Event Viewer. Listing 7-11 shows the code for the modified host.cs file of AuthAuditHost.
Example. Enabling Auditing for the Service
using System;
using System.ServiceModel;
using System.ServiceModel.Description;

namespace ExchangeService
{
    public class Program
    {
        public static void Main(string[] args)
        {
            Uri address = new Uri("http://localhost:8001/TradeService");
            WSHttpBinding binding = new WSHttpBinding();
            Type contract = typeof(ExchangeService.ITradeService);
            ServiceHost host = new ServiceHost(typeof(TradeService));
            host.AddServiceEndpoint(contract, binding, address);

// Add Auditing to the service
							            ServiceSecurityAuditBehavior auditProvider =
							                host.Description.Behaviors.Find<ServiceSecurityAuditBehavior>();
							            if (auditProvider == null)
							            {
							                auditProvider = new ServiceSecurityAuditBehavior();
							            }
							            auditProvider.AuditLogLocation = AuditLogLocation.Application;
							            auditProvider.MessageAuthenticationAuditLevel =
							                AuditLevel.SuccessOrFailure;
							            auditProvider.ServiceAuthorizationAuditLevel =
							                AuditLevel.SuccessOrFailure;
host.Description.Behaviors.Add(auditProvider);
host.Open();
Console.WriteLine("The WCF Management trading service is available.");
Console.ReadKey();
}
}
} |
Auditing is available in WCF using ServiceSecurityAuditBehavior from the System.ServiceModel.Description namespace. First, you will check whether the audit provider is available in the current context. If it doesn't already exist, then you create an audit provider using the ServiceSecurityAuditBehavior class. Next, you specify the audit location. This can be either the application or the security log. Choose the application log for this example. Then you can specify the audit level. The available levels are success, failure, or both success and failure. For this example, you have chosen the success and failure option. You can set these levels utilizing the MessageAuthenticationAuditLevel and ServiceAuthorizationAuditLevel properties for the message. Therefore, all the auditing information regarding messages and server authorization will be recorded on the server's application log. Finally, you add the audit provider to the service.
Now run the service and then the client. Let's check whether the information is available in the event log. Choose Start ![]() My Computer
My Computer ![]() Manage
Manage ![]() System Tools
System Tools ![]() Event Viewer, or choose Start
Event Viewer, or choose Start ![]() Run
Run ![]() Eventvwr.exe. Look under the application log under the event log, as shown in Figure 7-11.
Eventvwr.exe. Look under the application log under the event log, as shown in Figure 7-11.
Application log entries for the AuthAuditHost service

Let's look at one log entry to verify the details. Your screen should be similar to Figure 7-12. This entry describes a successful authorization call made by the AuthAuditClient instance.
Audit log entry that illustrates successful authorization by AuthAuditClient

You are familiar with WCF authentication, authorization, and auditing concepts. However, how do you manage your identity in a distributed environment? Is it fair to conclude that the identities are all scattered over a public network such as the Internet? Some of our traces of information are stored in Amazon accounts. You might also have a .NET Passport identity to sign on to your Hotmail account. Are you also an avid buyer and seller on eBay? Is there a way you can leverage all these identities at once? Or can you present your "platinum" eBay identity to convince Amazon to upgrade your membership? Can you manage them centrally? Does WCF offer a programming model to make this vision reality?
Windows CardSpace
Windows CardSpace (formally known as Infocard) is a specialized metaidentity system that helps you manage multiple identities. Let's take an everyday example. You use your driver's license to prove you are a valid driver on the road. How do you prove this to a suspecting police officer who inquires about it? You show them a valid driver's license card. In addition, you use a card to prove to a bank teller (or an automatic teller machine) that you have the correct credentials to withdraw money. Basically, you use different physical cards to accommodate different situations. However, you need a mechanism to manage all the cards every day. A common practice in real life is to store all the cards in a wallet. Therefore, the wallet becomes your identity metasystem in everyday life.
You can use the same concept in distributed computing. The .NET Passport system has provided an e-mail and password to validate you. This is similar to the bank providing a card to withdraw cash. Similarly, your employees will give the administration digital signature that proves they are legitimate employees of the company. How do you store all these identities and extract them on demand to facilitate your needs? The answer lies in Windows CardSpace. Windows CardSpace is an identity metasystem that handles multiple identities for you.
What are cards, and how many types of cards does CardSpace support? A card is a digitally signed entity that illustrates the user's claims to a system. In general, two types of cards exist. The first one is the personal card. The user can issue these cards to herself. This is similar to picking an e-mail address and a password for a Passport account. The second type is the provider card. This is provided by a trusted third party. These cannot be issued by the user. This is similar to a bank card that is given to you by the bank.
How Does Windows CardSpace Work?
How does CardSpace work? You may remember that your bank card has a magnetic strip on the back of it. This stores your claims to the bank system. Windows CardSpace works the same. CardSpace converts your personal or provider cards to special tokens and validates their authenticity on demand. Different card types can use different tokens for this validations. Personal cards use SAML 1.1 token types by default. However, provider card tokens are subject to an organization's technology preferences.
NOTE
It is important to note that CardSpace is based on the WS-Trust specification. Windows CardSpace can use SAML tokens to validate the user claims. However, it is not restricted to SAML tokens. It can use any custom token algorithm as long the server can validate the credentials. It is also important to understand that the Windows CardSpace is the Microsoft implementation of an identity metasystem. There are other identity metasystems based on other software platforms. Currently, CardSpace is available only on the Windows XP SP2, Windows Server 2003 SP1, and Windows Vista operating systems.
So, what is the difference between Passport and CardSpace? Microsoft .NET Passport is one identity system that enables access to multiple Microsoft resources. Passport's single identity system fits well into the metaidentity system of CardSpace. Microsoft has also indicated that a metaidentity system that supports multiple identities is more scalable than attempting to dominate the world with a single identity system (such as Passport). CardSpace is already supported by a Java toolkit from Ping Identity (a major player in the identity space). Therefore, you can utilize multiple identities on heterogeneous platforms to validate identities with CardSpace.
How do you know whether you have CardSpace available on your system? How can you set up cards that can be used by WCF for authentication purposes? You can verify the CardSpace availability by navigating to Start ![]() Control Panel. You should have an icon called Digital Identities. Your screen should be similar to Figure 7-13.
Control Panel. You should have an icon called Digital Identities. Your screen should be similar to Figure 7-13.
When you double-click the icon, you will see a wizard that will assist you in creating personal cards and exporting provider cards. This interface acts as a container for all your identity needs. Now you'll learn how to use CardSpace in WCF.
Checking whether you have CardSpace available on your system

Enabling Windows CardSpace in WCF
CardSpace is one of the client credential types in WCF. CardSpace is used as an authentication mechanism on the client side. The server receives a token that summarizes the claims in the personal or provider card. However, the service side must authenticate itself using an X.509 certificate to verify the authenticity. (In other words, since you rely on a foreign token, you need to make sure you have valid credentials at the server side to execute the service.) Therefore, the configuration file will be similar to Listing 7-12.
Example. Service Application Configuration File for CardSpace Support
<?xml version="1.0" ?>
<configuration>
    <system.serviceModel>
    <services>
            <service type="ExchangeService.TradeService"
                <endpoint address="http://localhost:8000/TradeMonitor"
                    binding="wsFederationBinding"
                    bindingConfiguration="wsBinding"
                    contract="ExchangeService.ITradeMonitor">
                    <identity>
                        <certificateReference findValue="localhost"
                            storeLocation="LocalMachine"
                            storeName="TrustedPeople"
                            x509FindType="FindBySubjectName" />
                    </identity>
                </endpoint>
            </service>
        </services>
    </system.serviceModel>
<wsHttpBinding>
<binding configurationName="wsBinding">
<security mode="Message">
<message clientCredentialType="IssuedToken" />
</security>
</binding>
</wsHttpBinding>
</configuration> |
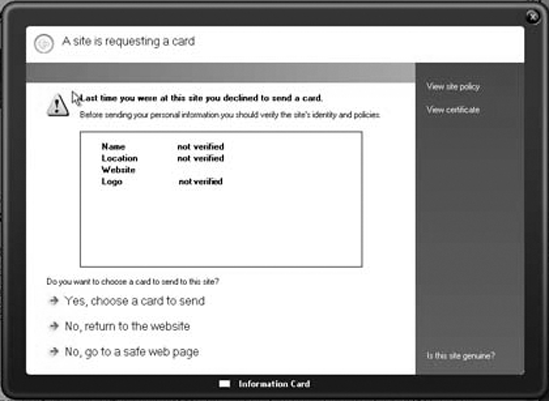
You will use the localhost certificate to authenticate the service to the server runtime. CardSpace also utilizes the message-level security. The client credential type you use to utilize CardSpace is called IssuedToken. The client configuration file is similar to the server configuration file. The client credential type will be IssuedToken, and you need to make sure you set the server certificate properly. When the service is built and running, you can execute the client instance. When the client instance runs for the first time, Figure 7-14 will appear. This is a confirmation request by the Windows CardSpace instance to proceed to choose a card to communicate with the service. You can navigate through the wizards and select the appropriate card to use.
Then you can select the CardSpace controller you prefer to use to communicate with the service. The Windows runtime will then create a special token that embeds the user's claims and sends it to the service to validate the claims. Figure 7-15 shows the dialog box that requests the user to select one of his cards to submit to the service.
Windows CardSpace request dialog box
Selecting a CardSpace card to authenticate against the service
