
![]()
SQL Server provides triggers as a means of executing T-SQL code in response to database object, database, and server events. SQL Server 2012 implements three types of triggers: classic T-SQL Data Manipulation Language (DML) triggers, which fire in response to INSERT, UPDATE, and DELETE events against tables; Data Definition Language (DDL) triggers, which fire in response to CREATE, ALTER, and DROP statements; and logon triggers, which fire in response to LOGON events. DDL triggers can also fire in response to some system SPs that perform DDL-like operations.
Triggers are a form of specialized SP, closely tied to your data and database objects. In the past, DML triggers were used to enforce various aspects of business logic, such as foreign key and other constraints on data, and other more complex business logic. Cascading declarative referential integrity (DRI) and robust check constraints in T-SQL have supplanted DML triggers in many areas, but they are still useful in their own right. In this chapter, we will discuss how triggers work, how to use them, and when they are most appropriate. We will also discuss DDL triggers and explore their use.
DML Triggers
DML triggers are composed of T-SQL code that is executed (fired) in response to an INSERT, an UPDATE, a DELETE, or a MERGE statement on a table or view. DML triggers are created via the CREATE TRIGGER statement, which allows you to specify the following details about the trigger:
- The name of the trigger, which is the identifier you can use to manage the trigger. You can specify a two-part name for a trigger (schema and trigger name), but the schema must be the same as the schema for the table on which the trigger executes.
- The table or view on which the trigger executes.
- The triggering events, which can be any combination of INSERT, UPDATE, and DELETE. The triggering events indicate the type of events that the trigger fires in response to.
- The AFTER/FOR or INSTEAD OF indicators, which determine whether the trigger is fired after the triggering statement completes or the trigger overrides the firing statement.
- Additional options like the ENCRYPTION and EXECUTE AS clauses, which allow you to obfuscate the trigger source code and specify the context that the trigger executes under, respectively.
![]() Note DML triggers have some restrictions on their creation that you should keep in mind. For one, DML triggers cannot be defined on temporary tables. Also, DML triggers cannot be declared on table variables. Finally, only INSTEAD OF triggers can be used on views.
Note DML triggers have some restrictions on their creation that you should keep in mind. For one, DML triggers cannot be defined on temporary tables. Also, DML triggers cannot be declared on table variables. Finally, only INSTEAD OF triggers can be used on views.
In addition to the CREATE TRIGGER statement, SQL Server provides an ALTER TRIGGER statement to modify the definition of a trigger, a DROP TRIGGER statement to remove an existing trigger from the database, and DISABLE TRIGGER and ENABLE TRIGGER statements to disable and enable a trigger, respectively.
Listing 6-1 shows how to disable and enable a specific trigger named HumanResources.EmployeeUpdateTrigger, or all triggers on an object, namely, the HumanResources.Employee table. It also contains an example of how to query the sys.triggers catalog view to return all the disabled triggers in the current database.
Listing 6-1. Disabling and Enabling Triggers
DISABLE TRIGGER HumanResources.EmployeeUpdateTrigger
ON HumanResources.Employee;

SELECT
    name,
    OBJECT_SCHEMA_NAME(parent_id) +  '.'  + OBJECT_NAME(parent_id) as Parent
FROM sys.triggers
WHERE is_disabled = 1;

ENABLE TRIGGER HumanResources.EmployeeUpdateTrigger
ON HumanResources.Employee;

-- disabling and enabling all triggers on the object
DISABLE TRIGGER ALL ON HumanResources.Employee;
ENABLE TRIGGER ALL ON HumanResources.Employee;
Disabling triggers can greatly improve performance when you apply a batch of modifications on a table. Just make sure, of course, that the rules enforced by the trigger(s) will be checked in another way, for instance manually after the batch. Do not forget also to re-enable the trigger at the end of the process.
MULTIPLE TRIGGERS
You can create multiple triggers on the same objects. They will fire in no specific order. If you really need to, you can only specify that a trigger will be fired first or last, by using the sp_settriggerorder system stored procedure. For example:
EXEC sp_settriggerorder @triggername = 'MyTrigger', @order = 'first', @stmttype = 'UPDATE';
That sets the MyTrigger trigger to fire first on UPDATE actions. However, in our opinion, this shouldn’t be used, because it adds uneccessary complexity in your database. If you really need to manage precedence between trigger actions, it is best to consolidate what you need to do in the same trigger.
When to Use DML Triggers
Way back in the day, using triggers was the best (and in some cases only) way to perform a variety of tasks, such as ensuring cascading DRI, validating data before storing it in tables, auditing changes, and enforcing complex business logic. Newer releases of SQL Server have added functionality that more closely integrates many of these functions into the core database engine. For instance, in most cases, you can use SQL Server’s built-in cascading DRI to ensure referential integrity and check constraints for simple validations during insert and update operations. DML triggers are still a good choice when simple auditing tasks or validations with complex business logic are required.
![]() Note DRI is not enforced across databases. What this means is that you cannot reference a table in a different database in a DRI/foreign key constraint. Because they can reference objects such as tables and views in other databases, triggers are still a good option when this type of referential integrity enforcement is necessary.
Note DRI is not enforced across databases. What this means is that you cannot reference a table in a different database in a DRI/foreign key constraint. Because they can reference objects such as tables and views in other databases, triggers are still a good option when this type of referential integrity enforcement is necessary.
Listing 6-2 shows a very simple trigger that we created on the HumanResources.Employee table of the AdventureWorks database. The HumanResources.EmployeeUpdateTrigger trigger simply updates the ModifiedDate column of the HumanResources.Employee table with the current date and time whenever a row is updated.
Listing 6-2. HumanResources.EmployeeUpdateTrigger Code
CREATE TRIGGER HumanResources.EmployeeUpdateTrigger
ON HumanResources.Employee
AFTER UPDATE
NOT FOR REPLICATION
AS
BEGIN
    -- stop if no row was affected
    IF @@ROWCOUNT = 0 RETURN
    -- Turn off "rows affected" messages
    SET NOCOUNT ON;

    -- Make sure at least one row was affected
    -- Update ModifiedDate for all affected rows
    UPDATE HumanResources.Employee
    SET ModifiedDate = GETDATE()
    WHERE EXISTS
     (
        SELECT 1
        FROM inserted i
        WHERE i.BusinessEntityID = HumanResources.Employee.BusinessEntityID
    );
END;
The first part of the CREATE TRIGGER statement defines the name of the trigger and specifies that it will be created on the HumanResources.Employee table. The definition also specifies that the trigger will fire after rows are updated, and the NOT FOR REPLICATION keywords prevent replication events from firing the trigger.
CREATE TRIGGER HumanResources.EmployeeUpdateTrigger
ON HumanResources.Employee
AFTER UPDATE
NOT FOR REPLICATION
The body of the trigger starts by checking the number of rows affected by the UPDATE with the @@ROWCOUNT system function. This is an optimization that skips the body of the trigger if no rows were affected.
Whenever any trigger is fired, it is implicitly wrapped in the same transaction as the DML statement that fired it. This has big performance and concurrency implications. What it means is that whatever your trigger does, it should do it as quickly and efficiently as possible. The T-SQL statements in your trigger body can potentially create locks in your database, a situation that you want to minimize. It is not unheard of for inefficient triggers to cause blocking problems. You should also minimize the amount of work done inside the trigger and optimize the operations it has to perform. It also means that a ROLLBACK TRANSACTION statement in the trigger will roll back DML statements executed in the trigger, as well as the original DML statement that fired the trigger (and all explicit transactions in which the statement is run, for that matter).
Checking @@ROWCOUNT at the start of your trigger helps ensure that your triggers are efficient. If @@ROWCOUNT is 0, it means that no rows were affected by the original DML statement that fired the trigger. Then your trigger has no work to do, and you can skip the rest.
-- stop if no row was affected
IF @@ROWCOUNT = 0 RETURN
![]() Caution Checking @@ROWCOUNT must be done at the very first line. Any previous action in the trigger, even SET commands, could change the @@ROWCOUNT value.
Caution Checking @@ROWCOUNT must be done at the very first line. Any previous action in the trigger, even SET commands, could change the @@ROWCOUNT value.
Next, the trigger turns off the rows affected messages via the SET NOCOUNT ON statement.
-- Turn off "rows affected" messages
SET NOCOUNT ON;
![]() Note Using SET NOCOUNT ON is not strictly required in triggers, but it prevents superfluous rows affected messages from being generated by the trigger. Some older database drivers—and even some more recent ones, such as certain Java Database Connectivity (JDBC) drivers—can get confused by these extra messages, so it’s not a bad idea to disable them in the body of your triggers. Any SET statement can be used in the body of a trigger. The statement remains in effect while the trigger executes and reverts to its former setting when the trigger completes.
Note Using SET NOCOUNT ON is not strictly required in triggers, but it prevents superfluous rows affected messages from being generated by the trigger. Some older database drivers—and even some more recent ones, such as certain Java Database Connectivity (JDBC) drivers—can get confused by these extra messages, so it’s not a bad idea to disable them in the body of your triggers. Any SET statement can be used in the body of a trigger. The statement remains in effect while the trigger executes and reverts to its former setting when the trigger completes.
The IF statement contains an UPDATE statement that sets the ModifiedDate column to the current date and time when rows in the table are updated. An important concept of trigger programming is to be sure that you account for multiple row updates. It’s not safe to assume that a DML statement will update only a single row of your table, because triggers in SQL Server are set-oriented and fire only once for a statement. There is no such thing as a per-row trigger in SQL Server. In this trigger, the UPDATE statement uses the EXISTS predicate in the WHERE clause to ensure that ModifiedDate is updated for every row that was affected. It accomplished this by using the inserted virtual table, described in the “The inserted and deleted Virtual Tables” sidebar in this section.
-- Update ModifiedDate for all affected rows
UPDATE HumanResources.Employee
SET ModifiedDate = GETDATE()
WHERE EXISTS
(
    SELECT 1
    FROM inserted i
    WHERE i.BusinessEntitylD = HumanResources.Employee.BusinessEntitylD
);
THE INSERTED AND DELETED VIRTUAL TABLES
A DML trigger needs to know which rows were affected by the DML statement that fired it. The inserted and deleted virtual tables fulfill this need. When a trigger fires, SQL Server populates the inserted and deleted virtual tables and makes them available within the body of the trigger. These two virtual tables have the same structure as the affected table and contain the data from all affected rows.
The inserted table contains all rows inserted into the destination table by an INSERT statement. The deleted table contains all rows deleted from the destination table by a DELETE statement. For UPDATE statements, the rows are treated as a DELETE followed by an INSERT, so that the pre-UPDATE-affected rows are stored in the deleted table, while the post-UPDATE-affected rows are stored in the inserted table.
The virtual tables are read-only and cannot be modified directly. The example in Listing 6-2 uses the inserted virtual table to determine which rows were affected by the UPDATE statement that fired the trigger. The trigger updates the ModifiedDate column for every row in the HumanResources.Employee table with a matching row in the inserted table. We’ll be using the inserted and deleted virtual tables in other sample code in this section.
Testing the trigger is as simple as using SELECT and UPDATE. The sample in Listing 6-3 changes the marital status of employees with BusinessEntityID numbers 1 and 2 to M (for “married”).
Listing 6-3. Testing HumanResources.EmployeeUpdateTrigger
UPDATE HumanResources.Employee
SET MaritalStatus = 'M'
WHERE BusinessEntityID IN (1, 2);

SELECT BusinessEntityID, NationalIDNumber, MaritalStatus, ModifiedDate
FROM HumanResources.Employee
WHERE BusinessEntityID IN (1, 2);
The results, shown in Figure 6-1 demonstrate that the UPDATE statement fired the trigger and properly updated the ModifiedDate for the two specified rows.
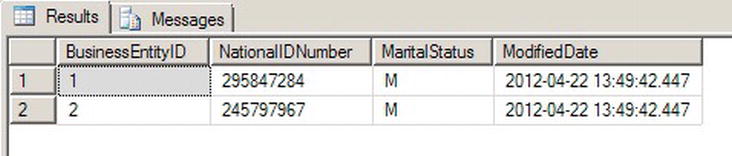
Figure 6-1. Updated Marital Status for Two Employees
![]() Caution If the RECURSIVE_TRIGGERS database option is turned on in the AdventureWorks database, HumanResources.EmployeeUpdateTrigger will error out with a message that the “nesting limit has been exceeded.” This is caused by the trigger recursively firing itself after the UPDATE statement in the trigger is executed. Use ALTER DATABASE AdventureWorks SET RECURSIVE_TRIGGERS OFF to turn off recursive triggers and ALTER DATABASE AdventureWorks SET RECURSIVE_TRIGGERS ON to turn the option back on. The default is OFF. Recursive triggers will be covered later in this chapter.
Caution If the RECURSIVE_TRIGGERS database option is turned on in the AdventureWorks database, HumanResources.EmployeeUpdateTrigger will error out with a message that the “nesting limit has been exceeded.” This is caused by the trigger recursively firing itself after the UPDATE statement in the trigger is executed. Use ALTER DATABASE AdventureWorks SET RECURSIVE_TRIGGERS OFF to turn off recursive triggers and ALTER DATABASE AdventureWorks SET RECURSIVE_TRIGGERS ON to turn the option back on. The default is OFF. Recursive triggers will be covered later in this chapter.
Another common use for DML triggers is auditing DML actions against tables. The primary purpose of DML auditing is to maintain a record of changes to the data in your database. This might be required for a number of reasons, including regulatory compliance or to fulfill contractual obligations.
USING CHANGE DATA CAPTURE INSTEAD
Since SQL Server 2008 you can use the feature known as Change Data Capture (CDC), which provides built-in auditing functionality. The CDC functionality provides another option for logging DML actions against tables. While CDC functionality is beyond the scope of this book, we recommend looking into this option before deciding which method to use when you need DML logging functionality, because it might be a more elegant and efficient way to audit data changes. One of the drawbacks with triggers is the performance impact they have on DML operations, especially because they are part of the DML transaction. CDC is much faster because it acts as a separate process that tracks the database transaction log for modifications applied to the audited tables and writes changes to internal change tables, using the same technology as transaction replication. Moreoever, CDC can also automatically prune the audit tables to keep their size manageable.
CDC is available only in Enterprise Edition.
The first step to implementing DML auditing is to create a table to store your audit information. Listing 6-4 creates just such a table.
Listing 6-4. DML Audit Logging Table
CREATE TABLE dbo.DmlActionLog (
    EntryNum int IDENTITY(1, 1) PRIMARY KEY NOT NULL,
    SchemaName sysname NOT NULL,
    TableName sysname NOT NULL,
    ActionType nvarchar(10) NOT NULL,
    ActionXml xml NOT NULL,
    LoginName sysname NOT NULL,
    ApplicationName sysname NOT NULL,
    HostName sysname NOT NULL,
    ActionDateTime datetime2(0) NOT NULL DEFAULT (SYSDATETIME())
);
GO
The dbo.DmlActionLog table in Listing 6-4 will store information for each DML action performed against a table, including the name of the schema and table against which the DML action was performed, the type of DML action performed, XML-formatted snapshots of the before and after states of the rows affected, and additional information to identify who performed the DML action and when the action was performed. Once the audit logging table is created, it’s time to create a trigger to log DML actions. This is shown in Listing 6-5.
Listing 6-5. DML Audit Logging Trigger
CREATE TRIGGER HumanResources.DepartmentChangeAudit
ON HumanResources.Department
AFTER INSERT, UPDATE, DELETE
NOT FOR REPLICATION
AS
BEGIN
    -- stop if no row was affected
    IF @@ROWCOUNT = 0 RETURN

    -- Turn off "rows affected" messages
    SET NOCOUNT ON;
    DECLARE @ActionType nvarchar(10), @ActionXml xml;

    -- Get count of inserted rows
    DECLARE @inserted_count int = (
        SELECT COUNT(*)
        FROM inserted
    );
    -- Get count of deleted rows
    DECLARE @deleted_count int = (
        SELECT COUNT(*)
        FROM deleted
    );

    -- Determine the type of DML action that fired the trigger
    SET @ActionType = CASE
        WHEN (@inserted_count > 0) AND (@deleted_count = 0) THEN N'insert'
        WHEN (@inserted_count = 0) AND (@deleted_count > 0) THEN N'delete'
        ELSE N'update'
    END;

    -- Use FOR XML AUTO to retrieve before and after snapshots of the changed
    --  data  in  XML  format
    SELECT @ActionXml = COALESCE
    (
        (
            SELECT  *
            FROM  deleted
            FOR  XML  AUTO
        ),  N'  <  deleted/>'
    )  +  COALESCE
    (
        (
            SELECT  *
            FROM  inserted
            FOR  XML  AUTO
        ),  N'  <  inserted/>'
    );

    -- Insert a row for the logged action in the audit logging table
    INSERT INTO dbo.DmlActionLog
    (
        SchemaName,
        TableName,
        ActionType,
        ActionXml,
        LoginName,
        ApplicationName,
        HostName
    )
    SELECT
        OBJECT_SCHEMA_NAME(@@PROCID, DB_ID()),
        OBJECT_NAME(t.parent_id, DB_ID()),
        @ActionType,
        @ActionXml,
        SUSER_SNAME(),
        APP_NAME(),
        HOST_NAME()
    FROM sys.triggers t
    WHERE t.object_id = @@PROCID;
END;
GO
The trigger in Listing 6-5 is created on the HumanResources.Department table, although it is written in such a way that the body of the trigger contains no code specific to the table it’s created on. This means you can easily modify the trigger to work as-is on most tables.
The HumanResources.DepartmentChangeAudit trigger definition begins with the CREATE TRIGGER statement, which names the trigger and creates it on the HumanResources.Department table. It also specifies that the trigger should fire after INSERT, UPDATE, or DELETE statements are performed against the table. Finally, the NOT FOR REPLICATION clause specifies that replication events will not cause the trigger to fire.
CREATE TRIGGER HumanResources.DepartmentChangeAudit
ON HumanResources.Department
AFTER INSERT, UPDATE, DELETE
NOT FOR REPLICATION
The trigger body begins by checking the number of rows affected by the DML statement with the @@ROWCOUNT function. The trigger skips the remainder of the statements in the body if no rows were affected.
-- stop if no row was affected
IF @@ROWCOUNT = 0 RETURN
The main body of the trigger begins with an initialization that turns off extraneous rows affected messages, declares local variables, and gets the count of rows inserted and deleted by the DML statement from the inserted and deleted virtual tables.
-- Turn off "rows affected" messages
SET NOCOUNT ON;

DECLARE @ActionType nvarchar(10), @ActionXml xml;

-- Get count of inserted rows
DECLARE @inserted_count int = (
    SELECT COUNT(*)
    FROM inserted
);
-- Get count of deleted rows
DECLARE @deleted_count int = (
    SELECT COUNT(*)
    FROM deleted
);
Since the trigger is logging the type of DML action that caused it to fire (an INSERT, a DELETE, or an UPDATE action), it must determine the type programmatically. This can be done by applying the following simple rules to the counts of rows from the inserted and deleted virtual tables:
- If at least one row was inserted but no rows were deleted, the DML action was an insert.
- If at least one row was deleted but no rows were inserted, the DML action was a delete.
- If at least one row was deleted and at least one row was inserted, the DML action was an update.
These rules are applied in the form of a CASE expression, as shown in the following:
    -- Determine the type of DML action that fired the trigger
    SET @ActionType = CASE
        WHEN (@inserted_count > 0) AND (@deleted_count = 0) THEN N'insert'
        WHEN (@inserted_count = 0) AND (@deleted_count > 0) THEN N'delete'
        ELSE N'update'
    END;
The next step in the trigger uses the SELECT statement’sFOR XML AUTO clause to generate XML-formatted before and after snapshots of the affected rows. FOR XML AUTO is useful because it automatically uses the source table name as the XML element name—in this case inserted or deleted. The FOR XML AUTO clause automatically uses the names of the columns in the table as XML attributes for each element. Because the inserted and deleted virtual tables have the same column names as this affected table, you don’t have to hard-code column names into the trigger. In the resulting XML, the < deleted > elements represent the before snapshot and the < inserted > elements represent the after snapshot of the affected rows.
-- Use FOR XML AUTO to retrieve before and after snapshots of the changed
--  data  in  XML  format
SELECT @ActionXml = COALESCE
(
    (
        SELECT  *
        FROM  deleted
        FOR  XML  AUTO
    ),  N'  <  deleted/>'
)  +  COALESCE
(
    (
        SELECT  *
        FROM  inserted
        FOR  XML  AUTO
    ),  N'  <  inserted/>'
);
![]() Tip The DML audit logging trigger was created to be flexible so that you could use it with minimal changes on most tables. However, there are some circumstances where it might require use of additional options or more extensive changes to work with a given table. As an example, if your table contains a varbinary column, you have to use the FOR XML clause’s BINARY BASE64 directive (FOR XML, BINARY BASE64).
Tip The DML audit logging trigger was created to be flexible so that you could use it with minimal changes on most tables. However, there are some circumstances where it might require use of additional options or more extensive changes to work with a given table. As an example, if your table contains a varbinary column, you have to use the FOR XML clause’s BINARY BASE64 directive (FOR XML, BINARY BASE64).
The final step in the trigger inserts a row representing the logged action into the dbo.DmlActionLog table. Several SQL Server metadata functions—like @@PROCID, OBJECT_SCHEMA_NAME(), and OBJECT_NAME(), as well as the sys.triggers catalog view—are used in the INSERT statement to dynamically identify the current trigger procedure ID, and the schema and table name information. Also, functions like SUSER_SNAME(), APP_NAME(), and HOST_NAME() allow you to retrieve useful audit information on the execution context. Again, this means that almost nothing needs to be hard-coded into the trigger, making it easier to use the trigger on multiple tables with minimal changes.
-- Insert a row for the logged action in the audit logging table
INSERT INTO dbo.DmlActionLog
(
    SchemaName,
    TableName,
    ActionType,
    ActionXml,
    LoginName,
    ApplicationName,
    HostName
)
SELECT
    OBJECT_SCHEMA_NAME(@@PROCID, DB_ID()),
    OBJECT_NAME(t.parent_id, DB_ID()),
    @ActionType,
    @ActionXml,
    SUSER_SNAME(),
    APP_NAME(),
    HOST_NAME()
FROM sys.triggers t
WHERE t.object_id = @@PROCID;
![]() Tip SQL Server includes several metadata functions, catalog views, and dynamic management views and functions that are useful for dynamically retrieving information about databases, database objects, and the current state of the server. We will describe more of these useful T-SQL functions and views as they’re encountered in later chapters.
Tip SQL Server includes several metadata functions, catalog views, and dynamic management views and functions that are useful for dynamically retrieving information about databases, database objects, and the current state of the server. We will describe more of these useful T-SQL functions and views as they’re encountered in later chapters.
You can easily verify the trigger with a few simple DML statements. Listing 6-6 changes the name of the AdventureWorks Information Services department to Information Technology, and then inserts and deletes a Customer Service department. The results are shown in Figure 6-2.
Listing 6-6. Testing the DML Audit Logging Trigger
UPDATE HumanResources.Department SET Name = N'Information Technology'
WHERE DepartmentId = 11;
INSERT INTO HumanResources.Department
(
    Name,
    GroupName
)
VALUES
(
    N'Customer Service',
    N'Sales and Marketing'
);

DELETE
FROM HumanResources.Department
WHERE Name = N'Customer Service';

SELECT
    EntryNum,
    SchemaName,
    TableName,
    ActionType,
    ActionXml,
    LoginName,
    ApplicationName,
    HostName,
    ActionDateTime
FROM dbo.DmlActionLog;

Figure 6-2. Audit Logging Results
The FOR XML AUTO-generated ActionXml column data deserves a closer look. As we mentioned earlier in this section, the FOR XML AUTO clause automatically generates element and attribute names based on the source table and source column names. The UPDATE statement in Listing 6-6 generates the ActionXml entry shown in Figure 6-3. Note that we’ve formatted the XML for easier reading, but we have not changed the content.

Figure 6-3. The ActionXml Entry Generated by the UPDATE Statement
A commonly asked question is “How do you pass parameters to triggers?” The short answer is you can’t. Because they are automatically fired in response to events, SQL Server triggers provide no means to pass parameters. If you need to pass additional data to a trigger, you do have a couple of options available, however. The first option is to create a table, which the trigger can then access via SELECT queries. The advantage to this method is that the amount of data your trigger can access is effectively unlimited. A disadvantage is the additional overhead required to query the table within your trigger.
Another option, if you have small amounts of data to share with your triggers, is to use the CONTEXT_INFO function. You can assign up to 128 bytes of varbinary data to the CONTEXT_INFO for the current session through the SET CONTEXT_INFO statement. This statement accepts only a variable or constant value—no other expressions are allowed. After you’ve set the CONTEXT_INFO for your session, you can access it within your trigger via the CONTEXT_INFO() function. The disadvantage of this method is the small amount of data you can store in the CONTEXT_INFO. Keep these methods in mind, as you may one day find that you need to pass information into a trigger from a batch or SP.
SQL Server supports triggers firing other triggers through the concept of nested triggers. A nested trigger is simply a trigger that is fired by the action of another trigger, on the same or a different table. Triggers can be nested up to 32 levels deep. We would advise against nesting triggers deeply, however, since the additional levels of nesting will affect performance. If you do have triggers nested deeply, you might want to reconsider your trigger design. Nested triggers are turned on by default, but you can turn them off with the sp_configure statement, as shown in Listing 6-7.
Listing 6-7. Turning Off Nested Triggers
EXEC sp_configure 'nested triggers', 0;
RECONFIGURE;
GO
Set the nested triggers option to 1 to turn nested triggers back on. This option affects only AFTER triggers. INSTEAD OF triggers can be nested and will execute regardless of the setting. Triggers can also be called recursively. There are two types of trigger recursion:
- Direct recursion: Occurs when a trigger performs an action that causes it to recursively fire itself.
- Indirect recursion: Occurs when a trigger fires another trigger (which can fire another trigger, etc.), which eventually fires the first trigger.
Direct and indirect recursion of triggers applies only to triggers of the same type. As an example, an INSTEAD OF trigger that causes another INSTEAD OF trigger to fire is direct recursion. Even if a different type of trigger is fired between the first and second firing of the same trigger, it is still considered direct recursion. For example, if one or more AFTER triggers are fired between the first and second firings of the same INSTEAD OF trigger, it is still considered direct recursion. Indirect recursion occurs when a trigger of the same type is called between firings of the same trigger.
You can use the ALTER DATABASE statement’s SET RECURSIVE_TRIGGERS option to turn direct recursion of AFTER triggers on and off, as shown in Listing 6-8. Turning off direct recursion of INSTEAD OF triggers requires that you also set the nested triggers option to 0, as shown previously in Listing 6-7.
Listing 6-8. Turning Off Recursive AFTER Triggers
ALTER DATABASE AdventureWorks SET RECURSIVE_TRIGGERS OFF;
Actions taken with an INSTEAD OF trigger will not cause it to fire again. Instead, the INSTEAD OF trigger will perform constraint checks and fire any AFTER triggers. As an example, if an INSTEAD OF UPDATE trigger on a table is fired, and during the course of its execution performs an UPDATE statement against the table, the UPDATE will not fire the INSTEAD OF trigger again. Instead the UPDATE statement will initiate constraint check operations and fire AFTER triggers on the table.
![]() Caution Nested and recursive triggers should be used with care, since nesting and recursion that’s too deep will cause your triggers to throw exceptions. You can use the TRIGGER_NESTLEVEL() function to determine the current level of recursion from within a trigger.
Caution Nested and recursive triggers should be used with care, since nesting and recursion that’s too deep will cause your triggers to throw exceptions. You can use the TRIGGER_NESTLEVEL() function to determine the current level of recursion from within a trigger.
The UPDATE() and COLUMNS_UPDATED() Functions
Triggers can take advantage of two system functions, UPDATE() and COLUMNS_UPDATED(), to tell you which columns are affected by the INSERT or UPDATE statement that fires the trigger in the first place. UPDATE() takes the name of a column as a parameter and returns true if the column is updated or inserted, and false otherwise. COLUMNS_UPDATED() returns a bit pattern indicating which columns are affected by the INSERT or UPDATE statement.
In case of an UPDATE, affected means that the column is present in the statement, not that the value of the column effectively changed. There is only one way to know if the value of a column really changed: by comparing the content of the deleted and inserted virtual tables. You can adapt the query example below to do that with your trigger.
SELECT i.ProductId, d.Color as OldColor, i.Color as NewColor
FROM deleted as d
JOIN inserted as i ON d.ProductId = i.ProductId
    AND COALESCE(d.Color, '') <> COALESCE(i.Color, ''),
This fragment is designed to be part of a trigger that could be created on the Production.Product table. The JOIN condition associates lines from the deleted and inserted tables on the primary key column and adds a non-equi join condition (joining on difference rather than on equivalence) on the Color column, to keep only rows where the Color value was changed. The COALESCE() function allows us to take into account the possibility of a NULL being present in the previous or new value.
Getting back to the UPDATE() and COLUMNS_UPDATED() functions, the sample trigger in Listing 6-9 demonstrates the use of triggers to enforce business rules. In this example, the trigger uses the UPDATE function to determine if the Size or SizeUnitMeasureCode has been affected by an INSERT or UPDATE statement. If either of these columns is affected by an INSERT or UPDATE statement, the trigger checks to see if a recognized SizeUnitMeasureCode was used. If so, the trigger converts the Size to centimeters. The trigger recognizes several SizeUnitMeasureCode values, including centimeters (CM), millimeters (MM), and inches (IN).
Listing 6-9. Trigger to Enforce Standard Sizes
CREATE TRIGGER Production.ProductEnforceStandardSizes
ON Production.Product
AFTER INSERT, UPDATE
NOT FOR REPLICATION
AS
BEGIN
    -- Make sure at least one row was affected and either the Size or
    -- SizeUnitMeasureCode column was changed
    IF (@@ROWCOUNT > 0) AND (UPDATE(SizeUnitMeasureCode) OR UPDATE(Size))
    BEGIN
        -- Eliminate "rows affected" messages
        SET NOCOUNT ON;
        -- Only accept recognized units of measure or NULL
        IF EXISTS
        (
            SELECT 1
            FROM inserted
            WHERE NOT
                ( SizeUnitMeasureCode IN (N'M', N'DM', N'CM', N'MM', N'IN')
                    OR SizeUnitMeasureCode IS NULL
                )
            )
        BEGIN
            -- If the unit of measure wasn't recognized raise an error and roll back
            -- the transaction
            RAISERROR ('Invalid Size Unit Measure Code.', 10, 127);
            ROLLBACK TRANSACTION;
        END
        ELSE
        BEGIN
            -- If the unit of measure is a recognized unit of measure then set the
            -- SizeUnitMeasureCode to centimeters and perform the Size conversion
            UPDATE Production.Product
            SET SizeUnitMeasureCode = CASE
                    WHEN Production.Product.SizeUnitMeasureCode IS NULL THEN NULL ELSE N'CM'                     END,
                Size = CAST (
                    CAST ( CAST(i.Size AS float) *
                        CASE i.SizeUnitMeasureCode
                            WHEN N'M' THEN 100.0
                            WHEN N'DM' THEN 10.0
                            WHEN N'CM' THEN 1.0
                            WHEN N'MM' THEN 0.10
                            WHEN N'IN' THEN 2.54
                        END
                    AS int
                    ) AS nvarchar(5)
                )
            FROM inserted i
            WHERE Production.Product.ProductID = i.ProductID
            AND i.SizeUnitMeasureCode IS NOT NULL;
        END;
    END;
END;
GO
The first part of the trigger definition gives the trigger its name, Production.ProductEnforceStandardSizes, and creates it on the Production.Product table. It is specified as an AFTER INSERT, UPDATE trigger and is declared as NOT FOR REPLICATION.
CREATE TRIGGER Production.ProductEnforceStandardSizes
ON Production.Product
AFTER INSERT, UPDATE
NOT FOR REPLICATION
The code in the body of the trigger immediately checks @@ROWCOUNT to make sure that at least one row was affected by the DML statement that fired the trigger, and uses the UPDATE function to ensure that the Size or SizeUnitMeasureCode columns were affected by the DML statement:
IF (@@ROWCOUNT > 0)
AND (UPDATE(SizeUnitMeasureCode) OR UPDATE(Size)) BEGIN
• • •
END;
Once the trigger has verified that at least one row was affected and the appropriate columns were modified, the trigger sets NOCOUNT ON to prevent the rows affected messages from being generated by the trigger. The IF EXISTS statement checks to make sure that valid unit-of-measure codes are used. If not, the trigger raises an error and rolls back the transaction.
-- Eliminate "rows affected" messages
SET NOCOUNT ON;
-- Only accept recognized units of measure or NULL
IF EXISTS
(
    SELECT 1
    FROM inserted
    WHERE NOT
        ( SizeUnitMeasureCode IN (N'M', N'DM', N'CM', N'MM', N'IN')
            OR SizeUnitMeasureCode IS NULL
        )
    )
BEGIN
    -- If the unit of measure wasn't recognized raise an error and roll back
    -- the transaction
    RAISERROR ('Invalid Size Unit Measure Code.', 10, 127);
    ROLLBACK TRANSACTION;
END
![]() Tip The ROLLBACK TRANSACTION statement in the trigger rolls back the transaction and prevents further triggers from being fired by the current trigger. Two error messages will be received by the client: the one raised by RAISERROR(), and the error 3609 or 3616, warning that the transaction ended in the trigger.
Tip The ROLLBACK TRANSACTION statement in the trigger rolls back the transaction and prevents further triggers from being fired by the current trigger. Two error messages will be received by the client: the one raised by RAISERROR(), and the error 3609 or 3616, warning that the transaction ended in the trigger.
If the unit-of-measure validation is passed, the SizeUnitMeasureCode is set to centimeters and the Size is converted to centimeters for each inserted or updated row.
BEGIN
    -- If the unit of measure is a recognized unit of measure then set the
    -- SizeUnitMeasureCode to centimeters and perform the Size conversion
    UPDATE Production.Product
        SET SizeUnitMeasureCode = CASE
            WHEN Production.Product.SizeUnitMeasureCode IS NULL THEN NULL ELSE N'CM' END,
            Size = CAST (
                CAST ( CAST(i.Size AS float) *
                    CASE i.SizeUnitMeasureCode
                        WHEN N'M' THEN 100.0
                        WHEN N'DM' THEN 10.0
                        WHEN N'CM' THEN 1.0
                        WHEN N'MM' THEN 0.10
                        WHEN N'IN' THEN 2.54
                    END
                AS int
            ) AS nvarchar(5)
        )
    FROM inserted i
    WHERE Production.Product.ProductID = i.ProductID
    AND i.SizeUnitMeasureCode IS NOT NULL;
END;
This trigger enforces simple business logic by ensuring that standard-size codes are used when updating the Production.Product table and converting the Size values to centimeters. To test the trigger, you can perform updates of existing rows in the Production.Product table. Listing 6-10 updates the sizes of the products with ProductID 680 and 780 to 600 millimeters and 22.85 inches, respectively. The results, with the Size values automatically converted to centimeters, are shown in Figure 6-4.
Listing 6-10. Testing the Trigger by Adding a New Product
UPDATE  Production.Product
SET Size = N'600',
    SizeUnitMeasureCode = N'MM'
WHERE  ProductId  =  680;

UPDATE  Production.Product
SET Size = N'22.85',
    SizeUnitMeasureCode = N'IN'
WHERE  ProductId  =  706;

SELECT  ProductID,
    Name,
    ProductNumber,
    Size,
    SizeUnitMeasureCode
FROM  Production.Product
WHERE ProductID IN (680, 706);

Figure 6-4. The Results of the Production.ProductEnforceStandardSizes Trigger Test
While the UPDATE() function accepts a column name and returns true if the column is affected, the COLUMNS_UPDATED() function accepts no parameters and returns a varbinary value with a single bit representing each column. You can use the bitwise AND operator (&) and a bit mask to test which columns are affected. The bits are set from left to right, based on the ColumnID number of the columns from the sys.columns catalog view or the COLUMNPROPERTY() function.
![]() Caution The position of COLUMNS_UPDATED() is not the same as the ORDINAL_POSITION value found in the INFORMATION_SCHEMA.COLUMNS catalog view. Rely on the sys.columns.ColumnID value instead.
Caution The position of COLUMNS_UPDATED() is not the same as the ORDINAL_POSITION value found in the INFORMATION_SCHEMA.COLUMNS catalog view. Rely on the sys.columns.ColumnID value instead.
To create a bit mask, you must use 20 (1) to represent the first column, 21 (2) to represent the second column, and so on. Because COLUMNS_UPDATED() returns a varbinary result, the column indicator bits can be spread out over several bytes. To test columns beyond the first eight, like the Size and SizeUnitMeasureCode columns in the example code (columns 11 and 12), you can use the SUBSTRING function to return the second byte of COLUMNS_UPDATED() and test the appropriate bits with a bit mask of 12 (12 = 22 + 23). The sample trigger in Listing 6-9 can be modified to use the COLUMNS_UPDATED() function, as shown here:
IF (@@ROWCOUNT > 0) AND (SUBSTRING(COLUMNS_UPDATED(), 2, 1) & 12 <> 0x00)
The COLUMNS_UPDATED() function will not return correct results if the ColumnID values of the table are changed. If the table is dropped and recreated with columns in a different order, you will need to change the triggers that use COLUMNS_UPDATED() to reflect the changes. There may be specialized instances in which you’ll be able to take advantage of the COLUMNS_UPDATED() functionality, but in general we would advise against using COLUMNS_UPDATED(), and instead use the UPDATE() function to determine which columns were affected by the DML statement that fired your trigger.
Although you cannot create AFTER triggers on views, SQL Server does allow you to create INSTEAD OF triggers on your views. A trigger can be useful for updating views that are otherwise nonupdatable, such as views with multiple base tables or views that contain aggregate functions. INSTEAD OF triggers on views also give you fine-grained control, since you can control which columns of the view are updatable through the trigger. The AdventureWorks database comes with a view named Sales.vSalesPerson, which is formed by joining 11 separate tables together. The INSTEAD OF trigger in Listing 6-11 allows you to update specific columns of two of the base tables used in the view by executing UPDATE statements directly against the view.
Listing 6-11. INSTEAD OF Trigger on a View
CREATE TRIGGER Sales.vIndividualCustomerUpdate
ON Sales.vIndividualCustomer
INSTEAD OF UPDATE
NOT FOR REPLICATION
AS
BEGIN
    -- First make sure at least one row was affected
    IF @@ROWCOUNT = 0 RETURN
    -- Turn off "rows affected" messages
    SET NOCOUNT ON;
    -- Initialize a flag to indicate update success
    DECLARE @UpdateSuccessful bit = 0;

    -- Check for updatable columns in the first table
    IF UPDATE(FirstName) OR UPDATE(MiddleName) OR UPDATE(LastName)
    BEGIN
        -- Update columns in the base table
        UPDATE Person.Person
        SET FirstName = i.FirstName,
            MiddleName = i.MiddleName,
            LastName = i.LastName
        FROM inserted i
        WHERE i.BusinessEntityID = Person.Person.BusinessEntityID;

        -- Set flag to indicate success
        SET @UpdateSuccessful = 1;
    END;
    -- If updatable columns from the second table were specified, update those
    -- columns in the base table
    IF UPDATE(EmailAddress)
    BEGIN
        -- Update columns in the base table
        UPDATE Person.EmailAddress
        SET EmailAddress = i.EmailAddress
        FROM inserted i
        WHERE i.BusinessEntityID = Person.EmailAddress.BusinessEntityID;

        -- Set flag to indicate success
        SET @UpdateSuccessful = 1;
    END;
    -- If the update was not successful, raise an error and roll back the
    -- transaction
    IF @UpdateSuccessful = 0
        RAISERROR('Must specify updatable columns.', 10, 127);
END;
GO
The trigger in Listing 6-11 is created as an INSTEAD OF UPDATE trigger on the Sales.vIndividualCustomer view, as shown following:
CREATE TRIGGER Sales.vIndividualCustomerUpdate
ON Sales.vIndividualCustomer
INSTEAD OF UPDATE
NOT FOR REPLICATION
As with the previous examples in this chapter, this trigger begins by checking @@ROWCOUNT to ensure that at least one row was updated:
-- First make sure at least one row was affected
IF @@ROWCOUNT = 0 RETURN;
Once the trigger verifies that one or more rows were affected by the DML statement that fired the trigger, it turns off the rows affected messages and initializes a flag to indicate success or failure of the update operation:
-- Turn off "rows affected" messages
SET NOCOUNT ON;
-- Initialize a flag to indicate update success
DECLARE @UpdateSuccessful bit = 0;
The trigger then checks to see if the columns designated as updatable were affected by the UPDATE statement. If the proper columns were affected by the UPDATE statement, the trigger performs updates on the appropriate base tables for the view. For purposes of this demonstration, the columns that are updatable by the trigger are the FirstName, MiddleName, and LastName columns from the Person.Person table, and the EmailAddress column from the Person.EmailAddress column.
-- Check for updatable columns in the first table
IF UPDATE(FirstName) OR UPDATE(MiddleName) OR UPDATE(LastName)
BEGIN
    -- Update columns in the base table
    UPDATE Person.Person
    SET FirstName = i.FirstName,
        MiddleName = i.MiddleName,
        LastName = i.LastName
    FROM inserted i
    WHERE i.BusinessEntityID = Person.Person.BusinessEntityID;

    -- Set flag to indicate success
    SET @UpdateSuccessful = 1;
END;

-- If updatable columns from the second table were specified, update those
-- columns in the base table
IF UPDATE(EmailAddress) BEGIN
    -- Update columns in the base table
    UPDATE Person.EmailAddress
    SET EmailAddress = i.EmailAddress
    FROM inserted i
    WHERE i.BusinessEntityID = Person.EmailAddress.BusinessEntityID;

    -- Set flag to indicate success
    SET @UpdateSuccessful = 1;
END;
Finally, if no updatable columns were specified by the UPDATE statement that fired the trigger, an error is raised and the transaction is rolled back:
-- If the update was not successful, raise an error and roll back the
-- transaction
IF @UpdateSuccessful = 1
    RAISERROR('Must specify updatable columns.', 10, 127);
Listing 6-12 demonstrates a simple UPDATE against the Sales.vIndividualCustomer view with the INSTEAD OF trigger from Listing 6-11 created on it. The result is shown in Figure 6-5.
Listing 6-12. Updating a View Through an INSTEAD OF Trigger
UPDATE Sales.vIndividualCustomer
SET FirstName = N'Dave',
    MiddleName = N'Robert',
    EmailAddress = N'[email protected]'
WHERE BusinessEntityID = 1699;

SELECT BusinessEntityID, FirstName, MiddleName, LastName, EmailAddress
FROM Sales.vIndividualCustomer
WHERE BusinessEntityID = 1699;

Figure 6-5. The Result of the INSTEAD OF Trigger View Update
Since SQL Server 2005, T-SQL programmers have had the ability to create DDL triggers that fire when DDL events occur within a database or on the server. In this section, we will discuss DDL triggers, the events that fire them, and the purpose. The format of the CREATE TRIGGER statement for DDL triggers is only slightly different from the DML trigger syntax, with the major difference being that you must specify the scope for the trigger, either ALL SERVER or DATABASE. The DATABASE scope causes the DDL trigger to fire if an event of a specified event type or event group occurs within the database in which the trigger was created. ALL SERVER scope causes the DDL trigger to fire if an event of the specified event type or event group occurs anywhere on the current server.
DDL triggers can only be specified as FOR or AFTER (there’s no INSTEAD OF-type DDL trigger). The event types that can fire a DDL trigger are largely of the form CREATE, ALTER, DROP, GRANT, DENY, or REVOKE. Some system SPs that perform DDL functions also fire DDL triggers. The ALTER TRIGGER, DROP TRIGGER, DISABLE TRIGGER, and ENABLE TRIGGER statements all work for DDL triggers just as they do for DML triggers.
DDL triggers are useful when you want to prevent changes to your database, perform actions in response to a change in the database, or audit changes to the database. Which DDL statements can fire a DDL trigger depends on the scope of the trigger.
DDL EVENT TYPES AND EVENT GROUPS
DDL triggers can fire in response to a wide variety of event types and event groups, scoped at either the database or server level. The events that fire DDL triggers are largely DDL statements like CREATE and DROP, and DCL (Data Control Language) statements like GRANT and DENY. Event groups form a hierarchical structure of DDL events in logical groupings, like DDL_FUNCTION_EVENTS and DDL_PROCEDURE_EVENTS. Event groups allow you to fire triggers in response to a wide range of DDL events.
BOL has complete listings of all available DDL trigger event types and event groups, so we won’t reproduce them fully here. Just keep in mind that you can fire triggers in response to most T-SQL DDL and DCL statements. You can also query the sys.trigger_event_types catalog view to retrieve available DDL events.
With DDL triggers, you can specify either an event type or an event group, the latter of which can encompass multiple events or other event groups. If you specify an event group, any events included within that group, or within the subgroups of that group, will fire the DDL trigger.
![]() Note Creation of a DDL trigger with ALL SERVER scope requires CONTROL SERVER permission on the server. Creating a DDL trigger with DATABASE scope requires ALTER ANY DATABASE DDL TRIGGER permissions.
Note Creation of a DDL trigger with ALL SERVER scope requires CONTROL SERVER permission on the server. Creating a DDL trigger with DATABASE scope requires ALTER ANY DATABASE DDL TRIGGER permissions.
Once the DDL trigger fires, you can access metadata about the event that fired the trigger with the EVENTDATA() function. EVENTDATA() returns information such as the time, connection, object name, and type of event that fired the trigger. The results are returned as a SQL Server xml data type instance. Listing 6-13 shows a sample of the type of data returned by the EVENTDATA function.
Listing 6-13. EVENTDATA() Function Sample Data
<EVENT_INSTANCE> <EventType>CREATE_TABLE</EventType> <PostTime>
2012-04-21T17:08:28.527</PostTime> <SPID>  115</SPID>

<ServerName>SQL2012</ServerName> <LoginName>SQL2O12Rudi</LoginName>
<UserName>dbo</UserName> <DatabaseName>AdventureWorks</DatabaseName>
<SchemaName>dbo</SchemaName> <ObjectName>MyTable</ObjectName>
<ObjectType>TABLE</ObjectType> <TSQLCommand> <SetOptions ANSI_NULLS  =  "ON"

ANSI_NULL_DEFAULT  =  "ON"
ANSI_PADDING  =  "ON"
QUOTED_IDENTIFIER  =  "ON"
ENCRYPTED  =  ">FALSE" /> <  CommandText>
CREATE TABLE dbo.MyTable (i int);
</CommandText>
</TSQLCommand> </EVENT_INSTANCE>
You can use the xml data type’s value() method to retrieve specific nodes from the result. The sample DDL trigger in Listing 6-14 creates a DDL trigger that fires in response to the CREATE TABLE statement in the AdventureWorks database. It logs the event data to a table named dbo.DdlActionLog.
Listing 6-14. CREATE TABLE DDL Trigger Example
-- Create a table to log DDL CREATE TABLE actions
CREATE TABLE dbo.DdlActionLog
(
    EntryId int NOT NULL IDENTITY(1, 1) PRIMARY KEY,
    EventType nvarchar(200) NOT NULL,
    PostTime datetime NOT NULL,
    LoginName sysname NOT NULL,
    UserName sysname NOT NULL,
    ServerName sysname NOT NULL,
    SchemaName sysname NOT NULL,
    DatabaseName sysname NOT NULL,
    ObjectName sysname NOT NULL,
    ObjectType sysname NOT NULL,
    CommandText nvarchar(max) NOT NULL
);
GO

CREATE TRIGGER AuditCreateTable
ON DATABASE
FOR CREATE_TABLE
AS
BEGIN
    -- Assign the XML event data to an xml variable
    DECLARE @eventdata xml = EVENTDATA();

    -- Shred the XML event data and insert a row in the log table
    INSERT INTO dbo.DdlActionLog
    (
        EventType,
        PostTime,
        LoginName,
        UserName,
        ServerName,
        SchemaName,
        DatabaseName,
        ObjectName,
        ObjectType,
        CommandText
    )
    SELECT
        EventNode.value(N'EventType[1]', N'nvarchar(200)'),
        EventNode.value(N'PostTime[1]', N'datetime'),
        EventNode.value(N'LoginName[1]', N'sysname'),
        EventNode.value(N'UserName[1]', N'sysname'),
        EventNode.value(N'ServerName[1]', N'sysname'),
        EventNode.value(N'SchemaName[1]', N'sysname'),
        EventNode.value(N'DatabaseName[1]', N'sysname'),
        EventNode.value(N'ObjectName[1]', N'sysname'),
        EventNode.value(N'ObjectType[1]', N'sysname'),
        EventNode.value(N'(TSQLCommand/CommandText)[1]', 'nvarchar(max)')
    FROM @eventdata.nodes('/EVENT_INSTANCE') EventTable(EventNode);
END;
GO
The first part of the example in Listing 6-14 creates a simple table to store the event-specific data generated by events that fire the DDL trigger:
-- Create a table to log DDL CREATE TABLE actions
CREATE TABLE dbo.DdlActionLog
(
    EntryId int NOT NULL IDENTITY(1, 1) PRIMARY KEY,
    EventType nvarchar(200) NOT NULL,
    PostTime datetime NOT NULL,
    LoginName sysname NOT NULL,
    UserName sysname NOT NULL,
    ServerName sysname NOT NULL,
    SchemaName sysname NOT NULL,
    DatabaseName sysname NOT NULL,
    ObjectName sysname NOT NULL,
    ObjectType sysname NOT NULL,
    CommandText nvarchar(max) NOT NULL
);
GO
The DDL trigger definition begins with the name, the scope (DATABASE), and the DDL action that fires the trigger. In this example, the action that fires this trigger is the CREATE TABLE event. Notice that unlike DML triggers, DDL triggers do not belong to schemas and do not have schemas specified in their names.
CREATE TRIGGER AuditCreateTable
ON DATABASE
FOR CREATE_TABLE
The body of the trigger begins by declaring an xml variable, @eventdata. This variable holds the results of the EVENTDATA() function for further processing later in the trigger.
-- Assign the XML event data to an xml variable
DECLARE @eventdata xml = EVENTDATA();
Next, the trigger uses the nodes() and value() methods of the @eventdata xml variable to shred the event data, which is then inserted into the dbo.DdlActionLog table in relational form:
-- Shred the XML event data and insert a row in the log table
INSERT INTO dbo.DdlActionLog
(
    EventType,
    PostTime,
    LoginName,
    UserName,
    ServerName,
    SchemaName,
    DatabaseName,
    ObjectName,
    ObjectType,
    CommandText
)
SELECT
    EventNode.value(N'EventType[1]', N'nvarchar(200)'),
    EventNode.value(N'PostTime[1]', N'datetime'),
    EventNode.value(N'LoginName[1]', N'sysname'),
    EventNode.value(N'UserName[1]', N'sysname'),
    EventNode.value(N'ServerName[1]', N'sysname'),
    EventNode.value(N'SchemaName[1]', N'sysname'),
    EventNode.value(N'DatabaseName[1]', N'sysname'),
    EventNode.value(N'ObjectName[1]', N'sysname'),
    EventNode.value(N'ObjectType[1]', N'sysname'),
    EventNode.value(N'(TSQLCommand/CommandText)[1]', 'nvarchar(max)')
FROM @eventdata.nodes('/EVENT_INSTANCE') EventTable(EventNode);
Listing 6-15 demonstrates the DDL trigger by performing a CREATE TABLE statement. Partial results are shown in Figure 6-6.
Listing 6-15. Testing the DDL Trigger with a CREATE TABLE Statement
CREATE TABLE dbo.MyTable (i int);
GO

SELECT
    EntryId,
    EventType,
    UserName,
    ObjectName,
    CommandText
FROM DdlActionLog;

Figure 6-6. DDL Audit Logging Results
Dropping a DDL trigger is as simple as executing the DROP TRIGGER statement, as shown in Listing 6-16. Notice that the ON DATABASE clause is required in this instance. The reason is that the DDL trigger exists outside the schemas of the database, so you must tell SQL Server whether the trigger exists at the database or server scope.
Listing 6-16. Dropping a DDL Trigger
DROP TRIGGER AuditCreateTable
ON DATABASE;
SQL Server offers yet another type of trigger: the logon trigger. Logon triggers were first made available in SQL Server 2005 SP 2. These triggers fire in response to an SQL Server LOGON event—after authentication succeeds, but before the user session is established. You can perform tasks ranging from simple LOGON event auditing to more advanced tasks like restricting the number of simultaneous sessions for a login or denying users the ability to create sessions during certain times.
The code example for this section uses logon triggers to deny a given user the ability to log into SQL Server during a specified time period (e.g., during a resource-intensive nightly batch process). Listing 6-17 begins the logon trigger example by creating a sample login and a table that holds a logon denial schedule. The first entry in this table will be used to deny the sample login the ability to log into SQL Server between the hours of 9:00 and 11:00 pm on Saturday nights.
Listing 6-17. Creating a Test Login and Logon Denial Schedule
CREATE LOGIN PublicUser WITH PASSWORD  =  'p@$$w0rd';
GO

USE Master;

CREATE TABLE dbo.DenyLogonSchedule (
    UserId sysname NOT NULL,
    DayOfWeek tinyint NOT NULL,
    TimeStart time NOT NULL,
    TimeEnd time NOT NULL,
    PRIMARY KEY (UserId, DayOfWeek, TimeStart, TimeEnd)
 );
 GO

INSERT INTO dbo.DenyLogonSchedule (
    UserId,
    DayOfWeek,
    TimeStart,
    TimeEnd
) VALUES (
    'PublicUser',
    7,
    '21:00:00',
    '23:00:00'
 );
The logon trigger that makes use of this table to deny logons on a schedule is shown in Listing 6-18.
Listing 6-18. Sample Logon Trigger
USE Master;

CREATE TRIGGER DenyLogons
ON ALL SERVER
WITH EXECUTE AS 'sa'
FOR LOGON
AS
BEGIN
    IF EXISTS ( SELECT 1
        FROM Master .dbo.DenyLogonSchedule
        WHERE UserId = ORIGINAL_LOGIN()
        AND DayOfWeek = DATEPART(WeekDay, GETDATE())
        AND CAST(GETDATE() AS TIME) BETWEEN TimeStart AND TimeEnd
    ) BEGIN
        ROLLBACK TRANSACTION;
    END;
END;
![]() Caution If your logon trigger errors out, you will be unable to log into SQL Server normally. You can still connect using the Dedicated Administrator Connection (DAC), which bypasses logon triggers, however. Make sure that the table dbo.DenyLogonSchedule exists and that your logon trigger works properly before putting it in production.
Caution If your logon trigger errors out, you will be unable to log into SQL Server normally. You can still connect using the Dedicated Administrator Connection (DAC), which bypasses logon triggers, however. Make sure that the table dbo.DenyLogonSchedule exists and that your logon trigger works properly before putting it in production.
The CREATE TRIGGER statement begins much like the other trigger samples we’ve used to this point, by specifying the name and scope (ALL SERVER). The WITH EXECUTE clause is used to specify that the logon trigger should run under the sa security context, and the FOR LOGON clause indicates that this is actually a logon trigger.
CREATE TRIGGER DenyLogons
ON ALL SERVER
WITH EXECUTE AS 'sa'
FOR LOGON
The trigger body is fairly simple. It simply checks for the existence of an entry in the AdventureWorks.dbo.DenyLogonSchedule table, indicating that the current user (retrieved with the ORIGINAL_LOGIN() function) is denied login based on the current date and time. If there is an entry indicating that the login should be denied, then the ROLLBACK TRANSACTION statement is executed, denying the login.
IF EXISTS ( SELECT 1
    FROM AdventureWorks.dbo.DenyLogonSchedule
    WHERE UserId = ORIGINAL_LOGIN()
    AND DayOfWeek = DATEPART(WeekDay, GETDATE())
    AND CAST(GETDATE() AS TIME) BETWEEN TimeStart AND TimeEnd
) BEGIN
    ROLLBACK TRANSACTION;
END;
Notice that the three-part name of the table is used in this statement, since the user attempting to log in may be connecting to a different default database. Attempting to log onto SQL Server using the PublicUser account on Saturday night between the hours indicated results in an error message like the one shown in Figure 6-7.
![]() Tip Logon triggers are useful for auditing and restricting logins, but because they only fire after a successful authentication, they cannot be used to log unsuccessful login attempts.
Tip Logon triggers are useful for auditing and restricting logins, but because they only fire after a successful authentication, they cannot be used to log unsuccessful login attempts.
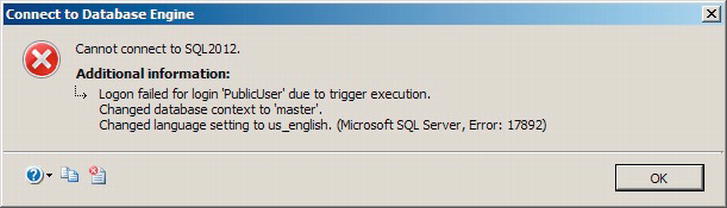
Figure 6-7. A Logon Trigger Denying a Login
The logon trigger also makes logon information available in XML format within the trigger via the EVENTDATA() function. An example of the logon information generated by the LOGON event is shown in Listing 6-19.
Listing 6-19. Sample Event Data Generated by a LOGON Event
<EVENT_INSTANCE > <EventType >LOGON</EventType > <PostTime >2012-04-21T23:18:33.357
</PostTime > <SPID >110</SPID>
<ServerName >SQL2012</ServerName > <LoginName >PublicUser</LoginName>
<LoginType >SQL Login</LoginType > <SID >zgPcN6UCBE2j/HYTug0i4A==</SID > <ClientHost ><local
machine></ClientHost > <IsPooled >0 </IsPooled > </EVENT_INSTANCE>
![]() Note Logon triggers to deny access to logins based on day of week, time of day, and number of sessions per login are available in the Common Criteria compliance package for SQL Server. You can download them on the SQL Server Common Criteria Certifications website: http://www.microsoft.com/sqlserver/en/us/common-criteria.aspx.
Note Logon triggers to deny access to logins based on day of week, time of day, and number of sessions per login are available in the Common Criteria compliance package for SQL Server. You can download them on the SQL Server Common Criteria Certifications website: http://www.microsoft.com/sqlserver/en/us/common-criteria.aspx.
Summary
This chapter discussed triggers, including traditional DML triggers, DDL triggers, and logon triggers. As you’ve seen, triggers are useful tools for a variety of purposes.
DML triggers are the original form of trigger. Much of the functionality that DML triggers were used for in the past, such as enforcing referential integrity, has been supplanted by newer and more efficient T-SQL functionality over the years, like cascading DRI. DML triggers are useful for auditing DML statements and for enforcing complex business rules and logic in the database. They can also be used to implement updating for views that are normally not updatable.
In this chapter, we discussed the inserted and deleted virtual tables, which hold copies of the rows being affected by a DML statement. We also discussed the UPDATE() and COLUMNS_UPDATED() functions in DML triggers, which identify the columns that were affected by the DML statement that fired a trigger. Finally, we talked about the differences between AFTER and INSTEAD OF triggers and explained nested triggers and trigger recursion.
DDL triggers can be used to audit and restrict database object and server changes. DDL triggers can help provide protection against accidental or malicious changes to, or destruction of, database objects. In this chapter, we discussed the EVENTDATA() function and how you can use it to audit DDL actions within a database or on the server.
Logon triggers can likewise be used to audit successful logins and restrict logins for various reasons.
In the next chapter, we will discuss the native encryption functionality available in SQL Server 2012.
EXERCISES
1. [True/False] The EVENTDATA() function returns information about DDL events within DDL triggers.
2. [True/False] In a DML trigger, the inserted and deleted virtual tables are both populated with rows during an UPDATE event.
3. [Choose all that apply] Which of the following types of triggers does SQL Server 2012 support?
- Logon triggers
- TCL triggers
- DDL triggers
- Hierarchy triggers
- DML triggers
4. [Fill in the blank] The ___________ statement prevents triggers from generating extraneous rows affected messages.
5. [Choose one] The COLUMNS_UPDATED() function returns data in which of the following formats?
- A varbinary string with bits set to represent affected columns
- A comma-delimited varchar string with a column ID number for each affected column
- A table consisting of column ID numbers for each affected column
- A table consisting of all rows that were inserted by the DML operation
6. [True/False] @@ROWCOUNT, when used at the beginning of a DML trigger, reflects the number of rows affected by the DML statement that fired the trigger.
7. [True/False] You can create recursive AFTER triggers on views.