The Objective-C programming language includes a preprocessor that is used to translate source files prior to compilation. Some of the translation is performed automatically, and a portion is performed based on the preprocessor language elements that you include in your source files. If you look at publicly available Objective-C source code, such as Apple’s Objective-C source code for example, you’ll most likely observe liberal use of the preprocessor language. So you may be wondering, what are the features of the preprocessor and how do you best use this language in your programs? Those are the subjects of this chapter, so let’s get started!
Overview
The general process of source code compilation takes input source files and transforms them into output files that can be executed on a target computing platform. The Objective-C compiler divides this process into several phases, as shown in Figure 5-1.
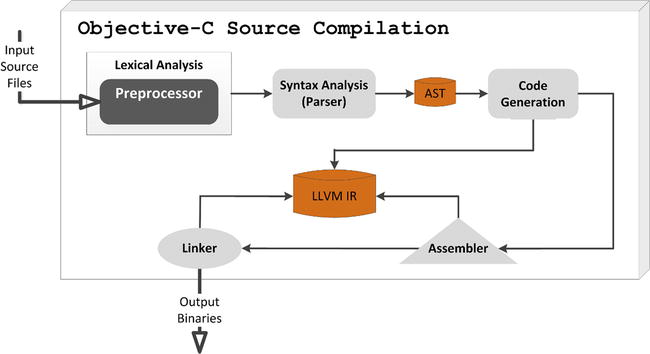
Figure 5-1. Compiling Objective-C source files
Together, these phases perform lexical analysis, syntax analysis, code generation and optimization, assembly, and linking operations to produce the output binaries. During the lexical analysis phase, the source code is broken down into tokens. Each token is a single element of the language; for example, a keyword, operator, identifier, or symbol name within the context of its grammar.
The syntax analysis (or parsing) phase checks the tokens for the correct syntax and verifies that they form a valid expression. This task concludes with the creation of a hierarchical parse tree or an abstract syntax tree (AST) from the tokens.
During code generation and optimization, the AST is used to generate code in the output language, which may be a machine language or an intermediate language representation (IR). The code is also optimized into a functionally equivalent but faster and smaller form.
The assembly phase takes the generated code and converts it into executable machine code for the target platform.
Finally, during the linking phase, one or more machine code outputs from the assembler are combined into a single executable program.
The preprocessor is used during the lexical analysis phase (as shown in Figure 5-1) prior to parsing. To understand its role in this phase, let’s review the operation of the preprocessor in detail.
The preprocessor works by substituting the input character sequences for other character sequences according to a set of predefined rules. These operations, depicted in Figure 5-2, are performed in the following order:

Figure 5-2. Preprocessing Objective-C source files
- Textual translation: First, the preprocessor translates the input source file by breaking it into lines, replacing trigraphs by their corresponding single characters, merging continued lines into one long line, and replacing comments with single spaces. A trigraph is a three-character sequence defined by the C programming language to stand for single characters.
- Token conversion: Next, the preprocessor converts the translated file into a sequence of tokens.
- Preprocessor language-based transformation: Finally, if the token stream contains any preprocessing language elements, they are transformed based on these inputs.
The first two operations are performed automatically, and the last is a function of the preprocessor language elements added to the source files.
That’s right, the preprocessor language is a separate programming language that’s distinct from Objective-C. The source-file transformations performed using the language are primarily source file inclusions, conditional compilation, and macro expansions. Preprocessor language elements operate on a source file prior to program compilation, and the preprocessor has no knowledge of the Objective-C language itself.
The preprocessor language defines directives to be executed and macros to be expanded. A preprocessor directive is a command that is executed by the preprocessor, not the compiler. A preprocessor macro is a named code fragment. Wherever the name is used in the source code, the code fragment is substituted for it. The preprocessor language also defines several operators and keywords.
Note It’s important to understand the capabilities and limitations of the preprocessor language because incorrect use can cause subtle compilation problems that are difficult to diagnose. You should keep this in mind as you look at the language in detail.
Preprocessor directives are indicated in Objective-C source files with a unique syntax that causes these lines to be treated by the preprocessor, not the compiler. A preprocessor directive has the following form:
#directiveName directiveArguments
A directive begins with a hash sign (#), immediately followed by the directive name, and then its corresponding arguments. The following line
#import "Elements.h"
is an example of a preprocessor directive; each directive is terminated by a newline. To extend a directive through more than one line, a backslash () is placed at the end of the line to be continued on another line. The following example
#define DegreesToRadians(x)
                 ((x) * 3.14159 / 180.0)
is a preprocessor directive that extends across two lines, as indicated by the backslash at the end of the first line of the directive.
The following is the complete set of preprocessor directives and the functionality that they provide:
- Header file inclusion (#include, #import)
- Conditional compilation (#if, #elif, #else, #endif, #ifdef, #ifndef)
- Diagnostics (#error, #warning, #line)
- Pragmas (#pragma)
The preprocessor has two directives (#include and #import) that enable header file inclusion; basically, they tell the preprocessor to take the text of a file and insert it into the current file. As such, they facilitate code reuse, because a source file can use external class interfaces and macros without having to copy them directly.
The syntax of the include directive has two forms:
#include "HeaderFileName"
or
#include <HeaderFileName>
HeaderFileName is the name of the header file to be inserted. The only difference between both expressions is the locations (i.e., directories) where the compiler looks for the file:
- Header file name between double quotes ("HeaderFileName"). The compiler first searches for the file in the same directory that includes the file containing the directive. If the file is not found there, the compiler searches for the file in the default directories, where it is configured to look for the system-standard header files.
- Header file name between angle brackets (<HeaderFileName>). The compiler searches for the file in the default directories, where it is configured to look for the standard header files.
By convention, standard header files are usually included using the angle brackets because they are normally located in the default directories, whereas other header files (such as those for your Objective-C classes) are included using double quotes.
The import directive (#import) also performs header file inclusion. Like the #include directive, the included header file is enclosed in either double quotes or angle brackets. This directive differs from #include in that it ensures a header file is only included once in a source file, thereby preventing recursive includes. For example, in the Elements program you implemented in Chapters 2 and 3, the main.m source file includes the Hydrogen.h and Atom+Nuclear.h header files. Now each of these files includes the Atom.h file, and hence you have a scenario that could result in duplicate includes of the Atom header file (in the main.m file). However, since main.m includes the Hydrogen and Atom+Nuclear header files using the #import directive (as shown in Listing 5-1), the Atom header file will only be included once (in the main.m source file).
Listing 5-1. Using the #import Directive to Prevent Recursive Includes
#import <Foundation/Foundation.h>
#import "Atom.h"
#import "Atom+Nuclear.h"
#import "Atom+Helper.h"
#import "Hydrogen.h"
Without the #import directive, it would be necessary to provide an include guard in a header file to prevent recursive inclusion. An include guard is a set of preprocessor statements that are used to prevent duplicate inclusion of a header file. It is typically constructed using the #ifndef conditional compilation expression and a #define directive. An example include guard for the Atom.h header file is shown in Listing 5-2.
Listing 5-2. Atom.h Header File Include Guard
#ifndef  ATOM_H
#define  ATOM_H
@interface Atom : NSObject
// Atom interface declarations
...
@end
#endif
The #import directive is typically used to include Objective-C header files, thus there is generally no need to implement include guards in your Objective-C source files. Now let’s look at the conditional compilation directives.
The conditional compilation directives (#if, #elif, #else, #endif, #ifdef, #ifndef) enable you to include or exclude part of the source text if a certain condition is met.
The #if directive enables you to test the value of an expression and include/exclude a portion of the source text based on the result. The syntax for using this directive is shown in Listing 5-3.
Listing 5-3. Syntax for the #if Preprocessor Directive
#if ArithmeticExpression
// conditional text (preprocessor or Objective-C source code)
...
#endif
An #if directive is used to test an arithmetic expression. As shown in Listing 5-3, it is paired with an #endif directive, which together enclose conditional text. The arithmetic expression is of integer type and may contain the following elements:
- Integer and character constants.
- Arithmetic operators, bitwise operations, shifts, comparisons, and logical operations (as defined in Appendix A).
- Preprocessor macros. The macros are expanded before computation of the expression.
- Uses of the defined operator, which is used to check whether a macro is defined.
- Identifiers that are not macros, which are all assigned the value zero when being evaluated.
The preprocessor evaluates the expression according to these rules. If the result of the evaluation is nonzero, the conditional text (typically source code but possibly also other preprocessor directives) is included for compilation or further preprocessing; otherwise, it is skipped. Look at the following example:
#if INPUT_ARGS <= 0
#warning "No input arguments defined"
#endif
The preprocessor would process these lines as follows:
- Expand the identifier INPUT_ARGS. If identifier is a macro, it is replaced with its corresponding value; if it is not a macro or the macro has no value, the identifier is replaced with the value zero.
- Calculate the value of the expression. If the value is nonzero (i.e., the value of the INPUT_ARGS identifier is less than or equal to zero), the text between the #if directive statement and the #endif directive is included (i.e., not filtered by the preprocessor). In this case (due to the #warning message), it would ultimately cause the compiler to generate a warning message.
This type of directive is often used to perform conditional compilation of platform-specific code for a designated target environment. For example, if you have Objective-C code that has customizations for several different compilers, these could be encapsulated using #if directives and the appropriate compiler-specific identifiers.
The #elif directive stands for “else if”; it augments the #if directive by enabling you to check for two or more possible conditions. It is placed between the #if and #endif directives; the conditional text following the #elif directive is processed only if the original #if directive (and any preceding #elif directive(s)) failed. The syntax for the #elif directive is shown in Listing 5-4.
Listing 5-4. Syntax for the #elif Preprocessor Directive
#if ArithmeticExpression1
// Conditional text 1
...
#elif ArithmeticExpression2
// Conditional text 2
...
#elif ArithmeticExpressionN
// Conditional text N
...
#endif
The preprocessor would process the text of Listing 5-4 as follows: if ArithmeticExpression1 succeeds then Conditional text 1 is processed; else if ArithmeticExpression2 succeeds then Conditional text 2 is processed; else if ArithmeticExpressionN succeeds then Conditional text N is processed. If multiple conditional expressions within the group of #if-#elif would succeed, only the first will be processed.
The #else directive augments the #if and #elif directives by providing a mechanism for conditional text to be executed if none of the associated #if and #elif expressions succeed. It is placed between the #if, #elif (if any #elif directives provided), and #elif directives, as the last directive immediately preceding the #endif. The syntax for the #else directive is shown in Listing 5-5.
Listing 5-5. Syntax for the #else Preprocessor Directive
#if ArithmeticExpression1
// Conditional text 1
...
#elif ArithmeticExpression2
// Conditional text 2
...
#else
// Else conditional text
...
#endif
The preprocessor would process the Else conditional text of Listing 5-5 if none of the other conditional expressions succeed.
At most, one #else directive can be placed between the #if and its corresponding #endif directive, and it must be the last directive before the #endif. Finally, also note that the #if, #elif, #else, and #endif directives can be nested; in this case, the #endif matches the closest preceding #if directive.
The #ifdef directive enables conditional text to be processed only if the macro that is specified as its parameter has been defined, no matter what its value is. It is paired with an #endif directive, which is enclosed by the conditional text. The syntax for this directive is shown in Listing 5-6.
Listing 5-6. Syntax for the #ifdef Preprocessor Directive
#ifdef MacroName
// Conditional text
...
#endif
The #ifndef directive functions as the complement to the #ifdef directive; it enables conditional text to be processed only if the macro that is specified as its parameter has not been defined. The syntax for this directive is shown in Listing 5-7.
Listing 5-7. Syntax for the #ifndef Preprocessor Directive
#ifndef MacroName
// Conditional text
...
#endif
The behavior of the #ifdef and #ifndef directives can also be achieved by using the defined operator in an #if or #elif conditional expression.
The defined operator is used to test whether a name is defined as a macro. It is equivalent to the #ifdef directive. The syntax for using the defined operator in a conditional expression is
#if defined MacroName
or
#elif defined MacroName
The macro name can be surrounded with parentheses, if desired. One of the reasons for using the defined operator (in lieu of the #ifdef directive) is when you need to test more than one macro in a single expression, as in the following example:
#if defined (MacroName1) || defined (MacroName2)
// insert source text here
#endif
The preprocessor includes several directives that provide diagnostics for problems that occur during program compilation. The #error directive causes the preprocessor to generate an error message and fail compilation. The syntax for this directive is
#error "ErrorMessage"
The error message is surrounded in double-quotes. This directive is commonly used if a conditional compilation check fails; for example, the following code fragment
#ifndef    INPUT_ARGS
#error "No input arguments provided"
#endif
causes compilation to fail and generates an error message (“No input arguments provided”) if the macro INPUT_ARGS is not defined.
The #warning directive causes the preprocessor to generate a compile-time warning message, but allows compilation to continue. The syntax for this directive is
#warning "WarningMessage"
The warning message is surrounded in double-quotes. The following code fragment
#ifndef    OUTPUT_FILE
#warning "Output filename not provided"
#endif
generates a warning message (“Output filename not provided”) if the macro OUTPUT_ARGS is not defined; compilation will continue.
The #line directive is used to supply a line number for compiler messages. If an error happens during the compiling process, the compiler shows an error message with references to the name of the file where the error happened and a corresponding line number, thereby making it easier to find the code that generated the error. The syntax for the #line directive is
#line LineNumber "FileName"
LineNumber is the new line number that will be assigned to the next code line. The line numbers of successive lines will be increased one by one from this point on. The “FileName” (surrounded in double-quotes) is an optional parameter that enables you to redefine the file name that will be displayed. Xcode and the Objective-C compiler use of the #line directive are illustrated in the following code fragment:
...
#line 10 "Elements.m"
int ?numProtons;
This code will generate an error that will be shown as error in file "Elements.m" at line 11.
The Xcode IDE displays the line numbers of source files and automatically displays errors and warnings while you enter code and at compilation; hence, you rarely have need to use this directive in your source files.
The pragma directive (#pragma) is used to specify additional options to the compiler, beyond that conveyed by the Objective-C language itself. These options are specific for the platform and the compiler being used. The syntax for the #pragma directive is
#pragma PragmaOptions(s)
The pragma options are a series of characters that correspond to a specific compiler instruction (and arguments, if any), and cause an implementation-defined action. If the compiler does not support a specific argument for a #pragma directive, it is ignored and no error is generated.
The Apple Objective-C compiler supports numerous pragma options; the exact options available can be found in the reference documentation for the compiler.
Xcode includes support for several #pragma mark directives. You would use these directives in implementation source files to categorize methods when viewing them within the IDE. Let’s look at an example to see how this works. The Xcode workspace window contains a jump bar at the top of the editor area; it is used to hierarchically view items in the workspace. If you click an item in the jump bar, it displays items at the same level within the hierarchy (as shown in Figure 5-3).
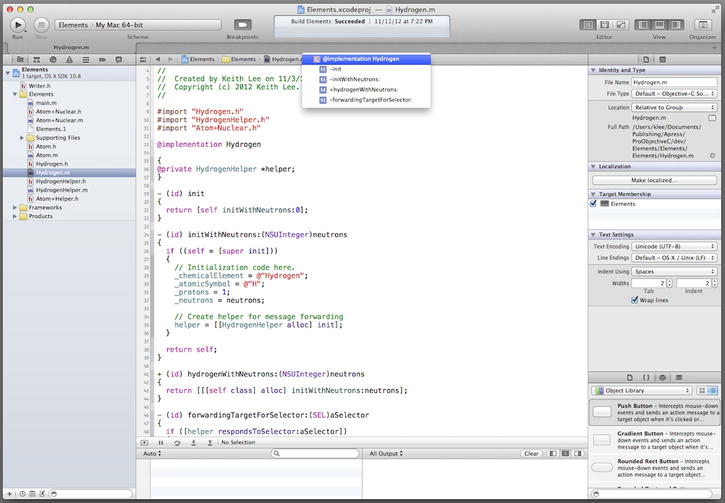
Figure 5-3. Using the Xcode jump bar to display methods
Figure 5-3 shows that clicking a class implementation in the Xcode jump bar brings up a pop-up window that displays a list of the Hydrogen class implementation’s methods. Now this is where pragma mark directives enter the picture—they can be used to organize how these methods are displayed in the jump bar pop-up. You can create a divider visible in the jump bar pop-up using the directive
#pragma mark -
You create a label used to categorize one or more methods using the directive
#pragma mark MarkName
MarkName is the label for the methods that will be displayed in the pop-up.
The following example includes pragma mark directives for the Hydrogen class implementation created in Chapters 2 and 3. These updates (shown in bold in Listing 5-8) categorize the class custom initialization methods.
Listing 5-8. Example #pragma mark Directive Usage
#pragma mark -
#pragma mark Custom Initializers

- (id) initWithNeutrons:(NSUInteger)neutrons
{
  if ((self = [super init]))
  {
    // Initialization code here.
    _chemicalElement = @"Hydrogen";
    _atomicSymbol = @"H";
    _protons = 1;
    _neutrons = neutrons;

    // Create helper for message forwarding
    helper = [[HydrogenHelper alloc] init];
  }

  return self;
}

#pragma mark -
If you now click the Hydrogen implementation in the Xcode jump bar (as shown in Figure 5-4), the pop-up display lists the method initWithNeutrons:, prefaced with a label of Custom Initializers, and surrounded by dividers.

Figure 5-4. Using the #pragma mark directives
Particularly for large projects and classes that contain a large number of methods, #pragma mark directives provide a mechanism that facilitates the categorization and organization of class methods and make the jump bar more efficient to use.
A preprocessor macro is a named code fragment. Wherever the name is used in the source code, the code fragment is substituted for it. Preprocessor macros can be used to define constant values or to provide function-like substitutions complete with input parameter values. Macros are defined with the #define preprocessor directive, and removed with the #undef directive. The syntax for an object-like macro that defines a constant value is
#define MacroName [MacroValue]
The optional macro value is placed after the name; the macro value may be an arithmetic expression composed of constant values. The syntax for a function-like macro is
#define MacroName(MacroArguments) Code
The macro name includes one or more arguments (separated by commas) surrounded by parentheses, and the code fragment substituted for it. An example function-like macro that adds two values is
#define SQUARE(x) ((x) * (x))
All arguments to a macro are completely macro-expanded before they are substituted into the macro body. After substitution, the complete text is scanned again for macros to expand, including the arguments. The preprocessor does not understand Objective-C; it simply replaces occurrences of the macro name with the corresponding macro value or code. Also note that macros are not affected by Objective-C scope rules. Once defined, a macro exists and can be used in a file until it is undefined with the #undef directive.
Now you may be wondering: why did I use all of those parentheses for defining the SQUARE macro? This reflects one of the issues with macros; because they merely perform simple substitution, you have to be careful with macro definitions to avoid unexpected results when they are expanded. Consider, for example, if the SQUARE macro listed earlier was instead defined as follows:
#define SQUARE(x) x * x
What result would you get if you later wrote the following statement in your source code?
int product = SQUARE(4 + 2);
Guess what? It’s not 36! Let’s see exactly how the macro works. Remember, it simply substitutes the macro for the corresponding code; hence, the statement is macro-expanded to
int product = 4 + 2 * 4 + 2;
Due to Objective-C operator precedence and associativity rules (listed in Appendix A), in the preceding statement, the multiplication of 2 * 4 is performed before the addition; thus, this statement will return a value of 14—probably not what you expect! To avoid these types of issues (due to macro expansion), you can surround the macro arguments and the macro itself with parentheses, as shown in the initial definition for the ADD macro.
#define SQUARE(x) ((x) * (x))
In fact, parentheses should be used for both function-like and object-like macros. On the other hand, multiline function-like macros that are being used to perform a computation rather than return a value should be surrounded by curly braces ({ }). For example, the following macro is surrounded with curly braces:
#define SWAP(a, b) {a^=b; b^=a; a^=b;}
Function-like macro definitions accept two special operators (# and ##) in the replacement sequence. The stringification operator (represented by the # symbol) is used to replace a macro input parameter with the corresponding text string (surrounded by double-quotes). The concatenation operator (represented by the ## symbol) is used to concatenate two tokens, leaving no blank space between them.
Warning, Don’t Overuse Macros!
Macros, particularly function-like macros, are a powerful feature, but can be very dangerous to use. Because preprocessor replacements happen before the source is parsed, it can be difficult to define macros that correctly expand in all cases. It is often problematic to pass arguments with side effects (i.e., changes the value of an argument(s)) to function-like macros. This can result in one or more of these arguments being evaluated multiple times (i.e., duplication of side effects), and therefore making unexpected changes to their values, which are difficult to diagnose.
Finally, code that relies heavily on complicated macros may be difficult to maintain because their syntax is, on many occasions, different from that used in Objective-C.
Roundup
This has been fun. You just learned a programming language in one chapter! Well, perhaps it hasn’t been that extreme, but now you have a good understanding of how the Objective-C preprocessor works and how the preprocessor language is used in Objective-C source files. Particularly, if you want to understand many publicly available software libraries and frameworks, or would like to examine Apple’s Objective-C source code, detailed knowledge of the preprocessor language is invaluable. To summarize, the following are the key takeaways from this chapter:
- The preprocessor is used during the lexical analysis phase of compilation, which occurs prior to parsing. It works by substituting the input character sequences (of source files) for other character sequences, according to a set of predefined rules. These operations perform textual translation, token conversion, and preprocessor-based language transformation.
- The preprocessor language is a separate programming language that’s distinct from Objective-C. The source file transformations performed using the language are primarily source file inclusions, conditional compilation, and macro expansions.
- The preprocessor language defines directives to be executed and macros to be expanded. A preprocessor directive is a command that is executed by the preprocessor, not the compiler. A preprocessor macro is a named code fragment. Wherever the name is used in the source code, the code fragment is substituted for it.
- Preprocessor directives perform header file inclusion, conditional processing, diagnostics, and platform-specific operations (pragmas).
- A preprocessor macro is a named code fragment. Wherever the name is used in a source file, the code fragment is substituted for it. Preprocessor macros define constant values and/or provide function-like substitutions complete with input parameter values.
- Macros, particularly function-like macros, are a powerful feature, but can be very dangerous. Improper use can cause misnesting, operator precedence problems, duplication of side effects, and other problems. In addition, code that relies heavily on complicated macros may be difficult to maintain because their syntax is often different from that used in Objective-C. In general, you should minimize your use of macros in your Objective-C source code.