For those of you new to Objective-C, welcome on board! In this chapter, you’ll receive an introduction to the language and then dive right in by writing some code. You’ll start with an overview of the Apple Objective-C development environment and discuss some of the reasons why Objective-C is such a popular language for application development. Next, you begin using Xcode, Apple’s integrated development environment (IDE), and see how it makes Objective-C programming both enjoyable and efficient.
Introduction
Objective-C is the primary programming language for developing applications on Apple’s OS X and iOS (iPod, iPhone, iPad) platforms. In recent years, these platforms have become some of the most popular application development environments. A key reason for this success is due, in fact, to features of the Objective-C language.
Apple released version 2.0 of Objective-C in 2007. It added many new features to the language, including declared and synthesized properties, dot notation, fast enumeration, exception support, runtime performance improvements, and 64-bit machine support.
The Objective-C language has continued to evolve and acquire features that make Objective-C programming more powerful and expressive. Some of the more significant recent additions to the language include automatic reference counting for Objective-C objects, improved support for data hiding, improved type safety for enumerations, as well as new language constructs for block objects, literals, and other features.
Apple’s Objective-C development environment consists of several parts:
- Objective-C programming language
- Objective-C runtime environment
- Software libraries
- Software development tools
Object-oriented software development using Objective-C is the main subject of this book. As such, Part 1 of this book covers the programming language and the way it supports object-oriented programming.
Objective-C programs execute within the Objective-C runtime environment; it enables the dynamic programming capabilities of the language. Part 2 of this book explores the Objective-C runtime environment in depth and demonstrates how to use its application programming interfaces (APIs).
The software libraries include a set of frameworks, libraries, and services that provide general-purpose functionality to simplify application development. This software provides, out-of-the-box, much of the functionality needed to develop applications on the OS X and iOS platforms. Part 3 of this book covers the Foundation Framework, the base APIs that are used for any type of Objective-C program.
Part 4 focuses on advanced features of Objective-C that are of particular interest to programmers as they develop more sophisticated applications.
The software development tools enable source code editing and compilation, user interface development, version control, project management, testing and debugging, and other features. They also simplify application development and enable developers to be more efficient when developing, managing, and maintaining Objective-C software. Throughout this book, instructions are provided for using these tools to develop programs. Appendix B offers additional tips and recommendations.
So, what are the benefits of Objective-C compared to the many other programming languages available today? After all, quite a few languages support object-oriented programming. Is its being the primary programming language for developing applications on Apple’s OS X and iOS platforms the biggest reason for its popularity? Well, Objective-C is a great programming language on its own merits, with a variety of features that make it incredibly powerful, versatile, and easy to use for application development:
- Object-oriented programming: The Objective-C programming language provides complete support for object-oriented programming (OOP), including capabilities such as object messaging, encapsulation, inheritance, polymorphism, and open recursion.
- Object messaging: Object messaging enables objects to collaborate by passing messages between themselves. In effect, Objective-C code (e.g., a class/object method or a function) sends a message to a receiving object (the receiver) and the receiver uses the message to invoke its corresponding method, returning a result if required. If the receiver does not have a corresponding method, it can handle the message in other ways, such as forwarding it to another object, broadcasting it to other objects, introspecting it and applying custom logic, and so forth.
- Dynamic runtime: Compared to many other languages that support OOP, Objective-C is very dynamic. It shifts much of the responsibility for type, message, and method resolution to the runtime, rather than compile or link time. These capabilities can be used to facilitate developing and updating programs both in real time, without the need to recompile and redeploy software, and over time, with minimal or no impact to the existing software.
- Memory management: Objective-C provides a memory management capability, Automatic Reference Counting (ARC), which both simplifies application development and improves application performance. ARC is a compile-time technology that incorporates many of the benefits of traditional automatic memory management mechanisms (i.e., garbage collectors). However, compared to these traditional technologies, ARC provides better performance (memory management code is interleaved with your program code at compile time), however, and it doesn’t introduce memory management-induced pauses into program execution.
- Introspection and Reflection: The Objective-C language includes features that enable a program to query an object at runtime, provide information (its type, properties, and the methods it supports), and modify its structure and behavior. This enables a program to be modified during its lifetime of execution.
- C language support: Objective-C is primarily an object-oriented extension to the C language. It constitutes a superset of C. This means that the raw power of C is available and that C libraries can be accessed directly.
- Apple technologies: Apple provides a wealth of software libraries and tools for Objective-C application development. The development kits have frameworks and libraries that include the infrastructure, enabling you to focus on developing your application-specific logic. Xcode, Apple’s integrated development environment, provides all the tools you’ll need to develop great applications using Objective-C.
These are just some of the reasons why Objective-C continues to grow in popularity among developers—and I’m sure you’ll discover more as you continue through this book. OK, enough talk. Now let’s use Xcode to take Objective-C out for a test drive and find out what it’s really capable of!
Developing a Simple Objective-C Program
The best way to become proficient in a programming language is to learn by doing, so now you are going to start writing some code! But first, let’s download and install Xcode.
Xcode is a complete IDE for Objective-C software development on the Mac. It is fully integrated with both iOS and OS X, and it includes all the tools necessary for writing and compiling source code, developing sophisticated user interfaces, software testing and debugging, release build and version management, project management, and a host of other features. Xcode is a free download for all members of the Apple iOS and Mac Developer Programs. If you are not a member of either program, it is also available as a free download from the Mac App Store. The examples in this book were developed using Xcode 4.5, the current release. This version of the IDE will run on any Intel Mac computer that has OS X Lion or later installed.
Once you have downloaded and installed Xcode, launch the program. The Xcode welcome window shown in Figure 1-1 will display.
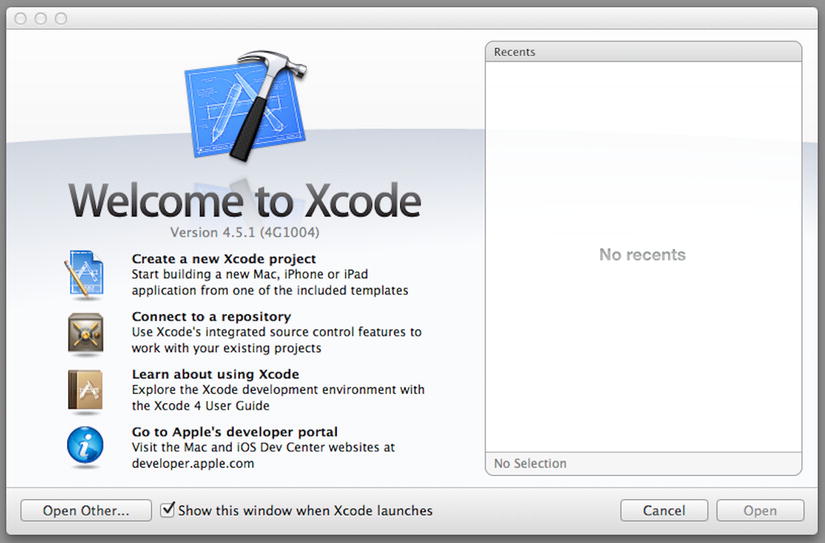
Figure 1-1. Xcode welcome window
Note If you have an iOS device (e.g., iPhone/iPod/iPad) connected to your computer, you may see a message asking whether or not you want to use that device for development. Because you will not be developing a mobile app here, you should click the Ignore button.)
This screen presents you with a variety of options: you can visit Apple’s developer portal, learn more about Xcode, and so forth. Because you want to create a new application, select the Create a new Xcode project option by selecting New ![]() Project … from the Xcode File menu. The Xcode workspace window will be displayed, followed by the New Project Assistant pane on top of that, as shown in Figure 1-2.
Project … from the Xcode File menu. The Xcode workspace window will be displayed, followed by the New Project Assistant pane on top of that, as shown in Figure 1-2.
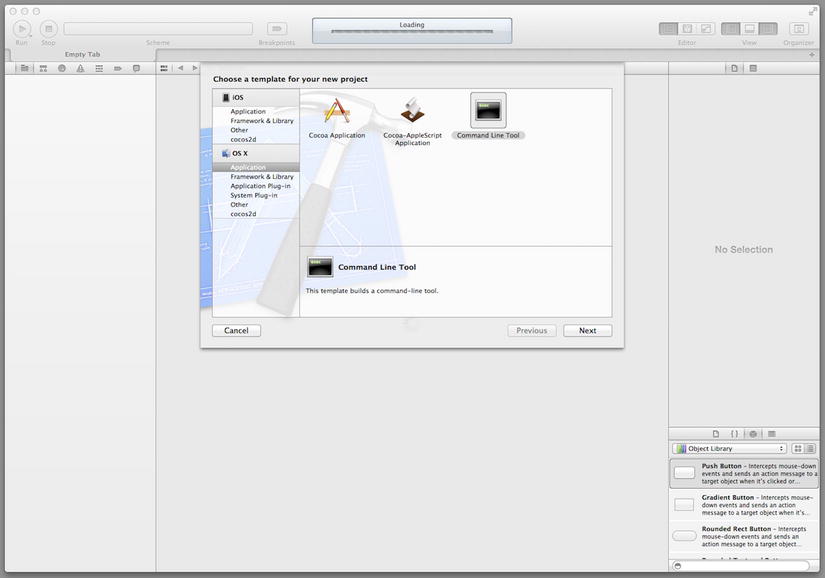
Figure 1-2. Xcode New Project Assistant
The left side of the New Project Assistant is divided into iOS and OS X sections. You are going to start by creating a command-line application, so select Application under the OS X section. In the upper-right pane, you’ll see several icons that represent each of the project templates that are provided as starting points for creating OS X applications. Select Command Line Tool and click Next. The project options window will be displayed (as shown in Figure 1-3) for you to input project-specific information.
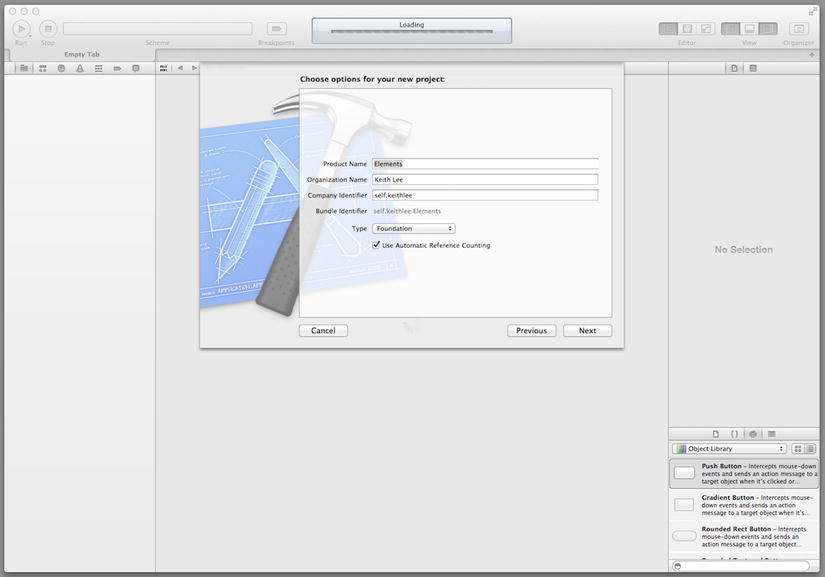
Figure 1-3. Xcode project options window
Specify the following:
- The Product Name for the project (for this example, Elements).
- The Organization Name (an identifier for the developer, typically a person or organization; this name will be included in the copyright comments at the top of your source files).
- A Company Identifier (this is a name used to provide an identifier for your application; typically you input something like your domain name in reverse order, but any name will suffice).
- The Type of application (Xcode supports various application types, including C, C++, etc.; here you select Foundation for an Objective-C project that uses the Foundation Framework).
- And finally, select the check box to specify that the project will use Automatic Reference Counting for memory management.
After this information has been provided, click Next to display the window for entering the name and location of your project (see Figure 1-4).
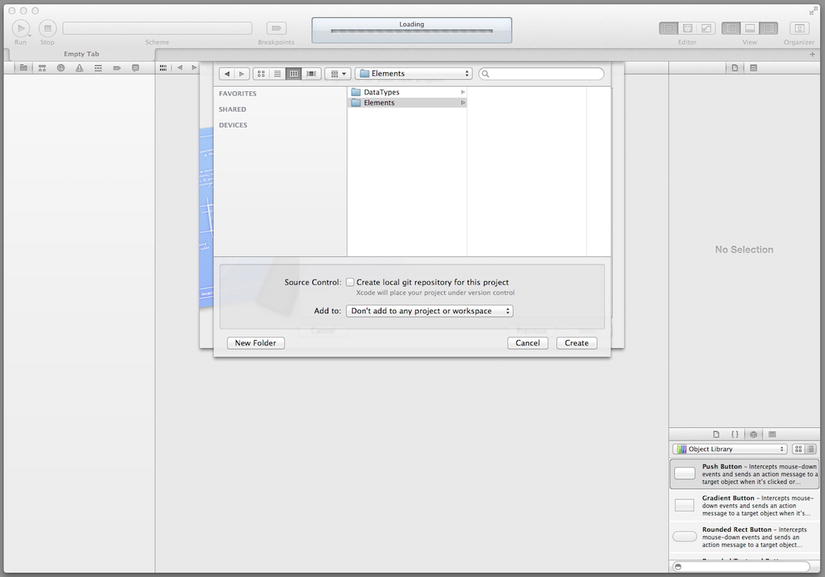
Figure 1-4. Xcode Project Location window
Specify the location in your file system where you want the project to be created (if necessary, select New Folder and enter the name and location for the folder); also be sure to uncheck the Source Control check box. Next, click the Create button. The project (workspace) window, as shown in Figure 1-5, is opened.
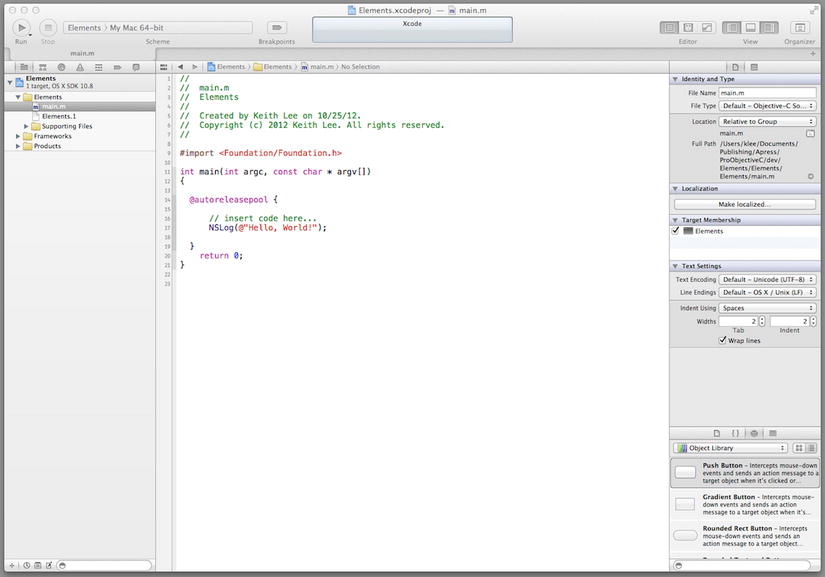
Figure 1-5. Xcode project window
Xcode Workspace
The project window consists of a toolbar and three main areas, as illustrated in Figure 1-6.
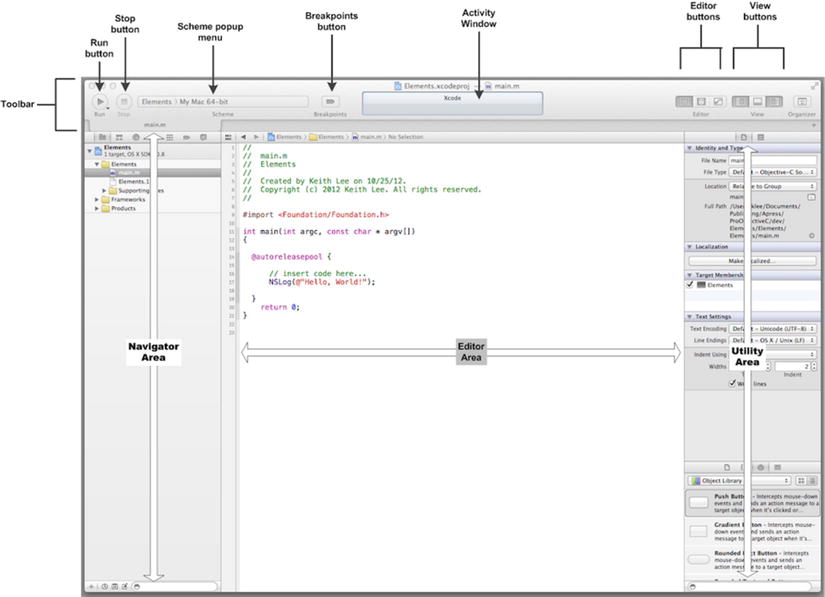
Figure 1-6. Project window main elements
The toolbar includes controls to start and stop running your project (the Run and Stop buttons); a pop-up menu to select the Scheme you want to run (a scheme defines information used to build and execute one or more targets); a Breakpoints button for toggling breakpoints on/off while debugging your program; the Activity View in the middle of the toolbar; a set of Editor buttons; a set of View buttons; and an Organizer button.
The three areas below the toolbar comprise the navigator area, editor area, and the utility area. The navigator area is used to view and access different resources (files, etc.) within a project. The editor area is where you write most of your program. The utility area is used to view and access Help and other inspectors, and to use ready-made resources in your project.
This has been a (very) high-level overview of the elements that comprise the Xcode workspace, so don’t worry about understanding all of it right now. You will gain plenty of experience using Xcode and its associated tools as you develop code throughout this book.
You have now created an Xcode project named Elements. If you look at the navigator area of the project window, at the top you’ll see a selector bar comprised of seven buttons and below that the main navigator area. Click the leftmost button (a folder icon) to see the Project Navigator view. The project navigator shows the contents (files, resources, etc.) of a project or Xcode workspace. Now open the Elements folder by clicking the disclosure triangle alongside the Elements folder icon. In the folder, select the file named main.m; this file contains the main() function for your program.
If you are already familiar with Objective-C or any of the C family of languages, you know that the main() function is the starting point for a program and that it is called when the program begins execution. An executable Objective-C program must have a main() function. In the editor area, observe the code shown in Listing 1-1.
Listing 1-1. Hello, World!
// insert code here...
NSLog(@"Hello, World!");
Yes, this is the ubiquitous Hello, World! greeting. When you create a command-line program with Xcode, it creates a main.m file, which includes a main() function with this default code. Now let’s actually write a little code for your simple program. Update the main() function as shown in Listing 1-2.
Listing 1-2. Hello, World! with Current Date
#import <Foundation/Foundation.h>

int main(int argc, const char * argv[])
{
  @autoreleasepool
  {
    NSLog(@"Hello, World!");

    // Display the current date, formatted nicely
    NSDate *dateTime = [NSDate date];
    NSDateFormatter *dateFormat = [[NSDateFormatter alloc]init];
    [dateFormat setDateFormat:@"EEE MMM d, yyyy"];
    NSString *dateString = [dateFormat stringFromDate:dateTime];
    NSLog(@"Today's date is %@", dateString);
  }
  return 0;
}
In addition to Hello, World!, the program also displays the current day and date. You can compile and run this program now by clicking the Run button on the toolbar (or by selecting Run from the Xcode Product menu). The output pane (located below the editor area) displays the Hello, World! message and the date (see Figure 1-7).

Figure 1-7. Hello, World! example
Perfect. You have learned how to create an Xcode project and how to compile and run a simple Objective-C program. Feel free to continue exploring the Xcode project window to become more familiar with its contents.
Roundup
This chapter introduced Objective-C. You downloaded and installed Xcode, and used it to write an Objective-C program. The Objective-C language, combined with the tools and software provided by Apple, make this a great platform for software development. With this introduction completed, you’re now prepared to begin learning the language in depth. When you’re ready, turn the page and let’s start developing some classes!