
13
ADVANCED REPORTING

Now that you’ve completed the tedious aspects of assembling all the parts of your vulnerability management system—scanner, database ingester, and basic reporting—you can start building complex reports. So far, you’ve generated simple CSV tables of vulnerabilities and hosts. In this chapter, you’ll expand your reports with more details about assets and vulnerabilities. You’ll also integrate an additional data source (a list of exploitable vulnerabilities from the Exploit Database) to supplement your in-house data collection.
Detailed Asset Reporting
To expand on the basic asset report that contained system information, number of vulnerabilities, and CVE IDs of the vulnerabilities, you’ll make three improvements:
- Add an option to report on a subset of hosts, selected by IP address.
- Enrich the report with all the host-specific data that’s available, plus OpenVAS and cve-search data for each vulnerability associated with the host.
- Output the reports in HTML format because the expanded information won’t map to a simple table.
To select hosts to include in the report, you’ll add logic to your script to filter for a provided network range.
The following is the information you’ll collect and format for each host:
IP address
The unique identifier for each host in the database.
Hostname(s)
In some environments, especially Windows-heavy networks where NetBIOS is in use, hostnames might be an easier way to identify individual hosts.
MAC information
Although this information is only worthwhile if the scanner can collect the host’s MAC, this is another way to uniquely identify the host in question as well as learn about its networking hardware.
Detected OS (if multiple, choose the one with highest accuracy)
The underlying OS can help you sort your hosts as well as look at per-OS vulnerability trends.
Open ports (sorted by protocol, port number) and detected services
Just knowing which ports are open can be very useful to a security team.
Vulnerabilities associated with the host
All of the host’s known vulnerabilities in one place, comprising the following details, all of which are pulled directly from the OpenVAS results:
- OID
- OpenVAS name
- OpenVAS summary
- OpenVAS CVSS score
- OpenVAS CVSS string
- CVE(s) associated
The resulting HTML document will look similar to Figure 13-1.
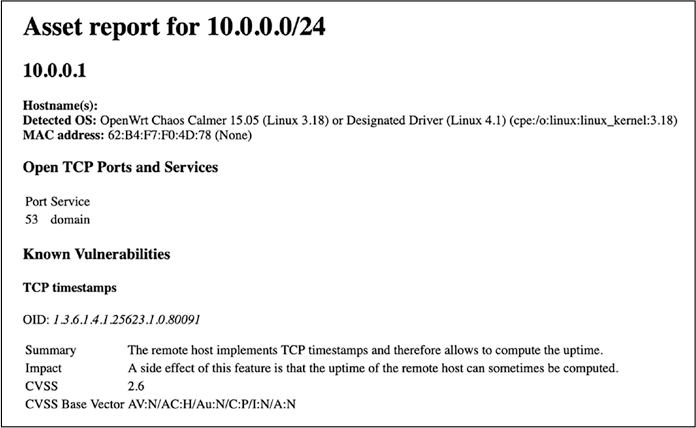
Figure 13-1: Sample report for assets in range 10.0.0.0/24
Unlike the basic asset report, this one provides detailed information on a host-by-host basis that isn’t structured in a spreadsheet format. Although the table borders are invisible, the “Open TCP Ports and Services” and “Known Vulnerabilities” sections are formatted via tables.
Planning the Script
Like your summary asset report (Listing 11-3 in Chapter 11), you’ll draw largely from the hosts collection in Mongo in detailed-assets.py. But for each host, you’ll also want information on every vulnerability (per OID) OpenVAS discovers for that host, which you’ll pull from the vulnerabilities collection. Listing 13-1 shows the logic to put together all the information.
Get all unique hosts in 'hosts'
Filter per IP range, if any, passed as a command line parameter
For each host in 'hosts' after IP filter:
    Gather basic information in Mongo document
    For each OID associated with the host:
        Look up in 'vulnerabilities' collection
        Assemble data from returned document
    Format and present data
Listing 13-1: Pseudocode for detailed-assets.py
Once you’ve planned your script’s logic, think about implementation details. How will you pass the filtering IP range to the script? Do you want to search for hosts any other way than by network range (more on this in “Customize It” on page 130)? How do you want to format the output HTML?
In Listing 13-2, I used the yattag library, which produces well-formatted HTML code by using standard Python structures and idioms. The yattag library automatically makes any text strings that pass through it HTML safe: for instance, it replaces < and > with < and >, and it replaces other entities with their HTML-encoded equivalents to ensure that the browser doesn’t interpret any unexpected HTML code (or scripts!). If you manually generate the HTML tags, you must ensure that all strings pulled from the database are properly HTML formatted before placing them into the output file.
As we walk through the sample script that implements this logic, you’ll learn about some of the other design choices I made. Use the code as inspiration to customize the form (displayed HTML) and function (specific fields retrieved from the database) for your own purposes.
Script Listing
Because the script detailed-assets.py in Listing 13-2 is fairly long, we’ll walk through it in parts. First, we’ll look at the script’s preamble and table-setting portions: loading important libraries and starting the script with the main() function.
  #!/usr/bin/env python3

  from pymongo import MongoClient
  from operator import itemgetter
➊ import datetime, sys, ipaddress
  from yattag import Doc, indent

  client = MongoClient('mongodb://localhost:27017')
  db = client['vulnmgt']
  outputFile = "detailed-asset-report.html"

  def main():
   ➋ if len(sys.argv) > 1:
          network = sys.argv[1]
      else:
          network = '0.0.0.0/0'
      networkObj = ipaddress.ip_network(network)
   ➌ doc, tag, text, line = Doc().ttl()
   ➍ with tag('html'):
          with tag('head'):
              line('title', 'Asset report for ' + network)
Listing 13-2: Script listing for detailed-assets.py (part 1)
We import the ipaddress library (from Python 3) ➊ and the Doc and indent functions from yattag (installed via pip). If we pass the script no arguments, it reports on hosts in any network range. If we pass an argument, it’s interpreted as an IP address range using classless interdomain routing (CIDR) notation ➋.
We initialize the yattag structure, which creates four objects (doc, tag, text, line) ➌ that will be used throughout the rest of the script to provide HTML structures for the document, tags, text blocks, and short (one-line) tags, respectively. By using these four objects to generate chunks of HTML, the entire document is created in memory before it’s written to a file at the end of the script. Keep this in mind because very large HTML documents for result sets of thousands or tens of thousands of assets might strain your vulnerability management system’s available memory.
The with structure lets you run code with setup and teardown procedures but abstracts away the complexity. When you run with function(): do things, you’re actually running setupFunction(), do things, cleanupFunction().
The with tag('tagname') ➍ structure means the HTML tag tagname encapsulates all the output generated within the following indented code block. The with structure creates the tag (when it’s invoked) and closes it when the block ends. In larger-scope tags, such as body and html, most of the script executes within the with block scopes!
Consider this brief example: imagine you want to make a simple HTML document, as shown in Listing 13-3.
<html>
    <head>
        <title>This is a title!</title>
    </head>
    <body>
        <h1>This is a heading!</h1>
        <p>This is some text in a paragraph.</p>
    </body>
</html>
You could use the yattag library to generate this using the Python snippet in Listing 13-4. Note that all you need to do is enclose the individual tag items (title, h1, p) within the larger with() blocks.
from yattag import Doc
doc, tag, text, line = Doc().ttl()
with tag('html'):
    with tag('head'):
        line('title', 'This is a title!')
    with tag('body'):
        line('h1', 'This is a heading!')
        line('p', 'This is some text in a paragraph.')
Most of the rest of the script takes place within the context of the html tag. In the next code section (Listing 13-5) we retrieve the basic information for each host and place it in the in-progress HTML document.
     ➊ with tag('body'):
            line('h1', 'Asset report for ' + network)
            iplist = db.hosts.distinct("ip")
         ➋ iplist.sort(key=ipaddress.ip_address)
            for ip in iplist:
             ➌ if ipaddress.ip_address(ip) not in networkObj:
                   continue
                details = db.hosts.find_one({'ip':ip})
                osList = details['os']
             ➍ if osList != []:
                    osList.sort(key=itemgetter('accuracy'))
                    os = osList[0]['osname']
                    cpe = osList[0]['cpe'][0]
                else:
                    os = "Unknown"
                    cpe = "None"
                hostnameString = ""
             ➎ if details['hostnames'] != []:
                    for name in details['hostnames']:
                        hostnameString += name + ', '

                line('h2', ip)
                line('b', 'Hostname(s): ')
                text(hostnameString)
                doc.stag('br')
                line('b', 'Detected OS: ')
                text(os + " (" + str(cpe) + ")")
                doc.stag('br')
                line('b', 'MAC address: ')
                if all (k in details['mac'] for k in ('addr', 'vendor')):
                    text("{} ({})".format(details['mac']['addr'],
                    details['mac']['vendor']))
                openTCPPorts = []
                openUDPPorts = []
             ➏ for portService in details['ports']:
                    if portService['proto'] == "tcp":
                        openTCPPorts.append([int(portService['port']),
                        portService['service']])
                    elif portService['proto'] == "udp":
                        openUDPPorts.append([int(portService['port']),
                        portService['service']])
                openTCPPorts.sort()
                openUDPPorts.sort()
                if len(openTCPPorts) > 0:
                    line('h3', 'Open TCP Ports and Services')
                    with tag('table'):
                        with tag('tr'):
                            line('td', 'Port')
                            line('td', 'Service')
                        for port, service in openTCPPorts:
                            with tag('tr'):
                                line('td', port)
                                line('td', service)

                if len(openUDPPorts) > 0:
                    line('h3', 'Open UDP Ports and Services')
                    with tag('table'):
                        with tag('tr'):
                            line('td', 'Port')
                            line('td', 'Service')
                        for port, service in openUDPPorts:
                            with tag('tr'):
                                line('td', port)
                                line('td', service)
Listing 13-5: Script listing for detailed-assets.py (part 2)
The with tag for the HTML body block is nested inside the html block ➊. We retrieve the list of hosts from the database and then sort it using the ipaddress library ➋. This is necessary because, unlike CSV, HTML can’t be easily sorted. The ipaddress.ip_address is a sortable field, but if you’re not using the ipaddress library, you’ll need to write a custom sort function to account for the dot-decimal notation of IP addresses.
The main body of the script loops over IP addresses. We first check whether each host is in the provided IP range ➌. If it is, we generate a block of HTML with the host details from the database. OS detection can generate multiple options, so the script first sorts these by accuracy and then reports the first result ➍. (There might be multiple 100 percent accuracy guesses, so take this with a grain of salt!) Next, we create a list of all associated hostnames ➎, gather open ports, both TCP and UDP ➏, and then print a table of open ports for each protocol.
Listing 13-6 shows the last major output section: for each host, a list of vulnerabilities is associated with the host including basic details for each.
             ➊ if 'oids' in details:
                    line('h3', 'Known Vulnerabilities')
                    for oidItem in details['oids']:
                        oidObj = db.vulnerabilities.find_one({'oid':
                        oidItem['oid']})
                        line('h4', oidObj['name'])
                        with tag('p'):
                            text('OID: ')
                            line('i', oidObj['oid'])
                        with tag('table'):
                            with tag('tr'):
                                line('td', 'Summary')
                             ➋ if 'summary' in oidObj:
                                    line('td', oidObj['summary'])
                                else:
                                    line('td', "")
                            with tag('tr'):
                                line('td', 'Impact')
                                if 'impact' in oidObj:
                                    line('td', oidObj['impact'])
                                else:
                                    line('td', "")
                            with tag('tr'):
                                line('td', 'CVSS')
                                line('td', oidObj['cvss'])
                            with tag('tr'):
                                line('td', 'CVSS Base Vector')
                                line('td', oidObj['cvss_base_vector'])
                    oidCves = db.vulnerabilities.find_one({'oid':
                    oidItem['oid']})['cve']
                    if oidCves != ['NOCVE']:
                        line('h5', 'Associated CVE(s):')
                        with tag('ul'):
                            for cve in oidCves:
                                line('li', cve)
                doc.stag('hr')
         ➌ with open(outputFile, 'w') as htmlOut:
                htmlOut.write(indent(doc.getvalue()))
                htmlOut.close()

main()
Listing 13-6: Script listing for detailed-assets.py (part 3)
We first check if any OIDs are associated with the host ➊ and then loop through them, gathering details. A number of the fields we want in our report are optional in the OpenVAS report, so you’ll need to check whether any given tag exists before trying to insert it ➋. Once the HTML is fully generated, we write the complete document to the output file using another with tag ➌ and exit. The indent function makes the output more readable. The result is that we’ve generated the report shown in Figure 13-1. (If you take some time to refine the HTML document, you can even make it a little less ugly.)
Customize It
You could place the kind of structured data generated by detailed-assets.py into a Word document, a PDF, or a JSON structure to send to another system for further analysis. If you’re a masochist, you could even structure it as a CSV table. But I’ll leave representing this kind of nested data in CSV as an exercise for you.
Instead of filtering on IP range, you could filter on any of the fields in the host document, such as hostnames or os.cpe. You can add more filtering options to the command line or build the filters directly into the script if you’re certain that you’ll always want them for your detailed asset reports.
If you’d prefer not to install yet another Python library, you could hand generate your HTML tags by constructing strings and writing them to the output file. If you do so, you’ll need to make all the data returned from Mongo, particularly the free-form text fields, HTML safe.
You can identify and sort hosts by hostname instead of IP address, especially in Windows-only environments where workstations and servers are often better known by hostname than IP address.
The script detailed-assets.py generates the entire HTML document in memory before writing it to a file at the end. If you have large datasets or limited RAM on your vulnerability management system, you can reduce RAM consumption by modifying the script to write the file piecemeal: first outputting the opening HTML tags and then one host record at a time.
In addition to using OpenVAS data, you can expand the script to pull data from the cve-search database for vulnerabilities with associated CVEs. You’ll learn how to use this database in the next script.
Detailed Vulnerability Reporting
This script expands the simple vulnerability report from Listing 11-5 with detailed vulnerability information from OpenVAS and the cve-search database, compiled together in one readable HTML report. We’ll add an IP range filter as a command line argument so you can view vulnerabilities for a subset of hosts. But the only host information in the report will be a list of IP addresses affected by each vulnerability and a count. We’ll also add a filter to exclude vulnerabilities without CVE IDs: we’ll assume that any vulnerability without a CVE isn’t serious enough to describe in detail. If you want to see all the vulnerabilities in the database, just remove this filter.
Here is the information you’ll collect and format for each vulnerability:
CVE
The CVE ID of the vulnerability
Summary
A brief description of the vulnerability
CWE
The common weakness enumeration (CWE) category with a link to the online CWE database
Published date
When the vulnerability was first disclosed publicly
Last update time
The last time the vulnerability information was updated
CVSS score
A numerical score from 0 to 10 of the overall vulnerability severity
CVSS details
The individual breakdowns of each component comprising the full CVSS score, each given on a scale of “none, low, medium, high, critical”:
- Confidentiality impact
- Integrity impact
- Availability impact
- Access vector
- Access complexity
- Authentication required
References
External links to reports, patches, and analysis
List of affected hosts
A list, by IP address, of hosts in your environment that this vulnerability affects
Count of affected hosts
The number of hosts with this vulnerability in your environment
As with CVE, the MITRE Corporation manages CWE and provides a comprehensive taxonomy of vulnerabilities. (If a vulnerability in some software you use is categorized, for example, as CWE-426: Untrusted Search Path, you can look up CWE-426 to learn how that class of vulnerabilities works.)
We include the list of references attached to the CVE, which might include patch or mitigation information, information about exploits, and third-party vulnerability reports, to provide important context that informs how your organization addresses the vulnerability.
The output will look similar to Figure 13-2. It’s ordered by vulnerability, and the important details are output in an HTML table.

Figure 13-2: Sample output for detailed-vulns.py
Planning the Script
Because detailed-vulns.py is designed to return vulnerabilities found on hosts within a specific network range, the first step is to find all of those hosts. Once we have that list, we’ll use it to find all vulnerabilities that exist on one or more hosts on the list. Then, using that list, we’ll pull details for each vulnerability that has an associated CVE: the rest are ignored. Listing 13-7 shows what the logic looks like.
Get all unique hosts in 'hosts'
Filter per IP range, if any, passed as a command line parameter
For each host in 'hosts' after IP filter:
    Collect list of OIDs, insert into OID list
For each OID in OID list:
    Determine if it has a CVE; if not, go to next OID
    Gather data from associated CVE in cvedb database
    Format and present data
Listing 13-7: Pseudocode for detailed-vulns.py
Like detailed-assets.py in the preceding section, Listing 13-8 uses yattag to format and output the report in HTML. Because the structure is similar to the previous script, I’ll provide the entire script in the next section and then draw your attention to a few key pieces.
Script Listing
Listing 13-8 shows the complete detailed-vulns.py script.
#!/usr/bin/env python3
from pymongo import MongoClient
import datetime, sys, ipaddress
from yattag import Doc, indent

client = MongoClient('mongodb://localhost:27017')
db = client['vulnmgt']
cvedb = client['cvedb']
outputFile = "detailed-vuln-report.html"

def main():
    if len(sys.argv) > 1:
        network = sys.argv[1]
    else:
        network = '0.0.0.0/0'
    networkObj = ipaddress.ip_network(network)
    hostCveMap = {}
    hostList = db.hosts.find({'oids': {'$exists' : 'true'}})
 ➊ for host in hostList:
        ip = host['ip']
        if ipaddress.ip_address(ip) not in networkObj:
            continue
        for oidItem in host['oids']:
            cveList = db.vulnerabilities.find_one({'oid':
            oidItem['oid']})['cve']
            for cve in cveList:
             ➋ if cve == "NOCVE":
                    continue
             ➌ if cve in hostCveMap.keys():
                    if ip not in hostCveMap[cve]:
                        hostCveMap[cve].append(ip)
                else:
                    hostCveMap[cve] = [ ip ]
    doc, tag, text, line = Doc().ttl()

    with tag('html'):
        with tag('head'):
            line('title', 'Vulnerability report for ' + network)
        with tag('body'):
            line('h1', 'Vulnerability report for ' + network)
         ➍ for cve in sorted(hostCveMap.keys()):
                cvedetails = cvedb.cves.find_one({'id': cve})
                affectedHosts = len(hostCveMap[cve])
                listOfHosts = hostCveMap[cve]
                line('h2', cve)
                line('b', 'Affected hosts: ')
                text(affectedHosts)
                doc.stag('br')
                if (cvedetails):
                    with tag('table'):
                        with tag('tr'):
                            line('td', 'Summary')
                            line('td', cvedetails['summary'])
                        with tag('tr'):
                            line('td', 'CWE')
                            with tag('td'):
                                id = 'Unknown'
                                if cvedetails['cwe'] != 'Unknown':
                                    id=cvedetails['cwe'].split('-')[1]
                             ➎ with tag('a',
                                href="https://cwe.mitre.org/data/"
                                "definitions/"+id):
                                    text(cvedetails['cwe'])
                                cweDetails = cvedb.cwe.find_one({'id': id})
                                if cweDetails:
                                    text("(" + cweDetails['name'] + ")")
                                else:
                                    text("(no title)")
                        with tag('tr'):
                            line('td', 'Published')
                            line('td',
                            cvedetails['Published'].strftime("%Y-%m-%d"))
                        with tag('tr'):
                            line('td', 'Modified')
                            line('td',
                            cvedetails['Modified'].strftime("%Y-%m-%d"))
                        with tag('tr'):
                            line('td', 'CVSS')
                            line('td', cvedetails['cvss'] or 'Unknown')
                        with tag('tr'):
                            with tag('td'):
                                line('b', 'Impacts')
                        if 'impact' in cvedetails:
                            with tag('tr'):
                                line('td', "Confidentiality")
                                line('td', cvedetails['impact']
                                ['confidentiality'])
                            with tag('tr'):
                                line('td', "Integrity")
                                line('td', cvedetails['impact']
                                ['integrity'])
                            with tag('tr'):
                                line('td', "Availability")
                                line('td', cvedetails['impact']['availability'])
                        with tag('tr'):
                            with tag('td'):
                                line('b', 'Access')
                        if 'access' in cvedetails:
                            with tag('tr'):
                                line('td', "Vector")
                                line('td', cvedetails['access']['vector'])
                            with tag('tr'):
                                line('td', "Complexity")
                                line('td', cvedetails['access']['complexity'])
                            with tag('tr'):
                                line('td', "Authentication")
                                line('td', cvedetails['access']
                                ['authentication'])
                        with tag('tr'):
                            with tag('td'):
                                line('b', "References")
                        for reference in cvedetails['references']:
                            with tag('tr'):
                                with tag('td'):
                                    with tag('a', href=reference):
                                        text(reference)
                else:
                    line('i', "Details unknown -- update your CVE database")
                    doc.stag('br')

                line('b', "Affected hosts:")
                doc.stag('br')
                for host in sorted(listOfHosts):
                    text(host)
                    doc.stag('br')
    with open(outputFile, 'w') as htmlOut:
        htmlOut.write(indent(doc.getvalue()))
        htmlOut.close()

main()
Listing 13-8: Script listing for detailed-vulns.py
In the first main loop, we collect a list of vulnerabilities on the specified hosts by CVE ID ➊. If a vulnerability doesn’t have an assigned CVE, we skip it ➋. We build a host map (a dictionary with CVE IDs as keys, mapped to a list of IP addresses) for each CVE during the first loop ➌, so when it comes time to list the hosts affected by each vulnerability, the information is already available. We loop through the full set of vulnerabilities ➍ and for each one generate a chunk of HTML containing vulnerability details (the same way as in detailed-assets.py). Because the vulnerability details include links to CWE information and CVE references, we need to use the HTML a tags with href attributes to generate links in the output report ➎.
Customize It
Several of the suggestions from detailed-assets.py, such as adding filters other than IP addresses and writing the report in chunks if it’s large, might be useful to you in customizing this script as well.
You might want to include more host information, for example, hostname, total vulnerabilities on that host, and OS detection.
If you report on all discovered vulnerabilities, not just those with CVE IDs, you need data from the OpenVAS report to fill in for the data that’s not in the cve-search database.
In addition, instead of sorting by CVE ID, from oldest to newest, you can sort from newest to oldest or use another sort entirely, such as total CVSS score.
Exploitable Vulnerability Reporting
Now that we’ve generated more complex reports, let’s bring in external vulnerability information to enrich an existing report. In this example, you’ll use a publicly available exploit repository, the Exploit Database (https://exploit-db.com/), and combine its information with the detailed vulnerability report to add another level of detail and actionability.
Preparation
To filter vulnerabilities according to their appearance in the Exploit Database, we’ll use cve_searchsploit (available at https://github.com/andreafioraldi/cve_searchsploit/), a free command line tool, to search the Exploit Database. It contains a JSON file, exploitdb_mapping_cve.json, that directly maps CVE IDs to a list of exploits that apply to that CVE, which is exactly the data we need to add an exploitability filter to our vulnerability report.
To install cve_searchsploit, run this command:
$ git clone https://github.com/andreafioraldi/cve_searchsploit.git
This line installs the tool in the cve_searchsploit/ subdirectory of the current directory. Once it’s there, don’t forget to add a command to your updater script (Listing 7-4) to periodically run git fetch; git checkout origin/master -- cve_searchsploit/exploitdb_mapping_cve.json within that directory to refresh the JSON file and ensure the mapping is up-to-date.
NOTE
The References section in the CVE database includes some Exploit Database links. But the mappings in exploitdb_mapping_cve.json are more comprehensive than the links in References. Using cve_searchsploit is a good example of integrating an external data source into our vulnerability management system.
Modifying the Old Script
Because exploitable-vulns.py is essentially detailed-vulns.py with one more filter, which is to only report on vulnerabilities that also have known exploits in the Exploit Database, the changes required are minimal. We load the CVE-to-exploit map from exploitdb_mapping_cve.json, but before outputting a report on any given vulnerability, we ensure that it exists in that map. Then we add a section to the report with links to the exploits that also exist on the Exploit Database. Listing 13-9 shows the changes from detailed-vulns.py. You can find the complete script listing at https://github.com/magnua/practicalvm/.
  #!/usr/bin/env python3
  --snip other imports--
➊ import datetime, sys, ipaddress, json
  --snip other global variables--
  cveToExploitdbMap = "/home/andy/cve_searchsploit/cve_searchsploit/exploitdb_"
  "mapping_cve.json"

  def main():
  --snip network selection--
   ➋ with open(cveToExploitdbMap) as mapfile:
          exploitMap = json.load(mapfile)
  --snip host finding--
     for host in hostList:
  --snip CVE finding--
            for cve in cveList:
                if cve == "NOCVE":
                    continue
             ➌ if cve not in exploitMap:
                    continue
  --snip CVE-to-host mapping--
     doc, tag, text, line = Doc().ttl()
     with tag('html'):
         with tag('head'):
             line('title', 'Exploitable vulnerability report for ' + network)
         with tag('body'):
             line('h1', 'Exploitable vulnerability report for ' + network)
             for cve in sorted(hostCveMap.keys()):
  --snip most HTML generation--
               line('b', "ExploitDB links")
               doc.stag('br')
             ➍ for exploitID in exploitMap[cve]:
                    with tag('a',
                    href="https://www.exploit-db.com/exploits/"+exploitID):
                        text("https://www.exploit-db.com/exploits/"+exploitID)
                    doc.stag('br')
    with open(outputFile, 'w') as htmlOut:
        htmlOut.write(indent(doc.getvalue()))
        htmlOut.close()

main()
Listing 13-9: Selected script listing for exploitable-vulns.py
First, we import the JSON library, which we need to parse exploitdb_mapping_cve.json ➊. Next, we load exploitdb_mapping_cve.json into memory, converting the JSON data into a Python dictionary using the with structure ➋. We discard vulnerabilities not in this map ➌ and convert the list of exploits into live links to their respective Exploit Database pages ➍.
Customize It
All of the suggestions from detailed-vulns.py are still valid for exploitable-vulns.py.
The Exploit Database is just one publicly available list of exploits. Another one is Metasploit, which I’ll briefly discuss in the next chapter. You can import its vulnerability mappings from its local database by running the appropriate queries in exploitable-vulns.py.
You can also write filters similar to the exploitability filter for other vulnerability fields if you have matching external data sources. For example, you can import commercial vulnerability intelligence data to report on only vulnerabilities that are known to be under active attack by APT adversaries.
Summary
You now have several new and more complex reports to experiment with and customize. Don’t forget to add them to your automation script (Listing 12-2) so they run regularly and you always have fresh reports.
At this point, your vulnerability management system is largely complete and, I hope, regularly generating useful vulnerability intelligence for your organization.
In Chapter 14, we’ll look at system integration with your other tools via a basic application programming interface (API), automated exploitation and whether it makes sense in your environment, and vulnerability management systems in cloud environments.