
12
AUTOMATING SCANS AND REPORTING

You’ve now created scripts to scan your network, inserted the results into your database, and generated simple reports from the resulting data. If you wanted to, you could run all those scripts manually every time you needed fresh information about your organization’s vulnerability posture. But why do that when you can write another script to do the work for you? In this chapter, we’ll automate this process using a bash script called automation.sh.
Automation might sound complicated, but a simple automation script just executes other scripts, one after the other, as in Listing 12-1, and is scheduled to run on a specific interval using cron.
#!/bin/bash
run-script-1
run-script-2
--snip--
run-script-x
Listing 12-1: A simple automation script
In our case, automation.sh will run the scripts we built in Chapters 8 through 11.
Visualizing the Automation Process
Before we build automation.sh, let’s walk through the process from beginning to end so you’re clear on the tasks you want to automate and in what order.
Figure 12-1 highlights the steps of the vulnerability management life cycle (described in Chapter 1) that we’ll automate, which are collect data and analyze data.
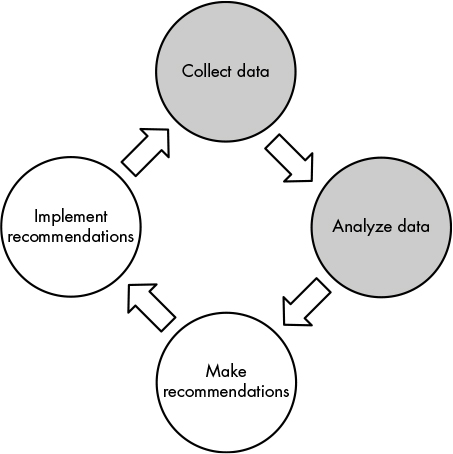
Figure 12-1: The vulnerability management life cycle
Collect Data
Collecting data usually occurs in two stages: run scans and then parse the results and import the data into your database. Chapters 8 and 9 showed the steps for this process.
- Run Nmap; output the results to XML.
- Run nmap-insert.py to parse the XML output and populate the Mongo database.
- Run OpenVAS; output the results to XML.
- Run openvas-insert.py to parse the XML output and populate the Mongo database.
Our automation script will use all of these steps in turn and will save the intermediate XML outputs with timestamps in case we need to review them later.
Instead of running one task, waiting for it to complete, and moving on to the next step, you could run some of the data-collecting steps in parallel. For example, you could run an Nmap scan and an OpenVAS scan at the same time, or you might import the results into Mongo in parallel. Monitoring multiple processes and ensuring they all finish before moving on to the next phase is an excellent challenge for experienced coders. But here we’ll err on the side of a simple script that you can build and understand easily
Analyze Data
By comparison, the data analysis step is easy: you run the scripts that generate reports (asset-report.py and vuln-report.py from Chapter 11) and then deliver the final result to whoever needs it. Of course, there’s room for considerable complexity in this step, both within the reports that generate the results and in how you combine them. You might use other tools to generate more reports or perform your own analyses on the data. The types and number of reports you create will depend on the data you accumulate and the reason for the analysis.
Maintain the Database
Maintaining the database, which was discussed in Chapter 10, isn’t part of the high-level vulnerability management process; nonetheless, it’s important. This is a separate process you should do continually, so we’ll build it into the automation script.
Planning the Script
The automation script doesn’t need to be complex. All it has to do is run all the steps that until now you’ve been running manually and store the outputs for later investigation. The list of operations is straightforward: collect and then analyze that data—run your scans, import the data, run your reports, and handle database maintenance tasks along the way. But there are some nuances worth mentioning:
- Order of operations. You must collect data before you can insert it and insert data before you can generate reports. But you don’t have to run your scans serially unless you customized your scan invocations so the input of one depends on the output of the other. For example, if you decided to save time in the OpenVAS script step by scanning only IP addresses that were returned as “live” by the Nmap scan, Nmap must finish before you start OpenVAS.
- Short subscripts or direct command lines. The database insertion process is complicated enough that it requires its own scripts. But since you can invoke Nmap using a single command, you can put the Nmap command directly into the main script. However, you might want to wrap that invocation in its own short script to keep your main script more consistent and readable. We’ll consider this decision and how automating Nmap differs from automating OpenVAS in “Running Nmap and OpenVAS” later in this chapter.
- Delivering the output. A script that runs asset-report.py and vuln-report.py will generate the reports, but once you have them, you need to decide what to do with them. You might save them to a shared folder in your environment, upload them via a web form to a secure location, or just email them to yourself. Whatever you choose to do, make sure the reports end up in a place where you won’t forget about them!
- Keeping your environment organized. Either delete the temporary files that scanning produces or save them in a way that won’t be overwritten by newer scan results every time you run the script. If you maintain an organized environment, you can easily refer to old scan results when you need to look at them directly (instead of via the database).
- Synchronizing with other scheduled tasks. Don’t schedule collection, reporting, updates, and maintenance tasks while you’re in the middle of a system update (Chapter 7) or a database cleanup (Chapter 10). You should run these tasks when they won’t conflict to avoid any incomplete or inaccurate results.
With these considerations in mind, here’s a suggested outline for the automation.sh script. In the next section, I’ll explain how I handled each design decision.
- Run a database cleanup script to remove data older than one month (db-clean.py).
- Run an Nmap scan on a configured network range; save the output to a timestamped XML file.
- Import the results of the preceding Nmap scan into the database (nmap-insert.py).
- Run an OpenVAS scan on a configured network range; save the output to a timestamped XML file.
- Import the results of the preceding OpenVAS scan into the database (openvas-insert.py).
- Run the reporting scripts; save the output to a timestamped CSV file.
Assembling the Script
Now that you know the steps your script needs to take and the order of the steps, you can build the script. Once it’s assembled, you’ll decide on an interval to run it, and you’ll have a working vulnerability management system.
But before we get to the script listing, I want to highlight a few of the design decisions I made, keeping in mind the concerns I outlined in the previous section and the reasons for those decisions.
Running Nmap and OpenVAS
Nmap is very straightforward: all you need to do is run the tool from the command line with the required parameters. For that reason, I set up automation.sh to run Nmap directly and then run nmap-insert.py to store its XML output in the database.
OpenVAS is more complicated. You must start the scan with one omp command, then wait for it to finish (monitoring its process with another omp command) before running a third omp command to generate the XML output. It’s possible to include all these steps directly in the automation script. But it’s more modular, maintainable, and readable to break out the OpenVAS commands into their own script. So the automation.sh script needs to run the OpenVAS script (run-openvas.sh) and wait for it to complete before importing the resulting XML file into the database.
Scheduling the Script
To control precisely when the script runs, edit the system crontab directly. As root, add the following line at the bottom of /etc/crontab, filling in the specific path to automation.sh:
4 0 * * 7 root </path/to/automation.sh>
This line will schedule the automation script to run at 12:04 AM, system time, on Sundays. You can also put the automation script, or a symlink to it, into /etc/cron.weekly or whichever directory best suits your preferred scan interval.
Because you’re also using cron to run your system update script from Listing 7-4, make sure the two scripts—system update and automation—don’t run simultaneously. Most systems run entries in the /etc/cron.xxxx directories in alphabetical order. But I’d suggest ensuring this is true in your environment before putting the scripts here for scheduling. If you’re placing the scripts directly in crontab, leave a safe interval between the update and automation scripts, ideally running them on different days.
Script Listings
Listing 12-2, automation.sh, and Listing 12-3, run-openvas.sh, are the code listings you’ll run. Don’t forget to mark them as executable (run: chmod +x filename) before scheduling.
  #!/bin/bash
➊ TS='date +%Y%m%d'
  SCRIPTS=/path/to/scripts
  OUTPUT=/path/to/output
  RANGE="10.0.0.0/24"
  LOG=/path/to/output-$TS.log
  date > ${LOG}
➋ echo "Running database cleanup script." >> $LOG
  $SCRIPTS/db-clean.py
➌ nmap -A -O -oX $OUTPUT/nmap-$TS.xml $RANGE >> $LOG
➍ $SCRIPTS/nmap-insert.py $OUTPUT/nmap-$TS.xml >> $LOG
➎ $SCRIPTS/run-openvas.sh >> $LOG
➏ $SCRIPTS/openvas-insert.py $OUTPUT/openvas-$TS.xml >> $LOG
  $SCRIPTS/asset-report.py >> $LOG
  mv $SCRIPTS/asset-report.csv $OUTPUT/asset-report-$TS.csv
  $SCRIPTS/vuln-report.py >> $LOG
  mv $SCRIPTS/vuln-report.csv $OUTPUT/vuln-report-$TS.csv
  echo "Finished." >> $LOG
Listing 12-2: Script listing for automation.sh
To timestamp the XML and CSV output files, we store the current time in a YYYYMMDD format in the variable TS ➊. Then we use the SCRIPTS and OUTPUT variables to store the paths to the script and output folders, respectively. We set RANGE to the network range or ranges we want to scan with Nmap. (Don’t forget that OpenVAS is configured differently, via setting up targets, and is not bound by the range specified here.) We point LOG to a log file location that will also be tagged with the current timestamp. This file will hold the STDOUT output of each command for later review. Because every log and output file is timestamped, it will be easy to return to the script outputs later in case we run into problems or need to conduct additional analysis.
We run the database cleanup script ➋ to ensure that no stale data remains in the database. This script invokes Nmap directly ➌ but runs OpenVAS using the script shown in Listing 12-3 ➎. After running the database insert scripts ➍➏, we run the asset- and vulnerability-reporting scripts and move their output files to the OUTPUT directory. Then we add the line "Finished." to LOG so we know the script ran to completion.
Listing 12-3 presents the details of run-openvas.sh:
  #!/bin/bash
➊ OUTPUT=/path/to/output
  TS='date +%Y%m%d'
➋ TASKID=taskid
  OMPCONFIG="-c /path/to/omp.config"
➌ REPORTID=' omp $OMPCONFIG --start-task $TASKID |
  xmllint --xpath '/start_task_response/report_id/text()' -'
➍ while true; do
      sleep 120
    ➎ STATUS='omp $OMPCONFIG -R $TASKID |
      xmllint --xpath 'get_tasks_response/task/status/text()' -'
      if [ $STATUS = "Done" ]; then
       ➏ omp $OMPCONFIG -X '<get_reports report_id="'$REPORTID'"/>'|
         xmllint --format - > $OUTPUT/openvas-$TS.xml
         break
    fi
done
Listing 12-3: Wrapper script to run OpenVAS scans
This script assumes we already created a task, either through the Greenbone web GUI or the command line (see Chapter 8). By reusing the same task for each scan, we get a report history in the web GUI. We set the TASKID variable to the task globally unique identifier (GUID) (from the command line XML output or web GUI) ➋ and OMPCONFIG to the path of the configuration file with our OpenVAS credentials. Then we invoke omp to start the specified task ➌.
The omp command returns a chunk of XML that we’ll parse with xmllint, the Swiss Army knife of XML tools. The --xpath flag tells it to return data from a specific location: the text content of a report_id tag inside a start_task_response tag. We save the resulting report ID to get the scan report later ➏.
The rest of the script is a simple loop ➍: wait two minutes; check the current status of the task ➎, again using xmllint; when it changes to Done, generate the final report ➏; and exit. At this point, a report will be in the configured output folder ➊, and the rest of the automation script will run as previously described in Listing 12-2.
Customize It
If you’re using multiple scanners and have built your own scanning and database insertion scripts, you’ll need to think about the order in which they execute and enter their results into the database. You’ll need to consider these issues especially if you plan to have your scripts overwrite results that are already in the database.
If you want to run your Nmap and vulnerability scans separately or scan multiple network segments on different intervals, run them with separate scripts on their own intervals. Also, time your report generation so it doesn’t run while a scan is still in progress or inserting its results into the database.
If you don’t want to clear old results from your dataset every time you run new scans, schedule db-clean.py to run at a different interval instead of calling it from automation.sh.
Additionally, if you’d prefer not to synchronize your update script and your collection/reporting script(s), you can combine the two: first run a full update of your system, then run the scans and report on the results. Note that this will increase the script’s total runtime.
Summary
In this chapter, you automated your scans and basic reporting, saving yourself a lot of busywork. At this point, you have a basic vulnerability management system: it periodically scans your environment and then generates and saves reports based on the most recent data available.
Now that you have a good understanding of the vulnerability management process, you can expand beyond the basics. In the next chapter, we’ll look at more complex reports that you can generate from your scan data. Then, in Chapter 14, we’ll incorporate other data sources and build a basic API to allow other tools to integrate with your vulnerability management system.