
Chapter 10: Operating the EA Repository
Someone once said that imitation is the sincerest form of flattery. Once you begin producing and publishing models based on detailed, complete, and consistent information about your organization's enterprise, there is little doubt others will want to do the same. This is an ideal situation. Having a common and consistent understanding of the composition and state of your enterprise is the basis for making sound decisions regarding it. It is what brings trust to the Enterprise Architecture (EA) practice. Indeed, you should encourage reusing the information in your repository whenever possible.
Sharing a repository, however, presents another set of challenges. For anyone who has worked within or managed a development environment or any other shared resource, these challenges may seem familiar. Managing or operating an EA as a shared resource is the subject of this chapter. In this chapter, we will review three topics related to operating the EA repository. Those topics are as follows:
- Sharing repositories
- Managing a shared repository
- Repository governance
Much of what we will cover in this chapter is covered in detail in the Sparx User Guide. However, we've simplified some of the most important features here in this chapter in a condensed format to make you aware of them and provide references to more information, and we've also added our own bits of wisdom to these various practices. Using a shared repository facilitates many interesting features of Sparx such as discussions, reviews, chat, mail, and the calendar. We won't go into detail about these features in this chapter. As you will see, their use is very straightforward, and they don't need much explanation. Instead, we've focused on the issues we think are critical to successfully deploying and managing a shared repository.
Let's take a look at what you will need to complete this chapter.
Technical requirements
We hope by now that you have Sparx Systems' Enterprise Architect installed on your computer.
You can access the repository at the following GitHub address: https://github.com/PacktPublishing/Practical-Model-Driven-Enterprise-Architecture/blob/main/Chapter10/EA%20Repository.eapx.
This chapter discusses repositories deployed on a commercially available relational database engine such as Oracle, SQL Server, or MySQL. If you have no intention of doing so, you can skip this chapter. If you do plan to migrate to a shared repository, you will need to read the Sparx User Guide covering this topic. You can find it at the following location: https://sparxsystems.com/enterprise_architect_user_guide/15.2/model_repositories/settingupdatabasemodelfile.html.
Important Note
You will need administrator privileges on your repository to take full advantage of this chapter.
Sharing repositories
The most effective way to share repository access is to maintain your repository in a form that is easily shared – a relational database. Even if your repository is an .eap file on your desktop, it's already in a relational database. Sparx uses a JET database to store local repositories. While that's fine for local access, sharing repository access among five or more users is best accomplished using Oracle, Microsoft SQL Server, MySQL, or a similar database engine to house your repository on a shared remote server.
Sparx provides two ways to connect to such a remote repository:
There are benefits and drawbacks to either choice:
- Connecting via the direct database connection is the fastest, but it requires a database user account for each user. It also requires that each user has network access to the server on which the database engine is deployed. This may not always be the case.
- Pro Cloud Server acts as a proxy and removes the need for a direct connection to the database engine. Communication with Pro Cloud Server is via HTTP, which is ubiquitous.
- The downside is that Pro Cloud Server adds another layer of administration and a very small amount of performance overhead to translate from HTTP.
Deciding which way to connect to your repository is beyond the scope of this chapter. It suffices to say that you need your enterprise repository stored in a relational database that you can share. Whichever method you choose, you must also consider how you will support multiple parallel tracks of model development.
Organizing and reorganizing the repository
Sharing and reusing model information requires that the modeler be able to find that information. The structure of your repository is critical to finding information. As your repository grows, its structure becomes even more important. Without a proper structure, the repository will become a tangled mess that is of little use to anyone. There is no single layout that is appropriate for all repositories, nor is one structure appropriate for any given repository over its entire lifespan. Analyzing, assessing, and reorganizing a repository needs to happen often. You should create a process for reorganizing as part of your EA practice.
As you begin the process of modeling, whether in a new repository or on a new subject area, it's often fine to simply place all elements and diagrams for the model into a single package. As you add models and subject areas to your model, you need to consider how you will reference your new models or subjects. When the number of items in a package begins to make it difficult to find things, it's time to reorganize.
The first thing to consider in organizing your repository is what areas modelers are most likely to reuse. They are more likely to reuse elements than diagrams. Diagrams represent a view of a subject from a specific viewpoint. The model element represents the facts that are often immutable. Separating model elements from the views that use those elements is usually the first level of organization.
Once the number of elements in a package starts to become unwieldy, you should consider organizing the elements by element types. You can use the ArchiMate® stereotypes for this purpose. This has the added advantage of allowing you to easily perform enterprise-wide operations on the repository based on the element type. We saw a glimpse of this type of organization back in Chapter 7, Enterprise-Level Technology Architecture Models, when we organized equipment elements by type:
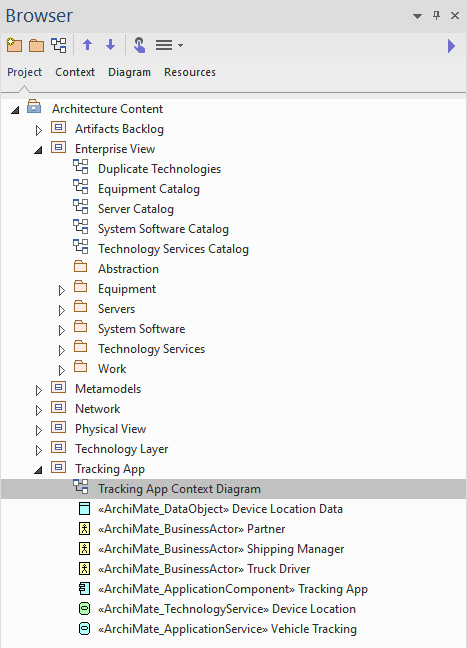
Figure 10.1 – A repository structure
With all of your elements organized by element type, you may be wondering what happens when you need to reference these same elements in other ways, such as from the context of an application or a business process. This is where a diagram comes into play. A diagram that contains elements from several packages serves as an index to those elements. Sparx even provides a way to open the diagram as a list. From any open diagram, right-click inside it and select Switch View, and then select Switch to List View, as shown in the following figure:
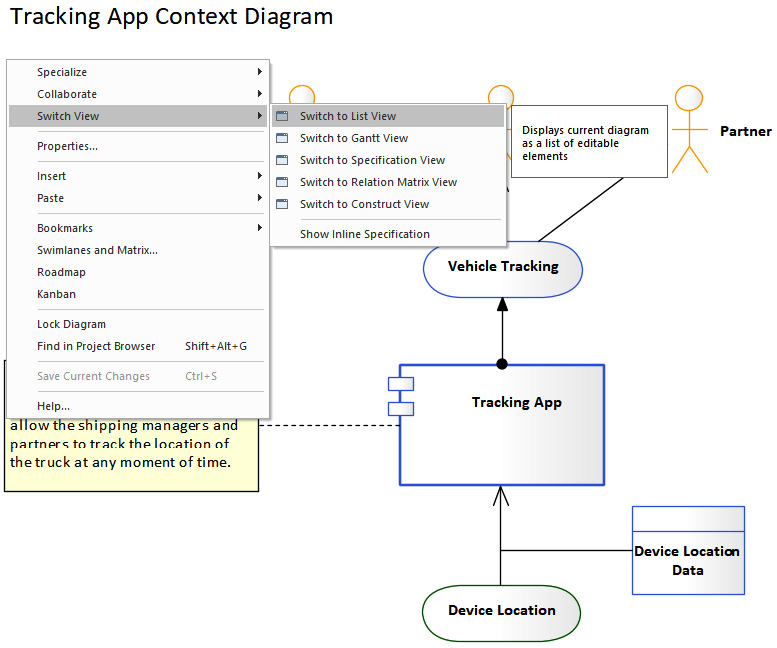
Figure 10.2 – Switching views from the Tracking App Context diagram
The result is a neat list of elements, as shown in the following diagram:

Figure 10.3 – A list view
While this approach to structuring a repository has served us well, it's not the only way. Our intent is not to be prescriptive in the structure you choose but rather to encourage you to apply some time and thought to the subject of repository organization. Now, let's look at other important considerations for sharing repositories.
Model abstraction
As you model various aspects of your enterprise, the number of connections among elements increases dramatically. This is especially the case when you increase the number of modelers working concurrently. These connections can often become troublesome. Consider the following scenario.
One of your architects, who we'll call Sam, is in the process of modeling a new inventory management system called ATC-INSTOCK. You, on the other hand, are responsible for identifying critical changes to the enterprise accounting system, ATC-GL. The ATC-GL model is comprised of 17 different elements, representing the components that make up the accounting system. One of these elements is the ATC-API1 component, which provides the API for external systems to add ledger transactions. Sam models the interaction for adding inventory by linking ATC-INSTOCK to ATC-API1. You realize that you need to replace the ATC-API1 component with a new type of element. Because ATC-GL has been around for years, there are dozens or even hundreds of links to ATC-API1. How do you reconcile these links with the latest version of ATC-GL?
There are issues with this scenario that would justify objection, not the least of which is the question of why two enterprise architects are working at such a low level. However, that's a question for another book; the question for this book is why there is no abstract element to represent the entire ATC-GL system. This is the point of this subsection. There need to be abstract representations in the model for all major information systems. Sam needs to reference the enterprise accounting system, not the ATC-API1 component. You can change all of the components or elements that make up the accounting system, but you should never remove or delete the abstract element that represents the entire enterprise accounting system.
Model replication
One of the primary tenets of a good data management or data architecture strategy is to eliminate redundant data whenever possible, except for backups. This is no different for model data. Replicating models is not a good practice. If you replicate a model to allow parallel model development, inevitably, both models will become inaccurate or incomplete over time. Reconciling the differences between replicated models can become a huge task. Our recommendation is to not go there. One exception to this rule involves the use of a version management tool. We'll talk about that next.
Version management
Sparx interfaces with various version management systems to manage parallel model development. This feature can be convenient in allowing for offline model work. It does, however, require effort when bringing two parallel development streams back together. As with any source management tool, when checking-in offline work, conflicts can occur.
You must reconcile those conflicts manually before merging the two branches. This process is similar to merging two branches of source code using a version management system. The only difference is that the content you are merging with may not be as familiar to you as the source code is unless you've worked with Sparx for a while.
Sandboxes
One method of supporting parallel model development that has worked quite well for us in the past is the employment of what we call sandboxes. A sandbox is simply another model root in the same repository, dedicated to a project that will change the enterprise. We name these sandboxes according to the project they represent. The following diagram depicts a new sandbox to support the new inventory management system at ABC Trading:
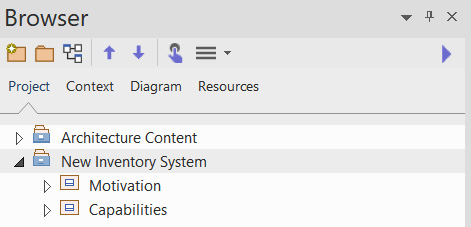
Figure 10.4 – A new sandbox for the inventory system
Naming a Sandbox
Although the name sandbox implies a play area, we avoid naming these new model roots after a person, as we've found that it tends to encourage experimentation in the shared repository. It's best to leave experimentation to a local repository; otherwise, these sandboxes tend to turn into cat boxes, if you know what we mean.
The use of sandboxes in the shared repository provides us with the means to represent the potential or proposed future state of the enterprise while leaving our original model root to represent the current state of the enterprise. This is an important capability. We need to always maintain the ability to know and report on the current state of the enterprise. Keeping new or proposed changes in a separate area is one measure to ensure that you always have that ability. Now, we'll look at another necessary measure – maintaining status.
Element status
One of the advantages of using a sandbox in a shared repository is that we can still reference the existing architectural elements. Sparx allows us to establish links from elements in one model root to elements in another. To do this safely, however, we must employ a means of identifying our sandbox elements as new; otherwise, we could run into a situation where reports run against the existing model root may unintentionally include new elements from a sandbox. We will learn more about reports and report templates in the next chapter. For now, we just need the means to distinguish elements other than by their location. This calls for the use of the element Status field.
When you create a new element in Sparx, the default behavior sets the element's status to Proposed. This is the perfect status for working in a sandbox. Sparx comes preconfigured with a set of status values. To see the configured status values, navigate to Configure > Reference Data > Model Types > General Types and select Status from the left panel of the dialog, as follows:
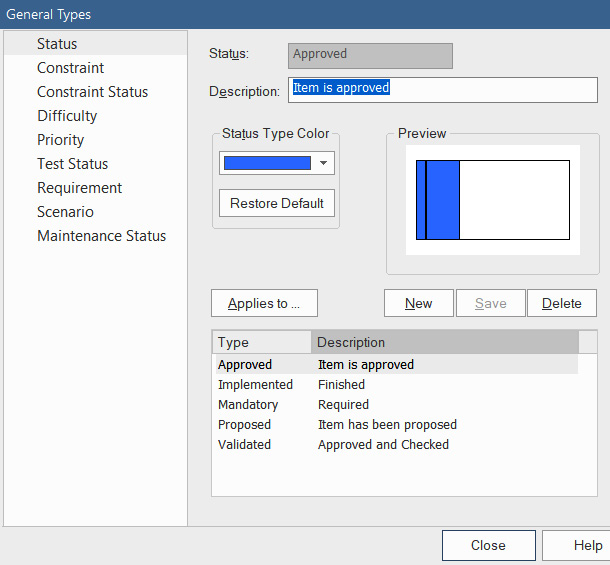
Figure 10.5 – The element status value configuration
To distinguish those elements that represent the current state of the enterprise, we set their status to Implemented. Before you go and open the properties dialog for each element in your repository, Sparx provides a quick and convenient way to update the status for an entire package, or even an entire model. Simply select the package level for the elements you want to update, and then navigate to Design > Model > Manage > Package > Update Status. The following dialog will appear:

Figure 10.6 – The Status Update dialog
Select the status you want to change to and click OK. As you can see, this dialog can change the values for the New Status, New Phase, New Version, and Modified Date fields.
The use of the element Status field implies a process behind the creation of elements and their promotion from a sandbox into the core model. Before you begin using the Status field, it's best to define and document the process of promoting elements from the sandbox. One way to do this is through the use of a UML state machine diagram, as depicted in the following figure:

Figure 10.7 – A state machine diagram
A state machine diagram describes how an entity, such as an element, responds to input, processes, the current state, and events that occur by showing the resulting state of that entity. In our example, state is analogous to status. We can show how the status of an element changes based on its current status and what process has occurred. The links between statuses are the processes or activities that take place to change the element from one status to another.
We'll talk more about architecture-related processes in the section called Repository governance later in this chapter.
Managing the shared repository
As the use of the shared repository grows, so grows the need to manage and care for it. Almost immediately on implementation, the shared repository needs an administrator or manager. In the beginning, we've usually relied on one or more knowledgeable users to perform administration and configuration tasks. As the use and number of users grow, you may find that this needs to change. In this section, we will take a look at the most common administrator tasks and functions. The topics we will cover in this section include the following:
- Configuration management
- Implementing security
- Deleting and merging elements
- Backup and restore
- Automation
Configuration management
Many of the Sparx administration tasks can be found in the Configure tab, as depicted in the following screenshot:

Figure 10.8 – The Sparx Configure tab
As you can see, the functions on this tab relate to enterprise-wide settings or the health of the repository. From here, you can configure security, version control, status values, authors, data sources, and other similar functions.
Often, the administrator is responsible for creating report templates and publishing reports and HTML content. These functions can be restricted to a Sparx user with administrative privileges only. We'll look at implementing security next.
Implementing security
The default configuration of a Sparx repository has security turned off. You must be a registered user to turn security on. You won't be able to do it by using a trial version of Sparx. To turn security on, you must obtain an access key from the Sparx Registered User web pages at https://sparxsystems.com/registered/reg_ea_down.html#RoleSecurity. You then enter this access key into the dialog that appears when you select the Enable Security option from Configure > Security > Administer > Enable Security:

Figure 10.9 – The authorization key entry dialog
Sparx provides the ability to set up permission for a single user or a group. Setting up groups allows you to specify permissions at the group level and then assign individuals to the appropriate group. You can import users into a new group from a Windows Active Directory group. This works for the initial setup of the group only. After that, you'll need to add each user manually. You can also implement a single sign-on from the user permissions configuration dialog by selecting either Accept Windows Authentication or Accept OpenID Authentication. The following screenshot depicts the Security Users permissions dialog:
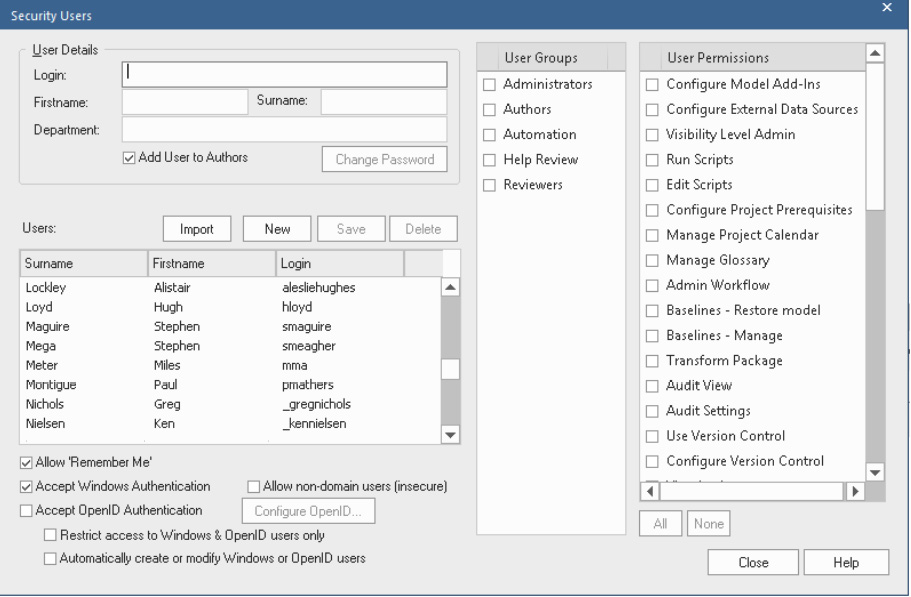
Figure 10.10 – The Security Users permissions configuration dialog (image courtesy of the Sparx User Guide:)
To learn more about enabling security, refer to the Sparx User Guide, which can be found at https://sparxsystems.com/enterprise_architect_user_guide/15.2/modeling/usersecurity2.html.
Model locks
If a user has the Lock Elements permission granted, they can lock or unlock elements, diagrams, or packages from getting updated by other users. It's also possible to set group-level locks that prevent updates from anyone outside of that group. To set a lock, select the element, diagram, or package in the project browser, and then right-click and select Lock from the context menu.
The browser window indicates when the current user has established a lock on an element, package, or diagram by placing a blue-colored exclamation point next to the locked element. It identifies locks established by other users with a red exclamation point, as shown in the following screenshot:

Figure 10.11 – The browser window lock indicators (image courtesy of the Sparx User Guide)
On occasion, locks can become stranded. When this occurs, the administrator can clear those locks by accessing Configure > Security > Locks.
Deleting and merging elements
Deleting elements from the repository can be a risky activity. An element can have dozens or even hundreds of links to other elements in the repository. The element can appear on any number of diagrams. These links and diagrams are not readily apparent unless you look for them. There is no undo function in Sparx. When you delete an element from the project browser, it's gone.
The only way to get it back is by restoring it from a backup or recreating it. For these reasons, you need to take extra care when deleting elements. In this section, we will show you three ways to check for links and whether the element appears in any diagrams. The method you choose will often depend on how many elements you need to delete.
When deleting a single element, the following steps describe the simplest method to check for usage in a diagram:
- In the Project browser, select the element and right-click on it:
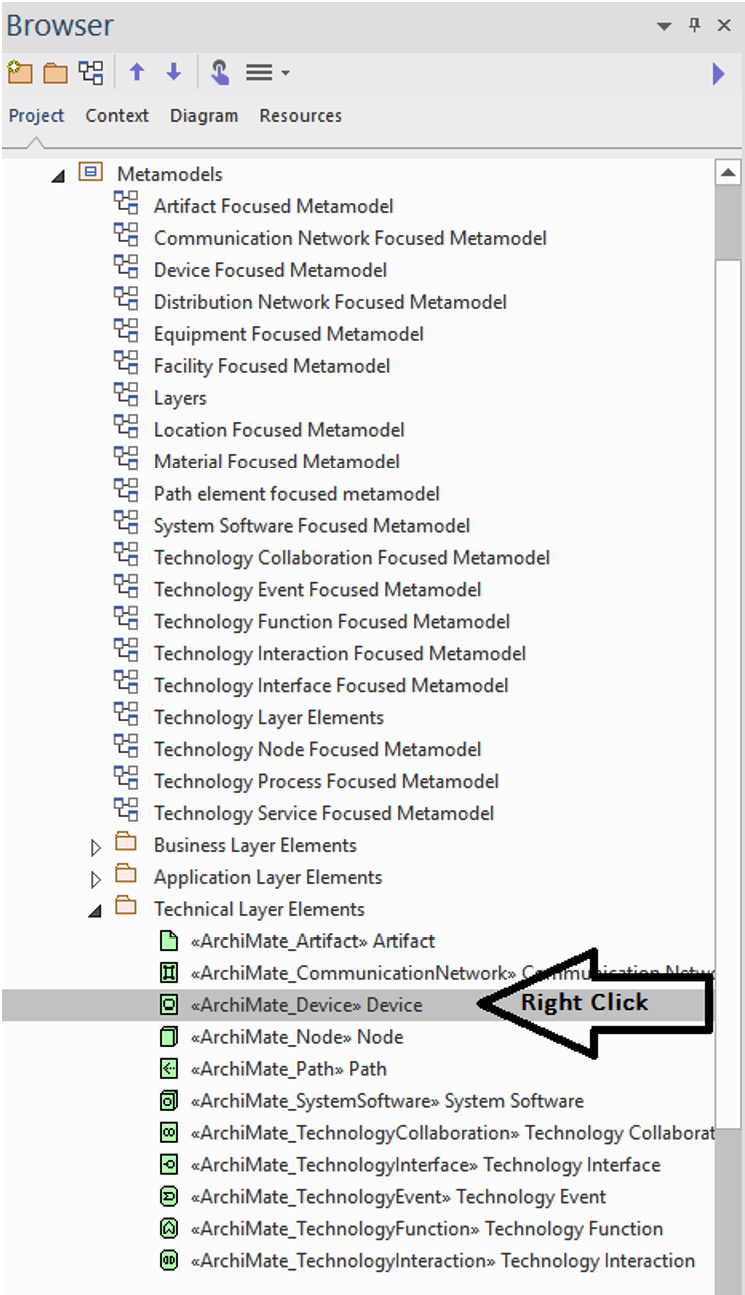
Figure 10.12 – Right-clicking on an element
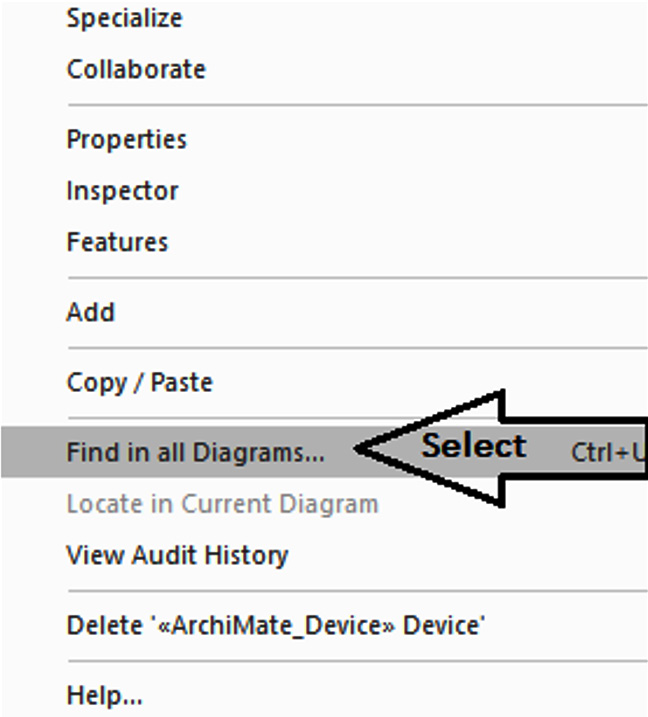
Figure 10.13 – Find in all Diagrams… from the right-click menu
The following window will open after we click on Find in all Diagrams...:
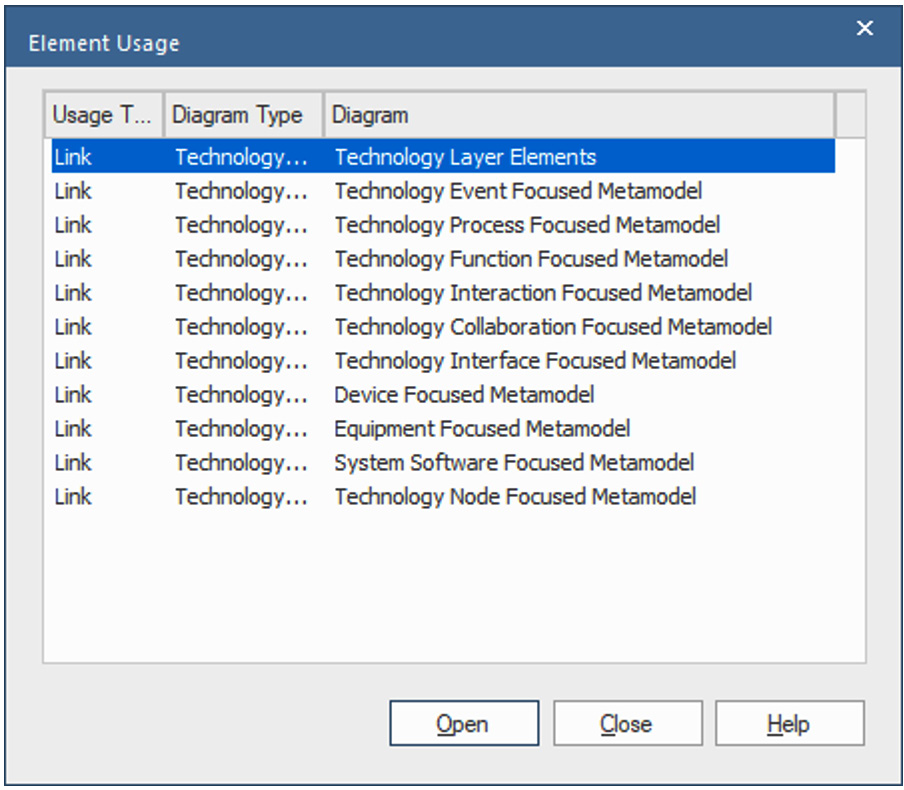
Figure 10.14 – Element Usage
The prior example indicates that the element in question appears in 11 diagrams. From this dialog, you can open each diagram. To check for links, open the element's Properties dialog and select the Links option from the leftmost panel. As the following example shows, the element in question links to 14 other elements:
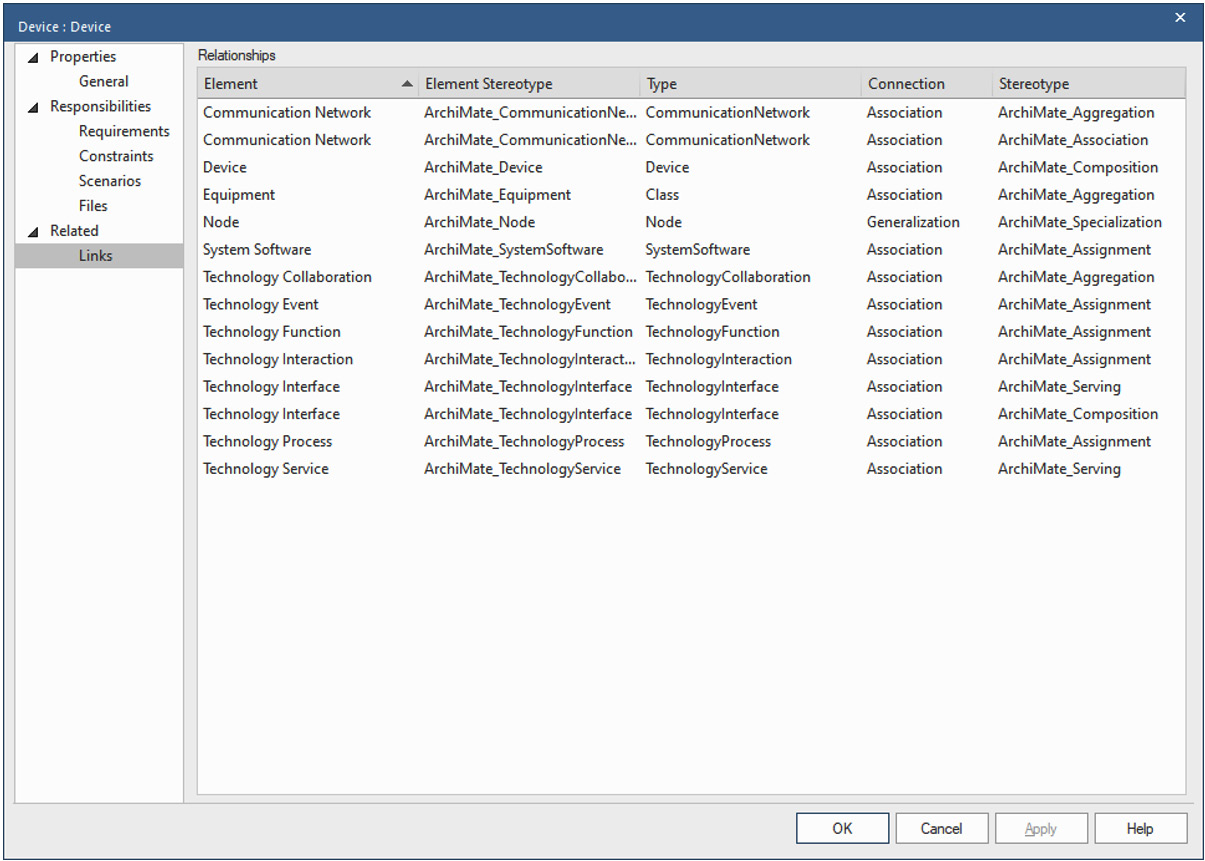
Figure 10.15 – The element links in the Properties dialog
When you need to delete several elements, the following process might be a bit easier:
- Select the first element in the Project browser.
- Open the Traceability panel by selecting Design > Impact > Trace.
- The Traceability panel displays all links to and from the selected element.
- To see a list of diagrams that the element appears in, click on the Usage button, as shown in the following screenshot of the Traceability panel:

Figure 10.16 – The Traceability panel display method
Merging elements
Sometimes, the need to delete an element arises because someone inadvertently created an extra version of an element. In such a case, it's necessary to move all the links from one of the extra elements, which we call the source, to the other, which we call the target. We also need to replace the source element with the target in any diagram. We call this process merging. The following steps describe the best way to accomplish this:
- Create a new temporary work diagram.
- Drag both source and target elements onto the diagram.
- Select the source element on the diagram.
- Right-click and select Insert Related Elements….
- Repeat step 3 and step 4 for the target element.
- Select a link endpoint on the source element.
- Drag the link to the target element.
- Repeat step 6 and step 7 for all remaining links on the source element.
- Check for usage of the source element. Replace all occurrences of the source element with the target element in any diagram.
- When clear, delete the source element.
As you can see, this process is a bit more involved than simply deleting the element. This is necessary because there is a great deal of information packed into the elements of a model.
Of course, if you do accidentally delete an element, you can always restore that element from a backup. We'll cover that topic next.
Backup and restore
There are many advantages to using a shared repository, but there is just not enough time and space to cover all of them in this chapter. Here, we will focus on one advantage, which is the opportunity to use the backup processes that are already in place. If you're deploying to a relational database platform that your organization already uses for other systems, you likely have database administrators and backup cycles in place that can cover the Sparx repository. If so, you're in luck. If not, you will need to create them.
In addition to database backups, you can also use a feature of Sparx called Controlled Packages to export portions of a repository for storing offline or to a version control system. Sparx stores the exported information in XML format. For a comprehensive description of this feature, see the Sparx User Guide section for Controlled Packages at the following link: https://sparxsystems.com/enterprise_architect_user_guide/15.2/model_publishing/controlledpackages2.html.
Automation
Automation is what Sparx calls the facility for providing scripting access to its object model. You can use the automation interface to provide functionality that Sparx doesn't provide out of the box. We won't go into detail on automation here because the User Guide provides comprehensive coverage of this topic. You can find it at the following location: https://sparxsystems.com/enterprise_architect_user_guide/15.2/automation/automation_interface.html.
We can tell you about occasions where we've used the automation interface to solve specific problems. The automation interface is great for making changes to large numbers of elements. In one case, we needed to change the stereotype applied to hundreds of elements in a model. Without automation, we would have had to open the properties dialog for each element.
On another occasion, in a model that contained elements with long and complex chains of relationships, we needed to identify elements of one type that had indirect (12 elements deep) relationships to elements of another type. While we could do this for an individual element by navigating the Traceability UI, in this case, the stakeholder didn't have Sparx, and there were hundreds of these elements. In both cases, we used JScript to make the change and produce a report.
If you're interested in the internal structure of the Sparx repository, the publication Inside Enterprise Architect: Querying EA's Database by Thomas Kilian is available at http://leanpub.com/InsideEA. In it, he lists all of the Sparx internal tables that he's discovered and identifies their content and use.
Repository governance
Argh! It's the dreaded G-word. Yes, governance is upon us. What would a book on EA be without a reference to governance? We promise to be brief. Our primary intent is to make a distinction between architecture governance and repository governance.
Architecture governance
Architecture governance is about making architectural decisions. This subject usually includes such areas as the following:
- Governing boards
- Principles and policies around architecture
- Governance review processes and documentation
In-depth coverage of architecture governance is beyond the scope of this book. There are already tomes written on this subject. You can see what Sparx Systems says about governance at the following URL: https://sparxsystems.com/enterprise_architect_user_guide/15.2/guidebooks/ea_managing_an_enterprise_architecture.html.
While we have our own perspectives on governance, we would prefer to not muddle this book with yet another opinion. We hope you will appreciate that position. That said, we would like to express a couple of principles related to governance that we have found to be invaluable in our personal careers as enterprise architects.
The best information makes for the best decisions. Some organizations entrust us, as architects, with making the architectural decisions for their enterprise, but that's not always the case. The larger or more complex the environment, the more people are often involved in the decision-making process. Regardless of whether we or an architecture board make the decisions, we are always responsible for the information on which those decisions are based.
Our aim in authoring this book is to help you do the following:
- Create the best information possible regarding your enterprise.
- Create enterprise information using the easiest and most consistent means possible.
- Make comprehensive and accurate information readily available to your stakeholders and decision-makers so that they can make the best decisions possible.
- Garner trust in the processes and methods you use to create enterprise information by using open and standard-based information artifacts.
- Provide open, accurate, and complete information on architecture alternatives, some of which you may not always agree with.
Okay, that's it! We will now step down from our soapbox. Now, let's look at repository governance.
Repository governance
Repository governance is a less lofty subject than architecture governance. This is all about making decisions about the use and maintenance of the shared repository. As you acquire more Sparx users, repository governance becomes more important. In this case, the decision-makers are well known.
Those who use the repository should have a say in how it's used. If the number of architects using the shared repository is so large that they can't all be involved in the decision-making process, then you'll need to establish a decision-making board to do it. If that's the case, congratulations! You are well past the governance advice provided here in this book. More likely, you are just starting out with your shared repository. Here are the areas in which you may need to employ a small governance process:
- Repository structure or restructuring
- Configuration settings and changes
- Sandbox creation and maintenance
- Diagram and element styles, including which colors and fonts to use
- Standard report templates and template structures (see Chapter 11, Publishing Model Content)
This doesn't need to be formal. Quite often, this can be done as a discussion point after a regular weekly architecture meeting.
Summary
Using Sparx Systems' EA on a shared repository is an effective means of generating and maintaining information about your enterprise, both in its current state and any proposed future states. As with any information system, the shared repository needs regular care and attention.
Also, as with any other information system, the value of the information contained within a shared repository quickly becomes apparent as it matures. The repository deserves attention commensurate with that value. It is that care and attention that we have attempted to cover in this chapter. We hope you've found it helpful.
In the next chapter, we will cover the ways in which you can make this valuable information known to others.