
The different tools currently available in JRockit Mission Control 4.0 are:
- The JRockit Management Console: Usually referred to as just the console, this tool is used for monitoring the JVM and the application running in the JVM. The Management Console supports customizable graphs, trigger rules (so that actions can be taken on user-defined conditions), and more.
- JRockit Flight Recorder: Normally referred to as the Flight Recorder or JFR. A low overhead, always on, recorder that creates a profile of what JRockit has been up to lately. The recording can be dumped from the JRockit Mission Control GUI and the contents analyzed offline. JRockit Flight Recorder is the main profiling tool in the suite and supersedes the old (prior to R27.x/3.x) JRockit Runtime Analyzer (JRA).
- The JRockit Memory Leak Detector: Memleak for short. A powerful, online, heap analyzer that visualizes memory usage trends, relationships between instances of different classes on the heap, and more. Memleak can quickly detect quite slow memory leaks that only become problematic over time. It accomplishes this by doing trend analysis on the live set for each type in the system.
Mission Control consists of two major parts—a set of APIs, agents and protocols built into the JRockit JVM and the JRockit Mission Control client. The different tools rely on different sets of APIs, but they all initiate communication with the JRockit JVM using JMX.
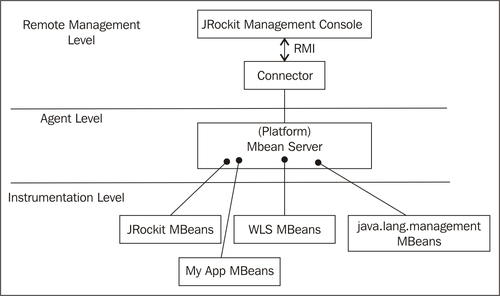
A full discussion on JMX is beyond the scope of this book, but we'll briefly discuss the basic concepts. The JMX standard is a three-layered architecture. It consists of:
- The Instrumentation Level: This is where applications running in the JVM expose resources for manageability through Managed Beans (MBeans). An MBean is a type of Java Bean that is defined by its attributes, its operations, and the notifications it can emit.
- The Agent Level: The agent is the component managing the MBeans. The most important agent-level component is the MBean server, which is a container where MBeans are registered and managed.
- The Remote Management Level: This level provides protocol adapters that enable communication with the MBean server from outside the JVM process.
The following figure shows how the different architectural levels of JMX apply in a typical JRockit deployment:
From a high-level Mission Control perspective, the monitored JRockit JVM consists of:
- A set of server-side APIs:
- JMXMAPI: JRockit JVM-specific extensions to the MBeans available in the platform MBean server. MBeans and the platform MBean server will be discussed in the next chapter.
- JRockit internal local Java APIs: For example the JRockit Management API (JMAPI).
- Server-side native APIs: APIs that are built into JRockit and not implemented in Java. For example, the native API used by Memleak.
- Agents exposing the previously mentioned APIs and miscellaneous services:
As of JRockit Mission Control 2.0, the JRMC client is based on Eclipse RCP (Rich Client Platform) Technology. This provides a series of architectural advantages, such as an OSGi-based component model and being able to run JRockit Mission Control both as a standalone application and inside the Eclipse IDE.
Note
The Rich Client Platform is the base platform for the Eclipse IDE. It contains, among other things, the Standard Widget Toolkit (SWT), JFace, the Eclipse OSGi implementation (Equinox), and an integrated mechanism to deliver and update RCP applications. OSGi is a standardized dynamic module system for Java, backed by numerous large corporations. RCP provides an excellent base platform for writing and delivering highly modular applications with a look and feel that is native to the host operating system.
For more information on RCP, please see http://www.eclipse.org/home/categories/rcp.php.
For more information on OSGi, please see http://www.osgi.org/.
The client-side of JRockit Mission Control is highly modular—new tools can easily be plugged in, and the tools themselves can be extended.
From a high-level Mission Control perspective, the Mission Control Client consists of:
- RCP: The Eclipse Rich Client Platform
- Client-side APIs:
- RJMX: Extended JMX services, such as an MBean attribute subscription framework, triggers, proxies for the old proprietary, and obsolete RMP protocol (used in 1.4 versions of JRockit)
- Memleak API: For communicating with the Memleak server
- Flight Recorder Model: For parsing JRockit Flight Recorder recordings
- JDP Client API: For detecting JRockit instances running on the network
- JRockit Mission Control core: Contains the core framework for the JRockit Mission Control client and defines the core extension points
- The JVM Browser: Keeps track of the detected and/or user-defined connections to JVMs
- The Tools: The various tools that can be launched from the JVM browser—the Management Console, the Flight Recorder, and Memleak
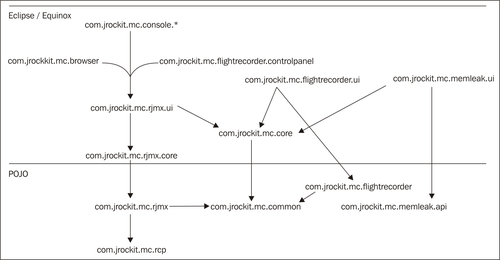
The following figure shows a simplified breakdown of the plug-ins in the 4.0.0 version of JRockit Mission Control:
The rest of this chapter will focus on how to get JRockit Mission Control up and running and how to troubleshoot JRockit Mission Control. The different tools in JRockit Mission Control will be explained in detail in the chapters that follow.
In order to efficiently communicate about the JRockit Mission Control client, a common terminology is needed. The terms discussed here apply when running Mission Control standalone as well as inside Eclipse.
Note
The reader familiar with Eclipse may note that we use the same terminology as with Eclipse and the Eclipse Workbench.
In an Eclipse RCP application, the main window is called the workbench. Inside the workbench there are two types of windows—views and editors. The editors occupy the center of the workbench—the editor area. The views are normally located around the editor area.
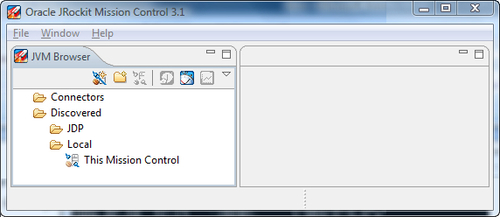
As shown in the following screenshot, the JVM Browser is the view to the left:

Views are normally used to show a specialized presentation of the contents of the selected editor, to manipulate the contents of an editor, or to launch new editors. Several views can be docked on each other by dragging a view on top of another view into the same view folder.
A certain configuration of which views to show, along with how they should be located, is called a perspective. In the screenshot, the Mission Control perspective is used, that shows the JVM Browser view and the Event Types view co-located in the same view folder to the left. Should you ever lose a view or mistakenly rearrange the views in a way you are not satisfied with, the perspective can easily be reset from the workbench menu (Window | Reset Perspective).
The editor currently opened in the editor area in the screenshot above is a JRockit Mission Control Console. It is being used to monitor a locally running application where the main class is called LoadAndDeadlock.
In Eclipse parlance, the JRockit tools are built as editors—any tool that is started will open up in the editor area. Several editors can be open at the same time. They will show as multiple tabs in the editor area. Several editors can also be viewed side-by-side by dragging an editor by the tab and docking it at any side of another editor. Views, such as the JVM Browser, cannot be docked into the editor area. They can, however, be docked to any side of the editor area.
To the left in the Management Console (in the editor area) is the tab group toolbar that selects tabs that are currently visible in the tab container at the bottom of the editor. A tab group toolbar is available in other JRockit Mission Control tools as well. In JRockit Mission Control 3.1, the General tab group, which is automatically selected when a Management Console is started, contains only a single tab—the Overview tab.
JRockit Mission Control exists both as a standalone executable and as a plug-in for the Eclipse IDE. The version of JRockit Mission Control included in the JRockit JDK is the standalone version.
Starting Mission Control in standalone mode is simple. Just run the executable named jrmc (or jrmc.exe on Windows) in the bin directory of the JRockit distribution.
Note
Do not attempt to start JRockit Mission Control in standalone mode through any mechanism other than running the jrmc executable. Sometimes we run into homegrown customer setups where Mission Control is started by running the jar files in the Mission Control directory with some elaborate class path configuration. This is generally a very bad idea and is strongly discouraged. The jrmc launcher ensures, among other things, that the correct version of JRockit is being used to launch JRockit Mission Control, and that the class path is correctly configured.
For example:
JROCKIT_HOME/bin/jrmc
On Windows systems, JRockit Mission Control, when installed, will also be available in the start menu.
Once JRockit Mission Control has been started, an empty workspace (JRockit Mission Control 3.x), or a welcome screen (JRockit Mission Control 4.0) is displayed. If everything is correctly set up, JRockit Mission Control will automatically discover JVMs running on the local system. Even if there are no other Java applications running, the JRockit JVM used to execute the JRockit Mission Control client will be discovered and displayed as This Mission Control in the JVM Browser.
From the JVM Browser, the different JRockit Mission Control tools can be launched against a selected JVM.
Note
Most of the tools require the JVM to be a JRockit JVM, as they are relying on JRockit specific APIs. The Management Console is currently the only exception among the tools, as it can be connected to any JMX compliant JVM. Some functionality will however be unavailable if connected to anything but a JRockit JVM.
Finding and monitoring locally running JVMs is simple and convenient—no additional setup is required. However, having the Mission Control client running on the same machine as the monitored JVM is usually a bad idea, especially in an enterprise configuration. The resources required by the client will be taken from whatever mission critical application executing on the JVM that is to be profiled. Of course, in a testing or development environment, this may be acceptable. Also, changes made to the settings, for instance the addition of an attribute to a graph in the JRockit Management Console, are stored on a per-connection basis. They are, however, not stored at all for local connections.
To add a user-defined connection, simply click on the Connectors folder and click on the Create Connection button.
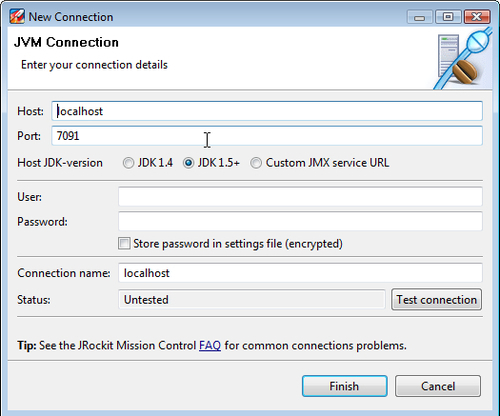
The Connection Wizard, as shown in the previous screenshot, will open. Here, the details of the connection can be specified. It is usually enough to enter the Host and Port, but the following is worth noting:
- If connecting to a JDK 1.4 version of JRockit, select the JDK 1.4 radio button.
- Selecting the Custom JMX service URL radio button will allow full control over the JMX Service URL. The JMX Service URL is a URL that specifies how to connect to a JMX agent. Specifying a custom URL is useful if a protocol other than JMX over RMI is required by the agent.
The protocol used by the default agent is JMX over RMI (JMXRMI). Other possible protocols include JMXMP (as described in the Java SE documentation) and IIOP. There are also proprietary protocols, such as WebLogic Server's t3. If using a custom agent and a custom protocol, see the agent documentation for more information.
- Passwords can be stored by checking the Store password in settings file (encrypted) check box. If storing passwords is enabled, a master password will be used each time the password is encrypted or decrypted. If no master password is set, one will be asked for. The master password can be reset by clicking on the Reset Master Password button in the JRockit Mission Control preferences.
- The Test connection button is very useful for validating that a connection is correctly configured before leaving the wizard.
There are some advantages to running JRockit Mission Control inside the Eclipse IDE, there are however no fundamental differences in functionality. One advantage, if the source code for the application being monitored is in the Eclipse workspace, is that it is possible to jump directly to the corresponding source whenever a class, method, or stack frame is shown in the JRockit Mission Control client.
If you are unfamiliar with Eclipse, or if you do not plan to use it for Java development, you can safely skip this section, as it assumes some familiarity with the Eclipse IDE.
In order to start JRockit Mission Control inside Eclipse, the JRockit Mission Control plug-ins from the JRockit Mission Control update site must first be installed. The latest version of the update site will be available from the JRockit Mission Control home page on Oracle Technology Network. At the time of writing, the JRockit Mission Control homepage is located at http://www.oracle.com/technology/products/jrockit/missioncontrol/index.html.
As that's a handful to remember, it can also be reached at http://www.tinyurl.com/missioncontrol.
Installation instructions can be found at the update site and will not be discussed in detail here. To fully take advantage of all of the features in the JRockit Mission Control plug-ins, Eclipse should be run on a JRockit JVM. Most of the functionality is available, even if Mission Control is running in an Eclipse instance executing on another JVM, but features such as local JVM discovery and some JRockit specific functionality in the Management Console will not work.
There are additional benefits of running Eclipse on JRockit. JRockit Real Time, discussed in Chapter 3, Adaptive Memory Management can be used to make any interactive application more responsive.
In the Eclipse home folder, there is a configuration file, eclipse.ini, that can be altered to change the command-line flags of the JVM running Eclipse. Here is an example eclipse.ini file that the authors use:
-showsplash
org.eclipse.platform
-framework
pluginsorg.eclipse.osgi_3.4.3.R34x_v20081215-1030.jar
-vm
d:jrockitsR27.6.3_R27.6.3-16_1.5.0in
-vmargs
-Xms512m
-Xmx512m
-XgcPrio:deterministic
-XpauseTarget:20
The previous example is for Eclipse 3.4 and JRockit R27, but it is very similar in Eclipse 3.5 and JRockit R28. To make it work with R28, simply specify the path to the R28 JVM after the -vm argument, and keep everything after the -vmargs.
Note
There are differences in command-line flags between R27 and R28, and the JRockit Documentation should be consulted for more elaborate JVM configurations.
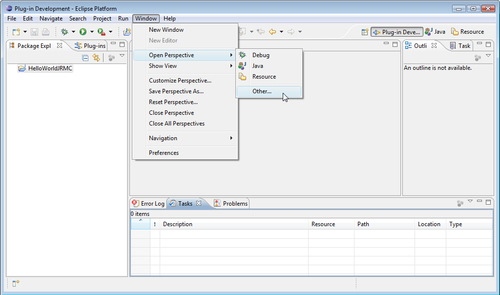
To start JRockit Mission Control once it is installed in Eclipse, the Mission Control perspective must be opened. There are two Mission Control perspectives available in 3.x—the Mission Control main perspective and the Mission Control Latency perspective. The latter is used to study JRA recordings containing latency data. In the 4.0 version of JRockit Mission Control, there is only one perspective optimized to work with all the tools.
As shown in the following screenshot, the Mission Control perspectives can be found in the Window | Open Perspective | Other... menu:
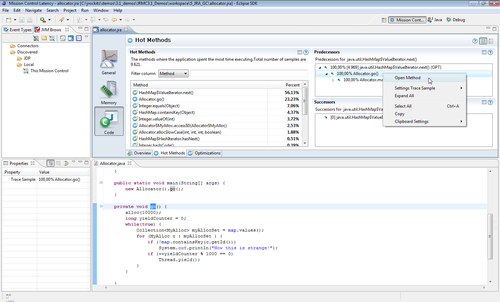
Once the Mission Control perspective has been opened, things will look pretty much the same as when using the standalone version of JRockit Mission Control. As mentioned, one benefit of running JRockit Mission Control from within Eclipse is the ability to open up the corresponding application source code from most places where JRockit Mission Control shows a class or method, as shown in the following screenshot:
To enable a JRockit JVM for remote management, the external management agent must be started. It can either be started with the -Xmanagement command-line switch, or JRCMD can be used. JRCMD is discussed in detail in Chapter 11.
The following example starts up a JRockit JVM with a simple test program and enables it for remote monitoring on port 4712. Authentication and SSL support for the connection are turned off.
JROCKIT_HOME/bin/java -Xmanagement:ssl=false,authenticate=false,port=4712 -cp . HelloJRMC
For now, let's ignore the security flags and focus on the port. Examples of how to set up JRockit Mission Control with security turned on will be shown in the section Running in a Secure Environment, later in this chapter.
As mentioned, the default management agent uses the JMX over RMI protocol for communication. This has been a source of some grief to people trying to establish connections through firewalls as RMI usually requires communication over an anonymous port. A full discussion on RMI is outside the scope of the book, but this is how it used to work in versions prior to R28:
-Xmanagement:port=<port>opens up a single entry, read only, RMI registry on the specified port (default 7091)- The RMI registry contains a single entry:
jmxrmithe stub for communicating with the RMI server - The port of the RMI server is anonymous with no way to override it
In R28, things have improved. The RMI registry and the RMI server ports are the same by default, making firewall configuration much easier.
The JRockit JVM comes with a network auto discovery feature called JRockit Discovery Protocol (JDP). The JDP Server works like a beacon that broadcasts the presence of the JRockit instance to the network. This makes it easier for JRockit Mission Control to automatically discover remote JVMs. The following example shows how to enable auto discovery.
JROCKIT_HOME/bin/java -Xmanagement:ssl=false,authenticate=false,port=4712, autodiscovery=true -cp . HelloJRMC
The following table lists the various system properties that can be used to control the JDP server in R28. Use the standard -D syntax for setting system properties on the command line when starting up the JRockit JVM.
For example:
-Dcom.oracle.management.autodiscovery.period=2500
|
System property |
Explanation |
|---|---|
|
|
Time between broadcasts (milliseconds). Default is |
|
|
Time to live for the broadcast packages. Default is |
|
|
The multicast address to use for autodiscovery. Default is |
|
|
Override the port used to broadcast autodiscovery information. Default is |
|
|
Hierarchical name. See the following example. |
Note
To use the properties in the previous table for JRockit versions prior to R28, the com.oracle.management.autodiscovery namespace in the properties must be replaced by jrockit.managementserver.discovery, as it was called earlier.
When a JDP server transmits the location of a running JRockit JVM, the JVM Browser in the JRockit Mission Control client can use the hierarchical name in three different ways.
- Simple name:
Example:
-Djrockit.managementserver.discovery.name=MyJVMResult: The name of the connection when it appears in the browser will be MyJVM.
- Full path:
Example:
-Djrockit.managementserver.discovery.name=/MyJVMs/MyJVMResult: The connection will appear under a MyJVMs folder in the browser, and the name will be MyJVM.
- Path ending with path delimiter:
Example:
-Djrockit.managementserver.discovery.name=/MyJVMs/Result: The connection will appear under MyJVMs, the name will be the result of a reverse DNS lookup of the host reported by the JDP packet.
Tip
Advanced tip for plug-in developers
System properties starting with the string
com.oracle.management.autodiscovery.propertywill be automatically picked up by the JDP server and broadcast to the client. For the R28.0.0 version, no such extra properties are actually used by the client. The properties will, however, be present in theIConnectionDescriptorof the Mission Control client—a fact that can be used by authors of plug-ins for Mission Control.
For reference, the following table lists the various -Xmanagement arguments in JRockit R28:
|
Flag |
Explanation |
Default |
|---|---|---|
|
|
The port of the RMI registry. |
|
|
|
Enables secure monitoring over SSL. Note that this only enables server-side SSL. If you also want clients to authenticate themselves, set |
|
|
|
Binds the RMI connector stub to an RMI registry protected by SSL. |
|
|
|
If this is set to false, JMX does not use passwords or access files all users are allowed full access. |
|
|
|
Enables autodiscovery service for the remote JMX connector. Autodiscovery allows other machines on the same subnet to automatically detect a JVM with remote management enabled. Note that the autodiscovery service will only start if remote JMX management is enabled. |
|
|
|
Explicitly enables or disables the local management agent. |
|
|
|
Binds the RMI server to the specified port. Default behavior is to bind to the same port as the RMI registry if possible. However, if the RMI server is using SSL and the registry is not, an arbitrary free port will instead be selected. |
|
|
|
Explicitly enables or disables the remote management agent. |
|
|
|
Specifies a file from which to load additional management configuration properties. |
|
There are also system properties available in JRockit R28 for controlling specific settings. The following table lists the relevant system properties with their default values:
|
Property |
Explanation |
Default |
|---|---|---|
|
|
Enables JMX local monitoring through a JMX connector. The connector is published on a private interface used by local JMX clients through the Attach API (see the Java Documentation for |
|
|
|
Same as |
|
|
|
Same as |
|
|
|
Same as |
|
|
|
Same as |
|
|
|
A comma-delimited list of SSL/TLS protocol versions to enable. Used in conjunction with the SSL flags. |
Default SSL/TLS protocol version. |
|
|
A comma-delimited list of SSL/TLS cipher suites to enable. Used in conjunction with the SSL flags. |
Default SSL/TLS cipher suites. |
|
|
If this property is true and SSL is enabled, client authentication will be performed. |
|
|
|
Same as |
|
|
|
Specifies the location of the password file. If |
|
|
|
Specifies the location for the access file. If |
|
|
|
Specifies the name of a Java Authentication and Authorization Service (JAAS) login configuration entry to use when the JMX agent authenticates users. When using this property to override the default login configuration, the named configuration entry must be in a file that is loaded by JAAS. In addition, the login modules specified in the configuration should use the name and password callbacks to acquire the user's credentials. For more information, see the API documentation for |
Default login configuration is file-based password authentication |
|
|
Same as |
|
|
|
Enables the built-in SNMP agent on the specified port. |
No default |
|
|
Remote port to which the built-in SNMP agent sends traps. |
|
|
|
Enables Access Control Lists (ACL) for the built-in SNMP agent. |
|
|
|
Path to a valid ACL file. After the agent has started, modifying the ACL file has no further effect. |
|
|
|
The |
No default |
|
|
Same as |
|
The best way to ensure a secure environment with JRockit Mission Control is to first use standard networking techniques, such as firewalls, to ensure that only a very limited set of machines are allowed to even attempt a connection to the management agent. Setting up routers and firewalls is beyond the scope of this book.
Note
In versions prior to the JRockit R28, using firewalls with the management agent was complicated, as communication with the RMI server was done on an anonymous port. That is, after establishing a connection with the RMI registry, there was no way of influencing on what port the communication with the RMI server would take place. In R28, the same port is used for the registry and the server by default, which makes firewall configuration much easier.
For secure communication, the management agent should be configured to only allow SSL encrypted connections. The management agent can be configured to use SSL both for the RMI registry and the RMI server. For a secure environment, both should use SSL. By default, secure server authentication over SSL is enabled, but client authentication is not.
Following is an example of the options used to enable SSL on the server and the registry, as well as for enabling secure client authentication:
JROCKIT_HOMEinjava -Xmanagement:ssl=true,registry.ssl=true,port=4711 -Dcom.oracle.management.jmxremote.ssl.need.client.auth=true MyApp
For SSL to work, certificates must be set up. In most Java environments, a keystore is used to store the private keys, and a truststore to store the trusted certificates.
Note
For more information on using keystores, please see the J2SE SDK Documentation, on the Internet, especially the JSSE section on creating keystores.
Next, authentication and roles need to be configured to ensure that only authorized entities have access to sensitive functionality. Access rights are controlled by the jmxremote.password and jmxremote.access files. These are normally placed in the directory JROCKIT_HOME/jre/lib/management/. The password file contains the passwords for the different roles, and the access file specifies the access rights of each role. A role must have an entry in both files in order to work.
To facilitate easy setup, there is a jmxremote.password template file included with the JRockit JRE. To get started with this template, copy the file JROCKIT_HOME/jre/lib/management/jmxremote.password.template to JROCKIT_HOME/jre/lib/management/jmxremote.password.
Note
To be able to initiate JMXMAPI, which is necessary for all Mission Control tools to work, the user must have the permission to create the JRockitConsole MBean.
Following is an example of granting permission to create the JRockitConsole MBean to the control role (see the jmxremote.access file):
controlRole readwrite
create oracle.jrockit.management.JRockitConsole
The JRockitConsole MBean will in turn initiate the rest of JMXMAPI.
In a multi-user environment, that is, in an environment where different users will use the same Java installation, the custom is to copy the jmxremote.password file to each user's home directory and use the com.sun.management.jmxremote.password.file system property to specify the location of the file.
As the password file contains unencrypted passwords, Java will rely on the file permissions of the underlying operating system to ensure that the file can only be read by the user executing the JVM. If an error is shown about the password file not being restricted, steps must be taken to ensure that the password file is only readable by the user that is executing the Java process. On a *NIX system, this can be done by executing something like chmod 600 <password file name> from a shell. On a Windows system, the process is slightly more complicated.
Note
There is a good guide for setting file access permissions on Windows in the Java 1.5.0 documentation, available at http://java.sun.com/j2se/1.5.0/docs/guide/management/security-windows.html.
To top things off, all communication can be done over an encrypted SSH tunnel, instead of by opening an additional port in the firewall. Access to the SSH tunnel is commonly enabled through a port on localhost. The stub transmitted when a connection to the JMX agent is established normally contains the address of the computer to connect to. We want to trick the computer running the agent into transmitting a stub containing the loopback address or localhost instead. This can either be done by editing the hosts file, or by setting the java.rmi.server.hostname system property on startup. Both these techniques should be used with caution, as they may cause problems for other software running in the system and/or on the same JVM.
If you are having problems connecting to locally discovered JRockit JVMs, you should check:
- If you are running on Windows, verify that the system temporary directory is on a file system that supports file permissions (for example NTFS). This is required. Local connections will create artifacts that rely on file permissions to work, and will simply fail if running on a FAT file system.
- Are you really attempting to connect to a JRockit JVM, and is the Mission Control client (or Eclipse, if running in Eclipse) running on a JRockit JVM?
- If a local connection is attempted, are both your JRockit Mission Control Client and the JRockit JVM that you are attempting to connect to, using a JDK version of 1.5 or later?
- Is the JVM you are trying to connect to executing as your user?
Note
To connect to a locally executing 1.4 version of the JRockit JVM, create a connection manually in the JRockit Mission Control JVM Browser. Then start the management agent explicitly on the JRockit JVM that you want to monitor. This is because 1.4 versions of the JVM really do not have a platform MBean server. JRockit 1.4 versions did, however, implement a proprietary management protocol called RMP that is translated to JMX on the client. Starting the agent can either be done by using the command-line options as described earlier, or by using the JRCMD tool, described in Chapter 11.
If you are having problems connecting to an external management agent (usually, but not necessarily, one running on a remote machine) you should check:
- Is the connection properly configured? There is a test button in the connection wizard that will verify the settings for you. If you are trying to connect to a JDK 1.4 version of the JRockit JVM, you should be using a 3.x client.
- Is the correct version of the client being used? The easiest way to be sure is to use the version that came with the JVM. If attempting to connect to a JDK 1.4 version of the JRockit JVM, a 3.x version should be used.
- Is the 1.4/1.5 setting correct in the Connection Wizard?
- Is the firewall configured to let the traffic through on the appropriate ports?
- If SSL is being used, are the SSL settings correct on both the server and the client?
- If authentication is enabled, is the
jmxremote.accessfile properly set up, as described in the Java SE documentation? - Verify the
hostsfile of the machine to which you are trying to connect.
While troubleshooting connections to the remote management agent, first make sure that the connection works with SSL and that authentication is turned off. If that works, make sure that all the steps in the Running in a Secure Environment section have been followed, that the certificate is valid, that the keystore password is correct, and that the password.properties file has been properly configured.
If the Management Console tells you that a certain MBean, for instance the Profiling MBean, cannot be found, it may be due to a misconfigured jmxremote.access file. To be able to initialize JMXMAPI, the user must have authorization to create the JRockitConsole MBean that, in turn, will initialize the rest of the JMXMAPI. See the Running in a Secure Environment section for more information.
Trouble connecting Mission Control to a remote machine can sometimes stem from the hostname resolving to the wrong address, for example to 127.0.0.1 (or localhost). An exception looking something like this would normally be shown in such a case:
Could not open Management Console for sthx6454:7094. java.rmi.ConnectException: Connection refused to host: 127.0.0.1; nested exception is: java.net.ConnectException: Connection refused: connect at sun.rmi.transport.tcp.TCPEndpoint.newSocket(TCPEndpoint.java:574) at sun.rmi.transport.tcp.TCPChannel.createConnection (TCPChannel.java:185)
at sun.rmi.transport.tcp.TCPChannel.newConnection(TCPChannel.java:171)
at sun.rmi.server.UnicastRef.invoke(UnicastRef.java:94)
at javax.management.remote.rmi.RMIServerImpl_Stub.newClient (Unknown Source)
at javax.management.remote.rmi.RMIConnector.getConnection (RMIConnector.java:2239)
at javax.management.remote.rmi.RMIConnector.connect (RMIConnector.java:271)
at javax.management.remote.rmi.RMIConnector.connect (RMIConnector.java:229)
at com.jrockit.console.rjmx.RJMXConnection.setupServer (RJMXConnection.java:504)
The RMI registry exports a stub relying on a hostname to establish a connection to the RMI server. In the previous example, we have successfully connected to the RMI registry and retrieved a stub for connecting to the RMI server. However, the default behavior when creating the stub is to use InetAddress.getLocalHost().getHostAddress(), to find out what host name to use. This will of course be a problem if the machine is multi-homed (that is, has several network interfaces) or if it is badly configured. In the previous example, the information provided in the stub tells us to connect to localhost instead of sthx6454.
The most common problem is that the hosts file (/etc/hosts on Linux systems, %SYSTEMROOT%system32driversetchosts on Windows) is not properly configured. On a Linux system, hostname -i can be used to see what the hostname resolves to.
A workaround is to set the java.rmi.server.hostname system property on the server to whatever name the client should use to locate the machine. Note that this can affect other applications running on the JVM.
Another workaround is to use SSH tunneling where the fact that the hostname resolves to localhost can be used to an advantage. This workaround is only possible using JRockit R28, where the RMI server port can be explicitly specified.