
Chapter 12. Network Troubleshooting
Network troubleshooting can unfortunately be a very difficult and confusing procedure. A network issue can cause a problem at several points in the cloud. Using a logical troubleshooting procedure can help mitigate the confusion and more quickly isolate where exactly the network issue is. This chapter aims to give you the information you need to make yours.
Using “ip a” to Check Interface States
On compute nodes and nodes running nova-network, use the following command to see information about interfaces, including information about IPs, VLANs, and whether your interfaces are up.
# ip a
If you’re encountering any sort of networking difficulty, one good initial sanity check is to make sure that your interfaces are up. For example:
$ ip a | grep state
1: lo: <LOOPBACK,UP,LOWER_UP> mtu 16436 qdisc noqueue state UNKNOWN
2: eth0: <BROADCAST,MULTICAST,UP,LOWER_UP> mtu 1500 qdisc pfifo_fast state UP qlen 1000
3: eth1: <BROADCAST,MULTICAST,UP,LOWER_UP> mtu 1500 qdisc pfifo_fast master br100 state UP qlen 1000
4: virbr0: <NO-CARRIER,BROADCAST,MULTICAST,UP> mtu 1500 qdisc noqueue state DOWN
6: br100: <BROADCAST,MULTICAST,UP,LOWER_UP> mtu 1500 qdisc noqueue state UP
You can safely ignore the state of virbr0, which is a default bridge created by libvirt and not used by OpenStack.
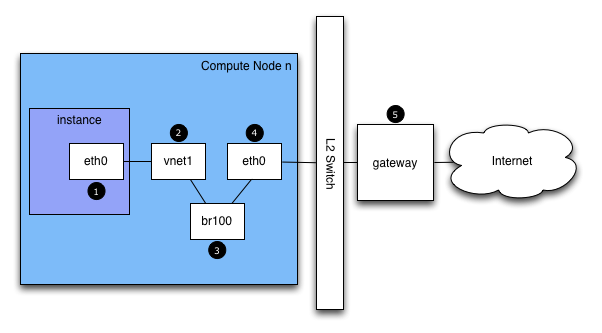
Network Traffic in the Cloud
If you are logged in to an instance and ping an external host, for example google.com, the ping packet takes the following route:
-
The instance generates a packet and places it on the virtual NIC inside the instance, such as, eth0.
-
The packet transfers to the virtual NIC of the compute host, such as, vnet1. You can find out what vent NIC is being used by looking at the /etc/libvirt/qemu/instance-xxxxxxxx.xml file.
-
From the vnet NIC, the packet transfers to a bridge on the compute node, such as,
br100.If you run FlatDHCPManager, one bridge is on the compute node. If you run VlanManager, one bridge exists for each VLAN.
To see which bridge the packet will use, run the command:
$brctl showLook for the vnet NIC. You can also reference nova.conf and look for the flat_interface_bridge option.
-
The packet transfers to the main NIC of the compute node. You can also see this NIC in the brctl output, or you can find it by referencing the flat_interface option in nova.conf.
-
After the packet is on this NIC, it transfers to the compute node’s default gateway. The packet is now most likely out of your control at this point. The diagram depicts an external gateway. However, in the default configuration with multi-host, the compute host is the gateway.
Reverse the direction to see the path of a ping reply.
From this path, you can see that a single packet travels across four different NICs. If a problem occurs with any of these NICs, a network issue occurs.
Finding a Failure in the Path
Use ping to quickly find where a failure exists in the network path. In an instance, first see if you can ping an external host, such as google.com. If you can, then there shouldn’t be a network problem at all.
If you can’t, try pinging the IP address of the compute node where the instance is hosted. If you can ping this IP, then the problem is somewhere between the compute node and that compute node’s gateway.
If you can’t ping the IP address of the compute node, the problem is between the instance and the compute node. This includes the bridge connecting the compute node’s main NIC with the vnet NIC of the instance.
One last test is to launch a second instance and see if the two instances can ping each other. If they can, the issue might be related to the firewall on the compute node.
tcpdump
One great, although very in-depth, way of troubleshooting network issues is to use tcpdump. It’s recommended to use tcpdump at several points along the network path to correlate where a problem might be. If you prefer working with a GUI, either live or by using a tcpdump capture do also check out Wireshark (http://www.wireshark.org/).
For example, run the following command:
tcpdump -i any -n -v 'icmp[icmptype] =
                icmp-echoreply or icmp[icmptype] = icmp-echo'
Run this on the command line of the following areas:
-
An external server outside of the cloud.
-
A compute node.
-
An instance running on that compute node.
In this example, these locations have the following IP addresses:
			  Instance
			  10.0.2.24
			  203.0.113.30
			  Compute Node
			  10.0.0.42
			  203.0.113.34
			  External Server
			  1.2.3.4
Next, open a new shell to the instance and then ping the external host where tcpdump is running. If the network path to the external server and back is fully functional, you see something like the following:
On the external server:
12:51:42.020227 IP (tos 0x0, ttl 61, id 0, offset 0, flags [DF], proto ICMP (1), length 84)
    203.0.113.30 > 1.2.3.4: ICMP echo request, id 24895, seq 1, length 64
12:51:42.020255 IP (tos 0x0, ttl 64, id 8137, offset 0, flags [none], proto ICMP (1), length 84)
    1.2.3.4 > 203.0.113.30: ICMP echo reply, id 24895, seq 1, length 64
On the Compute Node:
12:51:42.019519 IP (tos 0x0, ttl 64, id 0, offset 0, flags [DF], proto ICMP (1), length 84)
    10.0.2.24 > 1.2.3.4: ICMP echo request, id 24895, seq 1, length 64
12:51:42.019519 IP (tos 0x0, ttl 64, id 0, offset 0, flags [DF], proto ICMP (1), length 84)
    10.0.2.24 > 1.2.3.4: ICMP echo request, id 24895, seq 1, length 64
12:51:42.019545 IP (tos 0x0, ttl 63, id 0, offset 0, flags [DF], proto ICMP (1), length 84)
    203.0.113.30 > 1.2.3.4: ICMP echo request, id 24895, seq 1, length 64
12:51:42.019780 IP (tos 0x0, ttl 62, id 8137, offset 0, flags [none], proto ICMP (1), length 84)
    1.2.3.4 > 203.0.113.30: ICMP echo reply, id 24895, seq 1, length 64
12:51:42.019801 IP (tos 0x0, ttl 61, id 8137, offset 0, flags [none], proto ICMP (1), length 84)
    1.2.3.4 > 10.0.2.24: ICMP echo reply, id 24895, seq 1, length 64
12:51:42.019807 IP (tos 0x0, ttl 61, id 8137, offset 0, flags [none], proto ICMP (1), length 84)
    1.2.3.4 > 10.0.2.24: ICMP echo reply, id 24895, seq 1, length 64
On the Instance:
12:51:42.020974 IP (tos 0x0, ttl 61, id 8137, offset 0, flags [none], proto ICMP (1), length 84)
 1.2.3.4 > 10.0.2.24: ICMP echo reply, id 24895, seq 1, length 64
Here, the external server received the ping request and sent a ping reply. On the compute node, you can see that both the ping and ping reply successfully passed through. You might also see duplicate packets on the compute node, as seen above, because tcpdump captured the packet on both the bridge and outgoing interface.
iptables
Nova automatically manages iptables, including forwarding packets to and from instances on a compute node, forwarding floating IP traffic, and managing security group rules.
Run the following command to view the current iptables configuration:
# iptables-save
If you modify the configuration, it reverts the next time you restart nova-network. You must use OpenStack to manage iptables.
Network Configuration in the Database
The nova database table contains a few tables with networking information:
-
fixed_ips: contains each possible IP address for the subnet(s) added to Nova. This table is related to the instances table by way of the fixed_ips.instance_uuid column.
-
floating_ips: contains each floating IP address that was added to nova. This table is related to the fixed_ips table by way of the floating_ips.fixed_ip_id column.
-
instances: not entirely network specific, but it contains information about the instance that is utilizing the fixed_ip and optional floating_ip.
From these tables, you can see that a Floating IP is technically never directly related to an instance, it must always go through a Fixed IP.
Manually De-Associating a Floating IP
Sometimes an instance is terminated but the Floating IP was not correctly de-associated from that instance. Because the database is in an inconsistent state, the usual tools to de-associate the IP no longer work. To fix this, you must manually update the database.
First, find the UUID of the instance in question:
mysql> select uuid from instances where hostname = 'hostname';
Next, find the Fixed IP entry for that UUID:
mysql> select * from fixed_ips where instance_uuid = '<uuid>';
You can now get the related Floating IP entry:
mysql> select * from floating_ips where fixed_ip_id = '<fixed_ip_id>';
And finally, you can de-associate the Floating IP:
mysql> update floating_ips set fixed_ip_id = NULL, host = NULL where fixed_ip_id = '<fixed_ip_id>';
You can optionally also de-allocate the IP from the user’s pool:
mysql> update floating_ips set project_id = NULL where fixed_ip_id = '<fixed_ip_id>';
Debugging DHCP Issues
One common networking problem is that an instance boots successfully but is not reachable because it failed to obtain an IP address from dnsmasq, which is the DHCP server that is launched by the nova-network service.
The simplest way to identify that this the problem with your instance is to look at the console output of your instance. If DHCP failed, you can retrieve the console log by doing:
$ nova console-log <instance name or uuid>
If your instance failed to obtain an IP through DHCP, some messages should appear in the console. For example, for the Cirros image, you see output that looks like:
udhcpc (v1.17.2) started
Sending discover...
Sending discover...
Sending discover...
No lease, forking to background
starting DHCP forEthernet interface eth0 [ [1;32mOK[0;39m ]
cloud-setup: checking http://169.254.169.254/2009-04-04/meta-data/instance-id
wget: can't connect to remote host (169.254.169.254): Network is unreachable
After you establish that the instance booted properly, the task is to figure out where the failure is.
A DHCP problem might be caused by a misbehaving dnsmasq process. First, debug by checking logs and then restart the dnsmasq processes only for that project (tenant). In VLAN mode there is a dnsmasq process for each tenant. Once you have restarted targeted dnsmasq processes, the simplest way to rule out dnsmasq causes is to kill all of the dnsmasq processes on the machine, and restart nova-network. As a last resort, do this as root:
# killall dnsmasq
# restart nova-network
It’s openstack-nova-network on RHEL/CentOS/Fedora but nova-network on Ubuntu/Debian.
Several minutes after nova-network is restarted, you should see new dnsmasq processes running:
# ps aux | grep dnsmasq
nobody 3735 0.0 0.0 27540 1044 ? S 15:40 0:00 /usr/sbin/dnsmasq --strict-order --bind-interfaces --conf-file=
    --domain=novalocal --pid-file=/var/lib/nova/networks/nova-br100.pid --listen-address=192.168.100.1
    --except-interface=lo --dhcp-range=set:'novanetwork',192.168.100.2,static,120s --dhcp-lease-max=256
    --dhcp-hostsfile=/var/lib/nova/networks/nova-br100.conf --dhcp-script=/usr/bin/nova-dhcpbridge --leasefile-ro
root 3736 0.0 0.0 27512 444 ? S 15:40 0:00 /usr/sbin/dnsmasq --strict-order --bind-interfaces --conf-file=
     --domain=novalocal --pid-file=/var/lib/nova/networks/nova-br100.pid --listen-address=192.168.100.1
     --except-interface=lo --dhcp-range=set:'novanetwork',192.168.100.2,static,120s --dhcp-lease-max=256
     --dhcp-hostsfile=/var/lib/nova/networks/nova-br100.conf --dhcp-script=/usr/bin/nova-dhcpbridge --leasefile-ro
If your instances are still not able to obtain IP addresses, the next thing to check is if dnsmasq is seeing the DHCP requests from the instance. On the machine that is running the dnsmasq process, which is the compute host if running in multi-host mode, look at /var/log/syslog to see the dnsmasq output. If dnsmasq is seeing the request properly and handing out an IP, the output looks like:
Feb 27 22:01:36 mynode dnsmasq-dhcp[2438]: DHCPDISCOVER(br100) fa:16:3e:56:0b:6f
Feb 27 22:01:36 mynode dnsmasq-dhcp[2438]: DHCPOFFER(br100) 192.168.100.3 fa:16:3e:56:0b:6f
Feb 27 22:01:36 mynode dnsmasq-dhcp[2438]: DHCPREQUEST(br100) 192.168.100.3 fa:16:3e:56:0b:6f
Feb 27 22:01:36 mynode dnsmasq-dhcp[2438]: DHCPACK(br100) 192.168.100.3 fa:16:3e:56:0b:6f test
If you do not see the DHCPDISCOVER, a problem exists with the packet getting from the instance to the machine running dnsmasq. If you see all of above output and your instances are still not able to obtain IP addresses then the packet is able to get from the instance to the host running dnsmasq, but it is not able to make the return trip.
If you see any other message, such as:
Feb 27 22:01:36 mynode dnsmasq-dhcp[25435]: DHCPDISCOVER(br100) fa:16:3e:78:44:84 no address available
Then this may be a dnsmasq and/or nova-network related issue. (For the example above, the problem happened to be that dnsmasq did not have any more IP addresses to give away because there were no more Fixed IPs available in the OpenStack Compute database).
If there’s a suspicious-looking dnsmasq log message, take a look at the command-line arguments to the dnsmasq processes to see if they look correct.
$ ps aux | grep dnsmasq
The output looks something like:
108 1695 0.0 0.0 25972 1000 ? S Feb26 0:00 /usr/sbin/dnsmasq -u libvirt-dnsmasq --strict-order --bind-interfaces
 --pid-file=/var/run/libvirt/network/default.pid --conf-file= --except-interface lo --listen-address 192.168.122.1
 --dhcp-range 192.168.122.2,192.168.122.254 --dhcp-leasefile=/var/lib/libvirt/dnsmasq/default.leases
 --dhcp-lease-max=253 --dhcp-no-override
nobody 2438 0.0 0.0 27540 1096 ? S Feb26 0:00 /usr/sbin/dnsmasq --strict-order --bind-interfaces --conf-file=
 --domain=novalocal --pid-file=/var/lib/nova/networks/nova-br100.pid --listen-address=192.168.100.1
 --except-interface=lo --dhcp-range=set:'novanetwork',192.168.100.2,static,120s --dhcp-lease-max=256
 --dhcp-hostsfile=/var/lib/nova/networks/nova-br100.conf --dhcp-script=/usr/bin/nova-dhcpbridge --leasefile-ro
root 2439 0.0 0.0 27512 472 ? S Feb26 0:00 /usr/sbin/dnsmasq --strict-order --bind-interfaces --conf-file=
 --domain=novalocal --pid-file=/var/lib/nova/networks/nova-br100.pid --listen-address=192.168.100.1
 --except-interface=lo --dhcp-range=set:'novanetwork',192.168.100.2,static,120s --dhcp-lease-max=256
 --dhcp-hostsfile=/var/lib/nova/networks/nova-br100.conf --dhcp-script=/usr/bin/nova-dhcpbridge --leasefile-ro
If the problem does not seem to be related to dnsmasq itself, at this point, use tcpdump on the interfaces to determine where the packets are getting lost.
DHCP traffic uses UDP. The client sends from port 68 to port 67 on the server. Try to boot a new instance and then systematically listen on the NICs until you identify the one that isn’t seeing the traffic. To use tcpdump to listen to ports 67 and 68 on br100, you would do:
# tcpdump -i br100 -n port 67 or port 68
You should be doing sanity checks on the interfaces
using command such as "ip a" and "brctl
show" to ensure that the interfaces are
actually up and configured the way that you think that
they are.
Debugging DNS Issues
If you are able to ssh into an instance, but it takes a very long time (on the order of a minute) to get a prompt, then you might have a DNS issue. The reason a DNS issue can cause this problem is that the ssh server does a reverse DNS lookup on the IP address that you are connecting from. If DNS lookup isn’t working on your instances, then you must wait for the DNS reverse lookup timeout to occur for the ssh login process to complete.
When debugging DNS issues, start by making sure the host where the dnsmasq process for that instance runs is able to correctly resolve. If the host cannot resolve, then the instances won’t be able either.
A quick way to check if DNS is working is to
resolve a hostname inside your instance using the
host command. If DNS is working, you
should see:
$ host openstack.org
openstack.org has address 174.143.194.225
openstack.org mail is handled by 10 mx1.emailsrvr.com.
openstack.org mail is handled by 20 mx2.emailsrvr.com.
If you’re running the Cirros image, it doesn’t have the “host” program installed, in which case you can use ping to try to access a machine by hostname to see if it resolves. If DNS is working, the first line of ping would be:
$ ping openstack.org
PING openstack.org (174.143.194.225): 56 data bytes
If the instance fails to resolve the hostname, you have a DNS problem. For example:
$ ping openstack.org
ping: bad address 'openstack.org'
In an OpenStack cloud, the dnsmasq process acts as the DNS server for the instances in addition to acting as the DHCP server. A misbehaving dnsmasq process may be the source of DNS-related issues inside the instance. As mentioned in the previous section, the simplest way to rule out a misbehaving dnsmasq process is to kill all of the dnsmasq processes on the machine, and restart nova-network. However, be aware that this command affects everyone running instances on this node, including tenants that have not seen the issue. As a last resort, as root:
# killall dnsmasq
# restart nova-network
After the dnsmasq processes start again, check if DNS is working.
If restarting the dnsmasq process doesn’t fix the issue, you might need to use tcpdump to look at the packets to trace where the failure is. The DNS server listens on UDP port 53. You should see the DNS request on the bridge (such as, br100) of your compute node. If you start listening with tcpdump on the compute node:
# tcpdump -i br100 -n -v udp port 53
tcpdump: listening on br100, link-type EN10MB (Ethernet), capture size 65535 bytes
Then, if you ssh into your instance and try to
ping openstack.org, you should see
something like:
16:36:18.807518 IP (tos 0x0, ttl 64, id 56057, offset 0, flags [DF], proto UDP (17), length 59)
 192.168.100.4.54244 > 192.168.100.1.53: 2+ A? openstack.org. (31)
16:36:18.808285 IP (tos 0x0, ttl 64, id 0, offset 0, flags [DF], proto UDP (17), length 75)
 192.168.100.1.53 > 192.168.100.4.54244: 2 1/0/0 openstack.org. A 174.143.194.225 (47)