In the project navigator, find and select BNRDocument.xib. When you select a file in the project navigator that ends in .xib, Interface Builder opens in the editor area. Instead of code, you will see a layout grid displaying view objects defined in that XIB (XML Interface Builder document) file.
Right now, there are two view objects defined in BNRDocument.xib: a window and a text field. These are instances of NSWindow and NSTextField.
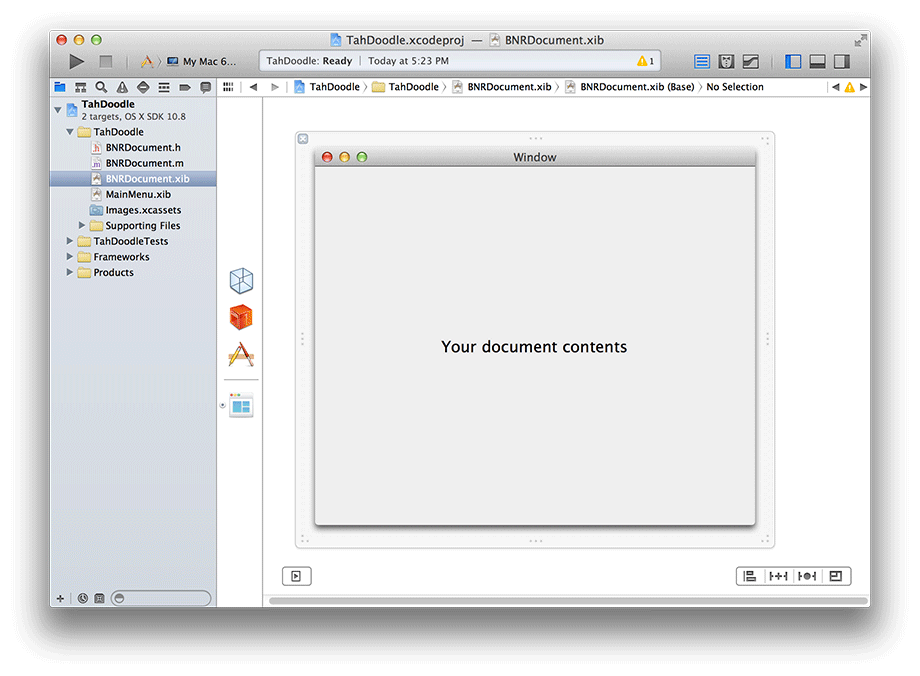
If you were to run this application now, a window would appear with the text Your document contents here centered in the window.
The window object is an instance of NSWindow. The template defined this object for you in the BNRDocument.xib. You simply use it as a canvas upon which you build your interface. You will not interact with it in code in TahDoodle.
In BNRDocument.xib, click the Your document contents here text to select the text field. Then press the Delete key on your keyboard to remove this object from the layout.
In the upper righthand corner of the Xcode window, click the button to reveal the utilities area.
The bottom half of the utilities area is the library. The library is divided into tabs. Select the ![]() tab to reveal the object library.
The object library presents the different object types that you can drag and drop on the layout grid to build your user interface.
tab to reveal the object library.
The object library presents the different object types that you can drag and drop on the layout grid to build your user interface.
At the bottom of the library is a search field. Search for “button.” The first item, Push Button, represents an instance of the NSButton class.
Here is the fun part. To create an instance of NSButton and add it to your layout, simply drag from the Push Button item in the object library to anywhere on the window object in the layout grid.

Now there is an instance of NSButton in TahDoodle’s user interface. Not only have you created a button object, but by dragging it onto the window object, you have also added it as a subview of the window.
Being a subview of the window is important; it is what gets a view object on screen when the application is launched. In iTahDoodle, you added the button to the window in BNRAppDelegate.m:
- (BOOL)application:(UIApplication *)application
didFinishLaunchingWithOptions:(NSDictionary *)launchOptions
{
...
[self.window addSubview:self.insertButton];
...
}
Let’s get that button in the right place. Drag the button to the lower lefthand corner of the window object. When you get close to the corner, blue dashed lines will appear. Position the button just inside the lines (Figure 32.7).

The dashed lines are from Apple’s Human Interface Guidelines, or HIGs. The HIGs are a set of rules that developers should follow when designing user interfaces for the Mac. There are also HIGs for the iPhone and iPad. You can browse all of the HIGs in the developer documentation.
Now you need to change the button’s title to Add Task. In iTahDoodle, you set the button’s title in BNRAppDelegate.m:
- (BOOL)application:(UIApplication *)application
didFinishLaunchingWithOptions:(NSDictionary *)launchOptions
{
...
[self.insertButton setTitle:@"Insert"
forState:UIControlStateNormal];
...
}
Setting the button’s title in Interface Builder is even simpler: double-click the button object, type Add Task, and press Return. The object will resize itself to fit the slightly longer title.
Return to the object library and search for “table view.” Select the Table View item and drag it to the upper lefthand corner of the window. Keep it just inside the dashed blue guidelines.
If you see a warning about a “misplaced view,” you can ignore it; you will fix the placement of your views in the next section.
This table view object is actually a collection of nested objects: an NSScrollView, which contains an NSTableView, which, by default, contains two NSTableColumn instances. To get to a particular object within this collection, hold down the Control and Shift keys while clicking on the table view. You will see a list of objects and can select the object you are really interested in. Select the NSTableView.

Now you are going to set the table view’s number of columns using another tool – the inspector.
The inspector is in the utilities area above the the object library. It is your one-stop shop for finding out about and configuring the object that is selected in the layout grid.
Like the object library, the inspector is organized in a set of tabs, and each tab is a different inspector.
Click the ![]() tab to get to the attributes inspector.
The attributes inspector is where you can see and modify the object’s attributes.
tab to get to the attributes inspector.
The attributes inspector is where you can see and modify the object’s attributes.
In the attributes inspector, find the Columns attribute of the NSTableView. Modify the NSTableView to have only one column.

Now you need to adjust the size of the table view. This is easy to do back in the layout grid. Control-Shift-click the table view and select the NSScrollView, which contains the NSTableView. Drag the scroll view’s bottom right corner so that it fills most of the window. Leave space for the button and stay inside the blue guidelines.
The objects that you have created and configured just now are described in XML in BNRDocument.xib. They will be automatically allocated and initialized at runtime when a new TahDoodle window opens and a new instance of BNRDocument is created.
(If you want to see the XML, right-click BNRDocument.xib in the project navigator and select Open As → Source Code.)
Build and run TahDoodle. You may need to click on the application icon in your Dock to see the window. Select File → New in TahDoodle’s menu bar or use the keyboard shortcut Command-N to open a second window. Each window is a separate instance of BNRDocument and a separate set of view objects.
To control how your user interface will appear when the window resizes, you can create several autolayout constraints. An autolayout constraint specifies an individual relationship between the views in your application.
In a desktop application, autolayout constraints are typically used to control how your user interface appears when the window is resized. In an iOS app, autolayout constraints are typically used to control how your user interface appears on devices with different screen sizes or font sizes.
Currently, TahDoodle’s user interface does not adjust at all when the user resizes the window. The table view and button maintain their position and size no matter the user does with the window. (Try it yourself.)
It would be much better if the table view and button would maintain their positions and if the table view would resize to stretch and shrink along with the window.
Let’s start with adding constraints to the table view. Recall that the table view is a nested collection of objects. The outermost object is an instance of NSScrollView. You are going to apply four autolayout constraints to specify the layout relationship between the scroll view and the window.
Autolayout constraints are added individually, and Control-Shift-clicking to select the scroll view in the layout grid is tiresome. Thankfully, you can also select a view object from the document outline.
In BNRDocument.xib, find the small black left-pointing arrow in a rounded rectangle in the bottom left corner of the editor area (Figure 32.10). Click this arrow to show the document outline. (You can click again to hide the document outline when you need more room to work in the layout grid.)

The document outline includes a hierarchical list of your view objects. Under Window, find and select the Bordered Scroll View – Table View object. This is the instance of NSScrollView that contains the rest of the objects that make up the table view. From Xcode’s menu bar, select Editor → Pin → Leading Space to Superview.
Leading Space to Superview is an autolayout constraint. The scroll view’s superview is the window object. Adding this constraint ensures that your view remains a fixed distance from the leading edge of the window regardless of the window’s size.
(In most cases, “leading” will mean “lefthand.” However, if your user’s system is set to a language that runs right to left, then the leading edge is the righthand edge.)
You can see the new constraint listed under the Constraints heading in the document outline. Click this constraint to see it displayed in the layout grid. It will appear as a red strut between the scroll view and the window.
Select the scroll view again in the document outline and add a second autolayout constraint: Editor → Pin → Trailing Space to Superview.
Select the scroll view yet again. Notice that the two struts identifying your autolayout constraints are red. The red color tells you that the scroll view does not yet have enough constraints to ensure its position when the application is running. Let’s confirm that.
Build and run TahDoodle. Drag the window’s right edge to widen it. The scroll view (and the views it contains) will stretch to maintain the relationships between the window and its leading and trailing edges.

However, if you change the height of the window by dragging at the top or bottom, the table view’s size will not change. You need constraints for the scroll view’s top and bottom.
Select the scroll view and add two more constraints: from the Editor menu, pin Top Space to Superview and Bottom Space to Superview.
Now there are enough constraints to guarantee the scroll view’s size and position no matter what the window does. Select the scroll view one more time, and you will see that the struts are now blue.

Build and run the application. The scroll view will resize itself as the window does. However, if you make the window taller, the scroll view will cover up the button. Your button needs autolayout constraints of its own to stake out its position.
In the document outline, select the Push Button and add two layout constraints: pin the leading space to the superview and pin the bottom space to the superview.
Build and run the application. The scroll view will resize with the window, and the button will maintain its position in the lower lefthand corner.