
![]()
14
Words and Letters
In This Chapter
![]() Processing words with TextEdit
Processing words with TextEdit
![]() Finding out all about Mavericks’ fonts
Finding out all about Mavericks’ fonts
![]() Managing fonts with Font Book
Managing fonts with Font Book
As I discuss in previous chapters, your Mac is well equipped for creating and managing media — music, movies, and photos. But your Mac is also ready to handle more-common tasks, such as typing a letter or writing an essay.
I think it’s fair to say that Mavericks’ TextEdit application is all that many users will ever need for writing letters or essays.
 If you need more control over your pages, try Pages from Apple (available in the Mac App Store for $19.99).
Furthermore, Mavericks comes with a wide variety of fonts (sometimes called typefaces), plus a handy little app called Font Book for managing those fonts. Fonts allow you to change the way text looks on the screen and the printed page.
In this chapter, you look at the OS X Mavericks text-composition and editing program, called TextEdit, and then explore fonts and how to manage them.
Processing Words with TextEdit
TextEdit is a word processor and text editor that you can use to write letters, scribble notes, or open Read Me files. It’s not as sophisticated as Microsoft Word (or Apple’s Pages, Quark Xpress, or Adobe InDesign, for that matter), but you can definitely use it for light word processing and text editing. TextEdit is capable of performing a respectable amount of text formatting, and it can even check your spelling and read text to you in a natural-sounding (if somewhat creepy) voice.
TextEdit supports images, too. Just copy an image from another program and paste it into a TextEdit document. Or you can drag and drop an image into a TextEdit document from many applications.
TextEdit can even open Microsoft Word documents (.doc and .docx files). This is fabulous if you don't happen to have a copy of Microsoft Word on your hard drive.
If you like Microsoft Word, you may enjoy my Office 2011 For Mac For Dummies, also from Wiley.
 Like all apps included with Mavericks, you find TextEdit in the Applications folder at root level on your hard disk.
The Dock doesn’t have a TextEdit icon, but if you like it, use it regularly, or would just like to have it in your Dock, either drag its icon from the Applications folder to the left side of the Dock or launch it, right-click (or Control-click) its Dock icon, and then choose Keep in Dock.
Creating and composing a document
In the Mountain Lion version of TextEdit, when you launched TextEdit, an Open File dialog (which you may recall from Chapter 6) appeared. Mavericks goes back to the pre-Mountain Lion way and displays a blank, untitled document.
So, if you’re following along at home, you should now have a blank document called Untitled on your screen. Let its name — Untitled — be a message to you that before you begin working on this document you should probably give it a name and save it to your hard drive. To do so now, choose File⇒Save or press ![]() +S. (If you’re new to Mac OS Mavericks Save sheets, flip to Chapter 6 for details.)
+S. (If you’re new to Mac OS Mavericks Save sheets, flip to Chapter 6 for details.)
As you work with the document, it’s a good idea to save it every few minutes, just in case. After you’ve named a file, all you need to do to save its current state is choose File⇒Save or press ![]() +S.
+S.
 TextEdit uses Mavericks’ version support and autosave features, so your work is saved on the fly. Don’t be lulled into a false sense of security; most third-party apps don’t support this feature. At least not yet. (Chapter 6 has the lowdown on versions and saving.)
 So why would I need Microsoft Word?
The free word processor included with OS X Mavericks can not only open Microsoft Word files — even ones in the latest file format, .docx — but it can also modify and save them again, too.
Why does this make me rave and marvel? Because now, even if you don’t own a copy of Microsoft Word, you can open documents created by others using Word, edit, and resave them — all without having to buy your own copy of Word.
Don’t get me wrong: If you need Microsoft Word, you need Microsoft Word. I use it as much as any other program, and there’s nothing else like it. Yes, it’s a bit bloated and may be overkill for some, but since TextEdit doesn’t support many of Word’s features — including but not limited to comprehensive style sheets, revision tracking, and embedded graphics editing and effects — TextEdit really is no replacement for Word.
For example, here is a Word document in TextEdit (left) and Microsoft Word (right).

Note the Reviewing toolbar near the top of the Word version and all the purple balloons that denote changed text; TextEdit offers no revision tracking or tools at all. To TextEdit’s credit, the two versions look remarkably alike otherwise.
So TextEdit lets you open, edit, and save Word documents, which may be all you need. If you think you can get by without a full-featured, professional-quality writing tool like Word, this freebie (TextEdit) may very well be the perfect word processor for you.
Now begin typing your text. When you type text in a word processor, you should know a few handy things:
![]() Press the Return (or Enter) key only when you reach the end of a paragraph. You don’t need to press Return at the end of a line of text; the program automatically wraps your text to the next line, keeping things neat and tidy.
Press the Return (or Enter) key only when you reach the end of a paragraph. You don’t need to press Return at the end of a line of text; the program automatically wraps your text to the next line, keeping things neat and tidy.
![]() Type a single space after the punctuation mark at the end of a sentence, regardless of what your typing teacher might have told you. Word processors and typewriters aren’t the same. With a typewriter, you want two spaces at the end of a sentence; with a word processor, you don’t. (Typewriters use fixed-width fonts; computers mostly use fonts with variable widths. If you put two spaces at the end of a sentence in a computer-generated document, the gap looks too wide.) Trust me on this one.
Type a single space after the punctuation mark at the end of a sentence, regardless of what your typing teacher might have told you. Word processors and typewriters aren’t the same. With a typewriter, you want two spaces at the end of a sentence; with a word processor, you don’t. (Typewriters use fixed-width fonts; computers mostly use fonts with variable widths. If you put two spaces at the end of a sentence in a computer-generated document, the gap looks too wide.) Trust me on this one.
![]() Limit most documents to a maximum of two different fonts. OS X offers you a wide selection of fonts — but that doesn’t mean you have to use them all in one document.
Limit most documents to a maximum of two different fonts. OS X offers you a wide selection of fonts — but that doesn’t mean you have to use them all in one document.
To put certain characters in your TextEdit document, choose Edit⇒Special Characters (shortcut: ![]() +Control+Spacebar). This command opens the Character palette, where you can choose special characters such as mathematical symbols, arrows, ornaments, stars, accented Latin characters, and so on. To insert a character into your document at the insertion point, simply click it and click the Insert button.
+Control+Spacebar). This command opens the Character palette, where you can choose special characters such as mathematical symbols, arrows, ornaments, stars, accented Latin characters, and so on. To insert a character into your document at the insertion point, simply click it and click the Insert button.
Working with text
TextEdit operates on the “select, then operate” principle, as do most Macintosh programs, including the Finder. Before you can affect text in your document — change its font face, style, size, margins, and so on — you need to select the text you want to operate on.
You can use several methods to select text in a document:
![]() If you double-click a word, the word is selected.
If you double-click a word, the word is selected.
![]() If you triple-click a word, the entire paragraph that contains the word is selected.
If you triple-click a word, the entire paragraph that contains the word is selected.
![]() You can click anywhere in the document, hold down the Shift key, and then click again somewhere else in the document, and everything between the two clicks will be selected.
You can click anywhere in the document, hold down the Shift key, and then click again somewhere else in the document, and everything between the two clicks will be selected.
![]() You can click anywhere in the document, hold down the Shift key, and use the keyboard arrow keys to extend the selection. Figure 14-1 shows some text that is selected.
You can click anywhere in the document, hold down the Shift key, and use the keyboard arrow keys to extend the selection. Figure 14-1 shows some text that is selected.
Give all these methods of selecting text a try, decide which ones feel most comfortable, and then memorize them for future use.

Figure 14-1: A highlighted sentence means it’s currently selected.
Rather than bore you with a rundown of what the buttons on TextEdit’s toolbar do, just hover the cursor over any item to display its tooltip, as I’ve done for the Line and Paragraph Spacing drop-down menu in Figure 14-1.
When text is selected, you can operate on it. For example, you can use the Format menu’s Font submenu to make text Bold, Italic, Outlined, or Underlined, as shown in Figure 14-2.

Figure 14-2: Only the selected sentence is affected by these formatting commands.
Another way I could have applied the Bold style to the text in Figure 14-2 is by clicking the B (for Bold) button on the toolbar. Note that the toolbar is visible only when you’re working on a Rich Text document; if you were to choose Format⇒Make Plain Text (![]() +Shift+T), the toolbar would disappear.
+Shift+T), the toolbar would disappear.
The same idea applies to tabs and margins. In Figure 14-3, I’ve dragged the left-margin markers from zero inches to the one-inch mark. Notice that the selected text is now indented by one inch.

Figure 14-3: The selected paragraph is now indented.
Select some text in your document, and try all the items in the Format menu’s Font and Text submenus. As you see, you have a great deal of control over the way your words appear on the screen. And because TextEdit, like most Macintosh software, is WYSIWYG (What You See Is What You Get), when you print the document (by choosing File⇒Print), the printed version should look exactly like the version you see on the screen. For help with printing, see Chapter 15.
Before you print your masterpiece, however, you may want to check your spelling and grammar — something that TextEdit makes extremely simple. Merely choose Edit⇒Spelling and Grammar⇒Check Document Now or press ![]() +; (semicolon). TextEdit highlights and underlines what it perceives to be mistakes in your document. Right-click (or Control-click) to correct the error, as shown in Figure 14-4.
+; (semicolon). TextEdit highlights and underlines what it perceives to be mistakes in your document. Right-click (or Control-click) to correct the error, as shown in Figure 14-4.
Don’t put too much faith in Mavericks’ spelling and grammar checker. It’s good, but not perfect, and no substitute for a good proofreading.
Adding graphics to documents
Last but not least, you have a couple of ways to add pictures to a TextEdit document. The first works as follows:
1. Copy a picture in another program — Preview, Safari, or whatever.
2. Put the cursor where you want the picture to appear in your TextEdit document.
3. Choose Edit⇒Paste.
The picture magically appears on the page.
Or you can drag a picture from the Finder or some application (such as Safari or Mail) to a TextEdit document, as I did in Figure 14-5.

Figure 14-4: Right-click (or Control-click) to correct a spelling or grammar error.
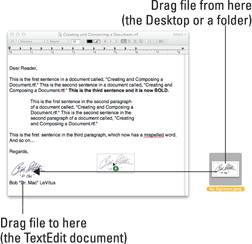
Figure 14-5: Dragging a picture into a TextEdit document.
Font Mania
You can jazz up your documents — or make them a little more serious — with different fonts. To a computer user, font means typeface — what the text characters look like. Although professional typographers will scream at my generalization, I’ll go with that definition for now.
Tens of thousands of different fonts are available for the Macintosh. You don’t want to use the same font for both a garage-sale flyer and a résumé, right? Luckily for you, OS X comes with hundreds of fonts. Some are pretty predictable, such as Times New Roman, but OS X gives you some artsy ones, too, such as Brush Script. If you really get into fonts, you can buy single fonts and font collections anywhere you can buy software. Plenty of shareware and public-domain fonts are also available from online services and user groups. Some people have thousands of fonts. (Maybe they need to get out more.)
The preinstalled fonts live in two different folders, both called Fonts. One is in the Library folder at root level on your hard drive; the other is in the Library subfolder within the System folder.
 OS X actually has four Font folders. A third one, also called Fonts, is in the (hidden) Library folder in your Home directory. The upcoming section explains the subtle distinctions among those three locations. The fourth one is in the
 Network/Library folder, and you see it only when you're connected to a NetBoot network server.
Types of fonts
You can find many font formats with names like OpenType, Mac TrueType, Windows TrueType, PostScript Type 1, bitmap, and dfont. No problem — OS X supports them all.
 The only font format I know that Mavericks doesn’t support is PostScript Type 3.
The three most common formats for Macs are
![]() TrueType fonts: These standard-issue Apple fonts come with OS X. They’re in common use on Macs as well as on Windows machines. That’s partly because these fonts are scalable: They use only a single outline per font, and your Mac can make their characters bigger or smaller when you choose a font size in a program.
TrueType fonts: These standard-issue Apple fonts come with OS X. They’re in common use on Macs as well as on Windows machines. That’s partly because these fonts are scalable: They use only a single outline per font, and your Mac can make their characters bigger or smaller when you choose a font size in a program.
![]() Type 1 fonts: These fonts are often referred to as PostScript Type 1 fonts, and they’re the standard for desktop publishing on the Mac (as well as on Windows and Unix). Tens of thousands of Type 1 fonts are available. (Not nearly as many high-quality TrueType fonts exist.)
Type 1 fonts: These fonts are often referred to as PostScript Type 1 fonts, and they’re the standard for desktop publishing on the Mac (as well as on Windows and Unix). Tens of thousands of Type 1 fonts are available. (Not nearly as many high-quality TrueType fonts exist.)
Type 1 fonts come in two pieces:
• A suitcase file to hold the bitmap that tells the computer how to draw the font on your screen.
• A printer font that tells the printer how to print the font on a page.
Some Type 1 fonts come with two, three, or four printer fonts, which usually have related names. Just keep all the parts together, and they should work.
![]() OpenType fonts: OpenType fonts are really TrueType fonts in which PostScript information is embedded. This gives you the greater typographic control that high-end typesetters require while keeping the one-file convenience of TrueType. OpenType is one of the most popular file formats and the one favored by most major type vendors including Adobe and Linotype.
OpenType fonts: OpenType fonts are really TrueType fonts in which PostScript information is embedded. This gives you the greater typographic control that high-end typesetters require while keeping the one-file convenience of TrueType. OpenType is one of the most popular file formats and the one favored by most major type vendors including Adobe and Linotype.
Managing your fonts with Font Book
 Font Book lets you view your installed fonts, install new fonts, group your fonts into collections, and enable and disable installed fonts. As usual, you find the Font Book application in the Applications folder at root level on your hard disk.
The easiest way to install a new font is to double-click it in the Finder. Font Book opens and displays the font. Click the Install Font button to install the font.
Other ways you can install new fonts are to choose File⇒Add Fonts or press ![]() +O. A standard Open dialog allows you to select a font or fonts to be installed.
+O. A standard Open dialog allows you to select a font or fonts to be installed.
Note that, by default, new fonts are installed in your Home folder's Fonts folder, which is inside your invisible Library folder (Users/Home/Library/Fonts). You can change the default installation location in Font Book's Preferences (Font Book⇒Preferences or ![]() +,).
+,).
To view a font or font family, click its name in the Font list. Click the disclosure triangle before the name of a font to see all the variants that are installed.
To change the size of the viewed font, click the triangle next to the font size (18 in Figure 14-6) in the top-right corner of the Font Book window and choose a new size from the drop-down list that appears, or type a different number where the number 18 appears in Figure 14-6, or move the size slider — the white dot and gray line that run along the right edge of the window — up or down.
To disable a font so it no longer appears on any applications’ Font menus, choose Edit⇒Disable or click the Disable button (the check mark in a square button) at the bottom of the window.

Figure 14-6: Click a font in the Font list to display its characters in the right pane.
To enable a previously disabled font, choose Edit⇒Enable or click the Enable button (same as the Disable button).
Mavericks’ Font Book looks out for your best interests; it won’t allow you to disable or delete any fonts required by Mavericks — including (but not limited to) Lucida Grande, Helvetica, and Helvetica Neue.
Installing fonts manually
To install a new font manually, drag its icon into one of the two Fonts folders that you have access to. Why might you want to install them manually? If you install a font via the double-click-and-use-Font Book method, the font will be installed in your Home/Library/Fonts folder, and available only to you.
If you want other users to be able to access the new font, drag the font’s icon to the Fonts subfolder inside the Library folder, which is at the root level of your hard drive. This Fonts folder has universal access. Or, if you usually want to install fonts for everyone, change the Default Install Location in Font Book Preferences (Font Book⇒Preferences or ![]() +,).
+,).
The Fonts folder in the Library inside the System folder is reserved for OS X and can't be modified easily. If you try to remove a font from it — or add one, for that matter — you first have to authenticate yourself as an administrator. Do yourself a favor, and never remove fonts from /System/Library/Fonts. You can really screw up your Mavericks operating system if you remove the wrong font. So don't go messing with the fonts in folders unless you know what you're doing. Otherwise, just use Font Book, which prevents you from doing anything bad to fonts.