11. Using iMovie on Your iPhone and iPad

In this chapter, you see how to use iMovie on your iPhone and iPad. Topics include the following:
→ Creating a new project
→ Adding video
→ Adding a voiceover
→ Creating a trailer
→ Using transitions
Although you might not think of your iPhone or iPad as a place to put together videos, iMovie works extremely well on those devices. This chapter covers some of the main features of iMovie for iPhone and iPad. The figures are from an iPhone, but the same steps work on an iPad and iPod touch. Some icons on the iPad are in different parts of the screen, but the steps are the same.
Creating a New Movie Project
When creating a new movie project, you have to choose a theme.
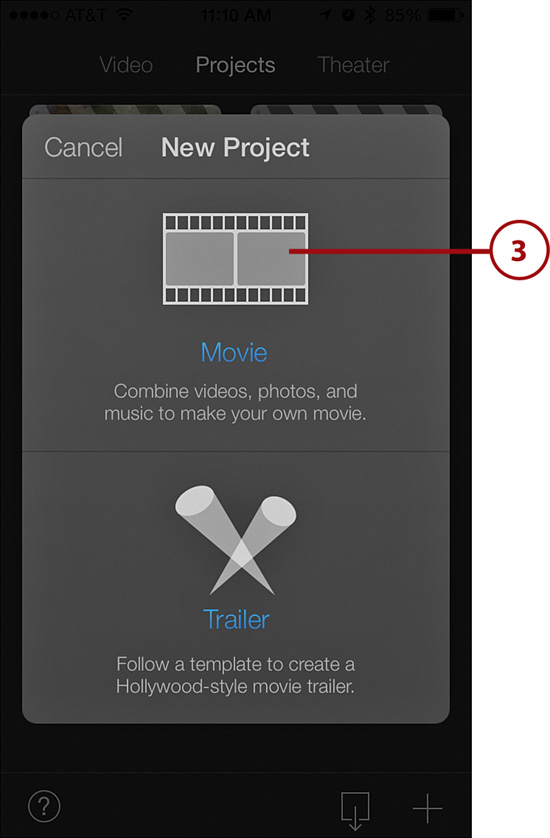
2. Touch the New Project icon.

3. Touch Movie.
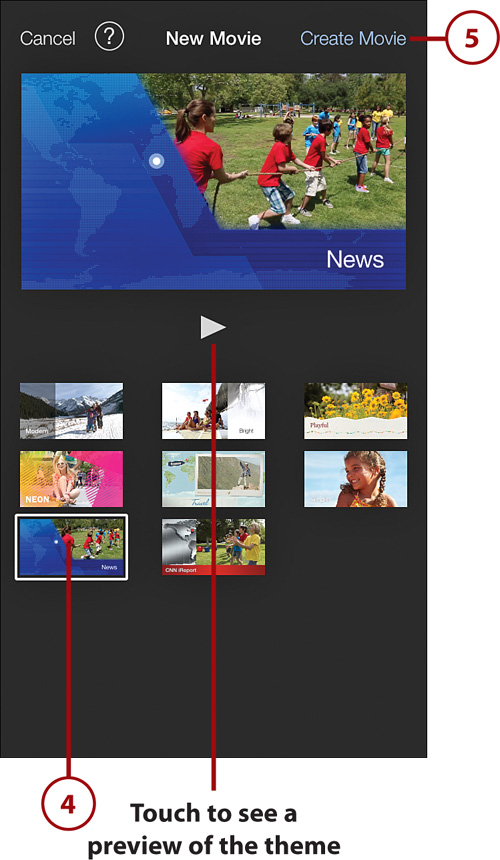
4. Touch a movie theme to select it.
5. Touch Create Movie.
What Does the Theme Do?
When you choose a theme, iMovie pulls together clip transitions, opening and closing titles, and other titles that fit a style for the chosen theme. While you are creating your movie, you can add these elements to your movie at any time, or even choose a different theme. Unlike iMovie on the Mac, which automatically inserts all titles and transitions, iMovie on the iPhone and iPad leaves that up to you.
How Do I Name My Project?
Unlike iMovie on the Mac, which lets you name your project at creation time, iMovie on the iPhone and iPad uses an automatically generated name for your project at creation time. After you have added at least one movie clip to your project, you will be able to rename the project. To do this, on the screen that shows a list of your projects, touch the project that you want to rename. On the next screen, touch the project name that appears below the preview of your project and type a new project name.
The Movie Project Main Screen
After you create a new movie project, you are presented with the main iMovie movie creation screen.
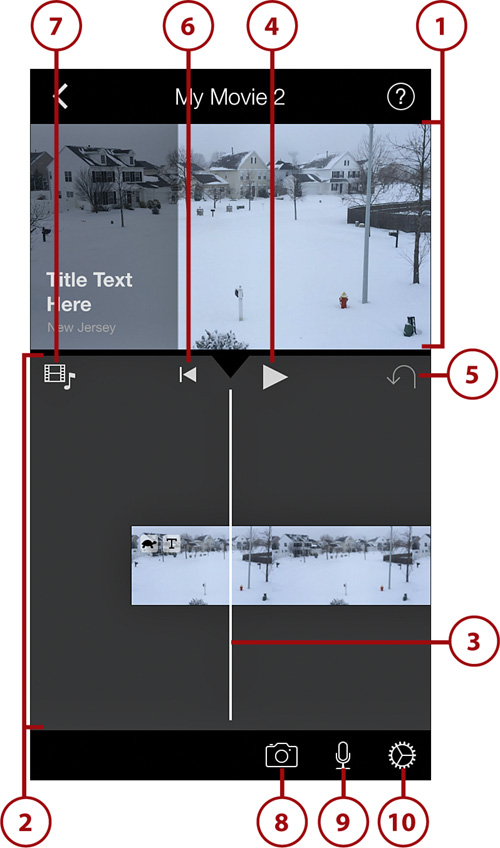
1. The preview window displays what is at the playhead and enables you to edit certain elements.
2. The timeline shows your movie’s timeline along with titles, transitions, and speed indicators.
3. The video playhead indicates which frame is being displayed in the preview window.
4. Touch the Play icon to play your movie starting at the location indicated by the playhead.
5. Touch the Undo icon to undo the most recent change you made to your movie. Touch and hold to redo your most recent change.
6. Touch to jump to the beginning of the clip that is currently under the playhead. Touch repeatedly to get back to the beginning of your movie’s timeline.
7. Touch the Media Import icon to add video, audio, or pictures to your movie’s timeline.
8. Touch the Camera icon to record video or take a picture and immediately add it to your movie’s timeline.
9. Touch the Microphone icon to record a voiceover track for your movie, starting at the position of the playhead.
10. Touch the Settings icon to change the settings for your movie project, including the theme, whether you want the theme music to be used, if you want the pitch of the audio to change when you adjust the speed of a movie clip, and if you want to add a fade-in from black or fade-out to black effect.
Adding Video, Photos, and Audio
Probably the first thing you want to add to your project is some multimedia.
1. Touch the Media Import icon.

2. Touch Video to see your available video.
3. Touch Photos to see your available photos.
4. Touch Audio to see your available audio, which includes music you have on your iPhone or iPad, audio you have recorded, and iMovie’s built-in sound effects.

Add Video
When you add video, you are able to choose video that you have previously recorded on your iPhone or iPad, video that you have downloaded from the Internet, or video that you have synchronized from your computer using iTunes.
1. Touch the clip you want to add.
2. Drag the yellow markers left or right to select only the part of the clip you want to add to your project.
3. Touch Play to see a preview of the selected video.
4. Touch the Add icon to add the video to your project. The clip is placed into your project at the position of the playhead.


1. Touch an album to see the photos in it. This example uses the Camera Roll.
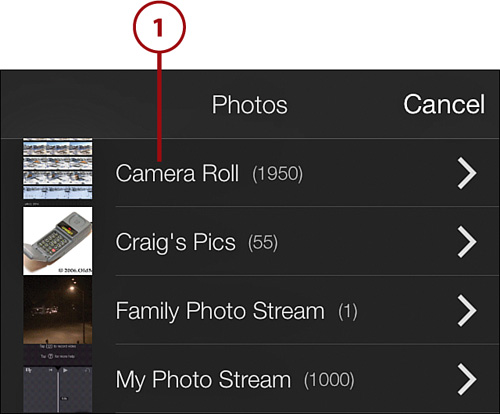
2. Touch a photo to add it to your project at the position of the playhead.

Add Audio
You can add audio from music you have purchased in iTunes, music you have downloaded through other sites, and iMovie built-in theme music and sound effects.
1. Touch to select either iMovie Theme Music or Sound Effects. If you want to select music that you own, touch Albums, Artists, or Songs; touch Playlists to select music that you have in a playlist. In this example, we add a song.

3. Touch Play to preview the song.
4. Touch the Add icon to add the song to your project.

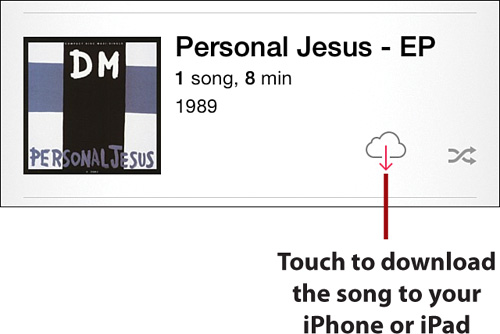
Why Are Some Songs Unavailable?
If you try to add music you have purchased in iTunes, iMovie shows you all of the music that you own, even songs that aren’t loaded onto your iPhone or iPad. If a song is grayed out, or starts with (Unavailable), it means that that song is not synced to your iPhone or iPad. Open the Music app, find the song, and touch the iCloud icon to download it to your device. If it still shows as unavailable in iMovie after you have downloaded it, then the song is protected by DRM and cannot be used in your movie project.
Editing Your Project
After you have your video, photos, and audio added to your movie project’s timeline, it’s time to edit and fine-tune your movie.
Add Titles
You can add titles to the beginning, end, or anywhere along your project timeline. The look of the titles is determined by the theme you have selected.
1. Position your timeline so that the playhead is directly over the place where you want to add a title. In this example, we add an opening title at the start of the timeline.
2. Touch the clip to select it.
3. Touch Video (unless it is already highlighted).
4. Touch Title.

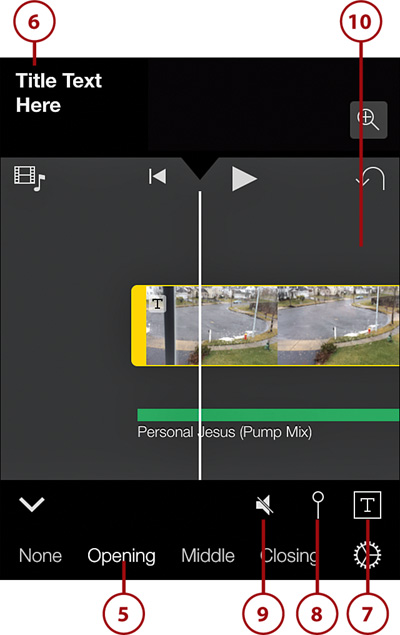
5. Touch the type of title you want. In this example, we use an Opening title.
6. Touch Title Text Here to type in your own title text.
7. Touch the Text icon to select the style of the title text, including title text that uses animation.
8. Touch the Location icon to add location information to the title text. If you use this option, iMovie adds your current location just below the title text.
9. Touch to mute or unmute the title text’s animation sound effect (if it has one).
10. Touch outside of the clip to save your changes.
iMovie can optionally include your location to the title text you add. Location information is only available for Opening titles. If you use this feature, touch the GPS location arrow to let iMovie use your current location, or use the Search feature to find place names. You can also manually edit the location once it has been chosen.

Speed Up or Slow Down a Clip
You can speed up or slow down the playing speed of a movie clip. For clips recorded in slow motion (slo-mo) on an iPhone 5S (and future iOS products), you can speed them up.
1. Touch the clip you want to change the speed for.
2. Touch Video (unless it is already highlighted).
3. Touch Speed.

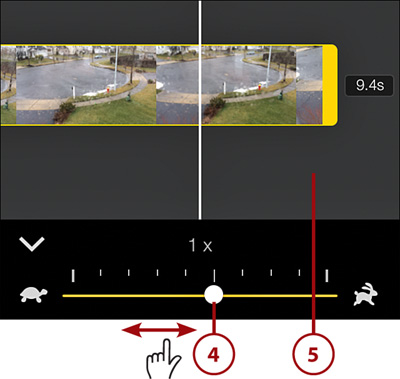
4. Drag the Speed slider left or right to either slow down or speed up the clip.
5. Touch outside of the clip to save your changes.
Slow Motion (Slo-Mo) Clips
Video that you originally recorded on your iPhone 5S in slow motion (also known as slo-mo) is recorded at 120 frames per second (fps). Regular video is recorded at 30fps. When you play slo-mo clips, they are effectively playing at one-fourth (¼) speed compared with regular clips, so when you bring up the Speed slider with a slo-mo clip selected, it shows that the speed is ¼. The difference between a clip recorded in slo-mo on an iPhone 5S and a regular clip recorded at 30fps that you are slowing down in iMovie is quality. If you slow down a clip recorded at 30fps to a ¼ speed, you are effectively playing it at about 7fps, so the video will appear a bit jerky. If you use a clip recorded in slo-mo on an iPhone 5S then at ¼ speed it is actually 30fps and at full speed it is 120fps.
Trim a Clip
You might want to trim the length of a clip in your timeline to make it shorter.
1. Touch the clip you want to trim.
2. Drag the yellow trim handle to shorten the clip.
3. Touch outside of the clip to save your changes.

1. Touch the clip you want to zoom.
2. Touch the Zoom icon.

3. Use your thumb and forefinger to zoom in and out of the clip. Spread your thumb and forefinger apart to zoom in, and pinch them back together to zoom out.
4. Touch outside of the clip to save your changes.

Duplicate a Clip
You might have a clip that you need to duplicate.
1. Touch the clip you want to duplicate.
2. Touch the More icon to see more options. If you are using an iPad, all the options are already on the screen.

3. Touch Duplicate. A copy of the selected clip is made and placed in the timeline to the right of the original clip.

Create a Freeze Frame
When you create a freeze frame, iMovie takes the current frame and creates a two-second freeze frame.
1. Move the clip so that the playhead is over the frame you want to create a freeze frame from.
2. Touch the clip to select it.
3. Touch the More icon to see more options. If you are using an iPad, all the options are already on the screen.

4. Touch Freeze. A two-second freeze frame is made and placed in the timeline at the playhead.

Split a Clip
Splitting a clip can be very useful if you want to apply different titles or slow down or speed up just part of the original clip. By splitting the clip, you can apply those changes to just the newly split-off clip.
1. Move the clip so that the playhead is over the place where you want to make the split.
2. Touch the clip to select it.
3. Touch the More icon to see more options. If you are using an iPad, all the options are already on the screen.

4. Touch Split. The original clip is split into two clips at the playhead.

2. Touch the Delete icon.

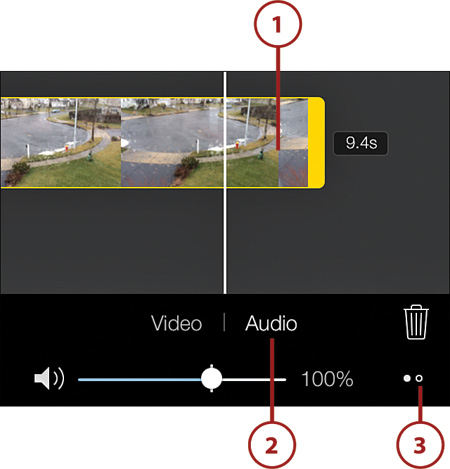
Change the Clip Volume
1. Touch the clip you want to change the volume for.
2. Touch Audio.
3. Drag the Volume slider to increase or decrease the volume of the clip.
4. Touch outside of the clip to save your changes.


Detach the Audio from a Clip
1. Touch the clip you want to detach the audio from.
2. Touch Audio.
3. Touch the More icon for more options. If you are using an iPad, all the options are already on the screen.
4. Touch Detach. The audio from the clip appears as a separate clip below the video clip.

Why Detach Audio?
Detaching the audio from your video clip allows you to edit just the audio. This allows you to treat the audio track as its own clip. You can split the audio clip, delete parts of the audio clip, speed it up, slow it down, duplicate it, and so on.
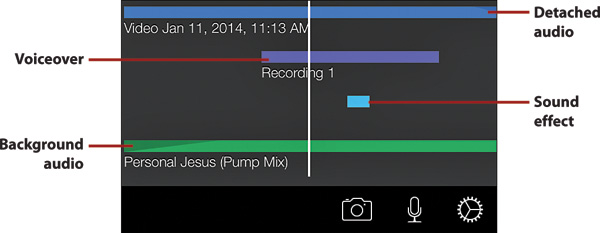
Audio Tracks
Audio tracks are shown in the timeline using colors to indicate what kind of audio it is. If an audio track is blue or purple, it means that it is foreground audio. If an audio track is green, it means that it is the background audio. You can only have one background audio track, but many foreground tracks. Background audio is typically a music track, but not necessarily. Background audio is always softer than the foreground audio. At any time, you can switch an audio track to be the background audio, or make the background audio into a foreground audio track. Finally, you can make any audio track fade in or fade out.
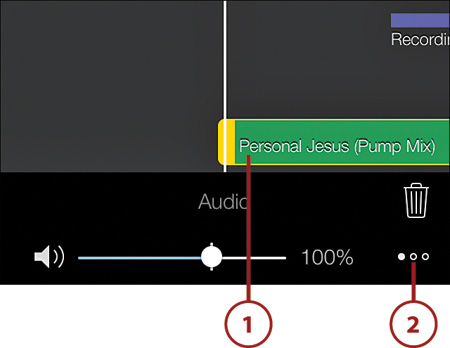
Fade Audio
Audio tracks (including audio that you may have detached from its original video clip) can be set to fade in and/or fade out.
1. Touch the audio clip you want to either fade in or fade out.
2. Touch the More icon for more options. If you are using an iPad, all the options are already on the screen.
3. Touch Fade.
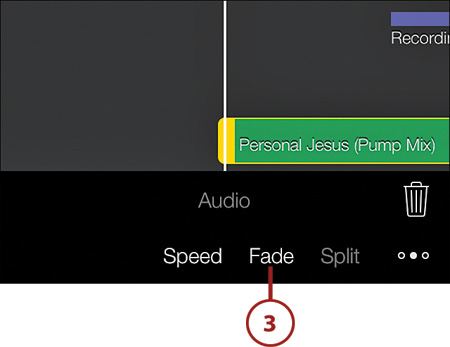
4. Drag the yellow arrow to set how long the fade-in or fade-out takes.
5. Touch outside of the clip to save your changes.

Switch Audio Between Foreground and Background
You can switch a background audio track to a foreground track or vice versa. In this example, we switch the background audio to the foreground.
1. Touch the audio clip you want to switch.
2. Touch the More icon twice (or once if you are using an iPad).

3. Touch Foreground.

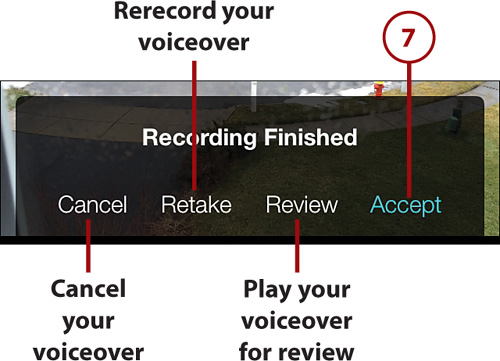
Record a Voiceover
Using your iPhone or iPad, you can record a voiceover track where you can narrate what is being seen, for example.
1. Drag the timeline so that the playhead is directly over where you want to start your voiceover.
2. Touch the Microphone icon.

3. Touch Record.


5. Start speaking.
6. Touch Stop when you are finished.

7. Touch Accept.
Edit a Transition
A transition is an effect that is used between two clips in your timeline. Based on the theme you choose, iMovie automatically inserts transitions. However, you might want to change which ones iMovie has used or edit them.
1. Touch the transition you want to edit.
2. Touch to change the duration of the transition.
3. Touch the Speaker icon to mute or unmute the transition’s sound effect (if it has one).
4. Choose a different type of transition.
5. Touch outside of the transition to save your changes.

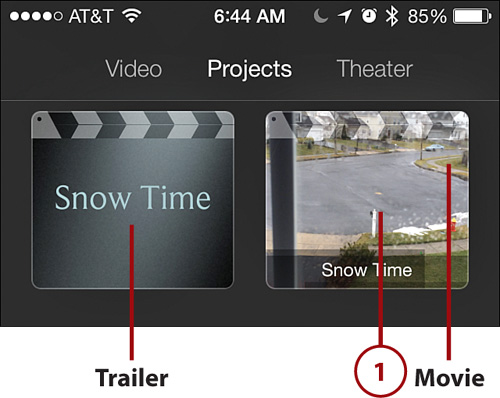
Just like iMovie on the Mac, you can create a very professional looking trailer for your movie. The steps for creating a trailer and the screens used are the same as iMovie on the Mac; read Chapter 9, “Creating and Customizing Trailers,” for more information.

Sharing Your Movie or Trailer
After your movie or trailer is finished, you can share it with friends and family using email, text message, AirDrop or video sharing sites, or social media.
1. Touch the trailer or movie you want to share. In this example, we share a movie.
2. Touch the Share icon.

3. Touch the recipient’s profile photo to send your movie or trailer to someone via AirDrop.
4. Touch the iMovie Theater icon to save your movie or trailer in your iMovie Theater.
5. Touch the Facebook icon to share your movie or trailer on Facebook.
6. Touch the YouTube icon to share your movie or trailer on YouTube.
7. Touch the Vimeo icon to share your movie or trailer on Vimeo.
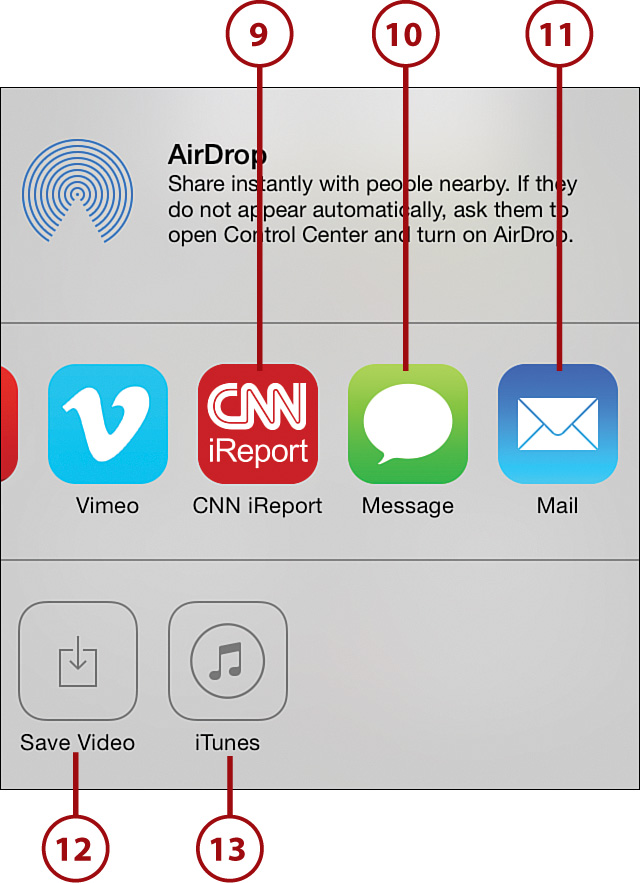
8. Swipe right to see more choices.

9. Touch the CNN iReport icon to save your movie or trailer with CNN using CNN iReport.
10. Touch the Message icon to share your movie or trailer via text message.
11. Touch the Mail icon to share your movie or trailer via email.
12. Touch the Save Video icon to save your movie or trailer to your iPhone or iPad’s camera roll, which will enable you to share it later using any service not listed here.
13. Touch the iTunes icon to save your movie or trailer to iTunes.