
10. Surfing with Internet Explorer
In this chapter, you learn how to use Internet Explorer on your Xbox One.
→ Understanding Internet Explorer on Xbox One
→ Adjusting Internet Explorer Settings
→ Learning the Internet Explorer Interface
Internet Explorer is Microsoft’s web browser. If you have a Microsoft Windows operating system on your computer or laptop, chances are that you’ve already used Internet Explorer in some capacity. But the neat thing about having Internet Explorer on your Xbox One console is that you can use it to explore the Web right on your TV and can even use your voice, gestures, or SmartGlass to easily navigate your favorite sites.
In this chapter, you learn how to set up and make the most of Internet Explorer on your Xbox One. You also learn how you can use Bing, Microsoft’s search engine, to locate the content you’re looking for.
Understanding Internet Explorer on Xbox One
If you’ve used Internet Explorer on Xbox 360, you’ll find three key improvements that enhance the user experience on Xbox One:
• Supports modern web standards—Internet Explorer on the Xbox One supports modern web standards, including HTML5 and CSS3, enabling more sites to function and look great on your TV.
• More navigation options—In addition to using your controller, you can use your voice or gestures to control Internet Explorer. You can also make use of SmartGlass, which enables you to navigate Internet Explorer with a tablet or mobile device instead of a controller, as well as to transfer web pages between your mobile device and your Xbox One. For more on SmartGlass, turn to Chapter 11, “Looking Through the SmartGlass.”
• Additional browser features—Internet Explorer on your Xbox One includes many features that were previously only available on a Windows PC, including website pinning, multiple tabs, InPrivate browsing, Smart-Screen, Cookie blocking, and Do Not Track.
Before you can start using Internet Explorer on your Xbox One, you need to have an Xbox Live Gold membership. In addition, although Internet Explorer comes preinstalled on your Xbox One, you need to set it up before you can use it.
Had an Xbox 360?
If you previously used an Xbox 360 and pinned or saved any sites to your Favorites in Internet Explorer, they’ll automatically be pulled forward to your Xbox One, so no need to hunt for them again on your Xbox One.
Set Up Internet Explorer
Setting up Internet Explorer on your Xbox One is easy because it’s already preinstalled. You basically just need to set your preferences and you’re good to go. Follow these steps:
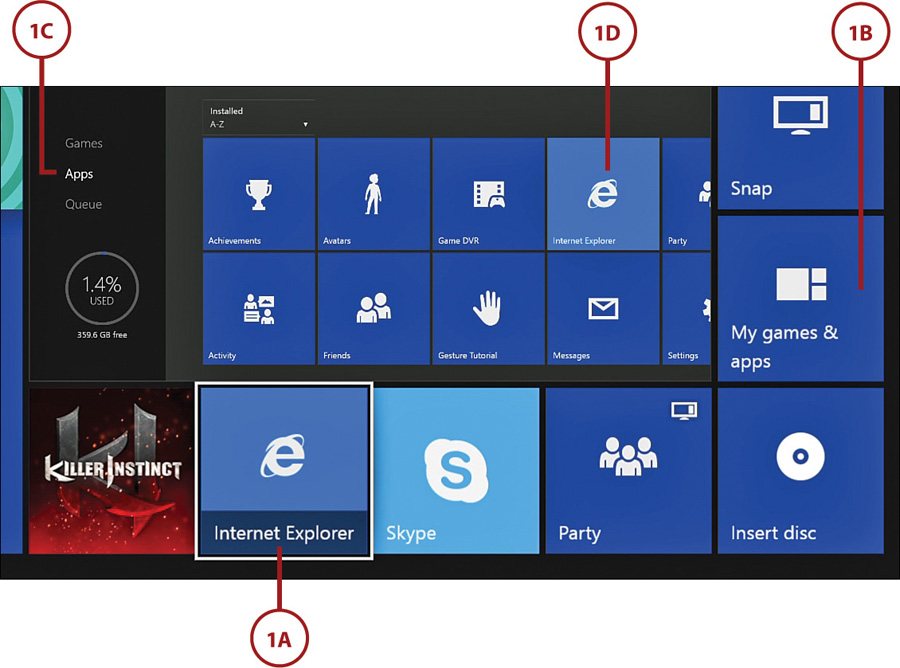
1. Sign in to your account and select the Internet Explorer app from the Home screen (A). If you do not see it on the Home screen, select the My Games & Apps tile (B), select Apps (C), and then select the Internet Explorer tile (D).
2. Select a setting for Turn On SmartScreen Filter. The authors recommend that you keep this filter turned on, as it helps detect phishing websites and can help protect you from downloading or installing malware.
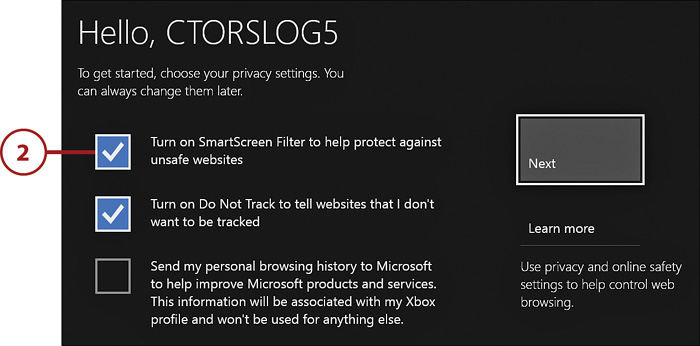
If you want to learn more about the SmartScreen filter, select Learn More, and then select SmartScreen for Safe Browsing.
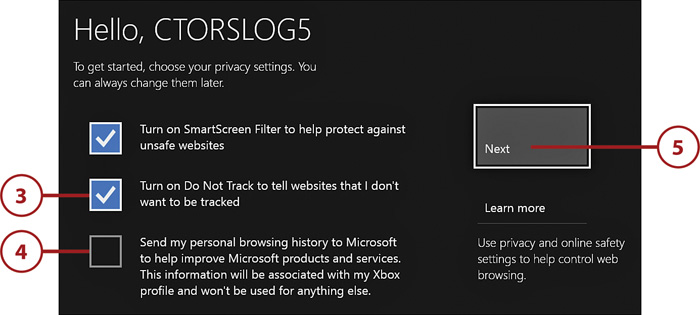
3. Select a setting for Turn On Do Not Track. This is another feature that helps protect your privacy by blocking online tracking.
4. Select a setting for Send My Personal Browsing History to Microsoft. Check this option if you’d like to share your personal browsing history with Microsoft to help improve its products. Leaving this unchecked doesn’t have any effect on your web browsing experience.
5. Select Next to continue.
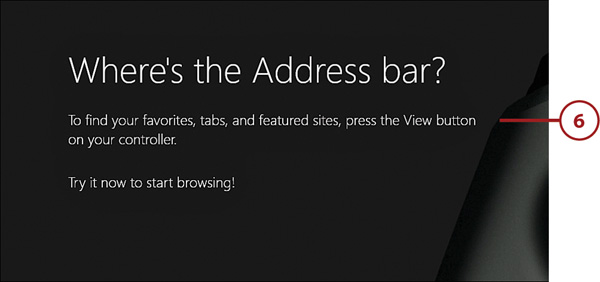
6. Press the View button on the controller to access the address bar.
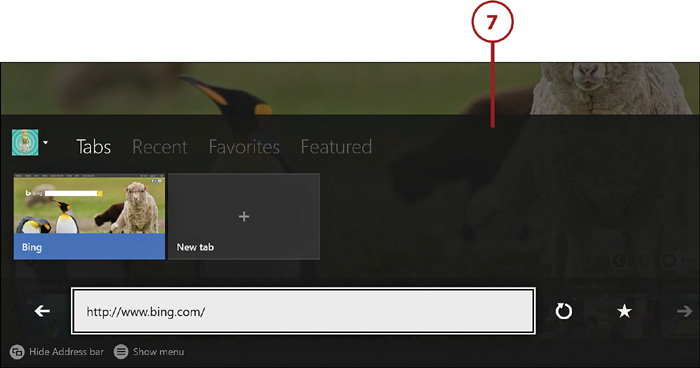
7. You are now in Internet Explorer and can start browsing; see the sections “Learning the Internet Explorer Interface” and “Navigating Web Pages” for more on the interface and how to navigate it, respectively.
Grasping the Internet Explorer Menu Options
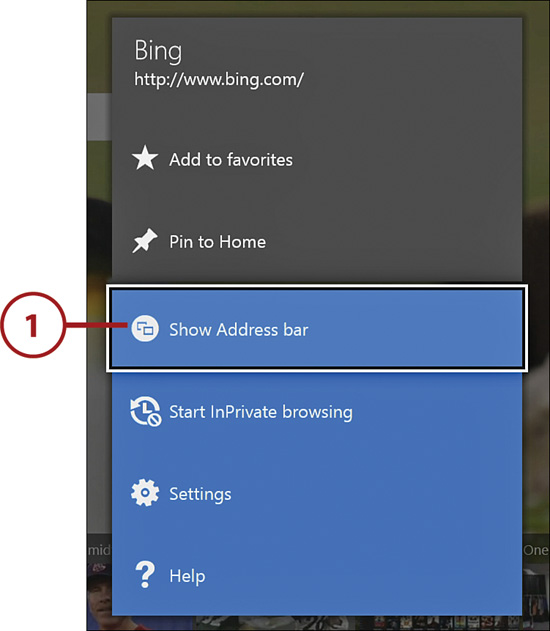
When you’re in Internet Explorer and on any web page, you can access a menu of website-specific (appears in the gray area) and Internet Explorer-specific (appears in the blue area) menu options by selecting the Menu button on your controller. This menu includes the following options:

• Add to Favorites—Above this option, you see the name of the website you’re on, along with the site’s uniform resource locator (URL). If you want to favorite this site, then select this option. Once you do, the website is added to your Favorites, which is accessible when you select the Show Address Bar option.
• Pin to Home—Select this option if you want to pin the website you’re on to the Pins section of the Home screen.
• Show Address Bar—This option pulls up the Internet Explorer interface, from which you can conduct searches using Bing and access a variety of other options. See the “Learning the Internet Explorer Interface” section later in this chapter for more on what you’ll find here.
• Start InPrivate Browsing—Select this option if you don’t want to leave a trace of your web browsing activity on your console. This option helps prevent your browsing history, temporary Internet files, form data, cookies, and usernames and passwords from being retained by the browser. If you select this option and want to resume normal browsing, simply press the Menu button again and then select End InPrivate Browsing.
• Settings—Go here to delete your history and adjust your general and privacy settings for Internet Explorer. For more on Internet Explorer settings, turn to the “Adjusting Internet Explorer Settings” section of this chapter.
• Help—Select this option if you’re looking for additional information and tips on how to use Internet Explorer on your console.
Adjusting Internet Explorer Settings
Once you set up Internet Explorer, you might want to tweak some settings before you start browsing the Web. In addition, the options you enabled when you set up Internet Explorer appear checked off here, and you can modify these if you want.
To adjust your settings, press the Menu button on your controller when in Internet Explorer and then select Settings. The following options are now available to you:

• Delete History—Select this option if you want to delete your browsing history. Keep in mind if you delete this, you might also delete useful stored information, such as saved web passwords.
• Learn More—Select this option to pull up the same information as the Help option when you press the Menu button while in Internet Explorer. Select this option if you need more information on Internet Explorer settings.
• Use Webpages Formatted for Mobile Devices—If you find a web page that’s not displaying properly on your console, consider selecting this option. In the event that a mobile device version of the page is available, it might display better on your Xbox One, as these pages are designed and streamlined to be compatible on more devices.
• Use My Whole TV Screen to Show Web Content—If this option is not checked, a black border appears around the web page. If checked, this is like pressing F11 while in a web browser on your computer; it fills the whole screen with the web page. On some displays, going full screen can cut off a portion of a web page’s content on the outer edges, so be sure to choose the option that works best for your specific setup.
• Block Unwanted Pop-ups from Websites—Pop-ups are little windows that can suddenly appear onscreen when you’re perusing a website. They are often associated with advertisements and can quickly clutter the screen, so it is better to keep this option enabled.
• Display JavaScript Errors (Advanced)—If you want to get into the technical details of why a website doesn’t work, you can enable this option.
• Allow Websites to Store Cookies on My Xbox—Cookies are small pieces of data sent from the websites you visit to your web browser, where they’re stored. They contain information about your activity. For example, they’ll store items in a shopping cart when you’re shopping online and save your login information for certain websites.
• Privacy—For more information on all of the available options here, see step 2 in the “Setting Up Internet Explorer” section earlier in this chapter.
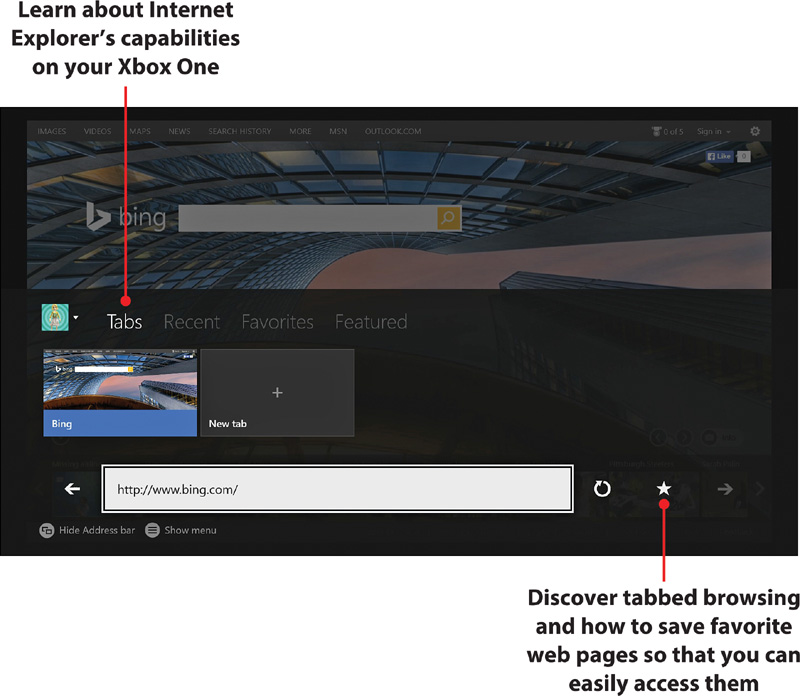
Learning the Internet Explorer Interface
Internet Explorer provides a full-screen browser experience. This enables you to focus on the content you’re interested in, rather than having the screen cluttered with nonessential items.
After you set up Internet Explorer, the next time you access it, you’re brought to Bing.com, which is set as the default home page. To get to the Internet Explorer interface, just press the Menu button on your controller and then select Show Address Bar.
The following Internet Explorer options are now available to you:

• Sign In—Select this icon to sign in a different Xbox Live Gold member; remember, unless an individual has Xbox Live Gold, he or she can’t access Internet Explorer.
• Tabs—Select this option to enable tabbed browsing, meaning you can view multiple pages/search results in one window by loading the desired websites into separate “tabbed” sections. For more on this, turn to the “Work with Tabs” section next.
• Recent—Select this option to access the web pages you recently viewed.
• Favorites—Select this option to quickly access your web pages that you’ve made Favorites. For instructions on how to do this, turn to the “Save and Delete Favorites” section later in this chapter.
• Featured—Select this option to view sites and applications that Microsoft is highlighting.
• Bing Search Bar—Click in the Bing search bar to use the onscreen keyboard to conduct a search or enter a URL.
Work with Tabs
Tabs can make your web browsing experience much more enjoyable and manageable, as they keep the web pages you’re interested in easily accessible. To add tabs, follow these steps:
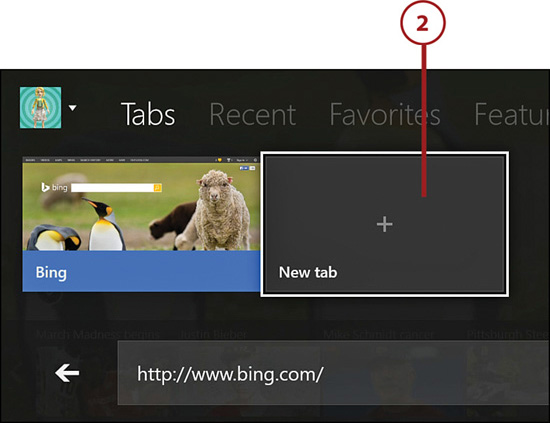
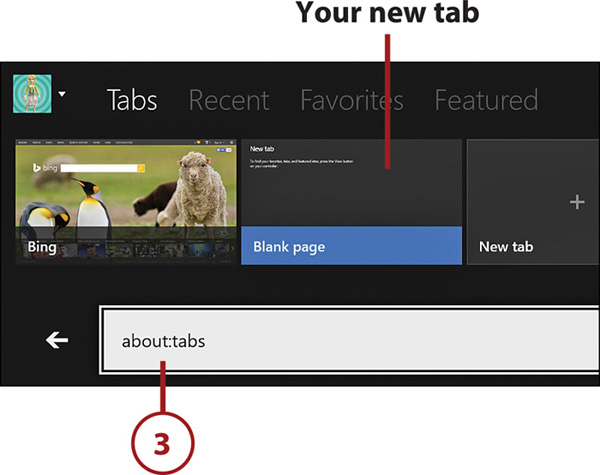
1. From Internet Explorer, select the Menu button and then select Show Address Bar.
2. Scroll to New Tab and press the A button to select it. There is now a blank page available, which is filled by whatever website you choose.
3. Go to the search bar and press the A button.
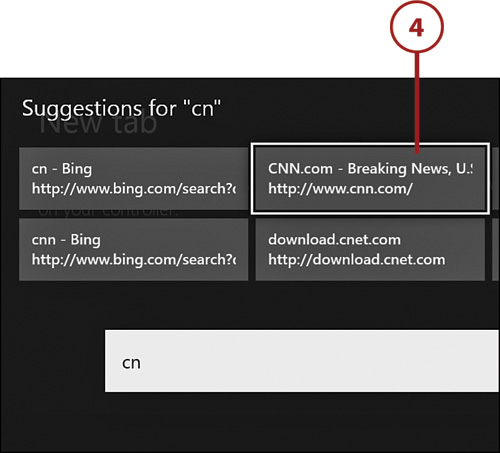
4. Use the onscreen keyboard to enter a term or web page of your choosing; as you type, you might see Suggestions appear at the top of the screen. If you see what you want listed there, scroll to it and press the A button. Otherwise, finish entering your term/destination and then select Enter.
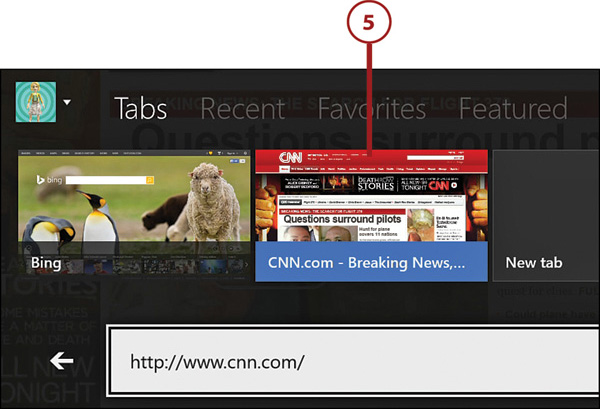
5. When you’re finished perusing the website, select the View button on your controller to add it to the tab. If you select the B button to go back, it won’t be added to the tab.
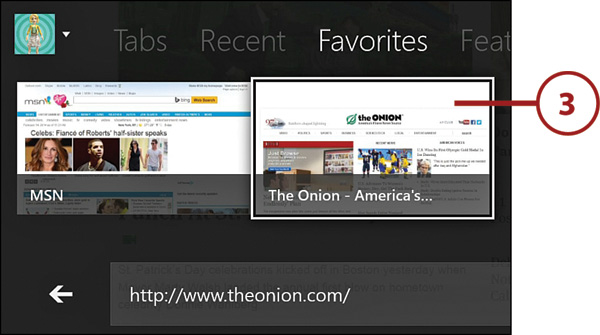
Save and Delete Favorites
In addition to making a website a Favorite via the Internet Explorer menu (see the “Add to Favorites” bullet point in the “Grasping the Internet Explorer Menu Options” section earlier in this chapter), you can do the following:
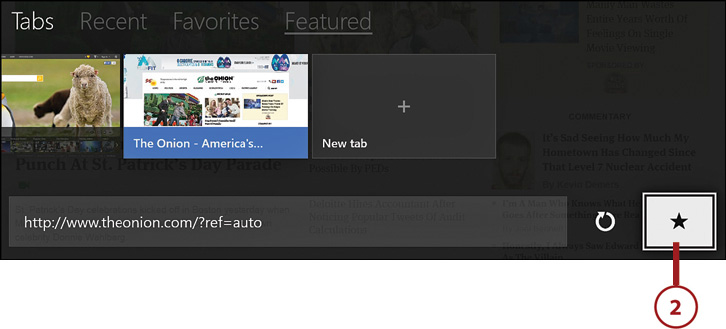
1. Go to the website you want to add to your Favorites.

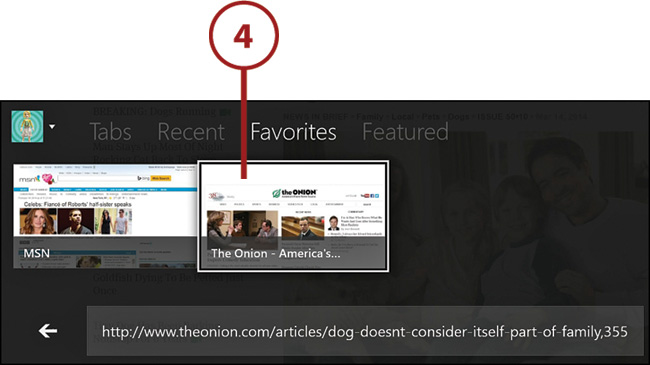
2. Select the View button on your controller to get back to the address bar, where the website is listed in the Bing search bar, and select the star icon.
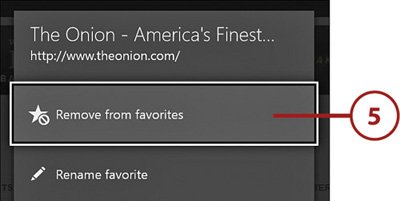
3. The item now appears under Favorites. To delete an item from Favorites, proceed to the next step.
4. Select the item you want to delete, and then press the Menu button on your controller.
5. Select Remove from Favorites.
Navigating Web Pages
Although navigating the Web with a controller may be less than ideal, Microsoft has provided pretty intuitive controls to accomplish this task. You can use the following basic controls to navigate web pages with your controller:
• Left and right bumpers—The left bumper zooms out whereas the right bumper zooms in so that you can get a closer look.
• Menu button—Opens a menu of options, such as enabling you to add an item to Favorites, pin it to Home, or open it in another tab.
• View button—Returns you to the Address Bar screen where you can access your tabs, recently viewed items, favorite items, and items featured by Microsoft.
• B button—Brings you back to the previous screen.
• A button—Selects an item.
• D-pad—Quickly scrolls through chunks of text.
• Left stick—Moves a cursor left and right. Pressing it in also zooms the page in and out with each press.
• Right stick—Moves a cursor up and down.
You can also use Kinect to control web pages via gestures and voice. For more information on how to achieve this, turn to the “Understanding Kinect Controls” section in Chapter 2, “Navigating Your Xbox One’s Dashboard and Settings.” Another great way to control web pages is via SmartGlass, which is discussed in Chapter 11.