8. Phone, SMS, and MMS

In this chapter, you find out how to make and take phone calls and send instant messages on your Galaxy Note 3. Topics include the following:
→ Making phone calls
→ Making conference calls
→ Sending and receiving text messages
→ Sending and receiving multimedia messages
As a cellular phone, your Galaxy Note 3 includes powerful features that enable you to make phone calls swiftly and easily. Your Galaxy Note 3 can also send both text-only instant messages and multimedia instant messages by using the Messaging app.
Phone
With the Phone app, you can quickly make and receive calls across the cellular network. When you need to talk to more than one other person, you can turn your current call into a conference call.
Open and Navigate the Phone App
The Phone app contains four tabs that enable you to make calls in various ways and to track the calls you receive.
1. On the Home screen, touch Phone.


Opening the Phone App from the Lock Screen
By default your Note 3 does not show any app shortcut icons on the lock screen. You can change this by going to Settings, Device, Lock screen and turning on Shortcuts. Now the Lock screen will show the Phone app shortcut along with a few others. To access the phone from the Lock screen, swipe the phone icon upward and your Note 3 will unlock and go straight to the phone app.
2. Touch the keys to dial a number.
3. If the Phone app displays a suggested contact with a matching number, you can tap the contact if it is the one you want.
4. Touch to place the call.

5. Touch Logs to see a list of the calls and messages you have placed and sent.

Making Your Logs Display the Information You Need
At first, the Phone app displays all your logs, but you can narrow the view to specific logs so you can more easily find the calls and messages you need. You learn to do this later in this chapter.
6. Touch Favorites to see lists of Favorites and Frequently Contacted contacts.

7. Touch Contacts to display your full contacts list in the Contacts app.
8. Touch Phone to return to the Phone app.

Receive a Call
When someone phones your Galaxy Note 3, you can accept the call, reject it, or reject it and send a text message.
Accept a Call
1. When the phone rings, look at the contact name (if it is available) or the phone number if it is not, and decide whether to take the call.
2. Touch and drag to accept the call.

3. Touch to switch to the speaker.
4. Touch to enable extra volume on the speaker.
5. Touch to switch to the headset.
6. Touch to mute the call. Touch again to turn off muting.
7. Touch to place the call on hold. Touch Unhold, which replaces the Hold button, when you are ready to restart the call.
8. Touch to end the call.

Reject a Call
If you do not want to accept the call, you can reject it so that it goes to your voicemail.
1. When the phone rings, touch and drag to reject the call.

The call goes to voicemail, and your Galaxy Note 3 displays the screen you were using before the call came in.
Reject a Call and Send a Message
Instead of simply declining a call and sending it to your voicemail, you can send a text message straight back to the caller. Your Galaxy Note 3 provides a selection of canned messages for general needs. You can also create your own messages or type custom messages for particular calls.
1. When the phone rings, touch and drag up to open the Reject Call with Message shade.

2. Touch to send one of the canned messages.

Creating Your Own Reject Messages
To create and save your own reject messages, open the Phone app and touch the Menu button. On the menu, touch Call Settings. On the Call Settings screen, touch Set Up Call Rejection Messages. On the Reject Messages screen, touch Create to create a new message, or touch an existing message to open it for editing.
Handle Missed Calls
If you miss a phone call, you can quickly locate it in the Phone app’s logs so that you can return it.
1. Touch to see the missed call.

2. If the Logs tab is not displayed, touch to display it.

3. If you want to change the logs displayed, touch the Menu button.
4. Touch View.

5. Touch the button you want to filter by. For example, touch Missed Calls, or Dialed calls.

6. Touch a call to see its details.

7. Touch the Menu button for more options.
8. Touch to add the caller to the reject list. This makes your Note 3 automatically reject calls from this person.
9. Touch to send the caller’s number to someone via text message (SMS).
10. Touch to delete one or more call log entries for this person.
11. Touch to copy the caller’s number to the dialing screen.
12. Touch to send the caller a text message.
13. Touch to return the call.

Place a Call
When you need to make a phone call, you can dial it manually using the keypad. But usually you can make a call more quickly by placing the call from a contact entry or by using your voice.
Dial with the Keypad
You can use the keypad to dial a call both when you need to call a number for which you do not have a contact and when you can remember part of the number for a contact.
1. Start typing the phone number. If you are typing to recall a number, type the part you remember.
2. If Phone suggests the correct number, touch to dial it.
3. Touch to dial the number you have typed if no matches were found.

Dial from a Contact Entry
If you know you have a contact entry for the person you want to dial, you can start from that contact entry.
1. In the Phone app, touch the Contacts tab to bring it to the front. Android switches from the Phone app to the Contacts app.
2. Touch the contact to display the contact’s details.

Starting a Call from the Contacts App
Instead of launching the Phone app and then touching the Contacts tab to go to the Contacts app, you can start a call directly from the Contacts app. Touch Contacts on the Home screen or the Apps screen to launch the Contacts app, touch the contact to display his or her details, and then touch the Call button.
3. Touch the number you want to call.

1. Double-press the Home button to launch S Voice.
2. Touch and release the microphone button and say, “Call,” followed by the contact’s name; if the contact has multiple phone numbers, say the type of number as well. For example, say, “Call Dana Smith mobile,” or, “Call Maria Ramirez work.”

3. Wait while S Voice dials the call. The Dialing screen appears.
Dial Using Your S Pen
Your Galaxy Note 3 also enables you to dial numbers using your S Pen.
1. Remove your S Pen.
2. Touch the Back button to cancel the Air Command window.
3. Hover your S Pen close to the screen and touch the writing icon.

4. Write the name of the person you want to call (or write numbers).
5. Touch a matched contact to call that person.

Control a Call
After accepting or establishing a phone call, you can control it from the Call screen.
1. Touch Hold to put the call on hold. When you do this, the person at the other end of the call normally receives an automatic announcement that you have put them on hold.
2. Touch Keypad to display the keypad (for typing more numbers after the call has connected).
3. Touch Mute to mute the call. Touch again to remove muting.
4. Touch Headset to switch the audio to the headset.
5. Touch Speaker to switch the audio to the speaker.
6. Touch to enable or disable extra volume.
7. Touch to enable or disable noise canceling.
8. Touch to end the call.

Using Other Apps During a Call
During a call, you can use most other apps freely, but you cannot play music or video. You can take photos with the Camera app, but you cannot shoot videos. To switch to another app, either use the Recent Apps list or press the Home button and use the Apps screen as usual. While you are using another app, your Galaxy Note 3 displays a green bar at the top of the screen to remind you that you are in a call. When you return to the Phone app, your Galaxy Note 3 displays a panel of options. Touch the Return to Call in Progress green phone button to go back to your call.


Make Conference Calls
You can quickly turn your current call into a conference call by adding further participants.
1. On the call screen, touch Add Call.

2. Dial the call in the most convenient way. For example, touch the Contacts tab, touch the contact in the list, and then touch the Call button on the contact’s details screen.

3. When your Galaxy Note 3 has established the new call, the original caller is on hold. Touch Merge to merge the calls.

4. When you are ready to finish the call, end it as you normally would.

Managing Your Conference Call
During a conference call you can manage the callers. Touch the Menu button and touch Manage Conference Call. Touch End next to the caller you want to drop from the conference call. Touch Back to Call to return to the main dialpad screen.


1. Touch the Menu button.
2. Touch Call Settings.

3. Touch to set up Auto Reject mode and the numbers you want to automatically reject.
4. Touch to edit your canned reject messages.
What Does Auto Reject Mode Do?
Your Galaxy Note 3’s Auto Reject mode can automatically reject either all calls or only the numbers on a list you provide. Automatically rejecting all calls can be useful for meetings and social occasions when you do not want to be disturbed. Automatically rejecting specific numbers enables you to avoid calls from people you do not want to talk to. You can turn Auto Reject mode on and off by moving the Auto Reject Mode switch.
5. Touch to choose if you want to use the Home key or your voice to answer incoming calls. Also set the option to use the Power button to end calls.
6. Touch to enable or disable turning off the proximity sensor while on a call.

7. Touch to choose options for vibrations, cell status tones, and alerts during calls. You can choose whether your Galaxy Note 3 vibrates when someone answers your call and when they hang up. You can also choose which status tones and alerts to receive during calls and which to suppress.
8. Touch to choose whether you want a pop-up window to display when you receive an incoming call.
9. Touch to choose if you want calls automatically answered when you have the headset plugged in, and if you want to be able to make outgoing calls if your Note 3’s screen is locked and you are using Bluetooth.
10. Touch to enable or disable Wi-Fi Calling.
11. Touch to see additional settings including how Caller ID is handled, call forwarding, call waiting, and Fixed Dialing Numbers (FDN).
12. Scroll down for more settings

What Is Wi-Fi Calling?
Wi-Fi Calling (or its technical name Unlicensed Mobile Access [UMA]) is a technology that is provided by some carriers around the world, which enables your Galaxy Note 3 to roam between the cellular network and Wi-Fi networks. Typically when you are connected to a Wi-Fi network, any calls you make are free and of higher audio quality because of the faster speeds. As you move out of Wi-Fi coverage, your Note 3 hands the call off to the cellular network—and vice versa—allowing your call to continue without interruption. If you want to read more about UMA or Wi-Fi calling read this online article: http://crackberry.com/saving-call-charges-recession-your-blackberry. The article is on a BlackBerry blog, but the descriptions of the technology still apply.
13. Touch to choose the ringtone and vibration pattern for incoming calls, whether to play the ringtone and vibrate at the same time, and whether to play the keypad tones.
14. Choose to customize how the audio on phone calls sounds. You can choose among Soft Sound, Clear Sound, Adapt Sound, or choose Off to use standard audio.
15. Touch to enable or disable noise reduction by default while on a call.
16. Touch to make the Galaxy Note 3 ring more loudly when it detects it is in a pocket or a bag.
17. Touch to choose which voicemail service to use (if you have more than one option).
18. Touch to adjust voicemail settings (if options are available).
19. Touch to choose your ringtone for announcing voicemail.
20. Touch to choose vibration settings for voicemail.
21. Scroll down for more settings.

22. Touch to enable or disable TTY mode and choose which TTY mode to use.
23. Touch to enable or disable improving the sound quality when using a hearing aid.

24. Touch to save your changes and return to the main phone screen.

SMS and MMS
Short Message Service (SMS), also known as text messaging, has been around for a long time. Multimedia Message Service (MMS) is a newer form of text messaging that can contain pictures, audio, and video as well as text. Your Galaxy Note 3 can send and receive both SMS and MMS messages.
Get to Know the Messaging App
The Messaging app is what you use to send and receive text messages. This app has all the features you need to compose, send, receive, and manage these messages.
1. Touch the Messaging icon on the Home screen.

2. Touch to compose a new text message.
3. Touch the sender’s picture to show the Quick Connect bar that allows you to contact the person using email, phone, and other methods.
4. Touch a message thread to open it.
5. Touch the Menu button to see more options.
6. Touch to search for a message.
7. Touch to delete a message thread.
8. Touch to open the Draft Messages folder to complete and send draft messages.
9. Touch to open the Locked Messages folder. Locked messages are messages that you have chosen to lock so they are not accidentally deleted.

10. Touch to open the Scheduled Messages folder to see messages that are scheduled to be sent at a specific time.
11. Touch to open the Spam Messages folder.
12. Touch to manage your text template messages. Text templates are pre-composed text messages you can use, such as “Sorry, I missed your call.”
13. Touch to open the Settings screen. See the next section for more on Settings.

How Do I Lock a Message?
You might want to lock a message so that it does not get accidentally deleted when you delete the message thread. To lock a message, touch and hold on the message and choose Lock. The lock symbol displays just below the locked message. To unlock the message, touch and hold on the message and choose Unlock.
Manage Settings for the Messaging App
You use the settings of the Messaging app to manage how the app handles your SMS and MMS messages. Before you actually start working with SMS and MMS, let’s take a look at the settings.
1. Touch to enable or disable automatically deleting old messages when the limits you set in steps 2 and 3 are reached.
2. Touch to change the text message limit per thread (or conversation). The maximum number you can enter is 999. When the limit is reached, Messaging deletes messages within the thread or conversation using the first in, first out (FIFO) method.
3. Touch to change the multimedia message limit per thread (or conversation). The maximum number you can type is 999. When the limit is reached, messages within the thread or conversation are deleted using the FIFO method.
4. Touch to choose what kind of bubble style is used for text message display.
5. Touch to choose which background the app uses for messages.
6. Touch to use a split view when you turn your Galaxy Note 3 to landscape orientation.

7. Touch to enable changing text size by pressing the volume buttons.
8. Touch to turn on or off adding a signature to each mesasge you send. Remember that the text in the signature counts against the text message size.
9. Touch to edit your signature if you enabled it in step 8.

10. Touch the SMS/MMS tab.
11. Touch to enable or disable delivery reports. Although your Galaxy Note 3 supports this feature, it is not well supported by other phones, so you might not get delivery reports from some recipients.
12. Touch to manage the text messages stored on your Galaxy Note 3’s SIM card.
13. Touch to change your message center number. This is the number at your carrier that the Galaxy Note 3 contacts to retrieve your messages.
14. Touch to choose the input method for composing SMS messages. Your choices are GSM alphabet, Unicode, or Automatic. Change the default setting only if you are sure you need to.
15. Scroll down for the rest of the settings.

What Does the Manage SIM Card Messages Command Do?
Many old cell phones store text messages on the SIM card and not in the phone’s memory. If you have just upgraded from an older phone, you might still have text messages on the SIM card that you would like to retrieve. Touch Manage SIM Card Messages on the Settings screen in the Messaging app to display the Manage SIM Card Messages screen. You can then copy the messages to your Galaxy Note 3’s memory and copy the senders to your contacts in the Contacts app.
16. Touch to enable or disable the ability to send a single MMS to multiple recipients.
17. Touch to enable or disable automatically requesting a delivery report for each multimedia message you send.
18. Touch to enable or disable a read report for each multimedia message you send.
What’s the Difference Between a Delivery Report and a Read Report?
A delivery report indicates that the message has reached the destination device. A read report indicates that the message has been opened for viewing. There is still no guarantee that whoever opened the message has actually read it, let alone understood it.
19. Touch to enable or disable automatically retrieving multimedia messages.

20. Touch to enable or disable automatically retrieving multimedia messages when roaming.
21. Touch to choose the Creation mode, which controls which content you can include in multimedia messages.
22. Touch to enable or disable a warning when you add content to an SMS message that makes it change to an MMS message.

Don’t Auto-Retrieve MMS While Roaming
Disable the automatic retrieval of multimedia messages when you travel to other countries because automatically retrieving these messages when you’re roaming can result in a big bill from your provider. International carriers love to charge large amounts of money for people traveling to their countries and using their networks. The only time it is a good idea to leave this enabled is if your carrier offers an international SMS or MMS bundle where you pay a flat rate up front before leaving. When you have auto-retrieve disabled, you see a Download button next to a multimedia message. You have to touch it to manually download the message.
What Is the Creation Mode for Multimedia Messages?
The Creation mode feature lets you control which content Messaging allows you to include in messages. Choose Restricted to have the Galaxy Note 3 prevent you from including content that the recipient might not be able to receive or view. Choose Warning to have the Galaxy Note 3 warn you about such content but allow you to proceed. Choose Free to be able to include potentially problematic content without warning.
24. Touch to enable or disable receiving messages “pushed” from the server. Push messages arrive at your Galaxy Note 3 shortly after they arrive at the server, which is usually faster than waiting until the Galaxy Note 3 checks for messages.
25. Touch to choose how to handle remote requests to load services. Your choices are Always, Prompt, and Never.
26. Touch to enable or disable receiving notifications when messages arrive.
27. Touch to select the ringtone that announces incoming messages. This is grayed out if your Note 3 is in Silent mode.
28. Touch to enable or disable vibration for message notifications. This is grayed out if your Note 3 is in Silent mode.
29. Touch to choose how often your Galaxy Note 3 repeats a message alert. Your choices are Once, Every 2 Minutes, or Every 10 Minutes.
30. Touch to enable or disable the display of a preview of each incoming message in the status bar.
31. Scroll down for the remaining settings.

32. Touch to manage which emergency alerts you want to receive. These alerts are sent out by your government or law enforcement (for example, AMBER alerts).
33. Touch to experience a preview of how emergency alerts will look and sound on your Note 3.
34. Touch to enable or disable the settings for detecting spam messages. Spam messages are unwanted commercial messages.
35. If you enable spam settings, touch to register a phone number as a sender of spam. Your Galaxy Note 3 then blocks this number.
36. If you enable spam settings, touch to build a list of phrases that identify messages as being spam.
37. Touch to enable or disable blocking of all senders who are not in your contacts.

Compose Messages
When you compose a new message, you do not need to make a conscious decision whether it is an SMS message or an MMS message. As soon as you add a subject line or attach a file to your message, your Galaxy Note 3 automatically treats the message as an MMS message.
Here is how to compose and send messages.
1. Touch to compose a new message.

2. Start typing the recipient’s phone number, or if the person is in your contacts, type the name. If Android finds a match, touch the mobile number.

3. Touch and start typing your message.
4. Touch to send your message.

Inserting Smiley Icons
To insert smiley icons (or emoticons), touch the Menu button and then touch Insert Smiley. In the Insert Smiley dialog, scroll down if needed, and then touch the smiley you want to insert.
Delay Sending the Message
You might decide that you want a text message to be sent at a later time automatically. To do this, before sending the message, touch the Menu button and choose Scheduling. Choose the date and time you want your message to be sent and touch Done. Then touch the Send button and your message will only send when you set it to.

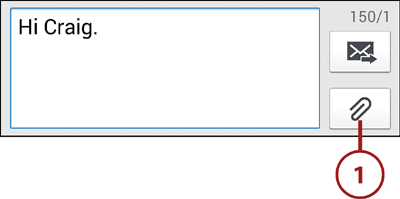
Attach Files to Messages
If you want to send a picture, audio file, or video along with your text message, all you need to do is attach the file. Attaching a file turns your SMS message into an MMS message.
1. Touch to attach a file.
2. Touch to attach a picture already stored in your Gallery app.
3. Touch to take a picture and attach it.
4. Touch to attach a video already stored in your Gallery app.
5. Touch to capture a video and attach it.
6. Touch to attach an audio file that is already stored on your Galaxy Note 3.
7. Touch to record audio and attach it.
8. Touch to attach an S Note document.
9. Touch to attach a calendar item.
10. Touch to attach your location.
11. Touch to attach a contact record from the Contacts app.

Receive Messages
When you receive a new SMS or MMS message, you can read it, view its attachments, and even save those attachments to your Galaxy Note 3.
1. When a new SMS or MMS message arrives, your Galaxy Note 3 plays a ringtone and displays a notification in the status bar.
2. Pull down the notification shade to see newly arrived messages.
3. Touch a message alert to display the message in the Messages app.

4. Touch an attachment to open it for viewing.
5. Touch and hold a message to display the Message Options dialog. Skip to step 7 for more about the additional options.
6. Touch to write a reply to the message.

7. Touch to delete the message. This deletes just the message and not the entire thread.
8. Touch to view a slideshow of attached images.
9. Touch to copy the message text so you can paste it elsewhere.
10. Touch to forward the message and attachment to someone else.
11. Touch to lock the message against deletion.
12. Touch to save the attachment to your Galaxy Note 3.
13. Touch to share the message via social media or other methods.
14. Touch to view the message details, such as its size and the date and time it was sent.

Usable Content
If a text message contains links to websites, phone numbers, or email addresses, touching those links makes the Galaxy Note 3 take the appropriate action. For example, when you touch a phone number, your Galaxy Note 3 calls the number; when you touch a web link, the Galaxy Note 3 opens the page in Chrome or your other default browser.