Chapter 6. Email
In this chapter, you explore how to set up your Palm Pre to connect to all your online email services. Topics include the following:
→ Setting up your email
→ Sending and receiving email
→ Working with attachments
→ Configuring email
Your Palm Pre has a full-featured email client that enables you to stay in touch wherever you are. You can send and receive emails, attach files, and open attachments for multiple email accounts. Your Palm Pre can connect you to your personal email accounts and your corporate email account allowing you to use one Smartphone for work and play. Not only can you get all your email on one device, but continuing the Synergy idea, your email is all in one mail application.
Understanding Email on Palm Pre
Your Palm Pre connects to your email accounts wirelessly over the Internet enabling you to send and receive email without needing to sit in front of a computer.
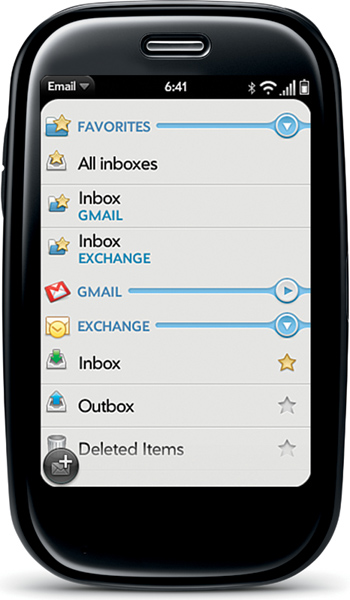
The main Email screen, which is accessed by tapping the Email icon on the Launcher, is broken up into two parts. The top part, which is called Favorites, shows your favorite folders and your Smart Folders. Smart Folders can be All Inboxes, All Flagged, or both. Flagged messages are messages that you set as flagged. We cover this later.

The lower part of the screen shows your email accounts. If you expand each email account by tapping the arrow, you see that account’s folders.
Step-by-Step: Configuring Email
Here is how you configure the Email application and set up your email accounts.
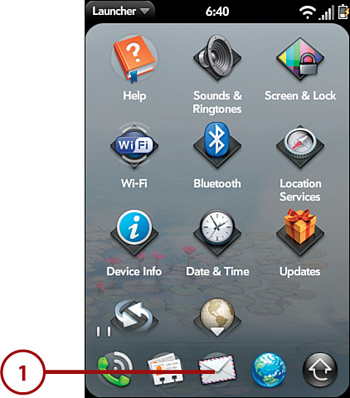
- Tap the Email icon from the Launcher.
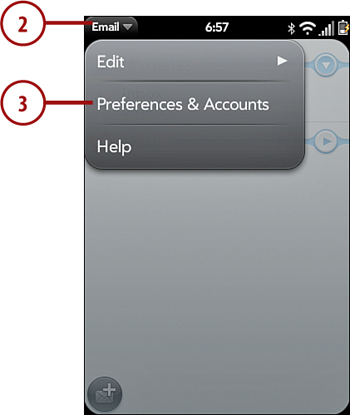
- Tap the Application menu on the top-left part of the screen.
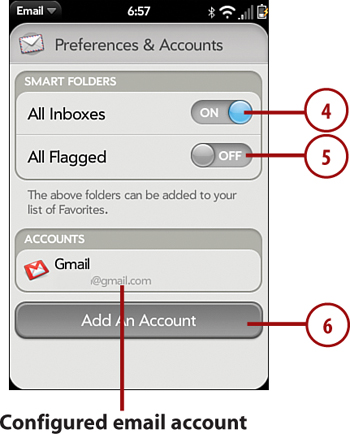
- Tap Preferences & Accounts.
- Tap the On/Off switch next to All Inboxes to show or hide the All Inboxes view in the Favorites section of the main screen. You might want to do this if you have multiple inboxes that result in the Favorites section looking cluttered.
- Tap the On/Off switch next to All Flagged to show or hide the All Flagged view in the Favorites section of the main screen. Flagging emails is a good way of reminding yourself to revisit a message, but if you make extensive use of the feature, this too can result in a rather cluttered Favorites section.
- If you want to add an email account, as covered over the next couple of sections, tap Add Account. When you add an account you can add both personal and corporate email accounts.
Adding an Automatic Personal Email Account
Let’s start with a personal email account, such as Gmail. These common accounts can be set up with almost no input from you. If you have added a Gmail account for synchronizing contacts, you will not need to add it again for email. If this is the first time you are setting up any accounts, you will be taken straight into the Add An Account screen when you tap on the mail icon.
- From the Add an Account screen (refer to step 6 in the previous section), type the email address and password for the account.
- Tap Sign In. Your Palm Pre tries to figure out how to set up your email account. With more common online email services like Gmail, Yahoo! Mail, and Hotmail, your Palm Pre can easily figure out what information to use to connect to that account. For online email services that are not common, your Palm Pre may not be able to figure it out and will ask you to manually enter that information. We will cover how to add these kinds of accounts in the next section.

Adding a Manual Personal Email Account
If you tried adding your personal email account and you see a login error, it is likely that your Palm Pre cannot figure out the information it needs to set up your account automatically. Fortunately, you still have options because Pre allows you to manually configure a personal account. To set up an email account manually, you will need to first find out the mail protocol (POP or IMAP), incoming mail server, mail server port, and outgoing mail server from your mail provider.
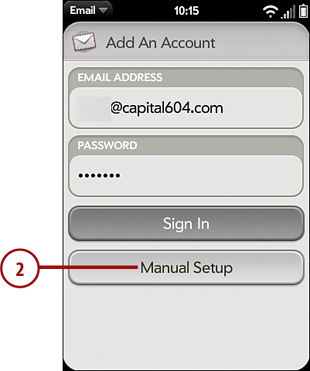
- Once you receive the login error, tap OK to return to the Add An Account screen.

- Now that an initial login attempt has failed, you’ll see that a new Manual Setup button has appeared. Tap Manual Setup to enter the information about your email account.
- Tap the Mail Type field and select POP or MAP for the type of email server. A third option, Exchange ActiveSync, is also available for corporate accounts, as we’ll discuss in the next section. Many online email services support both POP and IMAP protocols. If your mail service supports IMAP, choose that rather than POP because it allows much more mailbox control than POP.
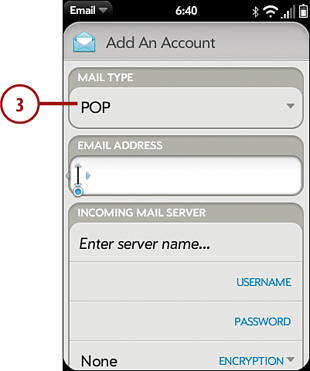
- Type your email address.
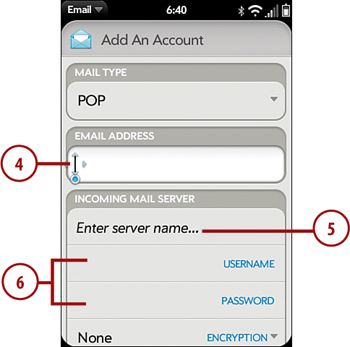
- Now it’s time to type the information required for the Incoming Mail Server. Start by entering the name of the server, which is its address.
- Enter your user account name (often the same as your email address), and password for the server.
- If your account requires encryption, select whether it is SSL or TLS. (Remember, all of this information should come from your email provider.)
- Enter the port number. This is usually 110.
- Enter the information required for the Outgoing Mail Server. Like the information for the incoming email server, this information should come from your email account provider. Enter the outgoing server name. Toggle Use Authentication on or off depending on whether your provider’s outgoing mail server requires you to log in to access it. If Use Authentication is enabled, provide your username and password. Finally, enter the port number, which is usually 25.
- Tap Sign In.

Adding a Corporate (Microsoft Exchange) Email Account
Your Palm Pre supports Microsoft Exchange email using Microsoft’s ActiveSync protocol. At the time of this writing, Lotus Domino/Notes and Novell GroupWise are not supported natively. However, if your system administrator enables the support for POP or IMAP, you will be able to get your corporate email by following the steps from the previous section to manually add a personal account. Before you follow the steps here, ask your administrator for all of the information you will need to connect to your mailbox.
- Tap Add An Account to add a new email account as shown at the end of the section, “Configuring Email,” earlier in this chapter.
- Tap on the application menu in the top left of the screen.
- Tap Manual Setup.

- Change the Mail Type to Exchange (EAS).
- Enter your corporate email address.
- Enter your incoming mail server. This will either begin with http:// or https:// depending on whether your company uses encryption or not. https:// indicates your company uses encryption, which is the case for most companies that use Exchange email servers.

- Enter your domain name. This will be the Active Directory domain name where your network account resides.
- Enter your network username. This is the same username you use to login to your network every day.
- Enter your network password.
- Tap Sign In. If all of the information you entered is correct, your account will be added.

Guess at the Settings
When setting up an Exchange account on your Palm Pre, you can normally guess at the settings. For example, most companies use the same name for the incoming mail server. If your email address is [email protected] then it is very probable that your incoming mail server name will be https://webmail.AllHitRadio.com. From logging into your network on a daily basis, you probably already know the domain name and your login and password. So if you can’t get hold of your network administrator, take a guess at the settings.
Editing your Mail Accounts
After you have set up your mail accounts you may want to go and edit some of the defaults. For example by default your Palm Pre sets Exchange accounts to only keep three days of past emails. Many users need email downloads from further back in the past. Here is how you can make that change and many others.
- From the Mail Preferences screen (which you can see in the “Configuring Email,” section earlier in this chapter), tap the account you want to modify. For this example we will modify the Exchange account we just created.
- Tap the Account Name to change it. Your account name can be whatever you want it to be. For example, you may want to change the Account Name from “Exchange” to something like Work to better indicate where the email is coming from.
- You can modify what happens when new email arrives by tapping the On/Off buttons next to Show Icon, Play Sound, and Vibrate. Chances are you don’t need three different alerts enabled when an email arrives, so just pick one or two of these to enable.
- You can modify your email signature. By default it says “—Sent from my Palm Pre”. It’s customary to add your name and contact information to the signature, but a signature is by no means required.

- Under the Sync heading, tap Show Email to change how far back your Palm Pre synchronizes mail with your mailbox back at the office. If you want all of your email downloaded to your Pre, then choose All from the available options. If your mailbox is large, you should go with one of the other choices.
- Tap Get Mail to choose what happens when new email arrives in your mailbox back at the office. If you choose As items arrive, then your Palm Pre will get those emails immediately. Your other choices allow you to set your Palm Pre on a schedule to pick up your email, or set it to Manual which means it only gets email when you tap on that email account.
- If you want to remove this particular account, tap Remove Account.
- If your mailbox settings have changed, tap Change Login Settings to make those changes. This is something you will need to do when your network password is changed. Some companies force you to change your password on a regular schedule like every 60 or 90 days.
- Swipe from right to left in the gesture area to save your settings and return to the previous screen.

Using Mail
Now that you have set up the Mail application to work the way you want it to, and added your email accounts, it is time to use it to send and receive email. Let’s go over the Mail Application’s main screen.
Using the Mail Main Screen
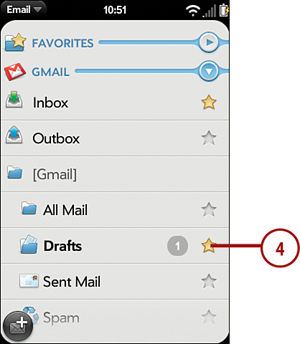
- Tap to expand the Favorites view. This shows your All Inboxes and All Flagged view, plus any folders that you marked as favorite folders. Each email account’s Inbox is automatically marked as a favorite folder. We cover how to select which folders are favorites a bit later.
- If you tap All Inboxes, you see a view of all your email account’s Inboxes merged into one view.
- Tap to expand the folder list for your email account (Gmail, for example). This allows you to see all of the folders instead of only the Inbox. Tap any folder to view its contents.

- After you expand the view to show all the email account’s folders, tap the star next to a folder to mark it as a favorite. When marked as a favorite, it displays in the Favorites view.
Composing an Email
We now cover how to compose a new email on your Palm Pre. It seems simple enough, but let’s step through it so you have practice.
- Open the Email application and Tap the compose icon to compose a new email.

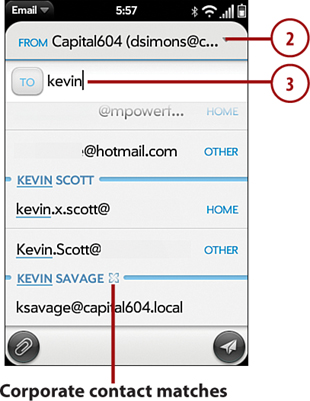
- Tap the From field to change which email account you use to send this email.
- Start typing the name of a recipient. As you type, your Palm Pre displays a list of possible matches. The more of the name you type, the shorter the list becomes. If you want to just type the email address, you can but bear in mind that your Palm Pre will not use it to search for the contact.
- When you see the person’s name, tap the email address you want to use. Don’t forget to add a subject for your email by tapping on the Subject line.
Finding Corporate Contacts
If you have set up your Palm Pre to access your corporate email via Exchange (EAS) then as you type the person you want to email, if the name you are typing matches someone in your company, you will see those results right at the bottom of the search result list. Scroll down until you see the little Exchange logo which looks like an X. Under that you will see the matches for people in your company.
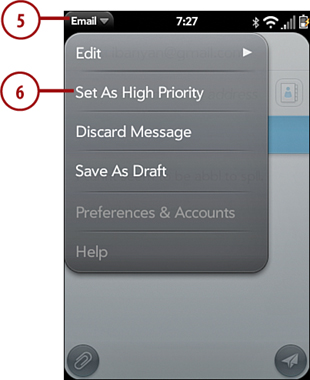
- If you want to mark your email as urgent, or High Priority, tap the application menu on the top-left part of the screen.
- Tap Set As High Priority. When you set an email to High Priority, the subject line changes from blue to red.
- Type a message in the body of the email.
- Tap the Send button (Paper Airplane icon) to send your email.

Attaching Files to Your Emails
What if you want to send someone a picture or video? You can do this right from your Palm Pre by simply attaching those files to your email.
- After you compose an email as we discussed above, tap the Paper Clip icon to attach a file.
- Tap the icons on the bottom of the screen to switch between the views, which include Pictures, Videos, Audio, and Documents. When you find the file you want to attach, tap it to attach it to your email. Repeat this to attach multiple files.

- Tap the paper airplane icon to send the email.

Reading and Managing Emails
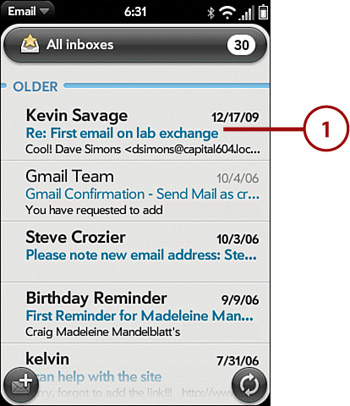
When you receive emails, you can read them, of course, but you can do other things to manage them, such as moving them to folders and flagging them for follow-up.
- Tap an email to open it. If the email has one or more attachments, you see them listed under the subject line. To open an attachment, tap it. The attachment downloads. After it downloads, tap it again to view it. If it is a video or audio file, it starts playing.
- Tap to reply to the sender of the email.
- Tap to reply to the sender and all recipients of the email.
- Tap to forward the email.
- Tap to delete the email.
- To flag a message to remind yourself to attend to it later, tap the application menu on the top-left part of the screen.

- Tap Set Flag. When you flag a message, it displays in the All Flagged view.
- To mark a message as unread, tap Mark As Unread.
- To move a message to another folder, tap Move To Folder.

- Tap the folder you want the message to be moved to.
