Chapter 4. Working with Date and Time, Calendar, To Do, and Memos

In this chapter, you explore Pre’s date and time, calendar, and task functionality. Topics include the following:
→ Synchronizing your calendars
→ Creating appointments
→ Seeing Google Weather in your calendar
→ Creating Task Lists
→ Adding tasks to Task Lists
→ Setting up your Time Zone
Continuing with the Synergy vein, your Palm Pre can synchronize multiple calendars from online services such as Google, Microsoft Exchange, and Facebook. All calendars display in one view enabling you to see your work and personal life in one place. If you want, you can choose not to synchronize your Palm Pre’s calendar with any online services, but just keep it on the Smartphone. While you can do that, it is wasting much of the value of the Synergy system. For example, if you use the Google calendar, and one at work, you can now see both of those calendars on one screen, easily being able to cut down on scheduling conflicts.
Let’s start by setting the time and date, and then we can move on to your calendar and tasks. If your date and time are wrong, your calendar is useless.
Date and Time
Before we start setting up calendars to synchronize with, we have to make sure that your Palm Pre has the correct time and date. Although your Palm Pre will function just fine with the wrong date and time, the calendar needs this to be accurate, or you will always be late for your appointments.
Step-by-Step: Setting Up the Date and Time
- Tap the Date & Time icon from the Launcher.

- Tap Time Format to change the format from 12 hour to 24 hour or vice versa. The 12-hour format treats the day as two 12-hour periods whereas 24 hour treats the day as one 24-hour period.
- Tap the On/Off switch next to Network time to enable or disable the capability of your Palm Pre to synchronize its date and time from the wireless carrier. If you disable this you must set your Palm Pre’s date and time manually. The advantage to synchronizing with your wireless carrier is that you never have to worry about time changes. For example, when daylight savings time begins or ends your phone adjusts automatically.

- Tap the On/Off switch next to Network time zone to enable or disable the capability of your Palm Pre to synchronize the time zone from the wireless carrier. Enabling this function means that if you’re traveling and you change time zones, your phone picks up the local time automatically. On the other hand, if you prefer to keep your phone set to your hometown time, you should disable this option.
- If you disable Network time or Network time zone, new options appear that enable you to configure the time and time zone manually.

Tasks
Tasks allows you to keep track of things you need to do. For example, walk the dog, pay bills, call someone, and so on. Your Palm Pre can keep track of your tasks and remind you when they are due. You can also keep track of your progress on each task. Tasks can be used in addition to calendar appointments.
Step-by-Step: Creating a Task List and Task
Your Palm Pre enables you to create lists of tasks. Each task list can contain one or many tasks. This helps you keep track of tasks more easily because they appear by category.
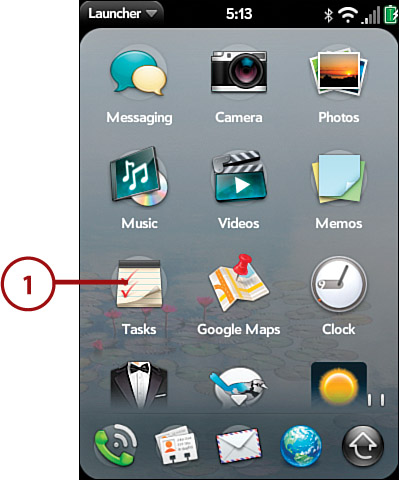
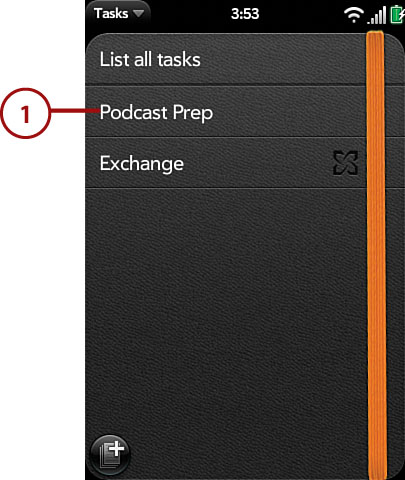
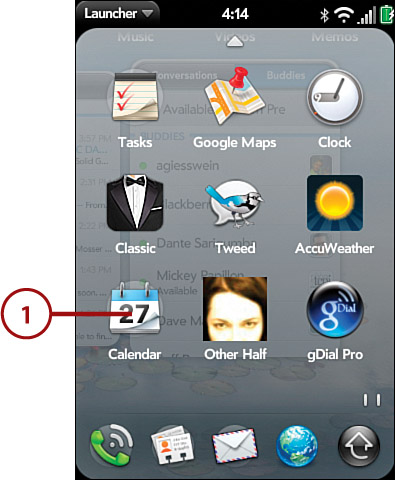
- Tap Tasks from the Launcher.
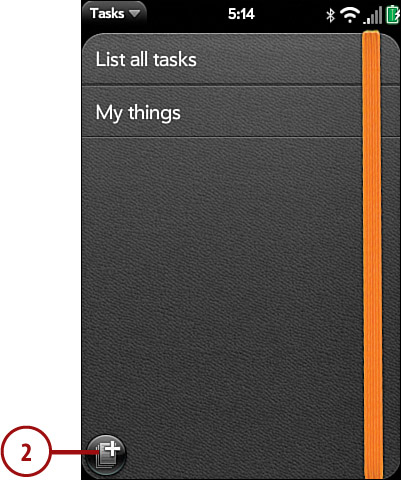
- Tap the Add Task List button on the bottom-left portion of the screen to add a Task List. Remember that a single task list can hold multiple tasks.
- Type the name of the Task List.
- Tap the Add Task button at the bottom-left portion of the screen to add your first task to the task list.

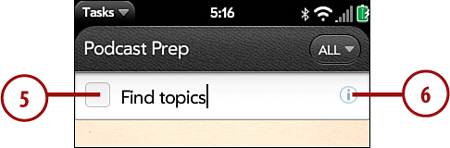
- Type the name of the Task. As you can see here, the task name is listed under the name of the selected task list.
- Tap the information icon to the right of the name to edit the task.
- Change task priority. This can be High, Normal, or Low.
- If you tap on the name of the task list (in this case Podcast prep), you can choose to move the task list to Exchange (if you synchronize with Exchange), to the Unfiled area, or to another task list.
- Change the task due date. When you tap on Due, you can choose Today, Tomorrow, In one week, In one month, or Other. If you tap Other, you can choose the exact date the task is due.
- Enter task notes. You can put just about anything you want here. In the context of this task, which is about finding topics for a podcast, I might enter some possible topic areas I want to consider covering.
- Return to the main task list by swiping from right to left in the gesture area. You can add as many tasks to an existing task list as you want. When you finish, you can return to the main Tasks screen by swiping from right to left in the gesture area. There you see your new Task List with any others you have previously created.

Step-by-Step: Marking a Task As Complete
After you have populated the Tasks application with tasks and task lists, you can start checking off completed tasks.
- Select a task list that contains a task or tasks that you want to mark as complete.
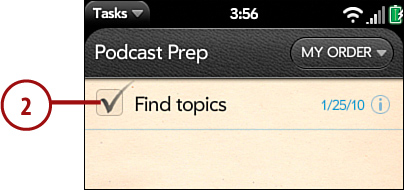
- To mark a task as completed, tap the square next to the task name. A check mark appears in the square to indicate it is complete.
- Return to the main task list by swiping from right to left in the gesture area.

Deleting Completed Tasks
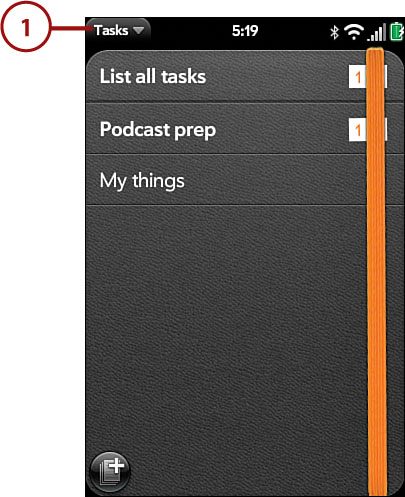
From the main Tasks screen, you see all the task lists you entered. If you have tasks listed that are complete you can remove them from your task list.
- In the Tasks application, tap the Application menu.
- Tap Purge Completed to remove all completed tasks in every task list.

Calendar
Your Palm Pre has a fully functional calendar application that enables you to synchronize multiple online calendars into one view. This enables you to enter your entire life, which might include your work calendar, personal calendar, and home calendar in a single place. Like Contacts, you cannot have a calendar that is not synchronized with at least one online source. Luckily when you activated your Palm Pre, you created a new Palm Profile. If you don’t end up adding any other online calendars, you will always synchronize your Palm Pre’s calendar with your Palm Profile account, which resides on Palm servers.
Step-by-Step: Viewing Your Calendars
Let’s start by opening the Calendar application and becoming familiar with the layout of the main screen, the buttons, and what they do.
- Tap Calendar from the Launcher.
- On the bottom of the screen you see three buttons. Tapping any of these buttons allows you to change the calendar view.
• Day View: Shows one day per screen. This view provides the most on-screen detail for your appointments.
• Week View: Shows one week per screen. Although you see individual appointments in this view, you do not see any detail until you tap on a particular day of the week. When you tap on a day, the view changes to the Day View.
• Month View: Shows one month per screen. This view displays the least detail, but it does give you the best long-term overview of your schedule. As with the Week View, if you tap on a day of the month, the view changes to the Day View.
Go ahead and tap the Month View button to have a look at this view.

- Regardless of which view you are using, on the top-right corner of the screen, you see a button, labeled All. Tap this button to open a menu that lets you select which synchronized calendars you want to view at one time.
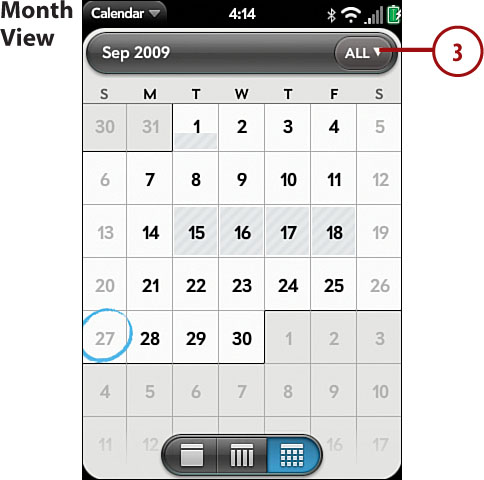
- By default the list of available calendars is set to All, which means all your calendars are included. Tap an individual calendar on this menu if you want to see only the information associated with that calendar.

Configuring the Calendar
Now that you are familiar with the main calendar screen, let’s set up and configure the Calendar application. Setting up your calendar involves adding one or more online calendars with which your Palm Pre can synchronize and configuring the way it behaves. For example, what sound plays when you are alerted of an upcoming appointment, or when your work day starts and ends?
- With the Calendar application open, tap on the application menu in the top-left corner of the screen.
- Tap on Preferences & Accounts.

- Tap on First Day of Week to change the day that you want to serve as the first day of your week. The default is Sunday.
- Use the buttons in the Day Start and End to set when you want your day to start and end.
- Later in this section, you see how to set up timed (partial day) meetings or all day meetings in your calendar. Under Default Event Reminder, you can set the amount of time ahead of a timed meeting and All Day meeting you want to be reminded.

- Scroll down the page to see more options.
- Under Event Reminders, tap the On/Off switch to enable or disable the event reminder sound.
- Set the Default Event Duration, which is the default time for new appointments you create. You can, of course, adjust this time from the default when setting up a new event.
- Under Accounts you see any calendars that you previously added. If you tap on an account, you can change the email address and password of that account.
- You can adjust the default calendar by tapping the Default Calendar option.

- Scroll down the screen to see the rest of the available options.
- If you tap on Calendar View Options, you can change the color for each calendar account. For Facebook calendars you can also control whether it displays in the All Calendar view.
- If you tap Sync Now, you force your Palm Pre to synchronize your calendars immediately.
- If you tap Add An Account, you can add a new online calendar. As with the Contacts application, enter the email address and password for the account. You can add calendars from Google, Facebook, Microsoft Exchange, and Yahoo!

Adding a New Event (Appointment)
- To add a new appointment, or as they are called on your Palm Pre, Events, scroll to the day of the event, and tap on the time of day that the event will occur.
- A one-hour block, if that is your default event duration as described in the previous section, of time turns green. Type the name of the event.
- At this point that is all that is needed. The event has been created. If you want to change some aspects of the event, tap the little “i” or Information icon to the right of the selected event.

- When you tap the information icon you see more details about the event. To change the calendar that this event must synchronize to, tap the button on the right of the event name.
- Tap the field directly under the event name to modify the start and end time for the event and the day it occurs on.
- Tap the next field down to type the address of the event.
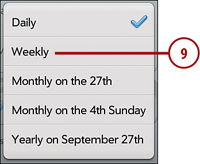
- Tap the next field down to specify whether the event is a recurring event. For example, you could use this section to set up a weekly meeting that you have with a team of co-workers.

- Your choices for a recurring event are Daily, Weekdays (which means daily but only on week days and not over a weekend), Weekly, and Custom. For this example, let’s set up a meeting that recurs on an irregular basis by choosing Custom.

- Setting up a custom recurring event forces you to select the days of the week on which the event should recur and on which weeks. Select a Weekly event.
- Select the days of the week on which the event occurs, and then select on which weeks the event occurs.
- If you want the event to stop recurring on a certain day, tap on Forever to remove its check mark, and use the calendar options that appear to set the day on which the recurring event should expire. Return to the main event screen.

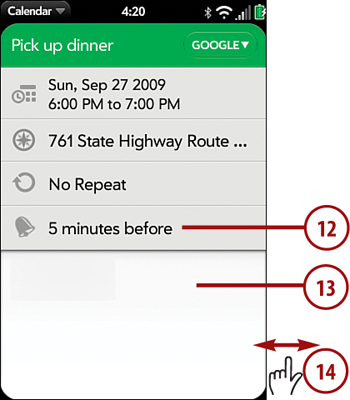
- To set an alert to play before your meeting starts, tap on the alert line, with the bell. Your choices are No Reminder, At Start Time (which alerts you when the meeting starts), and a range of time from five minutes to one hour before the meeting starts.
- If you want to add extra information about the meeting like a conference call bridge line, or online meeting, or information on the subject to be discussed, enter it in the Notes area.
- To save the meeting, swipe from right to left in the gesture area which will also take you back to the Calendar main screen.
Viewing an Event
- Tap on an existing event to view details about that event.
- If the event contains an address, you can show that address in Google Maps. To do this, tap the Application menu on the top-left section of the screen.

- Choose Map Location.
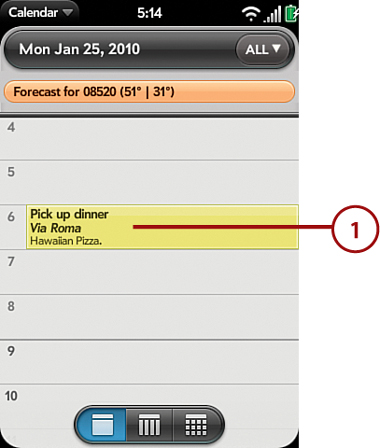
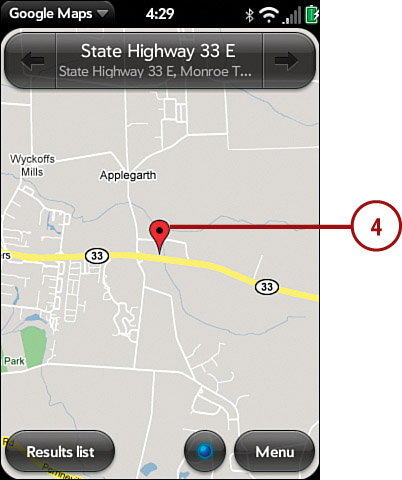
- Google Maps uses the address of your event and plots a red pointer at the event’s address. After the location is mapped in Google Maps, you can tap the pin to do extra things such as get directions to the address and so on.
Working with Google Maps
There is no chapter dedicated to Google Maps, but I thought I’d go over how to use it because we just showed you how to map a meeting’s address. Having Google Maps preloaded on your Palm Pre offers a lot of benefits because it allows you to see real-time traffic information, satellite and map views, and it can give you turn-by-turn driving directions. All of this is very useful for your appointments, but also as a standalone feature.
- If you choose to map an address in an appointment or manually type an address into Google maps, tap the Menu button to see your map options.
- To see the real-time traffic patterns around the address, tap Show Traffic. Traffic flowing well is represented in green, while traffic going slowly is in red.
- To see the satellite view as opposed to the map view, tap Satellite View. The advantage of using the Satellite View is that it gives you a sense of what an area actually looks like. Maybe there’s a hospital or gas station on a street corner you can easily identify to let you know you’re heading in the right direction.
- To get directions to the address, tap Get Directions.

- You can choose from driving, train, or walking directions. If you choose train directions, Google Maps will direct you to a train station close by, and tell you at which station you should disembark. It will then continue the directions as if you were on foot.
- The start address defaults to your current location (which your Palm Pre knows from its built-in GPS chip). You can, however, tap to type an address manually.
- The destination address defaults to the address you type or tapped in your meeting.
- Tap Get directions to see the directions listed on the screen.
- To see the directions on the map, tap View Map.

Step-by-Step: Adding Google Weather to Your Calendar
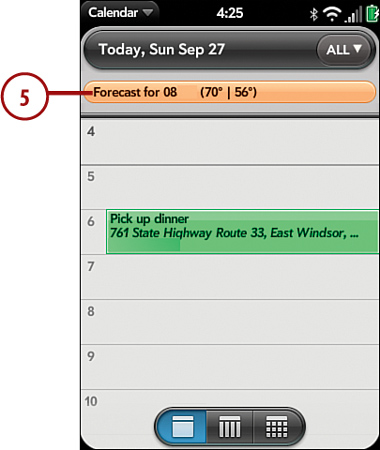
If you have a Google account, you can show the weather in your Palm Pre’s calendar. This useful feature inserts each day’s weather from a specific ZIP Code into your calendar. Google keeps your calendar up to date on the current day plus three days ahead.
- Log in to your Google Calendar account on your desktop computer and click on Settings.
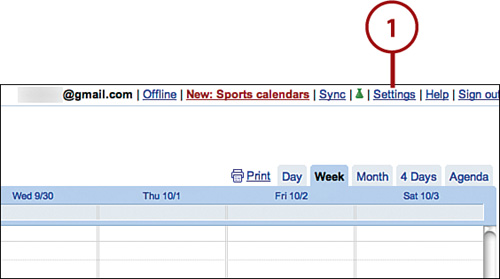
- Scroll down to Location. Enter either a ZIP Code or the name of a city or town.
- In the Show Weather Based on My Location section, select either Centigrade or Fahrenheit.
- Click Save.

- The next time your Palm Pre synchronizes the calendar, you see the weather at the top of each day.
Event Reminder
When an event nears its time, an event reminder pops up on your Palm Pre’s screen. The reminder shows the event name and time, and it includes Dismiss and Snooze buttons.
- Tap Dismiss to dismiss the event, or tap Snooze to be reminded in a few minutes.
- If you tap on the event, the Calendar launches and the full event information is displayed.

Memos (Notes)
Your Palm Pre’s Memos application is useful for many different note-taking activities, for example, writing a shopping list and referring to it as you walk around the store or taking notes during a meeting. You can color code your notes and even email them to someone.
Step-by-Step: Creating a Memo
The first step is to create one or more memos. You can type the memo text and even change the color of the memo.
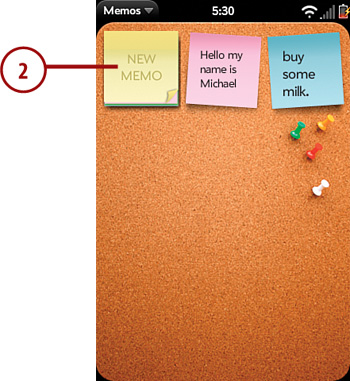
- Tap the Memos icon from the Launcher.

- When the Memos application launches, you see a cork board with a couple of sample memos and a yellow pad of blank memos labeled NEW MEMO. Tap on NEW MEMO to create a new Memo.
- Type the text of your new Memo.
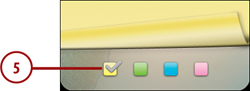
- Tap on the curled up bottom-right corner of the Memo to reveal the Memo color selection.

- To change the color of your Memo, tap the color.
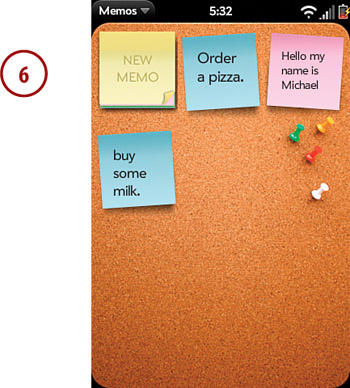
- Swipe back to return to the cork board where you see your new Memo.
Emailing a Memo
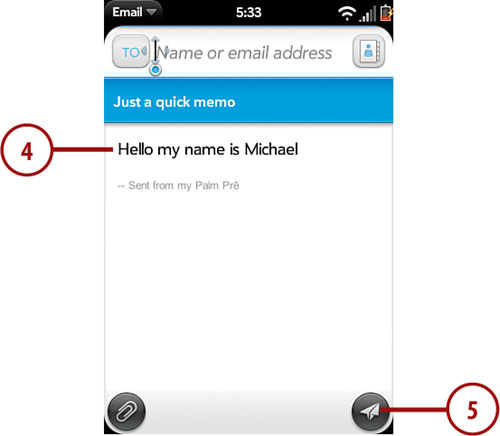
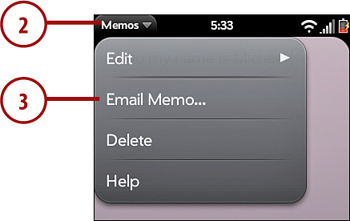
- To email a Memo, first open the Memo.
- Tap the Application menu on the top-left part of the screen.
- Tap Email Memo. (As you can see on this screen, you can also delete a Memo by tapping Delete.)
- Your Pre creates a new email, and inserts the body of the Memo into the body of the email. Tap the To field to select or enter a recipient.
- To send the email, tap the Send button. We cover how to work with email in much more detail in Chapter 6.