
Prologue. Getting to Know Your Apple Watch

In this prologue, you become familiar with the external features of the Apple Watch and the basics of getting started. Topics include the following:
→ Getting to know your Apple Watch’s external features
→ Setting up your Apple Watch for the first time
→ Learning how to interact with your Apple Watch
Let’s start by getting to know more about your Apple Watch by examining the external features, device features, and how you will interact with your Apple Watch.
Your Apple Watch’s External Features
Becoming familiar with the external features of your Apple Watch is a good place to start because you will be using them often. This section covers some of the technical specifications of your Apple Watch, including the touchscreen.
Front and Right Side

• Touchscreen—The Apple Watch comes in two screen sizes: 38mm and 42mm. The 38mm screen has a resolution of 340×272 pixels, whereas the 42mm screen has a resolution of 390×312 pixels. The screen incorporates capacitive touch, which allows you to use your finger to make gestures to control the Watch.
• Digital Crown—The Digital Crown is very similar to a regular mechanical watch Crown. Like a mechanical watch Crown, the Digital Crown can be rotated between your thumb and forefinger, or by running your finger over the edge of the Crown. You can press the Digital Crown to see the Home Screen, showing icons representing all apps installed on your Watch, similar to pressing the Home button on your iPhone. You can press and hold the Digital Crown to activate Siri, and you can double-press the Crown to return to the last Watch app you were using.
• Side Button—Press the Side Button to see and interact with your friends. Double-press the Side Button to activate Apple Pay. Press and hold the Side Button to choose whether you want to power off your Watch, activate Power Reserve, or lock your Watch.
Back
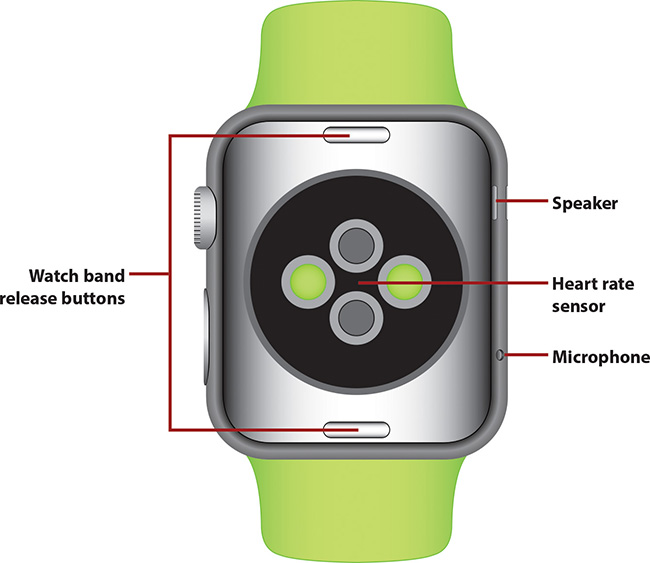
• Watch band release buttons—Press to release the band from your Watch and replace it with a new one.
• Microphone—You use the microphone when you are on a phone call, or to speak commands to Siri.
• Speaker—The speaker is used while you’re on a phone call, and it is also used to play all audio, including notifications and music.
• Heart rate sensor—The heart rate sensor uses infrared and green light to measure your heart rate. Your Watch captures your heart rate automatically every 10 minutes.
First-Time Setup
Your Apple Watch only works when it is paired with your iPhone. You must be using an iPhone 5 or later; otherwise, you will not be able to use your Apple Watch. Finally, your iPhone must be running iOS version 8.2 or later.
1. Put your Apple Watch on your wrist.
2. Press and hold the Side Button until you see the Apple logo.
3. Use the Digital Crown to choose your language, and tap the language on the screen to select it.

4. Your Apple Watch now pairs with your iPhone. Leave your Apple Watch on your wrist, and pick up your iPhone to continue the steps.
5. Tap the Apple Watch app to open it.

What If I Don’t See the Apple Watch App?
The Apple Watch app is included with iOS 8.2 or later. If you don’t see the Apple Watch app on your iPhone, it is most likely because you have not yet updated to iOS 8.2. To do this, tap the Settings icon, tap General, and tap Software Update. You may need to free up some space on your iPhone to accommodate the update.
7. Tap Start Pairing.

8. Hold your iPhone so that your Apple Watch fits into the viewfinder. Your Apple Watch’s screen displays colorful patterns, and your iPhone uses those patterns to complete the Bluetooth pairing between your iPhone and Apple Watch.

9. Tap Set Up Apple Watch once you see the next screen.

10. Tap Left or Right to choose on which wrist you will be wearing your Apple Watch.

Having a Better Right Wrist Experience
Your choice of which wrist you wear your Apple Watch (left or right) helps the Apple Watch more accurately determine when you are lifting your arm. If you wear your Apple Watch on your right wrist, like wearing a mechanical watch on your right wrist, nothing about the Watch will change. If you find it is awkward to manipulate the Digital Crown and Side Button, you have an additional setting that allows you to wear the Watch upside down so that the Digital Crown and Side Button are now on the left of the Watch. This may allow you to manipulate the Digital Crown and Side Button more easily. This setting also flips the onscreen image upside down so it appears right side up to you. To make this change, after you have finished setting up your Watch, in the Apple Watch app, tap General, tap Watch Orientation, and tap Digital Crown on Left Side.
11. Tap Agree to agree with the terms and conditions of using your Apple Watch.

12. Tap Agree again to confirm that you agree with the terms and conditions.

13. Type the password for your Apple ID.
14. Tap Next.

15. Tap OK on the Location Services screen to continue. If you have Location Services turned off on your iPhone, you are asked if you want to enable it on this screen.

Why Do I Need Location Services?
Your iPhone and Apple Watch can use your current location to provide important information, such as the weather in your current location, adjust the time correctly based on the time zone you are in, and provide walking or driving directions. If you keep Location Services turned off, you will not be able to take advantage of many of the Apple Watch’s features.
16. Tap OK on the Siri screen to continue with setup. If you have Siri turned off on your iPhone, you are asked if you want to enable it on this screen.

Why Do I Need Siri?
Your iPhone and Apple Watch can listen for your voice commands to send messages, place calls, create calendar events, launch apps, and more. With Siri enabled, you are able to lift your wrist and say “Hey Siri,” followed by commands.
17. Tap OK on the Diagnostics screen to continue. If you have the option to send usage and diagnostics information to Apple turned off on your iPhone, you are asked whether you want to enable it on this screen.

18. Tap Create a Passcode to enter a four-digit passcode on your Watch. The passcode is used in the future to unlock your Watch when you take it off and then put it back on.

19. Enter a passcode on your Apple Watch (not shown). After you have entered your new passcode, keep looking at your Watch for the next step. If you chose not to add a passcode, skip to step 21.
How Does the Passcode Work?
Your Apple Watch uses a sensor on the back to detect when it is in contact with your skin, so it knows whether or not it is being worn. If you set a four-digit passcode in step 18, when you remove your Watch, it will lock itself. When you put your Watch back on, it will prompt you to enter the passcode before you are able to use it. You enter the four-digit passcode on your Watch. If you chose to create a long passcode, when you put your Watch on, you are prompted to enter that longer passcode on your iPhone before your Watch is unlocked. Remember that you only need to unlock your Watch if you take it off and later put it back on. It is advisable to use a passcode on your Watch because if you lose it, or it is stolen, your information will be vulnerable. What makes securing your Watch with a passcode more manageable is that you can choose to have your Watch unlocked when you unlock your iPhone (see step 20). With this option enabled, if your Watch detects that it is on your wrist, and you unlock your iPhone, your Watch automatically unlocks itself. Finally, if you choose not to add a passcode to your Watch, you are unable to use Apple Pay from your Watch.
20. Choose whether you want your Apple Watch to be unlocked when it is on your wrist and you unlock your iPhone.
21. Tap Install All to install any Watch apps.


How Do I Already Have Watch Apps?
Apps already installed on your iPhone might include a Watch version of those apps. Now that you have your Watch, you can take advantage of those additional Watch apps. An example of this is the Twitter Watch app, which allows you to quickly access your timeline or see the top trends.
22. Your Watch synchronizes with your iPhone for the first time. You can either wait on this screen, or press the Home button on your iPhone (not shown) to continue working and wait for an alert from the Apple Watch app letting you know that the synchronization is complete.

23. Tap OK on your iPhone when you see the information message telling you that your Apple ID has been used to sign in to your Apple Watch. This is just confirming what you did in step 13.

24. Tap OK, and look at your Watch for the remaining steps of the Watch setup. If your Watch has gone to sleep, press the Digital Crown to wake it up and continue to step 25.

25. Tap Set Up the Activity App and then swipe through the screens that explain how your activity is tracked.

26. Tap Get Started to choose your daily activity level and how many calories you want to burn each day.

27. Tap to choose how active you are during the day. The choices you make tell the Activity app how many calories you normally burn each day, but you have the option of adjusting that in the next step.

28. Tap the minus and plus symbols to decrease or increase the number of calories you want to burn each day, also known as your Move Goal.
29. Tap Start Moving.

30. Press the Digital Crown to see a list of your Watch apps when you see the Activity screen. At this point your Apple Watch is completely set up.


Wait for Apps to Finish Installing
After you finish setting up your Apple Watch, you will naturally want to start exploring it right away. If you chose to install all Apple Watch apps in step 21, those apps might still be installing and might slow down your Watch. You can see the progress of an app install because it looks very much like the app install progress icon you see on your iPhone. Either wait for all apps to finish installing or be aware that you may experience some delayed responses from your Watch as they install.
Learning How to Use Your Apple Watch
Your Apple Watch is designed to allow you to quickly view and respond to alerts, perform simple tasks, run apps, communicate with friends, and of course show you the time. This section covers the essential information you need to use your Apple Watch.
You’ll need to master a few touchscreen gestures and button interactions in order to interact with your Watch more efficiently. Let’s take a look at them.
Use the Digital Crown
The Digital Crown is modeled after the Crown on a mechanical watch, and can be turned by using your thumb and forefinger or by rolling it under your forefinger. You can also press the Digital Crown, double-press it, or press and hold it to achieve certain actions.
1. Press the Digital Crown to toggle between the time and the Home Screen that shows the list of apps. For example, if you are looking at the list of apps and you press the Digital Crown, you see the time using the watch face you previously chose to use. If you are looking at your watch face and you press the Digital Crown, you are taken to the list of apps.
2. Press the Digital Crown to return to the centermost app when viewing the list of apps. For example, if you have been scrolling around the list of apps and want to quickly return to the centermost app (the clock), press the Digital Crown.

3. Press the Digital Crown to exit an app and return to the Home Screen.
4. Double-press the Digital Crown to switch to the app you were last using. For example, if you were looking at your email in the Mail app, and then switched to the Photos app, double-press the Digital Crown to switch back to the Mail app.
5. Press and hold the Digital Crown for two seconds to activate Siri. After you feel the tap on your wrist, you can speak commands to Siri, or ask her questions.

6. Rotate the Digital Crown to scroll up and down a list. Any time an app presents you with a list, such as a list of your email or list of songs, you can scroll through that list using the Digital Crown. As you turn the Digital Crown, an indicator shows you how far down the list you are. You can also use the Digital Crown to move through options in an app. For example, when you are customizing your watch face, you can scroll through the customization options using the Digital Crown.

Use the Side Button
You can also press the Side Button, double-press it, or press and hold it to achieve certain actions.
1. Press the Side Button once to see your Friends list and access ways to interact with them.

2. Double-press the Side Button to activate Apple Pay. Once Apple Pay is activated, hold your Watch near the reader at the checkout counter to pay for items.
3. Press and hold the Side Button for two seconds to choose whether you want to power off your Apple Watch, activate Power Reserve, or lock your Apple Watch by swiping one of the choices to the right.

What Is Power Reserve?
When your Watch is in Power Reserve mode, it just shows the time. Your Watch stops communicating with your iPhone, and you are not able to use any of your Watch apps. Power Reserve mode is automatically enabled when your Watch battery is getting low on power, so you shouldn’t need to activate it manually. To exit Power Reserve mode, first charge your Watch, and then press and hold the Side Button until you see the Apple logo. This indicates that your Watch is restarting.
Use the Touchscreen
In addition to using the Digital Crown and Side Button, you also interact with your Apple Watch by touching the screen, which is known as making gestures on the screen. You can tap, double-tap, swipe, and Force Touch.
• Tap—To start an app, tap its icon. Tap an onscreen button to select it. Tap the numbers of the onscreen keypad to unlock your Watch.
• Swipe—Swipe in any direction on the screen. You can swipe slowly or quickly. Swipe a notification to clear it. Swipe to explore your photos.
• Drag—Dragging is essentially a swipe, but with this gesture you drag an onscreen object to perform a function. Drag the map in the Maps app to reposition it. Drag the slider left to right to power off your Watch.
• Double-tap—Double-tapping is like double-clicking a mouse on a desktop computer. Tap the screen twice in quick succession. For example, you can double-tap the map in the Maps app to zoom in.
• Force Touch—Force Touch is a hard press on the screen. When you perform a Force Touch, you will see options to choose that are contextual. For example, if you Force Touch on a watch face, you can customize it or choose a different watch face. If you Force Touch during a workout, you can stop the workout.
Practicing Force Touch
The best way to practice how hard you need to press the screen to use the Force Touch gesture is to practice Force Touch on a watch face. Start by pressing softly, and you will notice that the watch face starts zooming out very slowly. The harder you push, the further it zooms out, until you eventually see the word Customize appear below the watch face, and feel a tap on your wrist (and your finger). Tap the watch face to zoom in on it again. Now, press on the screen again, but use the same amount of force that you were using when you saw the word Customize appear and felt the tap on your wrist and finger. If you got the pressure correct, you should immediately see the word Customize appear and feel the tap on your wrist. Use this same amount of pressure in the future when you want to perform the Force Touch gesture to access additional features, such as choosing the view mode for the Calendar app.
Use the Lock Screen
If you chose to lock your Watch with a passcode (highly recommended), when you take your Watch off, it locks itself. When you put your Watch back on your wrist, it remains locked until you unlock it. Once your Watch is unlocked, it remains unlocked until you take it off, or your choose to manually lock it.
1. Remove your Watch and wait for it to lock. Replace it on your wrist and lift your wrist to interact with your Watch in any way, such as by tapping the screen to access the Enter Passcode screen. Alternatively, just wait a few seconds after raising your wrist, and the Enter Passcode screen appears automatically.

2. Enter the four-digit passcode to unlock your Watch.

Other Unlock Methods
When you set up your Watch, you might have chosen to use a long passcode. If you did, instead of your Watch prompting you to enter the passcode, your iPhone prompts you to enter the long passcode. If you chose to have your Watch automatically unlocked when you unlock your iPhone, simply unlock your iPhone using a passcode or Touch ID, and your Watch is also unlocked. If you are holding the Watch in your hand, you can still unlock it by entering the passcode. Because it is not on your wrist, your Watch does not automatically unlock when you unlock your iPhone because it cannot detect your skin.
Interacting with the Watch Face
The most common screen you see on your Watch is the watch face. Here is how to interact with the various watch faces. Depending on the watch face you choose, and how you customize it, it might include one or more complications, which are additional icons that show information but also sometimes allow you to tap them to open the associated app. We will cover choosing and customizing your watch face in more depth in Chapter 1, “Personalizing Your Apple Watch.”
What Are Complications?
Makers of mechanical watches use the term “complications” to describe any mechanical watch function that is in addition to displaying the time in hours and minutes. In fact, a watch that only shows the hours and minutes is said to have a simple movement. Because mechanical watches are made using tiny gears, springs, and other mechanical pieces, adding extra functionality is complicated, and hence adding something such as the date to the display is said to be a complication. This is true not only in watch construction, but also when the watch needs to be repaired. Some examples of mechanical watch complications include a chronograph, moon phases, and displaying time in different times zones. When Apple designed the Apple Watch, they wanted to keep the traditional language surrounding watches, and so a watch face on your Apple Watch can include complications, which are essentially icons that show additional information such as the time in a different time zone or the weather.

Work with Notifications
When an app needs to alert you, your Watch taps you on the wrist. If you lift your arm within a second or two after you feel the tap, the notification is displayed on the screen. You are then able to dismiss it, or in some cases, take action on it. For example, if someone sends you a text message (or iMessage), you can reply to that message right on your Watch. More on choosing which notifications you want to see on your Apple Watch can be found in Chapter 1.

If you ignore the notification, later when you look at your Watch you will see a red dot on the top of your Watch screen. This indicates that you have missed notifications. Swipe down from the top of the Watch screen to see and manage your notifications.


To clear notifications one by one, swipe the notification to the left and then tap the Clear icon. To clear all notifications at the same time, Force Touch and tap the Clear All icon.


Use Glances
Glances are similar to Widgets on your iPhone. They provide real-time information and some functionality. Examples of Glances are Calendar Glance, Weather Glance, and even the Settings Glance. Besides the built-in Glances, certain apps you install on your Watch may include their own Glances. Examples of these include the Instagram app and the Swarm app. Swipe up from the bottom of your Watch screen to see Glances. Swipe left and right to scroll through the Glances. We will cover more on choosing which Glances you want to see on your Apple Watch in Chapter 1.


Run an App
In addition to telling the time, allowing you to respond to notifications, and showing you information via Glances, your Apple Watch can run apps. To run an app, press the Digital Crown to view the available apps, and then tap an app icon. Turning the Digital Crown zooms in and out of the list of apps. More on choosing which apps you want to see on your Apple Watch and how the list of apps is laid out can be found in Chapter 1.
If you don’t see the app icon, swipe around on the screen to move the view of apps to find the one you are looking for. Pressing the Digital Crown exits the list of apps and returns to the watch face.
If you zoom in all the way to an app icon at the center of your Watch screen, that particular app launches.


Quickly Access Your Friends
If you press the Side Button, you see the Friends list (contacts are called Friends in the Watch app). Turning the Digital Crown allows you to choose a friend. If you wait a few seconds after selecting your friend, you see a screen of communication options. You can find more on choosing which friends you want to see on your Apple Watch in Chapter 1.
For friends that do not have Apple Watches, you can call them and send them text messages (and iMessages). For friends that do have Apple Watches, you can also communicate with them using Digital Touch. Digital Touch allows you to send your actual heart beat, send pictures you draw on your Watch screen, and send a sequence of taps. See Chapter 2, “Messages, Email, and Phone Calls,” for more on interacting with the Friends app.


Command Your Watch Using Siri
If you raise your wrist and say, “Hey Siri,” Siri starts listening for your spoken commands. You can also press and hold the Digital Crown to activate Siri. Some examples of using Siri are “Hey Siri, where can I get a pizza around here?” and “Hey Siri, call Karen.” Chapter 3, “Using Siri,” covers how to interact with Siri on your Watch in more depth.
If you don’t speak right away, tap the microphone icon to speak.


From time to time, Apple will release an update for your Apple Watch. Updates can fix bugs and add new features. When a new update is available, you will see a red badge on the corner of the Watch app on your iPhone. Tap on the Watch app, and then tap General and choose Software Update. Tap Download and Install to download the Watch update, prepare it, and install it on your Watch. Your Watch must be on its charger, and have more than 50% charge before you can complete the update. Once the update is ready, the Watch app on your iPhone sends it to your Watch. On your Watch screen, you see a notice telling you that the update will start in 30 seconds. You will be able to tap Not Now to delay the update, or tap Install to install it immediately. See Chapter 8, “Installing and Managing Watch Apps,” for more information on this topic.
