LIVE ROOM SET-UP
Following, or simultaneously to, the powering-up and calibration of the recording equipment and, if required, the creation of DAW session files, recordists should prepare the studio for the arrival of the performers. At this stage, whoever is responsible for the set-up (possibly the assistant engineer) should consult the session plan in order to gather information regarding:
• Musicians’ placement, including the use of microphone stands and baffles
• Transducer and backline selection and positioning (including rental-related information)
• Cabling
• Inputs and track allocation
• Headphone / Foldback mix and talkback requirements
• The distribution and arrangement of comfort or atmosphere-related items
• Instrument-related requisites, e.g. oiling of pedals, tuning of drums, etc.
The set-up stage provides an opportunity for recordists to start their relationship with artists and producers on positive terms and it is important to note that strong first impressions commonly have a long-lasting impact in music production environments.
INSTRUMENT PLACEMENT
Spatial positioning can affect the sound of instruments dramatically so recordists should be very careful when selecting the placement for their sound sources. In rock and pop music, it is common for engineers to start the set-up process by searching for the ideal position for the drum kit, which seems sensible as this instrument is usually the largest and most complex element in standard productions.
Some of the most common techniques used for drum placement involve the playing and auditioning of a given component of the kit at different positions within the recording environment. Some individuals use the floor tom or the bass drum as the ‘placement testing’ instrument due to their low-frequency resonance. With that in mind, if a pronounced low-end resonance is desired, in most small to medium-sized, rectangular-shaped rooms, the best sounding position will almost certainly lie in the centre of all dimensions, i.e. the middle of the room.
Considering the importance of the snare drum in contemporary rock music, recordists may alternatively use this instrument for their drum kit placement tests. In such case, a technician may easily carry and play a snare drum around the studio unaided, listening for the interaction between the instrument’s ‘dry’ sound and its early reflections. Once the most appropriate sound (balance) for the ‘backbeat’ is found, the drum kit may be assembled around it.
There are no hard rules on how to place the rest of the performers and respective backline in relation to the drum kit, although it is common for bass players to prefer the hi-hat side of the kit and to request a line of sight with the drummer’s bass drum foot. Assistants should always consult the session plan for instructions before making any decisions involving placement.
Upon the arrival of the performers at the recording space, technicians should be ready to start the sound-check process. At this point, the backline should be in its general position (session plan) and drum kit should be in its place and in tune (see Appendix 6 for a description of drum tuning procedures).
The sound-check can be long and arduous process that demands concentration and it should be free from any unnecessary distractions relating to set-up.
Artist Comfort
Whenever possible and reasonable, the well being of the artists should be given priority over all else. This includes the allocation of adequate space for each of the performers and the strategic placement of baffles, allowing good visibility to be maintained throughout (encouraging interaction / interplay). The importance of artist comfort should never be underestimated, as musicians may perform beyond expectations when inspired by their surroundings.
Comfort and atmosphere-related items may include:
• Tapestries and pillows
• Chairs and small tables
• ‘Mood’ lighting devices and candles
• Artwork
• Incense and other aromatherapy products.
MICROPHONE PLACEMENT
Microphone placement strategies can range from the scientific to the borderline superstitious. Some technicians seem to enter the live room with a clear idea of where to place all transducers and are ready to accept immediate results as final. Others appear to thrive in the quest for the best possible microphone position and will not rest until they are completely satisfied with the results. Independent of the approach, the recording team should aim to capture sounds that will fit each production distinctively, even if this requires the recording of sounds that do not appear perfect in isolation.
Although the knowledge of instrument radiation pattern and familiarity with microphones and their qualities can undoubtedly help recordists make important decisions and save time in the studio, it is unreasonable to expect a certain formula to work consistently for the recording of a given sound source. With this in mind, microphone placement should be viewed as a dynamic process that demands highly developed listening skills and recordists should not be afraid to spend a considerable amount of time in the live room examining the natural sound of instruments at different angles and distances.
Evaluating Sound
Engineers use different techniques for the evaluation of the sounds they will record. Some start by relying exclusively on their ears while others prefer to take the transducer (microphone) into consideration from the beginning of the process. Both approaches have advantages and may be better suited for certain purposes, e.g. short or long sessions, quiet or loud instruments, etc.
1. The ‘Naked Ear’ Approach In this approach, while a performer plays an instrument, recordists obstruct or cover one of their ears (if recording in mono) and move their heads within the source’s surrounding area. Upon finding the spot where the instrument sounds best, the most appropriate microphone is selected to preserve or enhance (complement) the sound at the given position.
It is advisable for technicians to start this procedure by moving their heads within two dimensions, i.e. left / right and up / down, at a predetermined distance from the sound source. As the best position in relation to height and side displacement is established, recordists may move closer and further away from the source, evaluating the resulting change in spectrum (‘blend’ of frequencies) and the suitability of added reverberation.
It is imperative for technicians to be extremely careful when auditioning loud sound sources, e.g. drums, guitar cabinets, etc., as some instruments can produce sound pressure at harmful levels. In the case of ‘spot’ microphones, the ‘naked ear’ approach must never be attempted in close proximity to any component of a drum kit.
2. The ‘Microphone-Based’ Approach Some individuals prefer a microphone-based approach to sound evaluation, as they choose to audition instruments as they are picked up by the transducer. This technique requires the use of isolating headphones (closed back or ‘ear defender’ style) and may demand technicians to listen to signals at a considerably loud level, in order for the headphone output to be louder than the natural sound in the room.
It is not advisable for technicians to instruct performers to play quietly in order to facilitate the evaluation process, as no instrument will sound harmonically identical when played at quiet and loud levels, i.e. artists should play the part that will be recorded at its appropriate intensity (dictated by the composition).
In this approach, the microphones are commonly predetermined, e.g. by a session plan, and are moved within the sound radiation area (in the same way as the recordist’s head is moved in the ‘Naked Ear’ approach).
The following page contains a depiction of both the ‘naked ear’ and the ‘microphone-based’ approaches to microphone placement.

Microphone Set-up Procedure
1. In the control room:
• Make sure that phantom power is off in all console channel strips and/or standalone preamplifers.
• Bring all console faders down or mute all channels.
• Mute the control room loudspeaker outputs.
2. In the live room:
• Gather the necessary number of stands, plus a few spares.
• Check every stand part, e.g. clamps, boom arms, etc., and make sure that all joints can be tightened securely.
• Ensure that only rubber-covered parts come in contact with the floor (if necessary place foam pads under stands).
• Place stands in the general area and at the approximate height at which they will be used.
• Run cables from the input wall box (unpatched) to the microphone stands avoiding close proximity with power cables (if signal carrying cables must cross paths with power leads, they must be set and ‘gaffa’ taped at a 90˚ angle – minimising interference).
• Attach all clips that correspond to the microphones that will be used to their respective stands.
• Bring one microphone at a time to their corresponding stand (keep fragile microphones inside their protective bags).
• Place each microphone securely onto their clip / stand.
• Check that stands will not ‘droop’ with the weight of microphones.
• Patch the female XLR connector firmly onto the microphone and the male XLR connector onto the wall input box.
3. In the control room:
• Turn phantom power on where required.
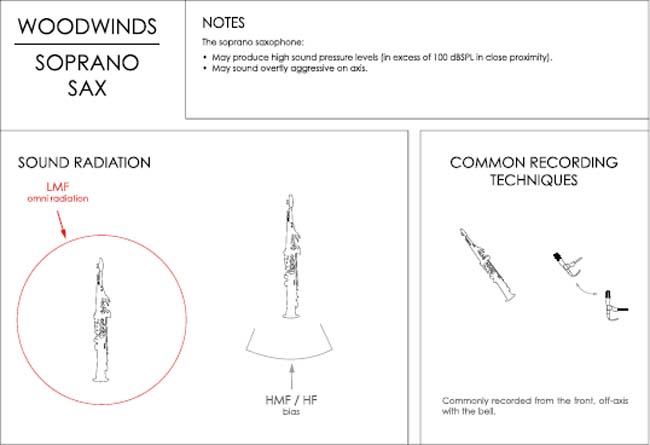
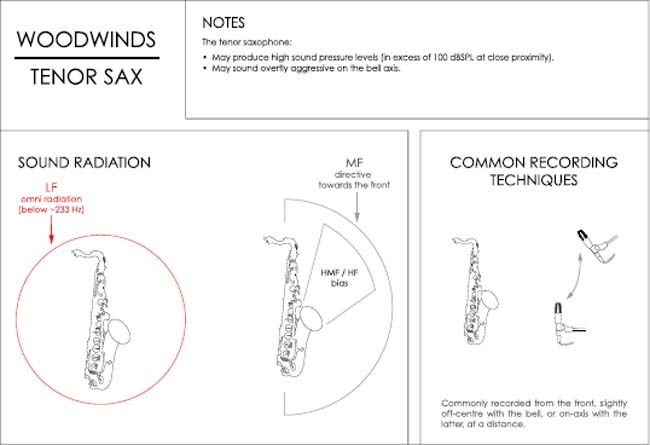
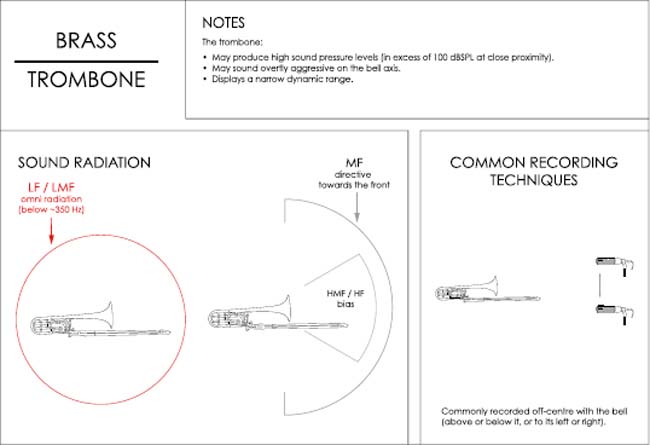
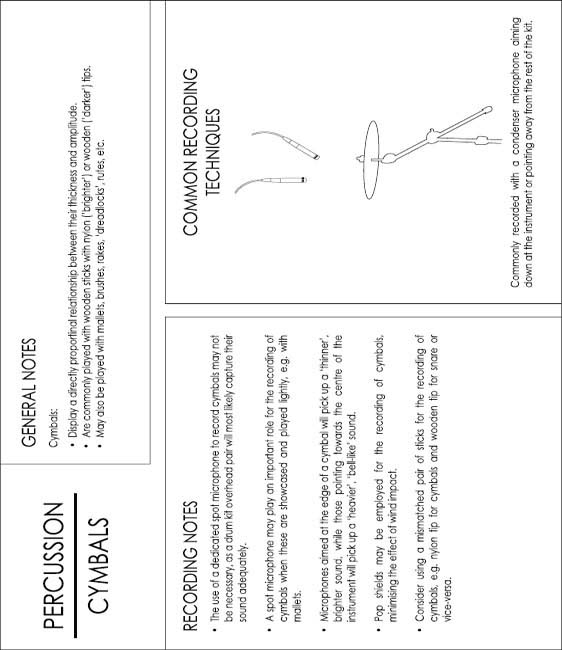
The following pages contain instrument-related information that may help recordists with microphone choice and placement procedures.


Extra Microphones
Recordists aiming to be prepared for common session eventualities may setup a few ‘standby’ microphones, placing them slightly outside the immediate recording area. These extra transducers may be brought out and connected rapidly in the case of new requirements, e.g. spontaneous instrumentation ideas, etc.
Using Multiple Microphones to Create Texture
In some circumstances, the use of a single microphone may not be sufficient to generate a full, well-balanced picture of a sound source. In such cases, it is not uncommon for engineers to use multiple ‘mics’ to capture the different sound attributes of an instrument and/or the acoustic qualities of the recording environment. This approach may help minimise or eliminate the need for processing (equalisation) during mixdown, as engineers might use the blending microphone signals at varying levels (but at a common ‘pan’ position) to create different textures, e.g. brighter, darker, etc.
It is important to remember that if two microphones are placed at different distances in relation to a sound source, their combined signal may present polarity problems (comb filtering). If the two signals interfere with each other negatively (and this must be evaluated by ear), recordists may need to use signal processing (delay) to ensure that they will not have a time gap between them.
The aforementioned use of multiple transducers must not be mistaken for a stereo microphone technique, as in the latter, two or more microphones are used to establish localisation and their individual signals are commonly panned separately across the stereo field.
Using Delay to Avoid Comb Filtering
The example below illustrates how a delay unit may be used to remedy the (possibly) negative comb-filtering effects resulting from the sum of signals from microphones placed at different distances from a sound source. The delay value is chosen to ensure that both signals will reach the recorder at the same time, i.e. the signal from the microphone closest to the amp is delayed by the amount of time that it takes sound to cover the extra metre between the two transducers. The equation presented here uses 344 metres per second as the speed of sound (corresponding to a temperature of approximately 21˚C).

DAW users may alternatively record the signal from the first microphone without delay and ‘nudge’ its corresponding region by 2.9 milliseconds or by 128 samples (if recording at 44.1 kHz).
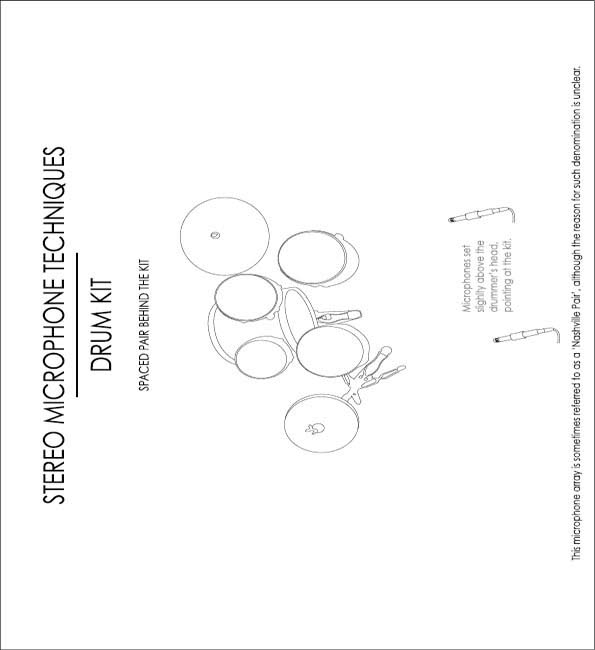
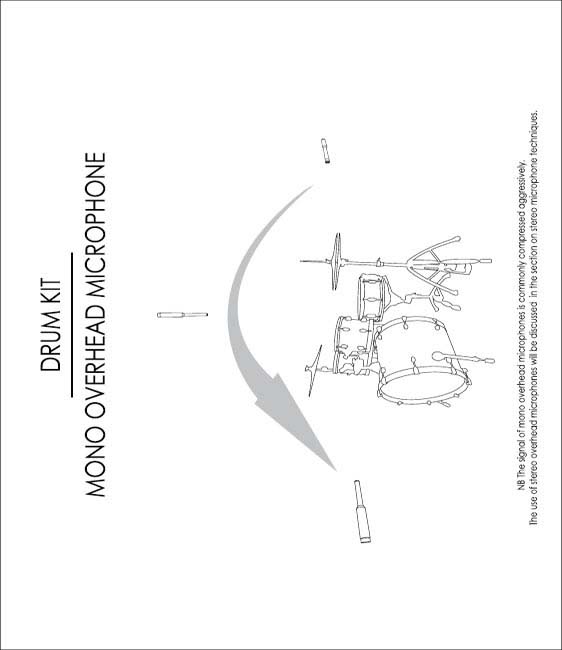
STEREO MICROPHONE TECHNIQUES
Stereo microphone techniques may be defined as the simultaneous use of two or more microphones to record a common sound source, as long as the signals they produce are unique and, more importantly, that they are panned opposite across the stereo field during playback or reproduction. Such techniques are commonly used to record ensembles, e.g. orchestras, string quartets, etc, and instruments such as the piano, vibraphone, glockenspiel, marimba, drums, etc.
Stereo microphone techniques are broadly categorised according to the physical distance between transducer diaphragms:
• XY / Coincident Techniques are those in which microphone capsules are placed immediately over one another and are set at different angles in relation to the sound source.
• Near-Coincident Techniques are those in which microphones are placed a few centimetres from one another and are set at different angles in relation to the sound source.
• AB / Spaced Pair Techniques are those in which microphones are placed more than (approximately) 30 centimetres apart. NB the term AB is used in some European countries to describe coincident pair techniques.
Three main factors influence stereo imaging when multiple transducers are used in tandem to record a common sound source. They are:
• Amplitude differences
• Time differences
• Spectral differences.
The aforementioned factors also dictate localisation in human hearing and it is important for recordists to understand their influence over the efficiency of a microphone technique. When the same sound source is picked up by two matched transducers used in a stereo configuration, localisation during reproduction is determined by:
• How much greater in amplitude the output of one transducer is in relation to the other (an approximate 15 dB difference implies a full left or right reproduction if the two microphone signals are panned ‘hard-left’ and ‘hard-right’).
• How much earlier one transducer picks up the source sound in relation to the other (an approximate 1.5 millisecond difference implies a full left or right reproduction if the two microphone signals are panned ‘hard-left’ and ‘hard-right’).
• (To a minimal degree) how much more harmonically rich the output of one transducer is in relation to the other (in relation to the same source).
A combination of the differences described above will be present when multiple microphones, used to record a common sound source, are set at different distances and angles in relation to each other.
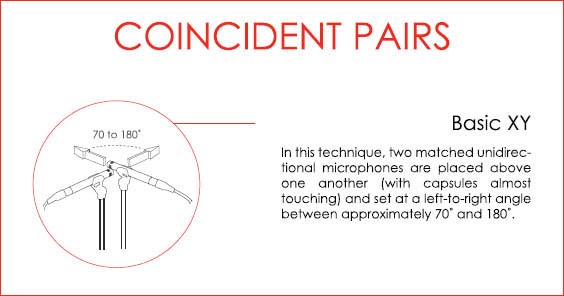
XY / Coincident Pair Techniques
In XY or coincident pair techniques, amplitude differences are essentially responsible for localisation, as there is no time-delay gap in sound pick-up between the two capsules (it is important to note that spectral differences may also play a minimal part in this process, if off-axis colouration is sufficient to generate considerable contrast between the two signals).
Coincident pairs:
• Are comprised of directional or bidirectional microphones
• Generate mono compatible signals (no time delay)
• Are least effective if placed distant from the sound source(s).

Using Middle and Sides
The M&S technique allows for the remote control of stereo width through changes in the level balance between the middle and the side components, e.g. the higher the level of the sides the wider the image. This technique can be particularly effective when used in live sound applications, as engineers can quickly change the overall stereo spread of recorded and front of house signals without repositioning microphones.
The following is a depiction of the M&S set-up when a console is used:
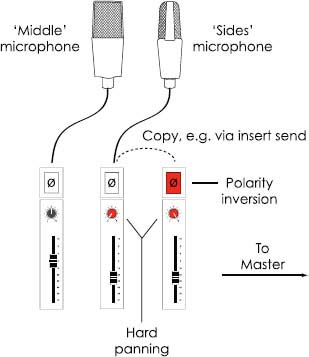
Recordists must pay close attention to the spectral changes that result from the rebalancing of levels when using M&S pairs, as it is not uncommon for signals to become ‘thinner’ as the amplitude of the ‘sides’ is increased. As a solution to this problem, the use of equalisation, e.g. low-mid shelving boosts, may help maintain the integrity of the material.
Near-Coincident Pair Techniques
In near-coincident techniques, amplitude is still primarily responsible for establishing localisation, although time arrival differences start to contribute to the stereo effect (once again spectral differences may play a very minor role in the process).
Near-coincident pairs:
• Are comprised of directional microphones (unless ‘baffled’).
• May not be mono compatible (check).
• Provide a greater sense of spaciousness (compared to XY techniques).
• May be placed at a greater distance from the sound source.

‘Baffled’ Near-Coincident Techniques
In ‘baffled’ near-coincident techniques, spectral differences play an important role in establishing localisation, as these techniques aim to emulate the human hearing mechanism.
The following are examples of ‘baffled’ near-coincident pairs:

AB / Spaced Pair Techniques
In AB or spaced pair techniques, a combination of amplitude and time arrival differences are responsible for localisation.
Spaced pairs:
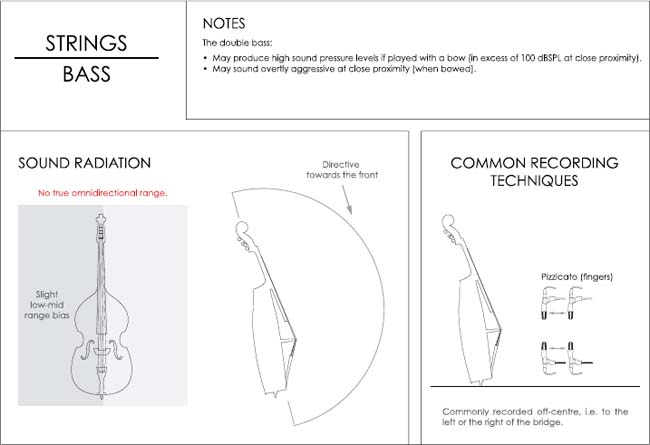
• Are commonly comprised of omnidirectional (less colouration) or hypocardioid microphones.
• May not be mono compatible (check).
• May generate a ‘hole in the middle’ during reproduction (a third, ‘middle’ microphone may help with this).
• Provide the greatest sense of spaciousness.
• May be placed at the greatest distance from the sound source.
In basic AB techniques, two omni (preferably) or directional microphones are positioned over 40 centimetres apart. Spaced microphone pairs are commonly used to record drums and other wide image sources, as they are very easy to set-up and reposition.

The Decca Tree
The technique known as ‘Decca Tree’ has had many variants through the years, although it may be generally described as an arrangement of three omnidirectional microphones mounted on a ‘T’ shaped bar, where the centre transducer is placed 1 to 1.5 metres ahead of the outriggers, which in turn are spaced by approximately 2 metres. It is common practice to use Decca Trees for the recording of orchestras, where the array is positioned a metre or so behind and 2 to 3 metres above the conductor’s position.
Choosing A Stereo Microphone Technique (An Ear-Based Approach)
The following is a suggested strategy for the selection of stereo microphone techniques for the recording of a small ensemble or instrument section:
• Approach the sound source and determine its ‘centre’ axis, i.e. an imaginary line that seems to separate its low and high registers or the axis of symmetry regarding the energy produced.
• Move away slowly (following the axis), listening for spectrum changes and for the balance between ‘dry’ and reverberant sound.
• Determine the point(s) where low and high frequencies are balanced, reverberation is optimum and unwanted sounds are low in amplitude (if the points do not coincide find a compromise placing emphasis on spectral balance as artificial reverberation may be added later).
• Check how much of the original stereo image is still preserved at the selected position.
• Base the choice of microphone technique (including polar patterns) on how much separation is still detected at the chosen position and on the desired spread during reproduction. As general rules-of-thumb, under normal circumstances:
1. Directional polar patterns and ‘tighter’ arrays are commonly effective in closer proximity to ‘stereo’ sound sources.
2. The distance between microphones may be seen as directly proportional to their distance to the sound source, i.e. the further the distance from the sound source the more spaced the capsules should be (some recordists use a 3:1 rule for spaced pairs, where every metre from the sound emitter equates to 3 metres between transducers).
• Audition the sum of the microphone signals in mono and check for polarity problems, e.g. invert the polarity of one of them.
• Audition the signals from the microphones panned ‘hard-left’ and ‘hard-right’ respectively and check for the localisation and the focus of each of the individual sound source components.
• Do not forget the possibility of requesting a change in spatial arrangement for small groups or ensembles, e.g. XY pairs may be best at closer proximity to sound sources configured in an arch formation, while near-coincident pairs may be best at closer proximity to sources placed on a straight line.
Stereo Microphone Techniques and Orchestral Recordings
Orchestras and large groups are commonly recorded with a combination of stereo pairs and ‘spot’ microphones. The following is one of many possible approaches:
• Set up a main coincident or near-coincident pair behind the conductor, at enough height to avoid possible acoustic shadowing (a simple way to determine a suitable height is to check if the microphone has a ‘line of sight’ with all the musicians).
• Set up a spaced pair of omnidirectional microphones ‘(outriggers’), to the left and right of the original pair (consider lining them up with the centre of each of the two halves of the ensemble respectively).
• Audition the first (main) pair in mono and check for polarity problems (cancellations or ‘holes’ in the spectrum).
• Audition the same pair panned ‘hard-left’ and ‘hard-right’ respectively and analyse the localisation and the focus of each of the individual sound source components, e.g. first and second violins, celli, basses, etc. (check the ‘phase’ or polarity using a metering device, if available).
• Repeat the two previous steps for the ‘outriggers’ in isolation and add their panned signals to the mix, checking that they do not ‘smear’ or fight the stereo image established by the main pair.
• Add ‘spot’ microphones to reinforce the sound of sections, e.g. woodwind, brass, etc. or single instruments that are not picked-up by the two pairs at a sufficient level, e.g. celesta, harp, etc.
The Stereo or Stereophonic Zoom
Engineer and author Michael Williams has coined the term ‘Stereophonic Zoom’ to describe a system that facilitates the selection of the most appropriate stereo microphone technique for unique recording conditions, i.e. on a case-by-case basis. When using the aforementioned system, recordists can choose their desired sound reproduction localisation characteristics, while minimising angular distortion or the ‘stretching’ of images. Engineers that are employed for the high-fidelity recording of acoustic ensembles or instrumentalists must familiarise themselves with this arguably definitive treatise on stereo microphone techniques.
The following pages contain examples of stereo pair applications.