
7
Transforming with DataWeave
In the previous chapter, we learned the very basics of DataWeave, including how to use functions, variables, conditions, operators, and selectors, but we didn’t see any transformation examples. In this chapter, we are going to learn about DataWeave modules and some of the most used functions in real life. We will cover the following topics:
- Understanding modules in DataWeave
- Using the DataWeave core functions
- Using the Transform Message component in Anypoint Studio
We cannot cover absolutely everything that you can do with DataWeave, but we will provide a guide so you can get familiar with the functions that are widely used by developers in real life. Even if you are already familiar with DataWeave, maybe there are some popular functions you want to learn more about, such as map and reduce. This chapter will provide additional tips and tricks for your development experience.
Remember DataWeave is a functional programming language. Some of these functions might look familiar to you if you come from a functional programming background. If you’re new to this programming paradigm, then this chapter is great for you to get started with DataWeave’s syntax and use cases.
Technical requirements
You will need the following technical requirements for this chapter.
- An internet browser: Google Chrome will be used throughout this chapter for the DataWeave Playground, located at https://developer.mulesoft.com/learn/dataweave/. To learn how to use the DataWeave Playground, you can follow this guide: https://developer.mulesoft.com/tutorials-and-howtos/dataweave/learn-dataweave-with-the-dataweave-playground-getting-started/.
- Anypoint Studio: Make sure you have Studio installed on your computer. We’ll mostly practice using the DataWeave Playground, but it’s also good for you to know how to use DataWeave from Studio. Download Studio from https://mulesoft.com/studio.
- GitHub repository: It’s not required for you to open this repository, but it’ll be easier for you to copy and paste the examples and scripts. You can access it through the following link: https://github.com/PacktPublishing/MuleSoft-for-Salesforce-Developers.
Understanding modules in DataWeave
Some programming languages make use of libraries to import functions or methods from other pieces of code. This is helpful to reuse complex functionality that was written by someone else instead of trying to reinvent the wheel and wasting precious development time while trying to develop the code yourself. In DataWeave, these libraries of code are called modules. You can either use other existing DataWeave modules or create your own custom modules, which we will see later in Using the Transform Message component in Anypoint Studio section.
Let’s see the syntax to import these modules in DataWeave.
Importing modules and functions
There are several ways of importing modules or functions to your DataWeave scripts, depending on your preference. But all of them make use of the import keyword and must be located within the header of your script. Let’s see some examples:
- Import the whole module: You can import the whole module in your script’s header and reference the function with its specified module from your script’s body. This is the syntax for doing so:
import-example-1.txt
import Module
---
Module::function()
This is cleaner to look at from the script’s header, but it makes it look busier in the script’s body.
- Import all functions: Another way is to import all the functions from a module and then directly reference the function from the script’s body. This is the syntax for doing so:
import-example-2.txt
import * from Module
---
function()
Now, it might look busier in the script’s header, but the script’s body looks cleaner. However, this might make it difficult for new developers to understand where your function is coming from, especially if they are not familiar with the different available DataWeave modules and you have several modules being imported in the same script.
- Import specific functions: To make things more explicit, you can import specific functions from each module, like so:
import-example-3.txt
import function from Module
---
function()
Now, everyone will be able to see where each function comes from. Plus, if you’re working on a very big and heavy project, making these little adjustments to the code might help with the performance of the Mule application.
You can also import several functions from the same module by separating them with a comma. See the following example:
import-example-4.txt
import function1, function2, function3 from Module
---
function1()
- Precedence: If you have more than one function with the same name but from different modules, whichever function/module was defined first will take precedence. See the following example:
import-example-5.txt
import function from Module1
import function from Module2
---
function() // from Module1
If you end up with something like this and want to make things less confusing, you can import just the module and not the functions. This will help you to clearly see which module the function is being used from:
import-example-6.txt
import Module1
import Module2
---
Module2::function()
- Create aliases: Alternately, if you want to create an alias for your functions or modules, you can use the as keyword followed by the alias. Here’s the syntax:
import-example-7.txt
import Module1 as Mod1 // alias Mod1 for Module1
import function1 as f1 from Module2 // alias f1 for
function1
import function2 as f2, function3 as f3 from Module3
// aliases f2 and f3 for functions from the same
module (Module3)
---
// Mod1::function
// f1()
// f2()
f3()
- Import from folders: Finally, when you have modules separated by :: and you want to import the whole module, you don’t need to reference the whole path in the script’s body, only the module name. Here’s what this syntax looks like:
import-example-8.txt
import folder1::folder2::Module
---
Module::function()
We are done understanding how to import modules or functions in DataWeave. Let’s now talk about some of the existing modules you can find in DataWeave so you don’t have to create code from scratch.
Analyzing the existing DataWeave modules
As mentioned earlier, the focus of this book is to get you started with the basics of MuleSoft’s features and products. Understanding all of the existing DataWeave modules is out of the scope of this book, but we can get a glimpse of what modules are available so you can have a better idea of them. Here’s a list of some of the existing DataWeave modules:
- dw::Core: We will talk more about this module in the next section. All the functions within this module are imported to your script by default so you don’t have to explicitly import them in the script’s header.
- dw::core::Arrays: Here, you can find functions to work with the Array type (defined by []). Some functions are countBy, every, join, slice, and splitAt. There are still more functions, but we mentioned a few so you can get a better idea of what the module does.
- dw::core::Binaries: Here, you can find functions to work with the Binary type. Its functions are fromBase64, fromHex, readLinesWith, toBase64, toHex, and writeLinesWith.
- dw::core::Dates: Here, you can find functions to work with the Date type (defined by ||). Some functions are atBeginningOfWeek, dateTime, today, tomorrow, and yesterday. There are still more functions, but we mentioned a few so you can get a better idea of what the module does.
- dw::core::Numbers: Here, you can find functions to work with the Number type. Its functions are fromBinary, fromHex, fromRadixNumber, toBinary, toHex, and toRadixNumber.
- dw::core::Objects: Here, you can find functions to work with the Object type (defined by {}). Some functions are divideBy, keySet, mergeWith, takeWhile, and valueSet.
- dw::core::Periods: Here, you can find functions to work with the Period type (defined by |P<...>|). Some functions are between, days, duration, months, and years. There are more functions but we mentioned a few so you can get a better idea of what the module does.
- dw::core::Strings: Here, you can find functions to work with the String type (defined by ""). Some functions are camelize, capitalize, dasherize, isAlphanumeric, isLowerCase, pluralize, substring, and words. There are more functions but we mentioned a few so you can get a better idea of what the module does.
- dw::core::Types: Here, you can find functions to work with data types. Some functions are arrayItem, functionParamTypes, functionReturnType, isBooleanType, literalValueOf, and nameOf. There are more functions but we mentioned a few so you can get a better idea of what the module does.
- dw::core::URL: Here, you can find functions to work with URIs. Its functions are compose, decodeURI, decodeURIComponent, encodeURI, encodeURIComponent, and parseURI.
- dw::Crypto: Here, you can find functions to encrypt data through common algorithms. Its functions are HMACBinary, HMACWith, MD5, SHA1, and hashWith.
- dw::Mule: Here, you can find functions to interact with the Mule runtime. Its functions are causedBy, lookup, and p.
- dw::Runtime: Here, you can find functions to interact with the DataWeave runtime. Some functions are eval, fail, orElseTry, props, run, try, and wait. There are more functions but we mentioned a few so you can get a better idea of what the module does.
- dw::System: Here, you can find functions to interact with the operating system. Its functions are envVar and envVars.
- dw::util::Math: Here, you can find functions to make use of mathematical functions. Its functions are acos, asin, atan, cos, log10, logn, sin, tan, toDegrees, and toRadians.
- dw::util::Timer: Here, you can find functions to measure time. Its functions are currentMilliseconds, duration, time, and toMilliseconds.
- dw::util::Tree: Here, you can find functions to handle tree structures. Some functions are filterArrayLeafs, filterTree, mapLeafValues, and nodeExists. There are more functions but we mentioned a few so you can get a better idea of what the module does.
- dw::util::Values: Here, you can find functions to make changes to certain values. Its functions are attr, field, index, mask, and update.
Note
At the time this book is being written, the latest DataWeave version is 2.4. If there are more advanced versions by the time you read this chapter, you may want to take a look at the release notes to see what changes were implemented. To review this, you can use the following link: https://docs.mulesoft.com/dataweave/latest/whats-new-in-dw.
To find the complete list of modules and their corresponding functions, please refer to the official documentation: https://docs.mulesoft.com/dataweave/latest/dw-functions.
As you can see, there is a wide variety of modules you can take advantage of instead of having to come up with the most efficient way of doing something. We can’t discuss all the modules, but we will focus on the Core module and its most used functions.
Using the DataWeave core functions
These functions come from the dw::Core module but there’s no need to explicitly import it into your script. All of these functions are added to DataWeave by default so you can make use of them right away.
We will mention whether the functions are null-safe. This means that you can send a null value as the input and it won’t result in a DataWeave error. Instead, it will simply give a null value in return so you can handle the data in further steps.
One important thing for you to understand about calling functions with two parameters is that you can use two different syntaxes to call them. This only applies to two-parameter functions. The syntax is as follows:
- Prefix notation, which looks like this:
function(arg0, arg1)
- Infix notation, which looks like this:
arg0 function arg1
You can choose whichever notation or syntax you feel more comfortable with, but most people prefer to use the infix notation whenever possible because the functions become easier to understand (without all the parentheses). This is especially helpful when working with functions that make use of lambdas as one of their parameters, such as map, for example. In this chapter, we will make use of the infix notation when we have two-parameter functions.
We talked about lambdas – or anonymous functions – in the previous chapter. However, we haven’t learned how to use them as another function’s parameter. We will see some examples throughout this chapter, especially with the functions for objects and arrays. To give you a quick reminder, this is the syntax to use map (with the infix notation), which we will see later in the chapter in the Transforming arrays section:
<Array> map ((value, index) -> <code>)
The first parameter is the array we use as input and the second parameter is a lambda with the value and index parameters. We can then create the transformation code to make use of these two parameters inside the lambda.
There is another syntax to use lambdas in DataWeave: the dollar-sign syntax. This is helpful with functionality or functions that may be more straightforward than creating the whole lambda expression. The number of dollar signs represents the number of the parameter in the lambda. For example, when using map, we have two parameters in the lambda: value and index. Since value is the first parameter, it’d be represented with $, while index would be represented with $$. You can now use these characters in the lambda code instead of having to explicitly declare both parameters in the lambda expression. This syntax would change to the following:
<Array> map (<code>)
We will see some more examples when talking about the functions to transform objects and arrays.
In the following sections, we will learn how to transform different data types, such as numbers, strings, objects, and arrays. We will see an overview of some of the most used functions for each specific data type and brief examples to see how these functions work.
Let’s start with some functions that can be applied to more than two data types.
Transforming multiple types
Let’s first take a look at some of the functions that can be used with either several data types or no parameters since they’re more general:
- ++ (plus plus): This function is used to concatenate two given parameters. It can be used with Array, String, Object, or some of the Date and Time-related types. For example, [1, 2] ++ [3, 4] results in [1, 2, 3, 4].
- now: This function is used to generate a DateTime data type with the information from today’s date and time. For example, now() can result in |2022-06-17T15:06:37.953742Z|.
- random: This function is used to generate a random number from 0.0 to 1.0. For example, random() can result in 0.5071719753789186.
- read: This function is used when DataWeave can’t determine the type of format that is being parsed. For example, read("[1, 2, 3]", "application/json") results in [1, 2, 3]. Note that the array is first being passed as a string and is then transformed into an actual array.
- readUrl: This function is used to retrieve the data from a URL and parse it to the given data format. For example, readUrl("https://jsonplaceholder.typicode.com/posts/1", "application/json") results in the JSON data retrieved from the URL.
- sizeOf: This function is used to retrieve a number with the size of the given parameter. It can be used with Array, String, Object, and Null (null-safe). For example, sizeOf([0, 1, 2, 3]) results in 4.
- typeOf: This function is used to retrieve the type of the given parameter. It can be used with any data type – which makes it null-safe. For example, typeOf("abc") results in String, typeOf(typeOf("abc")) results in Type, and typeOf(sizeOf) results in Function.
- uuid: This function is used to generate a Universally Unique Identifier (UUID). For example, uuid() can result in "ffe58a18-06d9-47f5-be1e-c6fb1e7cf197".
- with: This is a helper function that is used along with other functions, such as replace, update, or mask. We will see some of these main functions later in this chapter, in the Transforming strings section. For example, "hello world" replace "world" with "muley!" results in "hello muley!".
We listed some of the functions previously, but there are more functions that we’ll look at separately because they are more complex, starting with the isEmpty function.
isEmpty
This function returns a Boolean indicating whether the given parameter is empty or not. It can be used with Array, String, Object, and Null (null-safe). Let’s see some examples:
isEmpty.dwl
%dw 2.0
output application/dw
---
{
    Array: isEmpty([]), // true
    String: isEmpty(""), // true
    Object: isEmpty({}), // true
    Null: isEmpty(null) // true
}
If there were at least one item in the array, at least one character in the string, or at least one key-value pair in the object, the result would be false – indicating the provided parameter is not empty.
Tip
You can use the default keyword to set default values in certain transformations when a null value is received. For empty values ([], {}, or ""), however, it is better to use the isEmpty function. To learn more about the default keyword, see the official documentation: https://docs.mulesoft.com/dataweave/latest/dataweave-cookbook-defaults#example-of-using-the-keyword-default-to-set-a-default-value.
log
This function doesn’t affect any values or transform any data. This is used to debug the DataWeave code and log certain values to a console or the LOG VIEWER tab in the DataWeave Playground. It is very helpful especially when you have long pieces of code and you want to see what’s happening in specific steps within it. See the following example:
log.dwl
%dw 2.0
output application/json
---
[1, 2, 3] map log($)
In this case, we’re using the map function just to demonstrate (we will talk more about this function in the Transforming arrays section). This code is iterating through the input array and logging each item in the console. From the DataWeave Playground, it would look like this:

Figure 7.1 – View from the DataWeave Playground
There is not a way to formally debug DataWeave code yet but using this function is a close workaround. For example, you can use console.log in JavaScript to achieve the same functionality.
then
This is a helper function that is more useful in larger code. It essentially replaces the use of parentheses for certain use cases. For example, consider the following code:
[1, 2] + [3] // [1, 2, [3]]
You have an array of numbers (1 and 2) and then added a third item [3]. This results in an array containing both numbers and arrays. Let’s say you wanted to flatten this array to be just an array of numbers ([1, 2, 3]). To achieve this, you can use the flatten function, which we will see in detail in the Transforming arrays section, but you need to surround the whole code in parentheses in order to use it, like so:
flatten([1, 2] + [3]) // [1, 2, 3]
It doesn’t seem like a big deal now because we just have a line of code, but when you have hundreds of lines and lots of other parentheses, it gets harder to identify exactly where to start. This is where the then function comes in handy:
then.dwl
%dw 2.0
output application/json
---
[1, 2] + [3] then flatten($) // [1, 2, 3]
The result from the previous execution gets passed after the then function is called and becomes a lambda. We will learn how to use lambdas as a parameter to another function in the Transforming objects and Transforming arrays sections. For now, you can see the difference in the syntax and why using then can be better than adding surrounding parentheses to the code.
Now that we know some of the more general functions, let’s take a look at the functions that are specifically for transforming numbers.
Transforming numbers
These functions work specifically for the Number data type. Remember that a number in DataWeave can be either a decimal or integer number. For example, say you have a decimal number such as 5.6 that you want to round up to the nearest number; so, you’d transform it to 6.
The functions are as follows:
- abs: This function is used to retrieve the absolute value of a given number. For example, abs(-9) results in 9.
- ceil: This function is used to round up the value of a given decimal number. For example, ceil(5.1) results in 6.
- floor: This function is used to round down the value of a given decimal number. For example, floor(7.9) results in 7.
- isDecimal: This function is used to indicate whether a given number is a decimal value or not. It returns true if the parameter is a decimal number or false if it isn’t. For example, isDecimal(4.5) results in true and isDecimal(4) results in false.
- isEven: This function is used to indicate whether a given number is an even value or not. It returns true if the parameter is an even number or false if it isn’t. For example, isEven(4) results in true and isEven(5) results in false.
- isInteger: This function is used to indicate whether a given number is an integer value or not. It returns true if the parameter is an integer number or false if it isn’t. For example, isInteger(5) results in true and isInteger(5.5) results in false.
- isOdd: This function is used to indicate whether a given number is an odd value or not. It returns true if the parameter is an odd number or false if it isn’t. For example, isOdd(3) results in true and isOdd(2) results in false.
- mod: This function is used to retrieve the modulo of a given dividend (first parameter) and divisor (second parameter). This is the remainder of dividing the two parameters. For example, 5.5 mod 5 results in 0.5.
- pow: This function is used to retrieve the result of raising a given base number (first parameter) to a given power (second parameter). For example, 5 pow 3 results in 125.
- randomInt: This function is used to retrieve a random integer from 0 to the given number (excluding the given number). For example, randomInt(5) can result in 0, 1, 2, 3, or 4.
- round: This function is used to round up or down the value of a given decimal number into the nearest whole number. For example, round(4.1) results in 4 and round(4.5) results in 5.
- sqrt: This function is used to retrieve the square root of a given number. For example, sqrt(100) results in 10.
- to: We mentioned this function briefly in the previous chapter when we talked about ranges. This function is used to retrieve a range that falls within the two given numbers (including both numbers). For example, 1 to 5 results in [1, 2, 3, 4, 5]. Note that this result is not an array of numbers but a Range type.
We now know some of the functions we can use to transform numbers. Let’s continue with the functions for strings.
Transforming strings
These functions work specifically for the String data type. Remember that in DataWeave, a string is conformed by using quotes around it. For example, say you have a string such as "hello" that you want to transform into all uppercase to be "HELLO".
The functions are as follows:
- contains: This function is used to indicate whether a given string (first parameter) contains a given string or regular expression (second parameter). It returns true if it does or false if it doesn’t. For example, "Hello world!" contains "hi" results in false and "Hello world!" contains /w+ w+!/ results in true. This is a null-safe function – null contains "a" returns false.
- endsWith: This function is used to indicate whether a given string (first parameter) ends with a given string (second parameter). It returns true if it does or false if it doesn’t. For example, "Hello world!" endsWith "orld!" results in true. This is a null-safe function – null endsWith "a" returns false.
- find: This function is used to find the indexes of a given string or regular expression (second parameter) from the given string (first parameter). If no match is found, it returns an empty array. For example, "Hello world!" find "o" results in [4, 7]. This is a null-safe function – null find "o" returns [].
- indexOf: This function is used to find the first index of a given string (second parameter) from the given string (first parameter). If no match is found, it returns -1. For example, "Hello world!" indexOf "o" results in 4. This is a null-safe function – null indexOf "o" returns -1.
- isBlank: This function is used to indicate whether a given string is blank (including empty spaces or null values). It returns true if it is or false if it isn’t. For example, isBlank(" ") results in true but isBlank(" a") is false.
- lastIndexOf: This function is used to find the last index of a given string (second parameter) from the given string (first parameter). If no match is found, it returns -1. For example, "Hello world!" lastIndexOf "o" results in 7. This is a null-safe function – null lastIndexOf "o" returns -1.
- lower: This function is used to transform the given string to lowercase. For example, lower("Hello") results in "hello". This is a null-safe function – lower(null) returns null.
- match: This function is used to retrieve the matches of a given regular expression (second parameter) from the given string (first parameter). If no match is found, it returns []. Note that you will receive more items if your regular expression is separated into capture groups. For example, "Hello world!" match /w+ w+!/ results in ["Hello world!"] and "Hello world!" match /(w+) (w+)!/ results in ["Hello world!", "Hello", "world"]. This is a null-safe function – null match /w+/ returns null.
- matches: This function is used to indicate whether a given string (first parameter) matches a given regular expression (second parameter). It returns true if there is a match or false if there isn’t. For example, "Hello world!" matches /w+ w+!/ results in true. This is a null-safe function – null matches /w+/ returns false.
- replace: This function is used to replace a given string or regular expression (second parameter) from the given string (first parameter). If no match is found, it returns the original string. The with function is used along with replace. For example, "Hello world!" replace "world" with "team" results in "Hello team!". This is a null-safe function – null replace "a" with "b" returns null.
- scan: This function is used to retrieve all the matches of a given regular expression (second parameter) from the given string (first parameter). If no match is found, it returns []. Note that you will receive more items if your regular expression is separated into capture groups. For example, "Hello world!" scan /w+/ results in [["Hello"], ["world"]]. This is a null-safe function – null scan /w+/ returns null.
- splitBy: This function is used to split a given string (first parameter) into an array of strings, separated by the given string or regular expression (second parameter). For example, "a b c" splitBy " " results in ["a","b","c"]. This is a null-safe function – null splitBy " " returns null.
- startsWith: This function is used to indicate whether a given string (first parameter) starts with a given string (second parameter). It returns true if it does or false if it doesn’t. For example, "Hello world!" startsWith "Hello" results in true. This is a null-safe function – null startsWith "a" returns false.
- trim: This function is used to remove blank spaces at the beginning or the end of a given string. For example, trim(" Hello world ") results in "Hello world". This is a null-safe function – trim(null) returns null.
- upper: This function is used to transform the given string to uppercase. For example, upper("Hello") results in "HELLO". This is a null-safe function – upper(null) returns null.
We now know some of the functions we can use to transform strings. Let’s continue with the functions for objects.
Transforming objects
These functions work specifically for the Object data type. Remember that in DataWeave, an object is conformed by key-value pairs and it’s surrounded by curly brackets. For example, in {a: "b", c: "d"}, a and c are keys and "b" and "d" are values.
The functions are as follows:
- -- (minus minus): This function is used to remove key-value pairs (second parameter) from the given object (first parameter). As the second parameter, you can send a key-value pair, an array of strings, or an array of keys. For example, considering the same input (first parameter) {a: "b", c: "d"}, you can achieve the same output {c: "d"} with both -- {a: "b"} and -- ["a"]. This is a null-safe function.
- distinctBy: This function is used to remove duplicate key-value pairs from the given object. The second parameter of this function is a lambda with the value and key parameters. For example, {a: "b", c: "d", a: "b"} distinctBy $ results in {a: "b", c: "d"}. This is a null-safe function.
- entriesOf: This function is used to describe the key-value pairs from a given object. For example, entriesOf({a: "b"}) results in [{ key: "a", value: "b", attributes: {} }]. This is a null-safe function.
- filterObject: This function is used to filter the key-value pairs from the given object. The second parameter of this function is a lambda with the value, key, and index parameters. For example, {a: "b", c: "d"} filterObject $$ ~= "a" results in {a: "b"}. This is a null-safe function.
- keysOf: This function is used to retrieve the keys from a given object. Note that this returns an array of keys. For example, keysOf({a: "b", c: "d"}) results in ["a", "c"]. This is a null-safe function.
- mapObject: This function is used to transform the key-value pairs from the given object. The second parameter of this function is a lambda with the value, key, and index parameters. For example, {a: "b", c: "d"} mapObject {($): $$} results in {b: "a", d: "c"}. This is a null-safe function.
- namesOf: This function is used to retrieve the names of the keys from a given object. Note that this returns an array of strings. For example, namesOf({a: "b", c: "d"}) results in ["a", "c"]. This is a null-safe function.
- pluck: This function is used to transform the key-value pairs from the given object into an array. The second parameter of this function is a lambda with the value, key, and index parameters. For example, {a: "b", c: "d"} pluck upper("$$:$") results in ["A:B", "C:D"]. This is a null-safe function.
- valuesOf: This function is used to retrieve the values from a given object. For example, valuesOf({a: "b", c: "d"}) results in ["b", "d"]. This is a null-safe function.
We now know some of the functions we can use to transform objects. Let’s continue with the functions for arrays.
Transforming arrays
These functions work specifically for the Array data type. Remember that in DataWeave, an array is conformed by using square brackets around it. For example, [1, 2, 3] is an array of numbers and ["a", "b", "c"] is an array of strings.
The functions are as follows:
- -- (minus minus): This function is used to remove items (second parameter) from the given array (first parameter). As the second parameter, you can send an array containing the items you want to remove from the original array. For example, [1, 2, 3] -- [1, 2] results in [3]. This is a null-safe function.
- avg: This function is used to retrieve the average of the given array of numbers. For example, avg([1, 2, 3]) results in 2.
- contains: This function is used to indicate whether a given array (first parameter) contains a given item (second parameter). It returns true if it does or false if it doesn’t. For example, [1, 2, 3] contains 1 results in true. This is a null-safe function.
- distinctBy: This function is used to remove duplicate items from the given array. The second parameter of this function is a lambda with the item and index parameters. For example, [1, 2, 1] distinctBy $ results in [1, 2]. This is a null-safe function.
- filter: This function is used to filter the items from the given array. The second parameter of this function is a lambda with the item and index parameters. For example, [1, 2, 3] filter isEven($) results in [2]. This is a null-safe function. Note that this function can also be used with strings instead of arrays, although it’s not very popular to use it with strings.
- find: This function is used to find the indexes of a given item (second parameter) from the given array (first item). If no match is found, it returns an empty array. For example, [1, 2, 1] find 1 results in [0, 2]. This is a null-safe function.
- flatten: This function is used to flatten nested subarrays into one array. Note that it only works with the first level of subarrays. For example, flatten([1, [2], [3, [4]]]) results in [1, 2, 3, [4]]. This is a null-safe function.
- indexOf: This function is used to find the first index of a given item (second parameter) from the given array (first parameter). If no match is found, it returns -1. For example, [1, 2, 1] indexOf 1 results in 0. This is a null-safe function.
- joinBy: This function is used to join a given array of strings (first parameter) into a new string, separated by the given string (second parameter). Note this is the opposite of splitBy. For example, ["a","b","c"] joinBy " " results in "a b c". This is a null-safe function.
- lastIndexOf: This function is used to find the last index of a given item (second parameter) from the given array (first parameter). If no match is found, it returns -1. For example, [1, 2, 1] lastIndexOf 1 results in 2. This is a null-safe function.
- max: This function is used to find the highest-value item from the given array. For example, max([8, 3, 5]) results in 8. Note that you can also use the maxBy function if you want to create custom mappings by using a lambda.
- min: This function is used to find the lowest-value item from the given array. For example, min([8, 3, 5]) results in 3. Note that you can also use the minBy function if you want to create custom mappings by using a lambda.
- orderBy: This function is used to reorder the items from a given array. The second parameter of this function is a lambda with the item and index parameters. For example, ["c", "b", "d", "a"] orderBy $ results in ["a","b","c","d"]. This is a null-safe function. Note that this function can also be used with objects.
- sum: This function is used to sum the items from the given array of numbers. For example, sum([1, 2, 3]) results in 6.
We listed some of the functions previously, but there are three more complex functions that we’ll look at separately, starting with the groupBy function.
groupBy
This function is used to group the given items by specific criteria. The second parameter of this function is a lambda with the item and index parameters. This is a null-safe function. Note that this function can also be used with strings or objects instead of arrays, although it’s not very popular to use it this way.
Let’s see an example that is used a lot in real-life scenarios. Consider the next variable that we’ll use as the input array in our groupBy function:
groupBy.dwl
var arrayObject = [
    {
        id: 1,
        name: "alex",
        email: "[email protected]"
    },
    {
        id: 2,
        name: "akshata",
        email: "[email protected]"
    },
    {
        id: 3,
        name: "arul",
        email: "[email protected]"
    }
]
It’s an array of objects containing data such as id, name, or email. Say we want to retrieve the information from a specific email, for example, [email protected]. There are two main ways to achieve this: one with the filter function and one with the groupBy function. The filter approach is more straightforward: you can just filter the data by the email that matches the string, as follows:
arrayObject filter $.email == "[email protected]"
However, if you were to do this operation (filter data by email) several times within the same script, it would cost you more resources because every time you use filter, the function reads the complete array to return the filtered data. To avoid this, you can group the data by email and then just retrieve the data you need with a selector. For example, let’s create another variable with the grouped data:
var groupedByEmail = arrayObject groupBy $.email
Now, instead of having an array of objects, we have an object containing the emails as the first key and the value of each key would be the corresponding data, such as the following:
{
  "[email protected]": [
    {
      id: 1,
      name: "alex",
      email: "[email protected]"
    }
  ],
  "[email protected]": [
    {
      id: 2,
      name: "akshata",
      email: "[email protected]"
    }
  ],
  "[email protected]": [
    {
      id: 3,
      name: "arul",
      email: "[email protected]"
    }
  ]
}
Now, we can refer to this groupedByEmail variable and extract the specific data with a selector. Instead of having to filter the array n times, we just grouped the data once.
Note
To see more examples of the groupBy function, you can refer to this developer tutorial: https://developer.mulesoft.com/tutorials-and-howtos/dataweave/groupBy-function/.
For example, doing groupedByEmail["[email protected]"] would result in the following output:
[
  {
    id: 3,
    name: "arul",
    email: "[email protected]"
  }
]
Let’s now look into the next function: map.
map
This function is used to iterate through and transform the items in the array. The second parameter of this function is a lambda with the item and index parameters. This is a null-safe function. This is one of the most used functions to work with arrays because of the freedom to transform the given data structure into something very different. A simple example would be the following:
map.dwl
%dw 2.0
output application/json
---
["a","b","c"] map {
    ($$): $
}
The output of this function would be the following:
[
  {
    "0": "a"
  },
  {
    "1": "b"
  },
  {
    "2": "c"
  }
]
This example transforms the input array of strings into an array of objects where the key is the index of the item and the value is the actual item.
Note
To see more examples of the map function, you can refer to this developer tutorial: https://developer.mulesoft.com/tutorials-and-howtos/dataweave/map-function/.
You can use map to transform input arrays into a different array structure. However, you will always end up with an array as the output. If you want to process and transform the given array into a different data type, you can use the reduce function, which we’ll see next.
reduce
This function is used to iterate through and completely transform the given array (or a given string) into a different data type or structure. The second parameter of this function is a lambda with the item and accumulator parameters. This is a null-safe function. This is one of the most used functions to work with arrays because of the freedom to transform from an array to a different data type. A simple example would be the following:
reduce-simple.dwl
%dw 2.0
output application/json
---
(1 to 10) as Array reduce ($$ + $) // output is 55
First, we generate a Range data type from 1 to 10. Then, we coerce Range into Array to use it as the input array for the reduce function. Finally, we sum item (or $) and accumulator (or $$) to get the output of 55. There is a total of 9 iterations being made here instead of 10. If you add the log function to accumulator, you will be able to see how this value changes on each iteration, as follows:
reduce (log($$) + $)
This will output the values in the LOG VIEWER tab at the bottom of the online DataWeave Playground, or in the console if you’re in Anypoint Studio. The results will be the following:
- 1
- 3
- 6
- 10
- 15
- 21
- 28
- 36
- 45
Here’s a screenshot of what the previous results would look like from the DataWeave Playground once the log function is added to the code:
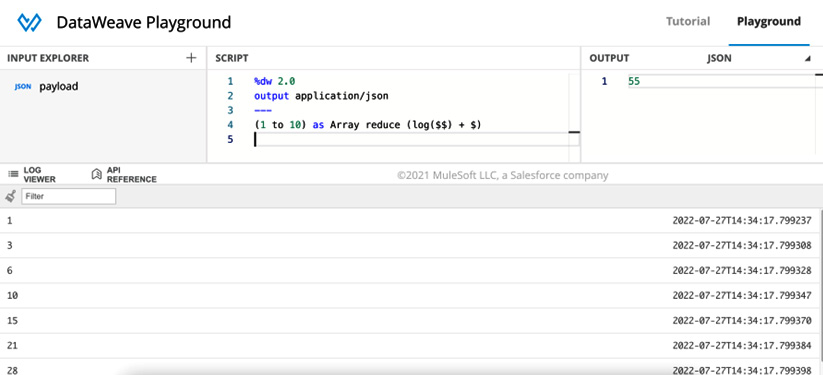
Figure 7.2: Preview from the DataWeave Playground
You might be wondering why the first value is 1 instead of 0. This happens when you don’t assign a specific value for the accumulator to start with, so DataWeave assigns the first value from the input array as the initial accumulator’s value. This functionality works perfectly when the output data type you want is the same for all the items – in this case, Number. Let’s now see a more complex example. Consider the following variable:
reduce-complex.dwl
var arr = [
    {
        code: "ABC",
        isNewGroup: false
    },
    {
        code: "DEF",
        isNewGroup: true
    },
    {
        code: "GHI",
        isNewGroup: true
    },
    {
        code: "JKL",
        isNewGroup: false
    },
    {
        code: "MNO",
        isNewGroup: true
    }
]
Based on this data structure, we want to end up with the following array:
[
  "ABC",
  "DEF",
  "GHI,JKL",
  "MNO"
]
Every time the isNewGroup field is true, we want to add a new item to the array containing the value of the code field. If the isNewGroup field is false, we want to keep concatenating code into the previous item and separate each item with a comma. Let’s see how we can solve this using the reduce function:
arr reduce (item, acc=[]) -> do {
    var previousItem = acc[-1]
    var previousItemIndex = acc find previousItem
    ---
    if (item.isNewGroup or previousItem ~= null)
        acc + item.code
    else
        acc update previousItemIndex with
            "$previousItem,$(item.code)"
}
Here, we make use of several other concepts we learned in this and the previous chapter, such as the do keyword, selectors, the find function, if/else conditionals, operators, and the update function, which we didn’t see in detail but learned is a part of the dw::util::Values module.
First, we evaluate whether the isNewGroup field is true or whether this is the first item (as is the case with "ABC") to add a new item to the existing accumulator. If this is not the case, then we update the previous item from the accumulator to now include the current item’s code.
This is why reduce is one of the most complex functions in DataWeave. This is the only function that can perform iterations in a line-by-line order, much like how forEach would work.
Note
To see more examples of the reduce function, you can refer to this developer tutorial: https://developer.mulesoft.com/tutorials-and-howtos/dataweave/reduce-function/.
We now have a better understanding of how some of the core functions work and some real-life transformations. Remember, you can also make use of some of the existing modules. There might already be a function that performs the functionality that you’re trying to implement with just core functions.
Note
To find the complete list of core functions, including more details and examples, please refer to the official documentation: https://docs.mulesoft.com/dataweave/latest/dw-core.
So far, we’ve talked about these examples and how to learn DataWeave using the online DataWeave Playground. Now that we have a basic understanding, it’s time we learn more about the Transform Message component or connector in Anypoint Studio.
Using the Transform Message component in Anypoint Studio
So far, we have been learning how to use DataWeave to transform data and we’ve been focusing on the use of the online DataWeave Playground to try out these concepts without having to install anything. However, the playground is used only to learn or experiment. To use DataWeave in Mule applications, we’d have to use Anypoint Studio; specifically, the Transform Message component. Let’s explore this component in more detail.
Exploring the views
Go to Anypoint Studio and create a new Mule project. After you have it, drag and drop the Transform Message component from Mule Palette onto the canvas to create a new empty flow with Transform Message.
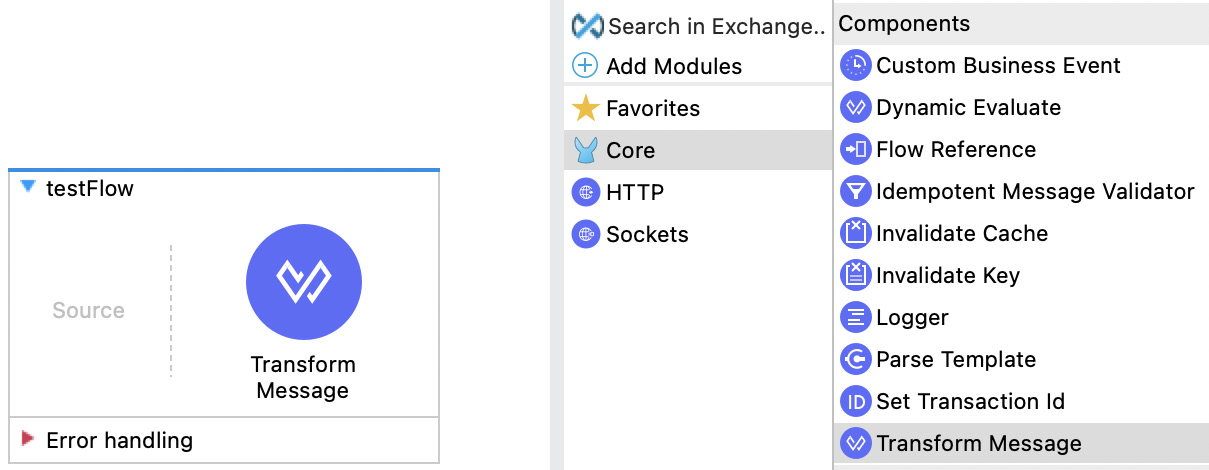
Figure 7.3: A flow with a Transform Message component in Anypoint Studio
If you double-click on the component in the flow, the component’s configuration view will appear at the bottom of the screen with the predefined view.
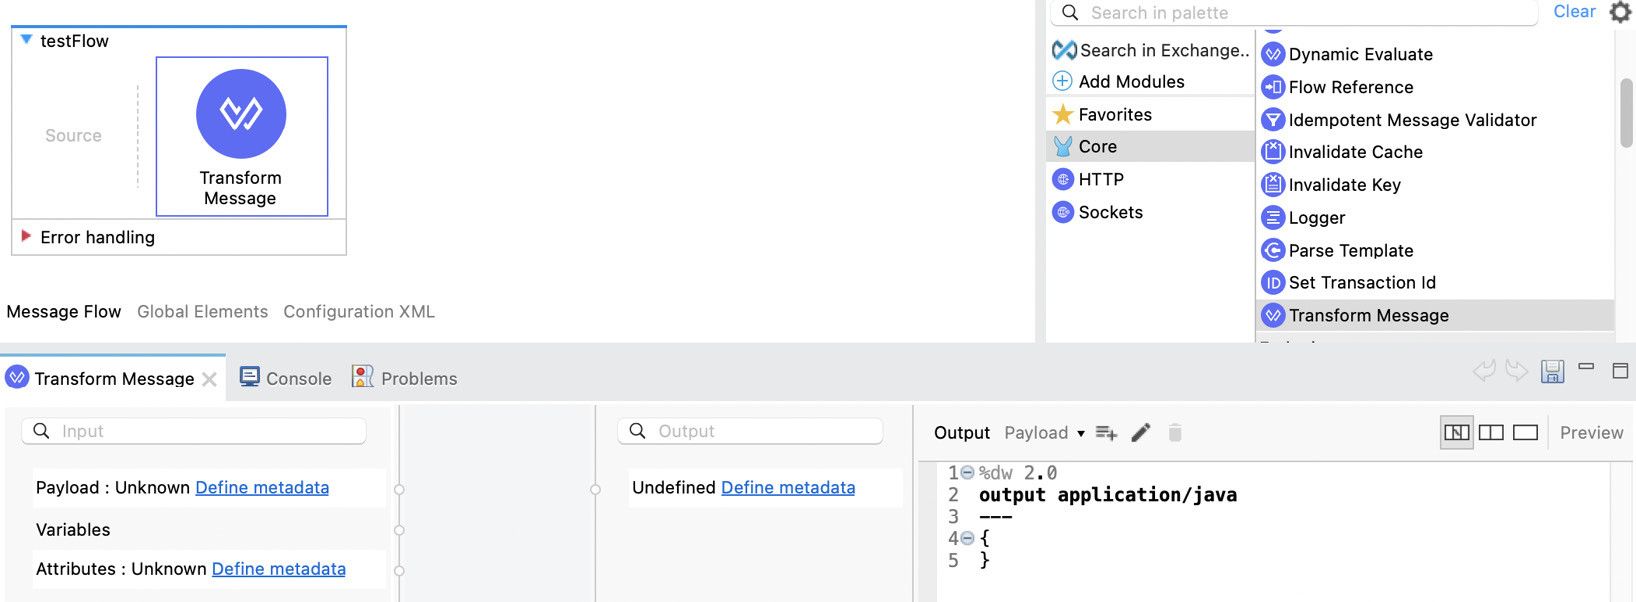
Figure 7.4: The Transform Message component’s configuration view
Let’s start by exploring the views you can use for your DataWeave scripts (or the Transform Message configuration). These are located at the top right of the Transform Message configuration window.
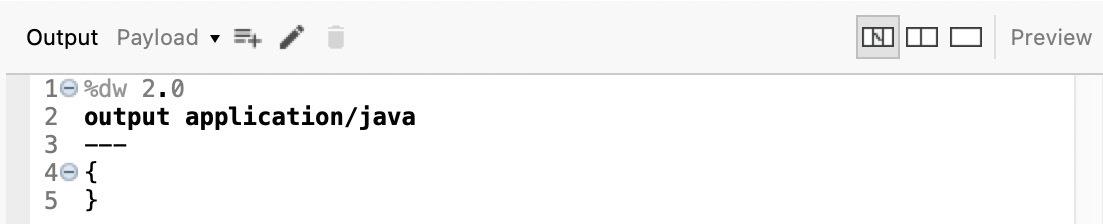
Figure 7.5: A closer look into the Transform Message component’s configuration view
There are three different views you can use for this configuration:
- Graphics: The default view is the first icon: the Graphics view. This view includes the inputs, a graphical mapping that you can use to drag and drop fields from the input into the output, the expected output, and the DataWeave script. Here’s an example of what this view looks like when there is some data to map.

Figure 7.6: The Transform Message component’s Graphics view
You can also press the Preview button to show how the output would look given the sample input that was given.
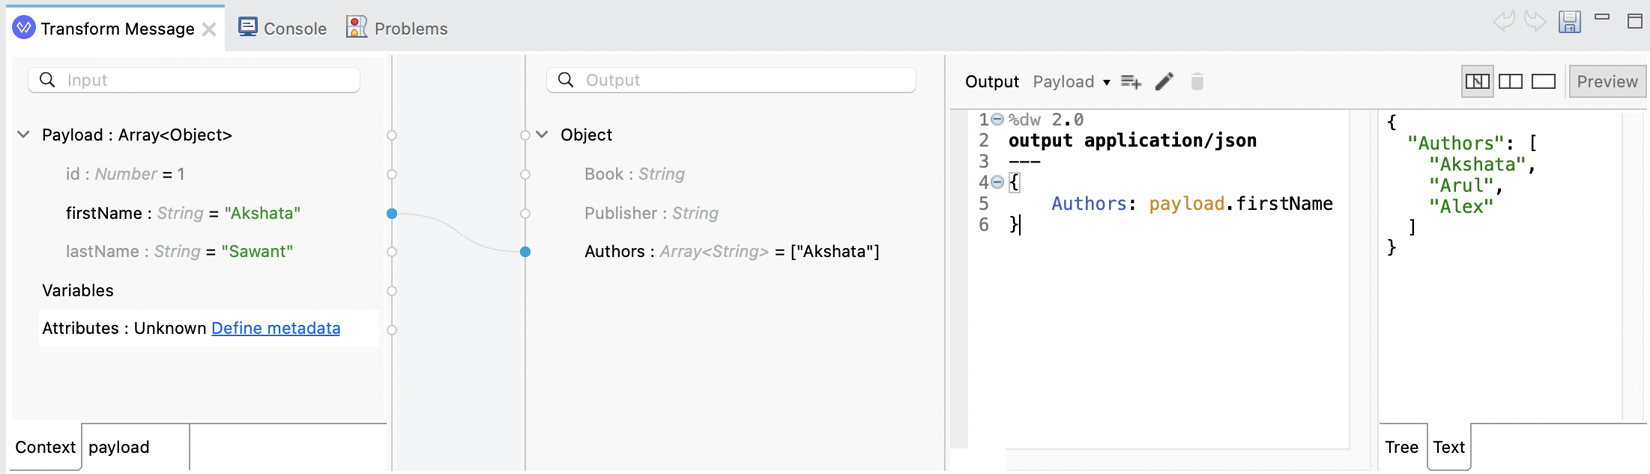
Figure 7.7: The Graphics view with the output’s preview
- Source with Trees: The second view is the Source with Trees view. This one shows the same information as the previous one but without the graphical mapping. You can still drag and drop from the input structure into the output structure, but the mappings won’t show in this view. Same as before, you can turn on or off Preview in order to see the sample output.
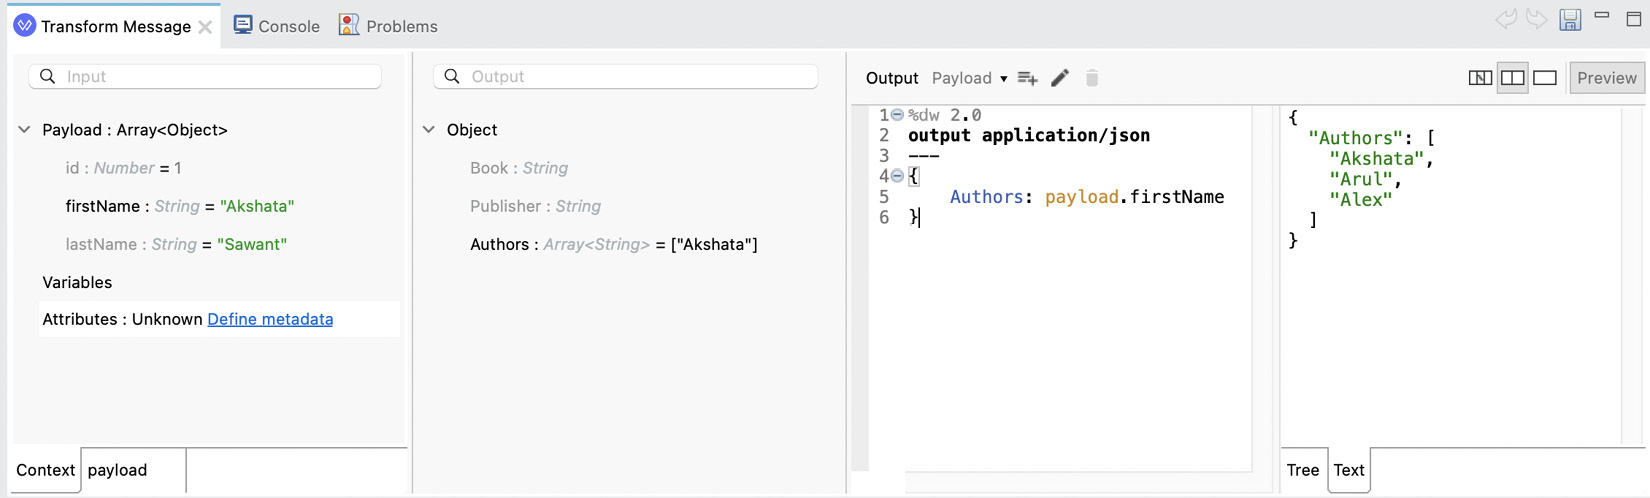
Figure 7.8: The Source with Trees view with a preview of the output
- Source Only: The third view is the most used one by experienced developers: the Source Only view. This one shows only the input and the script. You can’t drag and drop data with this view. Same as before, you can turn on or off Preview in order to see the sample output.
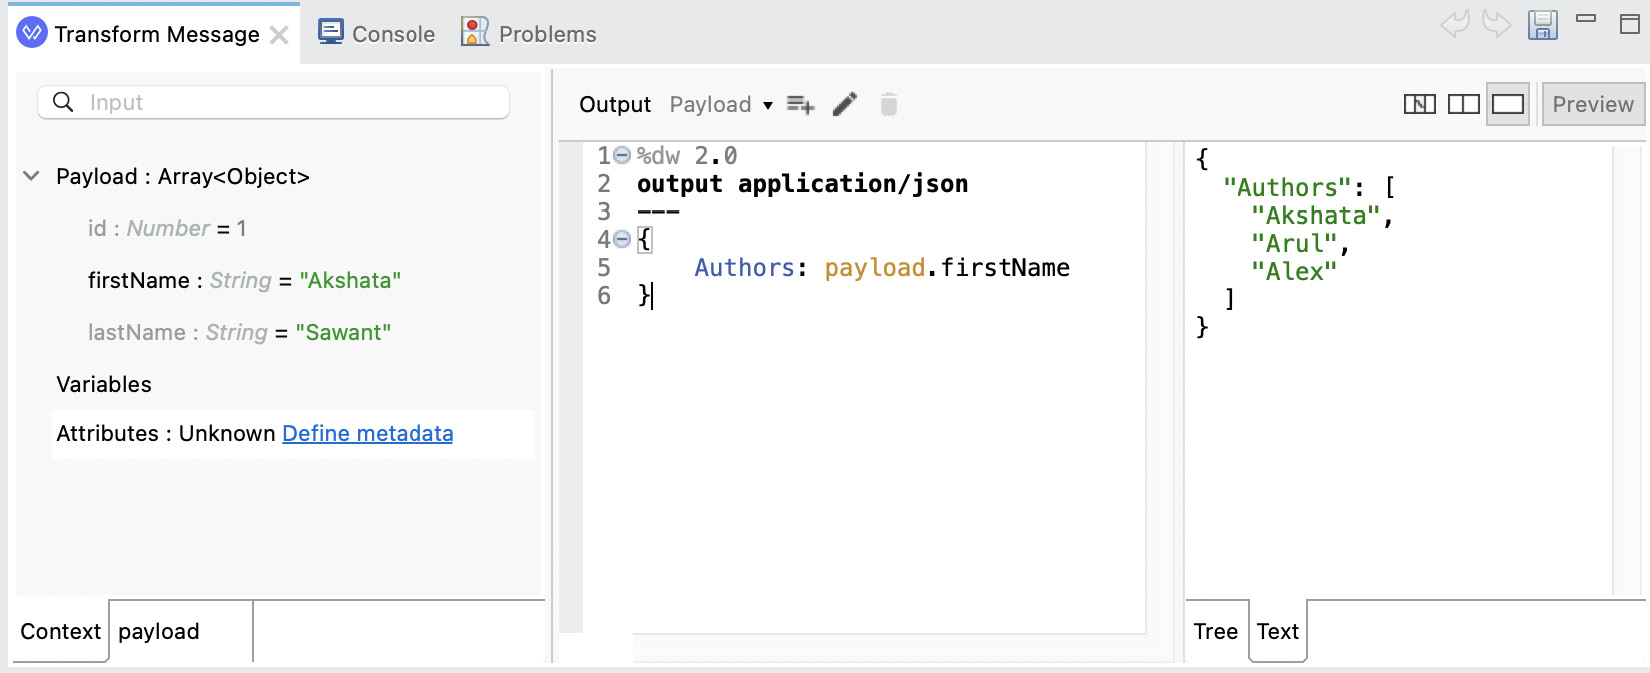
Figure 7.9: The Source Only view with a preview of the output
We will work with this last view in the rest of the chapter. The first two views are useful for drag-and-dropping purposes, but that functionality is mainly used for very simple data structures or one-to-one mappings.
Let’s now explore how we generated the sample data in the first place.
Defining metadata
When you first drag and drop the Transform Message component onto the canvas, it may or may not contain some metadata in either the input or the output structure. This depends on what other components are used before or after Transform Message. For example, if you first have a SOAP call, then Transform Message, then a REST call, Transform Message might be able to read the data structures from both the SOAP and REST calls and auto-populate the input and output metadata accordingly. Let’s see a simple example of this in the following screenshot:
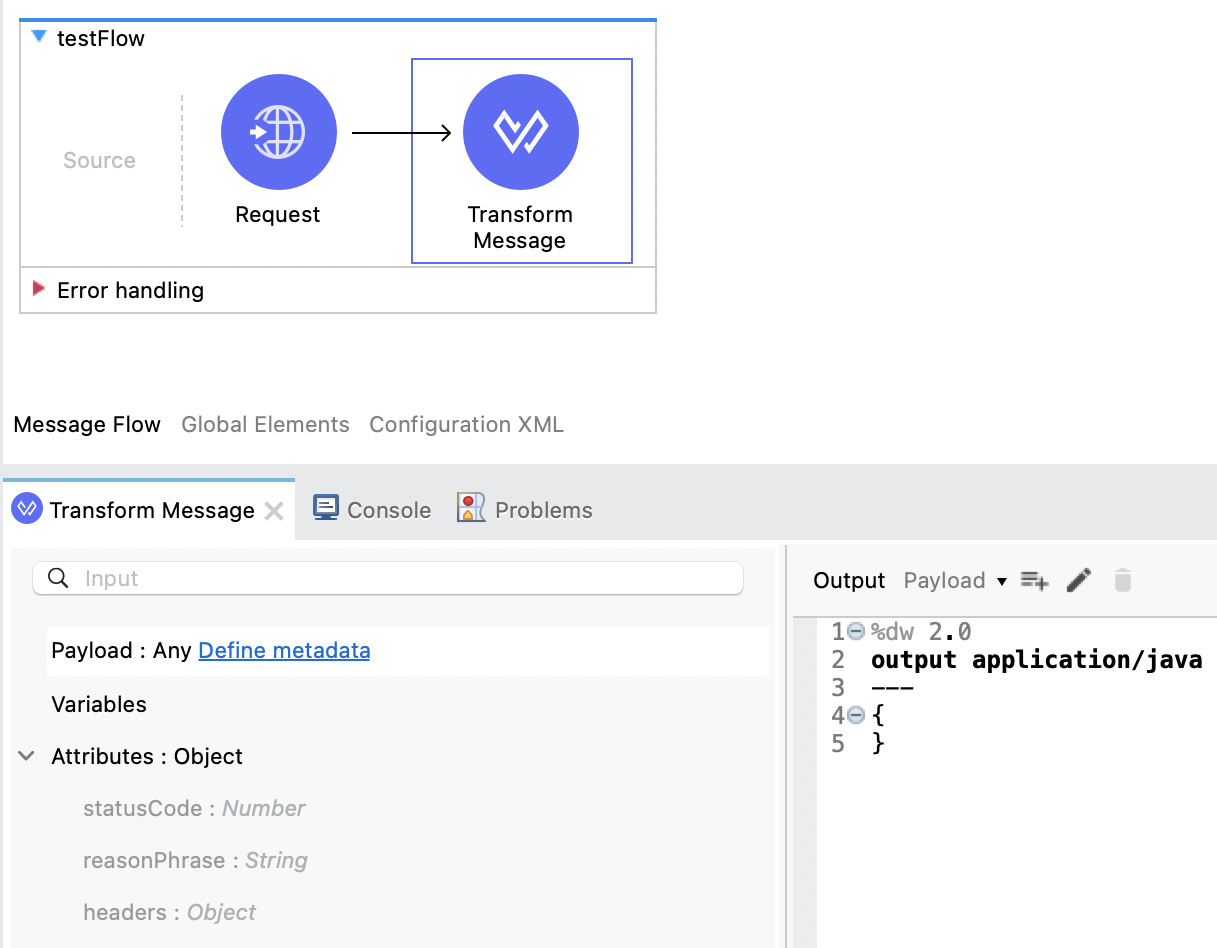
Figure 7.10: Transform Message’s auto-populated input based on HTTP Request
Here, we have an HTTP Request connector before Transform Message. Because of this, the attributes structure was auto-populated based on the metadata from the Request connector. We can receive a statusCode number, a reasonPhrase string, and a headers object. However, it was not able to recognize the payload.
Note
Payload, variables, and attributes are concepts we learned back in Chapter 4, Introduction to Core Components, when we talked about the Mule event structure. These variables are not the same variables we use inside DataWeave (with the var keyword). DataWeave variables are only visible from the DataWeave script, while Mule variables are visible within the Mule application’s components.
There are some connectors that will automatically return the output payload’s structure and you will be able to see it from Transform Message’s input structure. If this doesn’t happen, you can also populate your own metadata to see a preview of the data. You just have to click on the Define metadata link that appears next to the data structure you want to populate.
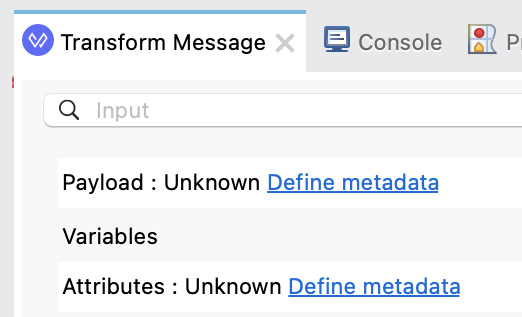
Figure 7.11: A closer look at Transform Message’s input
Let’s see this step by step:
- Click on the Define metadata link next to Payload to generate the payload’s metadata and sample data. You will see a new window to select your metadata type.
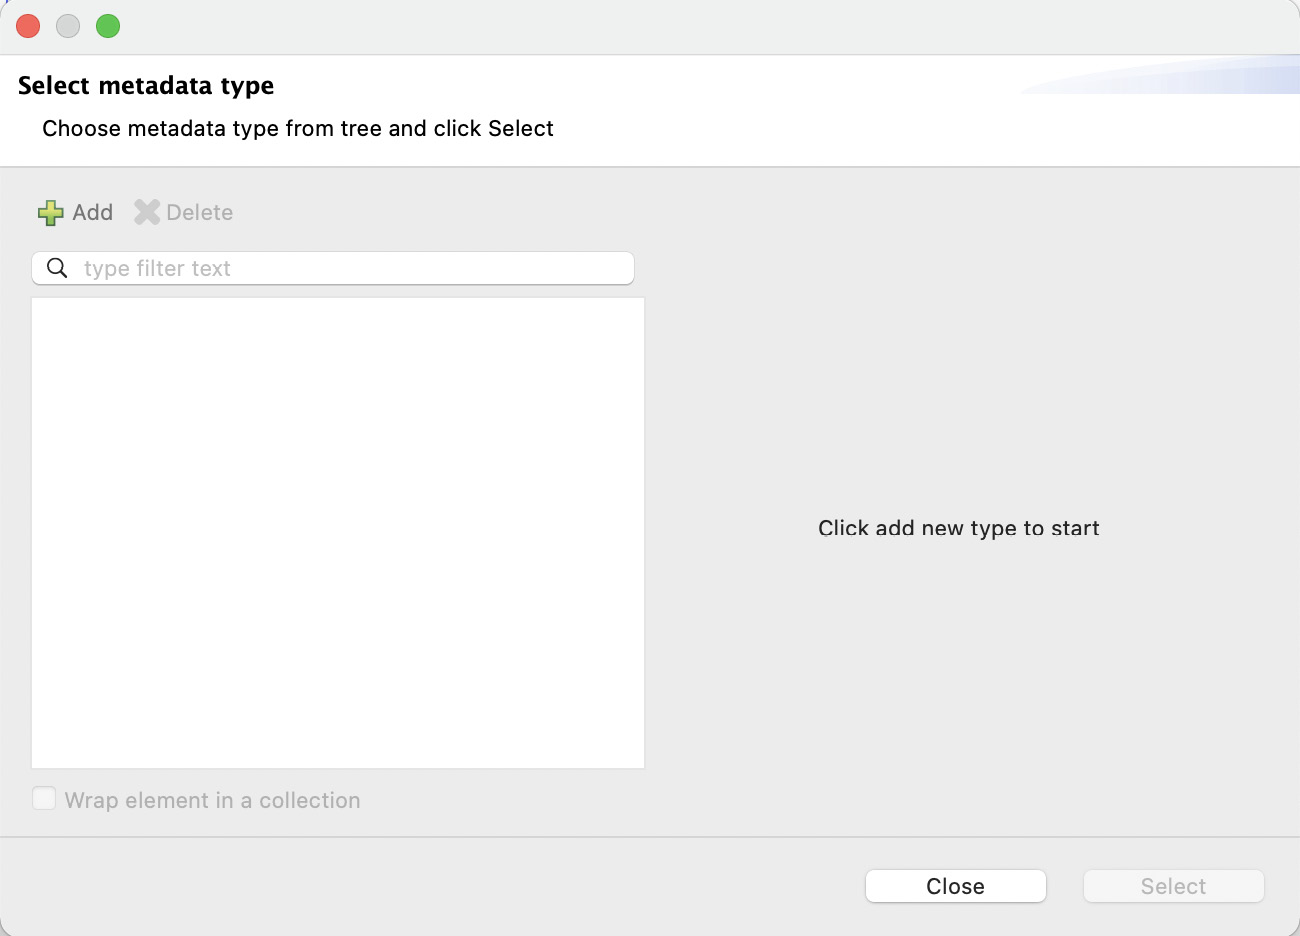
Figure 7.12: Window to select the metadata type
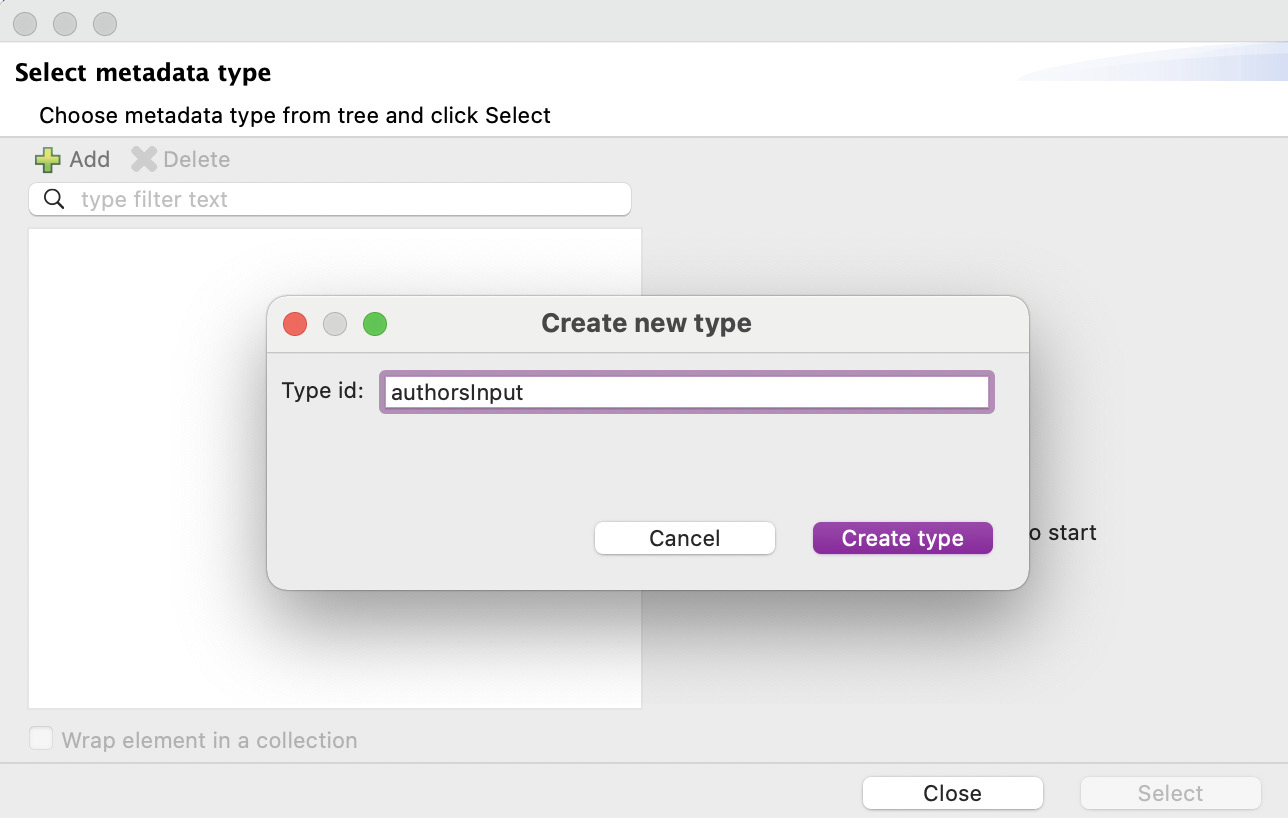
Figure 7.13: Window to create a new type
- Click on Create type. Now, we have to select the type of this data. Let’s select the JSON type and select Example instead of Schema from the dropdown.
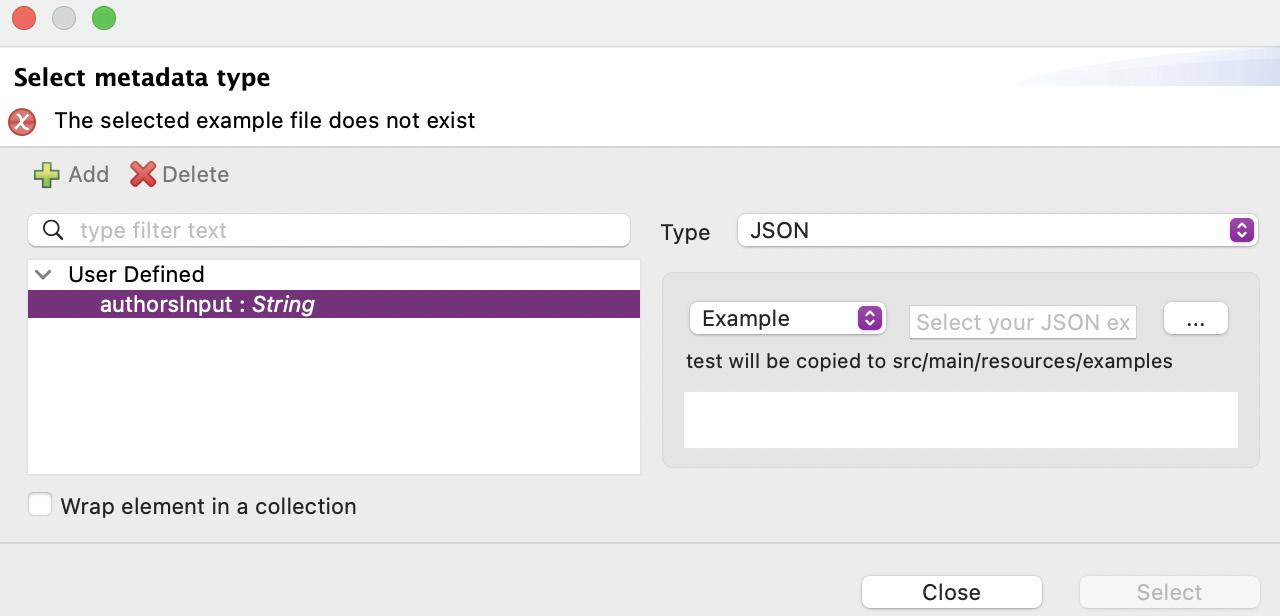
Figure 7.14: Window to modify the new type
You will be able to select the three-dots button next to the text box in order to choose a file with your metadata example. We are going to use the following file, which you can get from our GitHub repository, linked in the Technical requirements section at the beginning of this chapter:
authorsInput.json
[
    {
      "id": 1,
      "firstName": "Akshata",
      "lastName": "Sawant"
    },
    {
      "id": 2,
      "firstName": "Arul",
      "lastName": "Alphonse"
    },
    {
      "id": 3,
      "firstName": "Alex",
      "lastName": "Martinez"
    }
]- Click the three-dots (…) button and select this file from your computer. Once you see the structure with the fields and their data types, you can click on Select.
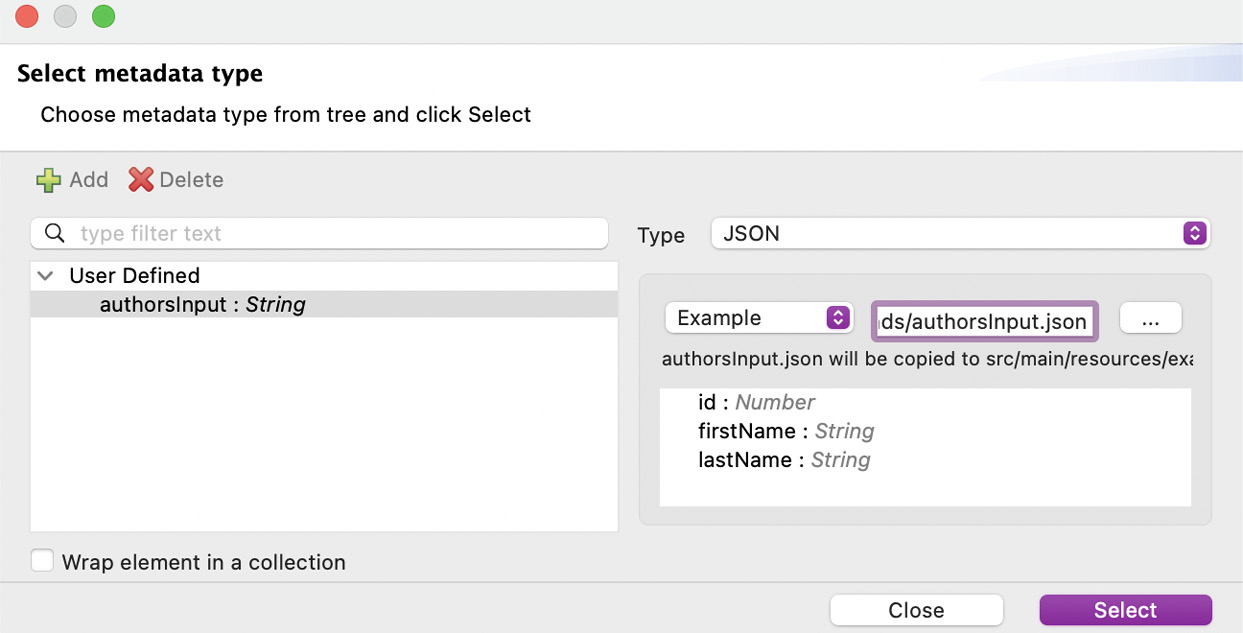
Figure 7.15: Window to finish creating the new type
Now your input payload contains metadata describing the data types of each field. Payload is an array of objects, id is a number, and firstName and lastName are strings.
- Add the following script and click on Preview. You will be able to see the sample data in the preview window:
payloadScript.dwl
%dw 2.0
output application/json
---
payload
It will look like this:
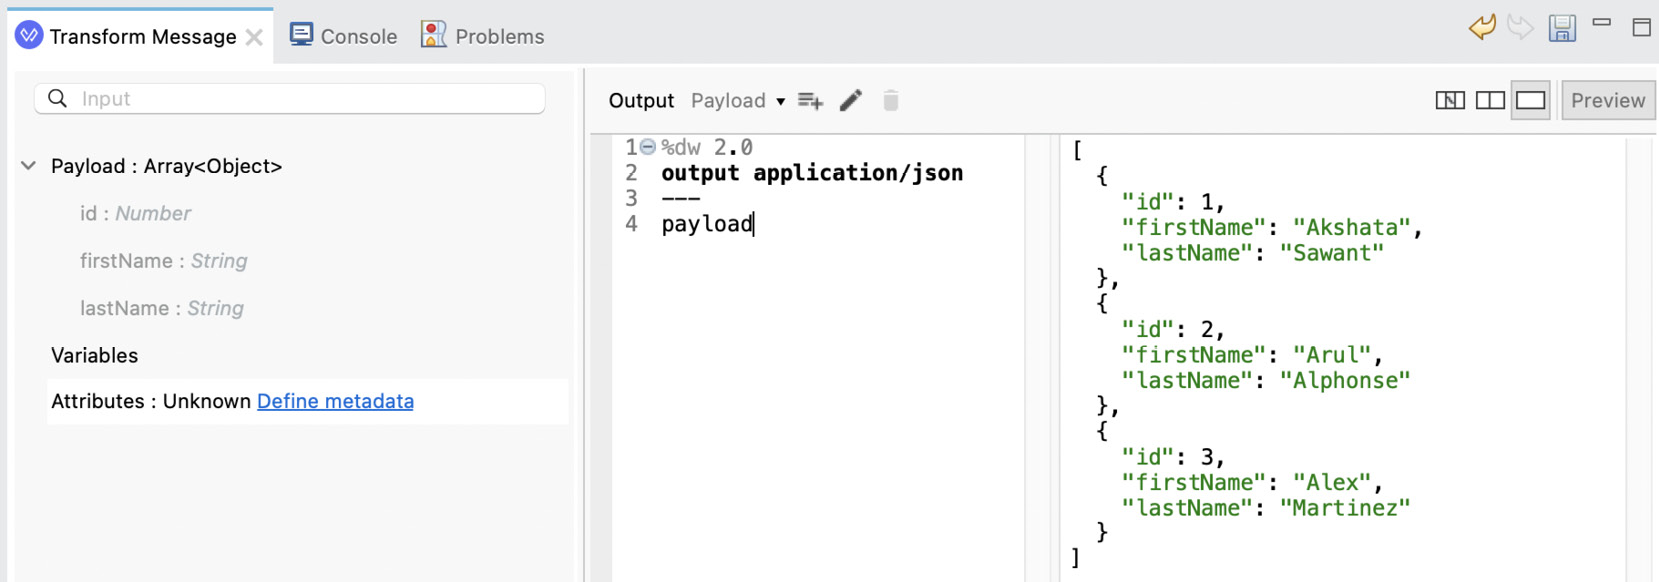
Figure 7.16: Payload preview in the output
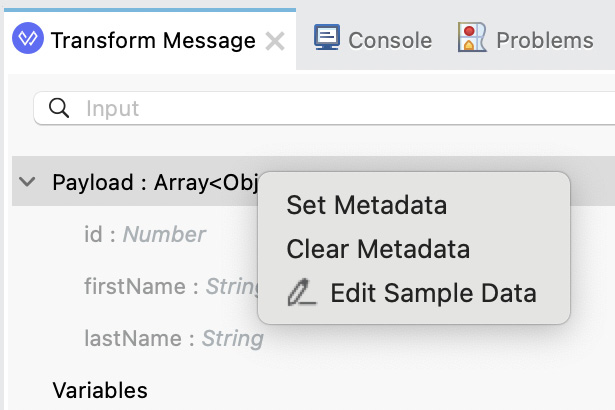
Figure 7.17: Payload options after right-clicking on it
This will open a new tab called payload that is located next to the Context tab (the previous figure). Here, you can modify the sample data for the input payload to test different scenarios for your script and generate different output previews:
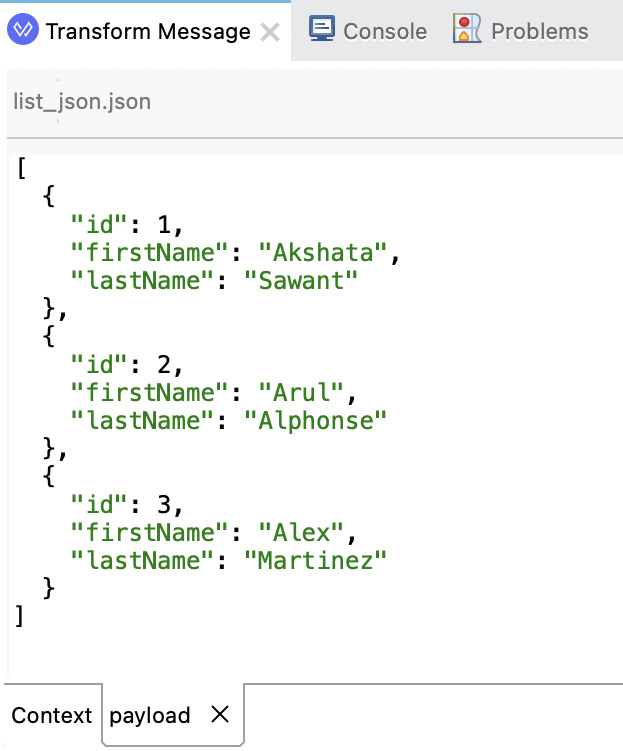
Figure 7.18: Sample data from the payload tab
You can continue generating metadata for other fields, such as the attributes or output structure, if needed. For now, we just demonstrated the steps to generate new metadata for the payload structure.
The Mule variables should also appear automatically within the context. Here is an example of what that would look like:

Figure 7.19: Prepopulated Mule variables within the context
Same as before, you can right-click on each variable from the input structure to change the sample data. If you need additional variables that were not auto-populated, you can also right-click on Variables and select New Variable.
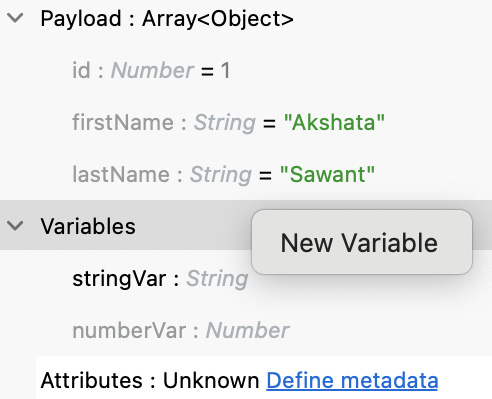
Figure 7.20: New Variable option after right-clicking on the Variables context
This will open the same window where we created our input payload type. We just need to repeat the same process as previously, but add the variable’s name.
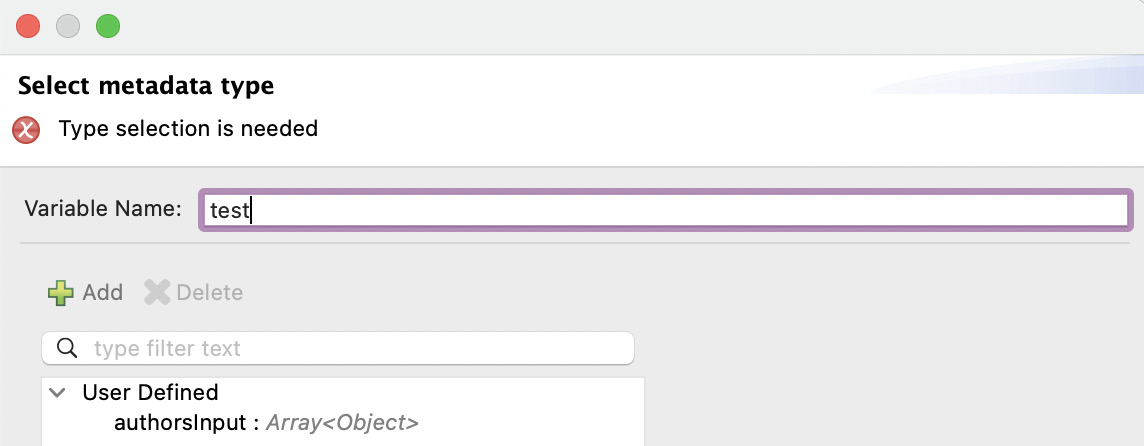
Figure 7.21: Creating new variable metadata
Whenever you want to reference the payload’s data, you use the payload keyword. To use any of the Mule variables, you use the vars keyword. To use the attributes, you use the attributes keyword. Something that doesn’t always appear in the context but is good to know is to reference an exception, you use the error keyword.
It is also worth noticing that any example file you use to create metadata will be stored under src/main/resources/examples and any sample data will be stored under src/test/resources/sample_data. If you chose to upload a schema instead of an example file, the schemas would be generated under src/main/resources/schemas. You can see a preview of the folder structure in the following screenshot:

Figure 7.22: View from Package Explorer
That is all we needed to learn about how the metadata works and how we can set it up to test our transformations and get a preview of the data. Let’s now quickly get a glimpse at how we can create and use custom DataWeave modules in our Mule applications.
Creating custom modules
Earlier, we saw some modules we can use in DataWeave to get more functions that are not included in the core module, for example, dw::core::Binaries or dw::Crypto. But we can also create our own modules within a Mule application and reuse them in several scripts. Let’s see the steps to create a custom module in Anypoint Studio:
- Create a new Mule project in Studio.
- Create a new folder called dw under src/main/resources. Then, create a new file in this new folder called Utilities.dwl.
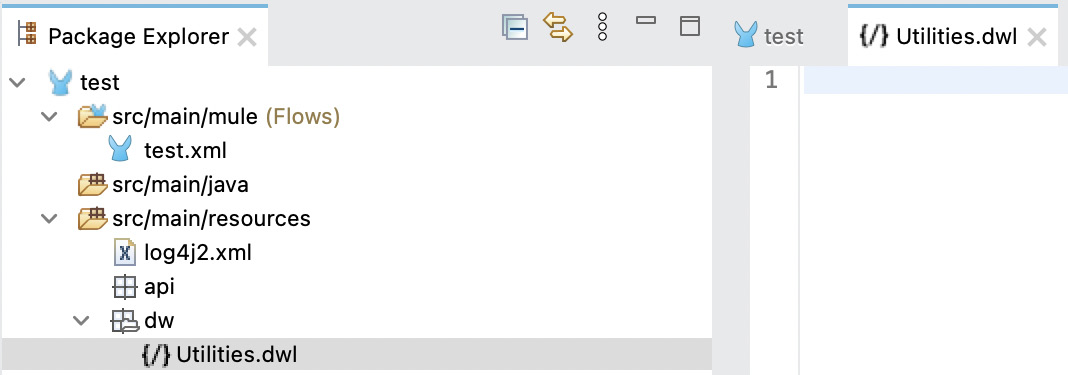
Figure 7.23: New Utilities file in src/main/resources
- Paste the following code into this new file and save it.
Utilities.dwl
%dw 2.0
fun getAuthorsNames(authors: Array): Array =
    authors map (
        ($.firstName default "")
        ++ " " ++
        ($.lastName default "")
    )
This function will get an array of objects with the authors’ information and return an array of strings with the authors’ full names. Our module would be dw::Utilities and our function would be getAuthorsNames.
Let’s go back to our flow and add a Transform Message component.
- Drag and drop the Transform Message component from Mule Palette onto the canvas.
- Create the metadata for the payload using the authorsInput.json file we previously used to create the payload’s metadata.
- Paste the following code into Transform Message’s script.
UtilitiesMapping.dwl
%dw 2.0
output application/json
---
import getAuthorsNames from dw::Utilities
getAuthorsNames(payload)
You should end up with something like this:

Figure 7.24: Transform Message using a custom module
Here, we can see the input metadata, the script we used to import the getAuthorsNames function from the dw::Utilities module, and a preview of the output based on the input payload’s sample data.
Note
If you want to share DataWeave modules outside of your Mule application with other applications, you can create a DataWeave library and publish it in Anypoint Exchange (a subproduct of Anypoint Platform). Other Mule applications can pull your library from Exchange and use it in their own scripts. To learn how to do this, refer to the following developer tutorials:
We now know how to use DataWeave in Anypoint Studio (or in a Mule application) with the Transform Message component. We explored the different views you can use to visualize your transformations, how to define metadata, which will be helpful if you want to see a preview of the output data, and how to create custom modules to reuse in your application.
Summary
In this chapter, we learned different ways to import a module or a function in DataWeave using the import directive. We listed some of the modules you can find in DataWeave with some of their functions so you can get a better idea of what is already available for you to use.
We learned how to use some of the most used core functions depending on the data type they’re used with. We also reviewed multi-type, numbers, strings, objects, and array functions that you can use to transform the different data types.
Finally, we learned how to use the Transform Message component in Anypoint Studio. We explored the three views we can use depending on our needs or our personal preferences. We learned how to use Preview and sample data (metadata) to generate a sample output of our transformation. We also learned how to create and reuse custom modules within our Mule application.
In the next chapter, you’ll learn more about building Mule applications and applying best practices to your projects.
Questions
Take a moment to answer the following questions to serve as a recap of what you just learned in this chapter:
- List at least three different ways to import a module or a function in DataWeave.
- Name at least five existing DataWeave modules.
- Name at least two functions that are used with multi-type, numbers, strings, objects, and arrays.
- In which folder should custom DataWeave modules be created?
Answers
- The different ways to import a module or a function in DataWeave:
- import Module // Module::function()
- import * from Module // function()
- import function from Module // function()
- import Module as Mod // Mod::function
- import function as f from Module // f()
- The DataWeave modules are:
- dw::Core
- dw::core::Arrays
- dw::core::Binaries
- dw::core::Dates
- dw::core::Numbers
- dw::core::Objects
- dw::core::Periods
- dw::core::Strings
- dw::core::Types
- dw::core::URL
- dw::Crypto
- dw::Mule
- dw::Runtime
- dw::System
- dw::util::Math
- dw::util::Timer
- dw::util::Tree
- dw::util::Values
- Functions that are used with multi-type, numbers, strings, objects, and arrays:
- Multi-type: ++, now, random, read, readUrl, sizeOf, typeOf, uuid, with, isEmpty, log, and then.
- Numbers: abs, ceil, floor, isDecimal, isEven, isInteger, isOdd, mod, pow, randomInt, round, sqrt, and to.
- Strings: contains, endsWith, find, indexOf, isBlank, lastIndexOf, lower, match, matches, replace, scan, splitBy, startsWith, trim, and upper.
- Objects: --, distinctBy, entriesOf, filterObject, keysOf, mapObject, namesOf, pluck, and valuesOf.
- Arrays: --, avg, contains, distinctBy, filter, find, flatten, indexOf, joinBy, lastIndexOf, max, min, orderBy, sum, groupBy, map, and reduce.
- Under src/main/resources. You can then create another folder to keep your modules as a best practice.