
Chapter 9
Creating a Private Cloud
The preceding sections of this book focused on the Virtual Machine Manager (VMM) elements that let you define the fabric of the private cloud. The VMM infrastructure enables you to shield users from the mechanics of deploying resources for their use. Instead, they see an abstraction of the underlying resources that supports the main benefits of private clouds described in Chapter 1, “Understanding Cloud Computing”; those benefits include self-service, access over a network, quick allocation and deallocation of pooled resources, measurement, and optimization.
This final section of the book focuses on using this investment in the fabric. You will form private clouds and provide access to them. You will learn how self-service users consume cloud resources: the interfaces they have access to, and the actions they can execute within the confines of those interfaces. You will be introduced to some management interactions with the public cloud before finally considering the process of formally requesting private clouds for your projects.
This chapter focuses on working with VMM as an administrator. It covers the following topics:
- What makes up a private cloud
- Access roles
- Creating private clouds and managing them through their lifecycle
Identifying Private Cloud Elements
All of the buildup we have carefully focused on until now has been to prepare to ultimately create private clouds. The process of forming these private clouds with VMM is reserved for users who have either Administrator or Delegated Administrator role access. Within the VMM console, clouds can be created using the Create Cloud Wizard or the PowerShell interface. As with all the elements you have defined so far, you will complete this exercise initially using the console and then with PowerShell.
The private-cloud concept embraces many of the elements defined within VMM as the fabric is modeled. Considering the resources and functions that each of these elements offers, administrators can formulate the functionality of the underlying fabric that they expose in the private cloud to address consumer requirements while hiding the physical details from consumers.
In the next few pages, you will review the elements from which you can select to create private clouds.
Host Groups
Addressing a large portion of the physical infrastructure that creates the fabric on which clouds are built, host groups encompass the virtualization hosts and networking services upon which all the virtualization activities of the private cloud are executed. Chapter 5, “Understanding the VMM Library,” introduced host groups, hypervisors, and their related capabilities.
Host groups also enable boundaries in VMM to define specific functionality options. They include placement rules, definitions of host reserves for hypervisors; configuration options related to dynamic optimization and power management; and associating both network and storage resources.
As you define a private cloud, you add compute resources from the fabric by assigning the host groups, which will allow you to organize and manage the resources you expose.
Logical Networks
The network resources offered within the private cloud are initially defined within VMM as part of the fabric. Each of the managed hypervisors exposes connections to the native network infrastructure, which may be implemented using physical networks or through virtual LANs. Irrespective of the underlying technologies, these networks are modeled in VMM as logical networks and may be associated with both IP and MAC pools for static-address association, or they may remain dynamic by default. Chapter 6, “Understanding Network and Storage Integration in VMM,” explains how these logical networks are defined and associated to the hypervisor host's physical network adapters.
By evaluating the logical networks bound to the hypervisor hosts within the host groups you are associating with the private cloud, VMM determines the logical networks that are available for use within your private cloud.
As you define your private cloud, you must associate at least one logical network so that the hosted services and VMs can communicate.
Load Balancers
As an optional component of the fabric, load balancers may be defined and offered for use within the private cloud. Load balancers are of value only in clouds that deploy services, and these services have one or more application tiers that are identified as scalable. Therefore, these service tiers are stateless by design.
Load balancers are introduced and configured in Chapter 6, while services are presented in Chapter 8, “Understanding Service Modeling.”
VIPs
Associated with load balancers, Virtual IP addresses (VIPs) define the virtual service address associated with a service hosted on one or more VMs within the cloud. The VIPs are defined within the fabric of VMM when you configure the load balancer and Logical Networks. VIPs need to be associated with a private cloud only if a load balancer is also associated with it. For more information, see Chapter 6.
Storage
An optional concept in VMM, storage classifications may be applied within the fabric to different classes of storage exposed to clouds. For example, high-speed fiber-channel attached storage could be defined as silver while slower SATA arrays are defined as bronze.
In some environments, all storage is of the same type or all the fabric connections are of the same interface. They may be presented as CSV volumes. In these cases, administrators might determine that no classifications are to be assigned. VMM automatically assigns storage classifications of Local and Remote when using local hard-disk and CSV volumes, respectively.
Storage configuration and classifications are covered in Chapter 6. The relevant storage classification (if any) is determined when the private cloud is defined by the administrator, depending on the requirements of the customer and the type of load hosted on the VM or as part of the definition of the service.
Cloud Libraries
Libraries are important for the creation and consumption of private cloud services. All of the resources that private clouds offer are related directly to libraries. Chapter 5 explores in depth the topic of libraries and introduces their function and creation; you are strongly encouraged to read it before you create a cloud.
VMM offers the ability to manage resources that have been deposited to a library share, giving private-cloud users an efficient method to provide resources for management and deployment. Table 9.1 summarizes the different uses of cloud libraries.
Table 9.1 Libraries and Shares in the Cloud
| Library | Overview |
| Read-only library shares for private clouds | Resources that are to be provided to self-service users for deployment within their cloud. Administrators may store VM images or application-framework resources to the read-only library share for a private cloud so that cloud users can deploy their own VMs or design their own service applications. |
| Self-Service user-role data paths | Used to offer members of a Self-Service user role a place to upload and share their own resources. This location is the best place for administrators to store resources for a specific Self-Service user role. For example, the development team may share new application packages for services that need to be deployed.
Permissions on the user data path are controlled through the file system. SCVMM discovers all the files to which the current self-service user has access. Access-control permissions determine whether the users have Read/Write or Read-Only access. Only self-service users with the Author or Deploy action can actually use these resources. |
| Self-Service user-role assigned resources | This feature presents VM and service templates available to the self-service users of the cloud.
If the user role has the Author action, these resources can be utilized as templates for customized resources. Self-service users do not need access to the physical resources that are referenced by templates and assigned profiles. |
| VM store and recover | This optional share is assigned from a library to a private cloud. It is used to store VMs and services associated to the cloud, but the deployed instance is not required to be actively used. Storing the resources releases valuable capacity from the cloud, which would otherwise be consumed, even if the resource is deployed but powered off. |
If you need to assign read-only shares to a private cloud, where administrators can store read-only resources such as .ISO files that will be made available to self-service users, then you must ensure that at least one library share exists that can be assigned as the read-only library share. Self-service users must have the Author permission to access the resources.
As you create each new private cloud, you can define a library share for the storage and recovery of VMs or services that you may be hosting as part of your cloud. These resources may not be required to be active at a specific point in time, and they may be stored in this library for safe keeping while releasing the quota capacity they consumed while deployed. This library share is usable only when the administrator has also granted permission for private-cloud users to store or recover items.
Cloud Capacity
Before you create a private cloud, you need to consider its capacity and how it might be measured or constrained. Administrators may need to implement capacity boundaries for different deployments needs. Table 9.2 defines the elements VMM can use as constraints to define the capacity of a cloud.
Table 9.2 Capacity Options
| Quota Type | Description |
| Virtual CPUs | Sets a limit on processing capacity within the private cloud that is equivalent to the capacity that can be provided by a specified number of CPUs. Applied against running VMs. Setting a CPU quota does not guarantee contiguous capacity (that is, virtual CPUs offered from the same host); it only guarantees total CPU capacity available among hosts in the private cloud. |
| Memory | Sets a quota on memory (in gigabytes) that is available for VMs that are deployed on the private cloud. Applied against running VMs only. Setting a memory quota does not guarantee contiguous capacity. For example, the private-cloud memory quota may be defined as 4 GB, but the underlying fabric hosts might have only 2 GB of available memory on one host and 2 GB of memory on another. |
| Storage | Sets a quota on storage capacity (in gigabytes) that is available to VMs deployed on the private cloud. For dynamic virtual hard disks, quota calculations are based on maximum size. |
| Custom quota (points) | Sets a quota on VMs that are deployed on the private cloud based on total quota points that are assigned to the VMs through their VM templates. Quota points are an arbitrary value that can be assigned to a VM template based on the anticipated size of the VMs. Custom quotas are provided for backward compatibility with Self-Service user roles that were created in VMM 2008 R2. |
| Virtual Machines | Limits the total number of VMs that can be deployed on the private cloud. |
As an example, memory might be the constraining option for some clouds, limiting the total amount of RAM permitted for all the VMs hosted within a cloud. With dynamic memory, however, some organizations define all their VMs with a maximum RAM limit of, for example, 64 GB. In a scenario such as this, the constraint for RAM is impossible to deploy because VMM defines its boundaries based on the maximum RAM a VM may consume, and not on its dynamically changing actual consumption at a specific point in time.
Similarly, storage quotas are calculated only for VMs deployed to the cloud, while VMs within a library of a private cloud are not considered. The virtual hard disk of the machine can also be defined as either static or dynamic, with limits based on the maximum capacity and not the currently expanded size.
Simpler quotas can be implemented by restricting the number of virtual CPUs, or even the total number of VMs on a cloud. However, with careful consideration and understanding of the limits within the capacity-management functions of VMM, these elements can be combined to impose customized boundaries for your private clouds.
Capability Profiles
Because VMM supports multiple hypervisors, capability profiles are available to help define the upper and lower limits for VM capabilities when deployed to these different virtualization technologies. Capability profiles are used to target the hardware profile on a VM. VMM comes with built-in profiles, representing the minimum and maximum limits of the different hypervisors that VMM supports. You can also define your own profiles.
Capability profiles assigned to a private cloud enforce a validation check on the VMs and services being deployed, ensuring that the deployment does not progress if the capability profile is not matched. For example, the virtual hard disk type of the VM can be restricted to ensure that only fixed VHDs can be deployed to the cloud.
Assigning capability profiles to private clouds is a good practice. VM templates also have capability profiles. For these VMs to be successfully deployed on your clouds, the capability profiles of the cloud and template must match.
Additional information about capability profiles appears in Chapter 4, “Setting Up and Deploying VMM 2012.”
The Create Cloud Wizard
With all the elements in place, you can now get to the fun part of the process and start creating clouds. VMM simplifies the process by providing a wizard to guide you as you assign each element from the fabric to your new cloud.
In the remainder of this section, you will create two clouds. Table 9.3 shows possible uses for them.
Table 9.3 Sample Clouds
| Type of Cloud | Use |
| Development | This cloud is used by the engineering team (using the Development Cloud user role) to validate their code as they prepare to create software releases and potential service packages. |
| Production | Applications hosted in this cloud are published live, for end users. |
Prior to creating the cloud, VMM administrators (or delegated administrators) review the submitted requirements for the new cloud, which may include details related to availability, security, and resiliency, and then prepare a plan assigning resources from the fabric to the requested cloud. Table 9.4 shows the resources that might be assigned to the clouds described in Table 9.3.
Table 9.4 Cloud Resources for Grabber, Inc.
| Resource | Development Cloud | Production Cloud |
| Host groups | All HostsDevelopment | All HostsProduction |
| Logical networks | VM1 | VM1 and VM2 |
| Load balancers | netscaler1.private.cloud | netscaler1.private.cloud |
| VIP profiles | Citrix HTTPS | Citrix HTTPS |
| Storage classifications | Bronze | Gold |
| Read-only library shares | SCVMMLibrary1-ReadOnly | SCVMMLibrary1-ReadOnly |
| Storage VMs | \VMMLIB1SCVMMLibrary1StoredVMsDev | \VMMLIB1SCVMMLibrary1StoredVMsProd |
| Capability profiles | Hyper-V | Hyper-V |
The wizard will guide you through a series of steps to assign the desired fabric resources and present them to users abstractly in the cloud. User roles are used to control access to the cloud.
Using the Create Cloud Wizard
Now that the fabric is defined and you understand the private cloud, you can use the VMM console to create the private cloud with the VMM Create Cloud Wizard. The following procedure creates the Development cloud described in Table 9.4.
Figure 9.1 The Resources screen

Figure 9.2 The Library screen

Figure 9.3 The Capability Profiles screen

Using PowerShell to Create Clouds
The previous section used the Create Cloud Wizard to create the Development cloud described in Table 9.3 and Table 9.4. In this section, you will use PowerShell to create the Production cloud.
To create a cloud using PowerShell, you set PowerShell variables that correspond to the selections you made in the wizard. Then you execute the New-SCCloud and Set-SCCloud commands.
Begin by generating a new empty variable to hold the list of host groups.
$hostGroups = @(}
Using the Get-SCVMHostGroup command, locate the desired host group and append it to the new variable.
$hostGroups += Get-SCVMHostGroup -Name "Production"
Next, form the new cloud, assigning it a name, a short description, and the host group. The $cloud variable receives a reference to the new cloud. You will use the reference when you add resources.
$cloud = New-SCCloud -Name "Production Cloud" -Description "Live Production Services; Please be careful" -VMHostGroup $hostGroups
That was easy, right? The next steps focus on generating a list of resources to attach to the new cloud. The next code block compiles references to the following resources into the $resources variable, using the indicated commands:
- Logical networks (Get-SCLogicalNetwork)
- Load balancers (Get-SCLoadBalancer)
- VIP profiles (Get-SCVIPProfile)
- Storage classifications (Get-SCStorageClassifications)
$resources = @()

$resources += Get-SCLogicalNetwork | Where {$_.Name –like "VM1"}
$resources += Get-SCLogicalNetwork | Where {$_.Name –like "VM2"}

$resources += Get-SCLoadBalancer | where {$_.Name -like "netscaler1.private.cloud"}

$resources += Get-SCLoadBalancerVIPTemplate -Name "Citrix_https"

$resources += Get-SCStorageClassification -Name "Gold"
The next code block sets variables to contain references to the appropriate read-only library shares and the desired capability profiles.
$readonlyLibraryShares = @()
$readonlyLibraryShares += Get-SCLibraryShare | Where {$_.Name –like "SCVMMLibrary1-ReadOnly"}

$CapabilityProfiles = @()
$CapabilityProfiles += Get-SCCapabilityProfile -Name "Hyper-V"
$CapabilityProfiles += Get-SCCapabilityProfile -Name "XenServer"
$CapabilityProfiles += Get-SCCapabilityProfile -Name "ESX Server"
With all the references in place, you can add the indicated resources to the new cloud. A reference to this cloud is saved in a variable called $cloud, which can be used to tell VMM to which cloud the resources should be added. The Set-SCCloud command accepts as arguments the variables that were just created.
Set-SCCloud -Cloud $cloud -AddCloudResource $resources -AddReadOnlyLibraryShare $readonlylibraryshare -AddCapabilityProfile $CapabilityProfiles -ReadWriteLibraryPath "\vmmlib1.private.cloudSCVMMLibrary1StoredVmsProd"
The cloud now exists and has resources. The following code block uses the Set-SCCloudCapacity command to clear all the quota limits.
$CloudCapacity = Get-SCCloudCapacity -Cloud $Cloud
Set-SCCloudCapacity -CloudCapacity $CloudCapacity -UseCustomQuotaCountMaximum $true -UseMemoryMBMaximum $true -UseCPUCountMaximum $true -UseStorageGBMaximum $true -UseVMCountMaximum $true
This section and the previous one demonstrate how easy it is to create private clouds. VMM enables you to pull elements of the fabric together to form a cloud and hide the details from the users. They manipulate abstractions of the actual underlying resources, and VMM handles the details.
After you put a cloud into service, you may need to add or remove elements of the fabric to address changing user requirements. For example, you may need to add additional RAM (called expanding the cloud) or remove other elements, such as processors (called contracting the cloud). Such expansion and contraction illustrate the elasticity of clouds.
With a little imagination, you should be able to make these changes pretty painlessly using either PowerShell or the VMM interface. Later in this chapter, you'll see exactly how.
Understanding User Roles
Now that you've created the private cloud, you need to grant users access to it. Like other products in the Microsoft System Center suite, VMM implements a role-based access control (RBAC) solution to help you delegate and manage access to features and functions.
This approach allows you to configure and customize the scope (items that can be managed) and profiles (which define what actions can be executed on the items managed), resulting in flexible and granular control for consumers of the new cloud services.
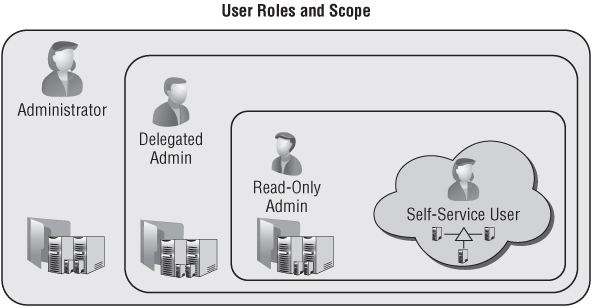
VMM implements four profiles that offer a predefined feature and functionality set. The personas of each of these respective profiles are introduced in the next section, and include the Virtual Machine Administrator, Delegated Administrator, Read-Only Administrator, and Self-Service User. Their hierarchy and span can be seen in Figure 9.4, illustrating Self-Service Users as the most restrictive access presented only as Clouds, while the three Administrator profiles have varying levels of administrative access based on the combination of both their assigned role and scope.
Figure 9.4 The user-role profile's span
To define a user role there are two steps:
The scope of the role depends on the functionality offered by the selected profile. Members of the role can be either Active Directory users or, as recommended, Active Directory groups. Active Directory users and groups can be members of multiple user roles.
Figure 9.5 illustrates the combination of profiles, scope, and membership that defines the user role.
Figure 9.5 Defining user roles

To illustrate the flexibility exposed via this combination, we consider the boundaries created through each of the elements; initially specifying Membership
- Determines which users are part of a particular user role
- Assign members as AD Users or preferably AD Groups
- Lets you include members in multiple user roles
Adding Profiles further defines the role by
- Determining which actions will be permitted
- Determining the accessibility offered or masked to the underlying fabric
- Determining how the scope should be defined
And finally this is completed by applying a Scope filter to
- Determine which objects the user role may take actions against
As additional user roles are created, the flexibility of the RBAC solution will become more apparent. User roles are hierarchical by design; the use and management of the fabric and its clouds can be delegated multiple times, permitting the environment to scale to fit the organizational requirements. Figure 9.6 illustrates this hierarchy with a sample approach that might be implemented to segregate a fabric and delegate administrative access.
Figure 9.6 A sample user-role-delegation hierarchy

VMM Profiles
In this section, you will learn about the attributes of the different profiles offered within VMM, along with both the functionality and scope they can expose and consume. With this knowledge, you will be able to create user roles to manage and operate your private clouds and their foundational fabric.
Administrator
The Administrator profile is not actually available to use in the roles you create in VMM. This profile is reserved for the Administrator user role that is automatically created when you install VMM. Members of the local Administrators group on the VMM server are automatically granted membership in this role, along with the user account used to install the VMM server.
The properties that define the Administrator profile/role include the following:
- There is unrestricted access to all VMM resources.
- No additional customization is available or required.
- Only administrators can add stand-alone XenServer hosts and clusters (pools).
- Only administrators can add a Windows Server Update Services server.
Delegated Administrators
The Delegated Administrators profile functions similarly to the Administrators profile except that Delegated Administrators is available for assignment in new roles. More importantly, it permits access scoping, which allows the associated members to divide their resources into groups while still retaining administrative autonomy.
Delegated administrators may further delegate the resources they manage by creating additional delegated administrators who manage part or all of the resources over which the parent delegated administrators have scope; but they cannot delegate access to resources that they themselves have no permission to use.
This functionality can be useful in many different business scenarios. As an example, assume the fabric is distributed across two geographically dispersed data centers, each having its own infrastructure team with responsibility for their local fabric.
The properties of the Delegated Administrators profile include the following:
- It can be scoped down to a single host group.
- It can be scoped down to a single library share.
- Its members are restricted to viewing status and jobs within their scope.
- Its members are restricted to viewing resource properties within their scope.
- It has administrative privileges to all resources within scope.
Read-Only Administrators Profile
As with delegated administrators, read-only administrators can have their access scoped. The Read-Only Administrators profile, however, restricts its members to a read-only experience across all access to the resources in their scope. A product of this read-only administrative access is an additional restriction denying these administrative members the ability to create additional user roles.
There are many scenarios where this role may be useful, including training for and monitoring of the cloud fabric. The functions offered by this profile include the following:
- It can be scoped down to a single host group.
- It can be scoped down to a single library share.
- Its members are restricted to viewing status and jobs within their scope.
- Its members are restricted to viewing resource properties within their scope.
- Scoped Run As accounts are restricted to viewing only.
Self-Service Users
The Self-Service Users profile provides the primary experience users encounter while working within the cloud. It uses a granular list of action permissions. Users interact in a customized environment for creating, deploying, and managing VMs and services in a private cloud.
In addition, users can use either the VMM console or the VMM command shell to create and manage resources. Self-service users can view status, resource capacity and quota usage, jobs, and Performance and Resource Optimization (PRO) tips (if authorized) for their cloud, VMs, and services.
Working primarily in the cloud, self-service users should neither know nor care about fabric elements, including host groups, hosts, library servers, or any other administrative configuration. As a result, they have no view of the VMM Fabric workspace, because this layer is completely abstracted from their profile. Chapter 10, “Working in the Cloud,” introduces the cloud from the consumer's perspective.
Self-service users see cloud libraries, which display physical resources that are available to them through private clouds. The Cloud Libraries node shows each of the private clouds in the scope of the Self-Service user role. Each private-cloud node displays physical resources on read-only library shares that have been configured for the cloud.
The Self-Service User Data node shows physical resources that users have access to on the user data path for their Self-Service user role. Access-control permissions in the file system determine what the users see.
In the Templates and Profiles nodes, self-service users can see only the templates and profiles that they own, that were assigned to their role, or that were shared by other self-service users.
The user data path, which is initially defined when a Self-Service role is created, enables its members to upload and share the physical resources they will use to create service templates and deploy services. Each Self-Service user role has only one user data path for all the private clouds within the scope of that role. The user data path must be in a library share.
Access to the physical resources on a user data path is controlled through the file system. To enable members of a Self-Service user role to use and share their own resources in VMM, grant Read/Write permission on the folder to all role members.
In the Library workspace, Self-Service users can see any resources for which they have permissions on the Library pane, in the Self-Service User Data node. However, only members of a Self-Service user role that has the Author action assigned to it can use the resources to create profiles and templates in VMM.
To enable members of a Self-Service user role to use their own application packages to create service templates and deploy services in VMM, configure a user data path for the Self-Service user role and grant Read/Write permission on the folder.
When a template is to be shared by all the members of a Self-Service user role, the template should have no owner assigned; this will allow members of the Self-Service user role with Author, Deploy, or Deploy (Template Only) actions to use the template. When an owner is assigned to the template, only the owner can use the template.
If authorized, self-service users can share resources with other Self-Service user roles by using the Share and Receive action. This allows users to share profiles (hardware, OS, application, and SQL), templates (VM and service), and services.
When launching the VMM console, self-service users who are members of multiple user roles must select the role under which they wish to work.
The properties of the Self-Service profile include the following:
- It can be scoped to a single host group for VM creation.
- It can be scoped to a single library share for VM storage.
- It can be scoped to logical and physical resources in the library.
- Its members are restricted to their own user data paths in the library.
- It can be restricted to specific templates for VM creation.
- It can be used to manage resource quotas.
- It permits access to PRO tips.
- It can be scoped to clouds, with per-cloud quota customizations.
User-Role Elements
Along with the various profiles offered for user roles, a number of additional elements are defined as part of the process of creating user roles. This section provides an overview of the different elements and how they can be used to customize the user roles you create to define access to the fabric and clouds.
Members
Members of a user role are selected from the hosting Active Directory domain. Normally, following best practices, members are assigned to the role as Active Directory groups rather than Active Directory users.
So that all members of a role can share ownership of all the VMs created by other members, you can create a security group in Active Directory and assign that group to the user role.
An alternative method for sharing resources among self-service users is to use the Share and Receive actions (discussed in Table 9.5) which enable resource owners who are self-service users to share individual resources with one or all members of a Self-Service user role.
Table 9.5 Action Permissions for Self-Service Users
| Cloud Actions | Description |
| Author | Grants permission to create and edit templates and profiles, including hardware profiles, operating-system profiles, application profiles, SQL Server profiles, VM templates, and service templates. |
| Deploy | Grants permission to deploy VMs and services from templates and virtual hard disks that are assigned to their user role. However, they have no rights to author templates and profiles for VMs and/or services. |
| Deploy (From Template only) | Grants permissions to deploy VMs and services from templates and virtual hard disks that are available to the active users scope. This action however does not permit users to author new templates. |
| Share | Allows members to grant resources they own to other Self-Service user roles. Shareable resources include hardware profiles, operating-system profiles, application profiles, SQL Server profiles, VM templates, VMs, service templates, and services. A self-service user must be the owner of a resource to share it. The Self-Service user role that receives the shared resource must be assigned the Receive action. |
| Receive | Allows members to receive resources that are shared by members of other Self-Service user roles. |
| Remove | Grants members permission to remove their own VMs and services. |
| Start | Grants members permission to start their own VMs and services. |
| Stop | Grants members permission to stop their own VMs and services. |
| Pause and Resume | Grants members permission to pause and resume their own VMs and services. |
| Shut down | Grants members permission to perform an orderly shutdown of their own VMs and services. |
| Checkpoint | Grants members permission to create, edit, and delete checkpoints for their own VMs and to restore their VMs to a previous checkpoint. Checkpoints are supported only on VMs and not on services. |
| Checkpoint (Restore only) | Grants permission to restore their own VMs to a checkpoint but not to create, edit, and delete checkpoints. |
| Store | Grants permission to store VMs in the VMM library. VMs stored in the library do not count against a user's VM quotas. |
| Local Administrator | Grants permission to serve as a local administrator on their own VMs. Important: Be sure to select the Local Administrator action on any Self-Service user role that has the Deploy (From Template) action selected. This action enables those users to set the local Administrator password during VM and service deployment. Self-service users who are granted the Deploy action do not need this action to be able to set Local Administrator credentials. |
| Remote Connection | Grants permission to connect to their VMs from the VMM console and the VMM self-service portal. |
Quota
You can utilize a user role to define a quota at two different scopes.
The first scope is for all members of the user role, and it defines the combined total quota for all the members of the user role in a cloud. The quota cannot exceed the capacity already defined on the private cloud.
The second scope is per member of the user role; you can use it to restrict the amount of cloud resources any single member of the user role can consume, up to the maximum capacity defined for all users of the role accessing the private cloud or the total capacity defined for the private cloud.
Resources
As users are offered access to a private cloud, additional resources may be needed so they can use the clouds to which they have access. Resources in a read-only library are available only to users who have been assigned the Author action.
Private-cloud users who are assigned the Author action can be assigned template and service resources so they can deploy them to the clouds within their scope.
When sufficient resources are available, administrators can grant access to additional elements within their clouds, including profiles, templates, and additional objects that are not hosted in the library.
Actions
For users to operate within a cloud, actions must be configured to define how that interaction will occur. VMM offers a number of actions for managing both services and VMs.
These actions can control how users can interact with the cloud for deploying both services and VMs. Scoping additionally enables the option to restricting this access, ranging from the full permission of authoring templates, to modifying settings of existing templates, or limited to just deploying preconfigured templates of VMs or Services.
Table 9.5 shows the actions that can be defined for Self-Service user roles.
Run As Accounts
A Run As account is a container used to store user or system credentials. Although most VMM wizards permit end users to supply credentials interactively, in some scenarios users may not have permission to know a specific password or the job being executed may not be interactive.
In these situations, Run As accounts can be associated with the template or profile. Self-service users might later be delegated access to one of these templates for use within their cloud; they will benefit when Run As accounts help VMM join the new VM or service deployment, joining a secure domain utilizing these stored credentials.
Run As accounts can be created by administrators and by self-service users with the Author action.
Managing User Roles with the Create User Role Wizard
User roles are a critical function of the administration of a VMM environment; and to assist in configuring these roles, VMM has yet another of its magical wizards standing by to guide you through the task of both creating and customizing user roles. In this section, you will learn about the process of managing, creating, and removing user roles in VMM using the Create User Role Wizard.
User roles are hierarchical in scope, in that if a new user role is created by delegated administrator A, this role is not visible to delegated administrator B. This hierarchy is not visibly presented in the VMM console. The Parent role (creator) of a user role can be viewed only through the use of PowerShell.
$Get-SCUserRole | Select name, parentuserrole
In the next few pages, you will configure sample user roles using the VMM Create User Role Wizard.
Managing Administrators
The Administrator role is mandatory in VMM. You cannot remove or duplicate the existing Administrator role. If you are an administrator, you can add users to this role or remove them. Use the following procedure to do so:
Creating a Delegated Administrator
To create a new Delegated Administrator user role, the user performing the exercise must already be a member of the Administrator role or an existing Delegated Administrator role.
If the role is being created by a delegated administrator, the delegation scope can only be granted on resources that are within the grantor's scope, including host groups, library servers, and Run As accounts. Use the following procedure to create a Delegated Administrator user role:
Figure 9.7 The Scope screen

After you create a delegated administrator, you can change members, scope, library servers, and Run As accounts in the Properties dialog box for the user role.
Creating a Read-Only Administrator
The process of creating a user role for a Read-Only Administrator is exactly the same as creating a Delegated Administrator user role, except that you select Read-Only Administrator on the Profile screen. Similarly, the permissions and scope allowed for creating this role are the same as for a Delegated Administrator role.
The process to create user roles using PowerShell is similar to the one you used to create private clouds.
Begin creating your new user role by providing a name, description, and profile, just as you would on the first two pages of the Create User Role Wizard. The variable $userrole receives a reference to the newly created role.
$userrole = New-SCUserRole -Name "Production Helpdesk" -UserRoleProfile "ReadOnlyAdmin" -Description "Helpdesk support"
Next, create the variable $resourcesToAdd to hold the list of resources to add to the scope of the new user. Successive lines of code add the host group (Production), cloud (Production Cloud), library server (vmmlib1.private.cloud), and Run As account (Run_As_Domain_Admin).
$resourcesToAdd = @()

$resourcesToAdd += Get-SCVMHostGroup -Name "Production"

$resourcesToAdd += Get-SCCloud -Name "Production Cloud"

$resourcesToAdd += Get-SCLibraryServer| where {$_.Name –like "vmmlib1.private.cloud"}

$resourcesToAdd += Get-SCRunAsAccount -Name "Run_As_Domain_Admin"
The next line adds both a new member (PRIVATEProduction Helpdesk Group) and the Resources we just created to the role.
Set-SCUserRole -UserRole $userrole -AddMember @("PRIVATEProduction Helpdesk Group") -AddScope $resourcesToAdd
Creating a Self-Service User
Self-service is one of the main purposes — perhaps the most important purpose — of private clouds. A Self-Service role combines the Active Directory user account of a potential cloud user with the Self-Service profile.
The honor of creating Self-Service User roles is reserved for administrators and delegated administrators, who can grant the roles access to resources within the grantor's scope. VMM offers a rich set of features for Self-Service roles, as you saw earlier.
To create a Self-Service User role, follow the same steps as for creating a Delegated Administrator role, except in step 3, click the Self-Service User radio button.
In step 4, you can only select clouds, because self-service users do not see the fabric of the cloud. This should bring you to the Quotas screen (Figure 9.8).
Figure 9.8 Assigning quotas to self-service users

To finish creating a Self-Service user role, follow these steps:
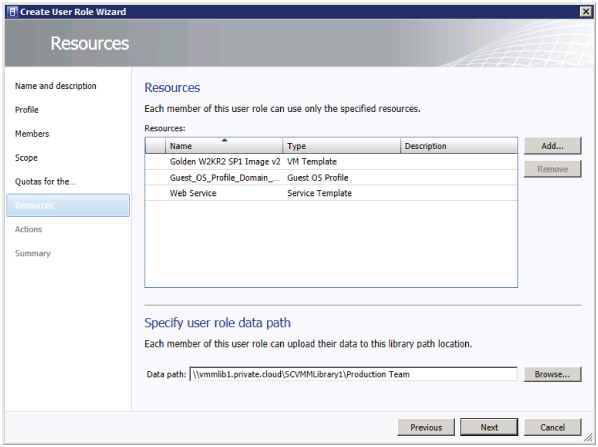
Figure 9.9 The VMM Create User Role Wizard's Resources screen
Managing a Private Cloud
The remainder of this chapter describes common tasks that administrators execute while supporting and maintaining private clouds.
Managing Cloud Use
Any user of a private cloud can monitor its resources. To do so in the console, go to the VMs and Services workspace, expand the Clouds node, and select a private cloud. On the Home tab of the ribbon, in the Show group, click Overview. Figure 9.10 shows the kind of information available.
Figure 9.10 Overview of a cloud
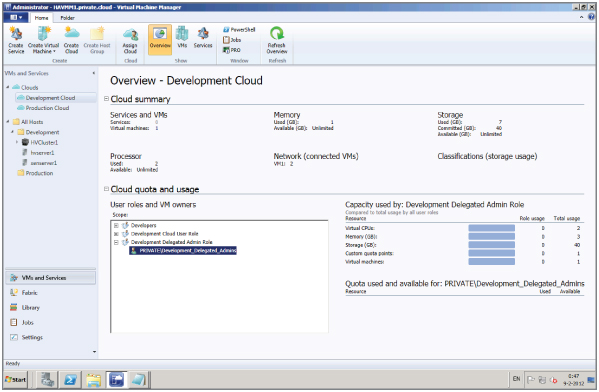
Also, in the Show group, you can select VMs or Services to view information about the VMs and services deployed to the private cloud.
Changing the Cloud's Capacity
In response to customer requests or your own proactive monitoring, you might need to expand a private cloud.
Before increasing a cloud's capacity, check the capacity of the underlying fabric. If the new cloud capacity exceeds the capacity of the fabric, you must first add hosts or other resources to the fabric.
If you have administrative permissions for a cloud, you can modify its capacity by right-clicking the cloud and opening its properties. Then select the tab containing the settings you want to modify.
Take the following steps to modify the capacity of the cloud:
$myCloud = Get-SCCloud –Name "Development Cloud"
Set-SCCloud -Cloud $myCloud -VMCount 20
Managing Shared Resources
VMM allows you to configure Self-Service user roles to enable owners of VMs and service templates to share their resources with other members of their own Self-Service user role, with another Self-Service user role, or with an individual member of another Self-Service user role.
The Share action enables a Self-Service user role to share resources; the Receive action enables a Self-Service user role to receive resources that are shared by another Self-Service user role.
Sharing Resources Between Self-Service User Roles
As a self-service user with permission for the Share action, use the following procedure to share a resource with another Self-Service role that has permission for the Receive action.
Assigning Access to a Private Cloud
A private cloud can be shared between one or more user roles. To assign the private cloud to an existing user role, follow these steps:
Deleting a Cloud
When projects or customers no longer need their clouds, you can remove the clouds from the environment. Deleting a cloud releases all the associated resources so they can be reused.
Before you can delete a cloud, make sure no VMs, services, or other artifacts remain within the boundaries of the cloud. You may want to archive stored VMs from the library before you delete the cloud.
To delete a cloud, follow these steps:
$myCloud = Get-SCCloud –Name "Production Cloud"
Remove-SCCloud -Cloud $myCloud
Summary
This chapter combines the materials we covered in earlier chapters to begin to form a cloud. It moves from discussing the capacity and capabilities of clouds through the creation of two sample clouds, one with the Create Cloud Wizard and the other with a sequence of PowerShell commands.
Roles, role-based access control, and profiles help simplify cloud security and management. They form the basis for the sample administrative and self-service roles you created for the sample clouds.
The chapter closes with a discussion of ongoing management tasks. Cloud administrators can quickly add capacity to a cloud or delete a cloud that is no longer needed. Self-service users can deploy and share resources without administrative intervention.