
Chapter 5: Implementing and Managing External Identities and Guests
The previous chapter focused primarily on member user accounts, creating groups, and assigning licenses, while also providing a high-level introduction to external users and groups. In this chapter, we will take a closer look at how we can plan, implement, and manage external identities and guests within our Azure Active Directory (Azure AD) tenant. The primary focus of the exam is on external identities and guests as they pertain to business partners. Business-to-customer, or B2C, guest access is not within that scope. Since this is also an important component in managing external access to cloud applications, we will cover this topic at a high level for clarity and understanding when we define external collaboration and discuss configuring identity providers. After completing this chapter, you will understand how to configure, invite, and manage external collaboration and guest user access within Azure AD.
In this chapter, we're going to cover the following topics:
- Managing external collaboration settings in Azure AD
- Inviting guest users
- Managing external users accounts in Azure Active Directory
- Configuring identity providers
Technical requirements
In this chapter, we will continue to explore configuring a tenant so that you can use Microsoft 365 and Azure. There will be exercises that will require access to Azure AD. If you have not created the trial licenses for Microsoft 365 yet, please follow the directions provided within Chapter 1, Preparing for Your Microsoft Exam.
Managing external collaboration settings in Azure AD
As stated in Chapter 4, Creating, Configuring, and Managing Identities, to be able to create users in Azure Active Directory, you will need to have the Global Administrator or the User Administrator role. Since the best practice is to adhere to the principle of least privilege, the User Administrator role should be given to anyone that is required to create, configure, and manage users within Azure AD.
Once you are in Azure AD with the proper role, you can create users. This chapter will focus on external and guest users. Different types of external users require separate configuration settings. The primary categories are business-to-business (B2B) and business-to-consumer (B2C). The next few sections will define each of these before we discuss external collaboration settings.
B2B
The primary focus of the Identity and Access Administrator exam is based on B2B collaboration and guest users. B2B guests are best described by a partnership relationship between users within two separate companies that need to collaborate on a project. These B2B relationships may be created through business mergers and acquisitions, project needs, or support relationships.
Within these B2B relationships, the external company can bring their own Azure AD and Microsoft 365 licenses for collaboration, though these licenses can be assigned if the external users do not come from an Azure AD tenant with Microsoft 365 licenses. External company collaboration settings provide these users with a single sign-on experience for both business tenants. If an external user does not use these licenses, then the username and password can be used from another identity, and that user can be assigned licenses from within the invited tenant.
B2C
The B2C relationship is an external account that's used for customers that are accessing applications and resources within the tenant. An example of this would be using a LinkedIn, Facebook, or Google username and password to log in and access your account on a shopping site. This is convenient for customers as they don't need to create another username and password. As stated previously, B2C guest users are outside the scope of the Identity and Access Administrator exam. We are mentioning this here to provide clarity regarding the different types of external users and to understand that this capability exists. We will discuss this further in the Configuring identity providers section, later in this chapter. These identity provider relationships can allow a B2C authentication relationship, but in this book, we will discuss them as they pertain to B2B authentication.
Now that we have defined the different types of external users, let's discuss how external collaboration is configured within Azure AD.
Configuring external collaboration settings
Whether the external users are B2B or B2C, there is a level of collaboration that needs to be planned for and configured within Azure AD to allow these guests access. These settings can be found within the Azure AD portal under External Identities – External collaboration settings. The following screenshot shows the settings that are available within External collaboration settings:
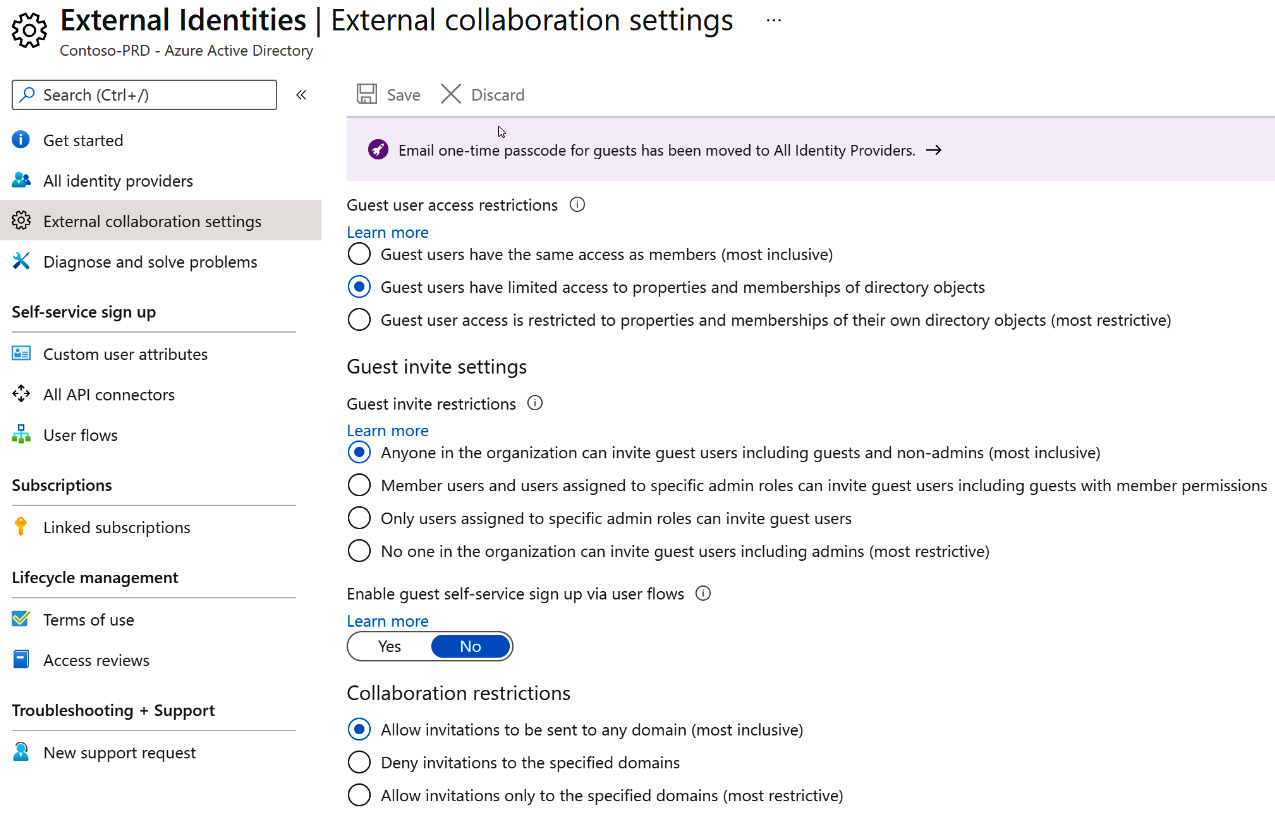
Figure 5.1 – External collaboration settings
Within these collaboration settings, you will define what guest users can access, who is allowed to invite guest users, and the restrictions on collaboration for the tenant. The preceding screenshot shows the default settings for external collaboration. These settings should be discussed with stakeholders to provide a proper plan for external guest access. Let's discuss each of these sections and how they should be utilized.
Guest user access
The first section within external collaboration settings is the overall Guest user access restrictions. The default setting is Guest users have limited access to properties and memberships of directory objects. Note that within each of these sections, Microsoft provides a level of guidance of what is the most inclusive and the most restrictive within these settings. The following screenshot shows these settings; more information can be found at https://aka.ms/aadguestpermissions:

Figure 5.2 – Guest user access restrictions
As we can see, the default setting creates a level of inclusion and restriction regarding how guests can interact within the tenant. This may be more restrictive than a member user. Using this setting will allow administrators within applications to determine guest user permissions specifically for those objects.
Guest invite settings
The next section within external collaboration settings is Guest invite settings. There are two settings within this section: Guest invite restrictions and Enable guest self-service sign up via user flows. The default setting for these settings is Anyone in the organization can invite guest users including guests and non-admins (most inclusive) for Guest invite restrictions and No for Enable guest self-service sign up via user flows, respectively.
In the following screenshot, the Guest invite restrictions options are set to the most inclusive, allowing even guests and non-administrator members to invite guest users to the tenant. Though this option takes some administrative burden off the IT department, it also could be a security risk, especially since this allows guest users from outside the company to invite other guests. Also, selecting the most restrictive option would block guest users from being invited to the tenant completely. If your company is highly regulated and has certain compliance requirements around guest access, then this may be a good option:
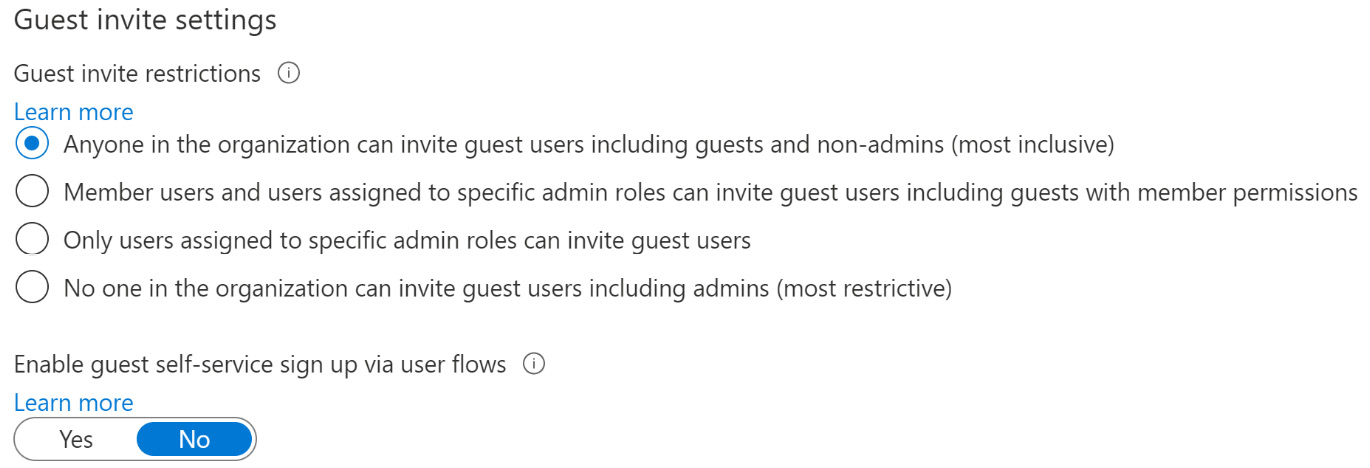
Figure 5.3 – Guest invite settings
In most cases, a good best practice would be to not allow guests to invite other guests, and to limit the member users that can invite guest users, which is one of the middle options we can see here. More information on these settings can be found here: https://aka.ms/guestinvitesettings.
Enable guest self-service sign up via user flows is a setting that is used with external identities, such as personal Microsoft, Facebook, or Google accounts. Before allowing these identity providers to be utilized for B2B or B2C login to the company's Azure AD, this setting will need to be moved to Yes. The default is No, as shown in the preceding screenshot. More information on guest user flows can be found here: https://aka.ms/exidenablesssu.
Collaboration restrictions
The final section within External collaboration settings is the Collaboration restrictions. Within this section, you have the option to allow invitations to be sent to all domains, deny invitations to specified domains, or allow invitations to only specified domains. As shown in the following screenshot, allowing invitations to only specified domains is the most restrictive option because you are setting a very narrow scope of companies that can be invited to the company tenant:
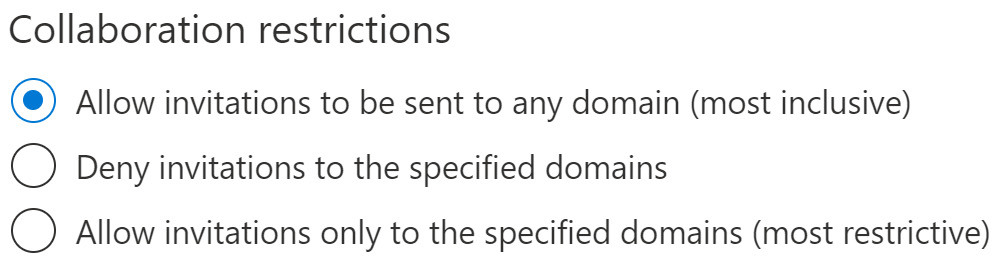
Figure 5.4 – Collaboration restrictions – Allow invitations
The default setting is to allow invitations to any domain, which has no restrictions and is the most inclusive.
The following screenshot shows that when selecting to deny invitations to specified domains, an entry field appears so that you can enter those blocked domains:
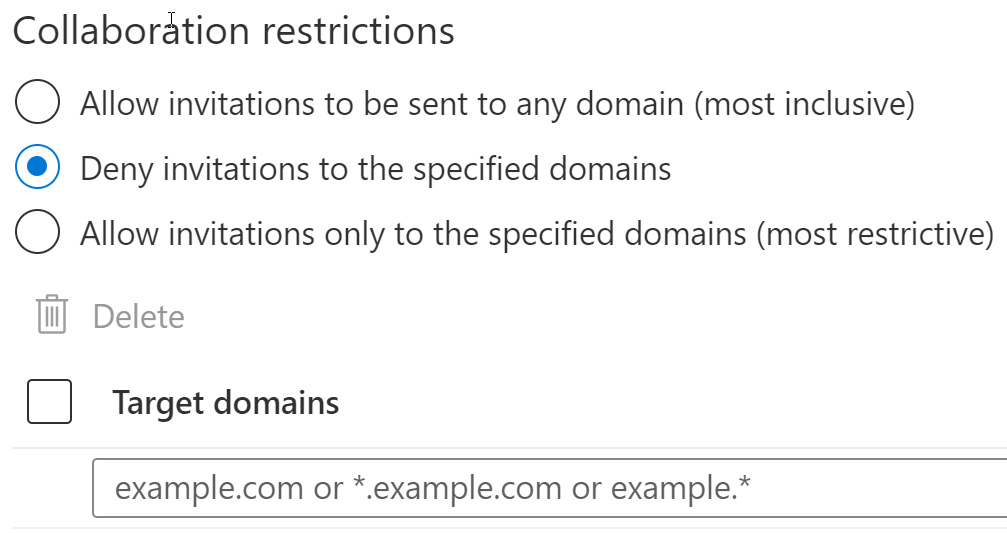
Figure 5.5 – Collaboration restrictions – Deny invitations
Target domains can be used to block competitor companies or companies that would create a conflict of interest if they were allowed to be within your company tenant.
The following screenshot shows that the same field appears when selecting to allow invitations only to specified domains:
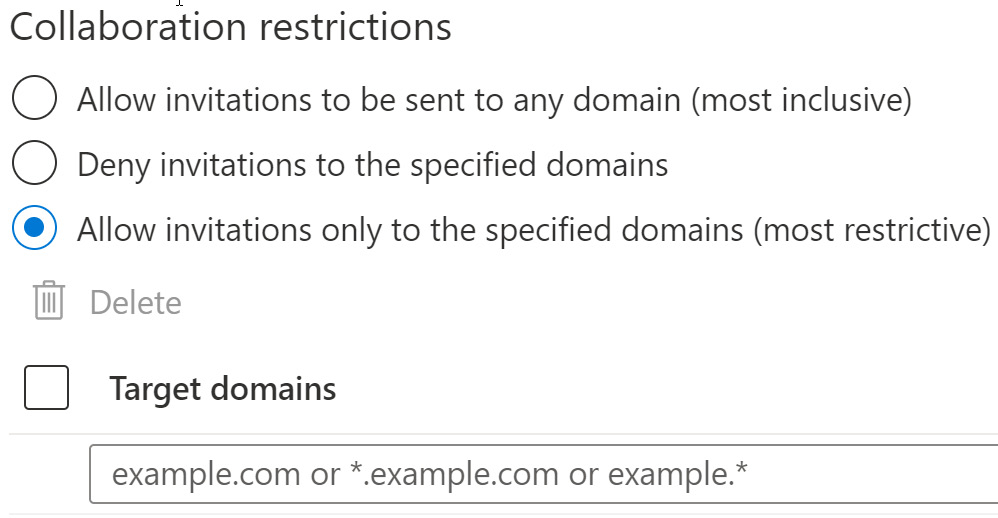
Figure 5.6 – Collaboration restrictions – Allow invitations from specified domains
The difference here is that you are specifying the only domains that are allowed to be invited to the company tenant. Unless the guest user invitation has this domain as their email, they will be blocked from receiving an invitation. In a company that handles sensitive information, this high level of restricting guests may be required. As the identity and access administrator, you will be responsible for identifying what these domains are and should have a process in place for approvals before additional domains are added.
Once these collaboration settings have been planned, approved, and completed, external users can be invited to the company tenant. The next section provides details on how these external guest users can be created in Azure AD.
Inviting external users individually and in bulk
Now that we understand how to configure the external collaboration settings, we are now ready to invite external users to collaborate on our Azure AD tenant.
Once we have set our tenant up to allow external users, the process of adding external users is similar to the process that we discussed in the previous chapter for adding member users, with some minor differences.
The next few sections will explore the different ways to invite external users to the Azure AD tenant.
Inviting guest users
External users within Azure AD are categorized as Guest users. As is the case with Member users, there are multiple ways for these users to be added to Azure AD. They can be added one user at a time through either the Azure AD portal or the Microsoft 365 admin center. They can also be added through a bulk import using a .csv file template that can be downloaded from the Azure AD portal, and they can be added using PowerShell commands.
We will step through each of these options to help you understand the steps you must follow to accomplish this yourself. Let's start with adding a single user through the admin portals.
Adding a single guest user in the Azure AD portal
This section will step through adding a guest user in the Azure AD portal using the graphical user interface (GUI).
First, we will use the Azure AD portal:
- Log into https://portal.azure.com and navigate to Azure Active Directory:
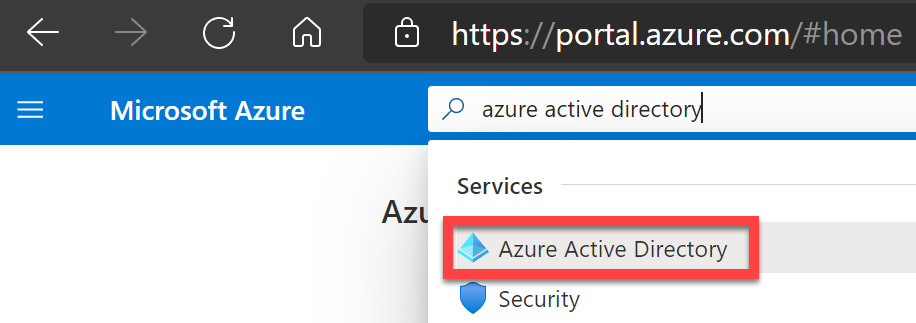
Figure 5.7 – Azure Active Directory in the Azure portal
- From the menu on the left of the tile, select Users under Manage:
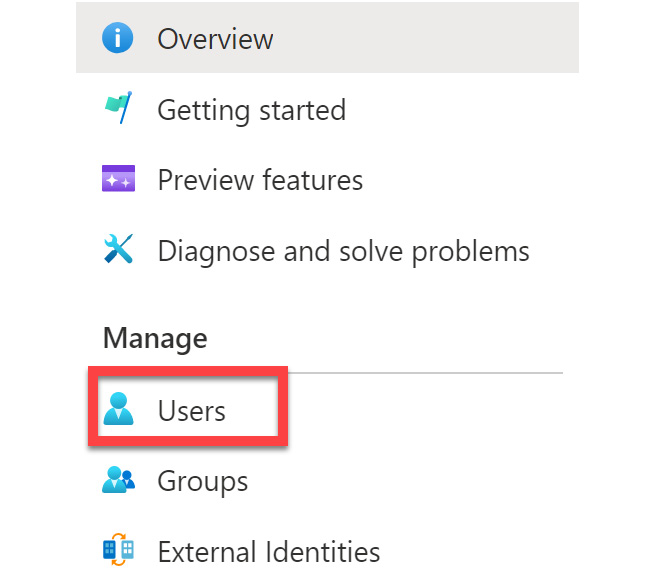
Figure 5.8 – Managing users in Azure AD
- Select + New guest user on the Users | All users tile:

Figure 5.9 – Adding a new user
- When the + New guest user tile opens, Invite user will be selected by default. Here, you will add the information for the user. The only required information is the email address of the guest user. There is an option to also add a Personal message to let the user know why they are being invited to collaborate. Once the email address has been added in the required field, select Invite to send the invitation:
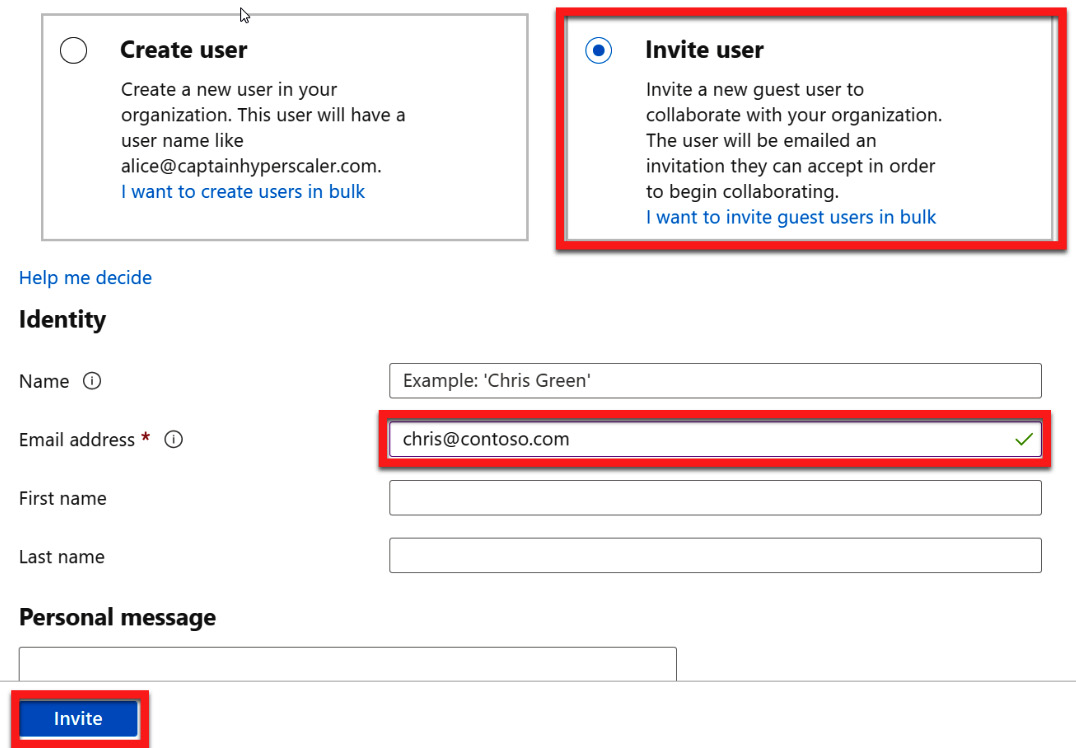
Figure 5.10 – Entering a guest user email address and an optional message to invite
- Once the invitation has been sent, the guest user will appear in the Azure AD users list as a Guest, with the creation type field showing Invitation. The following screenshot shows what this looks like in the list of users in Azure AD. Also note that User principal name includes the external email address, with the @ changed to an underscore and a prefix of #EXT#. The user is also not added to the custom domain but the default tenant domain name of tenantname.onmicrosoft.com:

Figure 5.11 – Guest user in the Azure AD user list
- Selecting the guest user will take you to the profile page for that user. Here, you can view whether the invitation has been accepted in the Identity section. Selecting Manage will allow you to resend the invitation, if necessary. The following screenshot shows that the guest user has not accepted the invitation:
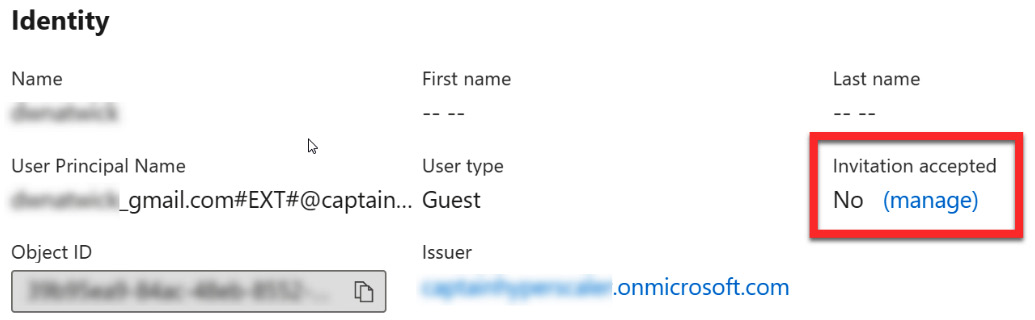
Figure 5.12 – Guest user invitation status
- The invited guest user will receive an email to accept the invitation, as shown in the following screenshot. Once they accept the invitation, they will be an active guest user on the Azure AD tenant:
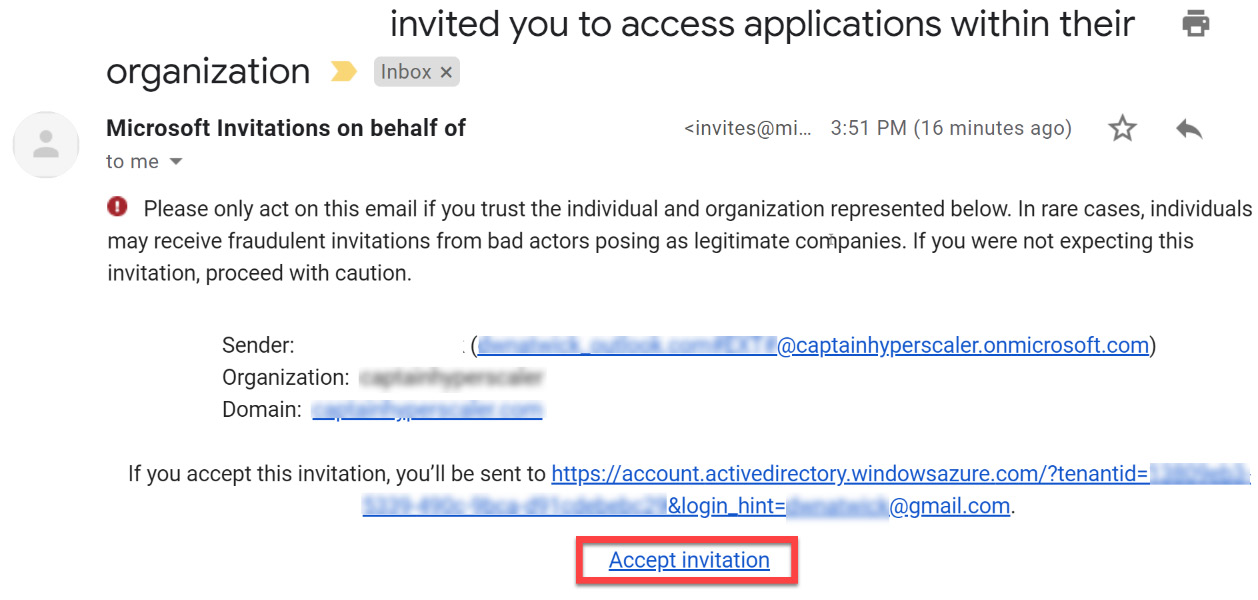
Figure 5.13 – Guest user email to accept the invitation to join
Once the guest user accepts the invitation, they can be assigned Microsoft 365 licenses in the same manner that member users are assigned licenses from their user profile. This process was discussed in the Assigning licenses section of Chapter 4, Creating, Configuring, and Managing Identities. Next, we will go through the same guest invitation process in the Microsoft 365 admin center.
Creating a new user in Microsoft 365 admin center
This section will step through adding a guest user to Microsoft 365 admin center using the GUI:
- Log into https://admin.microsoft.com and select Users – Guest Users from the left menu using the drop-down arrow:
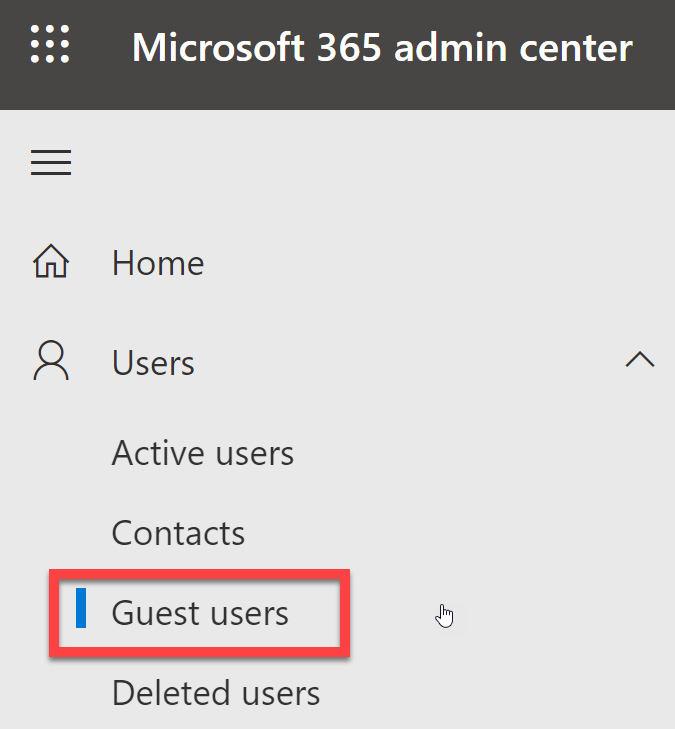
Figure 5.14 – Guest users in Microsoft 365 Admin center
- Select Add a guest user from the Guest users tile. Notice that within this tile, we can go to Manage Teams settings to adjust guest access to Teams. The following screenshot shows that this tenant has already been configured to allow guest access to Teams. Configuring access to Teams for guests is not within the scope of the Identity and Access Administrator exam. However, it is covered in detail within the Teams Administrator course and exam topics:
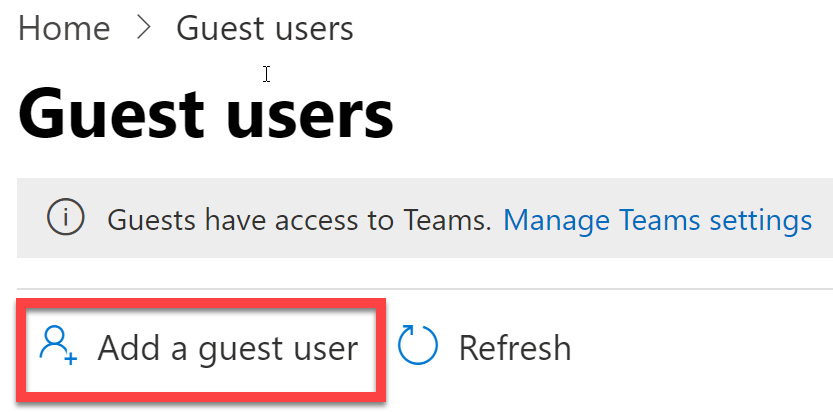
Figure 5.15 – Add a guest user via the Guest users tile
- Unlike the process of adding an active user, which we discussed in the previous chapter, when adding a guest user from the Microsoft 365 admin center, you are taken directly to Azure AD to create the guest user via the same process we covered in the previous section. This is shown in the following screenshot and is the same as what we saw in Figure 5.10:
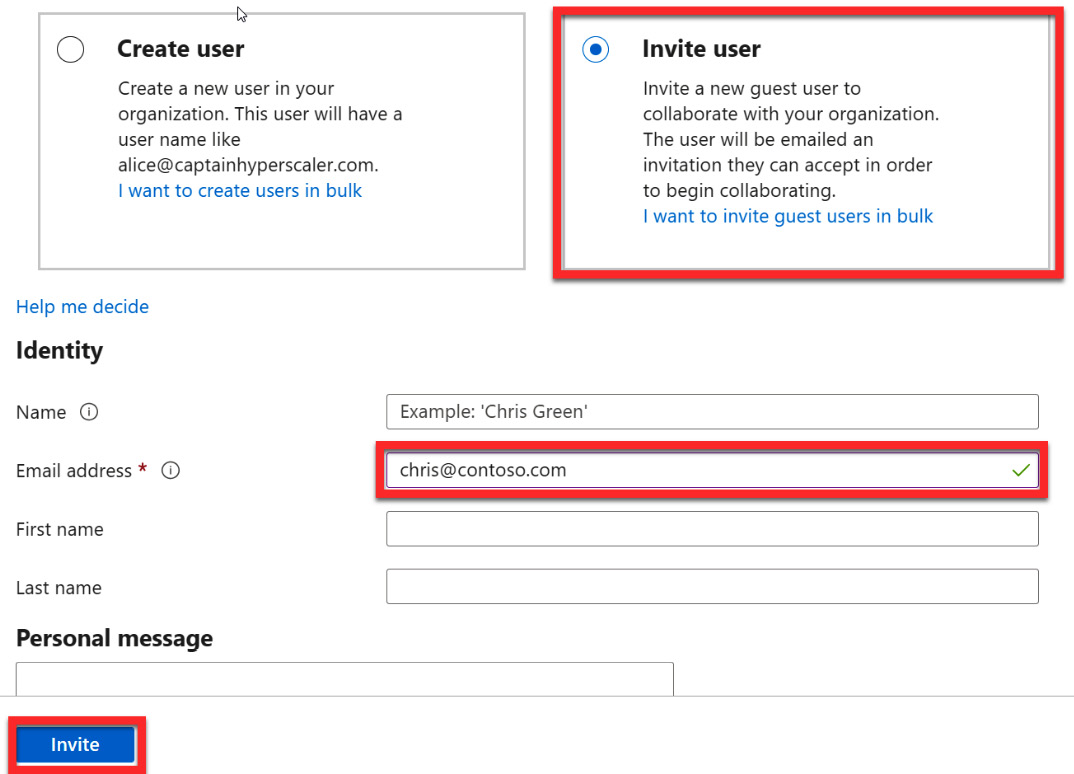
Figure 5.16 – Entering a guest user email address and an optional message to invite
- Scrolling down below the personal message also shows additional options for assigning the guest user to a group and a manager within the Azure AD tenant. This can be seen in the following screenshot:
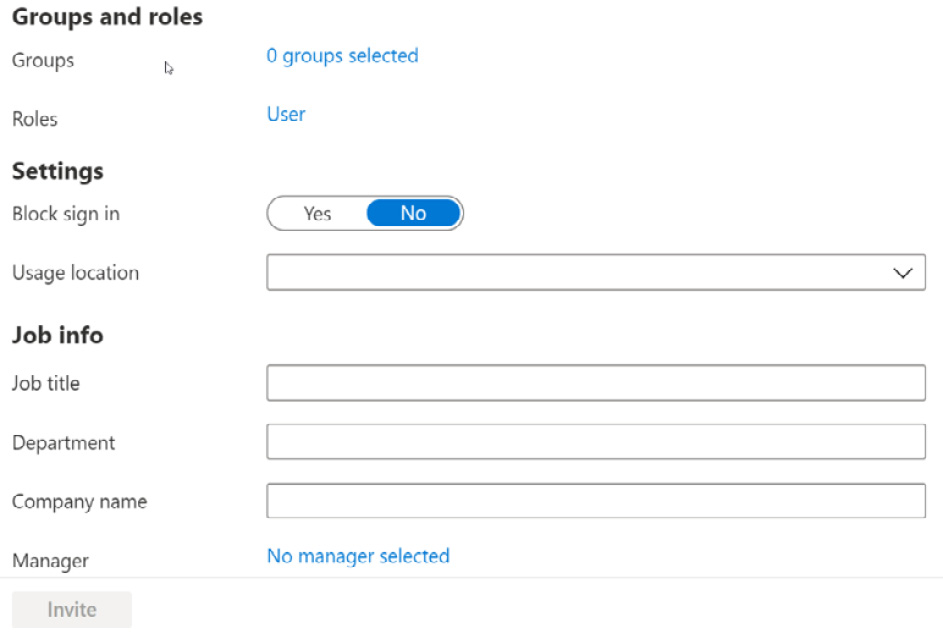
Figure 5.17 – Addng a location and licenses
- The remaining steps for inviting this user can be found in the previous section by following steps 4 through 7.
After completing these steps, you can return to the Guest users tile; the user that you added will be in the user list. Next, we will look at how to invite multiple guest users with a .csv file bulk import.
Inviting guest users with a bulk import
The previous steps are helpful when you have only a few users to add to Azure AD. The next two sections will go through steps of adding or inviting a group of users simultaneously to Azure AD. The first will be using a .csv file to bulk invite guest users. Let's get started:
- Log into https://portal.azure.com and navigate to Azure Active Directory:

Figure 5.18 – Azure Active Directory in the Azure portal
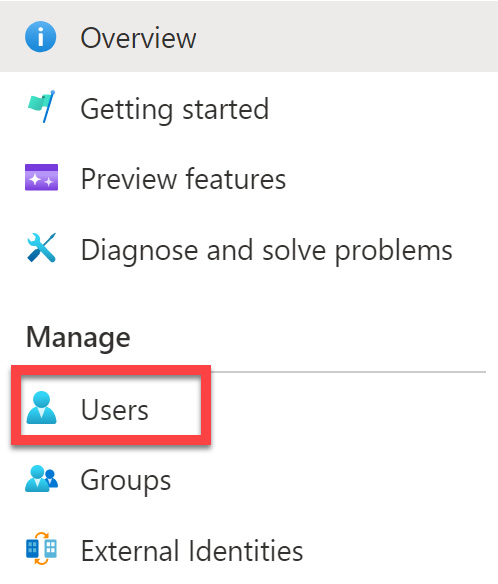
Figure 5.19 – Managing users in Azure AD
- Select the Bulk operations drop-down arrow and select Bulk invite for the Users | All Users tile:
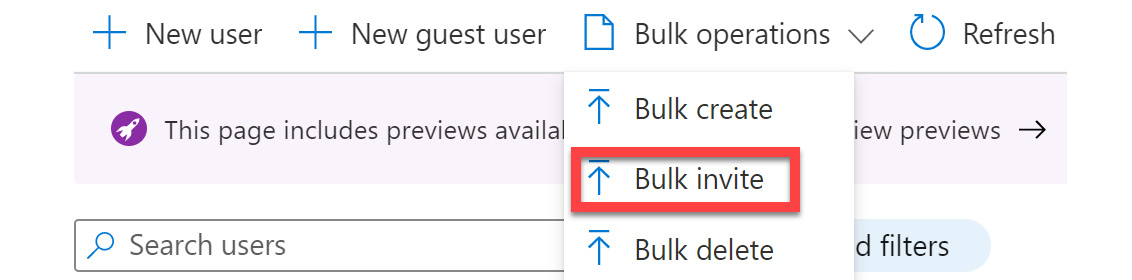
Figure 5.20 – Bulk invite users
- Selecting Bulk invite will open a new tile. This tile provides a download link to a template file that you must edit and populate with your user information. Once you've done this, you can upload it to bulk invite guest users:
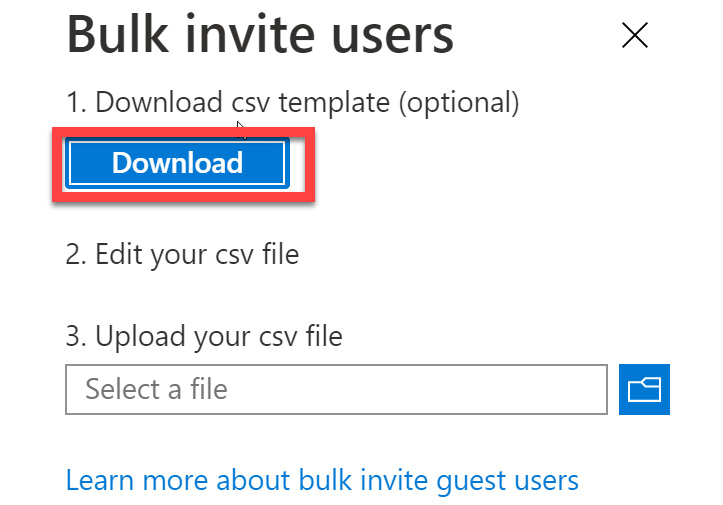
Figure 5.21 – Bulk create user steps
- The CSV template provides you with the fields included with the user profile. The required fields are the email address of the guest user and the redirection URL. The following screenshot shows how you can complete the .csv file:

Figure 5.22 – .csv file completion
- Once populated, save the changes and upload the CSV file to add the users.
- You will be notified that the file was uploaded successfully. Click Submit to add the users, as shown in the following screenshot:
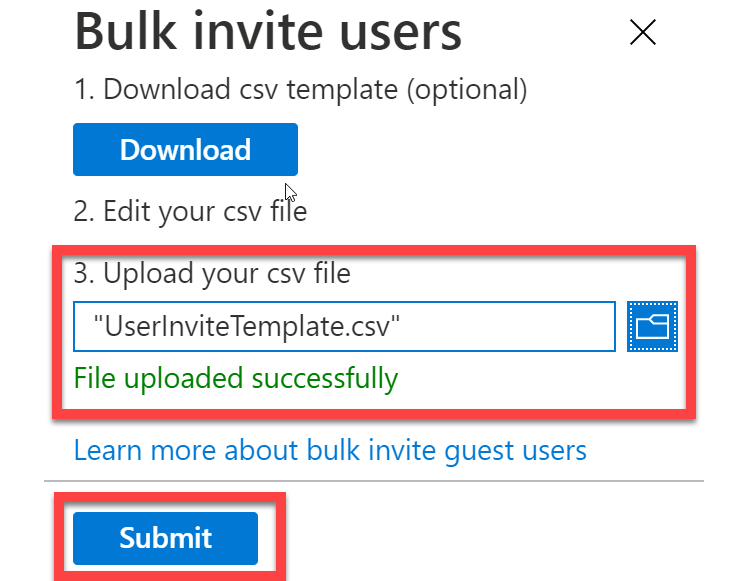
Figure 5.23 – Uploading and submitting the bulk invitation for guest users
- Once the file has been submitted and uploaded, you will be notified that the file was successfully processed. The following screenshot shows the completion of this process:
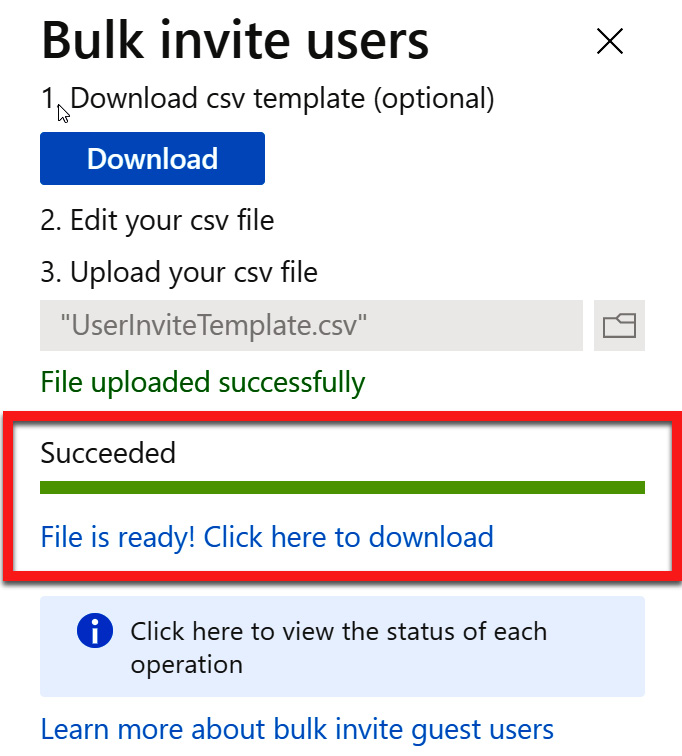
Figure 5.24 – Bulk invitation file has been successfully processed
- You also have the option to download the updated .csv file, which contains a field that documents this successful invitation for each of the guest users. The following screenshot shows the new field showing the successful completion in column E. If an invitation failed, a failure reason will be provided in column F:

Figure 5.25 – Bulk invitation status in the updated CSV file
Once the users have been invited, they will receive an email, stating that they will need to accept the invitation. This process is the same as step 7 in the Adding a single guest user in the Azure AD portal section. The added guest users will be populated in Users | All users. With that, you have completed a bulk user invitation using the CSV template. In the next section, we will add users with PowerShell.
Adding users with PowerShell
This section will step through how to add users with PowerShell. There are some steps you must follow to prepare PowerShell to run Azure AD commands. The following steps will get you ready to run the commands for adding users to Azure AD:
- Open PowerShell as an administrator. This can be done by searching for PowerShell in Windows and choosing Run as administrator:
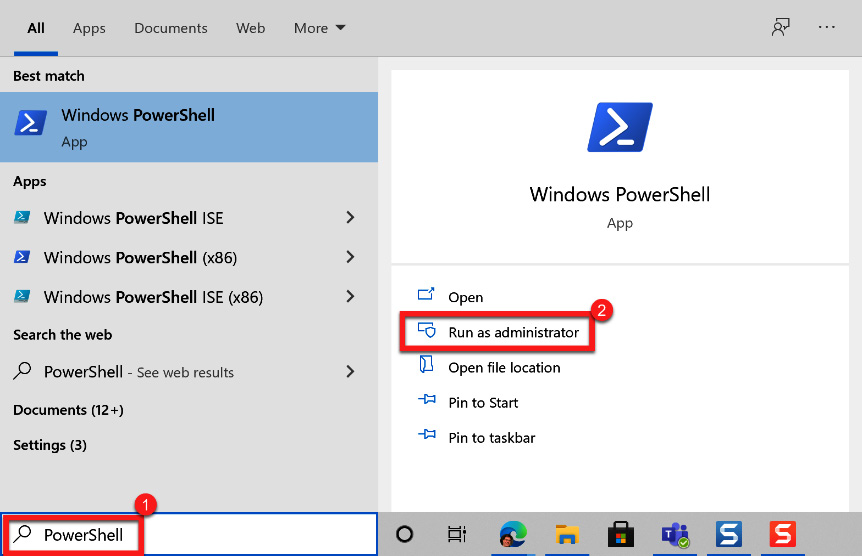
Figure 5.26 – Opening PowerShell as an administrator
- You will need to add the Azure AD PowerShell module if you have not used it before. Run the Install-Module AzureAD command. When prompted, press Y to continue:
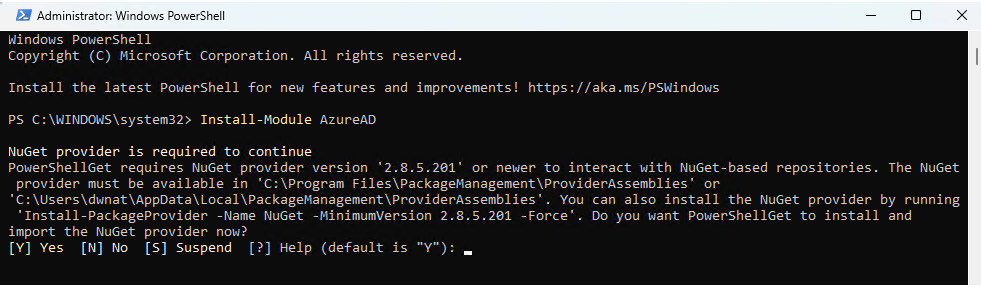
Figure 5.27 – Installing the Active Directory module
- Confirm that the module has been installed correctly by running the Get-Module AzureAD command.
- Next, you will need to log in to Azure by running Connect-AzureAD. The Microsoft login window will appear for you to log into Azure AD:
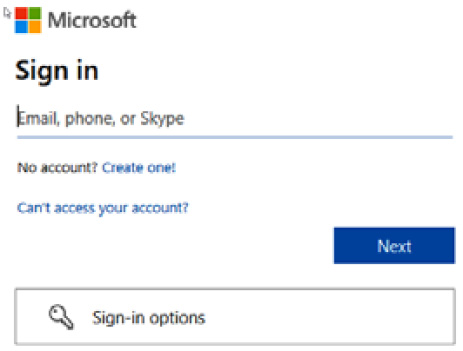
Figure 5.28 – Microsoft – log into Azure AD
- To verify that you are connected and to see existing users, run Get-AzureADUser.
- You are now ready to invite a guest user. The following command will be populated with the user information and run. If you have more than one user to add, you can use a .txt file to add the user information and copy and paste it into PowerShell:
New-AzureADMSInvitation -InvitedUserDisplayName "Display" -InvitedUserEmailAddress [email protected] -InviteRedirectURL https://myapps.microsoft.com -SendInvitationMessage $true
- The following screenshot shows the format of running the invitation command for multiple invitations:

Figure 5.29 – Inviting multiple guest users with PowerShell
- The following screenshot shows the response that is received for each invitation that was sent after running the invitation command:
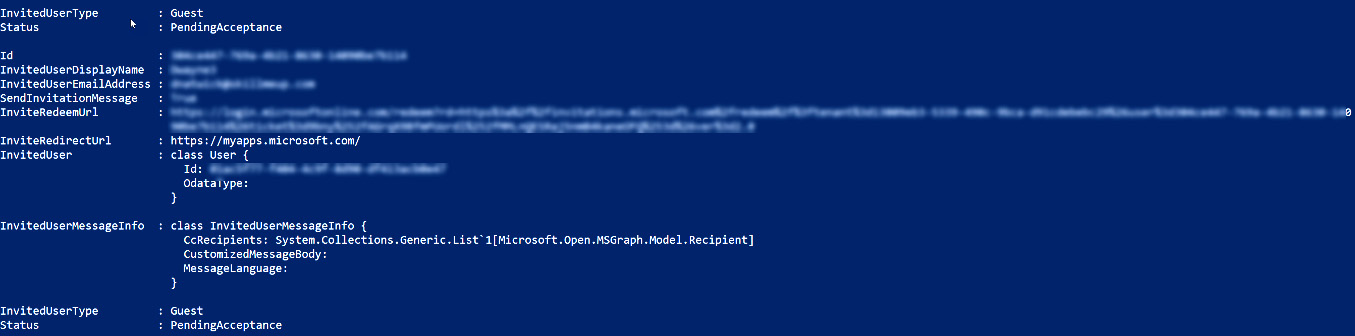
Figure 5.30 – Successful invitation sent response from within PowerShell
You now know how to invite users within the Azure AD portal and Microsoft 365 admin center, how to use bulk invitations with a CSV file, and how to invite users with PowerShell commands. Additional information on PowerShell commands for Azure AD guest users can be found at the following link:
In the next section, we will discuss how to manage external accounts within Azure AD.
Managing external user accounts in Azure AD
Now that we understand how to invite guest users in Azure AD, you may want to group these users based on roles, departments, or locations.
Once a guest user accepts the invitation to join the Azure AD tenant, they are now a B2B user. These B2B users can be assigned roles, added to groups, and assigned licenses in the same way as a member user. However, there are some differences that you should know about.
Managing guest user licenses
Regarding licenses, B2B users from partner businesses that currently have a Microsoft 365 license can utilize their licenses to collaborate on documents and join Microsoft Teams meetings on the Azure AD tenant, without the need to assign additional licenses. If the guest users are using a personal email, such as from Microsoft or Gmail, then licenses will need to be assigned to these guest users. For these users, it is the host tenant who has these licenses and assigns them to the guest account.
Password management
Unlike member users on the Azure AD tenant, where administrators assign the initial temporary password to the user and then they create their password, guest user accounts are different. Guest users are invited to the Azure AD tenant and utilize the current password of the email account that was used for the invitation. Any password updates and changes that are made on that email account are maintained by that email account and not on the Azure AD tenant. Therefore, guest user accounts cannot be managed with the same self-service password reset (SSPR) capabilities as a member account. SSPR will be discussed in more detail in Chapter 7, Planning and Implementing Azure Multi-Factor Authentication and Self-Service Password Reset.
Multi-factor authentication
Enabling, enrolling, and enforcing multi-factor authentication (MFA) will be discussed in detail later in Chapter 7, Planning and Implementing Azure Multi-Factor Authentication and Self-Service Password Reset. However, it is necessary to mention that as a host Azure AD tenant, guest users can be enrolled and enforced into MFA to access resources. This also allows conditional access policies to be enforced on guest users and groups that contain guest user accounts. The guest accounts for MFA are managed in the same way as member accounts. The following screenshot shows the MFA configuration page with user accounts available to enroll:
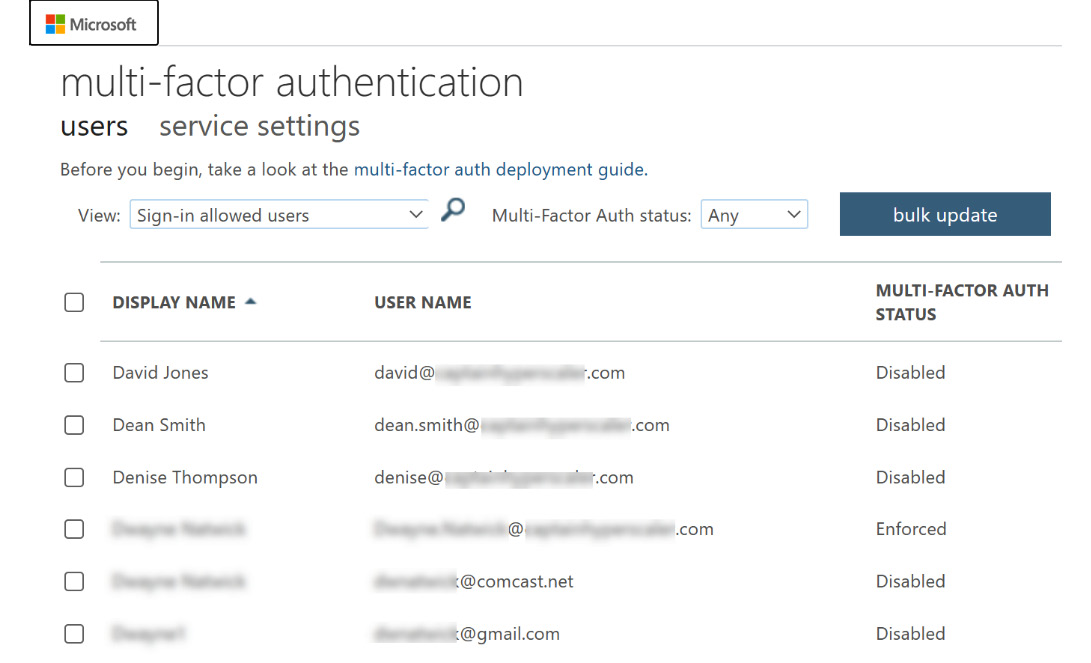
Figure 5.31 – MFA configuration page with guest accounts
With MFA enabled and enforced on the guest user accounts, they will be required to provide the additional verification information that is needed, such as a cell phone number or registering to the authenticator app for the host Azure AD tenant.
When managing an external user account, it is important to know that you cannot manage the original email address that was used to invite the guest user or their password. However, we do have the ability to enter information into their profile, such as their name, display name, usage location, profile picture, and other information that is important to identify the user on our Azure AD tenant. The guest user can also access their user portal to make these customizations. This section discussed how these guest users can be managed from a B2B invitation to allow partner collaboration. The final section of this chapter will discuss how to configure the use of identity providers for use within our Azure AD tenant.
Configuring identity providers
As we have already established, Azure AD is a cloud-based authentication service that is used by Microsoft 365, Azure, and all of Microsoft's cloud services and solutions for identity and authentication management. Some companies may have another IAM solution that they are using. Azure AD allows these companies to utilize these providers as part of the B2B authentication relationship as guests on the Azure AD tenant.
Azure AD is built on open source standards and, therefore, can support Security Assertion Markup Language (SAML) or WS-Federation. Configuring these direct federation relationships allows users to start collaborating while utilizing their existing identity credentials from their existing identity provider. These relationships are configured within the Azure AD tenant to create this federated B2B relationship between companies.
The users would then access the Azure AD tenant as a guest through the same portal URL that is used in the guest user invitation, but with the federated tenant ID added to the end to create a customized URL; for example, https://myapps.microsoft.com/?tenantid=tenantid or https://portal.azure.com/tenantid. The tenant ID will be created as part of the identity provider configuration, which we will discuss in the next section. If the guest is using their own Azure AD tenant, the URL would look like this: https://myapps.microsoft.com/guesttenantname.onmicrosoft.com.
When using an identity provider federation for these guest user B2B relationships, there are a few points to note:
- If a guest user has accepted an invitation to be part of the Azure AD tenant before the federation relationship has been created, they will continue to authenticate in the same manner.
- Regarding guest users that have been invited through direct federation as a partner company, and then the partner company moves to Azure AD, those guest users will continue to have access so long as the direct federation relationship between tenants exists.
- Guest users that have been invited through direct federation between partner companies will lose access if that direct federation relationship is removed.
With direct federation, the login experience for the user is the same as if they were logging into their own company resources. This maintains a consistent and unchanged experience for these users when they're collaborating with partner companies.
To create a direct federation relationship, navigate to External Identities from the Manage section of the Azure Active Directory portal, as shown in the following screenshot:
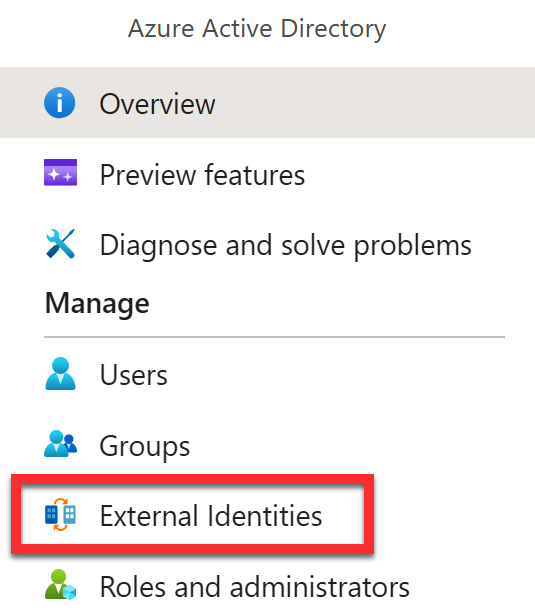
Figure 5.32 – External Identities in Azure AD
From there, you must select All identity providers, as shown in the following screenshot:
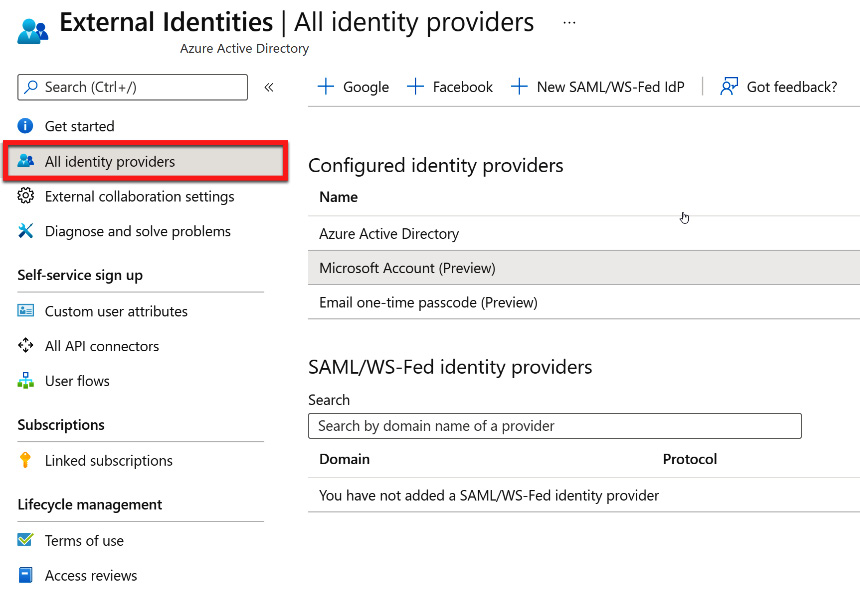
Figure 5.33 – All identity providers within the External Identities blade
For additional information and the steps for configuring direct federation, go to https://docs.microsoft.com/azure/active-directory/external-identities/direct-federation.
From within the External Identities | All identity providers blade, you will see that Azure Active Directory, Microsoft Account, and Email one-time passcode are the default pre-configured identity providers. You don't need to follow any additional steps to allow direct federation. For Azure Active Directory and Microsoft Account, the guest user invitation process is used to collaborate. The following screenshot shows what appears when selecting either of these identity provider options:
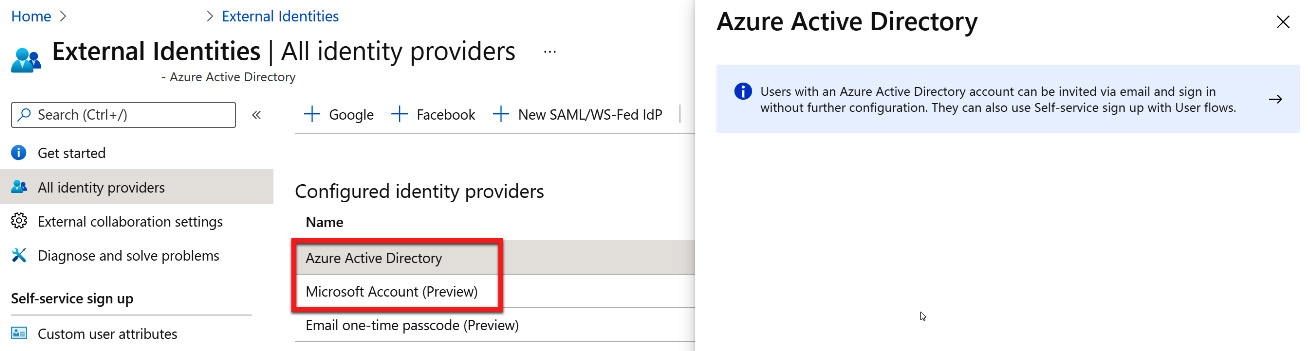
Figure 5.34 – Azure AD and Microsoft Account direct federation configuration
To allow a user to have guest access with a one-time passcode, multiple options can be used for configuration. These are shown in the following screenshot:

Figure 5.35 – Configuring a one-time passcode for guest user federation
The one-time passcode option is helpful when you have a single guest user that needs to be added rather than multiple guest users from a partner company.
In addition to the default identity providers of Azure Active Directory, Microsoft Account, and Email one-time passcode, additional SAML and WS-Federation identity providers can be configured, as well as Google and Facebook. In the following sections, we will discuss how this configuration is done with these two popular identity providers.
Google configuration
Microsoft provides a direct federation for Google as an identity provider. This can be initiated by selecting + Google from the External Identities | All identity providers blade, as shown in the following screenshot:
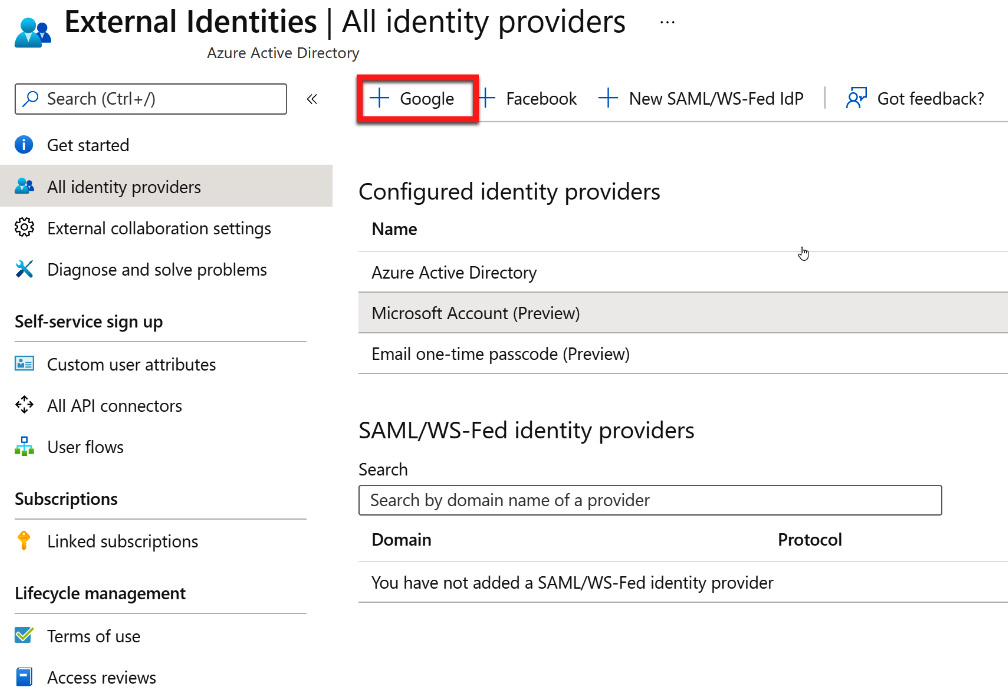
Figure 5.36 – Adding a Google direct federation
After selecting + Google, another blade will open with additional information that is required to configure Google as an identity provider. To obtain this information, the Azure AD account must be configured within Google. There is a link to these directions within the blade that opens, as shown in the following screenshot:
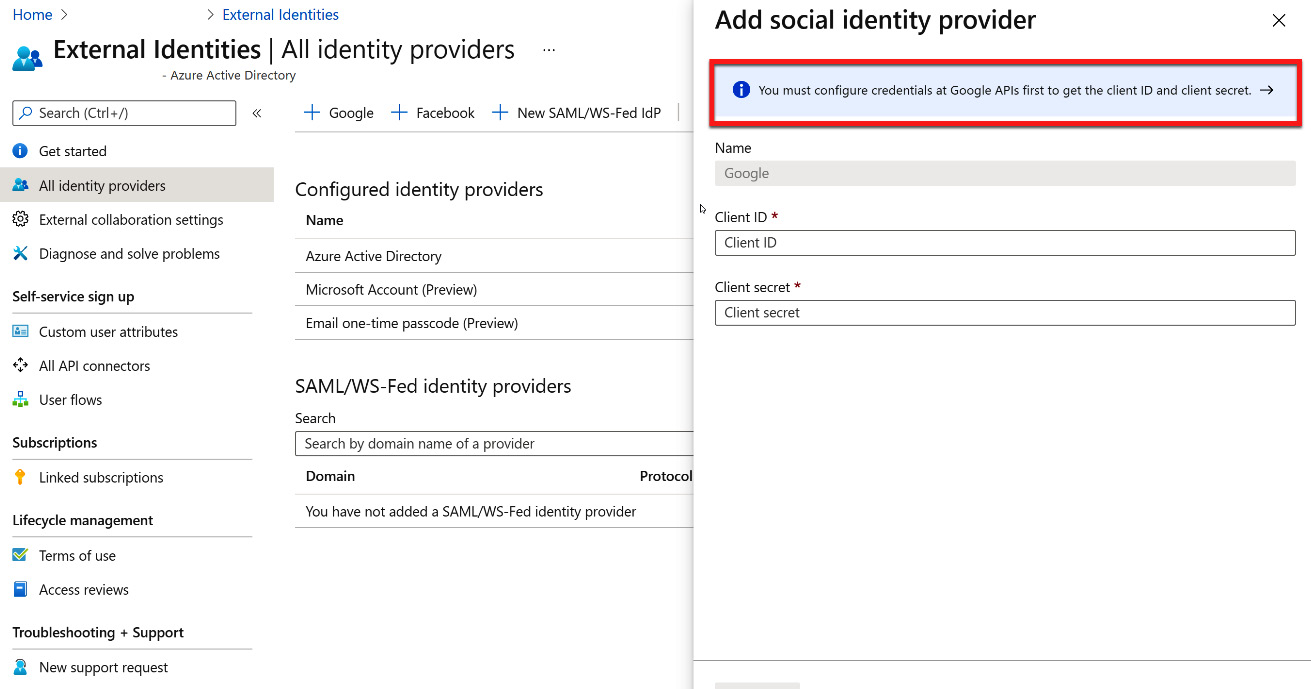
Figure 5.37 – Google identity provider configuration
The link for these directions is also provided here: https://docs.microsoft.com/azure/active-directory/external-identities/google-federation.
After going through the steps within Google for federation, a Client ID and Client secret will be provided. You must copy these values into the fields shown in the preceding screenshot and select Save to complete the direct federation.
The next section will show you how to configure Facebook as a direct federation identity provider.
Facebook configuration
Microsoft provides a direct federation for Facebook as an identity provider. This can be initiated by selecting + Facebook from the External Identities | All identity providers blade, as shown in the following screenshot:
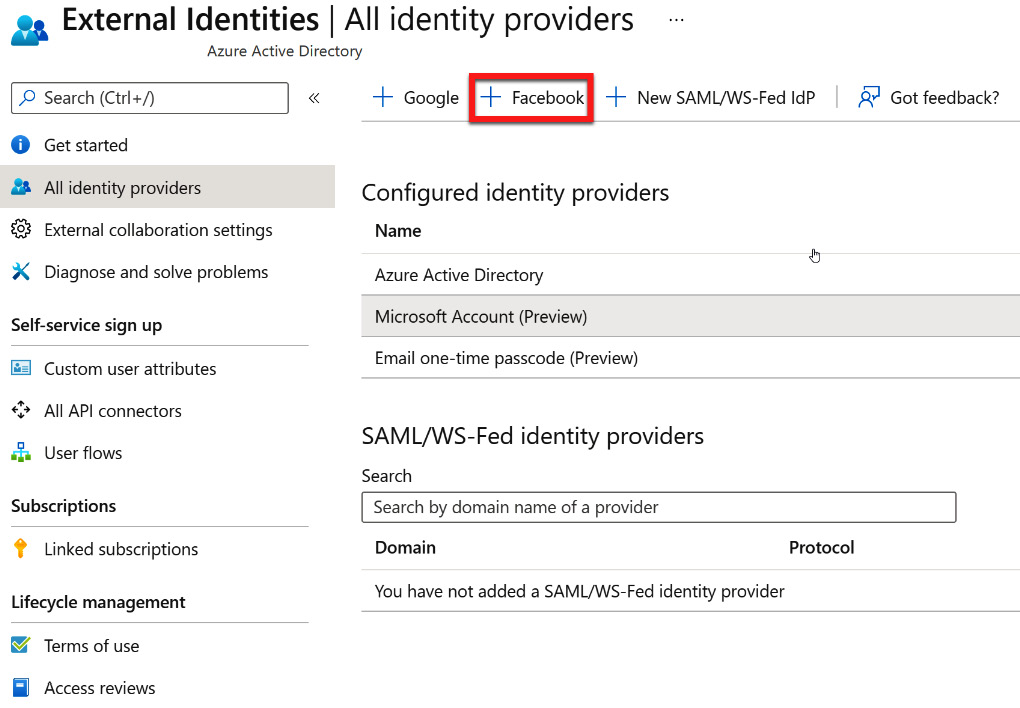
Figure 5.38 – Adding a Facebook direct federation
After selecting + Facebook, another blade will open with additional information that is required to configure Facebook as an identity provider. To obtain this information, the Azure AD account must be configured within Facebook. There is a link to these directions within the blade that opens, as shown in the following screenshot:
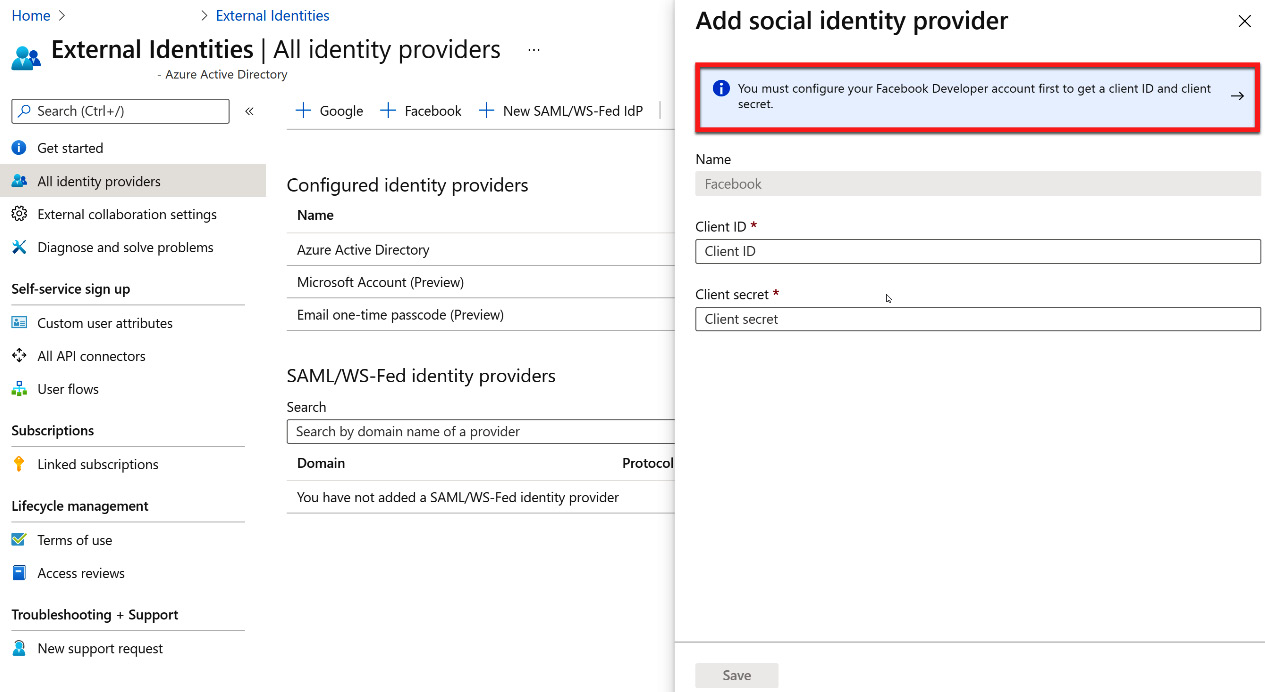
Figure 5.39 – Facebook identity provider configuration
The link for these directions is also provided here: https://docs.microsoft.com/azure/active-directory/external-identities/facebook-federation.
After going through the steps within Facebook for federation, a Client ID and Client secret will be provided. You must copy these values into the fields shown in the preceding screenshot and select Save to complete the direct federation.
Summary
In this chapter, we described how to configure external collaboration settings, invite external users, manage these users, and configure external identity providers. External users are important within our Azure AD tenant since they allow partner organizations and individuals to collaborate. In the upcoming chapters, we will discuss the ability to configure a hybrid identity, as well as the authentication infrastructure for users that need access to an on-premises Windows AD and cloud resources within Azure AD