
Chapter 9: Information Protection
Users and organizations work with ever-growing volumes and types of data, spread over various repositories, and security personnel and administrators have to protect an increasing number of resources. Not all resources are equal; some store more sensitive information than others, and to effectively protect their environments, security professionals have to know where to prioritize the protection.
Microsoft Defender for Cloud supports SQL information protection policies – a classification mechanism, and Microsoft Purview integration as well, which is a data governance service. With these capabilities and service integrations, Defender for Cloud can provide additional alerts and recommendations based on discovered and monitored data sensitivity types.
In this chapter, you will learn how to work with sensitivity labels and information types as well as how to work with data classification. This will provide valuable information to Defender for Cloud, enabling it to generate alerts and recommendations based on information policy data.
We will cover the following recipes in this chapter:
- Creating and managing sensitivity labels
- Creating and managing information types and managing information protection policy
To complete the recipes in this chapter, the following is required:
- An Azure subscription
- A web browser, preferably Microsoft Edge
- Defender for Cloud plans
- Resources in an Azure subscription, such as virtual machines, storage, SQL server, and Logic Apps. Defender for Cloud will create resource recommendations based on available resources.
The code samples can be found at https://github.com/PacktPublishing/Microsoft-Defender-for-Cloud-Cookbook.
Please note: To display SQL Information Protection button in Defender for Cloud, you must have tenant-level permissions. Alternatively, you can access Information Protection blade completing following steps:
- Open Azure SQL blade.
- Select a database.
- On the menu, under Security section, click Data Discovery & Classification
- Click Configure.
Creating and managing sensitivity labels
Sensitivity labels are one of the two foundations of SQL information protection and data classification mechanisms.
Labels define a degree or a level of data sensitivity and constitute a core classification attribute. Although information protection policy options contain predefined labels, it is important to create labels that match your data sensitivity.
In this recipe, you will learn how to create and manage sensitivity labels in SQL Information Protection.
Getting ready
Open a web browser and navigate to https://portal.azure.com.
How to do it…
To create a new sensitivity label in SQL Information Protection, in Defender for Cloud, complete the following steps:
- In the Azure portal, open Microsoft Defender for Cloud.
- On the left-hand menu, click Environment settings.
- On the top menu, click SQL Information Protection.
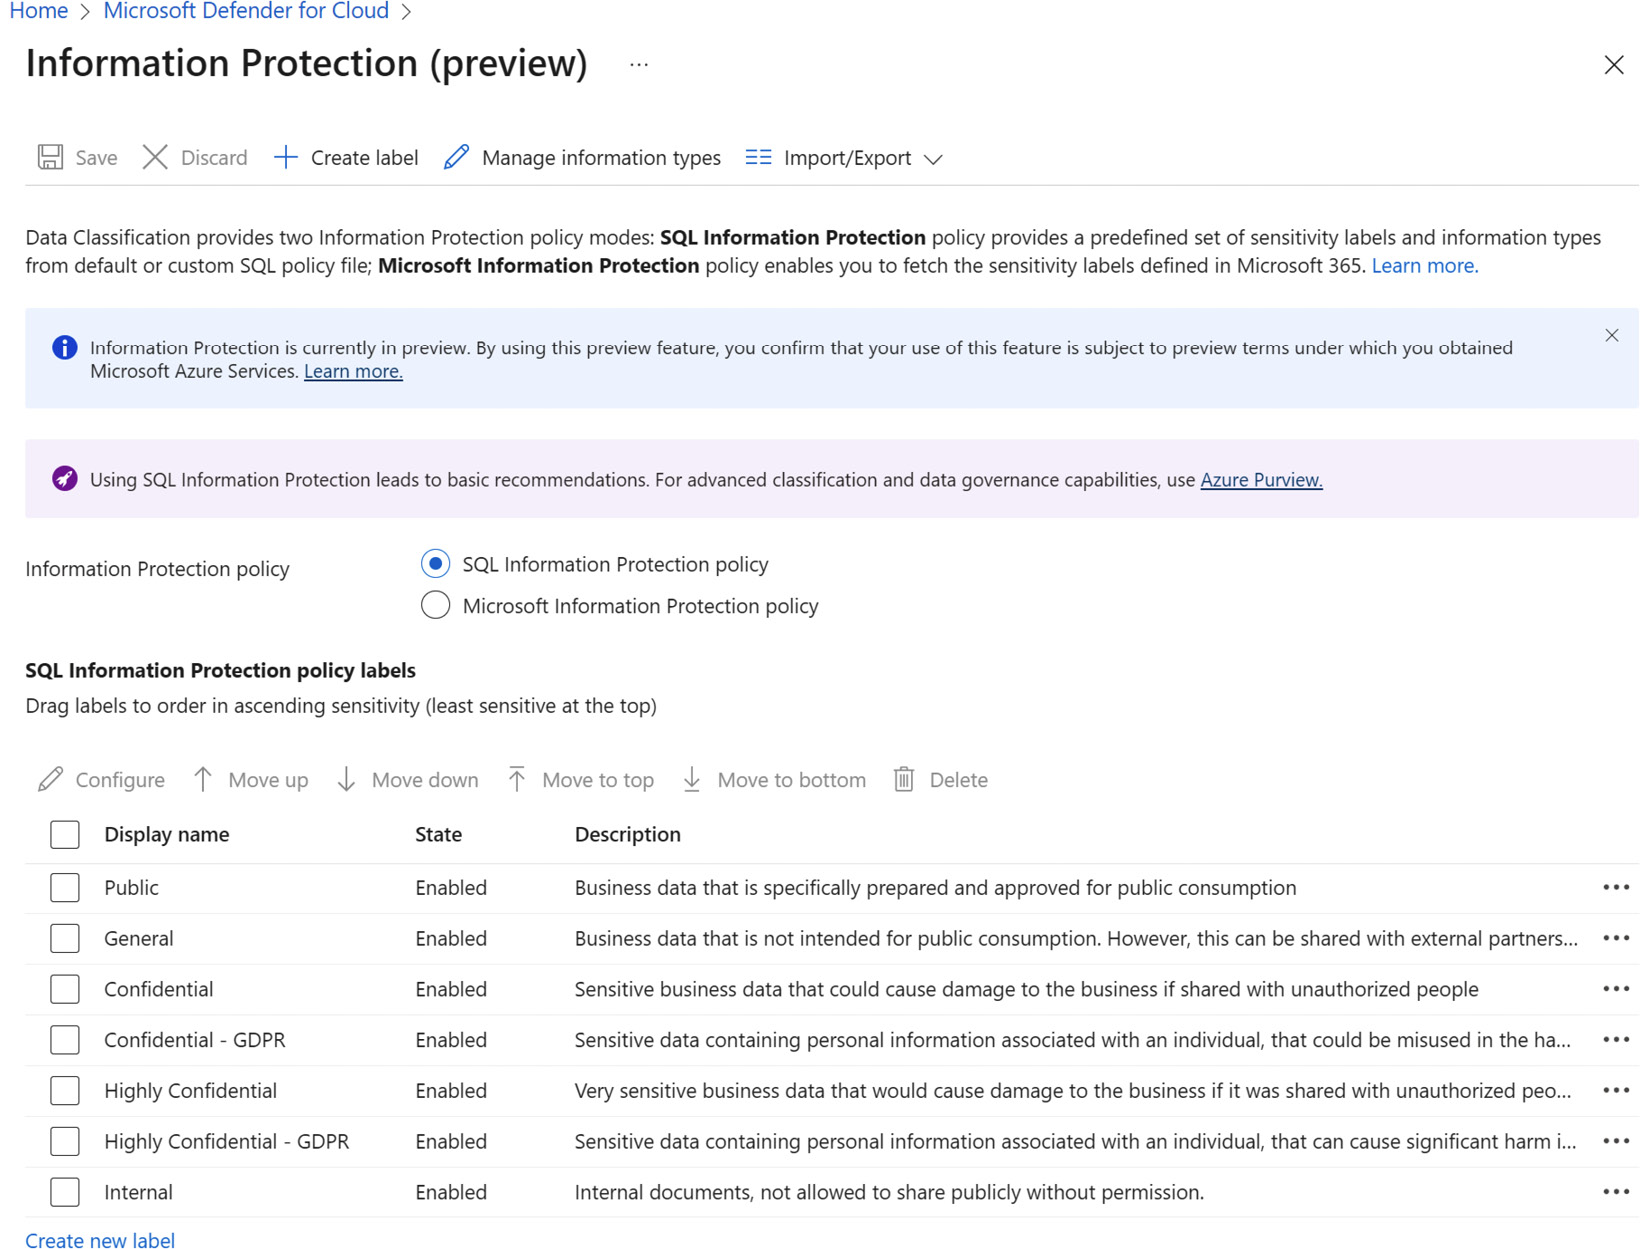
Figure 9.1 – Information Protection
SQL data classification supports two Information Protection policies: SQL Information Protection policy and Microsoft Information Protection policy. In this example, we will use the SQL Information Protection policy. Select SQL Information Protection Policy.
- From the top menu, click the + Create label button.

Figure 9.2 – Configure sensitivity label
- Sensitivity labels can be Enabled or Disabled. To start creating a sensitivity label and finish the process later, or to create a sensitivity label but not use it right away, select Disabled. Select Enabled to be able to use the label later.
- Type a label name. Label names should reflect the sensitivity of the content that will be labeled, such as Confidential, Top secret, Internal, and similar. Avoid naming labels Financial, Research, Contracts, and the like, as these words do not necessarily describe the sensitivity of the content.
- Type a label description that will accurately describe what kind of content is being labeled.
- From a drop-down menu, choose Rank. Rank describes a degree of content sensitivity.

Figure 9.3 – Configure sensitivity label rank
- The Configure Information types for automatically applying this label section allows you to define an information type to automatically apply this label. To choose a predefined information type, you would click on the Associate an information type link. You will not do that at this time as we will create a new information type and associate it with this label later.
Click OK to finish creating a label.
- A newly created label is shown in the list of available labels.
- To edit and change the label settings, on the menu under SQL Information Protection labels, click Configure. Alternatively, click on the ellipsis (three dots) on a label row on the right side and then click Configure.
- To order labels in ascending sensitivity – with the least sensitive label at the top and the most sensitive label at the bottom of the list, select a label (or labels), and click the Move up, Move down, Move to top, or Move to bottom buttons.

Figure 9.4 – Editing a label
How it works…
The labels you specify in your SQL Information Policy, or Information Protection policy, define data sensitivity levels and are used in data discovery, classification, labeling, and reporting mechanisms.
There's more…
Alternatively, you can also access the SQL Information Protection blade on the SQL database Azure portal pages. To access SQL Information Protection via the SQL database blade, complete the following steps:
- In the Azure portal, open SQL Database.
- On the left-hand menu, in the Security section, select Data Discovery & Classification.
- On the top menu, click Configure.
Creating and managing information types and managing information protection policy
Information types are the second of the two foundations of SQL Information Protection and data classification mechanisms. Information types are used to provide supplementary and more granular details of the discovered and classified data.
In this recipe, you will learn how to create and manage an information type that can be used in the SQL Information Protection policy. Moreover, you will also learn how to import and export an information protection policy.
Getting ready
Open a web browser and navigate to https://portal.azure.com.
How to do it…
To create and manage information types, complete the following steps:
- In the Azure portal, open Microsoft Defender for Cloud.
- On the top menu, click SQL Information Protection.
- In the Information Protection blade, on the top menu, click Manage Information Types.

Figure 9.5 – Information types
- The Information types blade contains a list of predefined and custom information types and their associated data:
- Name – Information type
- State – Enabled or disabled
- Associated label
- Type – Built-in or Custom
On the top menu, click + Create information type.
- On the right, the Configure information type window opens. Similarly to when configuring a sensitivity label, here as well you have the option to enable or disable the information type you are creating. Select Enabled:
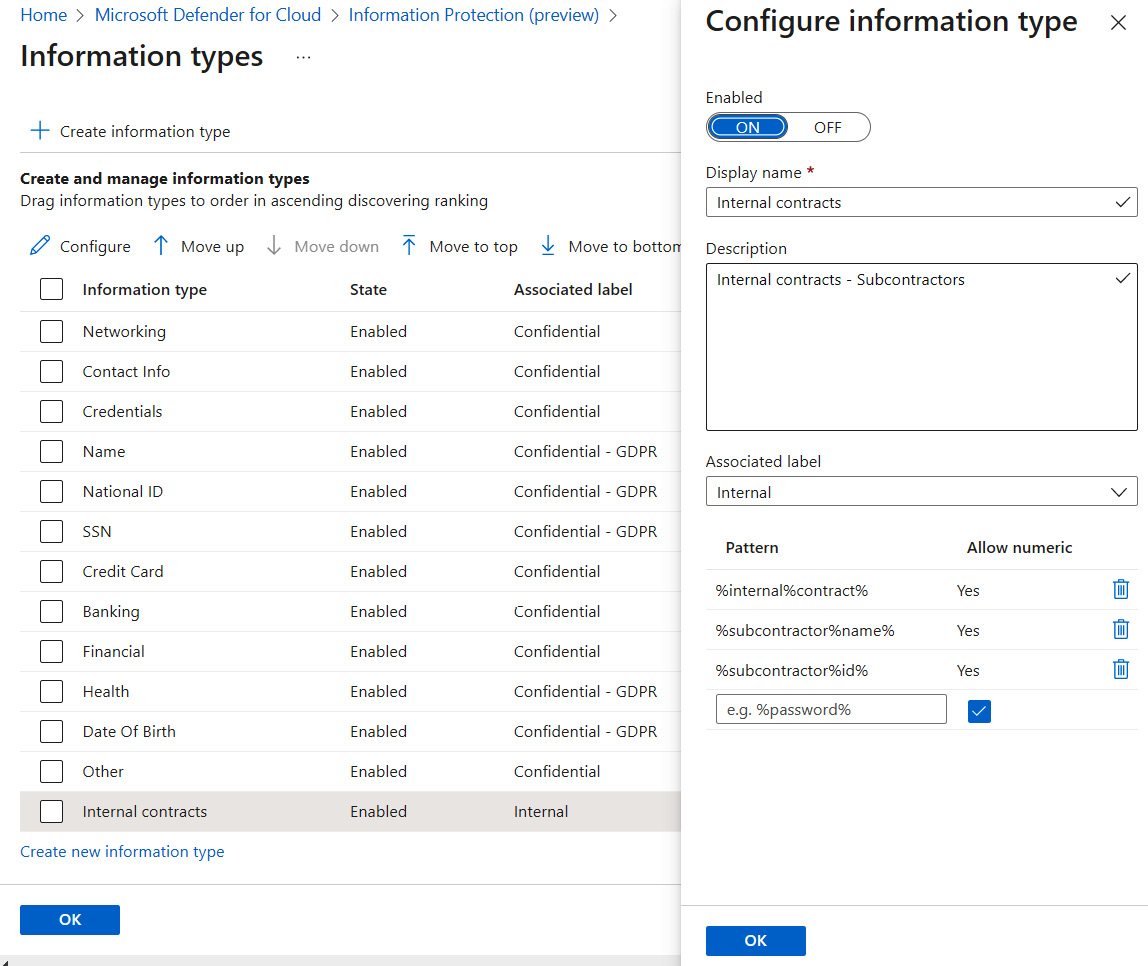
Figure 9.6 – Configuring information types
- In the Display name field, type a name for the information type you are configuring. The name should be concise, simple, and easy to understand.
- In the Description field, type a description of an information type you are configuring. Describe accurately what information type you are defining.
- In the Associated label menu, choose an information label to associate with the current information type. Alternatively, editing an information label gives you the option to associate it with an information type.
- Now, you must define an information type pattern. In the Pattern field, enter a pattern to match the data.
- Click OK.
How it works…
Information types provide additional details relating to sensitivity labels since search patterns use defined strings to match content in databases and classify it as sensitive. While you can't delete built-in information types, you can create your own information types and associate them with labels.
In the same way as labels, information types use list order to prioritize data matching: the higher an information type is in the list, the higher the matching priority.
There's more…
Use standard, regular matching patterns such as the following:
- % (percent) – to match any string of zero or more characters
- _ (underscore) – to match any single character in a string
For more information, refer to the following links:
- https://docs.microsoft.com/en-us/sql/t-sql/language-elements/string-operators-transact-sql?view=sql-server-ver15
- https://dev.mysql.com/doc/mysql-tutorial-excerpt/5.7/en/pattern-matching.html
Information policies can be exported and saved as a JSON format file. To export or import a policy, on the Information Protection blade, on the top menu, click on Import/Export and then select the desired option:

Figure 9.7 – Importing and exporting an Information Protection policy
As with any other JSON file, the policies can be edited and the file can be imported into a new Information Protection policy, overwriting the current policy:

Figure 9.8 – InformationProtectionPolicy.json file