
Chapter 6: Regulatory Compliance and Security Policy
In this chapter, you will learn how to manage security policies, manage compliance recommendations, add regulatory and compliance standards, manage compliance controls, and improve regulatory compliance in Microsoft Defender for Cloud.
Microsoft continuously updates regulatory compliance standards in Microsoft Defender for Cloud, displayed in the regulatory compliance dashboard. Using compliance assessment results presented in the dashboard, you can see the result of comparing the configuration of your resources with regulations, benchmarks, and industry standards. This way, you can quickly and efficiently remediate the results and work toward meeting particular compliance requirements.
We will cover the following recipes in this chapter:
- Managing Microsoft Defender for Cloud's default security policy
- Adding a custom security initiative and policy
- Adding a regulatory compliance standard
- Improving regulatory compliance, exempting, and denying a compliance control
- Accessing and downloading compliance reports
Technical requirements
To successfully complete recipes in this chapter, the following is required:
- An Azure subscription.
- A web browser, preferably Microsoft Edge.
- Microsoft Defender for Cloud plans.
- Resources in Azure subscription, such as virtual machines, storage, SQL Server, and Logic Apps. Microsoft Defender for Cloud will create resource recommendations based on available resources.
The code samples can be found at https://github.com/PacktPublishing/Microsoft-Defender-for-Cloud-Cookbook.
Managing Microsoft Defender for Cloud's default security policy
Microsoft Defender for Cloud generates security recommendations based on security policies. A security policy can be defined either on a management group, subscription, or a resource group.
In this recipe, you will learn to manage Microsoft Defender for Cloud's default security policy on a management group and a subscription.
Getting ready
Open a web browser and navigate to https://portal.azure.com.
How to do it…
To manage the Microsoft Defender for Cloud's default security policy, complete the following steps:
- In the Azure portal, open Microsoft Defender for Cloud.
- In the left menu, click Environment settings.
- Click on an arrow next to a management group to display a list of associated subscriptions. If you have created management groups and assigned subscriptions to management groups, the Environment settings page will display a list of management groups, with associated subscriptions, as shown in this example:
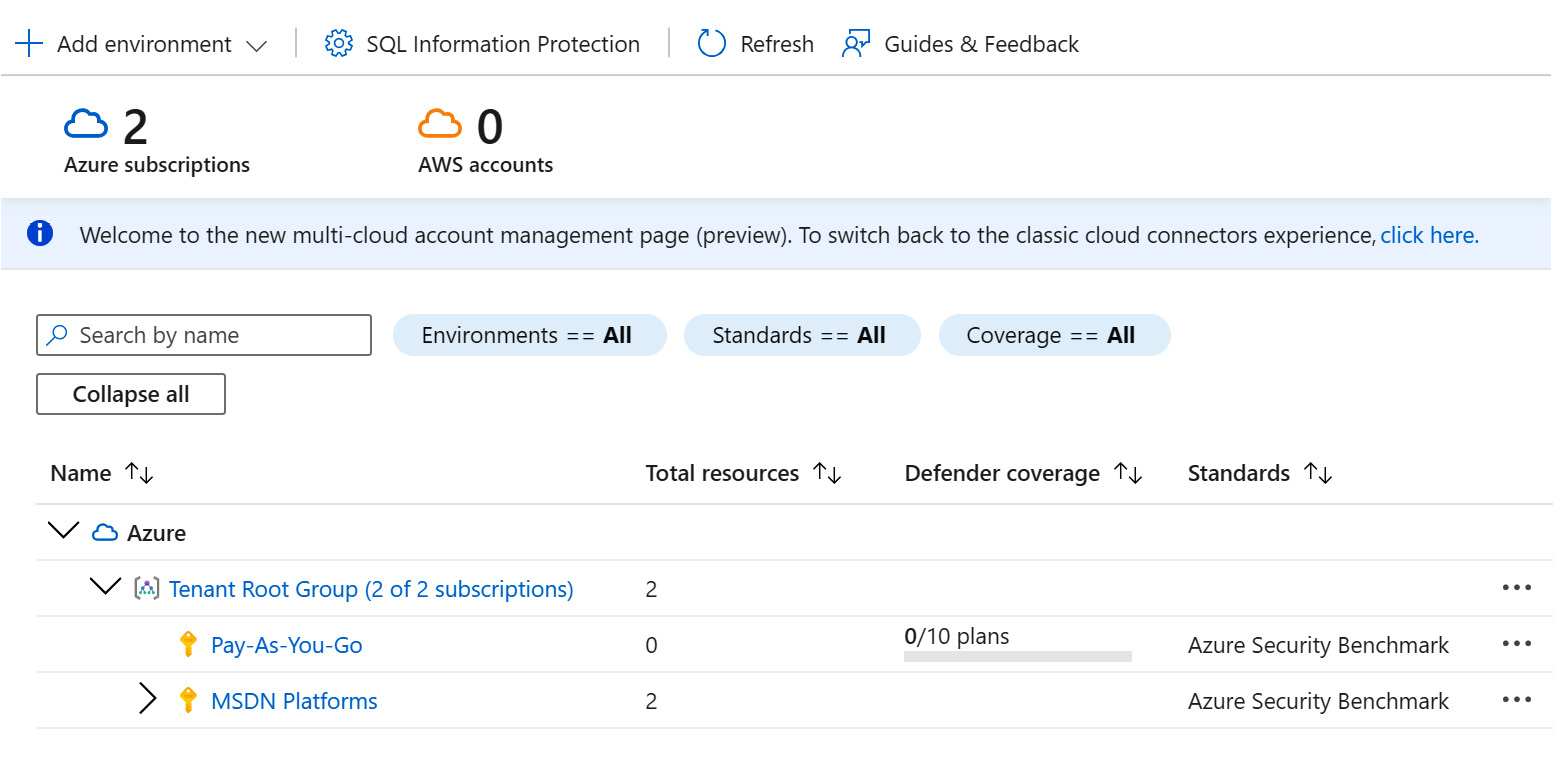
Figure 6.1 – Environment settings
- Click on a subscription.
- The Defender Plans blade opens. In the left menu, click on Security Policy.
- On the Security Policy blade, examine the Default initiative section and the list of default initiatives enabled on the selected subscription:

Figure 6.2 – Security policy
- On the right side of an initiative, click on the ellipsis to display a menu. The menu gives you the possibility to delete an initiative assignment, edit an initiative assignment, or create an exemption.
Select Edit assignment:

Figure 6.3 – Edit Initiative Assignment
- On the Edit Initiative Assignment blade, you can make several changes to an initiative. On the Basics page, in Exclusions, you can optionally exclude the following resources from the policy assignment: management groups, subscriptions, resource groups, and resources.
Click the ellipsis on the right side of the Exclusions text field.
- On the Exclusions blade, select a subscription and a resource group. Click the Add to selected scope button. Click Save to save the selected exclusions.
- The Policy enforcement switch allows you to disable policy enforcement. When policy enforcement is disabled, the policy effect is not enforced, but compliance assessment results are still available. Click Next.
- On the Parameters page, unselect Only show parameters that need input or review to display policy parameters that you can edit and change individually. Click Next.
- On the Remediation page, you can select either System assigned managed identity or User assigned managed identity. You will need a managed identity with policies containing deployIfNotExists and modify effect types to be able to deploy resources and edit tags on existing resources. Click Next.
- The Non-compliance messages page enables you to define a default non-compliance message. To define a policy-specific non-compliance message, click on an ellipsis right of a policy definition name and click Edit message:

Figure 6.4 – Non-compliance messages
- Type a non-compliance message and click Save.
- Click Next. On the Review + Save page, review the changes you made and click Save.
How it works…
When Defender for Cloud is enabled on a subscription, the Azure Security Benchmark policy initiative is automatically assigned to the subscription. Based on the policy parameters, the security policy initiative takes effect on a subscription. Furthermore, recommendations are generated and actions applied.
The policies' effect can be Append, Audit, AuditIfNotExists, Deny, DeployIfNotExists, and Disabled.
Adding a custom security initiative and policy
Microsoft Defender for Cloud supports adding your own custom initiatives.
In this recipe, you will learn to add a custom security initiative and regulatory compliance policy.
Getting ready
Open a web browser and navigate to https://portal.azure.com.
How to do it…
To add a custom security initiative and policy to a subscription, complete the following steps:
- In the Azure portal, open Microsoft Defender for Cloud.
- In the left-hand menu, click Environment settings.
- Click on an arrow next to a management group to display a list of associated subscriptions. If you have created management groups and assigned subscriptions to management groups, the Environment settings page will display a list of management groups, with associated subscriptions.
- Click on a subscription.
- The Defender Plans blade opens. In the left menu, click on Security Policy.
- Scroll down to the end of the blade until the Your custom initiatives section is visible.
- Click Add a custom initiative.
- At the Add custom initiatives blade, click + Create new to create a new custom policy initiative.
- On the Basics page, click on an ellipsis right next to Initiative location and choose a location where the initiative will be stored. The initiative assignment is only available to resources at or below this location in the hierarchy.
- Enter a name and a description of the initiative definition.
- Use an existing category or create a new category for your initiative. Optionally, you can define an initiative version as well. Click Next.
- On the Policies page, click Next to skip this page and navigate to Controls.
- Click the Create Control button and create a control; define a name, control domain, and add a description. Once you have created a control, you will be able to return to the Policies page and add a control to a policy. Save the control and click Previous to return to Policies.
- Click Add policy definition.
- Choose one or more policies or controls and click Add.
- Select one or more policies and click the Add selected policies to a control button:

Figure 6.5 – Initiative definition – Policies
- On Add selected policies to a control, select which controls the selected policies should belong to and click Save.
- Click Next to navigate to the Controls page. Click Next to navigate to the subsequent pages – Initiative parameters and Policy parameters.
Optionally, add initiative and (or) policy parameters. For example, allowedLocations is a parameter that enables a policy to limit the location of resources to a specified location only.
- Click Review + create to complete creating the initiative definition.
- On the right side of the Add custom initiatives page, click Add to add a policy to a subscription:

Figure 6.6 – Add custom initiatives
- Review the policy settings on each page (Basics, Parameters, Remediation, and Non-compliance messages) and click Review + create:

Figure 6.7 – The custom initiatives list
How it works…
Once you add your own custom initiative, you will begin to receive recommendations based on the custom security initiative, along with already defined and associated security initiatives.
If there is a conflict between two or more security initiatives, you will see a warning message and a link to expand the list of policy assignments in conflict:

Figure 6.8 – Security initiatives enabled on a subscription
Click on See conflicts to expand and list the details of recommendation conflicts:

Figure 6.9 – Security initiatives – recommendation conflicts
Adding a regulatory compliance standard
Microsoft Defender for Cloud assigns the Azure Security Benchmark regulatory compliance standard as default with every subscription. You can add a regulatory standard initiative to Azure subscriptions from the growing list of supported regulatory standards.
In this recipe, you will learn to add a regulatory compliance standard to an Azure subscription.
Getting ready
Open a web browser and navigate to https://portal.azure.com.
How to do it…
To add a regulatory compliance standard to Microsoft Defender for Cloud, complete the following steps:
- In the Azure portal, open Microsoft Defender for Cloud.
- On the left menu, click Environment settings.
- On the Environment settings blade on the right, select a subscription to open the Settings blade.
- On the left menu, click on Security policy.
- Security policy contains three sections – Default initiative, Industry & regulatory standards, and Your custom initiatives:

Figure 6.10 – The Industry & regulatory standards section
- The Industry & regulatory standards section shows the active compliance initiatives that are shown in the Regulatory compliance dashboard. The list contains the following information about compliance initiatives:
a. Name – identifies a compliance initiative and provides a link to the initiative definition
b. Description – a short initiative and standard description
c. Type – the type of the policy, either Out of the box or Manually added
d. Inheritance – information on whether an initiative is applied via inheritance – for example, if the initiative has been applied on a management group, the management group name will be displayed
e. The Action button – allows you to disable or delete a compliance initiative
- Click on the Add more standards button.
- The Add regulatory compliance standards blade contains the list of available regulatory compliance standards and their descriptions. Click the Add button to add a regulatory compliance standard – for example, NIST SP 800-53 R5:

Figure 6.11 – Add regulatory compliance standards
- The Assign initiative blade opens. The Basics tab is the first of five blades in total; Scope reflects the current working subscription, while you can add any exclusions to the initiative and a description. Click Next.
- On the Parameters tab, you can search for and edit any initiative parameter. Click Next.
- On the Remediation tab, you can configure remediation tasks for existing and newly created resources. To enable the initiative to apply deployIfNotExist and modify types to resources in a subscription, you need a managed identity, and here, you can choose between System assigned managed identity and User assigned managed identity. Click Next:

Figure 6.12 – Assign initiative – the Remediation tab
- On the Non-compliance messages tab, you can review policy-specific messages that are displayed in case you have any non-compliant resources or when a resource is denied. Click Next.
- On the Review + create page, review the initiative information and click Create to assign the initiative.
- Return to the Microsoft Defender for Cloud main page. On the left menu, click Regulatory compliance:

Figure 6.13 – Regulatory compliance
- The top part of the Regulatory compliance page shows the Azure Security Benchmark score, in addition to other compliance regulatory standards' scores, sorted from lowest to highest score.
The lower part shows a set of assessments associated with the chosen compliance control. If a recently added compliance control is not displayed on the page, on the right edge of the page, click on the ellipsis to show additional compliance controls and select the desired one.
- The list shows a set of assessments associated with the selected control run by Defender for Cloud, organized in categories. Click on an arrow next to a category to expand and see the associated assessments:

Figure 6.14 – The regulatory compliance control details
How it works…
Presently, the following regulatory compliance standards are available:
- PCI-DSS v3.2.1:2018
- SOC TSP
- NIST SP 800-53 R4
- NIST SP 800 171 R2
- UK OFFICIAL and UK NHS
- Canada Federal PBMM
- Azure CIS
- HIPAA/HITRUST
- SWIFT CSP CSCF v2020
- ISO 27001:2013
- New Zealand ISM Restricted
- CMMC Level 3
- NIST SP 800-53 R5
- FedRAMP H
- FedRAMP M
- AWS CIS
- AWS PCI DSS
- AWS Foundational Security Best Practices
- GCP CIS
If an assessment is green, it means it has a passing score, whereas if an assessment is red, it means it is not passing and needs further attention and remediation steps.
See also
Microsoft provides information about regulatory and compliance standards in Azure on various pages. Detailed information, downloadable information, as well as comprehensive information about regulatory compliance standards, can be accessed online, such as a standards overview, applicability, and services in scope. For your convenience, in the following list, we provide a few links to get started with compliance, governance, and regulatory standards:
- Azure compliance documentation: https://docs.microsoft.com/en-us/azure/compliance/
- Azure Global Compliance Map: https://azure.microsoft.com/en-us/resources/azure-global-compliance-map/
- Introduction to regulatory compliance: https://docs.microsoft.com/en-us/azure/cloud-adoption-framework/govern/policy-compliance/regulatory-compliance
- Microsoft Trust Center: https://www.microsoft.com/en-us/trust-center
- Microsoft Service Trust Portal: https://servicetrust.microsoft.com/
Improving regulatory compliance, exempting, and denying a compliance control
Microsoft Defender for Cloud continuously monitors and assesses your environment corresponding to regulatory compliance controls applied to subscriptions.
In this recipe, you will learn how to improve your regulatory compliance.
Getting ready
Open a web browser and navigate to https://portal.azure.com.
How to do it…
To improve your regulatory compliance status, complete the following steps:
- In the Azure portal, open Microsoft Defender for Cloud.
- On the left menu, click Regulatory compliance.
- On the tabs showing names of regulatory compliance standards, click on Azure Security Benchmark. We are using this regulatory compliance policy as an example – you are welcome to use any regulatory compliance you want.
- To expand a compliance control category, click on an arrow next to the desired category. There are two squares, containing MS and C letters. MS means a category contains controls that are under Microsoft's responsibility, while C means a category contains controls that are a part of the customer's responsibility:

Figure 6.15 – An expanded compliance control
- In this example, the compliance status of the Secure transfer to storage accounts should be enabled control is not adequate, and given its compliance status, we might want to improve its compliance. Under Customer responsibility, click on the Secure transfer to storage accounts should be enabled control link.
- The selected control's page opens:

Figure 6.16 – Security control details
- In the Affected resources section, select the resources you want to remediate. After you have selected a resource, three buttons at the bottom of the page become active.
You can click Fix to remediate selected resources, Trigger logic app to execute a logic app with this recommendation, or Exempt to exempt a recommendation from any scope so that it does not affect the secure score.
- At the top of the page, you can click the Deny button to set the scope to block the creation of resources that do not comply with the recommendation.
How it works…
The status of regulatory standards assessments and your compliance with the standards are shown in the regulatory standards dashboard. To improve the compliance, examine the list of controls for that standard and resolve the applicable assessment recommendations. If a control does not apply to your environment, and to ensure a recommendation does not affect your compliance status, you can exempt a recommendation. To make sure newly created resources are compliant with a current standard, you can prevent creating resources that are not compliant with a standard.
Accessing and downloading compliance reports
Microsoft Defender for Cloud allows you to download and export a regulatory standard compliance status, Azure and Dynamics certification reports for the applied standards, and to view and track regulatory compliance over time.
In this recipe, you will learn to access and download regulatory standards reports and certification reports, and check the compliance over time dashboard.
Getting ready
Open a web browser and navigate to https://portal.azure.com.
How to do it…
To download reports and check regulatory compliance status over time, complete the following steps:
- In the Azure portal, open Microsoft Defender for Cloud.
- On the left menu, click Regulatory compliance.
- To download a regulatory compliance status report, in the top menu, click the Download report button. The Download report blade opens on the right.
- From the Report standard menu, select a regulatory standard. The list of regulatory standards contains active standards on your subscriptions.
- From the Format menu, select the CSV or PDF report format:

Figure 6.17 – Download report
- Click Download to download and save a report.
- Close the Download report blade.
- In the top menu, click the Audit reports button. The Audit reports blade opens:

Figure 6.18 – Audit reports
- Each tab on the top contains reports for relevant standards: US Government, ISO, PCI, SOC, Industry & Regional, and HITRUST. You can search for a report and use filters to narrow down the list of reports. Identify the report you want to do view and click on the ↓Download link next to a report title.
- Read the Privacy Notice pop-up message and click Download to save the report.
- Close the Audit reports blade to return to the Regulatory compliance blade.
- On the top menu, click Compliance over time workbook.
- Before displaying the workbook details, you must configure continuous export to a Log Analytics Workspace on a subscription. To configure Defender for Cloud continuous export to a Log Analytics workspace; refer to the recipes in Chapter 3, Workflow Automation and Continuous Export.
- From the menus, select a Workspace option, a Subscription option, and a regulatory standard option from the Standard name dropdown. The Regulatory compliance overview and Regulatory compliance passed controls over time (weekly) dashboards display the following:
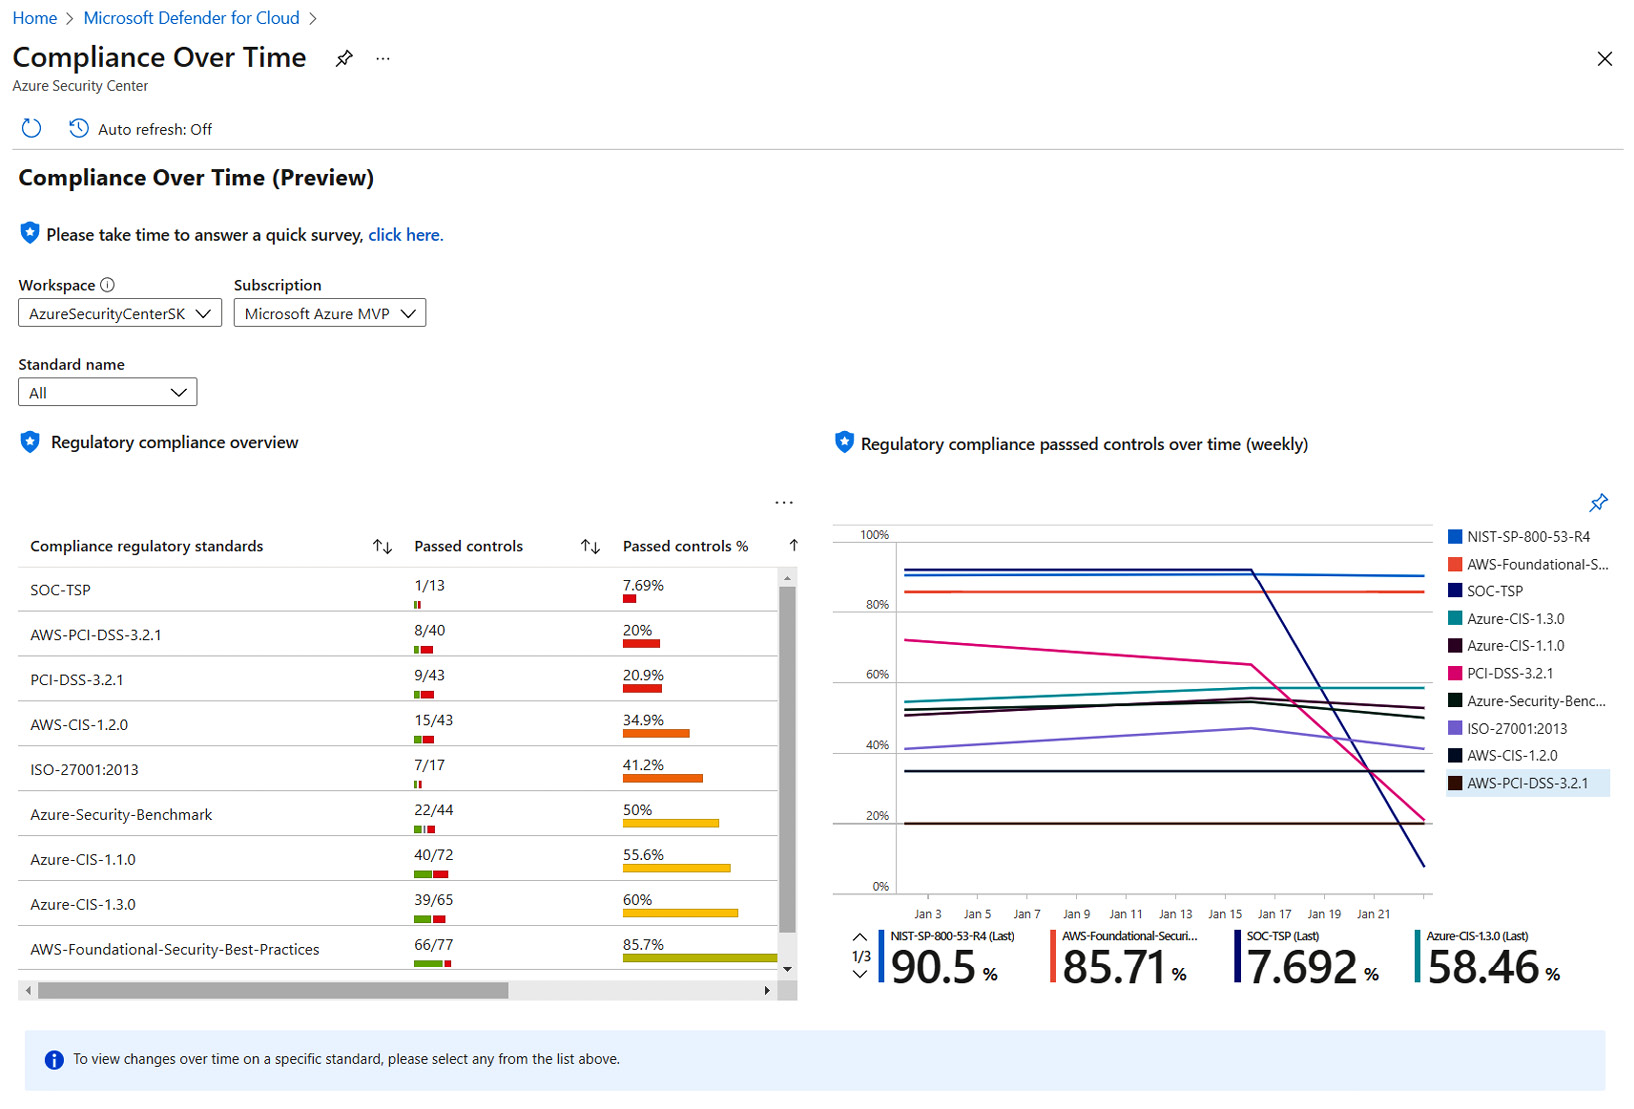
Figure 6.19 – The Compliance Over Time workbook dashboard
- On Regulatory compliance overview, click on a standard to display the changes for the selected standard and its categorized controls – the passed control percentages, and the 7- and 30-day changes:

Figure 6.20 – The changes over time dashboard
- Click on a Main control category to display its sub-control details: Current failed assessments, Failed assessments last week, and Failed assessments last month.
- Furthermore, you can select a sub-control's compliance control and see its assessments over time.

Figure 6.21 – The assessments over time dashboard
- Click on a recommendation name to see the current failing resources and the failed resources over time for each subscription.
How it works…
When you configure a continued export for a subscription, regulatory compliance data is stored in the Log Analytics workspace. The Compliance Over Time dashboard uses saved data to graphically present and display saved data in more human-friendly and easily understandable color-coded lists and charts.