

In this chapter, you will learn how to | |
|---|---|
✓ | Apply themes. |
✓ | Use different color and font schemes. |
✓ | Change the slide background. |
✓ | Change the look of placeholders. |
✓ | Change the alignment, spacing, size, and look of text. |
An overall consistent look, punctuated by variations that add weight exactly where it is needed, can enhance the likelihood that your message will be well received and absorbed by your intended audience. To make your Microsoft PowerPoint 2010 presentations visually appealing, you can add enhancements to the presentation as a whole or to individual slides.
In this chapter, you’ll apply a theme to a presentation and then change the theme’s color and font schemes. You’ll add color and shading to the background of slides and to the background of placeholders. Finally, you’ll change the look of specific text elements.
Practice Files
Before you can complete the exercises in this chapter, you need to copy the book’s practice files to your computer. The practice files you’ll use to complete the exercises in this chapter are in the Chapter04 practice file folder. A complete list of practice files is provided in Using the Practice Files at the beginning of this book.
When you create a presentation based on a template or a ready-made design, the presentation includes a theme—a combination of colors, fonts, formatting, graphics, and other elements that gives the presentation a coherent look. Even a presentation developed from scratch has a theme; the Office theme is applied by default. This theme consists of a white background, a very basic set of colors, and the Calibri font.
If you want to change the theme applied to a presentation, you can choose one from the Themes gallery. By using the Live Preview feature, you can easily try different effects until you find the one you want.
See Also
For information about creating your own themes, see Creating Theme Colors and Fonts in Chapter 13.
In this exercise, you’ll change the theme applied to one presentation that was created from scratch and to another that was created from a template.
Set Up
You need the Landscaping_start and CompanyMeetingA_start presentations located in your Chapter04 practice file folder to complete this exercise. Open the presentations, and save them as Landscaping and CompanyMeetingA, respectively. Then follow the steps.
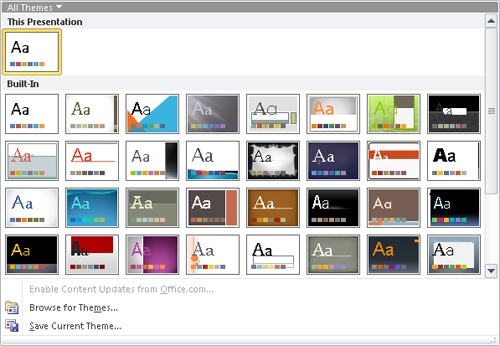
With the Landscaping presentation active, on the Design tab, in the Themes group, click the More button.
The Themes gallery appears, displaying all the available themes.
Point to each theme thumbnail in turn to see a live preview of what the presentation will look like with that theme applied.
Notice that the themes are organized alphabetically and that their names appear in ScreenTips when you point to them.
Click the Austin thumbnail to apply that theme to the entire presentation.
Click the Home tab, and then on slide 1, click the presentation’s title.
Instead of a white background with black text in the Calibri font, the presentation now has a green background design with title text in the Century Gothic font.

Most built-in themes have a distinctive title slide design that is modified for all the other slide layouts.
Troubleshooting
The appearance of buttons and groups on the ribbon changes depending on the width of the program window. For information about changing the appearance of the ribbon to match our screen images, see Modifying the Display of the Ribbon at the beginning of this book.
On the View tab, in the Window group, click the Switch Windows button, and click CompanyMeetingA to switch to that presentation.
This presentation already has a theme applied to it.
Display the Themes gallery, and then click the Urban thumbnail.
The background of the presentation now has dark blue and teal accents, and the text is in blue Trebuchet and black Georgia.

Every presentation you create with PowerPoint 2010, even a blank one, has a set of colors, called a color scheme, associated with its theme. A color scheme consists of 12 complementary colors designed to be used for the following elements of a slide:
Text/Background. Use these four colors for dark text on a light background or light text on a dark background.
Accent 1 through Accent 6. Use these six colors for objects other than text.
Hyperlink. Use this color to draw attention to hyperlinks.
Followed Hyperlink. Use this color to indicate visited hyperlinks.
When you click color buttons such as the Font Color button in the Font group on the Home tab, the color palette displays 10 of the 12 colors with light to dark gradients. (The two background colors are not represented in these palettes.)
Understanding color schemes can help you create professional-looking presentations that use an appealing balance of color. You’re not limited to using the colors in a presentation’s color scheme, but because they have been selected by professional designers and are based on good design principles, using them ensures that your slides will be pleasing to the eye.
See Also
For information about how scheme colors are allocated, see Creating Theme Colors and Fonts in Chapter 13. For information about using non-scheme colors, see the sidebar Non–Color Scheme Colors later in this chapter.
To view the color schemes you can apply to a presentation, you display the Colors gallery, which has Live Preview capabilities. When you find a color scheme you like, you simply click it to change the color scheme of all the slides in the presentation.
Tip
To apply a color scheme only to a selected slide, right-click the scheme and then click Apply To Selected Slides
In addition to changing the color scheme, you can change the font scheme, which provides two complementary fonts for each theme. The Fonts gallery lists the combinations in alphabetical order by theme. In each combination, the top font (called the heading font) is used for slides titles, and the bottom font (called the body font) is used for other slide text.
If none of the color schemes is exactly what you’re looking for, you can create your own by clicking Create New Theme Colors at the bottom of the Colors gallery and assembling colors in the Create New Theme Colors dialog box. You can also create a custom font scheme by clicking Create New Theme Fonts at the bottom of the Fonts gallery and then specifying the font combination you want in the Create New Theme Fonts dialog box.
After you save either type of custom scheme, you can apply it to one or all of the slides in a presentation.
When you apply a different color scheme or font scheme to a presentation, your changes are stored with the presentation and do not affect the underlying theme.
Tip
Also associated with each theme is an effects scheme. This scheme ensures that the shapes in the presentation have a consistent look. Clicking the Effects button in the Themes group of the Design tab displays a gallery of effect combinations to choose from.
In this exercise, you’ll apply a different color scheme to a presentation, create your own scheme, change the color scheme of one slide, and then apply a different font scheme.
Set Up
You need the CompanyMeetingB_start presentation located in your Chapter04 practice file folder to complete this exercise. Open the CompanyMeetingB_start presentation, and save it as CompanyMeetingB. Then follow the steps.
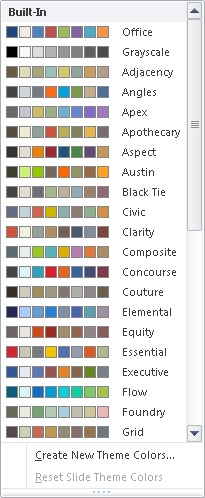
On the Design tab, in the Themes group, click the Colors button.
The Colors gallery appears.
In the gallery, point to a few color schemes, and watch the Live Preview effect on the active slide.
Click Essential to apply that color scheme to the presentation instead of the default color scheme of the Urban theme.
Notice that the theme retains all of its other characteristics, such as the fonts and background graphic; only the colors change.
With slide 1 displayed, in the Themes group, click the Colors button.
Right-click the Solstice color scheme, and then click Apply to Selected Slides.
PowerPoint applies the Solstice color scheme to only the title slide, changing its main background color from red to dark brown, but retaining the gold accent color.
On the Design tab, in the Themes group, click the Fonts button.
The Fonts gallery appears.
In the Fonts gallery, point to a few font schemes to display live previews of their effects on the active slide.
Click Newsprint.
PowerPoint applies that font scheme to the presentation instead of the default font scheme of the Urban theme.


In PowerPoint, you can customize the background of a slide by adding a solid color, a color gradient, a texture, or even a picture.
A color gradient is a visual effect in which a solid color gradually changes from light to dark or dark to light. PowerPoint offers several gradient patterns, each with variations. You can also choose a preset arrangement of colors from professionally designed backgrounds in which different colors gradually merge.
If you want something fancier than a solid color or a gradient, you can give the slide background a texture. PowerPoint comes with several built-in textures that you can easily apply to the background of slides. If none of these meets your needs, you might want to use a picture of a textured surface. For a dramatic effect, you can also incorporate an image or design of your own, although these are best reserved for small areas of the slide rather than the entire background.
In this exercise, you’ll shade the background of one slide. Then you’ll apply a textured background to all the slides in the presentation.
Set Up
You need the ColorDesign_start presentation located in your Chapter04 practice file folder to complete this exercise. Open the ColorDesign_start presentation, and save it as ColorDesign. Then follow the steps.
On the Design tab, in the Background group, click the Background Styles button.
The Background Styles gallery appears.
In the gallery, point to each thumbnail in turn to see a live preview of its effects.
Click the third thumbnail in the second row (Style 7).
Instantly, the background of all the slides in the presentation change to a blue gradient.
Click the Background Styles button again, and then at the bottom of the gallery, click Format Background.
The Format Background dialog box opens.
Click the Type arrow to display the list of options, and then click Rectangular.
Behind the dialog box, the active slide changes to reflect this setting.
Display the Direction list, and click the rightmost thumbnail (From Top Left Corner).
In the Gradient stops area, drag the middle handle on the slider (Stop 2 of 3) to the right until the Position setting is 80%.
Behind the dialog box, you can see that 80 percent of the slide is now a lighter shade, with the gradient to dark occupying only about 20 percent.
Display the Color list, and then under Theme Colors, click the third box in the purple column (Purple, Accent 4, Lighter 40%).
Click Close.
PowerPoint applies the shaded background to the current slide only.
Click the Background Styles button again, and then click Format Background.
In the Format Background dialog box, click Picture or texture fill.
The active slide shows a live preview of the default texture.
Display the Texture gallery, and then click Purple mesh.
Click the Apply to All button, and then click Close.
PowerPoint applies the textured background to all the slides in the presentation.
In the Themes group, click the More button.
The Themes gallery appears.


For a consistent look, you won’t usually want to change the formatting of a presentation’s placeholders. However, when you want to draw attention to an entire slide or an element of a slide, you can do so effectively by making specific placeholders stand out. You might also want to format text boxes that you have drawn manually on a slide.
See Also
For information about drawing text boxes, see Adding Text Boxes in Chapter 3.
When you format a placeholder or a text box, you are essentially formatting a shape. You have the following options:
Fill the background with a color, gradient, texture, pattern, or picture.
Change the color and style of the shape’s outline.
Apply a style such as a shadow, reflection, or glow.
Apply a three-dimensional effect.
In this exercise, you’ll first apply a color to a text box. Then you’ll change its border and give it a glow effect.
Set Up
You need the BusinessTravelA_start presentation located in your Chapter04 practice file folder to complete this exercise. Open the BusinessTravelA_start presentation, and save it as BusinessTravelA. Then follow the steps.
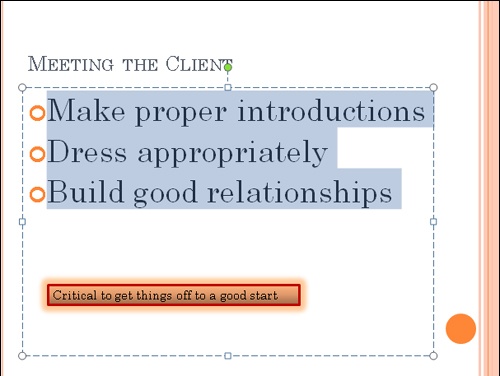
Display slide 5, click anywhere in the free-standing text at the bottom of the slide, and then click the border of the text box to select the box for manipulation.
On the Format contextual tab, in the Shape Styles group, click the Shape Fill arrow.
The Shape Fill palette appears.
In the palette, point to a few colors in turn to see a live preview of its effects on the background of the text box.
Click the third shade in the orange column (Orange, Accent 1, Lighter 40%).
The background of the text box is now a medium orange color.
Click the Shape Fill arrow again, and then below the palette, point to Gradient.
The Gradient gallery appears.
Under Dark Variations, click the second thumbnail in the third row (Linear Up).
In the Shape Styles group, click the Shape Outline arrow, and under Standard Colors, click the Dark Red box.
Click the Shape Outline arrow again. Then below the palette, point to Weight, and in the list, click 3 pt.
Tip
The abbreviation pt stands for point. A point is a unit of measurement used in the design and publishing industries. There are 72 points to the inch.
In the Shape Styles group, click the Shape Effects button.
A list of all the types of effects you can apply to the text box appears.
In turn, display the options for each type, and point to a few to see their live previews.
When you have finished exploring, point to Glow, and then click the first thumbnail in the last row (Orange, 18 pt glow, Accent color 1).
Click away from the text box to release the selection.
The text box is less likely to be overlooked now.


In most PowerPoint templates, text appears as either a slide title or a bulleted list. The alignment and spacing of the text are controlled by the design built into the template. You can override these settings, which are collectively called paragraph formatting. Click anywhere in the paragraph, and then do the following:
Lists. Click the Bullets arrow to display a gallery of alternative built-in bullet symbols. You can click None to remove bullet formatting and create an ordinary paragraph. To switch to a numbered list, click the Numbering arrow, and then click the numbering style you want.
Alignment. Click one of the following alignment buttons in the Paragraph group on the Home tab:
Click the Align Text Left button to align text against the placeholder’s left edge. Left-alignment is the usual choice for paragraphs.
See Also
For more information about keyboard shortcuts, see Appendix A at the end of this book.
Click the Center button to align text in the middle of the placeholder. Center-alignment is often used for titles and headings.
Click the Align Text Right button to align text against the placeholder’s right edge. Right-alignment isn’t used much for titles and paragraphs, but you might want to use it in text boxes.
Click the Justify button to align text against both the left and right edges, adding space between words to fill the line. You might justify a single, non-bulleted paragraph on a slide for a neat look.
Line spacing. Click the Line Spacing button in the Paragraph group, and make a selection.
Paragraph spacing. Open the Paragraph dialog box, either by clicking the Line Spacing button and then clicking Line Spacing Options at the bottom of the menu or by clicking the dialog box launcher in the lower-right corner of the Paragraph group. You can then adjust the Before and After settings for the entire paragraph.
In addition to changing the look of paragraphs, you can manipulate the look of individual words by manually applying settings that are collectively called character formatting. After selecting the characters you want to format, you can make changes by using the commands in the Font group on the Home tab, as follows:
Font. Override the font specified by the font scheme by making a selection in the Font box.
Size. Manually control the size of text either by clicking the Increase Font Size or Decrease Font Size button or by setting a precise size in the Font Size box.
Tip
If you turn off AutoFit so that you can manually size text, you have two ways to adjust the size of placeholders to fit their text: by manually dragging the handles around a selected placeholder, or by clicking Resize Shape To Fit Text on the Text Box page of the Format Shape dialog box. For information about AutoFit, see Correcting and Sizing Text While Typing in Chapter 3.
Style. Apply attributes such as bold, italic, underlining, and shadow and strikethrough effects to selected characters.
Color. Change the color of the selected characters by clicking the Font Color arrow and then clicking the color you want in the palette.
Case. Change the capitalization of the words—for example, you can change small letters to capital letters—by clicking the Change Case button and then clicking the case you want.
Character spacing. Increase or decrease the space between the letters in a selection by clicking the Character Spacing button and then clicking the option you want. You can also click More Spacing to display the Character Spacing page of the Font dialog box, where you can specify spacing more precisely.
Tip
You can clear all manually applied character formatting from a selection by clicking the Clear All Formatting button.
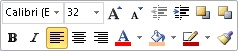
To make it quick and easy to apply the most common paragraph and character formatting, PowerPoint displays the Mini Toolbar when you make a text selection. This toolbar contains the same buttons you’ll find in the Font and Paragraph groups on the Home tab, but they’re all in one place, adjacent to the selection. If you don’t want to apply any of the Mini Toolbar formats, you can simply ignore it, and it will disappear.
After you have formatted the text on a slide, you might find that you want to adjust the way lines break to achieve a more balanced look. This is often the case with slide titles, but bullet points and regular text can sometimes also benefit from a few manually inserted line breaks. You can simply press Shift+Enter to insert a line break at the cursor.
This fine-tuning should wait until you have taken care of all other formatting of the slide element, because changing the font, size, and attributes of text can affect how it breaks.
In this exercise, you’ll experiment with changing various types of character formatting and paragraph formatting to achieve the look you want. You’ll also insert a few line breaks to balance the text on a slide.
Set Up
You need the BusinessTravelB_start presentation located in your Chapter04 practice file folder to complete this exercise. Open the BusinessTravelB_start presentation, and save it as BusinessTravelB. Then follow the steps.
Display slide 3, and in the fourth bullet point, double-click Buyer.
The Mini Toolbar appears.
Move the pointer over the Mini Toolbar to make it active, and then click the Italic button.
Display slide 4, and in the Slide pane, drag diagonally across the four bullet points to select them.
On the Home tab, in the Font group, click the Font Color arrow. Then under Standard Colors in the palette, click the Red box.
Display slide 5, and click anywhere in the bulleted list. Then in the Editing group, click the Select button, and click Select All.
All the text in the placeholder is selected. The text at the bottom is not selected because it is in a separate text box, not in the placeholder.
In the Font group, click the Increase Font Size button until the setting in the Font Size box is 44.
Using the Increase Font Size and Decrease Font Size buttons takes the guesswork out of sizing text.
In the Font group, click the Clear All Formatting button to return the font size to 24.
Display slide 9, and select both bullet points.
In the Paragraph group, click the Bullets arrow.
The Bullets gallery appears.
In the gallery, click None.
The bullet points are converted to regular text paragraphs.
With both paragraphs still selected, in the Paragraph group, click the Line Spacing button, and then click Line Spacing Options.
The Paragraph dialog box opens.
In the General area, change the Alignment setting to Centered.
In the Spacing area, change the Before setting to 0 pt and the After settings to 24 pt. Then change the Line Spacing setting to 1.5 lines.
Click OK.
In the first paragraph, click to the left of the word only, and press Shift+Enter to insert a line break.
Repeat step 15 to insert another line break before the word that.
In the second paragraph, insert a line break before the word to and another before the word for.
The phrases of both paragraphs are now nicely balanced.


Non–Color Scheme Colors
Although working with the 12 colors of a harmonious color scheme enables you to create presentations with a pleasing design impact, you might want to use a broader range of colors. You can add colors that are not part of the color scheme by selecting the element whose color you want to change and then choosing a standard color from the Font Color palette or a custom color from the wide spectrum available in the Colors dialog box.
To apply a custom color:
Select text on a slide, and then on the Home tab, in the Font group, click the Font Color arrow.
At the bottom of the color palette, click More Colors.
The Colors dialog box opens.
Click a color in the Colors spectrum, and then click OK.
You can also click the Custom tab to display a color gradient where you can select a color based on precise Red/Green/Blue or Hue/Saturation/Luminescence settings.

After you use a color, it becomes available on all the palettes that appear when you click a button that applies color—for example, the Font Color button in the Font group on the Home tab. The color remains on the palettes even if you change the theme applied to the presentation.
Switching from one predefined theme to another is an easy way of changing the look of an entire presentation.
You can apply a ready-made color scheme or font scheme to one or all the slides in a presentation, and you can create your own schemes.
To dress up the background of one slide or of all the slides in a presentation, you can apply a solid color, a color gradient, a texture, or a picture.
You can change the background, outline, and effect of specific placeholders or of text boxes.
The formatting of paragraphs and text in a presentation can easily be changed by using the commands in the Font and Paragraph groups on the Home tab.