
Chapter at a Glance

You can use the Microsoft Outlook 2010 calendar to organize your daily activities and to remind you of important tasks and events. If you’re a busy person and use the Outlook calendar to its fullest potential, it might at times seem as though the calendar runs your life—but that isn’t necessarily a bad thing! Using the calendar effectively can help you stay organized, on task, and on time. You can schedule and track appointments, meetings, and events, and block time as a reminder to yourself to take care of tasks.
If you have a Microsoft Exchange Server account, an Outlook calendar has already been created for you. If you have configured Outlook to connect to a different type of account, you can manually create a calendar within that account. You can easily create appointments, events, and meetings on your Outlook calendar.
In this chapter, you’ll schedule an appointment and an event on your own calendar and work with appointment options including recurrence, reminders, and availability. You’ll schedule a meeting with another person, and learn about responding to, updating, and canceling meeting requests. Then you’ll experiment with different ways of looking at your calendar to find the view that is most effective for your daily working style.
Note
Practice Files You don’t need any practice files to complete the exercises in this chapter. For more information about practice file requirements, see Using the Practice Files at the beginning of this book.
Important
The exercises in this chapter assume that you’re working with an Exchange account. Some functionality may be unavailable if you’re working with a calendar that’s part of another type of account.
Appointments are blocks of time you schedule for only yourself (as opposed to meetings, to which you invite other Outlook users). An appointment has a specific start time and a specific end time (as opposed to an event, which occurs for one or more full 24-hour periods).
To schedule an appointment, you enter, at the minimum, a subject and time in an appointment window. The basic appointment window also includes a field for the appointment location and a free form notes area in which you can store general information, including formatted text, Web site links, and even file attachments so that they are easily available to you at the time of the appointment.
When creating an appointment, you indicate your availability (referred to as Free/Busy time) by marking it as Free, Tentative, Busy, or Out Of Office. The appointment time is color-coded on your calendar to match the availability you indicate. Your availability is visible to other Outlook users on your network, and is also displayed when you share your calendar or send calendar information to other people.
Tip
When viewing your calendar in Day, Work Week, or Week view, each item on your Outlook task list appears in the Tasks section below its due date. You can schedule specific time to complete a task by dragging it from the Tasks area to your calendar.
Note
See Also For information about adding the contents of a received message to your calendar, see the sidebar Creating an Appointment from a Message later in this chapter. For information about Outlook 2010 features not covered in this book, refer to Microsoft Outlook 2010 Step by Step by Joan Lambert and Joyce Cox (Microsoft Press, 2010).
By default, Outlook displays a reminder message 15 minutes before the start time of an appointment—you can change the reminder to occur as far as two weeks in advance, or you can turn it off completely if you want to. If you synchronize your Outlook installation with a mobile device, reminders also appear on your mobile device. This is very convenient when you are away from your computer.
If you have the same appointment on a regular basis—for example, a bimonthly haircut or a weekly exercise class—you can set it up in your Outlook calendar as a recurring appointment. A recurring appointment can happen at almost any regular interval, such as every Tuesday and Thursday, every other week, or the last day of every month. Configuring an appointment recurrence creates multiple instances of the appointment in your calendar at the time interval you specify. The individual appointments are linked. When making changes to a recurring appointment, you can choose to update all occurrences or only an individual occurrence of the appointment.
You can specify the time zone in which an appointment starts and ends. You might want to have different time zones if, for example, your “appointment” is an airplane flight that starts and ends in different time zones, and you want the flight to show up correctly wherever you’re currently located.
In this exercise, you’ll schedule an appointment and a recurring appointment, and you’ll update appointments by using commands in the appointment window.
Note
SET UP You don’t need any practice files to complete this exercise. Display the Calendar module in the default Day view, minimize the To-Do Bar, and then follow the steps.
In the Date Navigator at the top of the Navigation Pane, click tomorrow’s date.
Note
See Also For information about the default Calendar module view and the Date Navigator, see Displaying Different Views of a Calendar later in this chapter.
Outlook displays tomorrow’s schedule.
In the Calendar pane, point to the 12:00 P.M. time slot (or, if you already have an appointment scheduled at 12:00 P.M., to another time when you have 30 minutes available).
Click to add appointment appears in the time slot.
Click once to activate the time slot.
In this default mode, you can enter basic appointment details directly in the Calendar pane.
Type SBS Lunch with Jane, and then press Enter.
Important
The subject of each appointment, meeting, or event you create while working through the exercises in this book begins with SBS so that you can easily differentiate the practice items you create from other items on your calendar.
Outlook creates a half-hour appointment beginning at 12:00 P.M.
Drag the appointment from the 12:00 P.M. time slot to the 1:00 P.M. time slot (or, if you already have an appointment scheduled at 1:00 P.M., to another time when you have an hour available).
Outlook changes the appointment start time.
Point to the bottom border of the appointment, and when the pointer changes to a double-headed arrow, drag down one time slot so that the appointment ends at 2:00 P.M.
While the appointment is selected in the calendar, the Appointment contextual tab is available.
Note
Troubleshooting The appearance of buttons and groups on the ribbon changes depending on the width of the program window or item window. For information about changing the appearance of the ribbon to match our screen images, see Modifying the Display of the Ribbon at the beginning of this book.
You can add more details to the appointment and change the default settings from within the appointment window.
Double-click the SBS Lunch with Jane appointment.
The appointment window opens. The subject, start time, and end time are set according to the information you entered in the Calendar pane.
In the Location box, type Fourth Coffee.
 On the Appointment
tab of the appointment window (not the Appointment contextual tab in the
Calendar module), in the Options group,
click the Show As
arrow, and then in the list, click Out of
Office.
On the Appointment
tab of the appointment window (not the Appointment contextual tab in the
Calendar module), in the Options group,
click the Show As
arrow, and then in the list, click Out of
Office. In the Options
group, click the Reminder arrow, and then
in the list, click 1 hour.
In the Options
group, click the Reminder arrow, and then
in the list, click 1 hour. In the Tags group,
click the Private
button.
In the Tags group,
click the Private
button.Marking an appointment, event, or meeting as Private hides the details from anyone you share your calendar with.
 In the Actions
group, click the Save &
Close button.
In the Actions
group, click the Save &
Close button.When the appointment window closes, Outlook applies your changes to the appointment shown on the calendar. Your availability is indicated by the colored bar on the left side of the appointment.
The settings on the Appointment contextual tab also reflect the changes you made to the appointment.
Double-click the 2:00 P.M. time slot.
Outlook opens an appointment window with the appointment start time set to 2:00 P.M. and the end time set 30 minutes later. Because this immediately follows the lunch appointment you just created, the information bar at the top of the meeting window indicates that the meeting is adjacent to another on your calendar.
In the Subject box, type SBS Staff Meeting. In the Location box, type Conference Room. Then in the notes area, type the following sentence:
 On the Appointment
tab, in the Options group, click the
Recurrence button.
On the Appointment
tab, in the Options group, click the
Recurrence button.The Appointment Recurrence dialog box opens.
The default appointment recurrence is weekly on the currently selected day of the week. You can set the appointment to recur until further notice, to end after a certain number of occurrences, or to end by a certain date.
In the End list, click 4:00 PM (2 hours). In the Range of recurrence area, click End after, and then in the box, replace 10 with 2.
To indicate that you want to create a 2-hour appointment beginning at 2:00 P.M. on the selected day of the week, this week and next week only, click OK in the Appointment Recurrence dialog box.
In the appointment window, the Start Time and End Time fields disappear and are replaced by the recurrence details.
On the Appointment Series tab, in the Actions group, click the Save & Close button.
The new appointment appears on your calendar.
If necessary, scroll the Calendar pane to display the entire appointment.
The circling arrow icon at the right end of the time slot indicates the recurrence.
In the Date Navigator, click the weekday of the appointment in each of the next two weeks, to verify that the appointment appears on your calendar next week, but not the following week.


Note
CLEAN UP Retain the SBS Lunch with Jane and SBS Staff Meeting appointments in your calendar for use as practice files later in this chapter.
Adding National Holidays to Your Calendar
You can easily add the local holidays of any of over 80 countries to your Outlook calendar.
To add national holidays to your Outlook calendar, follow these steps:
Open the Outlook Options dialog box.
On the Calendar page of the Outlook Options dialog box, under Calendar Options, click Add Holidays.
Select the check boxes of the countries whose holidays you want to add to your calendar, and then click OK.
After Outlook adds the selected country’s holidays to your calendar, click OK in the confirmation message box and in the Outlook Options dialog box.

Outlook 2010 assigns a color category named Holiday to all the local holidays it adds to your calendar. To view all the holidays on your calendar, enter category:holiday in the Search box. Note that Outlook adds each holiday for the next 20 years to the calendar, so the entire list of results might not be displayed immediately (only the first 200 results). If the search returns more than 200 results, add search criteria to narrow down the field (for example, start:2012 to view all holidays in 2012) or click the information bar at the top of the search results list to display the entire list. You can narrow your search by using any of the displayed column headers followed by a colon and a search specification.

To remove national holidays from your calendar, follow these steps:
Use the Search function to locate the holidays you want to remove.
Select individual holidays you want to remove; or click any holiday in the list to activate the list, and then press Ctrl+A to select all the holidays in the search results.
Press the Delete key.
Events are day-long blocks of time that you schedule on your Outlook calendar—for example, a birthday, a payroll day, or anything else occurring on a particular day but not at a specific time. In all other respects, creating an event is identical to creating an appointment, in that you can specify a location, indicate recurrence, indicate your availability, and attach additional information to the event item.
You can create an event directly on the calendar when viewing your calendar in Day, Work Week, Week, or Month view.
In this exercise, you’ll schedule an event and convert it to a recurring event by using the commands in the Calendar module.
Note
SET UP You don’t need any practice files to complete this exercise. Display the Calendar module in Day view, and then follow the steps.
In the Date Navigator at the top of the Navigation Pane, click the first day of next month.
The Date Navigator changes to display the next month.
In the Calendar pane, point to the blank space below the day header and above the time slots.
Click to add event appears in the space.
Click once to activate the event slot. The event space changes to display a darker background color, and an event placeholder becomes active.
In this mode, you can enter basic event details directly in the Calendar pane.
Type SBS Pay Day, and then press Enter.
- On the Appointment
contextual tab, in the Options group,
click the Recurrence button.
The Appointment Recurrence dialog box opens. The default recurrence for events is the same as for appointments—weekly on the currently selected day of the week. Note that the Start and End times are set to 12:00 AM and the Duration to 1 day, indicating that this is an all-day event.
In the Recurrence pattern area, click Monthly.
Tip
If you have an Exchange account and a mobile device that supports connections to Exchange accounts (such as a Windows 7 Phone, BlackBerry, or iPhone), it’s easy to keep your calendar and reminders at your fingertips wherever you are by configuring your mobile device to connect to your Exchange account.
You can schedule a monthly event to recur on a specific date of the month or on a selected (first, second, third, fourth, or last) day of the month. Monthly events can recur every month or less often (for example, every third month).
To create a recurring appointment on the first day of each month, with no specific end date, click OK.
The contextual tab changes to reflect that this is now a recurring event, and the recurrence icon appears to the right of the event subject.


A primary difficulty when scheduling a meeting is finding a time that works for all the people who need to attend it. Scheduling meetings through Outlook is significantly simpler than scheduling meetings by discussing times and locations with the participants, particularly when you need to accommodate the schedules of several people. Outlook displays the individual and collective schedules of people within your own organization, and of people outside of your organization who have published their calendars to the Internet. You can review attendees’ schedules to locate a time when everyone is available, or have Outlook find a convenient time for you.
You can send an Outlook meeting invitation (referred to as a meeting request) to any person who has an e-mail account—even to a person who doesn’t use Outlook. You can send a meeting request from any type of e-mail account (such as an Exchange account or an Internet e-mail account).
The meeting window has two pages: the Appointment page and the Scheduling Assistant (or Scheduling) page. The Appointment page is visible by default. You can enter all the required information directly on the Appointment page, or use the additional features available on the Scheduling Assistant page to find the best time for the meeting.

People you invite to meetings are referred to as attendees. By default, the attendance of each attendee is indicated as Required. You can inform non-critical attendees of the meeting by marking their attendance as Optional. You can invite entire groups of people by using a contact group or distribution list. You can also invite managed resources, such as conference rooms and audio/visual equipment, that have been set up by your organization’s Exchange administrator.
A meeting request must have at least one attendee other than you, a start time, and an end time. It should also include a subject and a location, but Outlook will send the meeting request without this information if you specifically allow it. The body of a meeting request can include text and Web links, as well as file attachments. This is a convenient way to distribute meeting information to attendees ahead of time.
The secondary page of the meeting window is the Scheduling Assistant page, if your e-mail account is part of an Exchange Server 2010 or Exchange Server 2007 network. Otherwise, the secondary page is the Scheduling page, which doesn’t include the Room Finder feature we discuss below. If you’re organizing a meeting for a large number of people and want to view collective information about their schedules, you do so on the Scheduling or Scheduling Assistant page.

The Scheduling and Scheduling Assistant pages include a group schedule that shows the status of each attendee’s time throughout your working day. Outlook indicates your suggested meeting time on the group schedule with green (start time) and red (end time) vertical bars. If free/busy information is available for meeting attendees, their time is shown as white (Available), blue (Busy), or purple (Out of Office). Their Tentative bookings are indicated by light-blue diagonal stripes. If no information is available (either because Outlook can’t connect to an attendee’s calendar or because the proposed meeting is further out than the scheduling information stored on the server), Outlook shows the time with gray diagonal stripes. The row at the top of the schedule, to the right of the All Attendees heading, indicates the collective schedule of all the attendees.
Tip
You can enter additional attendees in the To box on the Appointment page or in the All Attendees list on the Scheduling or Scheduling Assistant page.
You can change the time and duration of the meeting to work with the displayed schedules by selecting a different time in the Start Time and End Time lists, by dragging the green and red vertical bars (the start time and end time bars) in the group schedule, or by clicking the time you want in the Suggested Times list.
On the right side of the Scheduling Assistant page, the Room Finder task pane is open by default. The monthly calendar at the top of the Room Finder task pane indicates the collective availability of the group on each day, as follows:
Dates that occur in the past and non-working days are gray.
Days when all attendees are available are white (Good).
Days when most attendees are available are light blue (Fair).
Days when most attendees are not available are medium blue (Poor).
Tip
The Room Finder task pane is available only for Exchange accounts. You can display or hide the Room Finder task pane on the Appointment page or on the Scheduling Assistant page by clicking the Room Finder button in the Options group on the Meeting tab.
Managed conference rooms that are available at the indicated meeting time are shown in the center of the Room Finder task pane. At the bottom of the Room Finder task pane, the Suggested Times list displays attendee availability for appointments of the length of time you have specified for the meeting.
Selecting a date in the calendar displays the suggested meeting times for just that day. (Scheduling suggestions are not provided for past or nonworking days.) Clicking a meeting time in the Suggested Times list updates the calendar and the meeting request.
Note
See Also For information about creating a meeting request from an e-mail message, see the sidebar Creating an Appointment from a Message earlier in this chapter.
Outlook tracks responses from attendees and those responsible for scheduling the resources you requested, so you always have an up-to-date report of how many people will attend your meeting. The number of attendees who have accepted, tentatively accepted, and declined the meeting request appears in the meeting header section when you open a meeting in its own window. In this exercise, you’ll create and send a meeting request.
Note
SET UP You don’t need any practice files to complete this exercise. Display your default calendar and inform two co-workers or friends that you are going to practice inviting them as attendees to a meeting. Ask the attendees not to respond to the meeting request that they receive. Then follow the steps.
In the Date Navigator, click tomorrow’s date. Then in the Calendar pane, click the 3:00 P.M. time slot (or if you have a conflicting appointment, click a time when you have 30 minutes available).
 On the Home tab, in
the New group, click the New Meeting
button.
On the Home tab, in
the New group, click the New Meeting
button.An untitled meeting window opens. The selected date and times are shown in the Start Time and End Time boxes above the notes pane.
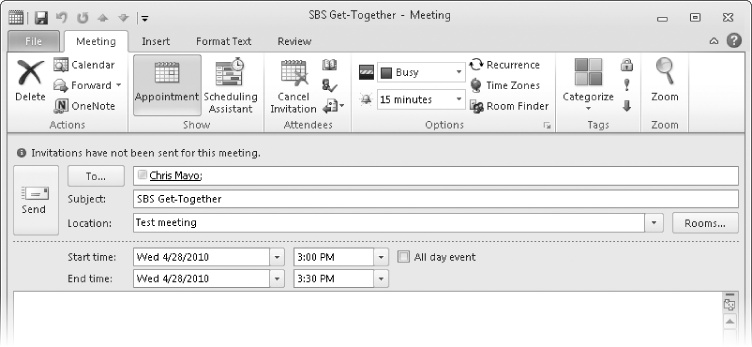
In the To box, type the e-mail address of the first co-worker or friend with whom you arranged to practice.
In the Subject box, type SBS Get-Together.
In the Location box, type Test meeting to indicate that the meeting request is for testing purposes only.
You have provided all the standard information for a meeting request.
 On the Meeting tab,
in the Show group, click the Scheduling Assistant button.
On the Meeting tab,
in the Show group, click the Scheduling Assistant button.The All Attendees list on the Scheduling Assistant page includes you and the attendee you entered in the To box (showing the attendee’s e-mail address or, if the attendee has an entry in your Address Book, the associated name). The icon next to your name, a magnifying glass in a black circle, indicates that you are the meeting organizer. The icon next to the attendee’s name, an upward-pointing arrow in a red circle, indicates that he or she is a required attendee.
If necessary, scroll to the bottom of the Room Finder task pane to display the Suggested times list.
The times shown are based on your schedule and the schedule information that is available for the first attendee.
In the All Attendees list, click Click here to add a name, enter the e-mail address of the second person with whom you arranged to practice, and then press Tab.
The Suggested Times list in the Room Finder task pane is updated to reflect any schedule conflicts for the second attendee.
 Click the Required
Attendee icon to the
left of the second attendee’s name.
Click the Required
Attendee icon to the
left of the second attendee’s name.A list of attendance options expands.
In the list, click Optional Attendee.
The second attendee’s icon changes to the letter i (for information) in a blue circle to indicate that you’re sending the meeting request for his or her information, but he or she does not need to attend.
In the group schedule, experiment with changing the meeting time and duration by dragging the green start time bar and the red end time bar. Then in the Suggested times list, select a meeting time that works for all three attendees.
The start time and end time bars move to the selected time slot.
You can change the Show As and Reminder settings, create recurrences, assign color categories, and make any other changes you want. The availability specified in the Show As list will apply to all attendees who accept your meeting request.
 After you select the meeting time you want, click
the Appointment button in the Show group.
After you select the meeting time you want, click
the Appointment button in the Show group.On the Appointment page, the second attendee has been added to the To box, and the Start Time and End Time boxes display the meeting time you selected.
 Verify the meeting details, and then click the
Send button.
Verify the meeting details, and then click the
Send button.The meeting appears in your calendar, and your co-workers or friends receive the meeting request.


Note
CLEAN UP Remind your attendees not to respond to the meeting request. Retain the SBS Get-Together meeting in your calendar for use in later exercises.
Updating and Canceling Meetings
You might find it necessary to change the date, time, or location of a meeting after you send the meeting request. As the meeting organizer, you can change any information in a meeting request at any time, including adding or deleting invited attendees, or canceling the meeting.
To edit a meeting request, double-click the meeting on your calendar. If the meeting is one of a series (a recurring meeting), Outlook prompts you to indicate whether you want to edit the meeting series or only the selected instance of the meeting. Make the changes you want, and then save and close the meeting window.

To cancel a meeting, click the meeting on your calendar and then click the Delete button in the Actions group on the Meeting or Meeting Series tab, or open the meeting window and then click the Delete button in the Delete group on the Meeting tab.
After you edit or cancel a meeting, Outlook sends an updated meeting request to the invited attendees to keep them informed. If the only change you make is to the attendee list, Outlook gives you the option of sending an update only to the affected attendees.
When you receive a meeting request from another Outlook user, the meeting appears on your calendar with your time scheduled as Tentative. Until you respond to the meeting request, the organizer doesn’t know whether you plan to attend.

You can respond to a meeting request in one of these four ways:
You can accept the request. Outlook deletes the meeting request and adds the meeting to your calendar.
You can tentatively accept the request, which indicates that you might be able to attend the meeting but are undecided. Outlook deletes the meeting request and shows the meeting on your calendar as tentatively scheduled.
You can propose a new meeting time. Outlook sends your request to the meeting organizer for confirmation and shows the meeting with the original time on your calendar as tentatively scheduled.
You can decline the request. Outlook deletes the meeting request and removes the meeting from your calendar.
If you don’t respond to a meeting request, the meeting remains on your calendar with your time shown as tentatively scheduled.

If you’re unsure whether a meeting time works for you, you can click the Calendar button within the meeting window. Your Outlook calendar for the suggested meeting day opens in a separate window so that you can view any conflicting appointments.
When accepting or declining a meeting, you can choose whether to send a response to the meeting organizer. If you don’t send a response, your acceptance will not be tallied, and the organizer will not know whether you are planning to attend the meeting. If you do send a response, you can add a message to the meeting organizer before sending it.

To respond to a meeting request:
In the meeting window, in the Reading Pane, or on the shortcut menu that appears when you right-click the meeting request, click Accept, Tentative, or Decline.
Choose whether to send a standard response, a personalized response, or no response at all.
To propose a new time for a meeting:
In the meeting window, in the Reading Pane, or on the shortcut menu that appears when you right-click the meeting request, click Propose New Time, and then click Tentative And Propose New Time or Decline And Propose New Time.
In the schedule area of the Propose New Time dialog box, change the meeting start and end times to the times you want to propose, and then click the Propose Time button.
In the meeting response window that opens, enter a message to the meeting organizer if you want to, and then click Send.
Outlook sends your response and adds the meeting to your calendar as tentatively scheduled for the original meeting time. If the meeting organizer approves the meeting time change, you and other attendees will receive updated meeting requests showing the new meeting time.

You can select a view and an arrangement for the display of your calendar. The default view is Calendar, and the default arrangement is Day. Most exercises in this chapter have shown the calendar in this default view and arrangement, which we refer to simply as Day view.
Tip
Because Outlook 2010 coordinates your scheduled tasks to your calendar, you can look at your calendar in Day view or Week view to see the tasks that need to be completed that day or that week, and you can track your progress by marking tasks as complete when you finish them.
The Calendar module offers four distinct views of content, which are available from the Change View list in the Current View group on the View tab. These views are:
Calendar This is the standard view in which you display your Outlook calendar. In the Day, Work Week, or Week arrangement, Calendar view displays the subject, location, and organizer (if space allows) of each appointment, meeting, or event, as well as the availability bar and any special icons, such as Private or Recurrence.
Preview In the Day, Work Week, or Week arrangement, Preview view displays additional information, including information from the notes area of the appointment window, as space allows.
List This list view displays all appointments, meetings, and events on your calendar.
Active This list view displays only future appointments, meetings, and events.
When working in a list view, you can group calendar items by selecting a field from the Arrangement gallery on the View tab.
Important
In this book, we assume you are working in Calendar view, and refer to the standard Calendar view arrangements as Day view, Work Week view, Week view, and Schedule view. For information about changing and resetting views, see Displaying Different Views of Contact Records in Chapter 22.
By default, your calendar is shown in the Day arrangement of Calendar view. However, this arrangement displays your schedule only for the current day and doesn’t keep you apprised of upcoming appointments later in the week or month. To help you stay on top of your schedule, you can display several different arrangements of your calendar:
Day Displays one day at a time separated into half-hour increments.
Work Week Displays only the days of your work week. The default work week is Monday through Friday from 8:00 A.M. to 5:00 P.M. Time slots that fall within the work week are white on the calendar; time slots outside of the work week are colored.
Week Displays one calendar week (Sunday through Saturday) at a time.
Month Displays one calendar month at a time, as well as the preceding and following weeks (for a total of six weeks, the same as the Date Navigator). When displaying Month view, you can choose one of three detail levels:
Low Detail Displays a calendar that is blank except for events.
Medium Detail Displays events and shaded, unlabeled bars to indicate appointments and meetings.
High Detail Displays events and labeled bars to indicate appointments and meetings.
Schedule view Displays a horizontal view of the calendar for the selected time period. Schedule view, which is new in Outlook 2010, is very useful for comparing multiple calendars such as those of the members of a calendar group.
You switch among arrangements by clicking the buttons in the Arrangement group on the View tab of the Calendar module ribbon.
Tip
If you’ve made changes to any view (such as the order in which information appears) and want to return to the default settings, click the Reset View button in the Current View group on the View tab. If the Reset View button is unavailable, the view already displays the default settings.
You can display a specific day, week, or month in the Calendar pane by using these techniques:
In Month view, you can click the week tab at the left edge of a week to display only that week.
In Month, Week, or Work Week view, you can display a specific day in Day view by double-clicking the header for that day.
You can display the previous or next time periods by clicking the Back button or the Forward button next to the date or date range.
You can display the current day by clicking the Today button in the Go To group on the Home tab.
You can use the Date Navigator to change the day or range of days shown on the calendar.

By default, the Date Navigator displays six weeks at a time. The current date is indicated by a red border. The days of the selected month are black. Days of the previous month and the next month are gray, but you can still select them in the Date Navigator. Bold dates indicate days with scheduled appointments, meetings, or events.
You can display a specific day, week, or month in the Calendar pane by selecting it in the Date Navigator. Use these techniques to work with the Date Navigator:
To display a day, click that day.
If you’re displaying the calendar in Day, Work Week, or Week view, the day appears and is highlighted in the current view. If you’re displaying the calendar in Month view, the display changes to Day view.
To display a week, click the margin to the left of that week. Or, if you display week numbers in the Date Navigator and Calendar, click the week number to display that week.
In any calendar view, selecting a week in the Date Navigator changes the display to Week view.
Tip
Specific weeks are referred to in some countries by number to simplify the communication of dates. (For example, you can say you’ll be out of the office “Week 24” rather than “June 7-11.”) Week 1 is the calendar week in which January 1 falls, Week 2 is the following week, and so on through to the end of the year. Because of the way the weeks are numbered, a year can end in Week 52 or (more commonly) in Week 53.
To display week numbers in the Date Navigator and in the Month view of the calendar, select the Show Week Numbers… check box on the Calendar page of the Outlook Options dialog box.
To display a month, click the Previous or Next button to scroll one month back or forward, or click the current month name and hold down the mouse button to display a range of months, point to the month you want to display, and then release the mouse button. To scroll beyond the seven-month range displayed by default, point to the top or bottom of the month list.
In Month view, scrolling the month displays the entire month; in Day view it displays the same date of the selected month, and in Week or Work Week view it displays the same week of the selected month.
In every Outlook module, the Date Navigator is located at the top of the To-Do Bar. In the Calendar module, if you close the To-Do Bar, the Date Navigator moves to the top of the Navigation Pane. In either location, you can display additional months by increasing the width or height of the area allocated to the Date Navigator. You can allocate up to 50 percent of the program window to the Navigation Pane or To-Do Bar.

When the Date Navigator displays more than one month, each month shows either five or six weeks at a time—whichever is necessary to show all the days of the currently selected month in a Sunday through Saturday calendar format and to match the height of any other month displayed next to it. Only the first and last months include the days of the preceding or following month (in gray).
In this exercise, you’ll first display different periods of time in your calendar and reset a customized view to its default settings. Then you’ll change the display of the Daily Task List and of the To-Do Bar. Finally, you’ll navigate through your calendar by using the Date Navigator, and display different levels of information about scheduled appointments and events.
Note
SET UP You need the SBS Lunch with Jane and SBS Staff Meeting appointments and the SBS Pay Day event you created in the previous exercises in this chapter. If you did not complete those exercises, you can do so now, or use any appointments, meetings, or events on your own calendar. Display the Calendar module in any Calendar view, and then follow the steps.
 On the Home tab,
in the Arrange group, click the
Work Week button.
On the Home tab,
in the Arrange group, click the
Work Week button.The Calendar pane displays your currently configured work week and high-lights the corresponding days in the Date Navigator. The Daily Task List is open at the bottom of the pane. The first time slot of your work day appears at the top of the pane.
Scroll the Calendar pane to display one hour prior to the start of your work day.
Time slots within your work day are white; time slots outside of your work day are shaded.
 In the Go To
group, click the Today button.
In the Go To
group, click the Today button.If the Calendar pane wasn’t previously displaying the current week, it does so now. The times displayed remain the same. The current day and the current time slot are highlighted.
 On the View tab,
in the Current View group, click the
Reset View button.
On the View tab,
in the Current View group, click the
Reset View button.A message box prompts you to confirm that you want to reset the view.
In the Microsoft Outlook message box, click Yes.
The Calendar pane changes to display today’s schedule in the default Day arrangement, with the Daily Task List open at the bottom of the pane.
 On the View tab,
in the Layout group, click the
Daily Task List button, and then in the list, click
Minimized.
On the View tab,
in the Layout group, click the
Daily Task List button, and then in the list, click
Minimized.The Daily Task List changes to a single row at the bottom of the Calendar pane. The minimized Daily Task List displays a count of your total, active, and completed tasks for the day.
 In the Layout
group, click the To-Do Bar button, and then in the list, click
Minimized.
In the Layout
group, click the To-Do Bar button, and then in the list, click
Minimized.The To-Do Bar changes to a single column at the right side of the program window. The minimized To-Do Bar displays your next appointment and the number of tasks due today (from the To-Do Bar Task List).
In the Date Navigator, which now appears at the top of the Navigation Pane, click a bold date to display your calendar for a day on which you have scheduled appointments or meetings.
In the Date Navigator, point to the left edge of a calendar row that contains one or more bold dates. When the cursor changes to point toward the calendar, click once.
 On the Home tab,
in the Arrange group, click the
Month button (not its
arrow).
On the Home tab,
in the Arrange group, click the
Month button (not its
arrow).Outlook displays your calendar for the month. Alternating months are shaded to provide an obvious visual indicator of the change. The Daily Task List is not available in Month view.
In the Arrange group, click the Month arrow, and then click Show Medium Detail.
The calendar changes to display only events as readable items; appointments and meetings appear as horizontal lines, with the width of the line indicating the amount of time scheduled for that item.
In the Month list, click Show Low Detail to hide appointments and meetings entirely.
The calendar changes to display only events; appointments and meetings are hidden entirely.
Click one of the week labels that appear along the left edge of the Calendar pane.
Outlook displays the selected week in Week view. (If you had more recently displayed a Work Week view, the week would be shown in that view.) The calendar item details are no longer hidden.
 To the left of the date range in the calendar
header, click the Forward
button.
To the left of the date range in the calendar
header, click the Forward
button.The calendar moves forward one week.
Use any of the available navigation methods to display the week containing one of the SBS Staff Meeting appointments.
 On the View tab,
in the Current View group, click the
Change View button and then in
the gallery, click Preview.
On the View tab,
in the Current View group, click the
Change View button and then in
the gallery, click Preview.The notes saved with the recurring appointment appear on the calendar.
Click the day label at the top of the day on which the SBS Staff Meeting appointment occurs.
Outlook returns to Day arrangement, but still displays the Preview view.
In the Change View gallery, click Calendar.
The Calendar pane returns to its default settings.


You can create and manage appointments and all-day events in your calendar.
Other people in your organization can see whether you are free, busy, or out-of-office as a result of the appointments, events, and meetings scheduled in your calendar.
You can personalize the display of your available working hours, and mark appointments as private to hide the details from other people.
You can use Outlook to set up meetings, invite participants, and track their responses.
Outlook can identify a meeting time based on participants’ schedules.
If your organization is running Exchange Server 2010 or Exchange Server 2007, you can use the Scheduling Assistant features to quickly identify meeting times of a specific duration during which your planned attendees are available.
You can display many different views of your calendar. You can change the dates and date ranges displayed in the Calendar pane by using the Date Navigator, by using navigational buttons within the Calendar pane, or by using commands on the ribbon.