
13
Analyzing Android Malware Samples
With the rise of mobile devices, the name Android has become well-known to most people, even to those far from the IT world. It was originally developed by Android Inc. and later acquired by Google in 2005. The Android name is derived from the nickname of the founder of the company, Andy Rubin. This open source operating system is based on a modified version of the Linux kernel and there are several variants of it, such as Wear OS for wearable devices, and Android TV, which can be found on multiple smart TVs.
As mobile devices store and can provide access to more and more sensitive information, it’s no surprise that mobile platforms are increasingly becoming targets for attackers who are exploring ways to leverage their power for malicious purposes. In this chapter, we are going to dive into the internals of the most popular mobile operating system in the world, explore existing and potential attack vectors, and provide detailed guidelines on how to analyze malware targeting Android users.
To facilitate learning, this chapter is divided into the following main sections:
- (Ab)using the Android internals
- Understanding Dalvik and ART
- File formats and APIs
- Malware behavior patterns
- Static and dynamic analysis of threats
Let’s get started!
(Ab)using the Android internals
Before analyzing the actual malware, let’s become familiar with the system itself first and understand the principles it is based on. This knowledge is vital when performing analysis, as it allows the engineer to better understand the logic behind malicious code and not miss any important part of its functionality.
The file hierarchy
As Android is based on the modified Linux kernel, its file structure resembles the one that can be found in various Linux distributions. The file hierarchy is a single tree, with the top of it called the root directory or root (generally specified with the / symbol), and multiple standard Linux directories, such as /proc, /sbin, and others. The Android kernel is shipped with multiple supported filesystems; the exact selection varies depending on the version of the OS and the device’s manufacturer. It has used EXT4 as the default main filesystem since Android 2.3, but prior to that, YAFFS was used. External storage and SD cards are usually formatted using FAT32 to maintain compatibility with Windows.
In terms of the specifics of the directory structure, the official Android documentation defines the following data storage options:
- Internal: On modern versions of Android, internal storage is mainly represented by the /data/data/ directory and its symlink, the /data/user/0 directory.
Its main purpose is to securely store files privately from apps. What this means is that no other apps, or even the user, have direct access to them. Each app gets its own folder, and if the user uninstalls the application, all its content will be deleted. Thus, the usual applications don’t store anything that should persist independently of them here (for example, photos taken by a user with an app’s help). Later, we will see what the corresponding behavior of malicious apps is.
- External: Nowadays, this is generally associated with the /storage/emulated/0 path. In this case, /storage/self/primary is a main symlink to it, which, in turn, has /sdcard and /mnt/sdcard symlinks pointing to it. /mnt/user/0/primary is another common symlink pointing to /storage/emulated/0. This space is shared across all apps and is world-readable, including for the end user. This is where users see well-known folders such as Downloads or DCIM. For the apps themselves, its presence is not actually guaranteed, so its availability should be checked each time that it is accessed. In addition, apps have the option to have their own app-specific directory (in case they need more space), which will be deleted with the app once it is uninstalled. The main location for this data on modern forms of Android is /storage/emulated/0/Android/data/<app_name>. Again, this location is world-accessible.
In addition, the documentation describes shared preferences and databases, which are outside the scope of this book.
There may be a considerable level of confusion here in terms of naming, as many file-manager apps call the external file storage internal when they want to distinguish it from SD cards (which are treated by the OS in pretty much the same way as the embedded phone’s external storage). The truth is, unless the device is rooted, the internal storage can’t be accessed and therefore won’t be visible to a normal user:
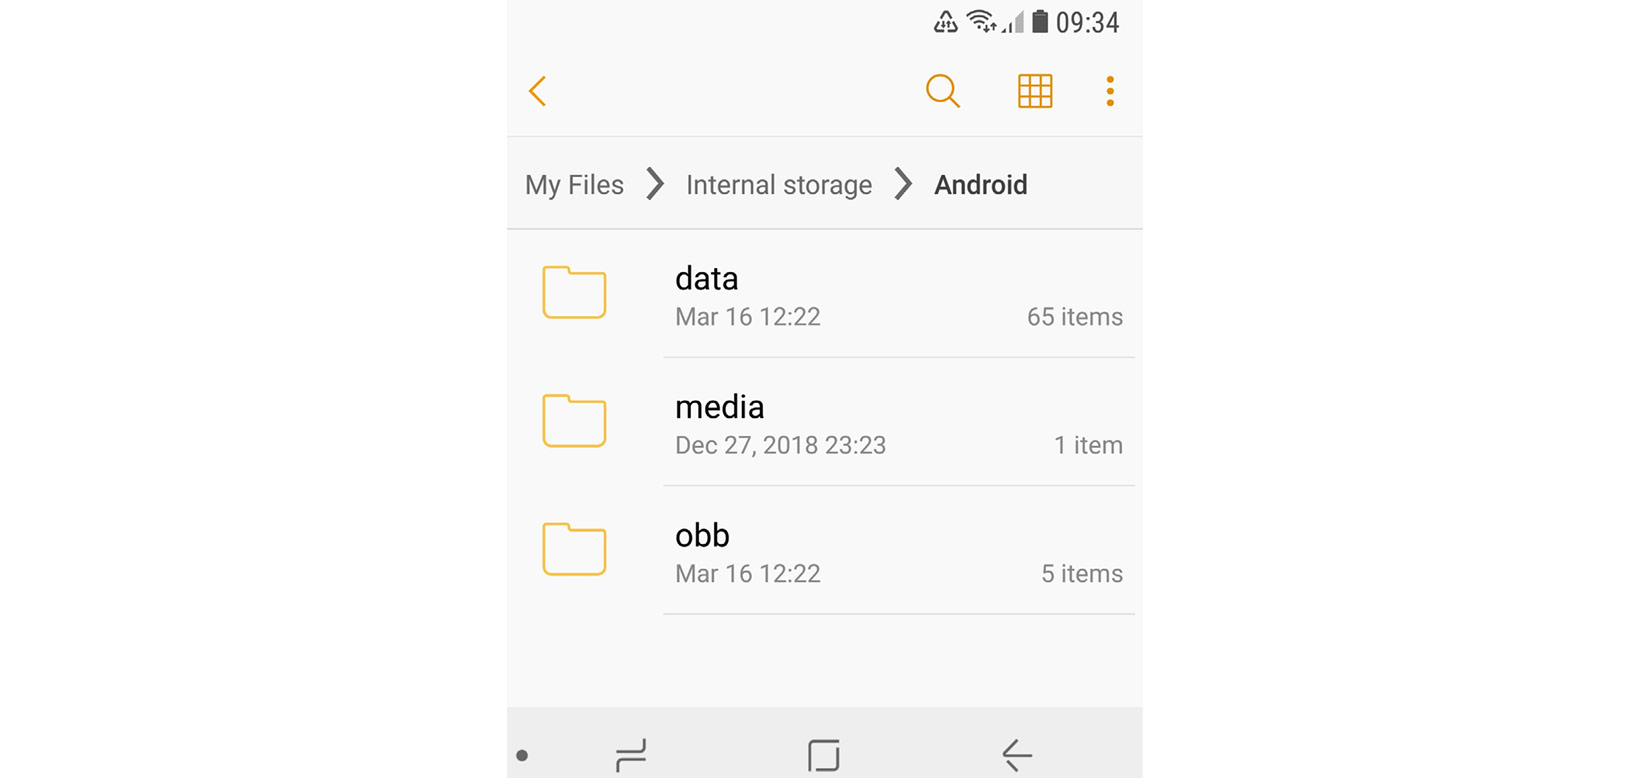
Figure 13.1 – The file manager referring to external storage as internal
Apart from this, here are some of the other important file paths unique to Android:
- /data/app and its modern symlink, /factory: Contains APK and ODEX files for installed apps.
- /data/dalvik-cache: The optimized bytecode for installed apps.
- /system: This is the location of the operating system itself. It contains directories that are normally found in the root directory.
- /vendor: A symbolic link to /system/vendor. This path contains vendor-specific files.
- /system/app/: Contains pre-installed Android system apps, for example, to interact with the camera or messages.
- /data/local/tmp/: A directory where temporary files can be stored.

Figure 13.2 – Android’s root directory
Later, we will see which paths malware generally uses during the deployment.
The Android security model
There are multiple mechanisms implemented in Android in order to complicate the lives of attackers. The system has evolved gradually over time and the latest versions differ quite significantly from the earlier editions in terms of security. In addition, modern Android systems are based on the newer Linux kernel 4.x+ starting from version 7.0. Let’s talk about some of the most important aspects of them.
Process management
Android implements Mandatory Access Control (MAC) over all processes and uses the Security-Enhanced Linux (SELinux) model to enforce it. SELinux is based on the deny-by-default principle, where everything that is not explicitly allowed is forbidden. Its implementation has evolved over different versions of Android; the enforcing mode was enabled in Android 5.0.
On Android, each app runs as an individual process and its own user is created. This is how process sandboxing is implemented: to ensure that no process can access the data of another one. An example of the generated username in this case is u2_a84, where 2 is the actual user ID, with the offset 100000 (the actual value will be 100002), and 84 is the app ID, with the offset 10000 (which means the value itself is 10084). The mappings between apps and their corresponding user IDs can be found in the /data/system/packages.xml file (see the userId XML attribute), as well as in the matching, more concise packages.list file.
In addition to actual users, Android has many system accounts with predefined IDs. Apart from AID_ROOT (0), which is used to run some native daemons, here are some other examples:
- AID_SYSTEM (1000): This is a regular user account with special permissions to interact with system services.
- AID_VPN (1016): This is associated with the Virtual Private Network (VPN) system.
- AID_SHELL (2000): This is the account the user gets when they use the adb tool with the shell argument.
- AID_INET (3003): This can create AF_INET or AF_INET6 sockets.
A full, up-to-date list of these can be found in the android_filesystem_config.h file in the Android source code, which is easily accessible online.
In order to support Inter-Process Communication (IPC), a dedicated Binder mechanism has been introduced. It provides a remote method invocation functionality, where all the communication between client and server apps passes through a dedicated device driver. Later, we will discuss how a single vulnerability in it allows attackers to elevate privileges in order to root the corresponding devices.
The filesystem
As we now know, all generic user data and shared app data is stored in /storage/emulated/0. It is available for read and write access but setting executable permissions for files located there is not allowed. The idea here is that the user won’t be able to simply write to a disk and then execute a custom binary directly, even by mistake or as the result of a social engineering attack.
By contrast, each installed app has full access to its own directory in /data/data, but not to the directories of other apps unless they explicitly allow it. This is done so that one app won’t be able to affect the work of another one or get access to sensitive data.
App permissions
The main purpose of app permissions is to protect user privacy by giving them control over what data and system functionalities can be accessed by each application. By default, no app can affect the work of another app, unless it is explicitly allowed to do so; the same applies to accessing sensitive user data. Depending on the version of Android and the settings, some permissions may be granted automatically, while others will require manual user approval.
The default behavior when requesting user consent depends on the Android version and the SDK version used to build the app. For Android 6.0+ and SDK version >= 23, the user is not notified about it at installation time. Instead, the app has to ask permission at runtime using a standard system dialog window. For older Android and SDK versions, all permissions were requested at installation time. The user is presented with groups of permissions rather than individual entries; otherwise, it might be overwhelming to go through all of them.
Each app has to announce what permissions it requires in its embedded manifest file. For this purpose, dedicated <uses-permission> tags can be used. Permissions are split into three protection levels:
- Normal: These entries may pose very little risk to the device’s operation or a user. Examples of such permissions include the following:
- ACCESS_NETWORK_STATE
- BLUETOOTH
- NFC
- VIBRATE
- Signature: These permissions are granted at installation time if the app is signed. Here are some examples:
- Dangerous: These entries could pose a significant risk and therefore require manual approval. Unlike the previous two levels, they are split into groups, and if an app is granted at least one of the permissions within a group, it is supposed to get the rest without any interaction on the part of the user. Here are some examples of these groups:
- Contacts:
- READ_CONTACTS
- WRITE_CONTACTS
- GET_ACCOUNTS
- Location:
- ACCESS_FINE_LOCATION
- ACCESS_COARSE_LOCATION
- Contacts:
An example of the permissions requested by a sample in its manifest file can be seen in the following figure:
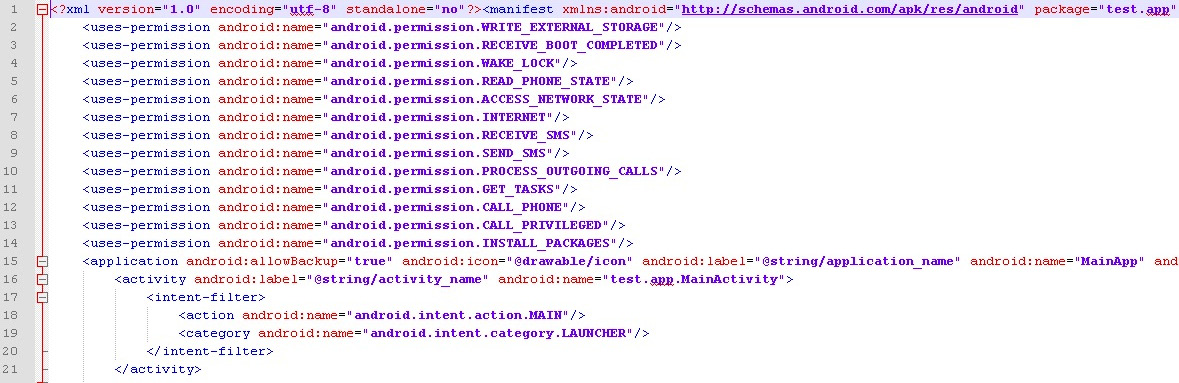
Figure 13.3 – An example of the permissions requested by malware in the manifest file
It is worth mentioning that the list of permissions evolved over time, with multiple new permissions being enforced eventually, making the system more secure. The exact API version in which a particular permission was added (or deprecated) can be found in the most recent official Android documentation.
Apart from this, there are also so-called special permissions that are distinct from normal or dangerous ones. They are particularly important, so an app should ask for user authorization, in addition to declaring them in the manifest file. Examples of such permissions are SYSTEM_ALERT_WINDOW and WRITE_SETTINGS.
As different devices may have different hardware features, another manifest tag, <uses-feature>, was introduced. In this case, if the android:required attribute is set to True, then Google Play won’t allow that app to be installed on the device without the feature being supported by it.
Security services
Multiple services have been introduced on the Android platform in order to improve the overall security structure:
- Android updates: As long as vulnerabilities are being identified and fixed, users receive updates to improve reliability and security.
- Google Play: Introduces several security features, such as application security scanning that aims to prevent malicious authors from uploading and promoting malicious software.
- Google Play Protect: A system that runs safety checks on apps downloaded from Google Play and checks the device for potentially malicious apps coming from other sources.
- SafetyNet: Provides several APIs, aiming to give apps that process sensitive data extra security-related information (for example, whether the current device is protected against known threats and whether the provided URL is safe).
The console
By default, the console is not available on the device itself (adb is supposed to be used from another connected device). Thus, in order to get the ability to execute basic commands, users have to install third-party apps such as Termux or Terminal Emulator. The interface would look as follows on the mobile device:
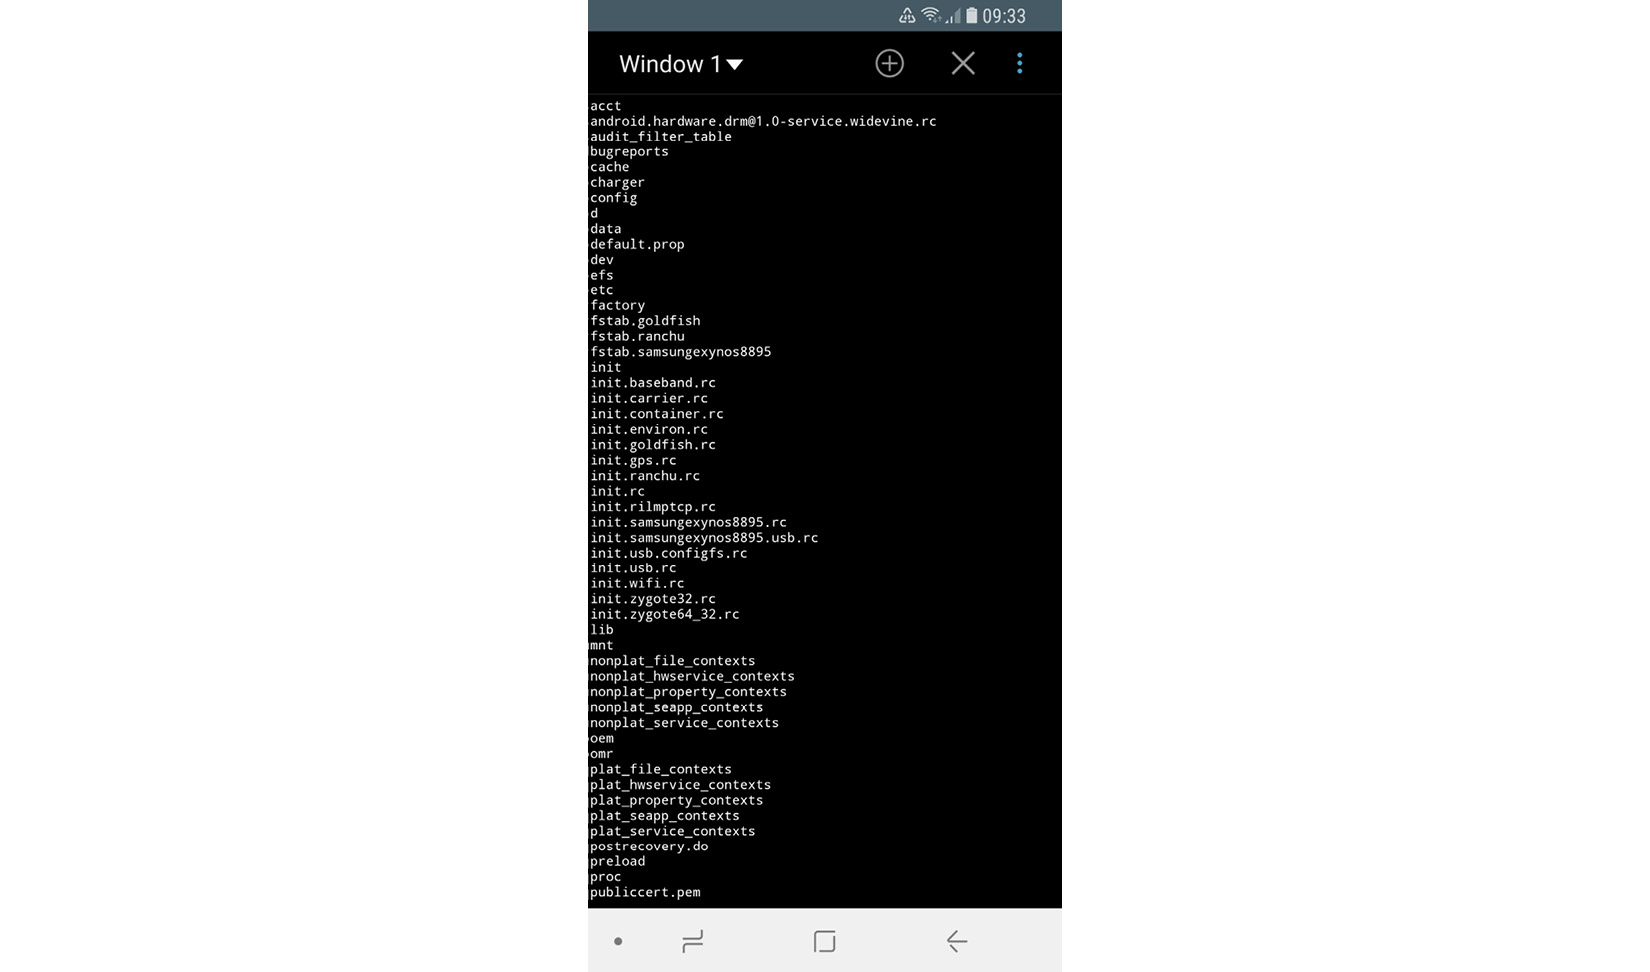
Figure 13.4 – Listing the files in a root directory using the Terminal Emulator app
In this case, advanced commands can be used only on the rooted device with BusyBox or similar sets of tools installed separately.
Now, let’s talk about rooting in greater detail.
To root or not to root?
Every once in a while, users may encounter applications that require their device to be rooted. What exactly does this mean and how does this process actually work? In this section, we will explore the security mechanisms implemented within different Android versions and how they can be bypassed.
If the user requires some functionality not supported by standard system APIs (for example, removing certain pre-installed applications or carrier applications, overclocking the CPU, or completely replacing the OS), the only option they have – apart from creating a feature request – is to obtain root access through a known vulnerability. As a result, the user gets elevated privileges and full control over the system. The legality of this process varies depending on the country, but generally, it is either unclear (which means it falls into a gray area), acceptable for non-copyright-related activity, or regulated by some dedicated exemptions.
Sometimes, the rooting process is used interchangeably with jailbreaking, generally applied to iOS devices. However, these are different procedures in terms of scope. Jailbreaking is the process of bypassing several different types of end-user restrictions; the main ones are listed here:
- The ability to modify and replace the operating system (controlled by the locked bootloader technology on iOS)
- Installing non-official applications (sideloading)
- Obtaining elevated privileges (what is usually known as rooting)
Unlike iOS, on Android, it is possible to officially enable sideloading, and many devices are shipped with bootloaders unlocked, so only rooting remains an issue.
Each time a new rooting-related vulnerability becomes known, the developers are expected to fix it and either release a security patch or make the next version of the OS more secure. Thus, researchers have to come up with a new vulnerability to exploit in order to make rooting possible. Some rooting methods involve using adb, while others can be executed with the help of the usual user interface. Here are some of the most well-known privilege escalation exploits for Android OS:

Rooting is accompanied by security risks for end users, as in this case, they are no longer protected by system-embedded security mechanisms and restrictions. A common way to get root privileges is to place a standard Linux su utility, which can grant the required privileges to custom files, in an accessible location and use it on demand. Malware can check whether this tool is already available on the compromised device and misuse it at its discretion without any extra work being required.
Many Android malware families are also bundled with rooting software in order to elevate privileges on their own. There are multiple reasons why root access is beneficial to malware authors; particularly, it allows them to obtain the following:
Examples of these kinds of malware families include:
- Dvmap: Uses root privileges to modify system libraries for persistence and privilege escalation
- Zeahache: Escalates privileges and opens a back door for other modules to enter the compromised system
- Guerrilla: Here, root privileges are required to access a user’s Google Play tokens and credentials and gain the ability to interact with the store directly, installing and promoting other apps
- Ztorg: Escalates privileges, mainly to achieve better stealth and aggressively display ads
- CopyCat: Infects Android’s Zygote process (a template for other processes) and loads itself into other processes to access and alter sensitive information
- Tordow: Steals sensitive information such as credentials from browsers
It is worth mentioning that not all malware families implement rooting, as it also increases the probability of being detected by antivirus solutions or damaging the device. In the end, it is up to the authors whether the advantages associated with it outweigh the risks, all depending on the purpose of malware.
As we now have some basic understanding of how Android works, it’s time to dive deeper into its internals.
Understanding Dalvik and ART
The Android OS has evolved drastically over the past several years in order to address user and industry feedback, making it more stable, fast, and reliable. In this section, we will explore how the file execution process was implemented and progressed. In addition, we will dig into various original and newer file formats and learn how the Android executables are actually working.
Dalvik VM (DVM)
The Dalvik VM (DVM) was an open source process virtual machine used in Android up to version 4.4 (KitKat). It got its name from the village Dalvík in Iceland. The DVM implemented register-based architecture, which differs from stack-based architecture VMs such as Java VMs. The difference here is that stack-based machines use instructions to load and manipulate data on the stack and generally require more instructions than register machines in order to implement the same high-level code. By contrast, analogous register machine instructions must often define the register values used (which is not the case for stack-based machines, as the order of values on the stack is always known and the operands can be addressed implicitly by the stack pointer), so they tend to be bigger.
Usually, Dalvik programs are written in the Java or Kotlin before being converted to Dalvik instructions. For this purpose, a tool called dx is used, which converts Java class files into the Dalvik Executable (DEX) format. It is worth mentioning that multiple class files can be converted into a single DEX file.
Once DEX files are created, they can be combined together with resources and code native to the Android Package (APK) file; this is the standard way Android applications are distributed. Once the app gets executed, the DEX file is processed by the dexopt tool, producing the Optimized DEX (ODEX) file, which is interpreted by the DVM.
Starting from Android 2.2, the Just-In-Time (JIT) compiler was introduced for Dalvik. The way it works is that it continually profiles applications on every run and dynamically compiles the most used blocks of bytecode into native machine code. However, independent benchmark tests have shown that stack-based the Java HotSpot VM was on average two to three times faster than the DVM (with enabled JIT) on the same device, with the Dalvik code not taking up less space either. In order to improve the overall performance and introduce more features, Android Runtime (ART) was created.
Android runtime (ART)
ART was first introduced as an alternative runtime environment in Android 4.4 (KitKat) and completely replaced Dalvik in the subsequent major release of Android 5.0 (Lollipop).
In order to explore the relationship between Dalvik and ART, let’s take a look at this diagram:
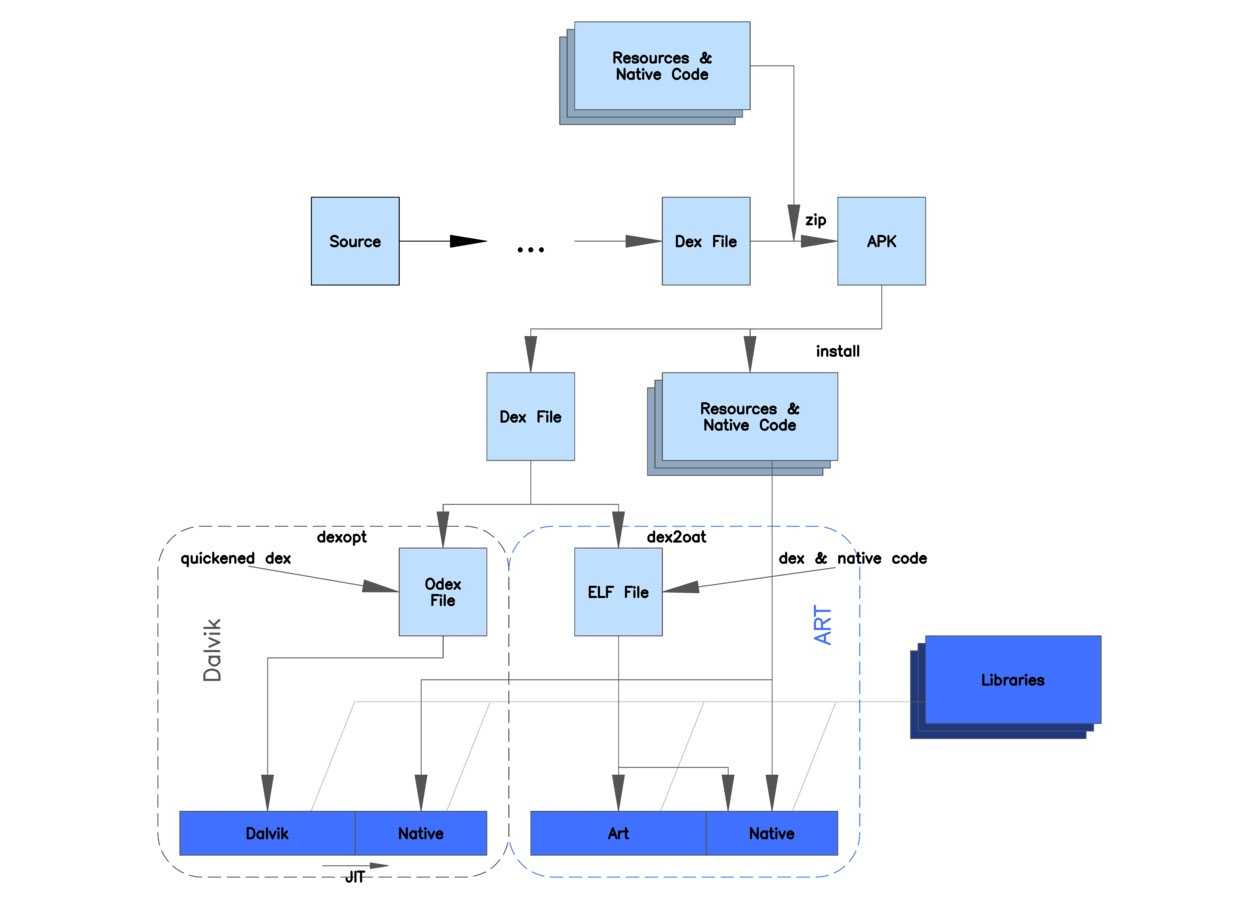
Figure 13.5 – A diagram depicting the differences between Dalvik and ART (origin: Wikimedia Commons)
As you can see, both Dalvik and ART share the same logic at the beginning, and operate with the same DEX and APK files to maintain backward compatibility. The major differences lie in how the files are actually processed and executed. Instead of interpreting DEX bytecode, ART translates it to machine code instructions in order to achieve better performance results. This way, instead of generating ODEX files at install time, ART compiles apps using the dex2oat tool to generate ELF files (already covered in the previous chapters) that contain native code. Originally, they also contained DEX code, but on modern Android systems, the DEX code is stored in dedicated VDEX files rather than inside the OAT files. This process is known as Ahead-Of-Time (AOT) compilation.
Starting from Android 7.0 (Nougat), a JIT compiler complements AOT compilation and optimizes the code execution on the fly based on the profiler output. While JIT and AOT use the same compiler, the former is able to incorporate runtime information in order to achieve better results generally, for example, via improved inlining. The following is a diagram depicting the relationship between JIT and AOT:
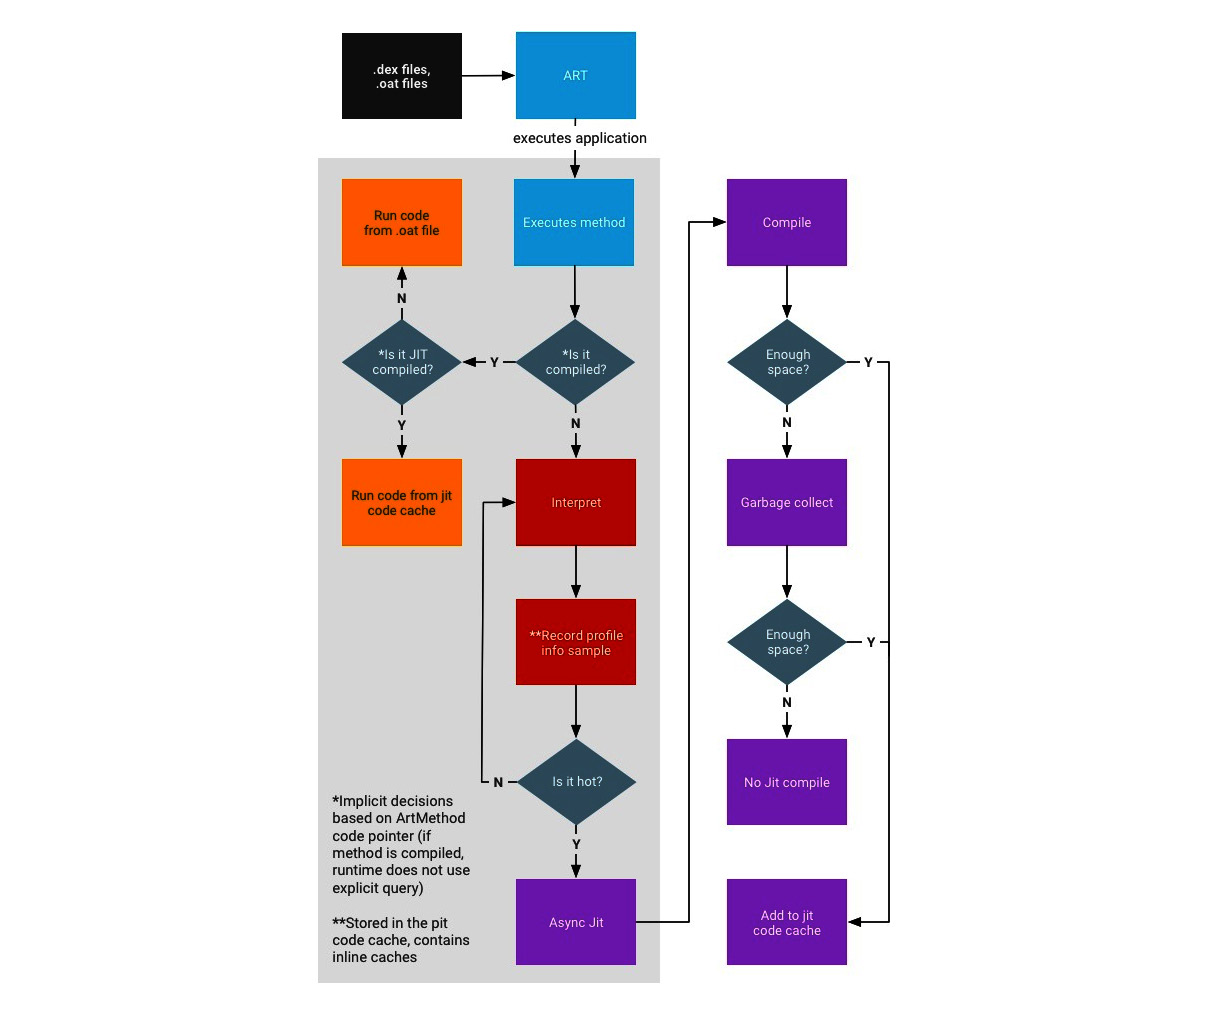
Figure 13.6 – The process of compiling and executing files in ART (origin: source.android.com)
As you can see, if the AOT binary is available (which is not always the case), they are executed straight away, either from the JIT code cache (if it is JIT-compiled) or in the usual way. Otherwise, they are interpreted and optionally compiled by JIT, depending on how it is used throughout the system, in particular, whether it is used by other applications and whether it has a meaningful profile (profile files are recorded and created during the sample execution). The AOT compilation daemon also runs periodically and utilizes this information to (re)compile highly used files.
Now, let’s dive deeper into Dalvik’s bytecode instruction set.
The bytecode set
As we now know, Dalvik is a register-based machine, which defines the syntax of bytecode. There are multiple instructions operating with registers in order to access and manipulate data. The total size of any instruction is a multiple of 2 bytes. All instructions are type-agnostic, which means that they don’t differentiate between the values of different data types as long as their sizes are the same.
Here are some examples of how they look in the official documentation. We’ll split them into several categories for easier navigation. The explanation of how to interpret the first column can be found after this table:
- Data access and movement:
_B18500.jpg)
_B18500.jpg)
- Arithmetic operations:
_B18500.jpg)
_B18500.jpg)
- Branching and calls: As all instructions are multiples of 2 bytes, all branching instructions operate with words:
_B18500.jpg)
_B18500.png)
It is worth mentioning that some sets of instructions (for example, for optimized code) can be marked as unused in the official documentation, and it is quite unlikely they will be found in malware aiming to achieve the maximum coverage possible.
Now, let’s examine the format notation used in the first column.
The first byte is the opcode of the instruction (Dalvik utilizes only one-byte values (00-0xFF) to encode the instructions themselves). In the official documentation, some similar instructions are grouped into one row with the range they belong (“..” is used to define the range) specified in the first column and the mappings for the corresponding instructions provided in the second column.
Supported instruction formats are described using a special format ID notation in the official documentation. Format IDs mostly consist of three characters – two digits and a letter:
- The first digit indicates the number of two-byte code units in the resulting bytecode (see the Examples column).
- The second digit specifies the maximum number of registers used (as some instructions support a variable number of them).
- The final letter indicates the type of any extra data encoded by the format. Here is the official table describing these mnemonics:

Let’s use the first row of the first table as an example. Here, a 01 12x value describing the move v0, v1 instruction encoded using 2 bytes, 0110, means the following:
- 01 – the byte encoding the actual instruction (0x01).
- 12x should be interpreted as three individual values:
- 1 – the size of the instruction (one word, 2 bytes in total: 0x01 and 0x10)
- 2 – the number of registers (two in total, v0 and v1)
- x – no extra data used here
As for the prefixes for arguments used in the second column of the first table, this is what they mean:
- The v symbol is used to mark the arguments that the name registers.
- The #+ prefix specifies arguments indicating a literal value.
- The + symbol is used for arguments that indicate a relative instruction address offset.
- The kind@ prefix indicates a constant pool kind (string, type, field, and so on).
A separate official document describes all the possible variants of format.
Here is an example of how a sequence of Dalvik bytecode looks:
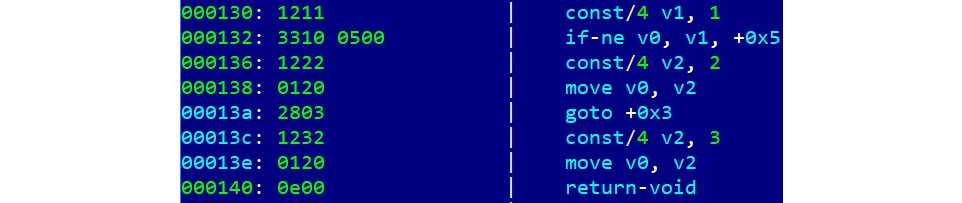
Figure 13.7 – An example of disassembled Dalvik bytecode
Overall, the related Android documentation is very detailed and easily accessible, so in case of doubt, it always makes sense to consult it.
Now that we know how Android works, it’s time to go one level deeper and understand the main file formats used in its apps.
File formats and APIs
Here are the most important file formats associated with applications written for different versions of Android.
DEX
The DEX format holds a set of class definitions and associated data. The file layout is as follows:
_B18500.jpg)
_B18500.png)
The rest of the fields define the sizes and offset of other data blocks:
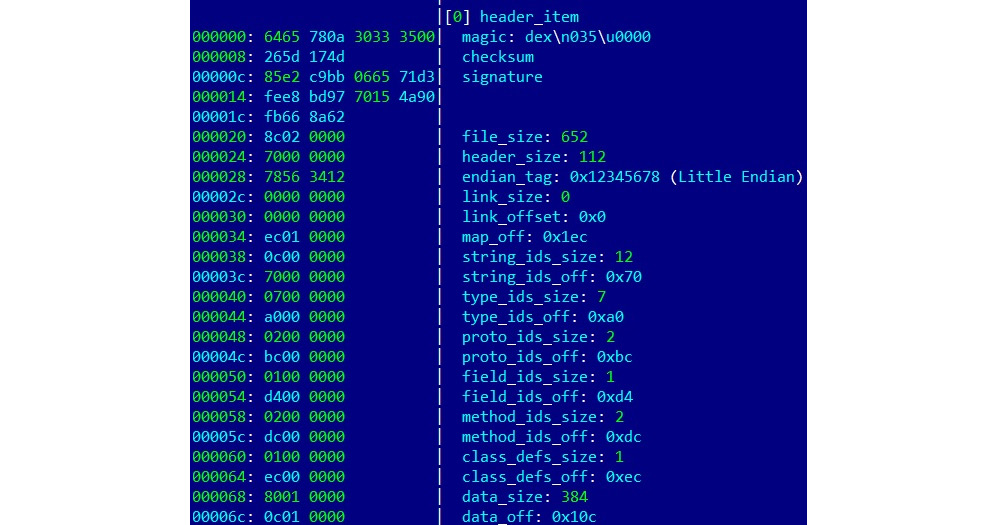
Figure 13.8 – A DEX header with the fields described in detail
The header starts with an 8-byte DEX_FILE_MAGIC value that consists of a dex string (x64x65x78) followed by the newline symbol (x0a), the 3 bytes defining the format version, and finally a zero byte (x00). This format aims to provide a way to identify DEX files and the corresponding layout used, and to prevent basic data corruption.
ODEX
Actively used before the appearance of ART, ODEX files are the result of the optimizations made to DEX on the device in order to improve performance and decrease the result size. ODEX files consist of the already described DEX layout, wrapped with a short ODEX header:
typedef struct DexOptHeader {
  u1 magic[8];
  u4 dexOffset;
  u4 dexLength;
  u4 depsOffset;
  u4 depsLength;
  u4 auxOffset;
  u4 auxLength;
  u4 flags;
  u4 padding;
} DexOptHeader;
The header magic value is the same as for DEX but features a slightly different first 3-byte signature, dey (x64x65x79), rather than dex. This format is defined in the DexFile.h source code file.
OAT
OAT files aimed to replace ODEX in the newer ART environment. To begin with, file extensions shouldn’t be trusted when dealing with Android executables. In particular, on recent Android systems, files with the .dex, .odex, and .oat extensions may actually implement the OAT format. It is not very well-documented and varies for different versions of Android, but the most important thing here is that the result data is wrapped in ELF shared objects. Starting from Android Oreo, OAT files don’t store DEX code, leaving it to VDEX files, and are used mainly to store mapping information and the native code.
VDEX
These files were introduced in newer versions of Android (starting from Android Oreo) and are created by the dex2oat tool. The idea here is to store DEX code independently, not inside the OAT structure, with some additional metadata to speed up verification. As with OAT, the file format is not documented and changes between different versions of Android. Its description can be found in Android’s vdex_file.h source code file.
Apart from this, a new internal ART format called Compact DEX (CDEX) was introduced in Android 9. It aims to reduce storage and RAM usage by compacting various data structures and de-duplicating data blobs in cases where multiple DEX files are present; it may be encountered when working with VDEX files. The corresponding magic header value to recognize them in this case would be cdex. The most up-to-date description can be found in the compact_dex_file.h source code file.
ART
These files contain internal representations of certain strings and classes listed in the APK for ART and are used to speed up the application start. The common file extension used in this case is .art. As in the previous case, this file format is not documented and changes between different versions of Android. As it is generally not used by malware, we won’t go into greater detail here.
ELF
In addition to Android-specific file formats, it is also possible to execute general ELF files compiled for the corresponding architecture. Unlike Linux systems, which mostly rely on glibc, Android uses its own Bionic C library due to licensing issues. At the moment, x86 and ARM (both 32-bit and 64-bit) architectures are supported. Besides this, as has just been mentioned, it is also used to store OAT data blocks for optimized Android executables.
The ELF format has already been covered in great detail in Chapter 11, Dissecting Linux and IoT Malware.
APK
APK files are archive files based on the JAR format, which, as we know from Chapter 9, Reversing Bytecode Languages – .NET, Java, and More, implements the ZIP format. What this means is that APK files can be unpacked using any software supporting ZIP-compressed files.
Usually, APK files contain the following files:
- res: This directory contains various resource files (such as XMLs and pictures).
- META-INF: Stores metadata files associated with the package, mainly the following ones:
- MANIFEST.MF: A manifest file containing names and SHA1/SHA2 digests of files inside the APK
- <name>.RSA: Contains the application’s signature and certificate
- <name>.SF: Contains SHA1 or SHA2 digests of the corresponding lines in the MANIFEST.MF and the list of associated resources
- AndroidManifest.xml: The main manifest file defining various important app-related values for the system and Google Play. It is stored in human-unreadable format inside the APK. One of the easiest ways to decode it is by using apktool for extraction.
- classes.dex: A compiled file containing the app’s DEX bytecode; there can be several of them with numbers added following this format: classes<num>.dex.
- resources.arsc: This compiled file contains metadata associated with resources used by the app.
At the moment, Android doesn’t perform CA verification for application certificates, so self-signed certificates are allowed. Apart from this, other directories such as assets and files can also be commonly found inside APK files.
Regarding AndroidManifest.xml, only the <manifest> and <application> elements are required to be present. Generally, the following data can be specified there:
- Basic app information (such as the package name)
- App components and the corresponding types (activity, service, broadcast receiver, or content provider)
- Required permissions (see the corresponding section, The Android security model)
- Hardware and software features that the app needs
- Information about the supported Android SDK
Unlike programs on many other systems, generally speaking, Android apps don’t necessarily have a single entry point, which means there is no main function. The sample’s main activities can be found by looking at the app’s AndroidManifest.xml file and searching for the components with the android.intent.action.MAIN value specified. Also check that if there is a class name mentioned in the android:name attribute of the <application> element (this name should represent a subclass of the Application class), it gets control first. Once found, search for the onCreate methods in these components – here is how they will look in disassembly:
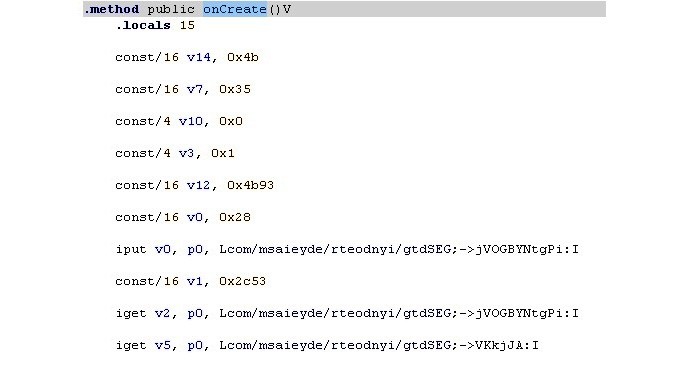
Figure 13.9 – The onCreate method in the disassembled Android sample
Now that we have become familiar with the most common file formats used in Android, let’s talk about its APIs.
APIs
Most of the code for the Android platform is written in Java, so the whole infrastructure is built on it. However, Android implements its own APIs in order to let programs interact with the OS to achieve their goals. While some classes might be quite similar to Java (for example, the System class), there are also a significant number of differences, such as the different meanings of certain properties (or properties that have lost their meaning). In addition, some introduced classes and APIs are new and aim to provide access to the unique features implemented in Android. An example is the DexClassLoader class, which loads classes from JAR and APK files and can be used to execute code that wasn’t part of an application. Here are some other examples of APIs and their classes, with self-explanatory names that can be commonly seen in malware:
- SmsManager
- sendTextMessage
- ActivityManager
- GetRunningServices
- getRunningAppProcesses
- PackageManager
- GetInstalledApplications
- getInstalledPackages
- DevicePolicyManager
- LockNow
- reboot
- Camera
- TakePicture
- DownloadManager
- enqueue
- DownloadManager.Request
- setDestinationUri
Some functionality can also be accessed through the use of a combination of the Intent class, with a particular argument describing the requested action, and the Activity class, to actually perform an action, generally using the startActivityForResult method.
Regarding the downloading-related functionality, many malware families obviously prefer to avoid using the standard download manager, as it tends to be more visible to the user, and instead implement it using Java classes such as java.net.URL and java.net.URLConnection. And, of course, as we know, some APIs require particular permissions to be requested prior to use. In this case, it should be at least android.permission.INTERNET.
Now that we have learned how the files are structured as well as what APIs we need to pay attention to, it is time to focus on particular patterns commonly found in malware as well as the logic behind them.
Malware behavior patterns
Generally speaking, even though malware for mobile devices has its own nuances caused by the different environment and use cases of the targeted systems, many motivation patterns behind attacks stays the same as for PC platforms. In this section, we are going to dive deeper into various examples of mobile malware functionality and learn what methods it uses in order to achieve malevolent goals.
Now that we know how things are supposed to work, let’s take a look at how malware authors leverage them. Here, we will go through various attack stages common for the vast majority of malware, which will enable us to see these patterns in the analyzed samples and understand their purpose.
Initial access
The most common ways malware gets access to devices are the following:
- Google Play
- Third-party markets and sideloading
- Malicious ads and exploits
In the first two cases, malware authors generally rely on social engineering, tricking users into installing a potentially useful app. There are many techniques used to make this possible, such as the following:
- Similar design: The app may look similar and have a similar name to some other well-known, legal application.
- Fake reviews: To make the app look authentic and not suspicious.
- Anti-detection techniques: To bypass automatic malware scanners and prolong the hosting.
- Malicious update: The original application uploaded to the store is clean, but its update contains hidden malicious functionality.
- Luring description: Promises free or forbidden content, easy money, and so on.
The app itself may be mostly legitimate but also contain hidden malicious functionality. There are multiple ways the user may come across them – by clicking fraudulent links received via messengers, texts, emails, or left on forums, or encountering it during searches for particular apps due to illegal Search Engine Optimization (SEO) techniques.
Use of malicious ads involves delivering malicious code through the advertisement network with the help of exploits. An example could be lbxslt, an exploit leaked from HackingTeam and used by attackers to spread ransomware in 2017. In addition, exploits may also be used for high-profile attacks targeting particular individuals.
Privilege escalation
The next stage is to obtain all required permissions. Apart from the rooting options already discussed, it is possible for malware to abuse so-called administrative permissions.
Originally designed for enterprise use cases to remotely administrate the mobile devices of employees, they can offer malware powerful capabilities, including the ability to wipe important data. Usually, the easiest way to get permissions is to keep asking the user and don’t stop until they are granted.
As long as all the required privileges are obtained, malware generally attempts to deploy its modules somewhere on a device. At this stage, extra modules can be downloaded after contacting the command and control server.
Persistence
The most common places where malware installs itself once it gets executed are the following:
- /data/data: Standard paths intended to be used for all Android applications. This approach poses a threat to attackers, as it is relatively easy to remediate such threats.
- /system/(app|priv-app|lib|bin|xbin|etc): These paths require malware to use rooting exploits to get access to them. This makes it harder for the user to identify and delete the threat.
Persistence in this case can be achieved using the standard Android BroadcastReceiver functionality common to all apps using the BOOT_COMPLETED action. The RECEIVE_BOOT_COMPLETED permission is required in this case.
While many mass malware families follow similar patterns in order to achieve their goals, there is also a much smaller – but at the same time, often a more highly significant – set of examples implementing advanced techniques in order to achieve more specific goals. An example is APT groups performing high-profile espionage tasks and therefore having much higher requirements in terms of stealth and effectiveness. An example of the relevant malware family patching system libraries is Dvmap. It uses root privileges to back up and then to patch system libraries (particularly libdvm.so and libandroid_runtime.so), injecting its code there. The libraries are supposed to execute a standard system executable with system privileges, which is replaced by the attackers to achieve persistence and escalate privileges at the same time.
Impact
As long as the malware completed its installation, it can switch to the main purpose it was created for. The exact implementation will vary drastically depending on that. Here are some of the most common behaviors found in mass malware:
- Premium SMS senders: Probably the easiest way to make money straight away in mobile malware in certain countries is to send paid SMS messages to premium numbers (including the ones related to in-app purchases) or subscribing to paid services. Each of them will cost a certain amount of money, or an automatic subscription payment will be taken regularly, which eventually leads to draining the victim’s balance. In order to bypass CAPTCHA protection, existing anti-CAPTCHA services may be used.
- Clickers: A more generic group of threats that uses mobile devices to make money in multiple different ways:
- Ad clickers: Simulates clicks on advertising websites without the user’s interaction, eventually draining money from advertising companies.
- WAP clickers: This group is similar to SMS senders in the way that it uses another form of mobile payment, this time, by simulating clicks on WAP-billing web pages. The charge will be applied to the victim’s phone balance.
- Clickers that increase traffic to websites for illegal SEO purposes; for example, to promote malicious apps.
- Clickers that leave fake reviews or change ratings of some apps and services.
- Clickers that buy expensive apps on Google Play, for example, using accessibility services to emulate user taps or implementing their own clients to interact with the store directly.
- Adware: These threats aim to monetize custom advertisements shown to users, often in an excessive and abusive way.
- Infostealers: As mobile devices often contain sensitive information, including saved credentials, photos, and private messages, it is also possible for malware authors to make money from stealing it, for example, by selling it on the underground market or extorting users. Another possible option here is cyber espionage.
- Banking trojans: Sometimes also named infostealers, this malware aims to steal users’ banking information to get access to their bank accounts, or manipulate payments. The most common ways to do this are by displaying fake windows simulating a real banking or popular booking app on top of the real one and letting the user enter their credentials there, or by using accessibility services to make the real app perform illegitimate transactions. Access to SMS messages on a device can be used to bypass the two-factor authentication introduced by some banks.
- Ransomware: As in the PC world, some malware families try to block access to certain files or a whole device to illegally push the users into paying a ransom in order to restore access. Quite often, this behavior is accompanied by statements that the affected user did something wrong (for example, watched illegal content), and demanding them to pay a fine, otherwise, the information will become public.
- DDoS: Multiple infected mobile devices can generate enough traffic to cause significant load for the targeted websites.
- Proxy: Quite rarely used alone, this functionality allows malicious actors to use infected devices as a free proxy to get access to particular resources and increase anonymity. An example of such a family is Sockbot.
- Cryptocurrency miners: This group abuses a device’s calculation power in order to mine cryptocurrencies. While the CPU of each device might be not very powerful, a large amount of affected devices when put together can generate significant profit for attackers. For the affected user, it results in increased traffic usage, and the device slows down drastically and excessively heats up, which eventually may cause damage.
Some trojans prefer to implement backdoor or RAT functionality and then deliver customizable modules in order to achieve flexibility in extending malware functionality.
It is worth mentioning that not all malware families get their unique names based on the actual functionality. Quite often, a shared name describing its propagation method is used, for example, Fakeapp.
In terms of propagation, as malware can easily access a victim’s contacts, usually, the spreading mechanism involves sending links or samples to people the user knows via text, messengers, and email.
As for getting the actual money, at first, malware authors preferred to get it via premium SMS messages and local payment kiosks. Later, with the rise of cryptocurrencies, alternative options became an obvious choice for malicious authors due to anonymity and an easier setup process, providing users with detailed instructions on how to make a payment.
Collection
Pure keylogging without screen capturing is not very common for Android malware. There are several reasons for this, starting with the fact that, in most cases, it is just not needed, and also because of the peculiarities of data input on mobile devices. Sometimes high-profile spying malware implements it in a pretty creative way. For example, it is possible to keep track of screen touches and match them against a pre-defined map of coordinates to deduce the keys pressed.
An example of a family implementing it is BusyGasper, which is backdoor malware.
Defence evasion
There are multiple anti-analysis techniques that mobile malware can incorporate in order to protect itself, including the following:
- An inaccessible location: A previously mentioned technique where malware uses rooting exploits to allow it to deploy itself in locations that are not accessible with standard user privileges. Another option is to overwrite existing system apps.
- Detecting privilege revocation: Multiple techniques are used to scare the user when permissions are revoked in an attempt to prevent it.
- Detecting antivirus solutions: In this case, malware keeps looking for files associated with known antivirus products and once detected, may display a nag window asking for its uninstallation. These kinds of messages are shown in a loop and prevent the victim from using the device properly until the requested action is taken.
- Emulator and sandbox detection: Here, the malware checks whether it is being executed on the emulated environment or not. There are multiple ways it can be done: by checking the presence of certain system files or values inside them, such as IMEI and IMSI, build information, various product-related values, as well as the phone numbers used. In this case, malware behaves differently depending on the result to tamper with automatic and manual analysis. Another popular simple technique used to bypass basic sandboxes with an execution time limit is to sleep or perform benign actions for a certain period of time.
- Icon hiding: The idea here is that the user can’t easily uninstall the app using an icon. For example, a transparent image with no visible app name can be used.
- Multiple copies: Malware can install itself in various locations in the hope that some of them will be missed. In addition, infecting the Zygote process allows malware to create multiple copies in the memory.
- Code packing or obfuscation: As many Android programs are written in Java, the same code protection solutions can also be used here. Multiple commercial options are available on the market at the moment. This topic has already been covered in Chapter 9, Reversing Bytecode Languages – .NET, Java, and More.
In previous chapters, we covered state-of-the-art malware that aims to get more control over the operating system in order to perform more advanced tasks, such as hiding files and processes from monitoring software and amending data at a lower level. These approaches can be applied to mobile operating systems as well. While still not actively used by malware due to deployment complexity, there are several open source projects proving that it is possible.
One of them is the Android-Rootkit project, based on the ideas described in Phrack Issue 68 about intercepting various system calls by hooking sys_call_table. The final goal here is to hide the presence of a sample at a low level.
Now, it’s time to summarize everything we have learned so far and apply it to practice to be able to understand the functionality of Android malware samples.
Static and dynamic analysis of threats
At this stage, we have enough knowledge to start analyzing actual malware. For static analysis, the process and tools used will be mostly the same for different versions of the Android OS (regardless of whether it is based on the old DVM or new ART technology); the differences will be in the dynamic analysis techniques used. Now, it is time to get our hands dirty and become familiar with the tools that can facilitate this process.
Static analysis
Generally, static analysis of bytecode malware involves either disassembling it and digging into the bytecode instructions or decompiling to the original language and exploring the source code. In many cases, the latter approach is preferable wherever possible, as reading the human-friendly code reduces the time the analysis takes. The former approach is often used when decompiling doesn’t work for whatever reason, such as a lack of up-to-date tools or because of anti-reverse-engineering techniques implemented in the sample.
Here are some of the most commonly used tools for static analysis of Android malware.
Disassembling and data extraction
These tools aim to restore Dalvik assembly from the compiled bytecode:
- Smali or Baksmali: Smali (meaning assembler in Icelandic) is the name of the assembler tool that can be used to compile Dalvik instructions to the bytecode and, in this way, build full-fledged DEX files. The corresponding disassembler’s name is Baksmali; it can restore Dalvik assembly code from bytecode instructions, as well as dump a DEX header structure and deodex files. Both tools operate with text files, storing assembly code that has .smali file extensions.
There were a handful of changes to the format between version 1 and 2 of SMALI files. To convert existing SMALI files to the new format, you can assemble the old ones with the latest Smali tool, version 1, and then disassemble them with the latest Baksmali tool, version 2.
- Apktool: A wrapper around the Smali tool; it provides the functionality to easily process APK files. Its interface looks as follows:
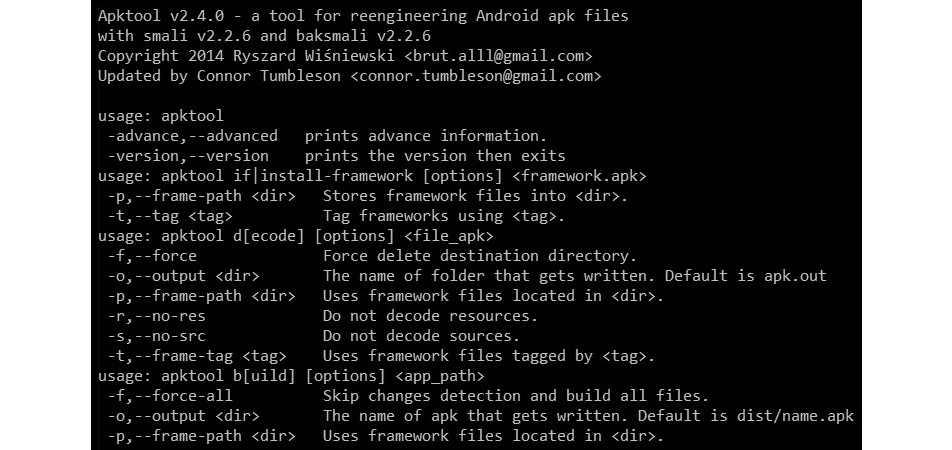
Figure 13.10 – The interface of the Apktool
Apart from these, there are other online and desktop solutions built on top of these two, providing convenient UIs and extra features, for example, APK Studio:
- aapt: Shipped as a part of Android’s SDK Build Tools, this tool can quickly give valuable insights into the APK’s internals including the apps’ names, permissions used, and much more. For example, to find the app’s label(s) for a specific APK, run aapt dump badging <path_to_apk>, and to parse AndroidManifest.xml, use aapt dump xmltree <path_to_apk> AndroidManifest.xml
- oat2dex (part of SmaliEx): A very useful tool for extracting DEX bytecode from older ELF files, storing it as part of the OAT data so that it can be analyzed as usual.
- vdexExtractor: This tool can be used to extract DEX bytecode from VDEX files, as modern OAT files don’t store it anymore.
- LIEF: This cross-platform library provides plenty of functionality to parse and modify Android files of various formats.
- Androguard: A versatile toolset combining multiple tools to perform various types of operations, including disassembling, parsing, and decoding of various files.
While bytecode assembly can definitely be used for static analysis purposes on its own, many engineers prefer to work with decompiled code instead to save time. In this case, decompiling tools are extremely useful.
Decompiling
Instead of restoring the assembly instructions, this set of tools restores the source code, which is usually a more human-friendly option:
- JADX: A DEX to Java decompiler that provides both a command-line and a GUI tool to obtain something close to the original source code in the Java language. In addition, it provides a basic deobfuscation functionality. Here is how its interface looks:
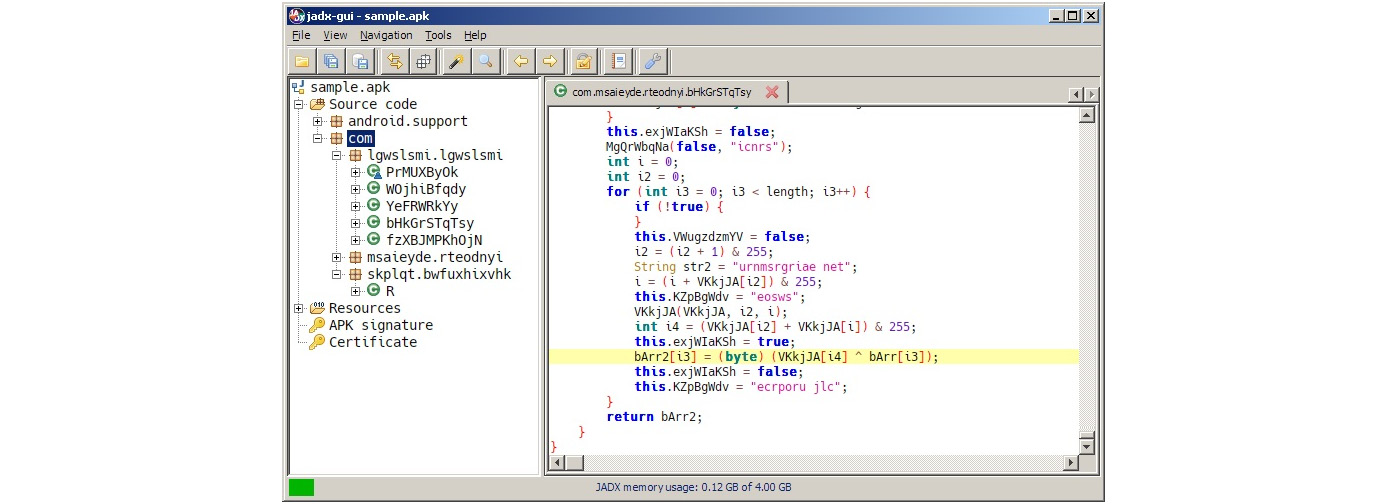
Figure 13.11 – A decompiled Android sample in JADX
- AndroChef: This commercial decompiler supports both Java and Android files and provides a handy GUI to go through the results.
- JEB decompiler: Another powerful commercial disassembling and decompiling solution, this supports both Dalvik and machine code.
- dex2jar: While not exactly a decompiler, this tool allows engineers to convert DEX files to JARs. After that, it becomes possible to use multiple Java decompilers to obtain Java source code, as already discussed in Chapter 9, Reversing Bytecode Languages – .NET, Java, and More.
- Ghidra: In addition to native executables, this powerful toolset also supports Android apps by converting them into JARs and can be used to facilitate static analysis for this platform.
Once obtained, the source code can be analyzed in any IDE or text editor with syntax highlighting that supports it.
Now, it is time to explore the options engineers have to perform dynamic analysis.
Dynamic analysis
Effective dynamic analysis requires either some sort of emulation or remote debugging, as many mobile devices tend to have relatively small native screens and basic input capabilities.
Android Debug Bridge
Android Debug Bridge (ADB) is a versatile command-line tool that lets users interact with mobile devices from the PC, providing a variety of actions. It is a part of Android SDK Platform Tools and consists of three parts:
- A client running on the PC, providing an interface to enter commands.
- A daemon (adbd) executing entered commands on the mobile device. It runs as a background process on all devices.
- A server running on the PC that manages communication between the client and the daemon.
On the physical devices, ADB can be allowed by enabling the USB Debugging option under Developer options in Settings. On a modern Android OS, this option is hidden by default and can become visible by tapping the Build number option (usually, can be found in Settings | About phone) multiple times and then returning to the previous screen. In addition to real devices, ADB can also recognize and work with an Android emulator without any changes required.
In addition to accessing the device via USB, wireless interaction via Wi-Fi is also possible by first issuing the adb tcpip <port> command via USB, disconnecting the device, and using the adb connect <ip_address>:<port> command.
Here are some examples of other command-line options available:
- adb devices: Lists the attached devices.

Figure 13.12 – Adb seeing an emulated device
- adb kill-server: Resets the adb host
- adb install <path_to_apk>: Sideloads the app using its APK file
- adb pull or adb push: Moves files between the mobile device and the PC
- adb root or adb unroot: Restarts the adbd daemon with or without root permissions (not intended to be used in production builds)
- adb forward: Forwards the specified port from the host to the device:
- Example: adb forward tcp:1234 tcp:5678 – forwards the host’s port 1234 to the device’s port 5678
- adb shell [<command>]: Creates a remote interactive shell or runs a command within the shell
Apart from traditional Linux commands, such as ls or cat, the Android shell supports multiple custom commands. Here are some examples:
- screencap <filepath>: Takes a screenshot and save the result on the device.

Figure 13.13 – Using the screencap command
- screenrecord <filepath>: Performs screen video recording until Ctrl + C is pressed.
- monkey <package_name>: Originally designed to perform random activities and this way, stress-test applications, it can also be used to launch desired apps by using the adb shell monkey -p <package_name> 1 syntax.
- input keyevent <num>: Initiates the specified key event. Here are a few examples of them and the corresponding numbers:
- 3 – presses the Home button
- 4 – presses the Back button
- 64 – opens a browser
- 207 – opens contacts
The complete up-to-date list can be found by looking at the KeyEvent class in the official Android documentation.
Important note
To pass arguments requiring quotes as part of the command, you will have to surround the quoted string with a pair of different quotes (either single or double).
In addition, ADB can be used to issue commands to additional modules:
- Package Manager (PM): Performs actions on apps installed on the device.
- Example: adb shell pm list packages – lists the names of all packages. Use the –f option to also get the paths of the corresponding APKs. Third-party apps can be filtered out using the –3 argument.
- Activity Manager (AM): Responsible for performing various system-related actions:e
- Example: adb shell am start -a android.intent.action.MAIN -n <package_name>/<main_activity> – launches the main activity of an app. The most reliable way to specify the main activity is to provide the full path to it within the package (such as adb shell am start -a android.intent.action.MAIN -n com.google.android.calendar/com.android.calendar.LaunchActivity).
- Device Policy Manager (DPM): Used for developing and testing device management apps.
All the commands can be found in the comprehensive official documentation.
Emulators
As with any other platform, emulators aim to facilitate dynamic analysis by emulating the executed instructions without the need to use real devices. There are several third-party solutions aiming to provide easier access to Android apps and games, for example, BlueStacks. However, for reverse-engineering purposes, solutions that are more focused on giving developers the ability to create and debug apps generally provide better options. They include the following:
- Android Emulator: The official Android Emulator can be installed as part of the official Android Studio or using the command-line SDK Manager. It provides almost all the capabilities of real physical devices and comes with predefined sets of configurations aiming to simulate various mobile devices (whether a phone, tablet, and wearable) on the PC.
To install the emulator without Android Studio (using only the command line), follow these steps:
- If you have never installed the Android SDK before, create an empty directory somewhere where you would like the whole Android SDK to be located and create an environment variable, ANDROID_HOME, to point to this directory.
- Download the Android command-line tools, unzip them, and move the whole extracted directory, cmdline-tools, (not its content!) to the Android SDK folder.
- Inside $ANDROID_HOME/cmdline-tools, create a directory called latest, and move the whole content of cmdline-tools there.
- In the $ANDROID_HOME/cmdline-tools/latest/bin directory, you can find the sdkmanager tool. Use this method to get the emulator and platform tools, including adb:
./sdkmanager emulator platform-tools
- You can list all the available Android system images by running the following command:
./sdkmanager --list | grep "system-images;android"
- For example, we decided to emulate Android 12, corresponding to the API level of 31. Use the following command to download a system image that will be emulated on an x86-64 machine, together with the corresponding packages:
./sdkmanager "system-images;android-31;google_apis;x86_64" "platforms;android-31"
Important note
Using google_apis_playstore images will enable access to Google Play but the adb root command will not work on them!
- Use the following command to create a virtual device linked to the chosen system image (no need to create a custom hardware profile). In this case, the name used is avd_31_noplay, but it can be any other name:
./avdmanager create avd -n "avd_31_noplay" -k "system-images;android-31;google_apis;x86_64"
- Now, everything is ready to run the emulator, located in the $ANDROID_HOME/emulator directory, using the following command:
./emulator -avd "avd_31_noplay"
Important note
When running an emulator on the VM, you may be prompted about hardware acceleration – to address it, enable support for Intel VT-x in the VM’s settings.
Here is how the result will look:

Figure 13.14 – Running the Android Emulator on a VM
The Emulator also allows us to create and restore snapshots containing the entire state of the emulated device.
- VMWare, VirtualBox, or QEMU: These versatile solutions can be used to run an Android-x86 image and perform dynamic analysis in a similar way to what would be done on the Linux VM. Keep in mind that Android-x86 is usually a few versions behind the latest Android release:
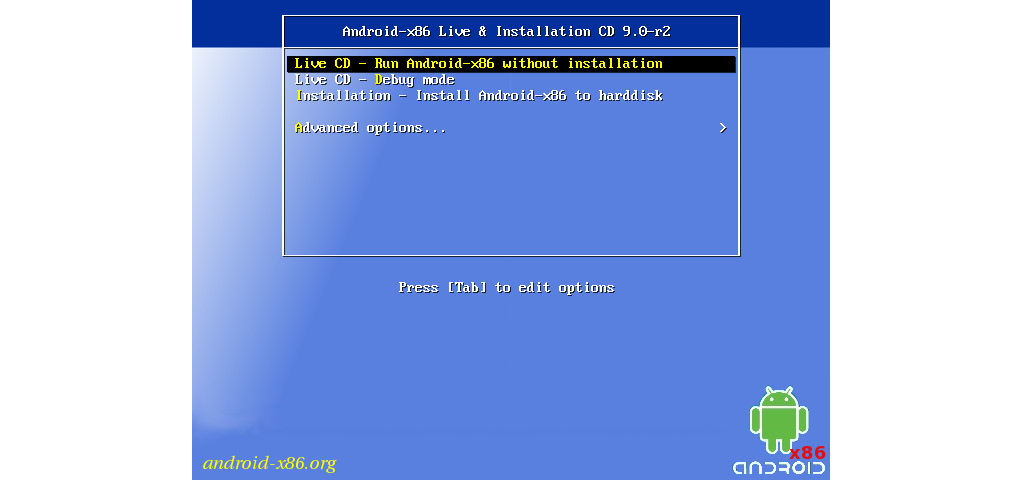
Figure 13.15 – Running Android-x86 on a VM
Other ways to get access to Android systems include cloud-based Genymotion and container-based anbox solutions.
Once we have the environment to run Android programs, we need debuggers to do it in a controlled way.
Debuggers
Once the app of interest is decompiled back to Java code, parts of it can be debugged as with usual source code in the IDE supporting it, for example, Android Studio. If you are using a physical device instead of an emulator, don’t forget to enable USB debugging. In addition, the code should include the debuggable true option in its build configuration.
Sometimes, it is required to debug the native Dalvik instructions or whole apps. Luckily, there are tools that can facilitate this process. One that deserves particular attention is smalidea. It is a plugin for IntelliJ IDEA (or Android Studio, which is based on it) allowing for step-by-step execution of the analyzed code. This project belongs to the Smali authors and can be found with the corresponding assembler and disassembler tools.
In addition, Android also provides tools to debug native code. Here are the instructions on how to attach at the start:
- First, obtain the Android NDK to get lldb-server prebuilt, as well as the lldb tools (in the past, the gdbserver and gdb tools were used)
- Then, push the lldb-server executable to the device, for example, to the /data/local/tmp directory, and make it executable:
adb push lldb-server /data/local/tmp
adb shell chmod +x /data/local/tmp/lldb-server
- Set up port forwarding:
adb forward tcp:<host_port> tcp:<device_port>
Now, we have two options: either to use lldb-server in gdbserver or the platform mode. Let’s provide examples for both.
Using the gdbserver mode involves the following:
- Start the debugger server on the Android device – the sample of interest should be copied there as well:
adb shell /data/local/tmp/lldb-server g :<device_port> <sample_path_on_device>
- Launch lldb on the host and connect to the debugger server running on the device via the forwarded port:
gdb-remote 127.0.0.1:<host_port>
Using the platform mode involves the following:
- Start the debugger server on the Android device – no need to copy the sample there:
adb shell /data/local/tmp/lldb-server p --listen "*.<device_port>" --server --gdbserver-port <any_other_forwarded_port>
Important note
Here, we have to provide the --gdbserver-port argument, otherwise, lldb won’t be able to copy a sample from the host machine to the Android device later. An additional adb forward command is required to forward this auxiliary port.
- Launch lldb on the host, connect to the debugger server via the forwarded port, and launch the sample – it will be copied to the Android device automatically:
platform select remote-linux
target create <sample_path_on_host>
platform connect connect://127.0.0.1:<host_port>
process launch --stop-at-entry
Here is how the successful connection will look on the debugger server side:
Figure 13.16 – A successful connection to the debugger server running on the Android emulator
Apart from that, IDA is shipped with a set of proprietary debugger servers for Android supporting both 32- and 64-bit versions of x86 and ARM platforms (android_server or android_server64).
App startup can be debugged in the following way:
- Go to Settings | Developer options | Select debug app, choose the app of interest, and press Wait for debugger. This will make the app wait for the jdb debugger to be attached.
- Start the app from the launcher or using the console, wait for it to load.
- Attach a debugger such as lldb, set the required breakpoints, and continue the execution.
- Attach the jdb debugger to let the app run:
adb forward tcp:<port> jdwp:<app_pid>
jdb -attach localhost:<port>
Now, let’s talk about behavioral analysis.
Behavioral analysis and tracing
As with many other platforms, the fsmon tool can be used to monitor file operations on Android. Here is an example of it being used to detect the creation of a new file:

Figure 13.17 – Testing fsmon on the Android Emulator by recording test file creation
In terms of APIs, an AppMon solution includes a set of components to intercept and manipulate API calls. It is based on the Frida project, which also provides its own versatile tools, such as frida-trace (working together with frida-server). One more tool based on Frida is Objection, which provides access to multiple options including various memory-related tasks, heap manipulation, and the execution of custom scripts.
For native programs, the standard strace tool can also be used to monitor system calls. As you can see in the following screenshot, its interface is identical to the one found on Linux systems:
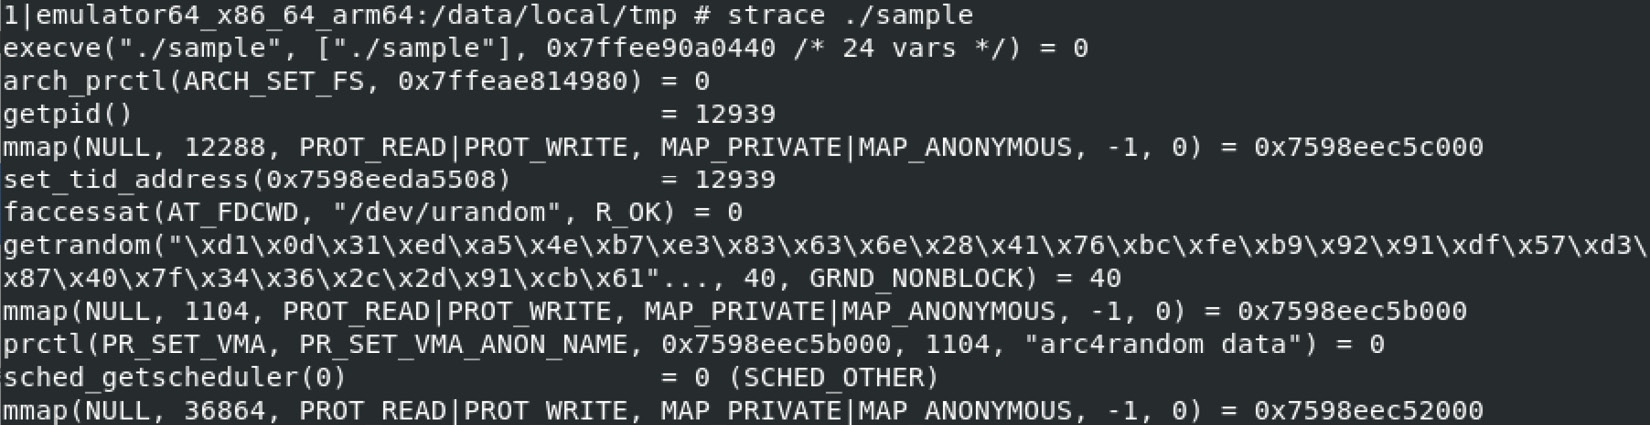
Figure 13.18 – Using strace for behavioral analysis on the Android Emulator
Speaking about recording network traffic, the standard tcpdump tool can run on the device for this purpose and is generally the easiest-to-use solution. Wireshark creators also supply a tool called androiddump to provide interfaces to capture on Android devices (which generally needs to be built separately). In addition, as long as the malicious sample is decompiled, it also becomes possible to embed various libraries intercepting API calls, for example, AndroidSnooper to intercept HTTP traffic.
Once we know which tools can be used for the analysis, let’s summarize the analysis workflow.
The analysis workflow
Here is an example of the workflow, describing how the Android sample analysis can be performed:
- Sample acquisition: Quite often, the sample is already provided by the customer or is easily downloadable from a third-party website. However, sometimes it is required to obtain samples from Google Play. There are multiple ways this can be done: by using dedicated tools such as APK Downloader or by installing an app on the emulator and then getting its APK file from the disk. If optimized ART files are provided (particularly OAT), make sure you have all the system files required to extract the DEX bytecode, for example, the boot.oat file.
- Reviewing the app manifest: For apps, it is worth spending some time reviewing the manifest, as it can give you valuable insight into the sample’s functionality, in particular, the following:
- Decompilation or disassembling: It always makes sense to try to get the decompiled source code, as it is usually much easier to read it and perform dynamic analysis, including alteration if necessary. If decompilation doesn’t work and some anti-reverse-engineering technique is expected, then the code can be disassembled so that the tampering logic can be amended. Native code in ELF binaries can be processed in the same way as described in Chapter 11, Dissecting Linux and IoT Malware.
- Static analysis: Now, it is time to open the whole project in a tool providing the convenient UI to start reviewing the logic. For apps, many engineers prefer to start with the onCreate methods of the main activities, and the previously mentioned optional Application’s subclass specified in the manifest, as the app execution starts there.
- Deobfuscation and decryption: If it has been confirmed that the sample is obfuscated, at first, it’s worth trying to figure out whether it is a known Java solution and whether any ready deobfuscators exist. If not, then generic method renaming will be helpful. There are multiple tools that can do this; refer to Chapter 9, Reversing Bytecode Languages – .NET, Java, and More.
- Behavioral analysis: It may make sense to execute a sample in the emulator with your behavioral analysis tools of choice enabled to quickly get an idea of the potential functionality. If an emulator detection technique is implemented, it’s usually pretty straightforward to identify it in the code and amend the sample to exclude these checks.
- Debugging: Sometimes, it’s hard to understand certain blocks of functionality, particularly ones where malware heavily interacts with the operating system. In this case, proper step-by-step debugging may be required to speed up the analysis. Always use emulators supporting snapshot creation, so that it is possible to go back and quickly reproduce the same situation as many times as necessary.
Obviously, each case is unique, and depending on circumstances, the selection of actions and their order may vary. Malware analysis is also an art and often requires a certain amount of creativity in order to achieve results in a prompt way.
Summary
In this chapter, we learned about the most important aspects of Android’s internals, covering various runtime environments implemented in different versions of it. In addition, we became familiar with the associated file formats and went through the syntax of the bytecode instructions.
Then, we dove deeper into the world of modern mobile malware, familiarizing ourselves with its different types and the associated behavior. We also learned how attackers can bypass Android security mechanisms in order to achieve their goals. Finally, we learned about various reverse-engineering tools aiming to facilitate static and dynamic analysis, and established guidelines on how and when they can be used.
Equipped with this knowledge, you can better track threat actors that are trying to penetrate Android devices and promptly mitigate the risks. In addition, the set of skills obtained can be used during the incident response process to properly understand the logic of the attacks to improve the overall security posture.
This is the last chapter of this book – we hope you enjoyed it! As a next step, we recommend putting your new knowledge into action by practicing analyzing various types of malware and sharing your results with the community. Malware analysis is a never-ending journey. We really hope this book will help many novice and experienced engineers to analyze modern and future threats more efficiently and eventually make the world a safer place.