9
Packaging Applications
In this chapter, we are going to look at Helm, the Kubernetes package manager. Every successful and non-trivial platform must have a good packaging system. Helm was developed by Deis (acquired by Microsoft in April 2017) and later contributed to the Kubernetes project directly. It became a CNCF project in 2018. We will start by understanding the motivation for Helm, its architecture, and its components. Then, we'll get hands-on and demonstrate how to use Helm and its charts within Kubernetes. That includes finding, installing, customizing, deleting, and managing charts. Last but not least, we'll cover how to create your own charts and handle versioning, dependencies, and templating.
The topics we will cover are as follows:
- Understanding Helm
- Using Helm
- Creating your own charts
Understanding Helm
Kubernetes provides many ways to organize and orchestrate your containers at runtime, but it lacks a higher-level organization for grouping sets of images together. This is where Helm comes in. In this section, we'll go over the motivation for Helm, its architecture and components, and discuss what has changed in the transition from Helm 2 to Helm 3.
The motivation for Helm
Helm provides support for several important use cases:
- Managing complexity
- Easy upgrades
- Simple sharing
- Safe rollbacks
Charts can describe even the most complex apps, provide repeatable application installation, and serve as a single point of authority. In-place upgrades and custom hooks allow easy updates. It's simple to share charts that can be versioned and hosted on public or private servers. When you need to roll back recent upgrades, Helm provides a single command that allows you to roll back a cohesive set of changes to your infrastructure.
The Helm 2 architecture
Helm is designed to perform the following:
- Create new charts from scratch
- Package charts into chart archive (TGZ) files
- Interact with chart repositories where charts are stored
- Install and uninstall charts into an existing Kubernetes cluster
- Manage the release cycle of charts that have been installed with Helm
Helm uses a client-server architecture to achieve these goals.
Helm 2 components
Helm has a server component that runs on your Kubernetes cluster and a client component that you can run on a local machine.
The Tiller server
This server is responsible for managing releases. It interacts with the Helm clients as well as the Kubernetes API server. Its main functions are as follows:
- Listening for incoming requests from the Helm client
- Combining a chart and configuration to build a release
- Installing charts into Kubernetes
- Tracking the subsequent release
- Upgrading and uninstalling charts by interacting with Kubernetes
The Helm client
You install the Helm client on your machine. It is responsible for the following:
- Local chart development
- Managing repositories
- Interacting with the Tiller server
- Sending charts to be installed
- Asking for information about releases
- Requesting upgrades or the uninstallation of existing releases
Helm 3
Helm 2 is great and plays a very important role in the Kubernetes ecosystem. However, there was a lot of criticism about Tiller – its server-side component. Helm 2 was designed and implemented before RBAC became the official access control method. In the interest of usability, Tiller is installed by default with a very open set of permissions. It wasn't easy to lock it down for production usage. This is especially challenging in multi-tenant clusters.
The Helm team listened to the criticisms and came up with the Helm 3 design. Instead of the Tiller in-cluster component, Helm 3 utilizes the Kubernetes API server itself via CRDs to manage the state of releases. The bottom line is that Helm 3 is a client-only program. It can still manage releases and perform the same tasks as Helm 2, but without needing to install a server-side component.
This approach is more Kubernetes-native, is less complicated, and the security concerns are gone. Helm users can perform via Helm only as much as their Kube config allows.
Using Helm
Helm is a rich package management system that lets you perform all the necessary steps to manage the applications installed on your cluster. Let's roll up our sleeves and get going. We'll look at installing both Helm 2 and Helm 3, but we will use Helm 3 for all of our hands-on experiments and demonstrations.
Installing Helm
Installing Helm involves installing the client and the server. Helm is implemented in Go. The Helm 2 executable can serve as either the client or the server. Helm 3, as mentioned before, is a client-only program.
Installing the Helm client
You must have Kubectl configured properly to talk to your Kubernetes cluster because the Helm client uses the Kubectl configuration to talk to the Helm server (Tiller).
Helm provides binary releases for all platforms here:
https://github.com/helm/helm/releases
For Windows, the chocolatey package manager is the best option (and is usually up to date):
choco install kubernetes-helm
For macOS and Linux, you can install the client from a script:
$ curl https://raw.githubusercontent.com/helm/helm/master/scripts/get > get_helm.sh
$ chmod 700 get_helm.sh
$ ./get_helm.sh
On macOS, you can also use Homebrew:
$ brew install kubernetes-helm
$ helm version
version.BuildInfo{Version:"v3.0.0", GitCommit:"e29ce2a54e96cd02ccfce88bee4f58bb6e2a28b6", GitTreeState:"clean", GoVersion:"go1.13.4"}
Installing the Tiller server for Helm 2
If you run Helm 2 for some reason, then you need to install Tiller – the server-side component – which is not necessary for Helm 3. Tiller typically runs inside your cluster. For development, it is sometimes easier to run Tiller locally.
Installing Tiller in-cluster
The easiest way to install Tiller is from a machine where the Helm 2 client is installed. Run the following command: helm init.
This will initialize both the client as well as the Tiller server on the remote Kubernetes cluster. When the installation is complete, you will have a running Tiller pod in the kube-system namespace of your cluster:
$ kubectl get po --namespace=kube-system -l name=tiller
NAME                            READY  STATUS   RESTARTS   AGE
tiller-deploy-3210613906-2j5sh  1/1    Running  0          1m
You can also run helm version to check both the client's version and the server's version:
$ helm version
Client: &version.Version{SemVer:"2.16.8", GitCommit:"1402a4d6ec9fb349e17b912e32fe259ca21181e3", GitTreeState:"clean"}
Server: &version.Version{SemVer:"2.16.8", GitCommit:"1402a4d6ec9fb349e17b912e32fe259ca21181e3", GitTreeState:"clean"}
Finding charts
In order to install useful applications and software with Helm, you need to find their charts first. Helm was designed to work with multiple repositories of charts. Helm 2 was configured to search the stable repository by default, but you could add additional repositories. Helm 3 comes with no default, but you can search Helm Hub (https://hub.helm.sh/) or specific repositories. Helm Hub was launched in December 2018, and it was designed to make it easier for you to discover charts and repositories hosted outside the stable or incubator repositories.
This is where the helm search command comes in. Helm can search the Helm Hub or a specific repository.
The hub contains 1,300 charts at the moment:
$ helm search hub | wc -l
     1300
We can search the hub for a specific keyword like mariadb:
$ helm search hub mariadb
URL                                                 CHART VERSION   APP VERSION DESCRIPTION
https://hub.helm.sh/charts/ibm-charts/ibm-galer...   1.1.0                      Galera Cluster is a multi-master solution for M...
https://hub.helm.sh/charts/ibm-charts/ibm-maria...   1.1.2                      MariaDB is developed as open source software an...
https://hub.helm.sh/charts/bitnami/mariadb           7.5.1          10.3.23    Fast, reliable, scalable, and easy to use open-...
https://hub.helm.sh/charts/bitnami/phpmyadmin        6.2.0          5.0.2      phpMyAdmin is an mysql administration frontend
https://hub.helm.sh/charts/bitnami/mariadb-cluster   1.0.1          10.2.14    Chart to create a Highly available MariaDB cluster
https://hub.helm.sh/charts/bitnami/mariadb-galera    3.1.3          10.4.13     MariaDB Galera is a multi-master database clust...
As you can see, there are several charts that match the keyword MariaDB. You can investigate them further and find the best one for your use case.
Adding repositories
By default, Helm 3 comes with no repositories set up, so you can only search the hub. Let's add the bitnami repository, so we can limit our search to that repository only:
$ helm repo add bitnami https://charts.bitnami.com/bitnami
"bitnami" has been added to your repositories
Now, we can search the bitnami repo:
$ helm search repo mariadb
NAME                CHART VERSION   APP VERSION DESCRIPTION
bitnami/mariadb           7.5.1     10.3.23     Fast, reliable, scalable, and easy to use open-...
bitnami/mariadb-cluster   1.0.1     10.2.14     Chart to create a Highly available MariaDB cluster
bitnami/mariadb-galera    3.1.3     10.4.13     MariaDB Galera is a multi-master database clust...
stable/mariadb            7.3.14    10.3.22     DEPRECATED Fast, reliable, scalable, and easy t...
bitnami/phpmyadmin        6.2.0     5.0.2        phpMyAdmin is an mysql administration frontend
stable/phpmyadmin        4.3.5         5.0.1         DEPRECATED phpMyAdmin is an mysql administratio...
The results are a subset of the results returned from the hub.
The official repository has a rich library of charts that represent all of the modern open source databases, monitoring systems, Kubernetes-specific helpers, and a slew of other offerings, such as a Minecraft server. Searching for Helm charts is a good way to find interesting projects and tools. I often search for the kube keyword:
$ helm search repo kube
NAME                            CHART VERSION   APP VERSION     DESCRIPTION
bitnami/kube-state-metrics      0.3.2           1.9.7            kube-state-metrics is a simple service that lis...
bitnami/kubeapps                3.7.1           v1.10.1       Kubeapps is a dashboard for your Kubernetes clu...
bitnami/kubewatch               1.0.14          0.0.4        Kubewatch notifies your slack rooms when change...
kubefed-charts/kubefed          0.3.0                     KubeFed helm chart
kubefed-charts/federation-v2 0.0.10                         Kubernetes Federation V2 helm chart
bitnami/external-dns            3.2.0           0.7.2      ExternalDNS is a Kubernetes addon that configur...
bitnami/metallb                 0.1.14          0.9.3              The Metal LB for Kubernetes
bitnami/metrics-server          4.2.0           0.3.7          Metrics Server is a cluster-wide aggregator of ...
bitnami/prometheus-operator     0.20.0          0.39.0             The Prometheus Operator for Kubernetes provides...
To get more information about a specific chart, we can use the show command (you can use the inspectalias command too). Let's look at bitnami/mariadb:
$ helm show chart bitnami/mariadb
Error: failed to download "bitnami/mariadb" (hint: running 'helm repo update' may help)
Ha-ha. Helm requires that the repositories are up to date. Let's update our repositories:
$ helm repo update
Hang tight while we grab the latest from your chart repositories...
...Successfully got an update from the "bitnami" chart repository
Update Complete.  Happy Helming!
Now, it works:
$ helm show chart bitnami/mariadb
apiVersion: v1
appVersion: 10.3.22
description: Fast, reliable, scalable, and easy to use open-source relational database
  system. MariaDB Server is intended for mission-critical, heavy-load production systems
  as well as for embedding into mass-deployed software. Highly available MariaDB cluster.
home: https://mariadb.org
icon: https://bitnami.com/assets/stacks/mariadb/img/mariadb-stack-220x234.png
keywords:
- mariadb
- mysql
- database
- sql
- prometheus
maintainers:
- email: [email protected]
  name: Bitnami
name: mariadb
sources:
- https://github.com/bitnami/bitnami-docker-mariadb
- https://github.com/prometheus/mysqld_exporter
version: 7.5.1
You can also ask Helm to show you the README file, the values, or all of the information associated with a chart. This can be overwhelming at times.
Installing packages
OK. You've found the package of your dreams. Now, you probably want to install it on your Kubernetes cluster. When you install a package, Helm creates a release that you can use to keep track of the installation progress. Let's install MariaDB using the helm install command. Let's go over the output in detail.
The first part of the output lists the name of the release that we provided mariadb, when it was deployed, the namespace, and the revision:
$ helm install mariadb bitnami/mariadb
NAME: mariadb
LAST DEPLOYED: Mon Jun 8 12:26:34 2020
NAMESPACE: ns
STATUS: deployed
REVISION: 1
The next part includes custom notes, which can be pretty wordy. There is a lot of useful information here about verifying, getting credentials, connecting to the database, and upgrading the chart if necessary:
NOTES:
Please be patient while the chart is being deployed
Tip:
  Watch the deployment status using the command: kubectl get pods -w --namespace default -l release=mariadb
Services:
  echo Master: mariadb.ns.svc.cluster.local:3306
  echo Slave:  mariadb-slave.ns.svc.cluster.local:3306
Administrator credentials:
  Username: root
  Password : $(kubectl get secret --namespace default mariadb -o jsonpath="{.data.mariadb-root-password}" | base64 --decode)
To connect to your database:
  1. Run a pod that you can use as a client:
      kubectl run mariadb-client --rm --tty -i --restart='Never' --image  docker.io/bitnami/mariadb:10.3.18-debian-9-r36 --namespace default --command – bash
  2. To connect to master service (read/write):
      mysql -h mariadb.ns.svc.cluster.local -uroot -p my_database
  3. To connect to slave service (read-only):
      mysql -h mariadb-slave.ns.svc.cluster.local -uroot -p my_database
To upgrade this helm chart:
  1. Obtain the password as described on the 'Administrator credentials' section and set the 'rootUser.password' parameter as shown below:
      ROOT_PASSWORD=$(kubectl get secret --namespace default mariadb -o jsonpath="{.data.mariadb-root-password}" | base64 --decode)
      helm upgrade mariadb bitnami/mariadb --set rootUser.password=$ROOT_PASSWORD
Checking the installation status
Helm doesn't wait for the installation to complete because it may take a while. The helm status command displays the latest information on a release in the same format as the output of the initial helm install command. In the output of the install command, you can see that the persistent volume claim had a pending status. Let's check it out now:
$ kubectl get pods -w -l release=mariadb
NAME               READY   STATUS    RESTARTS   AGE
mariadb-master-0   0/1     Pending   0          4m21s
mariadb-slave-0    0/1     Pending   0          4m21s
Oh, no. The pods are pending. A quick investigation shows that MariaDB declares a persistent volume claim; however, since there is no default storage class in the cluster, there is no way to provide the storage needed:
$ kubectl describe pvc data-mariadb-master-0
Name:          data-mariadb-master-0
Namespace:     default
StorageClass:
Status:        Pending
Volume:
Labels:        app=mariadb
               component=master
               heritage=Helm
               release=mariadb
Annotations:   <none>
Finalizers:    [kubernetes.io/pvc-protection]
Capacity:
Access Modes:
VolumeMode:    Filesystem
Events:
  Type       Reason         Age                  From                         Message
  ----       ------         ----                 ----                         -------
  Normal     FailedBinding  3m3s (x42 over 13m)  persistentvolume-controller  no persistent volumes available for this claim and no storage class is set Mounted By:  mariadb-master-0
That's OK. We can create a default storage class with a dynamic provisioner. First, let's use Helm to install a dynamic host path provisioner. Refer to https://github.com/rimusz/hostpath-provisioner for details. We add a new Helm repo, update our repo list, and then install the proper chart:
$ helm repo add rimusz https://charts.rimusz.net
"rimusz" has been added to your repositories
$ helm repo update
Hang tight while we grab the latest from your chart repositories...
...Successfully got an update from the "rimusz" chart repository
...Successfully got an update from the "bitnami" chart repository
Update Complete.  Happy Helming!
$ helm upgrade --install hostpath-provisioner --namespace kube-system rimusz/hostpath-provisioner
Release "hostpath-provisioner" does not exist. Installing it now.
NAME: hostpath-provisioner
LAST DEPLOYED: Mon Jun 8 17:52:56 2020
NAMESPACE: kube-system
STATUS: deployed
REVISION: 1
TEST SUITE: None
NOTES:
The Hostpath Provisioner service has now been installed.
A storage class named 'hostpath' has now been created
and is available to provision dynamic volumes.
You can use this storageclass by creating a 'PersistentVolumeClaim' with the
correct storageClassName attribute. For example:
    ---
    kind: PersistentVolumeClaim
    apiVersion: v1
    metadata:
      name: test-dynamic-volume-claim
    spec:
      storageClassName: "hostpath"
      accessModes:
        - ReadWriteOnce
      resources:
        requests:
          storage: 100Mi
Since we don't control the persistent volume claim that the MariaDB chart is creating, we can't specify the new "hostpath" storage class. However, we can make sure it is the default storage class!
$ kubectl get sc
NAME                 PROVISIONER   AGE
hostpath (default)   hostpath      6m26s
If you have another storage class set as the default, you can make it non-default like so:
kubectl patch storageclass <your-class-name> -p '{"metadata": {"annotations":{"storageclass.kubernetes.io/is-default-class":"false"}}}'
We have to perform one more non-conventional step. Because we run our tests on k3d + k3s where the nodes are virtual, the host directory of the host path provisioner is actually allocated inside the Docker container that corresponds to the node. For some reason, the permissions for those directories allow only the root to create directories. This can be fixed by running the following command on each of the Docker containers that correspond to the k3s nodes:
$ docker exec -it <container name> chmod -R 0777 /mnt/hostpath
Now, we can try again. This time everything works. Yay!
Here are the pods, the volumes, the persistent volume claims, and the StatefulSets created by the MariaDB release:
$ kubectl get po
NAME               READY   STATUS    RESTARTS   AGE
mariadb-master-0   1/1     Running   0          24m
mariadb-slave-0    1/1     Running   9          24m
$ kubectl get pv
NAME                                       CAPACITY   ACCESS MODES   RECLAIM POLICY   STATUS   CLAIM                           STORAGECLASS   REASON   AGE
pvc-b51aeb37-4a43-4f97-ad52-40e6b6eda4f4   8Gi        RWO            Delete           Bound    default/data-mariadb-master-0   hostpath                30m
pvc-58c7e42e-a01b-4544-8691-3e56de4676eb   8Gi        RWO            Delete           Bound    default/data-mariadb-slave-0    hostpath                30m
$ kubectl get pvc
NAME                    STATUS   VOLUME                                     CAPACITY   ACCESS MODES   STORAGECLASS   AGE
data-mariadb-master-0   Bound    pvc-b51aeb37-4a43-4f97-ad52-40e6b6eda4f4   8Gi        RWO            hostpath       30m
data-mariadb-slave-0    Bound    pvc-58c7e42e-a01b-4544-8691-3e56de4676eb   8Gi        RWO            hostpath       30m
$ kubectl get sts
NAME             READY   AGE
mariadb-master   1/1     30m
mariadb-slave    1/1     30m
Let's try to connect and verify that MariaDB is indeed accessible. Let's modify the suggested commands from the notes a little bit in order to connect. Instead of running bash and then running mysql, we can directly run the mysql command on the container. First, let's get the root password and copy it to the clipboard (on macOS):
$ kubectl get secret -o yaml mariadb -o jsonpath="{.data.mariadb-root-password}" | base64 --decode | pbcopy
Then we can connect using mariadb-client and paste the password when you see If you don't see a command prompt, try pressing enter.:
$ kubectl run --generator=run-pod/v1 mariadb-client --rm -it --image bitnami/mariadb --command -- mysql -h mariadb.default.svc.cluster.local -uroot -p
If you don't see a command prompt, try pressing enter.
Welcome to the MariaDB monitor.  Commands end with ; or g.
Your MariaDB connection id is 1364
Server version: 10.3.18-MariaDB-log Source distribution
Copyright (c) 2000, 2018, Oracle, MariaDB Corporation Ab and others.
Type 'help;' or 'h' for help. Type 'c' to clear the current input statement.
MariaDB [(none)]>
Then, we can start playing with our MariaDB database:
MariaDB [(none)]> show databases;
+--------------------+
| Database           |
+--------------------+
| information_schema |
| my_database        |
| mysql              |
| performance_schema |
| test               |
+--------------------+
5 rows in set (0.001 sec)
Customizing a chart
Very often, as a user, you will want to customize or configure the charts that you install. Helm fully supports customization via config files. To learn about possible customizations, you can use the helm show command again; however, this time, focus on the values. Here is a partial output:
$ helm show values bitnami/mariadb
db:
  forcePassword: false
  name: my_database
  password: null
  user: null
image:
  debug: false
  pullPolicy: IfNotPresent
  registry: docker.io
  repository: bitnami/mariadb
  tag: 10.3.18-debian-9-r36
master:
  affinity: {}
  antiAffinity: soft
  config: |-
    [mysqld]
    skip-name-resolve
    explicit_defaults_for_timestamp
    basedir=/opt/bitnami/mariadb
    port=3306
    socket=/opt/bitnami/mariadb/tmp/mysql.sock
    tmpdir=/opt/bitnami/mariadb/tmp
    max_allowed_packet=16M
    bind-address=0.0.0.0
    pid-file=/opt/bitnami/mariadb/tmp/mysqld.pid
    log-error=/opt/bitnami/mariadb/logs/mysqld.log
    character-set-server=UTF8
    collation-server=utf8_general_ci
    [client]
    port=3306
    socket=/opt/bitnami/mariadb/tmp/mysql.sock
    default-character-set=UTF8
...
rbac:
  create: false
replication:
  enabled: true
  forcePassword: false
  password: null
  user: replicator
rootUser:
  forcePassword: false
  password: null
For example, if you want to set a root password and create a database when installing MariaDB, you can create the following YAML file and save it as mariadb-config.yaml:
mariadbRootPassword: supersecret
mariadbDatabase: awesome_stuff
First uninstall the existing mariadb release:
$ helm uninstall mariadb
Then, run Helm and pass it the YAML file:
$ helm install -f mariadb-config.yaml mariadb bitnami/mariadb
You can also set individual values on the command line with --set. If both --f and --set try to set the same values, then --set takes precedence.
For example, in this case, the root password will be evenbettersecret:
$ helm install -f mariadb-config.yaml --set mariadbRootPassword=evenbettersecret bitnami/mariadb
You can specify multiple values using comma-separated lists: --set a=1, b=2.
Additional installation options
The helm install command can install from several sources:
- A chart repository (as we've seen)
- A local chart archive (
helm installfoo-0.1.1.tgz) - An unpacked
chartfolder (helm installpath/to/foo) - A full URL (
helm installhttps://example.com/charts/foo-1.2.3.tgz)
Upgrading and rolling back a release
You may want to upgrade a package that you have installed to the latest and greatest version. Helm provides the upgrade command, which operates intelligently and only updates things that have changed. For example, let's check the current values of our mariadb installation:
$ helm get values mariadb
USER-SUPPLIED VALUES:
mariadbDatabase: awesome_stuff
mariadbRootPassword: evenbettersecret
Now, let's run, upgrade, and change the name of the database:
$ helm upgrade mariadb --set mariadbDatabase=awesome_sauce bitnami/mariadb
$ helm get values mariadb
USER-SUPPLIED VALUES:
mariadbDatabase: awesome_sauce
Note that we've lost our root password. All of the existing values are replaced when you upgrade. OK, let's roll back. The helm history command shows us all of the available revisions we can roll back to:
$ helm history mariadb
REVISION    UPDATED                     STATUS      CHART           APP VERSION DESCRIPTION
1           Mon Jun 8 09:14:10 2020    superseded  mariadb-7.3.14  10.3.22     Install complete
2           Mon Jun 8 09:22:22 2020    superseded  mariadb-7.3.14  10.3.22     Upgrade complete
3           Mon Jun 8 09:23:47 2020    superseded  mariadb-7.3.14  10.3.22     Upgrade complete
4           Mon Jun 8 09:24:17 2020    deployed    mariadb-7.3.14  10.3.22     Upgrade complete
Let's roll back to revision 3:
$ helm rollback mariadb 3
Rollback was a success! Happy Helming!
$ helm history mariadb
REVISION    UPDATED                     STATUS      CHART           APP VERSION DESCRIPTION
1           Mon Jun 8 09:14:10 2020    superseded  mariadb-7.3.14  10.3.22     Install complete
2           Mon Jun 8 09:22:22 2020    superseded  mariadb-7.3.14  10.3.22     Upgrade complete
3           Mon Jun 8 09:23:47 2020    superseded  mariadb-7.3.14  10.3.22     Upgrade complete
4           Mon Jun 8 09:24:17 2019    superseded  mariadb-7.3.14  10.3.22     Upgrade complete
5           Mon Jun 8 09:26:04 2019    deployed    mariadb-7.3.14  10.3.22     Rollback to 3
As you can see, the rollback created a new revision number 5. Revision 4 is still there in case we want to go back to it.
Let's verify that our changes were rolled back:
$ helm get values mariadb
USER-SUPPLIED VALUES:
mariadbDatabase: awesome_stuff
mariadbRootPassword: evenbettersecret
Yep. The database name was rolled back to awesome_stuff and we got the root password back.
Deleting a release
You can, of course, uninstall a release too using the helm uninstall command.
First, let's examine the list of releases. We have only the mariadb release:
$ helm list
NAME    NAMESPACE   REVISION    UPDATED                                 STATUS      CHART           APP VERSION
mariadb default     5           2020-06-08 09:26:04.766743 -0700 PDT    deployed    mariadb-7.3.14  10.3.22
Now, let's uninstall it:
$ helm uninstall mariadb
release "mariadb" uninstalled
So, no more releases:
$ helm list
NAME    NAMESPACE   REVISION    UPDATED STATUS  CHART   APP VERSION
Helm can keep track of uninstalled releases too. If you provide --keep-history when you uninstall, then you'll be able to see any uninstalled releases using the --all or --uninstalled flags with helm list:
$ helm list --all
NAME    NAMESPACE   REVISION    UPDATED                                 STATUS      CHART           APP VERSION
mariadb default     1           2020-06-08 09:35:47.641033 -0700 PDT    uninstalled mariadb-7.3.14  10.3.22
Working with repositories
Helm stores charts in repositories that are simple HTTP servers. Any standard HTTP server can host a Helm repository. In the cloud, the Helm team verifies that both AWS S3 and Google Cloud storage can serve as Helm repositories in web-enabled mode.
Note that Helm doesn't provide tools to upload charts to remote repositories because that would require the remote server to understand Helm, to know where to put the chart, and to know how to update the index.yaml file.
On the client side, the helm repo command lets you list, add, remove, index, and update:
$ helm repo
This command consists of multiple subcommands to interact with chart repositories.
It can be used to add, remove, list, and index chart repositories. Example usage:
$ helm repo add [NAME] [REPO_URL]
Usage:
  helm repo [command]
Available Commands:
  add         add a chart repository
  index       generate an index file given a directory containing packaged charts
  list        list chart repositories
  remove      remove a chart repository
  update      update information of available charts locally from chart repositories
We've already used the helm repo add command earlier. Let's see how to create our own charts and manage them.
Managing charts with Helm
Helm provides several commands to manage charts.
It can create a new chart for you:
$ helm create cool-chart
Creating cool-chart
Helm will create the following files and directories under cool-chart:
$ tree cool-chart
cool-chart
├── Chart.yaml
├── charts
├── templates
│   ├── NOTES.txt
│   ├── _helpers.tpl
│   ├── deployment.yaml
│   ├── ingress.yaml
│   ├── service.yaml
│   ├── serviceaccount.yaml
│   └── tests
│       └── test-connection.yaml
└── values.yaml
Once you have edited your chart, you can package it into a tar gzipped archive:
$ helm package cool-chart
Successfully packaged chart and saved it to: cool-chart-0.1.0.tgz
Helm will create an archive called cool-chart-0.1.0.tgz and store it in the local directory.
You can also use helm lint to help you to find issues with your chart's formatting or information:
$ helm lint cool-chart
==> Linting cool-chart
[INFO] Chart.yaml: icon is recommended
1 chart(s) linted, 0 chart(s) failed
Taking advantage of starter packs
The helm create command takes an optional --starter flag that lets you specify a starter chart.
Starters are just regular charts located in $HELM_HOME/starters. As a chart developer, you may author charts that are specifically designed to be used as starters. Such charts should be designed with the following considerations in mind:
- The YAML will be overwritten by the generator
- Users will expect to be able to modify such a chart's contents, so the documentation should indicate how users can do this
At the moment, there is no way to install charts; the only way to add a chart to $HELM_HOME/starters is to manually copy it there. Make sure to mention that in your chart's documentation if you develop starter pack charts.
Creating your own charts
A chart is a collection of files that describe a related set of Kubernetes resources. A single chart might be used to deploy something simple, such as a Memcached pod, or something complex, such as a full web app stack with HTTP servers, databases, caches, queues, and so on.
Charts are created as files laid out in a particular directory tree. Then, they can be packaged into versioned archives to be deployed. The key file is Chart.yaml.
The Chart.yaml file
The Chart.yaml file is the main file of a Helm chart. It requires name and version fields:
name: The name of the chart (same as the directory name)version: A SemVer 2 version
It may also contain various optional fields:
kubeVersion: A SemVer range of compatible Kubernetes versionsdescription: A single sentence describing this projectkeywords: A list of keywords about this projecthome: The URL of this project's home pagesources: A list of URLs to source code for this projectdependencies: A list of (name, version, repository) for each dependency (repository is the URL)maintainers: A list of (name, email, URL) for each maintainer (name is required)icon: The URL to an SVG or PNG image to be used as an iconappVersion: The version of the app that this containsdeprecated: Whether this chart is deprecated (Boolean)
Versioning charts
The version field inside of the Chart.yaml is used by many Helm tools. When generating a package, the helm package command will use the version that it finds in Chart.yaml when constructing the package name. The system assumes that the version number in the chart package name matches the version number in Chart.yaml. Violating this assumption will cause an error.
The appVersion field
The appVersion field is not related to the version field. It is not used by Helm and serves as metadata or a piece of documentation for users who want to understand what they are deploying. Helm ignores it.
Deprecating charts
From time to time, you may want to deprecate a chart. You can mark a chart as deprecated by setting the optional deprecated field in Chart.yaml to true. This is enough to deprecate the latest version of a chart. You can later reuse the chart name and publish a newer version that is not deprecated. The workflow for deprecating charts is:
- Update the chart's
Chart.yamlfile to mark the chart as deprecated and bump the version - Release the new version to the chart repository
- Remove the chart from the source repository (for example, Git)
Chart metadata files
Charts may contain various metadata files like README.md, LICENSE, and NOTES.txt that describe the installation, configuration, usage, and license of a chart. The README.md file should be formatted as Markdown. It should provide the following information:
- A description of the application or service the chart provides
- Any prerequisites or requirements to run the chart
- Description of options in the YAML and default values
- Any other information that may be relevant to the installation or configuration of the chart
If the chart contains a templates/NOTES.txt file, it will be displayed after the installation or when viewing the release status. The notes should be concise to avoid clutter and point to the README.md file for detailed explanations. It's common to put usage notes and any next steps in this NOTES.txt file. Remember that the file is evaluated as a template. The notes are printed to the screen when you run helm install as well as helm status.
Managing chart dependencies
In Helm, a chart may depend on other charts. These dependencies are expressed explicitly by listing them in a requirements.yaml file or by copying the dependency charts into the charts sub-folder during installation. This provides a great way to benefit from and reuse the knowledge and work of others. A dependency can be either a chart archive (foo-1.2.3.tgz) or an unpacked chart folder. But its name cannot start with _ or .. Such files are ignored by the chart loader.
Managing dependencies with requirements.yaml
Instead of manually placing charts in the charts sub-folder, it is better to declare dependencies using a requirements.yaml file inside of your chart. The following is just an illustration. The charts are fictional.
A requirements.yaml file is a simple file used for listing the chart dependencies:
dependencies:
  - name: foo
    version: 1.2.3
    repository: http://example.com/charts
  - name: bar
    version: 43.52.6
    repository: http://another.example.com/charts
The name field is the name of the chart you want.
The version field is the version of the chart you want.
The repository field is the full URL to the chart repository.
Note that you must also use helm repo add to add the repository locally if it isn't added already.
Once you have a dependencies file, you can run the Helm dependency update, and it will use your dependency file to download all of the specified charts into the charts sub-folder for you:
$ helm dep up cool-chart
Hang tight while we grab the latest from your chart repositories...
...Successfully got an update from the "local" chart repository
...Successfully got an update from the "bitnami" chart repository
...Successfully got an update from the "example" chart repository
...Successfully got an update from the "another" chart repository
Update Complete. Happy Helming!
Saving 2 charts
Downloading Foo from repo http://example.com/charts
Downloading Bar from repo http://another.example.com/charts
Helm stores the dependency charts as archives in the charts folder. In our example, the charts sub-folder will contain the following files:
charts/
  foo-1.2.3.tgz
  bar-43.52.61.tgz
Managing charts and their dependencies with requirements.yaml is best practice for explicitly documenting dependencies, sharing across the team, and supporting automated pipelines.
Utilizing special fields in requirements.yaml
Each entry in the requirements.yaml file may also contain the optional fields tags and condition.
These fields can be used to dynamically control the loading of charts (by default, all charts are loaded). If the tags or condition fields are present, Helm will evaluate them and determine if the target chart should be loaded or not:
- Condition: The
conditionfield holds one or more comma-delimited YAML paths. If a path exists in the top parent's values and resolves to a Boolean value, the chart will be enabled or disabled based on that Boolean value. Only the first valid path found in the list is evaluated, and if no paths exist, then the condition has no effect and the chart will be loaded. - Tags: The
tagsfield is a YAML list of labels to associate with this chart. In the top parent's values, all charts with tags can be enabled or disabled by specifying the tag and a Boolean value.
Here are example requirements.yaml and values.yaml files that make good use of conditions and tags to enable and disable the installation of dependencies. The requirements.yaml file defines two conditions for installing its dependencies based on the value of the global enabled field and the specific subchart's enabled field:
# parent/requirements.yaml
dependencies:
  - name: subchart1
    repository: http://localhost:10191
    version: 0.1.0
    condition: subchart1.enabled, global.subchart1.enabled
    tags:
      - front-end
      - subchart1
  - name: subchart2
    repository: http://localhost:10191
    version: 0.1.0
    condition: subchart2.enabled,global.subchart2.enabled
    tags:
      - back-end
      - subchart2
The values.yaml file assigns values to some of the condition variables. The subchart2 tag doesn't get a value, so it is considered to be enabled automatically:
# parent/values.yaml
subchart1:
  enabled: true
tags:
  front-end: false
  back-end: true
You can set tags and condition values from the command line too when installing a chart, and they'll take precedence over the values.yaml file:
$ helm install --set subchart2.enabled=false
The resolution of tags and conditions is as follows:
- Conditions that are set in values override tags. The first condition path that exists per chart takes effect, while other conditions are ignored.
- If any of a chart's tags are true, the chart is enabled.
- Tags and condition values must be set in the top parent's values.
- The tags' key-in values must be a top-level key. Globals and nested tags tables are not currently supported.
Using templates and values
Any non-trivial application will require you to configure and adapt to the specific use case. Helm charts are templates that use the Go template language to populate placeholders. Helm supports additional functions from the Sprig library and a few other specialized functions. The template files are stored in the templates/ sub-folder of the chart. Helm will use the template engine to render all of the files in this folder and apply the provided value files.
Writing template files
Template files are just text files that follow the Go template language rules. They can generate Kubernetes configuration files along with any other file. Here is the service template file of the GitLab CE chart:
apiVersion: v1
kind: Service
metadata:
  name: {{ template "gitlab-ce.fullname" . }}
  labels:
    app: {{ template "gitlab-ce.fullname" . }}
    chart: "{{ .Chart.Name }}-{{ .Chart.Version }}"
    release: "{{ .Release.Name }}"
    heritage: "{{ .Release.Service }}"
spec:
  type: {{ .Values.serviceType }}
  ports:
  - name: ssh
    port: {{ .Values.sshPort | int }}
    targetPort: ssh
  - name: http
    port: {{ .Values.httpPort | int }}
    targetPort: http
  - name: https
    port: {{ .Values.httpsPort | int }}
    targetPort: https
  selector:
    app: {{ template "gitlab-ce.fullname" . }}
It is available here: https://github.com/helm/charts/tree/master/stable/gitlab-ce/templates/svc.yaml.
Don't worry if it looks confusing. The basic idea is that you have a simple text file with a placeholder for values that can be populated later in various ways, as well as some functions and pipelines that can be applied to those values.
Using pipelines and functions
Helm allows rich and sophisticated syntax in the template files via the built-in Go template functions, sprig functions, and pipelines. Here is an example template that takes advantage of these capabilities. It uses the repeat, quote, and upper functions for the food and drink keys, and it uses pipelines to chain multiple functions together:
apiVersion: v1
kind: ConfigMap
metadata:
  name: {{ .Release.Name }}-configmap
data:
  greeting: "Hello World"
  drink: {{ .Values.favorite.drink | repeat 3 | quote }}
  food: {{ .Values.favorite.food | upper }}
Let's add a values.yaml file:
favorite:
  drink: coffee
  food: pizza
Testing and troubleshooting your charts
Now, we can use helm template to see the result:
$ helm template food food-chart
---
# Source: food-chart/templates/config-map.yaml
apiVersion: v1
kind: ConfigMap
metadata:
  name: food-configmap
data:
  greeting: "Hello World"
  drink: "coffeecoffeecoffee"
  food: PIZZA
As you can see, our templating worked. The drink coffee was repeated 3 times and quoted. The food pizza became uppercase PIZZA (unquoted).
Another good way of debugging is to run install with the --dry-run flag. It provides additional information:
$ helm install food food-chart --dry-run
NAME: food
LAST DEPLOYED:  Mon Jun 8 09:46:19 2020
NAMESPACE: default
STATUS: pending-install
REVISION: 1
TEST SUITE: None
USER-SUPPLIED VALUES:
{}
COMPUTED VALUES:
favorite:
  drink: coffee
  food: pizza
HOOKS:
MANIFEST:
---
# Source: food-chart/templates/config-map.yaml
apiVersion: v1
kind: ConfigMap
metadata:
  name: food-configmap
data:
  greeting: "Hello World"
  drink: "coffeecoffeecoffee"
  food: PIZZA
You can also override values on the command line:
$ helm template food food-chart --set favorite.drink=water
---
# Source: food-chart/templates/config-map.yaml
apiVersion: v1
kind: ConfigMap
metadata:
  name: food-configmap
data:
  greeting: "Hello World"
  drink: "waterwaterwater"
  food: PIZZA
The ultimate test is, of course, to install your chart in your cluster. You don't need to upload your chart to a chart repository for testing; just run helm install locally:
$ helm install food food-chart
NAME: food
LAST DEPLOYED: Mon Jun  8 08:22:36 2020
NAMESPACE: default
STATUS: deployed
REVISION: 1
TEST SUITE: None
There is now a Helm release called food:
$ helm list
NAME    NAMESPACE   REVISION    UPDATED                                 STATUS      CHART               APP VERSION
food    default     1           2020-06-08 08:22:36.217166 -0700 PDT    deployed    food-chart-0.1.0    1.16.0
More importantly, the food ConfigMap was created with the correct data:
$ kubectl get cm -o yaml
apiVersion: v1
items:
- apiVersion: v1
  data:
    drink: coffeecoffeecoffee
    food: PIZZA
    greeting: Hello World
  kind: ConfigMap
  metadata:
    creationTimestamp: "2020-06-08T15:22:36Z"
    name: food-configmap
    namespace: default
    resourceVersion: "313012"
    selfLink: /api/v1/namespaces/default/configmaps/food-configmap
    uid: a3c02518-4fe2-4a72-bdd0-99a268c7033f
kind: List
metadata:
  resourceVersion: ""
  selfLink: ""
Embedding built-in objects
Helm provides some built-in objects that you can use in your templates. In the GitLab chart template, Release.Name, Release.Service, Chart.Name, and Chart.Version are examples of Helm's predefined values. Other objects are:
ValuesChartTemplateFilesCapabilities
The Values object contains all the values defined in the values file or on the command line. The Chart object is the content of Chart.yaml. The Template object contains information about the current template. The Files and Capabilities objects are map-like objects that allow access via various functions to non-specialized files and any general information about the Kubernetes cluster.
Note that unknown fields in Chart.yaml are ignored by the template engine and cannot be used to pass arbitrarily structured data to templates.
Feeding values from a file
Here is part of the GitLab CE default values file. The values from this file are used to populate multiple templates. The values represent defaults that you can override by copying the file and modifying it to fit your needs. Note the useful comments that explain the purpose and various options for each value:
## GitLab CE image
## ref: https://hub.docker.com/r/gitlab/gitlab-ce/tags/
##
image: gitlab/gitlab-ce:9.4.1-ce.0
## For minikube, set this to NodePort, elsewhere use LoadBalancer
## ref: http://kubernetes.io/docs/user-guide/services/#publishing-services---service-types
##
serviceType: LoadBalancer
## Ingress configuration options
##
ingress:
  annotations:
      # kubernetes.io/ingress.class: nginx
      # kubernetes.io/tls-acme: "true"
  enabled: false
  tls:
      # - secretName: gitlab.cluster.local
      #   hosts:
      #     - gitlab.cluster.local
  url: gitlab.cluster.local
## Configure external service ports
## ref: http://kubernetes.io/docs/user-guide/services/
sshPort: 22
httpPort: 80
httpsPort: 443
Here is how to provide your own YAML values file to override the defaults during the install command:
$ helm install --values=custom-values.yaml gitlab-ce
Scope, dependencies, and values
value files can declare values for the top-level chart, as well as for any of the charts that are included in that chart's charts folder. For example, let's look at the sentry chart from https://github.com/sapcc/helm-charts/blob/master/system/sentry.
This chart has two chart dependencies: postgresql and redis:
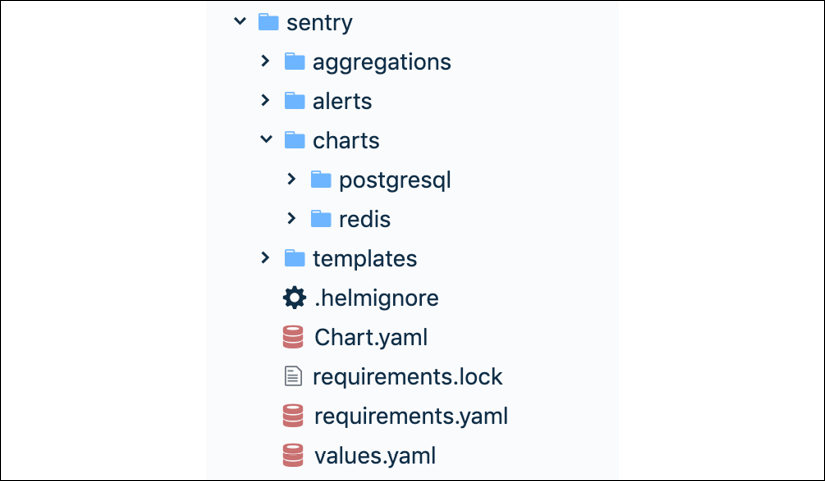
Figure 9.1: sentry chart
Both the postgressql and redis charts have their own values.yaml file with their defaults. However, the top-level values.yaml file contains some default values for its dependency charts, postgresql and redis:
postgresql:
  postgresDatabase: sentry
  persistence:
    enabled: true
    accessMode: ReadWriteMany
    size: 50Gi
  resources:
    requests:
      memory: 10Gi
      cpu: 4
redis:
  # redisPassword:
  persistence:
    enabled: true
    accessMode: ReadWriteMany
    size: 10Gi
  resources:
    requests:
      memory: 10Gi
      cpu: 2
The top-level chart has access to the values of its dependent charts, but not vice versa. There is also a global value that is accessible to all charts. For example, you could add something like this:
global:
  app: cool-app
When a global value is present, it will be replicated to each dependent chart's values, as follows:
global:
  app: cool-app
postgresql:
  global:
    app: cool-app
  ...
 redis:
   global:
     app: cool-app
   ...
Summary
In this chapter, we took a look at Helm, the Kubernetes package manager. Helm gives Kubernetes the ability to manage complicated software composed of many Kubernetes resources with inter-dependencies. It serves the same purpose as an OS package manager. It organizes packages and lets you search charts, install and upgrade charts, and share charts with collaborators. You can develop your own charts and store them in repositories. Helm 3 is a client-side-only solution that uses CRDs to manage the status of releases, instead of the Tiller server-side component of Helm 2, which poses a lot of security issues with its default configuration.
At this point, you should be able to understand the important role that Helm serves in the Kubernetes ecosystem and community. You should be able to use it productively and even develop and share your own charts.
In the next chapter, we will look at how Kubernetes does networking at a pretty low level.