

Phase 10: First initial program load of z/OS V2R2
This chapter describes the start-up and shutdown tasks for the target system, the first initial program load (IPL) of z/OS V2R2. Before we can IPL the z/OS V2R2, we must complete some preparation tasks by customizing parameters and review our resources readiness. Then, we can IPL the z/OS V2R2 system from the Hardware Management Console (HMC) and start the Time Sharing Option (TSO) for logon. We then must enable some products and customize them for use.
Finally, we must run some installation verification program (IVP) jobs from the target system to verify that our installation is done correctly and key components of z/OS V2R2 are enabled. We also must run some clean-up jobs on target and driving system to remove System Specific Aliases (SSAs) and other information that is not needed.
This chapter includes the following topics:
13.1 Goals
Phase 10 features the following goals:
•Pre-IPL jobs and actions: These jobs prepare the system for IPL, such as setting up IODF, parmlib, and stand-alone dump.
•IPL the new Target System: These steps IPL the new target system and messages displayed during IPL.
•Postinstallation - From Target System: These postinstallation jobs must run on the target system. They perform the initial setup of many of the products that are contained in your order.
•Installation verification: These product-supplied jobs verify successful installation and must run on the target system.
•Completing the installation: These jobs perform installation cleanup, such as SSA removal, that is run after a successful installation of your new target system.
Phase 10 is required to achieve Milestone 5: Load z/OS Operating System. Where this phase is positioned in the overall process is shown in Figure 13-1.

Figure 13-1 Phase 10 Milestone 5
It is important that you understand how the terms in Table 13-1 are used in this chapter.
Table 13-1 Terms and Meaning
|
Term
|
Definition
|
|
Ready to run
|
The product requires no other installation tasks
|
|
FSR
|
Full System Replacement
|
|
SUI
|
Software Upgrade Installation
|
13.2 Requirements
Before we can IPL the z/OS V2R2 system, we must prepare the hardware and software resources for IPL.
13.2.1 Resources
The following hardware is used:
•System z machine
•Logical partition (LPAR) resource
•External devices, including disk, OSA-ICC device, and OSA device
•Workstation to run Personal Communication software
The following software is used:
•Customized Offering Driver (COD) system
•Personal Communication software
•CustomPac Installation Dialog
13.3 Related documents
The following IBM publications provide relevant information during this phase.
•ServerPac: Installing Your Order Order Number OS2xxxx
•ServerPac: Using the Installation Dialog, SA23-2278
•z/OS V2R2 Planning for Installation, GA32-0889
•CustomPac Installation Dialog Reference Manual
•z/OS V2R2 IBM MVS Initialization and Tuning Reference, SA23-1380
For more information about downloading these publications, see this website:
The following references are available:
•z/OS System Commands, SA38-0666
•z/OS Initialization and Tuning Reference, SA22-7592
•JES2 Initialization and Tuning Guide, SA32-0991
•z/OS Communications Server: SNA Operation, SC27-3673
•TSO/E Customization, SA32-0976
Also available is ServerPac FAQ. This document contains frequently asked questions about ServerPac and is available at this website:
13.4 Preparing the ServerPac IPL tasks from driver system
Before we can IPL the ServerPac, we must complete some preparation tasks for one successful load.
13.4.1 Defining I/O configuration
The IODFLOAD job is used to copy the driving system’s IODF data set to the target system. Before performing this task, we must update the job with our operating system (OS) configuration in the IODF and the Unit Information Modules (UIMs) must be available during the IPL if the devices are to be used on the target system.
We can define a new operating system configuration to specify the I/O devices that the ServerPac LPAR needs for IPL. Select HCD (for Hardware Configuration Definition) to display the operating system configuration list, as shown in Figure 13-2.
|
--------------------------------------------------------------------------
Operating System Configuration List Row 1 of 2
Command ===> ___________________________________________ Scroll ===> PAGE
Select one or more operating system configurations, then press Enter. To
add, use F11.
/ Config. ID Type Gen Description D/R site OS ID
_ M0S0 MVS OS CONFIG FOR M0S0(SERVPAC)
_ OS390 MVS OS CONFIG FOR COD(DRIVER)
******************************* Bottom of data *******************************
|
Figure 13-2 Defining a new operating system configuration in HCD
13.4.2 Creating data set for Health Checker
The HBB77A0E job is used to create a unique HZSPDATA data set on the target system for Health Checker start-up. HZSPDATA DDNAME must match the name of the data set that is used in start-up procedure HZSPROC for Health Checker.
13.4.3 Initializing LOGREC and creating IPL text
The IPLTEXT job is used to start the LOGREC data set and create IPLTEXT on the volume that contains the SYS1.NUCLEUS data set. This DASD is considered to be our target system’s IPL volume (M0SR21).
13.4.4 Creating stand-alone DUMP IPL text
The DMPBLD job is used to create the SADMP program by using the one-step generation method.
|
Note: Check DMPBLD before you submit it to ensure that the job does not place SADMP (SYS1.PAGEDUMP.Vnnnnnn) on the target system’s IPL volume. Stand-alone dump requires IPL text to be written to the volume from which it is IPLed, and only one IPL text can be on a volume at any time.
|
13.4.5 Creating LOAD00 in IPLPARM
The LOAD00 job is used to create member LOAD00 in our target system’s SYS1.IPLPARM data set and fills it with the correct target system’s master catalog name and the DASD volume serial number where it is stored.
|
Note: Review the IODF statement to ensure that the wanted OS configuration is specified in columns 22 - 29 (starting by column 22). If more than one OS configuration identifier exists but is not specified in LOAD00, a disabled wait state is loaded during IPL.
|
In our example, we create two Operating System Configuration Identifiers in SYS1.IODF01: one for the COD system and another for the z/OS V2R2 ServerPac use. We refer to it in the LOADxx of IPLPARM library, as shown in Figure 13-3.

Figure 13-3 LOAD00 in IPLPARM referred to M0S0 OS Configuration
Failure to include the OS configuration name in LOADxx can cause a disable wait state code of 0B1 during HMC Load action, as shown in Figure 13-4.

Figure 13-4 Disable wait when LOADxx is not correctly coded
13.4.6 Running Post-apply Link
The CALLLINK job contains the JCL statements for the LINK LMODS command that is generated by the UPDDDD job as described in 12.7.9, “Defining SMP/E environment” on page 206.
13.4.7 Copying customized parmlib members from driver to target
In this section, we describe the jobs that are used to copy the customized parmlib members from the driver to the target.
The COPYCON job is used to copy the specified CONSOLxx member from the driving system to the target. Before running this job, it is suggested that you create a backup copy of the target system’s SYS1.PARMLIB(CONSOL00) member that was shipped with this order. The COPYCON job overlays the shipped CONSOL00 member.
Ensure that the second LPAR, which this ServerPac is going to use for IPL, is using the same channel and IO devices as OSA-ICC sessions. Otherwise, you must customize the console device number in target system's SYS1.PARMLIB(CONSOL00), as shown in Figure 13-5.
|
CONSOLE DEVNUM(SYSCONS) ROUTCODE(ALL)
MONITOR(JOBNAMES-T)
/* */
CONSOLE DEVNUM(0A1) ROUTCODE(ALL)
NAME(CON1)
PFKTAB(PFKTAB1)
AUTH(MASTER)
UNIT(3270-X)
MONITOR(JOBNAMES-T)
CON(N) DEL(RD) RTME(2) MFORM(J,T) AREA(NONE)
|
Figure 13-5 CONSOL00 in parmlib
The VATLST job is used to set default mount attributes for DASD volumes. This job also adds entries to your target system’s SYS1.PARMLIB(VATLST00) member for the DASD volumes that were used to install the order, as shown in Figure 13-6.
|
VATDEF IPLUSE(PRIVATE),SYSUSE(PRIVATE)
M0SCT1,1,0,3390 ,Y
M0SD21,1,2,3390 ,Y
M0SIN2,1,2,3390 ,Y
M0SR21,1,2,3390 ,Y
M0SUX1,1,2,3390 ,Y
|
Figure 13-6 VATLST00 in parmlib
The CPYVTLCL job copies the driving system’s SNA definitions and tables to the target system by using the IEBCOPY utility. The driver system’s VTAMLST data set is copied to the target system’s CPAC.VTAMLST. Before running this job, it is recommended that you create a backup copy of the members in the target system's CPAC.VTAMLST library.
The job SMFPRM job ensures that the SMFPRM00 member of PARMLIB data set contains the required log stream definitions for the value of variable SMF Option that is provided by you in the Installation Order - Variables panel.
This variable can have two values: DATASET and LOGSTREAM. If you choose Logstream, SYS1.MANxx data sets do not appear in Modify System Layout panel and are not allocated by the installation jobs. If you choose DATASET, you must review the destination volume for SYS1.MANxx data sets in Modify System Layout panel and confirm that they are allocated with ALLOCDS job.
13.4.8 Renaming data sets and creating Symlinks for target
The ALTCAT job renames each allocated data set to its final data set name. ALTCAT also defines aliases for these data sets in their respective catalogs. Each alias points to the final data set name and converts the /etc and /var directories to symbolic links. Ensure that the file systems remain mounted before running this job.
|
Note: The ALTCAT job is intended for full system replacement installations only. If you are performing a software upgrade, run job RECATDS and optionally, UPDDDUV instead.
|
13.5 IPL z/OS V2R2 from HMC
Before we can IPL our z/OS V2R2, ensure that the LPAR can access the DASD, OSA-ICC devices, and channels that connect them.
Also, you must ensure that the target system can use all of the operational data sets that are needed to IPL the system, run batch jobs, and use TSO/E and ISPF. These operational data sets include but are not limited to the following data sets:
•A complete set of the necessary system control files (such as PARMLIB and VTAMLST)
•A master catalog that can be updated while building the target system
•Page data sets
•BROADCAST data set
•LOGREC data set
•JES2 Spool and checkpoint data sets
•RACF Security database or SYS1.UADS data set
13.5.1 HMC task
First, we must log on to the HMC by using user ID SYSPROG, and select the second LPAR that loads the z/OS V2R2 system, as shown in Figure 13-7.

Figure 13-7 Loading z/OS V2R2 from HMC
Next, we enter the Load address (the SYSRES DASD device number) and the Load parameter (the SYS1.IODF01 IODF volume and the LOADxx suffix), as shown in Figure 13-8.
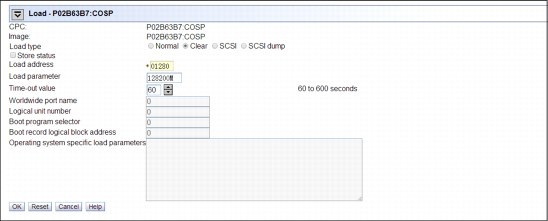
Figure 13-8 Entering the Load address and parameter
When confirming the LPAR Load action by entering the password for SYSPROG, we open the operation system message window that is waiting for the NIP console message to come up, as shown in Figure 13-9.

Figure 13-9 OS message in HMC
We use the following reply:
R 00,SYSP=00,CLPA
The resulting messages vary, depending on your configuration.
13.5.2 Starting address spaces

Figure 13-10 Activating console for command input
Starting JES2

Figure 13-11 Replying WTOR message to JES2
When JES2 starts, we must specify whether a cold or warm start is required. Consider the following points:
•If you used the full system replacement option to generate the installation jobs, a cold start is required for the first IPL, as shown in Example 13-1. If you used the Software Upgrade option, a cold start is not required.
•A warm start can be used for subsequent IPLs.
Example 13-1 Reply to JES2 WTOR to do a cold start
*02 $HASP426 SPECIFY OPTIONS - JES2 z/OS 2.2 SSNAME=JES2
R 02,COLD,NOREQ
*03 $HASP441 REPLY 'Y' TO CONTINUE INITIALIZATION OR 'N'
TO TERMINATE IN RESPONSE TO MESSAGE HASP436
R 03,Y
If you change the SYSNAME in IEASYSxx, you must confirm for JES2 that no other members are active, as shown in Example 13-2.
Example 13-2 Confirm to JES2 WTOR message
*$HASP405 JES2 IS UNABLE TO DETERMINE IF OTHER MEMBERS ARE ACTIVE
*04 $HASP420 REPLY 'Y' IF ALL MEMBERS ARE DOWN (IPL REQUIRED), 'N' IF NOT
R 04,Y
For warm start
In subsequent IPLs of z/OS V2R2, we can start JES2 for a warm start to retain the JES2 SPOOL, as shown in Example 13-3.
Example 13-3 Reply to JES2 WTOR to do a WARM start
*nn $HASP426 SPECIFY OPTIONS - JES2 z/OS 2.2 SSNAME=JES2
r nn,WARM,NOREQ
Starting VTAM
We issue the S VTAM command from the HMC console.
If you have a customized ATCSTRxx member, enter START VTAM,,,(LIST=xx), where xx is the two-character suffix of the ATCSTRxx member to be used in addition to the default ATCSTR00 member. Check the CONFIG=nn in the ATCSTRxx member to look for the ATCCONnn member to ensure that every VTAM majnode profile exists.
When VTAM is started, a logo is displayed on active terminals if the shipped USSTAB was used, as shown in Figure 13-12.

Figure 13-12 VTAM is active
Starting TSO
We issue the S TSO command from the HMC console. The message that is shown in Example 13-4 is displayed.
Example 13-4 TSO is active
IKT007I TCAS ACCEPTING LOGONS
IKT005I TCAS IS INITIALIZED
We are ready to log onto the z/OS V2R2 system.
13.5.3 Logging on to z/OS V2R2
We log on by using user ID IBMUSER and password IBMUSER into the z/OS V2R2 through the non-SNA terminal.
The Logical Unit (LU) is the OSA-ICC session that is defined for the second LPAR. Check your OSA-ICC server and session configuration from HMC to verify the OSA-ICC server IP address, LU session, and Port number.
We use COSP00A0. The port is 3270 and is defined in our OSA-ICC Server configuration to logon to the ServerPac system, as shown in Figure 13-13.

Figure 13-13 Log on with IBMUSER
Enter the password IBMUSER, as shown in Figure 13-14.

Figure 13-14 Entering password for IBMUSER
Next, we enable some products and customize them for use. Before we perform this task, we can practice the shutdown procedure of z/OS V2R2 system for next IPL, if needed.
13.5.4 Enabling products and subsystems
z/OS consists of base elements that deliver essential operating system functions. When you order z/OS, you receive all of the base elements. In addition to the base elements, you can order optional features that have an affinity to the elements.
Dynamic enablement allows you to dynamically enable and disable a feature.
If you order a feature, it is shipped enabled, meaning it is defined as “enabled” in the IBM-supplied IFAPRD00 member of CPAC.PARMLIB that enables the features that you order.
If you do not order a feature, it is shipped disabled, meaning it is defined as “disabled” in IFAPRD00. Although a feature you did not order is described in the product overview appendix from the ServerPac: Installing Your Order Order Number OS2xxxx document, its postinstallation activities and IVPs are not included in this book.
If you want to dynamically enable one product, you can update the IFAPRDxx member and enter a SET command (SET PROD=xx) or re-IPL the z/OS to take the change in effect. For more information about the use of IFAPRDxx, see z/OS MVS Initialization and Tuning Reference, SA23-1380, and z/OS Planning for Installation, GA32-0890.
|
Note: After you install z/OS, you must inform IBM of your intentions if you choose to run an unordered feature that supports dynamic enablement. You also must have a license for each feature that you enable. Then, enable it dynamically through PARMLIB(IFAPRDxx).
|
Enabling SDSF
If the z/OS V2R2 ServerPac order does not include SDSF, the default status of SDSF in IFAPRD00 is disabled. First, we must change the state from “disabled” to “enabled” in IFAPRD00, as shown in Figure 13-15. We then activate it by issuing the SET PROD=00 command from Console or SDSF.
|
PRODUCT OWNER('IBM CORP')
NAME('z/OS')
ID(5650-ZOS)
VERSION(*) RELEASE(*) MOD(*)
FEATURENAME('SDSF')
STATE(ENABLED)
|
Figure 13-15 Enabling SDSF
Next, we must update the PROGxx to add SDSF libraries into APF and LNKLST, as shown in Figure 13-16.
|
APF ADD
DSNAME(ISF.SISFLOAD) VOLUME(M0SR21)
APF ADD
DSNAME(ISF.SISFLPA) VOLUME(M0SR21)
LNKLST ADD NAME(LNKLST00) DSN(ISF.SISFLOAD)
|
Figure 13-16 CPAC.PARMLIB(PROG00)
We also must update the LPALSTxx to add SDSF libraries into LPA list, as shown in Figure 13-17.
|
SYS1.LPALIB,
ISP.SISPLPA,
ISF.SISFLPA,
EOY.SEOYLPA,
CEE.SCEELPA,
TCPIP.SEZALPA,
SYS1.SDWWDLPA,
SYS1.SBDTLPA
|
Figure 13-17 CPAC.PARMLIB(LPALST00)
Now, we can enter the SDSF panel and view the JES2 queue.
Enabling RACF
As with SDSF, the default status of RACF in IFAPRD00 is disabled if the z/OS V2R2 ServerPac does not include RACF product, as shown in Figure 13-18. We must change the state from “disabled” to “enabled” in IFAPRD00. Then, we activate it by issuing the SET PROD=00 command.
|
PRODUCT OWNER('IBM CORP')
NAME('z/OS')
ID(5650-ZOS)
VERSION(*) RELEASE(*) MOD(*)
FEATURENAME('SECURITY SERVER')
STATE(ENABLED)
|
Figure 13-18 Enabling RACF
If RACF was not included in the base order but enabled later, we must initialize two data sets. The first dat set is the primary RACF database; the second data set is the backup. We submitted the initialization job, Figure 13-19.
|
//DEFRACDB JOB CLASS=A,MSGCLASS=X,MSGLEVEL=(1,1),NOTIFY=&SYSUID,
// REGION=0M
//INI01 EXEC PGM=IRRMIN00,PARM=NEW
//STEPLIB DD DSN=SYS1.LINKLIB,DISP=SHR
//SYSPRINT DD SYSOUT=*
//SYSRACF DD DSN=SYS1.RACF,DISP=(NEW,CATLG),
// UNIT=3390,VOL=SER=M0SCT1,
// SPACE=(CYL,(50),,CONTIG),
// DCB=DSORG=PSU
//INI02 EXEC PGM=IRRMIN00,PARM=NEW
//STEPLIB DD DSN=SYS1.LINKLIB,DISP=SHR
//SYSPRINT DD SYSOUT=*
//SYSRACF DD DSN=SYS1.RACFSEC,DISP=(NEW,CATLG),
// UNIT=3390,VOL=SER=M0SCT1,
// SPACE=(CYL,(50),,CONTIG),
// DCB=DSORG=PSU
|
Figure 13-19 Define RACF databases
We must re-IPL the system to make it effective. Some components in z/OS depend on RACF product, such as OMVS. If OMVS cannot start, TCPIP and TN3270 also cannot start.
We still log on with IBMUSER after IPLing again, but enter SYS1 as the password instead of IBMUSER. We enter this password because we logged on as IBMUSER previously by using SYS1.UADS for user ID authentication when the RACF product was not yet enabled. Now, the RACF product is enabled, the RACF database is in effect, and the default password for IBMUSER is SYS1 in the new defined RACF database. However, we must change the IBMUSER password during the first logon.
When the system is up, we run the S IRRDPTAB command from the console or SDSF to enable dynamic parse function for RACF. Otherwise, you cannot start RACF commands through the TSO interface. An error message is reported, as shown in Example 13-5.
Example 13-5 Error when RACF dynamic parse function is not enabled
IRR52100I Processing terminated. Dynamic parse is not active. Contact your system programmer.
READY
Defining the new system name to SMS
As shipped in your order, the system name (SYSNAME) for the target system is CPAC. If you changed the SYSNAME value for the target system (for example, through the Define Variables function of the installation dialog), you must ensure that the new system name is defined to SMS.
We use ISMF to update the SMS base configuration to include the new system name, as shown in Figure 13-20.
|
SCDS BASE ALTER Page 2 of 2
SCDS Name . : SYS1.DFSMS.SCDS
SCDS Status : VALID
Specify one of the following options . . (1 Add, 2 Delete, 3 Rename)
Specify System Name . . . . . or Sys Group Name . .
New System/Sys Group Name . . (For option 3, Rename)
System: CPAC M0S0
Sysgrp:
Use ENTER to Perform Option; Use UP Command to View previous Panel;
Command ===>
|
Figure 13-20 Defining new SYSNAME into the SMS base configuration
Then, we reactivate the SMS configuration so that it takes effect, as shown in Figure 13-21.
|
CDS APPLICATION SELECTION
To Perform Control Data Set Operations, Specify:
CDS Name . . 'SYS1.DFSMS.SCDS'
(1 to 44 Character Data Set Name or 'Active')
Select one of the following Options:
5 1. Display - Display the Base Configuration
2. Define - Define the Base Configuration
3. Alter - Alter the Base Configuration
4. Validate - Validate the SCDS
5. Activate - Activate the CDS
6. Cache Display - Display CF Cache Structure Names for all CF Cache Sets
7. Cache Update - Define/Alter/Delete CF Cache Sets
8. Lock Display - Display CF Lock Structure Names for all CF Lock Sets
9. Lock Update - Define/Alter/Delete CF Lock Sets
If CACHE Display is chosen, Enter CF Cache Set Name . . *
If LOCK Display is chosen, Enter CF Lock Set Name . . . *
(1 to 8 character CF cache set name or * for all)
Command ===>
CONFIRM ACTIVATE REQUEST
To Confirm Activation on the following Control Data Set:
CDS : SYS1.DFSMS.SCDS
Specify the following:
Enter "/" to select option / Perform Activation
|
Figure 13-21 Activating the SMS base configuration
We reply to the WTOR message from the console and verify that the DFSMS configuration was changed, as shown in Figure 13-22.
|
COMMAND INPUT ===> /D SMS SCROLL ===> PAGE
RESPONSE=CPAC
IGD002I 16:47:03 DISPLAY SMS 438
SCDS = SYS1.DFSMS.SCDS
ACDS = SYS1.DFSMS.ACDS
COMMDS = SYS1.DFSMS.COMMDS
ACDS LEVEL = z/OS V2.2
DINTERVAL = 150
REVERIFY = NO
ACSDEFAULTS = NO
SYSTEM CONFIGURATION LEVEL INTERVAL SECONDS
CPAC 2015/11/19 16:46:57 15
M0S0 ---------- -------- N/A
|
Figure 13-22 Displaying SMS output
13.5.5 Shutting down z/OS V2R2
The sequence of commands to shut down your system is listed in Table 13-2.
Table 13-2 Shutting down address spaces in z/OS V2R2
|
Command
|
Description
|
|
F OMVS,SHUTDOWN
|
Stop OMVS
|
|
P TN3270
|
Stop TN3270
If there are users still alive, reply WTOR with FSTOP:
*04 IKT010D 00001 USER(S) ACTIVE, REPLY 'SIC' OR 'FSTOP'
r 04,FSTOP
|
|
P FTPD1
|
Stop FTP Server
|
|
P RESOLVER
|
Stop TCPIP Resolver
|
|
P TCPIP
|
Stop TCPIP
|
|
P TSO
|
Stop TSO
|
|
P VLF
|
Stop VLF
|
|
P LLA
|
Stop LLA
|
|
F DLF,STOP
|
Stop DLF.
If DLF task is busy, try to use FORCE, ARM command to stop it:
FORCE DLF,ARM
|
|
Z NET,QUICK
|
Stop VTAM
|
|
P FFST™
|
Stop EPWFFST
Reply “YES” to the WTOR message:
*05 EPW0309I ENTER 'YES' TO CONTINUE TERMINATION, 'NO' TO KEEP FFST
r 05,YES
|
|
$P JES2,TERM
|
Stop JES2
|
|
Z EOD
|
Stop SMF recording
|
|
Note: Some commands might not apply for this IPL because some address spaces are not yet started.
|
Then, we perform one reset clear action from the HMC against the LPAR for the next IPL.
13.6 Running postinstallation from target system
When the z/OS V2R2 system is up, we can continue our postinstallation tasks from the target system.
13.6.1 Importing the CustomPac Installation Dialog to the target
The target system requires access to the CustomPac Installation Dialogs for further tasks; therefore, we must connect the dialog to the system so that the target system can access it.
We need to IMPORT CONNECT the driver’s master catalog to the ServerPac’s system to access the CustomPac installation dialog. Because we only must access those data sets other than any CPAC.** data sets, we enable the catalog alias level from 1 to 2 and define two second-level aliases in target system’s master catalog, as shown in Example 13-6.
Example 13-6 Changing Catalog Alias Level to 2
F CATALOG,ALIASLEVEL(2)
IEC351I CATALOG ADDRESS SPACE MODIFY COMMAND ACTIVE
IEC352I CATALOG ADDRESS SPACE MODIFY COMMAND COMPLETED
F CATALOG,REPORT
IEC351I CATALOG ADDRESS SPACE MODIFY COMMAND ACTIVE
IEC359I CATALOG REPORT OUTPUT 894
*CAS************************************************************
* CATALOG COMPONENT LEVEL = HDZ2220 *
* CATALOG ADDRESS SPACE ASN = 002D *
* SERVICE TASK UPPER LIMIT = 180 *
* SERVICE TASK LOWER LIMIT = 60 *
* HIGHEST # SERVICE TASKS = 4 *
* # ATTACHED SERVICE TASKS = 4 *
* MAXIMUM # OPEN CATALOGS = 1,024 *
* ALIAS TABLE AVAILABLE = YES *
* ALIAS LEVELS SPECIFIED = 2 *
* SYS% TO SYS1 CONVERSION = OFF *
* CAS MOTHER TASK = 005AC680 *
* CAS MODIFY TASK = 005FC9B0 *
* CAS ANALYSIS TASK = 005FC550 *
* CAS ALLOCATION TASK = 005FC780 *
* CAS ASYNC TASK = 005FC320 *
* CAS SYSPLEX COMMAND TASK = 00594E88 *
* CAS SYSPLEX QUIESCE TASK = 005FC0F0 *
* VOLCAT HI-LEVEL QUALIFIER = SYS1 *
* NOTIFY EXTENT = 80% *
* DEFAULT VVDS SPACE = ( 10, 10) TRKS *
* ENABLED FEATURES = DSNCHECK DELFORCEWNG SYMREC *
* ENABLED FEATURES = UPDTFAIL *
* DISABLED FEATURES = VVRCHECK AUTOTUNING BCSCHECK *
* DISABLED FEATURES = DELRECOVWNG EXTENDEDALIAS *
* DISABLED FEATURES = ECS AUTOADD DUMPON GDGFIFO *
* DISABLED FEATURES = GDGSCRATCH GDGPURGE *
* DISABLED FEATURES = GDGEXTENDED *
* INTERCEPTS = (NONE) *
*CAS************************************************************
IEC352I CATALOG ADDRESS SPACE MODIFY COMMAND COMPLETED
We then must vary online the volume that contains the driver’s master catalog and the volume where CPAC.MASTER.* and CPAC.OS220149.* data sets are stored, submit the job that is shown in Figure 13-23, and access those data sets. The catalog alias is changed from level from 1 to 2 after every IPL if you want to continue accessing those data sets.
|
//IMPORT JOB CLASS=A,MSGCLASS=X,MSGLEVEL=(1,1),NOTIFY=&SYSUID,
// REGION=0M
//IMPORT EXEC PGM=IDCAMS
//SYSPRINT DD SYSOUT=*
//SYSIN DD *
IMPORT -
CONNECT -
OBJECTS((CATALOG.MVSICFM.VD9ECAT -
VOLUMES(D9ECAT) -
DEVT(3390))) -
CATALOG(CATALOG.M0S0.MASTER)
DEFINE -
ALIAS(NAME(CPAC.MASTER) -
RELATE(CATALOG.MVSICFM.VD9ECAT )) -
CATALOG(CATALOG.M0S0.MASTER)
DEFINE -
ALIAS(NAME(CPAC.OS220149) -
RELATE(CATALOG.MVSICFM.VD9ECAT )) -
CATALOG(CATALOG.M0S0.MASTER)
/*
|
Figure 13-23 Importing Connect Driver’s catalog in ServerPac system
Here, CATALOG.MVSICFM.VD9ECAT is the driver’s master catalog; CATALOG.M0S0.MASTER is our target system’s master catalog. Two new aliases are created in target system’s master catalog and point back to driver’s catalog.
Later, we can disconnect the catalog. Figure 13-24 shows the JCL that is used to perform the disconnection.
|
//EXPORT JOB CLASS=A,MSGCLASS=X,MSGLEVEL=(1,1),NOTIFY=&SYSUID,
// REGION=0M
//EXPORT EXEC PGM=IDCAMS
//SYSPRINT DD SYSOUT=*
//SYSIN DD *
EXPORT -
CATALOG.MVSICFM.VD9ECAT -
DISCONNECT
//LIST EXEC PGM=IDCAMS
//SYSPRINT DD SYSOUT=*
//SYSIN DD *
LISTCAT CATALOG(CATALOG.M0S0.MASTER)
|
Figure 13-24 Export Disconnect the Driver’s catalog
13.6.2 Defining RACF profiles for target system
The RACFTGT job is used to create RACF profiles that are required to use the system. The job also creates RACF profiles for each high-level qualifier in the order, including SSA qualifiers. RACFTGT creates the RACF profiles for started procedures, OCSF, System Logger, and z/OS UNIX System Services.
The user ID that runs the RACFTGT job must have the RACF SPECIAL attribute. We run this job with IBMUSER.
13.6.3 Allocating log streams for logger
The DEFNLOGS job is used to define System Logger policy information about the target system. We run the DEFNLOGS job on the target system.
13.6.4 Loading and activating Workload Manager policy
The optional IWMINSTI job as provided in the installation dialog (also found in member IWMINSTL of SAMPLIB) allows you to load and activate a sample policy for Workload Manager (WLM).
13.6.5 Customizing TCP/IP
Before we can start the TCPIP address space, we must customize and verify the following configurations:
•TCPIP TRL VTAM Node
This VTAM node defines the TCPIP MPC port name and associate the port name with the OSAD device number.Make sure the 0040-0042 OSA device numbers can be accessed by the LPAR and their attribute in OS Configuration is INITIAL OFFLINE=NO, as shown in Example 13-25.
|
TRL0040 VBUILD TYPE=TRL
TRL004A TRLE LNCTL=MPC, X
READ=(0040), X
WRITE=(0041), X
DATAPATH=(0042), X
PORTNAME=OSAQDIO2, X
MPCLEVEL=QDIO
|
Figure 13-25 CPAC.VTAMLST(TRL0040)
•TCPIP TCP LU Session
This VTAM node defines the LU names for TCP sessions. Increase the definitions for more TCPIP connections if more are needed, as shown in Figure 13-26.
|
TCP VBUILD TYPE=APPL
TCP00001 APPL AUTH=NVPACE,EAS=1,PARSESS=NO,MODETAB=ISTINCLM,SESSLIM=YES
TCP00002 APPL AUTH=NVPACE,EAS=1,PARSESS=NO,MODETAB=ISTINCLM,SESSLIM=YES
TCP00003 APPL AUTH=NVPACE,EAS=1,PARSESS=NO,MODETAB=ISTINCLM,SESSLIM=YES
TCP00004 APPL AUTH=NVPACE,EAS=1,PARSESS=NO,MODETAB=ISTINCLM,SESSLIM=YES
|
Figure 13-26 CPAC.VTAMLST(TCPAPPL)
•TSO LU Session
This VTAM node defines the LU names for TSO sessions. Here, you can increase the definitions for more TSO connections, as shown in Figure 13-27.
|
TSOAPPL VBUILD TYPE=APPL APPLICATION MAJOR NODE
*
*
TSO APPL AUTH=(NOACQ,NOBLOCK,PASS,NOTCAM,NVPACE,TSO,NOPO), X
EAS=1,ACBNAME=TSO
*
TSO01 APPL AUTH=(NOACQ,NOBLOCK,PASS,NOTCAM,NVPACE,TSO,NOPO), X
EAS=1,ACBNAME=TSO0001
*
|
Figure 13-27 CPAC.VTAMLST(TSOAPPL)
•VTAM PROC Profile
Check CPAC.VTAMLST(ATCSTR00) for the CONFIG=xx statement, which points to the ATCCONxx VTAMLST member. The ATCCONxx member defines all VTAM majnodes definition names. Ensure that they are all in the VTAMLST data set, as shown in Figure 13-28.
|
A0600,EXLOCAL,TCPAPPL,IVPLU,SMCSAPPL,SMCSCONS,APMSO,TRL0040,D0A00BF
|
Figure 13-28 CPAC.VTAMLST(ATCCON00)
•TCPIP PROC Profile
In the TCPIP profile, we must define the IP address, gate way, and route. A partial sample configuration is shown in Figure 13-29.
|
;
INTERFACE OSAQDIO24 ; IPv4 OSA-Express QDIO ethernet
DEFINE IPAQENET
PORTNAME OSAQDIO2
INBPERF DYNAMIC
VMAC
; SOURCEVIPAINT VLINK1
IPADDR 9.56.195.19/24 ; address and subnet mask
;
PORT
7 UDP MISCSERV ; Miscellaneous Server - echo
7 TCP MISCSERV ; Miscellaneous Server - echo
9 UDP MISCSERV ; Miscellaneous Server - discard
9 TCP MISCSERV ; Miscellaneous Server - discard
19 UDP MISCSERV ; Miscellaneous Server - chargen
19 TCP MISCSERV ; Miscellaneous Server - chargen
20 TCP * NOAUTOLOG ; FTP Server
; 20 TCP * NOAUTOLOG SAF FTPDATA ; FTP Server
21 TCP FTPD1 ; FTP Server
23 TCP TN3270 ; Telnet 3270 Server
; 23 TCP INETD1 BIND 9.67.113.3 ; z/OS UNIX Telnet server
25 TCP SMTP ; SMTP Server
53 TCP NAMED ; Domain Name Server
53 UDP NAMED ; Domain Name Server
ROUTE 9.56.195.0 255.255.255.0 = OSAQDIO24 MTU 2000
ROUTE DEFAULT 9.56.195.1 OSAQDIO24 MTU DEFAULTSIZE
START OSAQDIO24
|
Figure 13-29 TCPIVP.TCPPARMS(PROFILE)
•TCPIP TCPDATA profile
Use the default profile in TCPIVP.TCPPARMS(TCPDATA).
The HIP6220J job allocates the required TCP/IP data sets, such as translation tables, HOSTS.LOCAL, and ETC.SERVICES.
The HIP6220K job runs TSO/E command MAKESITE and generates the TCPIP.HOSTS.ADDRINFO and TCPIP.HOSTS.SITEINFO data sets.
Then, we can start the TCPIP by issuing the S TCPIP command from the console or SDSF. Before TCPIP is started, we must verify that the OSA devices that are used by MPC TRL VTAM node are all in ONLINE status.
13.6.6 Customizing TN3270
Before we can start the TN3270 address space, we need to customize and verify the following configurations:
•TCPIP PROF Profile
Ensure that Port 23 is opened for TN3270 in TCPIP starting profile TCPIVP.TCPPARMS(PROFILE).
•TN3270 PROC Profile
This profile defines the TN3270 required information, such as Port, LU, and USSTAB, as shown in Figure 13-30.
|
BeginVTAM ; Mapping for basic and TTLS ports.
Port 23 ; 23,9.10.11.12
DEFAULTLUS ; Define LUs to be used for general users.
TCP00001..TCP00999
ENDDEFAULTLUS
LuGroup LugDBCS ; LUs for DBCS
DLU001..DLU250 ; Maximum 250 DBCS connections allowed
EndLuGroup
; DEFAULTAPPL TSO ; Default application for all TN3270(E) clients
; LINEMODEAPPL TSO ; Send all line-mode terminals directly to TSO.
ALLOWAPPL TSO* DISCONNECTABLE
; Allow all users access to TSO applications.
; TSO uses unique applications for each session
; which all begin with TSO. Use TSO* to cover
; all TSO sessions.
; If a session is closed, disconnect the user
; rather than log off the user.
ALLOWAPPL * ; Allow access to all applications.
USSTCP USSTAB ; Send out the default TN USS table
LuMap LugDBCS DestIP,9.10.11.12 ; This DestIP uses LugDBCS
EndVTAM
|
Figure 13-30 TCPIVP.TCPPARMS(TNPROF1)
•TN3270 RACF Profile
We define the started task for TN3270 in RACF, as shown in Example 13-7.
Example 13-7 Defining started task profile for TN3270
ADDGROUP STCGROUP SUPGROUP(SYS1)
RDEFINE STARTED TN3270.* OWNER(IBMUSER) STDATA(USER(IBMUSER) GROUP(STCGROUP))
Otherwise, you cannot start the TN3270 address space because the user ID is “++++++++” and has no OMVS segment. You see an error that is similar to the error that is shown in Example 13-8 on page 232.
Example 13-8 Starting TN3270 failed
S TN3270
$HASP100 TN3270 ON STCINRDR
IEF695I START TN3270 WITH JOBNAME TN3270 IS ASSIGNED TO USER
++++++++
$HASP373 TN3270 STARTED
IEF403I TN3270 - STARTED - TIME=15.07.04
ICH408I JOB(TN3270 ) STEP(TN3270 ) CL(PROCESS ) 434
OMVS SEGMENT NOT DEFINED
EZZ4204I TELNET INITIALIZATION FOR TN3270 FAILED.
Then, we can start the TN3270 by issuing the S TN3270 command from the console or SDSF.
13.6.7 Customizing Predictive Failure Analysis
The following jobs are used to customize the Predictive Failure Analysis (PFA):
•Job HBB77A0M
This job is in the installation dialog and is used to create PFA directories by using the installation script AIRSHREP.sh and customizing the .ini files. Starting with z/OS V2R2, running this script is not a mandatory migration task.
PFA requires IBM 31-bit SDK for z/OS, Java Technology Edition, Version 7.1 (Program Number 5655-W43) operational on your system.
|
Note: PFA does not support the IBM 64-bit SDK for z/OS.
|
•Job HBB77A0O
This job is used to update COMMND00 to start PFA automatically when the system is up.
13.6.8 Customizing Common Information Model
The HPG77A0B job defines ownership and permission for Common Information Model (CIM) directories and copy "/usr/lpp/wbem/install/profile.add" to "/u/CFZSRV/" directory.
13.6.9 Customizing z/OSMF
Starting in z/OS V2R2, z/OSMF is a base element of z/OS and z/OSMF V2R2 is not orderable as a separate product.
Job HSMA220C sets up the TCP/IP port for z/OSMF and gives owner access to the z/OSMF started task User and Group for the z/OSMF user file system mount point directory.
For more information about how to customize and enable z/OSMF product, see the ServerPac DOC z/OS 2.2 Z/OSMF.
For more information about customizing z/OSMF V2R2, see IBM z/OS V2R2 ServerPac SG24-8500.
For more information, see IBM z/OSMF Management Facility Configuration Guide, SC27-8419.
13.6.10 Customizing IBM Knowledge Center
IBM Knowledge Center for z/OS (KC4z) is a new element that was added to the z/OS base starting with z/OS V2R2.
The HKZC100C job creates target subdirectories.
The HKXZ100D job copies sample configuration files from the IBM Knowledge Center Installation directory.
13.6.11 Updating COMMNDxx in parmlib for automatic start
Before the z/OS V2R2 system is reloaded, it is better to include some statements in COMMNDxx parmlib member to start those customized subsystems and products automatically during IPL, as shown in Figure 13-31.
|
COM='S VLF,SUB=MSTR'
COM='S DLF,SUB=MSTR'
COM='DD ADD,VOL=M0SR21'
COM='DD NAME=SYS1.&SYSNAME..DMP&SEQ'
COM='DD ALLOC=ACTIVE'
COM='S EZAZSSI,P=NODENAME'
COM='S VTAM'
COM='S TSO'
COM='S RESOLVER'
COM='S TCPIP'
COM='S FTPD'
COM='S TN3270'
COM='S SYSLOGD'
COM='S OSNMPD'
COM='S CFZCIM'
COM='S IZUANG1'
COM='S IZUSVR1,IZUPRM='00''
COM='S CSF'
COM='SETLOGRC LOGSTREAM'
COM='S EPWFFST.FFST,SUB=MSTR'
COM='S PFA'
|
Figure 13-31 CPAC.PARMLIB(COMMND00)
13.7 Running installation verification programs
IBM provides several installation verification programs (IVPs) to test basic functions in your system to ensure that the products in your order were installed properly. These programs are listed in Table 13-3.
Table 13-3 IVPs
|
Job name
|
Function
|
|
HBB77A0V
|
Verify that the base control program (BCP) was installed properly
|
|
HWQ4160I
|
Verify that High-Level Assembler installed correctly.
|
|
HIP62200
|
Test that TCPIP and FTP were correctly set up.
|
|
HLE77A0F
|
Verify IBM Language Environment® was installed properly.
|
|
HTV77A0R
|
Verify that the Runtime Library Extensions element was installed properly.
|
|
HDZ2220Q
|
Verify that the DFSMS OAM function was installed properly.
|
|
EDU1H01G
|
Verify that Device Support Facility (ICKDSF) element was installed properly.
|
|
HFST101K
|
Verify that First Failure Support Technology/IBM MVS™ (FFST) was properly installed.
|
|
HPG77A0I
|
Verify that the CIM component was installed properly.
|
The other IVPs are provided, depending on your order.
13.8 Running clean-up jobs to complete installation
This section describes the following optional steps that you can take after you verify that your new target system was installed successfully:
•Updating your new master catalog
•Cleaning up your driver system after the installation
The clean-up jobs that can be run are listed in Table 13-4.
Table 13-4 Determination matrix for clean up jobs
|
Job Name
|
Is the job for FSR, SUI, or both?
|
Keep SSAs defined during your installation?
|
Remove SSAs and use explicit VOLUME information for SMP/E DDDEFs?
|
Remove SSAs and use catalog information for SMP/E DDDEFs?
|
|
UPDDDUV
|
F
|
No
|
Yes
|
No
|
|
UPDDEF
|
S
|
No
|
No
|
Yes
|
|
UPDBCK
|
F
|
No
|
No
|
Yes
|
|
DELDSN
|
S
|
No
|
Yes
|
Yes
|
|
DELCSI
|
F
|
No
|
Yes
|
Yes
|
|
DELSSA
|
S
|
No
|
Yes
|
Yes
|
Run these jobs on the target system, except for DELSSA and DELNTS, which must be run on the driving system.
|
Note: After you remove the SSAs, the following jobs are affected:
•Jobs that run on the driving system no longer can access the target system master catalog.
•Jobs that use SMS-managed target system data sets can no longer run on the driving system.
|
For non-SMS-managed data sets, the UPDDDUV job updates the following SMP/E DDDEF entries in the target system CSIs:
•Removes SSAs from data set names
•Removes SSAs from SMP/E work data sets
•Removes SSAs from SMP/E ZONEINDEX subentries in the global zone
•Adds UNIT, VOLSER, and WAITFORDSN values
•Removes the installation directory from the UNIX file system paths.
For SMS-managed data sets, job UPDDDUV removes SSAs from data set names.
|
Caution: Removing the installation directory from the UNIX file system paths requires some caution when applying services, which can affect these file systems. We run this job in our lab.
|
Run the UPDDEF job only if you did not run UPDDDUV.
UPDDEF updates the following SMP/E DDDEF entries in the target system CSIs:
•Removes SSAs from data set names.
•Removes the installation directory from the UNIX file system paths.
Run the UPDBCK job only if you did not run UPDDDUV.
UPDBCK updates the following SMP/E DDDEF entries in the target system CSIs:
•Removes SSAs from SMP/E work data sets.
•Removes SSAs from SMP/E ZONEINDEX sub entries in the global zone.
The DELDSN job deletes data set name aliases from the target system catalogs.
The DELCSI job deletes the path entries for the target system CSIs. We run this job in our lab.
The DELSSA job deletes SSAs from the driving and target system catalogs
The DELNTS job deletes the order's archive files that were created during the download process. If a new UNIX file system was allocated to receive the download of the order files, it is unmounted and deleted.
|
Note: It is recommended that you back up your order’s archive files before the clean up job DELNTS is run to avoid having to upload again from the DVD.
|
Job SETSTAT is an optional job. It sets the orders status to “Installed” in the order inventory.
|
Note: If you plan to change your configuration, do not run this job. After the order status is set to “Installed”, you cannot update the order configuration.
|
Your installation is now complete. You have a system that can be IPL in which data sets can be referenced by using the data set name or by the data set aliases, which were defined during the installation.
We now move on to Phase 11.
..................Content has been hidden....................
You can't read the all page of ebook, please click here login for view all page.