
In the previous chapter, we developed the POSApp using an all-in-one approach. We will start converting the application to MVVM by looking at the view and considering which functions should stay with it and which functionality will be delivered by the ViewModel and the Model. I start exploring the MVVM pattern from the View, but this is not necessary; you can begin your design from the Model or the ViewModel. Here, we will use the View as a starting point, as it is easier to demonstrate a way of approaching the design of an application in the MVVM domain.
Note
The more familiar you become with the MVVM pattern, the easier it becomes to work out the ViewModel first. ViewModels work as a bridge between the Model and the View and allow different teams in bigger projects to work separately and in parallel without losing focus. For example, you may have a group of developers working on the models and the ViewModels of your application and a designer crafting the user interface and experience without the need for the latter to wait until your developers complete an important part of the application.
The View of the MainScreen
The main screen of POSApp is pretty simple. It has a number of static labels, a button that opens the invoice form, and one label that shows the updated sales figure. The most obvious element that deserves its place in a ViewModel or in a Model is the total sales figure. We map the visualization of the total sales figure to a property in the ViewModel, which in turn receives its value from the Model itself via a function. Figure 3-1 shows this relationship. The aim is to create a view that is as thin as possible and empty from elements that define the view logic and view state. In this sense, we treat the static labels’ text and the button’s text as parameterized (for example, in an application that requires translations) and we map them to separate fields and properties.
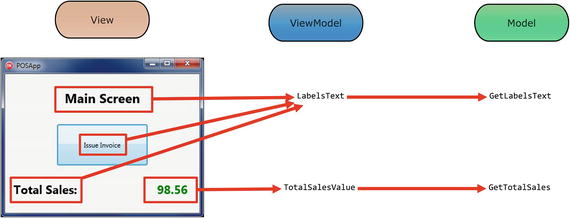
Figure 3-1. Main screen in an MVVM approach
Follow the next steps:
Create a new folder to store the new version of POSApp. Call it POSAppMVVM. Within this folder, create three new folders called Models, ViewModels, and Views.
Create a new multi-device application (Blank application) in Delphi, save the new unit as Views.MainForm in the Views folder, save the project as POSAppMVVM in the POSAppMVVM folder, and then save the project group in the POSAppMVVM folder as POSAppMVVMProjectGroup.
Go to the Design tab of the MainForm and add the components of the form as you did in the previous chapter (refer back to Figure 2-4). This time, use dummy text for the labels (we will retrieve the actual values from the ViewModel).
Tip
In the book’s code, you will find the files (View.ModelForm.fmx and View.ModelForm.pas) of an empty version of the MainForm for your convenience. They are located in the Thin Forms folder. You can import them in an empty project (using the menu in Figure 2-5 and the Add option) instead of creating the components from scratch.
The Designer of the form and the Project Manager of your IDE environment should look very similar to Figure 3-2. Note that the form file in the right sidebar is located in the Views folder. This will help us keep the files organized while we are developing the project.

Figure 3-2. The IDE main window
The Model of the MainScreen
The model of the MainForm provides two functions, as discussed (see Figure 3-1). Remember that the model is now responsible for accessing any data sources and performing all the required manipulations to supply data to the ViewModel.
Create a new unit and save it as Model.Main.pas in the Models folder.
You need the Declarations.pas and Database.pas units from the first version of POSApp. Copy the original files and paste them into the Models folder. Then, you can add the units to the project. For consistency, you can rename the files to Model.Declarations and Model.Database, but this is not necessary. If you decide to rename the files, you need to change the unit declarations too.
Create a new unit and save it as Model.Main.pas.
According to the plan, we need to be able to retrieve the labels of the components. We could create separate functions for each one, but we will follow a simpler apprach instead. We will create a record and populate it with the desired values. We also need to retrieve the updated total sales figures, a job that was initially done in the MainForm.
Load the Model.Declarations unit and declare the following record. Title field keeps the caption of the LabelTitle component; IssueButtonCaption refers to the text of ButtonInvoice; and TotalSalesText is for the LabelTotalSales element.

Switch to the Model.Main unit and add the following code. You have to declare the Model.Declarations, Model.Database, and System.SysUtils units in the uses clauses.
You can now add the GetTotalSales, which is the last function of this unit. This is a simple reference to the appropriate function in the Model.Database unit.


The ViewModel of the MainScreen
As mentioned in Chapter 1, the ViewModel has direct access to the Model. Create a new unit and save it as ViewModel.Main.pas in the ViewModels folder. We will build the code that receives data from the model and transforms it to information that makes sense to the view (view logic/view state).


We can move forward by linking the View to the ViewModel. Open the View.MainForm form and include the following piece of code.


I have created two methods (UpdateLabels and UpdateTotalSalesFigure) to refresh the graphical elements. Although I could include the code in the SetViewModel directly, keeping the code separate serves several practical reasons, which will become apparent later in the next chapter.
Creating the Classes
If you compile and execute the project, you will only see the main form with the “dummy” labels. This is because we have not yet created the classes for the ViewModel and the Model. As mentioned in the first chapter, there are different approaches to this regarding which part of the MVVM structure should be created first. In this case, I will create the ViewModel and the Model after the creation of the View for simplicity as we are, already, in the MainForm. When we create the InvoiceForm, we will follow the other approach for demonstration purposes.
In MainForm, write this code in the OnCreate and OnDestroy events of the form.


How the Code Works
When the MainForm is created, the OnCreate event creates a new instance of TMainModel. Then, it creates a new ViewModel class (fViewModel) and assigns the Model to the ViewModel. Finally, the ViewModel is attached to the View and this completes the chain of M-VM-V (see Figure 3-3). One point you may notice in the code is that the mainModel variable is local to the FormCreate procedure and it survives even though the procedure ends. This is because we link mainModel to a variable that exists for the whole life of MainForm (fViewModel).

Figure 3-3. Order of creation of classes in POSApp
Creating the ViewModel and the Model Outside the Main Form
As you notice, we do all the job of creating the ViewModel and Model classes within the form. This receives some criticism from a number of MVVM fans on the basis that having all the elements in the View doesn't follow the MVVM principles and keeps the parts together in such way that testing becomes difficult. My view is that you observe this situation only when you set up the main form of the application. In regard to the argument about the separation of the elements, we have only created the classes in a procedure of the form and the form doesn't directly interact with the ViewModel or the Model and the communication follows the MVVM logic. Despite this, I will show you how to approach the creation of the ViewModel and the Model from outside the View.
Save POSAppMVVMProjectGroup and all its files in a different folder under a different name. The code that comes with the book uses the name POSAppMVVMMainForm for the folder and the project group.
Open View.MainForm and delete the FormCreate procedure.
Execute POSApp. You should see the main screen with the “dummy” labels and caption.
We are going to create the ViewModel and the Model classes before we create the main form.
Go to the Project ➤ Options ➤ Forms menu and move the MainForm from the Auto-Create Forms list to the Available Forms, as you did in the previous chapter (review Figure 2-7).
Select POSAppMVVM.exe or POSAppMVVMMainForm.exe if you are using the code from the book in the Project Manager panel. Open the source of the .exe file (choose View Source from the menu shown in Figure 2-5) or press Ctrl+V.
Enter the following lines of code:
In a graphical presentation, the order of creation of the classes and the form is shown in Figure 3-4. The MainForm unit is very simple in this case and only holds the code to update the total figures label.

Figure 3-4. Order of creation of classes outside the MainForm
Notes About the Code
There are a few points to notice in the code we developed to implement the MVVM pattern for the MainForm.
Both Model.Main and View.MainForm are very light in the implementation.
ViewModel.Main is responsible for the way data is presented to the view. The GetLabelsText function deals with default values and the GetTotalSalesValue function formats the sales figure as retrieved from the model.
You may wonder why I get into the trouble to the trouble to retrieve the labels from the model instead of setting the captions directly in the form. Although it may look a small thing in this application, it is a great opportunity to challenge the way we see forms. Consider, for example, how you would change the design if you were asked to provide the ability to change the interface language at runtime. With this design, you would simply go to the model unit and add a few lines to the GetMainFormLabelsText function in order to get the translated text.
Following the previous point, the View now is totally detached from the text of the visual elements. This means that you can send the form files to an UI designer (with the lines for the class creation and retrieval of data commented) who is familiar with Delphi and they will do all the visual work for you. They can even rearrange the components as they feel best for the workflow. When you receive it back, what you have to do is uncomment all the lines in the code.
This example exposed the Model and ViewModel in the relevant classes by defining properties. I could, equally, use the SetModel (in ViewModel.Main) and the SetViewModel (in View.MainForm) to get the same result (both methods should be declared as public in that case). Properties allow the creation of fluent interfaces where you can directly write
mainViewModel.Model:=mainModel;
instead of calling the procedure
mainViewMode.SetModel(mainModel);
Other than this, there are no real benefits, so you can consider it a matter of personal preference.
What we achieve by declaring TMainViewModel and setting the View model and the Model to the form and the View model respectively is a high degree of isolation and, therefore, of reusability of the View model and the form classes. This is an example of what is called dependency injection. It allows programmers to modify at runtime any variables (dependencies) the classes require. For example, if you have the need, you can change the View Model of the main form without closing it or restarting the application.
If we wanted to control the color of the label in the main form, we would have to create a new field in the ViewModel and GetTotalSalesValue would set the value. The Model and the View would be ignorant of how we determined the color of the label separating, in this way, the view logic and the view state from the view.
How We Converted MainScreen
At this stage, we converted the MainScreen to follow the Model-ViewModel-View paradigm. Figure 3-5 explains the steps we followed.
We started with the MainScreen form (view). We recognized the visual elements and decided that we can not keep any code in the form that determines the content of the visual elements. Instead, the only code we host in the View just passes any values to the appropriate visual element (controls). Therefore, we needed to remove the part of the UpdateTotalSales method that decides on the view state and view logic. Initializing values is a view state and formatting values is view logic
The action in the first step implies that we need a “place” to format and initialize total sales. The obvious location for these activities is in the ViewModel. The ViewModel determines how the view state and view logic are implemented. Therefore, the ViewModel formats the TotalSalesValue and gives access to the view. We moved the code from the original UpdateTotalSales to the ViewModel under the method called TotalSalesValue.
What is left is the initialization and, subsequently, the updating of the values that are being passed to the view. This is the job of the Model. New, separate methods (GetLabelsText and GetTotalSales) appear in the Model.

Figure 3-5. Code conversion to MVVM
Summary
In this chapter, we converted the first of the forms of the application in such way that follows the MVVM principles. Figure 3-5, along with the descriptions, epitomize the steps we followed to achieve this conversion. You can see them as the first part of a methodology that allows us to work on monolithic applications. Before we move to the second form of POSApp, we need to develop some tools in order to establish bi-directional access to the elements of MVVM. The next chapter deals with these tools.