
Secure communication is a concern, particularly when sharing confidential and vital information between people. Like in World War II, Winston Churchill, the prime minister of the United Kingdom, and Franklin D. Roosevelt, the president of the United States, shared critical military information, such as troop movements. To secure their voice conversations through the telephone, the SIGSALY (aka Green Hornet) was devised to encrypt and decrypt using cryptographic keys.
Nowadays, we cannot imagine anyone not worrying about network security. Even people who are not so technically savvy should be concerned. For instance, what if your bank's network is not secured and a hacker steals your bank account number and PIN? Likewise, a database administrator may want to connect to a Linux server situated in a remote geographical location or another room in the building while working at the office or at home. What if a co-worker is eavesdropping while that DBA is accessing sensitive data?
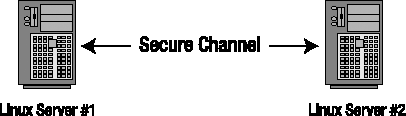
To address the network security concerns, version 1 of the Secure Shell (aka SSH) was hatched in 1995 but was replaced a year later by version 2 for security enhancements. SSH is a network protocol where the encrypted data traverses through the network using a secure channel between computers, as illustrated in Figure 14-1. The ssh protocol replaces the older network protocols, namely, telnet, rlogin, and rsh, as well as the scp command for the rcp command. The older protocols and commands were replaced since they lack the security feature; it just was not considered when they were initially designed.
In this chapter, we'll focus the discussion on how to log on securely to a remote Linux server through SSH, as well as how to generate the server's SSH host key, how to use the SSH public key for authentication in lieu of the username's password, how to securely copy files between Linux servers, and how to secure an unsecured connection.
You want to configure SSH so you can have a secured and encrypted connection to your remote Linux server.
Before you configure SSH, ensure that you have the required packages, namely, openssh, openssh-server, openssh-clients, and openssh-askpass. You can verify the SSH packages installed on your server by running the rpm command as follows:
# rpm -qa | grep -i ssh
openssh-3.9p1-8.RHEL4.24
openssh-askpass-gnome-3.9p1-8.RHEL4.24
openssh-askpass-3.9p1-8.RHEL4.24
openssh-server-3.9p1-8.RHEL4.24
openssh-clients-3.9p1-8.RHEL4.24
Note
Run the command ssh -V to check the type and version of SSH installed on your server.
Before you can connect to your remote Linux server, the SSH daemon server (sshd) must be running. You can run sshd as follows:
# service sshd start
Starting sshd:                                             [  OK  ]
You can also run sshd by calling the following script, which is the same script called by the previous command:
# /etc/rc.d/init.d/sshd start
Starting sshd:                                             [  OK  ]
However, if sshd is already started, then you can restart it, as shown here. Another way is to issue the command /etc/rc.d/init.d/sshd restart:
# service sshd restart
Stopping sshd:                                             [  OK  ]
Starting sshd:                                             [  OK  ]
For sshd to start automatically when the Linux server is rebooted, you need to have sshd activated. You can activate sshd using either chkconfig, ntsysv, or system-config-services.
For the chkconfig command, use the --level option, and provide the runlevel in which you want sshd to start. The following command indicates that sshd is configured to start in runlevels 2, 3, 4, and 5:
# chkconfig --level 2345 sshd on
Note
For a discussion of the Linux system V init runlevels, please review Chapter 11.
For the ntsysv command, also use the --level option, and specify the runlevels for sshd to start. If no runlevels are specified, then sshd will be activated only on the current runlevel. The following command will run ntsysv and will affect only runlevels 3 and 5:
# ntsysv --level 35
Note
You can also launch ntsysv through the text mode setup utility by running the operating system setup command and selecting System Services from the menu.
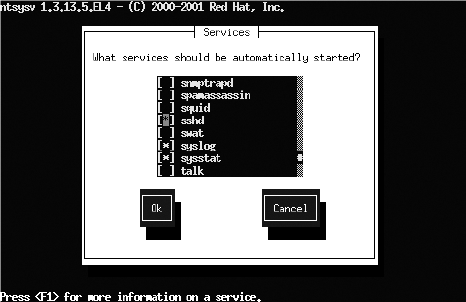
After you launch the ntsysv command, the screen of the text console service configuration tool will appear, as shown in Figure 14-2. Navigate by scrolling down using the arrow keys until the cursor is on sshd. The asterisk (*) inside the square brackets indicates that the status of the service is active, while empty square brackets means that it is not active. You can press the spacebar to toggle the status to become active or not active. To save the changes, click the Tab key to highlight the Ok button, and press the Enter key.
Another option to activate sshd is to run the system-config-services command; you can launch this tool as follows:
# /usr/sbin/system-config-services
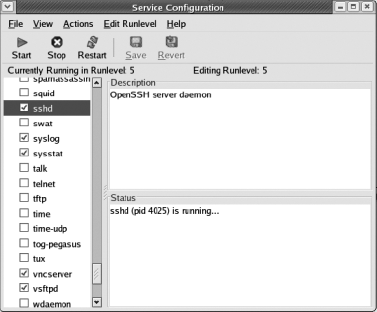
After you launch system-config-services, the GUI-based service configuration tool will appear, as shown in Figure 14-3. Navigate by scrolling down to the sshd service, and check the adjacent box to activate it. In this dialog box, you also have the option to start, stop, and restart the sshd service, as well as check the status and process ID.
By default, the required SSH packages are included in major Linux distributions. Otherwise, you can download them from any Linux package download site, such as http://www.openssh.com.
Once the SSH packages are installed on your remote Linux server, you can activate and run the sshd daemon, and it should be ready to accept SSH connections. You can, however, make some changes, such as modifying the default port number on which sshd should be listening.
Note
The default SSH port number that the Linux server will listen on is 22. To change the default SSH port number, modify the value of the parameter Port in the /etc/ssh/sshd_config file.
The file /etc/ssh/sshd_config is the SSH systemwide configuration file at the Linux server, which is the computer that you want to connect via SSH, while /etc/ssh/ssh_config is the configuration file for the SSH client, which is the computer from which you are initiating SSH. If you make some changes to the /etc/ssh/sshd_config file, then you need to reload sshd by running service sshd reload as follows:
[root@BLLNX2 stage]# service sshd reload
Reloading sshd:                                            [  OK  ]
You can also run the command service sshd restart, or another method is to stop and start the sshd service, which will give the same results, as follows:
# service sshd stop
Stopping sshd:                                             [  OK  ]
# service sshd start
Starting sshd:                                             [  OK  ]
To verify the runlevel that sshd is configured to start, run the chkconfig command with the --list option. As shown here, sshd is set to start on runlevels 2, 3, 4, and 5:
# chkconfig --list sshd
sshd            0:off   1:off   2:on    3:on    4:on    5:on    6:off
Once sshd is running, issue the following operating system command to verify whether the corresponding sshd process is running. If there are no results, then this means sshd is not running yet. So, you need to run the service sshd start command to manually start sshd:
# ps -ef | grep -v grep | grep ssh
root      4025     1  0 16:32 ?        00:00:00 /usr/sbin/sshd
Note
To disallow the root user to log on via SSH, set the parameter PermitRootLogin to no in the /etc/ssh/sshd_config file. Once the non-root users have successfully logged on to the Linux server via SSH, they can then then run the su - root command or run the sudo command instead.
The SSH host key of your remote Linux server is lost, is corrupted, or was not generated when the SSH packages were installed or during the first run. You want to generate a new SSH host key.
To generate a new SSH host key of the Linux server, log on as root, and run the ssh-keygen command with the -t option, which indicates the type of key to be generated. You must provide the -f option followed by the file name of the key file. If you omit the -f option, then it will create the public key for the operating system account root instead of the SSH host key on the Linux server.
The following example will generate the SSH host key for the RSA type. If the files of the SSH host keys already exist, then you are asked whether you want to overwrite them. Next, you are asked to provide the passphrase.
[root@BLLNX2 ˜]# ssh-keygen -t rsa -f /etc/ssh/ssh_host_rsa_key
Generating public/private rsa key pair.
/etc/ssh/ssh_host_rsa_key already exists.
Overwrite (y/n)? y
Enter passphrase (empty for no passphrase):
Enter same passphrase again:
Your identification has been saved in /etc/ssh/ssh_host_rsa_key.
Your public key has been saved in /etc/ssh/ssh_host_rsa_key.pub.
The key fingerprint is:
43:1a:78:99:d0:d1:5b:3a:4b:a3:f9:0f:4b:d7:cd:63 root@BLLNX2
Note
For security reasons, we recommend you supply a passphrase when creating the SSH host key. This prevents non-root users from peeking on the SSH host key by running ssh-keygen with the -y option, which is discussed in detail in the next section.
The SSH host key is like a master key that is used to encrypt and decrypt the data that traverses between the remote Linux server and the client computer, where you want to initiate the SSH connection. This secures your connection to the remote Linux server and eliminates vulnerability to man-in-the-middle attacks.
When creating a new SSH host key, you need to provide the type of key that corresponds to the version of SSH and the kind of encryption algorithm, which is either RSA or DSA. The valid values for the type of key are rsa1, rsa, and dsa. rsa1 refers to RSA of SSH version 1 (SSHv1), while rsa and dsa are for SSH version 2 (SSHv2).
Note
If your Linux server supports only SSH version2, set the value of the parameter Protocol to 2 in /etc/ssh/sshd_config.
To create the RSA host key, run ssh-keygen with the -t rsa option; this will create two files, namely, /etc/ssh/ssh_host_rsa_key and /etc/ssh/ssh_host_rsa_key.pub. For the DSA host key, run -keygen with the -t dsa option; this will create /etc/ssh/ssh_host_dsa_key and /etc/ssh/ssh_host_dsa_key.pub. Both ssh_host_rsa_key and ssh_host_dsa_key contain the private and public key, while ssh_host_rsa_key.pub and ssh_host_dsa_key.pub contain only the public key. The public key is used to encrypt the data, while the private key is used to decrypt the data.
The first time you log on to the remote Linux server, which is the computer you are connecting to via SSH, you are prompted to confirm the server's SSH host key fingerprint, as shown here. If you accept it, the file $HOME/.ssh/known_hosts will be created on the local Linux server, which is the computer from where you initiated the SSH connection. $HOME/.ssh/known_hosts contains the server's SSH host key.
[bslopuz@BLLNX1 ˜]$ ssh bllnx2
The authenticity of host 'bllnx2 (192.168.0.12)' can't be established.
RSA key fingerprint is 5b:0f:a0:df:e0:9a:90:db:c7:bb:82:5c:15:d5:da:78.
Are you sure you want to continue connecting (yes/no)? yes
Warning: Permanently added 'bllnx2,192.168.0.12' (RSA) to the list of known hosts.
bslopuz@bllnx2's password:
Last login: Fri Jul 18 14:51:13 2008 from bllnx1
[bslopuz@BLLNX2 ˜]$
To determine the SSH key fingerprint on the remote Linux server, run the ssh-keygen command with the -l option, as shown here. This is to verify whether you have the correct SSH host key fingerprint of the remote Linux server that you want to connect via SSH.
[root@BLLNX2 ˜]# ssh-keygen -l -f /etc/ssh/ssh_host_rsa_key.pub
2048 4f:14:67:02:ba:6b:f0:84:65:d4:e2:31:c7:ee:a9:10 /etc/ssh/ssh_host_rsa_key.pub
Meanwhile, to determine the SSH host key on the remote Linux server, run the ssh-keygen command with the -y option, as shown here. For security reasons, you can be asked to provide the passphrase that you supplied when creating the SSH host key.
[root@BLLNX2 ssh]# ssh-keygen -y -f /etc/ssh/ssh_host_rsa_key
Enter passphrase:
ssh-rsa AAAAB3NzaC1yc2EAAAABIwAAAQEAvTP3/fa21nnbpkaXUsPLtCViVaQrK5Dejh3jHcoYggwiDKWZ
5H7DebomI5WGrjFnTRtlMw6w/R7NTKWN9qJ5kEQBG4zM+AV9Bmm+8jHKL3i/YuR6w7qDR0CUYMuVnfk+5C4H
TArCSv8v6XbzbrgSDT/jI8QCKuaOlvqrgDGCAaPt6qKhR8qluOFACLyrGIZbmygwwCImollzNjkK080SYFFp
aJfw+OpuEDjkKlRN21K9rUJrbx38uRUd/ANy1bWJH4WehdMvjvZkOIh3a2+VLmzpLtkqXCJ7L2+/wIVyoZ5U
8SO+15SkOtzKH90jatwvsV3eqDe6ivD/lYYTOaewXQ==
On your local client computer, run the tail command, as shown in the following example. Check the SSH host key, which are the characters after ssh-rsa, and compare them against the results of the ssh-keygen -y option.
[oracle@BLLNX1 ˜]$ tail −1 $HOME/.ssh/known_hosts
bllnx2,192.168.0.12 ssh-rsa AAAAB3NzaC1yc2EAAAABIwAAAQEAvTP3/fa21nnbpkaXUsPLtCViVaQr
K5Dejh3jHcoYggwiDKWZ5H7DebomI5WGrjFnTRtlMw6w/R7NTKWN9qJ5kEQBG4zM+AV9Bmm+8jHKL3i/YuR6
w7qDR0CUYMuVnfk+5C4HTArCSv8v6XbzbrgSDT/jI8QCKuaOlvqrgDGCAaPt6qKhR8qluOFACLyrGIZbmygw
wCImollzNjkK080SYFFpaJfw+OPuEDjkKlRN21K9rUJrbx38uRUd/ANy1bWJH4WehdMvjvZkOIh3a2+VLmzp
LtkqXCJ7L2+/wIVyoZ5U8SO+15SkOtzKH90jatwvsV3eqDe6ivD/lYYTOaewXQ==
However, when a new SSH host key is generated on the remote Linux server, you will experience the following error messages the next time you log on. You can also encounter a similar problem if you reinstalled Linux on the server with the same hostname and IP address, because a new SSH host key is also generated.
[oracle@BLLNX1 ˜]$ ssh BLLNX2
@@@@@@@@@@@@@@@@@@@@@@@@@@@@@@@@@@@@@@@@@@@@@@@@@@@@@@@@@@@
@    WARNING: REMOTE HOST IDENTIFICATION HAS CHANGED!     @
@@@@@@@@@@@@@@@@@@@@@@@@@@@@@@@@@@@@@@@@@@@@@@@@@@@@@@@@@@@
IT IS POSSIBLE THAT SOMEONE IS DOING SOMETHING NASTY!
Someone could be eavesdropping on you right now (man-in-the-middle attack)!
It is also possible that the RSA host key has just been changed.
The fingerprint for the RSA key sent by the remote host is
5b:0f:a0:df:e0:9a:90:db:c7:bb:82:5c:15:d5:da:78.
Please contact your system administrator.
Add correct host key in /home/oracle/.ssh/known_hosts to get rid of this message.
Offending key in /home/oracle/.ssh/known_hosts:2
RSA host key for bllnx2 has changed and you have requested strict checking.
Host key verification failed.
To resolve this problem, you can rename $HOME/.ssh/known_hosts, but this is not advisable since you will lose the reference of the SSH host keys of the other servers. Another workaround is to edit $HOME/.ssh/known_hosts and remove the entry that corresponds to the hostname or IP address and type of SSH host key of the remote Linux server that you want to connect via SSH. However, before you edit $HOME/.ssh/known_hosts, we recommend you make another copy of the said file.
On the local server, run the ssh command followed by the hostname or IP address of the remote Linux server that you want to connect. Afterward, supply the password of the corresponding operating system user on the remote Linux server.
In the first line of the following example, the operating system prompt [oracle@BLLNX1 ˜]$ indicates that the operating system username is oracle logged on to the local Linux server BLLNX1. The following ssh command will connect to the remote Linux server BLLNX2 and will log on to the same operating system username oracle. You will then be prompted to provide the password of the operating system user on the remote Linux server.
[oracle@BLLNX1 ˜]$ ssh BLLNX2
oracle@bllnx2's password:
Last login: Wed Jul 16 20:48:19 2008 from bllnx1
[oracle@BLLNX2 ˜]$
Once you have successfully logged on, you can verify whether you are already in the remote Linux server. In the following example, the operating system prompt is obvious that you are now logged on as oracle on server BLLNX2. However, you can run the operating system commands echo $HOSTNAME and echo $USER, as shown here, to display the hostname of the Linux server and operating system username, respectively:
[oracle@BLLNX2 ˜]$ echo $HOSTNAME
BLLNX2
[oracle@BLLNX2 ˜]$ echo $USER
oracle
Before you can run ssh on your local server, ensure that the packages open-ssh and openssh-clients are already installed. Otherwise, you can download them from any Linux package download site, such as http://www.openssh.com.
To connect to the remote Linux server from another Unix/Linux computer or Mac OS, run the ssh command. If you are initiating the SSH connection from Windows, we recommend you use the PuTTY software, as illustrated in recipe 1-1. Another option is to download and install OpenSSH for Windows.
The first time you log on to the remote Linux server via SSH, you will be prompted to confirm the SSH host key fingerprint of the remote Linux server, as shown here. Once you accept the SSH host key fingerprint, then a row will be added in $HOME/.ssh/known_hosts of the local Linux server, which contains the hostname, the IP address, and the SSH host key of the remote Linux server.
[oracle@BLLNX1 ˜]$ ssh BLLNX2
The authenticity of host 'bllnx2 (192.168.0.12)' can't be established.
RSA key fingerprint is 5b:0f:a0:df:e0:9a:90:db:c7:bb:82:5c:15:d5:da:78.
Are you sure you want to continue connecting (yes/no)? yes
Warning: Permanently added 'bllnx2,192.168.0.12' (RSA) to the list of known hosts.
oracle@bllnx2's password:
Last login: Wed Jul 16 20:49:43 2008 from bllnx1
[oracle@BLLNX2 ˜]$
Note
You can run the command ssh-keygen -l -f /etc/ssh/ssh_host_rsa_key and ssh-keygen -y -f /etc/ssh/ssh_host_rsa_key to verify the SSH host key fingerprint and SSH host key of the server.
To log on to a different operating system user when connecting to the remote Linux server, you need to add the -l option followed by the username, as shown here. Notice in the first line of the following example, the prompt is [oracle@BLLNX1 ˜]$. This means the current operating system username is oracle and the hostname is BLLNX1. In the last line, the prompt is [bslopuz@BLLNX2 ˜]$. This means you are now logged in as the username bslopuz of the remote server BLLNX2.
[oracle@BLLNX1 ˜]$ ssh  -l bslopuz  BLLNX2
bslopuz@bllnx2's password:
Last login: Wed Jul 16 20:34:08 2008 from bllnx1
[bslopuz@BLLNX2 ˜]$
Another way to connect using a different username than you are currently logged on with is to runthe command ssh bslopuz@bllnx2, where the username and hostname are concatenated with the @ character, as follows:
[oracle@BLLNX1 ˜]$ ssh bslopuz@BLLNX2
bslopuz@bllnx2's password:
Last login: Wed Jul 16 21:45:23 2008 from bllnx1
By default, the SSH daemon server (sshd) is listening on port number 22. If the parameter Port in /etc/ssh/sshd_config on the remote Linux server is pointing to a number other than 22, then you need to add the -p option when running the ssh command followed by the correct SSH port number, as shown here:
[oracle@BLLNX1 ˜]$ ssh -p 72 BLLNX2
oracle@bllnx2's password:
Last login: Wed Jul 16 20:52:10 2008 from bllnx1
[oracle@BLLNX2 ˜]$
Note
If you want to run an X Window application on the remote Linux server, then run the ssh command with the -X option. For additional information about running an X Window application via SSH, please review recipe 15-5.
If you cannot connect to your remote Linux server via SSH, run the ping command, as shown here. This is to verify whether you have a direct connection to the Linux server. The -c3 option of the ping command means it will send requests to the remote Linux server only three times.
[oracle@BLLNX1 ˜]$ ping -c3 BLLNX2
PING BLLNX2 (192.168.0.12) 56(84) bytes of data.
64 bytes from BLLNX2 (192.168.0.12): icmp_seq=1 ttl=64 time=0.221 ms
64 bytes from BLLNX2 (192.168.0.12): icmp_seq=2 ttl=64 time=0.229 ms
64 bytes from BLLNX2 (192.168.0.12): icmp_seq=3 ttl=64 time=0.226 ms

--- BLLNX2 ping statistics ---
3 packets transmitted, 3 received, 0% packet loss, time 2000ms
rtt min/avg/max/mdev = 0.221/0.225/0.229/0.012 ms
However, if you are passing through a proxy server before you can connect to the remote Linux server, then we recommend you use the PuTTY software, because it is easy to configure the proxy server settings, as illustrated in recipe 1-1. If the remote Linux server is behind a firewall, then check with your system administrator (SA) to see whether the corresponding SSH port number is open.
To monitor the OS users connecting to the remote Linux server via SSH, check the /var/log/secure file, as shown here. This log file provides important information, such as the date and time that a particular operating system user is logged on, the hostname or IP address from where the SSH connection is initiated, and the relevant messages why you are perhaps unable to log on.
[root@BLLNX2 ˜]# tail -f /var/log/secure
Jul 15 00:57:26 BLLNX2 sshd[25321]: pam_unix(sshd:auth): authentication failure;
logname= uid=0 euid=0 tty=ssh ruser= rhost=bllnx1  user=oracle
Jul 15 00:57:28 BLLNX2 sshd[25321]: Failed password for oracle from 192.168.0.11
port 12674 ssh2
Jul 15 00:57:41 BLLNX2 sshd[25321]: Accepted password for oracle from 192.168.0.11
port 12674 ssh2
Jul 15 00:57:41 BLLNX2 sshd[25321]: pam_unix(sshd:session): session opened for user
oracle by (uid=0)
Run the scp command to copy files between Linux servers through SSH. To run the scp command, provide the source files and target files. These files can be in the local and/or remote Linux servers. In the following example, the file /rmanbkup/DB11G/uajllfa5_1_1.tar is copied from server BLLNX1 to the /stage directory on server BLLNX2. You will be prompted for a password of the username on the remote Linux server.
[oracle@BLLNX1 ˜]$ scp /rmanbkup/DB11G/uajllfa5_1_1.tar BLLNX2:/stage
oracle@bllnx2's password:
uajllfa5_1_1.tar                              100% 1934MB   7.3MB/s   04:25
Note
The sftp command is another protocol to securely transfer files between Linux servers. However, we excluded examples of the sftp command, since the sftp protocol is not yet an Internet standard.
Like the ssh command, the first time you run the scp command to securely copy files to the remote Linux server via SSH, you will be prompted to confirm the SSH host key fingerprint of the remote Linux server, as shown here. Once you accept the SSH host key fingerprint, a row will be added in $HOME/.ssh/known_hosts of the local Linux server, which contains the hostname, IP address, key type, and SSH host key of the remote Linux server.
[oracle@BLLNX1 ˜]$ scp $HOME/temp/exp_scott.dmp BLLNX2:/stage
The authenticity of host 'bllnx2 (192.168.0.12)' can't be established.
RSA key fingerprint is 5b:0f:a0:df:e0:9a:90:db:c7:bb:82:5c:15:d5:da:78.
Are you sure you want to continue connecting (yes/no)? yes
Warning: Permanently added 'bllnx2,192.168.0.12' (RSA) to the list of known hosts.
oracle@bllnx2's password:
exp_scott.dmp                                 100%   72KB  72.0KB/s   00:00
Note
The scp command replaces the rcp command, because the latter is not a secure way of copying files between Linux servers, particularly when the data is traversing the Internet. So, we recommend you use the scp command to safeguard your critical data.
The following is the syntax of the scp command. The hostnames can be different Linux servers. If no hostnames are defined, then the files will be copied to the same local Linux server. The usernames may be different between the local and remote Linux servers.
scp [<option>] [source_user@]source_host:]source_file
       [[target_user@]target_host:]target_file
Note
PuTTY also provides a pscp.exe client to securely copy files from the Microsoft Windows environment to a Unix/Linux environment. You can download pscp.exe from PuTTY's download page.
To copy recursively all the files and directories, use the -r option. The following command will copy all the files and subdirectories of $HOME/temp of the local server BLLNX1 to a remote Linux server BLLNX2 under the directory $HOME/temp1:
[oracle@BLLNX1 ˜]$ scp -r $HOME/temp bllnx2:$HOME/temp1
Like the cp command, use a wildcard, such as the asterisk (*), to copy selected files. The following command will copy all the files with an extension of log in the directory /stage on the remote Linux server BLLNX2 to the directory $HOME/temp on the local Linux server BLLNX1.
[oracle@BLLNX1 ˜]$ scp BLLNX2:/stage/*.log $HOME/temp
oracle@bllnx2's password:
adrci_output01.log                            100%  638     0.6KB/s   00:00
rmanbkup.log                                  100% 1289KB   1.3MB/s   00:00
rman_debug01.log                              100%   42KB  42.0KB/s   00:00
Table 14-1 shows the common options of the scp command. You can run man scp to determine other options.
You want to log on to a remote Linux server when connecting via SSH. You want to authenticate using a public key instead of typing the operating system (OS) password.
In the following example, the OS username oracle is currently logged on to the local Linux server BLLNX1 and will log on to the remote Linux server BLLNX2. Perform the following steps to use a public key for authentication in lieu of a password prompt:
On the local Linux server
BLLNX1, run thessh-keygencommand with the-t rsaoption to generate the RSA public key or the-t dsafor the DSA public key. If the files of the RSA and DSA keys already exist, then you will be asked whether you want to overwrite them. If no, then you can skip this step, but ensure that you remember their passphrases, because you will need them later. If yes, you are prompted to provide the passphrase, which is used to access the newly created private key. Afterward, the names of the private and public key files and key fingerprints are displayed.[oracle@BLLNX1 ˜]$ /usr/bin/ssh-keygen -t rsa Generating public/private rsa key pair. Enter file in which to save the key (/home/oracle/.ssh/id_rsa): /home/oracle/.ssh/id_rsa already exists. Overwrite (y/n)? y Enter passphrase (empty for no passphrase): Enter same passphrase again: Your identification has been saved in /home/oracle/.ssh/id_rsa. Your public key has been saved in /home/oracle/.ssh/id_rsa.pub. The key fingerprint is: c9:31:c8:df:a3:80:ef:38:d2:be:20:a7:12:e8:bd:68 oracle@BLLNX1
On the local Linux server
BLLNX1, provide the read, write, and execute permission only to the owner for security reasons so the private and public keys are not accessible to others.[oracle@BLLNX1 ˜]$ chmod 700 $HOME/.ssh [oracle@BLLNX1 ˜]$ chmod 600 $HOME/.ssh/*
Copy the public key from the local Linux server
BLLNX1to the remote Linux serverBLLNX2. You may need to supply the password of the OS user on the remote Linux serverBLLNX2. This public key must be from the OS username on the local Linux server, which is the computer where you want to initiate the logon to the remote Linux server and connect via SSH.[oracle@BLLNX1 ˜]$ scp $HOME/.ssh/id_rsa.pub BLLNX2:$HOME oracle@bllnx2's password: id_rsa.pub 100% 395 0.4KB/s 00:00
Note
We recommend you make local copies of the key files, such as id_rsa and id_rsa.pub. So, just in case someone mistakenly executes ssh-keygen -t rsa, at least you can always restore the original copies.
Create the directory
$HOME/.sshif not yet available on the remote Linux serverBLLNX2:[oracle@BLLNX2 ˜]$ mkdir $HOME/.ssh
On the remote Linux server
BLLNX2, append the public key from the local Linux serverBLLNX2to$HOME/.ssh/authorized_keys. Afterward, delete the key file$HOME/id_rsa.pubon the remote Linux serverBLLNX2, which you copied from the local Linux serverBLLNX1.[oracle@BLLNX2 ˜]$ cat $HOME/id_rsa.pub >> $HOME/.ssh/authorized_keys [oracle@BLLNX2 ˜]$ rm $HOME/id_rsa.pub
On the remote Linux server
BLLNX2, provide the read, write, and execute permission only to the owner for security reasons. So, other users cannot access and modify$HOME/.ssh/authorized_keys.[oracle@BLLNX2 ˜]$ chmod 700 $HOME/.ssh [oracle@BLLNX2 ˜]$ chmod 600 $HOME/.ssh/authorized_keys
After the public key is successfully appended to
$HOME/.ssh/authorized_keyson the remote Linux serverBLLNX2, you can now log on without supplying the password of the OS user when connecting via SSH to the remote Linux serverBLLNX2, as shown here. Instead, you will be prompted for the passphrase, which is actually the passphrase you supplied when creating the public key on the local Linux serverBLLNX1.[oracle@BLLNX1 ˜]$ ssh BLLNX2 Enter passphrase for key '/home/oracle/.ssh/id_rsa': Last login: Wed Jul 16 20:55:23 2008 from bllnx1
Note
If you immediately press the Enter or Return key when asked to provide the passphrase, or if you provide the passphrase incorrectly three times, then you will be prompted instead for the actual password of the OS username that you want to log on to the remote Linux server.
To authenticate using the public key, run the ssh-keygen command to generate the public key at the local Linux server, which is the computer from where you are going to initiate the SSH connection. Afterward, copy the newly generated public key, and append it to the $HOME/.ssh/authorized_keys on the remote Linux server, which is the computer where you are going to connect via SSH.
The ssh-keygen will create the RSA and DSA key files, which are used to encrypt and decrypt the data. For RSA, use the -t rsa option command, which will create two files, namely, $HOME/.ssh/id_rsa and $HOME/.ssh/id_rsa.pub. For DSA, use the -t dsa option, which will create $HOME/.ssh/id_dsa and $HOME/.ssh/id_dsa.pub.
$HOME/.ssh/id_rsa and $HOME/.ssh/id_dsa contain both the private key and the public key, while $HOME/.ssh/id_rsa.pub and $HOME/.ssh/id_dsa.pub contain just the public key. The public key is used to encrypt the data, while the private key is used to decrypt the data. So, for security reasons, ensure that both the private key and the public key files are writable and readable only by the owner.
When creating the public key, you are prompted to provide the passphrase, which can be a string of arbitrary length. The passphrase is your password to decrypt the data. Even if the private and public keys are stolen, they are useless without the passphrase, because the data cannot be decrypted. So, it is important that you keep the passphrase to yourself and don't share it with others.
To change the passphrase, run the ssh-keygen command with the -p option, as shown here. However, you have to supply the old passphrase before you can change it. This is to prevent unauthorized users from changing your passphrase.
[oracle@BLLNX1 ˜]$ ssh-keygen -p
Enter file in which the key is (/home/oracle/.ssh/id_rsa):
Enter old passphrase:
Key has comment '/home/oracle/.ssh/id_rsa'
Enter new passphrase (empty for no passphrase):
Enter same passphrase again:
Your identification has been saved with the new passphrase.
Using the public key as a way to authenticate when connecting to the remote Linux server via SSH can be a security risk. For example, if other OS users can modify your $HOME/.ssh/authorized_keys, then they can append their own public key to the said file. As a result, they can log on to your account on the remote Linux server even without knowing your password.
As a security measure, we recommend you provide a passphrase when creating the public key and don't share the passphrase with anyone. Also, run the chmod 700 $HOME command. This is to ensure that the directories and files underneath the $HOME directory are writable, readable, and executable only by the owner. This prevents other OS users to peek and alter any files starting from your $HOME directory.
After you have successfully logged in, run the following OS commands to verify the OS username and hostname of the remote Linux server BLLNX2, as shown here. Even though that information is sometimes obvious in the OS prompt, but it's a good exercise to verify it.
[oracle@BLLNX2 ˜]$ echo $HOSTNAME
BLLNX2
[oracle@BLLNX2 ˜]$ echo $USER
oracle
You want to log on without providing the remote OS user's password and public key's passphrase when connecting through SSH to a remote Linux server.
In the following example, the OS username oracle is currently logged to the local Linux server BLLNX1 and will log on to the remote Linux server BLLNX2. Perform the following steps to set up a promptless logon when connecting to the remote Linux server via SSH:
Create the public key on the local Linux server
BLLNX1and OS username where you are going to initiate the SSH connection. For additional details, please refer to recipe 14-5, since you need to perform the same steps as in that recipe.Run the SSH agent, and capture the output to
$HOME/ssh-agent.sh:[oracle@BLLNX1 ˜]$ /usr/bin/ssh-agent > $HOME/ssh-agent.sh
Run
$HOME/ssh-agent.shto set the environment variables SSH_AUTH_SOCK and SSH_AGENT_PID:[oracle@BLLNX1 ˜]$ source $HOME/ssh-agent.sh Agent pid 3948
Run the
ssh-addcommand, and provide the passphrase you supplied when the public key was created on the local Linux server:[oracle@BLLNX1 ˜]$ /usr/bin/ssh-add Enter passphrase for /home/oracle/.ssh/id_rsa: Identity added: /home/oracle/.ssh/id_rsa (/home/oracle/.ssh/id_rsa)
As shown here, the OS username
oracleon the local Linux serverBLLNX1can now log on to the remote Linux serverBLLNX2without providing the OS user password and the public key passphrase:[oracle@BLLNX1 ˜]$ ssh BLLNX2 Last login: Wed Jul 16 21:38:44 2008 from bllnx1 [oracle@BLLNX2 ˜]$
In recipe 14-5, you used a public key for authentication in lieu of the OS username's password on the remote Linux server. However, you are asked to provide the passphrase, which is generated when the public key was created on the local Linux server. So, you are still prompted to enter something.
For a complete promptless logon to the remote Linux server when connecting via SSH, run the ssh-agent and ssh-add commands. The ssh-agent command will create a socket and cache the passphrase of the private key. This will also create a new directory under /tmp, as defined in the environment variable SSH_AUTH_SOCK. The ssh-add command will add the RSA and DSA identities and present them to the SSH agent. Afterward, you can now log on to the remote Linux server without any prompt for a password or passphrase.
To verify the key fingerprints, run the ssh-add command with the -l option to check what's presented to the SSH agent. Next, run the ssh-keygen command with the -l option followed by the path name of the private key file. As shown here, notice that both outputs have a similar key fingerprint, which is c9:31:c8:df:a3:80:ef:38:d2:be:20:a7:12:e8:bd:68.
[oracle@BLLNX1 ˜]$ /usr/bin/ssh-add -l
2048 c9:31:c8:df:a3:80:ef:38:d2:be:20:a7:12:e8:bd:68 /home/oracle/.ssh/id_rsa (RSA)

[oracle@BLLNX1 ˜]$ /usr/bin/ssh-keygen -l -f $HOME/.ssh/id_rsa
2048 c9:31:c8:df:a3:80:ef:38:d2:be:20:a7:12:e8:bd:68 /home/oracle/.ssh/id_rsa.pub
To delete the identities presented to the SSH agent, run ssh-add with the -d option. To delete everything, use the -D option instead:
[oracle@BLLNX1 ˜]$ /usr/bin/ssh-add -d
Identity removed: /home/oracle/.ssh/id_rsa (/home/oracle/.ssh/id_rsa.pub)
For a promptless logon, the critical key is to ensure that the environment variable SSH_AUTH_SOCK is pointing to the correct path name before connecting through SSH. Otherwise, you will be prompted again for the passphrase once you exit from your shell or log out of system. A workaround is to run the ssh-agent command and capture the output to $HOME/ssh-agent.sh. Before you connect to the remote Linux server via SSH, you must run $HOME/ssh-agent.sh in order to set the same value to the environment variable SSH_AUTH_SOCK. This setting should be the same when the ssh-agent command was first executed.
To schedule the ssh or scp command in the cron job, ensure that the environment variable SSH_AUTH_SOCK is set correctly each time you log on to the OS username on the local Linux server. To do this, we recommend you add the following lines in $HOME/.bashrc, as shown here. Notice that you send the output to /dev/null when you run $HOME/ssh-agent.sh. This is to avoid displaying the SSH agent process ID every time you log on to that OS username.
if [ -f $HOME/ssh-agent.sh ]; then
  source $HOME/ssh-agent.sh > /dev/null
fi
If you think you have configured everything correctly but still get prompted for the passphrase, you'll need to troubleshoot. Begin by verifying that the OS process of the SSH agent is still active and the environment variables are set correctly. Issue the ps -ef | grep ssh-agent command to determine the process ID of the SSH agent, as follows:
[oracle@BLLNX1 ˜]$ ps -ef | grep ssh-agent
root      2378  2298  0 Jul17 ?        00:00:00 /usr/bin/ssh-agent
/usr/bin/dbus-launch --exit-with-session /etc/X11/xinit/Xclients
oracle    3948     1  0 00:49 ?        00:00:03 ssh-agent
oracle   12092  4295  0 11:02 pts/5    00:00:00 grep ssh-agent
Afterward, run the env | grep SSH command to display the environment variables, as shown here. The value of the SSH_AGENT_PID and the process ID of the SSH agent should be the same. In the example, the process ID is 3948:
[oracle@BLLNX1 ˜]$ env | grep SSH
SSH_AGENT_PID=3948
SSH_AUTH_SOCK=/tmp/ssh-Obtikk3947/agent.3947
SSH_ASKPASS=/usr/libexec/openssh/gnome-ssh-askpass
Also, the value of the environment variable SSH_AUTH_SOCK should be pointing to an existing path name. To verify, run the ls command as follows:
[oracle@BLLNX1 ˜]$ ls -l /tmp/ssh-Obtikk3947/agent.3947
srw------- 1 oracle oinstall 0 Jul 18 00:49 /tmp/ssh-Obtikk3947/agent.3947
After you have successfully logged on, run the following OS commands to verify the OS username and hostname of the remote Linux server BLLNX2, as shown here. Even though those information are sometimes obvious in the OS prompt, it's a good exercise to verify them.
[oracle@BLLNX2 ˜]$ echo $HOSTNAME
BLLNX2
[oracle@BLLNX2 ˜]$ echo $USER
oracle
As illustrated in Figure 14-4, you have only telnet access from servers BLLNX1 and BLLNX2 to server BLLNX4, but you have ssh access from BLLNX1 to BLLNX2. In this scenario, the server BLLNX1 is the local or client server, where the ssh and telnet commands are initiated, while the target server is BLLNX4, which is the computer you want to connect to using the telnet command.
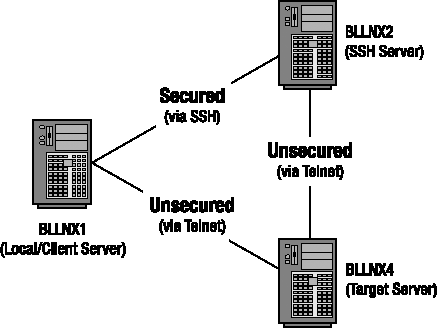
Furthermore, the SSH daemon server (sshd) is running on server BLLNX2 but is not running on server BLLNX4, which is the computer you want to log on to from server BLLNX1. However, telnet is configured on server BLLNX4. In this situation, you cannot connect from server BLLNX1 directly to server BLLNX4 through SSH.
To secure your connection from the client server BLLNX1 to target server BLLNX4, the Internet Protocol traffic is passed through the SSH server BLLNX2, where the data is encrypted and forwarded to server BLLNX4 via SSH tunneling. To implement SSH tunneling, issue the following ssh command with the -L option on server BLLNX1. You will be prompted for the password of the username on the SSH server BLLNX2.
[bslopuz@BLLNX1 ˜]$ ssh bslopuz@BLLNX2 -L 2300:BLLNX4:23 -f -N
bslopuz@bllnx2's password:
Afterward, you can issue the telnet command on the client server BLLNX1, as shown here, and you will be asked to provide the username's password on the target server BLLNX4:
[bslopuz@BLLNX1 ˜]$ telnet localhost 2300
Trying 127.0.0.1...
Connected to localhost (127.0.0.1).
Escape character is '^]'.
Red Hat Enterprise Linux AS release 4 (Nahant Update 6)
Kernel 2.6.9-67.EL on an i686
login: oracle
Password:
Last login: Sun Jul 20 01:21:31 from BLLNX4
[oracle@BLLNX4 ˜]$
telnet is a client-server protocol that is unsecured unlike the ssh protocol, because the data is not encrypted when it traversed through the network between computers. So, hackers can easily trace and read the usernames and passwords, which they can use to access the servers. This exposes the data and makes the server vulnerable to unauthorized access.
Note
The default port number for the telnet protocol is 23.
For servers where the SSH daemon service (sshd) is not enabled or running, a workaround is to implement SSH tunneling, which secures the network access, such as the telnet protocol. In fact, you can even deploy SSH tunneling to secure the unsecured connection to your mail server or when using the VNC free edition (refer to recipe 16-7 for additional information).
In the following example, run the ssh command to log on to bslopuz on the server BLLNX2, where sshd is running. To implement SSH tunneling, use the -L option, which forwards the IP traffic from the local port number 2300 on server BLLNX1 to port number 23 on the target server BLLNX4. Add the -f option for SSH to wait in the background before commands are executed on the local server BLLNX2. Meanwhile, the -N option prevents a particular user from executing commands on the server BLLNX2.
[bslopuz@BLLNX1 ˜]$ ssh bslopuz@BLLNX2 -L 2300:BLLNX4:23 -f -N
To run the telnet command, connect to the localhost or 127.0.0.1 to loop back to the local server, which is BLLNX1. This is followed by 2300, which is the local port number assigned in -L 2300:BLLNX4:23 when running the ssh command.
[bslopuz@BLLNX1 ˜]$ telnet localhost 2300
For troubleshooting, run the ssh command with the -v option to display debugging messages. For more debugging messages, run with the -vvv option instead. The following is a snippet of the debugging message, which shows the local port number 2300 is being forwarded to server BLLNX4 on port 23. So, make sure those port numbers are not blocked by the firewall of those servers. You can get assistance with your system administrator to resolve the firewall issue.
debug1: Connection to port 2300 forwarding to BLLNX4 port 23 requested.
debug1: channel 2: new [direct-tcpip]
debug1: channel 2: free: direct-tcpip: listening port 2300 for BLLNX4 port 23,
connect from 127.0.0.1 port 63216, nchannels 3
On the server BLLNX4, where sshd is running, issue the tail -f /var/log/secure command to display the messages of the logon and logout to the SSH server. You can use this to monitor the SSH connections to server BLLNX4.
[root@BLLNX2 ˜]# tail -f /var/log/secure
Jul 21 01:38:21 BLLNX2 sshd[26793]: Accepted password for bslopuz from 192.168.0.11
port 28686 ssh2
Jul 21 01:38:21 BLLNX2 sshd[26793]: pam_unix(sshd:session): session opened for user
bslopuz by (uid=0)
After you have successfully logged on, run the following OS commands to verify the OS username and hostname of the remote Linux server BLLNX4, as shown here. Even though that information is sometimes obvious in the OS prompt, it's a good exercise to verify them.
[oracle@BLLNX4 ˜]$ echo $HOSTNAME
BLLNX4
[oracle@BLLNX4 ˜]$ echo $USER
oracle
Note
You can take advantage of SSH tunneling to bypass security protocols. For example, if the default SSH port number 22 is blocked in your company's firewall, then a workaround is to use a dummy port number that is not blocked and forward the IP traffic to the SSH port number of the target server, which is the computer you want to connect outside your company's network, passing through a designated SSH server