Fewer and fewer database administrators are working in front of the console of the servers hosting their Oracle databases. It is common now to see the database servers or data centers located in separate geographical areas from DBAs. For example, a database server might be hosted somewhere in New York City, while the DBA is in the city of Orlando enjoying the sunny weather.
DBAs can now easily access database servers remotely using their preferred protocols, such as telnet, rsh, rlogin, or ssh, and using the various tools on the market today. Some of those tools are freely available for download, particularly those such as PuTTY and VNC.
Software such as PuTTY, described earlier in Chapter 1, allows you to remotely access a server via telnet or ssh from a Windows client. PuTTY allows you to configure proxy settings and ssh port tunneling, as well as to save configurations so that you don't have to type everything each time you need to connect to the same database server.
In most cases, accessing a database server in a command-line mode via PuTTY is all you need. However, you may sometimes need to access a database server in a way that lets you run GUI-based software. For example, you may need to run Oracle's Database Configuration Assistant (DBCA) to create an Oracle database or run some other X Window System-based software. In this situation, Virtual Network Computing (VNC) comes in handy.
VNC is a thin-client product of RealVNC, which is based in Cambridge, United Kingdom. VNC allows you to access the database server in a graphical way. This feature is useful to DBAs, because Oracle requires an X server to display its Java-based screens for Oracle database installation, creation, and configuration, as well as Oracle listener setup. In other words, you can run the same GUI-based applications on your local VNC-client computer that you can actually run on the console of the database server.
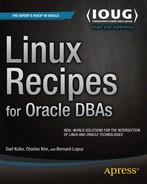
To run VNC, you need two components: the server and viewer, as shown in Figure 16-1. The VNC server component runs on the computer you want to monitor. The VNC viewer component runs on the computer from which you want to monitor the remote server. Both components need to be installed before you can initiate a VNC session. VNC runs on most operating systems, including Unix, Linux, Windows, and Mac OS.
Aside from routing the output to the VNC server, you can also route the display to other X servers that are available on the market today, such as Cygwin/X, Reflections X, and Hummingbird. However, we recommend VNC, because it is freely available and is usually included by default in most Linux distributions, such as Red Hat Enterprise Linux, Novell SUSE Linux Enterprise, and Oracle Enterprise Linux (OEL). Also, VNC has rich features, such as 2048-bit RSA server authentication, 128-bit AES session encryption, HTTP proxy, file transfer, desktop scaling, and screen sharing.
In this chapter, you will learn where to download the VNC software, how to install and configure the VNC server on your remote Linux database server and the VNC viewer on your client computer, how to share and secure your VNC connection, how to configure proxy server, and how to troubleshoot VNC issues.
As you put into practice what you have read in this chapter, such as using the VNC software to access and manage your remote Linux database server from anywhere and anytime, you will learn to appreciate the benefits provided to you as the DBA, such as flexibility, convenience, better collaboration with your team members, data security, and potential cost savings to your company.
You want to download the VNC software to allow you to manage and display the console of your remote Linux database server from your client computer. You want to work in an X Window System environment instead of a command-line prompt.
You need two components to run VNC: the VNC server running on your remote Linux database server and the VNC viewer on your client computer. Perform the following steps to download the VNC software for the two computers:
Go to
http://www.realvnc.com/products/download.html, and click the Download & Try button that corresponds to the type of VNC you want to download.On the next screen, you are asked to provide your name, your e-mail address, the organization that you belong to, and so on. You can also skip these settings and immediately click the Proceed to Downloads button.
Click the Download button that corresponds to the operating system and processor type of your system, as well as the type of compressed file you want to download.
Note
To determine the processor type of your Linux system to see whether you have x86, x64, or ia64, issue the Linux command uname -a or uname -m.
Select I Accept These Terms and Conditions after you review the VNC end user license agreement. Finally, click the Download button, and save the file to a specific directory.?
For VNC to work, you need to download and install the VNC server on your remote Linux database server and the VNC viewer on your client computer. You have three different VNC editions to choose from, namely, the Free Edition, Personal Edition, and Enterprise Edition.
For Linux, you can download either the Enterprise Edition or the Free Edition, because the Personal Edition is not available for Unix/Linux. By default, the Free Edition is included in most Linux distributions, such as Red Hat, SUSE, and OEL. However, the Personal Edition and Enterprise Edition have some advantages over the Free Edition, such as encryption, authentication, and proxy server features. If you want to take advantage of these features, download the Enterprise Edition, and replace the Free Edition, which is usually included as a package on your Linux distribution. The Enterprise Edition and Personal Edition, however, require a license key before you can start the VNC server.
You want to install the VNC server on your remote Linux database server and the VNC viewer on your Windows client computer, where you want to manage and access your remote Linux database server.
For VNC to work, you need to install the VNC server on your remote Linux database server and the VNC viewer on your client computer. On your server, you can choose to install the VNC server's Enterprise Edition or Free Edition. To install, you must log on as root and then run the rpm --upgrade command:
# rpm --upgrade /home/bslopuz/download/vnc/vnc-E4_4_1-x86_linux.rpm
Checking for xauth... [OK]
Updating /etc/pam.d/vncserver
Looking for font path... unix/:7100 (from /etc/X11/xorg.conf).
Looking for RGB database... /usr/X11R6/lib/X11/rgb from /etc/X11/xorg.conf
Checking for single sign-on support... Not found
areConfigKeysValid: exception Private key not found
Generating primes:
  p: .........................................
  q: .........................................................................
filename=/root/.vnc/private.key
A new secure key has been generated and stored.
To install the VNC viewer on your Windows client computer, you must log on as the administrator and double-click the file vnc-E4_3_2-x86_x64_win32.exe. Just accept the default installation directory, C:Program FilesRealVNCVNC4, and ensure that you select at least the VNC viewer as one of the components to install.
To manage and access your remote Linux database server from your Windows client computer using the VNC software, you must install the VNC server on your remote Linux database server and install the VNC viewer on your Windows client computer. However, you can install the VNC server and VNC viewer on both computers. So, you can also manage and access other servers from your Linux database server.
On Linux, you can install VNC server's Enterprise Edition or Free Edition, because the Personal Edition is not available for Linux. On your Windows machine, you can install the VNC viewer's Free Edition, Personal Edition, or Enterprise Edition.
Before you install the VNC software on your remote Linux database server, you can run the Linux command rpm -qa to verify the current version of the VNC software installed. The results shown here indicate that the VNC software installed is Enterprise Edition version 4.3.2-1:
# rpm -qa | grep vnc
vnc-E-4.3.2-1
If you want to remove the currently installed VNC software, then run the rpm --erase command:
# rpm --erase vnc-E-4.3.2-1
If you have a subscription to the Red Hat Network or Oracle's Unbreakable Linux Network, then run the up2date command to download and install the VNC packages. For example:
# up2date vnc
Fetching Obsoletes list for channel: el4_i386_latest...
Fetching rpm headers...
########################################
Name                                    Version        Rel
----------------------------------------------------------
vnc                                     4.0            11.el4            i386
Testing package set / solving RPM inter-dependencies...
########################################
vnc-4.0-11.el4.i386.rpm:    ########################## Done.
Preparing              ########################################### [100%]
Installing...
   1:vnc                    ########################################### [100%]
To manually start the VNC server on your Linux database server, log on or su to the OS user where you want to run the VNC server. The example shown here will make vncuser the current OS user:
# su - vncuser
Then, type vncserver and a port number where you want the VNC server to be listening. The port number is optional, and the default value is 1. The following example shows the VNC server being started in its default configuration:
$ vncserver
VNC Server Enterprise Edition E4.4.1 (r12183) - built May 12 2008 12:08:54
Copyright (C) 2002-2008 RealVNC Ltd.
See http://www.realvnc.com for information on VNC.
You will require a password to access your desktops.

Password:
Verify:
Generating primes:
  p: ............................................
  q: ...............................................................................
filename=/home/vncuser/.vnc/private.key
A new secure key has been generated and stored.
Running applications in /home/vncuser/.vnc/xstartup
Log file is /home/vncuser/.vnc/BLLNX3:1.log
New desktop is BLLNX3:1
This next example shows how to specify a port number. It starts the VNC server to listen at port number 9:
$ vncserver  :9
VNC Server Enterprise Edition E4.4.1 (r12183) - built May 12 2008 12:08:54
Copyright (C) 2002-2008 RealVNC Ltd.
See http://www.realvnc.com for information on VNC.
You will require a password to access your desktops.

Password:
Verify:
Generating primes:
  p: ...............................................................................
  q: ...............................................................................
filename=/home/vncuser/.vnc/private.key
A new secure key has been generated and stored.
Running applications in /home/vncuser/.vnc/xstartup
Log file is /home/vncuser/.vnc/BLLNX3:9.log
New desktop is BLLNX3:9
Note
To have a similar look and feel of your desktop as when you log on to the console of the Linux server, uncomment or add unset SESSION_MANAGER and /etc/X11/xinit/xinitrc to the $HOME/.vnc/xstartup file.
To manually stop the VNC server on your Linux database server, run the Linux command vncserver -kill, and provide the same port number you used when starting the VNC server. For example:
# /usr/bin/vncserver -kill :9
Killing Xvnc process ID 13836
You start the VNC server on your remote Linux database server by running vncserver and a port number. Like the other Linux daemons--such as httpd, which usually listens on port number 80, and sshd, which usually listens on 22--the VNC server listens on port number 5901 by default. If you include a port number when running vncserver, the actual port number is plus 5900. For example, if you run vncserver :9, then the VNC server listens on port number 5909.
The first time you run VNC Server Enterprise Edition on your Linux server, you must issue the command vnclicense -add <license key> to install the license key. However, the license key is not required if you are using the VNC Free Edition. For example, to add the license key, use this:
# /usr/bin/vnclicense -add FR46B-N43LQ-4YUD2-A27B6-4N2YA
Note
You can purchase a VNC license at http://www.realvnc.com/cgi-bin/purchase.cgi?product=enterprise4/Xvnc&productTypes=LICENSE.
For security reasons, we recommend you don't run the VNC server under a privileged user, such as root or oracle (in other words, the Oracle RDBMS software owner). If you run the VNC server as root, then any remote VNC user will have root privileges once they are connected to your Linux server, and that is a security risk. Instead, we recommend you create a new Linux user and launch the VNC server from that account. Once a remote user is connected to the server, then they can su to root or oracle to perform any needed administrative tasks.
In the following example, the groupadd command creates a new group called vncuser; the useradd command creates a new user called vncuser, and the -g option will associate this user to the group vncuser. The passwd command prompts you to assign a new password for OS user vncuser. For additional details about creating OS groups and users, check recipes 3-12 and 3-14.
# groupadd vncuser
# useradd vncuser -g vncuser
# passwd vncuser
The first time you launch vncserver for a particular OS user, you will be prompted for a password, and the relevant VNC files, such as the security key or the private.key file, will be created in the .vnc directory under the home directory of that OS user. In the example shown here, the su command makes vncuser the current OS user, and the ls -al $HOME/.vnc command displays the files in the .vnc directory under the home directory of OS username vncuser:
# su - vncuser

$ ls -al $HOME/.vnc
total 28
drwxr-xr-x 2 vncuser vncuser 4096 May  3 08:52 .
drwx------ 4 vncuser vncuser 4096 May  3 08:52 ..
-rwxrwxr-x 1 vncuser vncuser  799 May  3 08:52 BLLNX3:9.log
-rw-rw-r-- 1 vncuser vncuser    5 May  3 08:52 BLLNX3:9.pid
-rw------- 1 vncuser vncuser    8 May  3 08:52 passwd
-rw------- 1 vncuser vncuser 2824 May  3 08:52 private.key
-rwxr-xr-x 1 vncuser vncuser  171 May  3 08:52 xstartup
Subsequent restarts of the VNC server will not ask you to set the password, and they won't regenerate the secure key. However, you can run the Linux command vncpasswd to change the VNC server password for an OS user, as shown here:
# /usr/bin/vncpasswd
Password:
Verify:
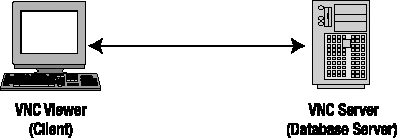
To generate a new secure key or private.key under the $HOME/.vnc directory, run the Linux command vnckeygen. For example:
# /usr/bin/vnckeygen -f
Generating primes:
  p: ......................
  q: ..........
filename=/home/vncuser/.vnc/private.key
A new secure key has been generated and stored.
The next time you run the VNC viewer on your client computer when a new security key is generated, you will be prompted with a screen similar to Figure 16-2.
In case you forget the port number on which the VNC server is listening, you can run the Linux command ps -ef. The following example illustrates this. In the results, Xvnc :9 indicates that the VNC server is listening on port number 5909.
# ps -ef | grep Xvnc
vncuser   8443     1  0 08:52 ?        00:00:00 Xvnc :9 -PasswordFile
/home/vncuser/.vnc/passwd -auth /home/vncuser/.Xauthority -desktop BLLNX3:9
(vncuser) -pn -httpd <inline> -fp unix/:7100 -co /usr/share/X11/rgb
root      8444  8443  0 08:52 ?        00:00:00 Xvnc :9 -PasswordFile
/home/vncuser/.vnc/passwd -auth /home/vncuser/.Xauthority -desktop BLLNX3:9
(vncuser) -pn -httpd <inline> -fp unix/:7100 -co /usr/share/X11/rgb
root      8777  7233  0 08:58 pts/0    00:00:00 grep Xvnc
Perform the following steps to ensure that the VNC server will automatically start when your Linux database server is rebooted:
Modify the
/etc/sysconfig/vncserversfile, and insert the lineVNCSERVERS="<port#>:<OS_user>". In the example, the VNC server is owned byvncuserto listen on port number 5909.# cat /etc/sysconfig/vncservers VNCSERVERS="9:vncuser"
Check the existence of the file
/etc/init.d/vncserver. If it is not available, then create the file, and insert the following lines:#!/bin/bash # # chkconfig: - 91 35 # description: Starts and stops vncserver. # used to provide remote X administration services. # Source function library. . /etc/init.d/functions # Source networking configuration. . /etc/sysconfig/network # Check that networking is up. [ ${NETWORKING} = "no" ] && exit 0unset VNCSERVERARGS VNCSERVERS="" [ -f /etc/sysconfig/vncservers ] && . /etc/sysconfig/vncservers prog=$"VNC server" start() { echo -n $"Starting $prog: " ulimit -S -c 0 >/dev/null 2>&1 RETVAL=0 if [ ! -d /tmp/.X11-unix ] then mkdir -m 1777 /tmp/.X11-unix || : restorecon /tmp/.X11-unix 2>/dev/null || : fi NOSERV=1 for display in ${VNCSERVERS} do NOSERV= echo -n "${display} " unset BASH_ENV ENV DISP="${display%%:*}" export USER="${display##*:}" export VNCUSERARGS="${VNCSERVERARGS[${DISP}]}" runuser -l ${USER} -c "cd ˜${USER} && [ -f .vnc/passwd ] && " || "vncserver :${DISP} ${VNCUSERARGS}" RETVAL=$? [ "$RETVAL" -ne 0 ] && break done if test -n "$NOSERV"; then echo -n "no displays configured "; fi [ "$RETVAL" -eq 0 ] && success $"vncserver startup" || failure $"vncserver start" echo [ "$RETVAL" -eq 0 ] && touch /var/lock/subsys/vncserver } stop() { echo -n $"Shutting down $prog: " for display in ${VNCSERVERS} do echo -n "${display} " unset BASH_ENV ENV export USER="${display##*:}" runuser ${USER} -c "vncserver -kill :${display%%:*}" >/dev/null 2>&1 doneRETVAL=$? [ "$RETVAL" -eq 0 ] && success $"vncserver shutdown" || failure $"vncserver shutdown" echo [ "$RETVAL" -eq 0 ] && rm -f /var/lock/subsys/vncserver } # See how we were called. case "$1" in start) start ;; stop) stop ;; restart|reload) stop sleep 3 start ;; condrestart) if [ -f /var/lock/subsys/vncserver ]; then stop sleep 3 start fi ;; status) status Xvnc ;; *) echo $"Usage: $0 {start|stop|restart|condrestart|status}" exit 1 esacEnsure that
/etc/init.d/vncserverhas an execute permission:# ls -l /etc/init.d/vncserver -rw-r--r-- 1 root root 488 Apr 28 23:37 /etc/init.d/vncserver # chmod a+x /etc/init.d/vncserver # ls -l /etc/init.d/vncserver -rwxr-xr-x 1 root root 488 Apr 28 23:37 /etc/init.d/vncserver
Create a softlink in
/etc/rc.d/rc3.dand/etc/rc.d/rc5.d:# ln -s /etc/init.d/vncserver /etc/rc.d/rc5.d/S91vncserver # ls -l /etc/rc.d/rc5.d/S91vncserver lrwxrwxrwx 1 root root 21 Apr 28 23:48 /etc/rc.d/rc5.d/S91vncserver -> /etc/init.d/vncserver # ln -s /etc/init.d/vncserver /etc/rc.d/rc3.d/S91vncserver # ls -l /etc/rc.d/rc3.d/S91vncserver lrwxrwxrwx 1 root root 21 Apr 28 23:49 /etc/rc.d/rc3.d/S91vncserver -> /etc/init.d/vncserver
Enable the VNC service using the
chkconfigcommand:# chkconfig --level 35 vncserver on # chkconfig --list | grep vnc vncserver 0:off 1:off 2:off 3:on 4:off 5:on 6:off
If possible, log on as
root, and issue the Linux commandrebootto manually restart your Linux database server. Otherwise, you can manually restart the VNC service by executing the Linux command/sbin/service vncserver restart.Issue the Linux command
ps -ef | grep Xvncto verify whether the VNC server started automatically after the reboot. The following is an example. In the results, the VNC server is listening on port number 9 running under Linux uservncuser.# ps -ef | grep Xvnc vncuser 11585 1 0 04:43 pts/4 00:00:00 Xvnc :9 -PasswordFile /home/vncuser/.vnc/passwd -auth /home/vncuser/.Xauthority -desktop BLLNX3:9 (vncuser) -pn -httpd <inline> -fp unix/:7100 -co /usr/share/X11/rgb root 11586 11585 0 04:43 pts/4 00:00:00 Xvnc :9 -PasswordFile /home/vncuser/.vnc/passwd -auth /home/vncuser/.Xauthority -desktop BLLNX3:9 (vncuser) -pn -httpd <inline> -fp unix/:7100 -co /usr/share/X11/rgb root 11689 12895 0 04:44 pts/4 00:00:00 grep Xvnc
In some environments in which you heavily use VNC, you may want to automate the restart of the VNC server. If the VNC service is enabled at the OS level, one of the files that will be executed during the system startup is /etc/init.d/vncserver. That script in turn reads the file /etc/sysconfig/vncservers. The /etc/sysconfig/vncservers file contains the OS user under which the VNC server will run and the port number on which the VNC server will listen.
Note
Once the VNC server is automatically started, you can still manually stop and start the VNC server, as discussed in recipe 16-3. You may, for example, want to manually stop the VNC server because you lack memory resources on the machine where it is running.
You want to start the VNC viewer on your client machine, which is either your Windows computer or another Linux server. From that client, you want to manage and access your remote Linux database server.
To start the VNC viewer on your Windows computer, run the program C:Program FilesRealVNCVNC4vncviewer.exe, or you can navigate to that program by selecting Start
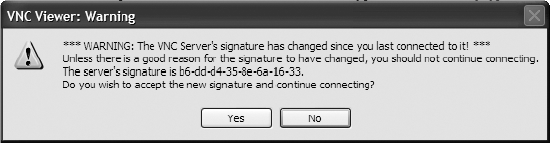
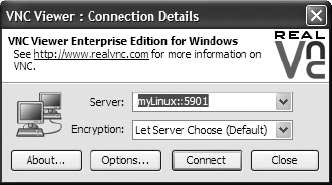
In the Connection Details dialog box, provide the hostname or IP address of your remote Linux database server, as well as the port number on which the VNC server is listening. Click the OK button to confirm.
To start the VNC viewer on your Linux server, run the Linux command /usr/bin/vncviewer as follows (assuming port number 9):
# /usr/bin/vncviewer BLLNX3:9
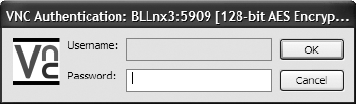
You will be prompted for a username and password, as shown in Figure 16-4. Depending upon the security settings in the VNC server, you may be prompted only for a password.
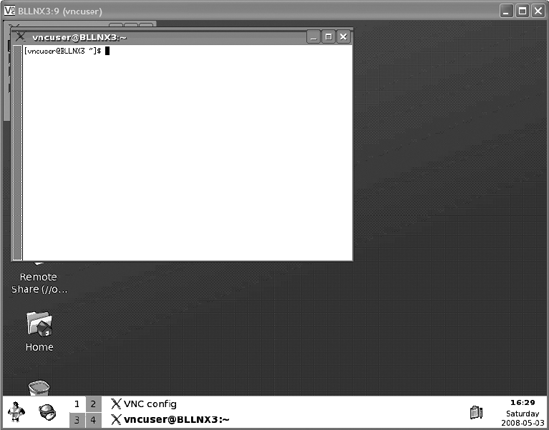
Once your username and password are successfully verified, the screen of your remote Linux database server is displayed, as shown in Figure 16-5. You can now start to access and manage your remote Linux database server just as if you were in front of the console.
If you don't have the VNC viewer installed on your client computer and your Internet browser supports Java applets, then you can open the URL http://<host>:<port>, where <host> is the hostname or IP address of the VNC server and <port> is the port number on which the VNC server is listening minus 100. For instance, if the VNC server's IP address is 192.168.0.13 and the server is listening on port number 5909, the URL will be http://192.168.0.13:5809.
Before you can run the VNC viewer on your client computer, you need to ensure that the VNC server is running on your remote Linux database server and listening on a specific port number. For details on how to install and start the VNC server, review the first four recipes in this chapter.
However, if the VNC viewer is not installed on your client computer, such as a computer in an Internet café or perhaps in an airport, you can still access the VNC viewer using a Java-capable Internet browser. This provides great flexibility, since you are no longer confined to working in your office to perform DBA tasks. (Work from your local café instead!) But ensure that your VNC connection is secured, which you will learn more about in recipe 16-7.
If you have the VNC server's Enterprise Edition running on your remote Linux database server, you cannot use the VNC viewer's Free Edition because of its security limitations. Instead, you must use the VNC viewer's Personal Edition or Enterprise Edition version 4.
You want to share your VNC connection with another team member who is located in another area in your building or on the other side of the globe. You want to share so that you and the other team member can collaborate and access the same display together in real time when managing a remote Linux database server.
Before you launch the VNC viewer on your client computer, perform the following steps to configure the shared connection option:
Start the VNC viewer (for details on starting the VNC viewer, check recipe 16-5).
Click the Options button, as shown in Figure 16-6.
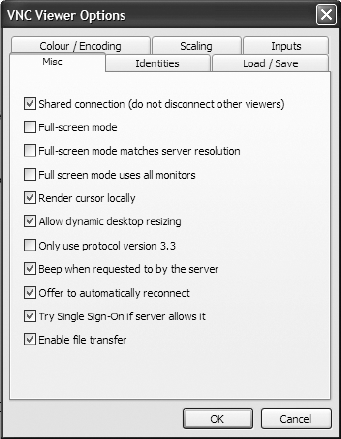
In the VNC viewer Options dialog box, as shown in Figure 16-7, click the Misc tab.
Select the Shared Connection (Do Not Disconnect Other Viewers) box. If you leave this unchecked, then other previously connected VNC viewers will be terminated.
Finally, click the OK button.

However, if you want to share VNC connections with a server all the time regardless of your VNC viewer settings, then add the AlwaysShared parameter when starting the VNC server on your remote Linux database server:
# /usr/bin/vncserver :9 -AlwaysShared
If the VNC server is already running, then execute the vncconfig command to dynamically change the value of the AlwaysShared parameter. To enable the AlwaysShared parameter, set it to 1, or set it to 0 to disable it. For example:
# /usr/bin/vncconfig -set AlwaysShared=1
Note
To determine the current values of VNC server parameters, such as AlwaysShared, issue the Linux command /usr/bin/vncconfig -get AlwaysShared.
If you don't want to share VNC connections with a particular server, then set the NeverShared parameter to 1, or set it to 0 to disable it. For example:
# /usr/bin/vncconfig -set NeverShared=1
With this setting, remote users cannot share their connections even when selecting the Shared Connection (Do Not Disconnect Other Viewers) checkbox shown in Figure 16-7.
You can configure the sharing of VNC connections either on the remote Linux database server, where the VNC server is running, or on your client computer, where you want to run the VNC viewer. The VNC's screen-sharing feature allows a team of DBAs to collaborate from anywhere anytime, which saves a lot of time and dollars since they don't have to be at the site where the database server is hosted.
Configuring the VNC viewer to share a VNC connection works only if the VNC server parameters AlwaysShared and NeverShared are disabled, which are the default settings. If you enable the AlwaysShared parameter in the VNC server, then the VNC connection will always be shared regardless of the configuration you set in the VNC viewer.
However, if you enable the NeverShared parameter in the VNC server, then the VNC connection is not shared, even if you enable the AlwaysShared parameter. In this case, if you open a second VNC connection to access the same VNC server and port number, the first VNC connection will be automatically disconnected. In other words, there can be only one VNC connection at a time to the said VNC server and port number. But if the DisconnectClients parameter is disabled (the default is enabled) in the VNC server, then the second VNC connection will be refused, and the first one will remain connected.
When the VNC server is already running, you can change its parameters, such as AlwaysShared, on the fly using vncconfig. However, this works starting in VNC server version 4 only.
You want to secure your VNC connection. Also, you want to have a good authentication method when users access the remote Linux database server from your client computer using the VNC viewer.
To enhance a user's authentication and the security of your VNC connection, we recommend you add the following parameters when starting the VNC server:
SecurityTypes: Sets the security method to employ. Valid values areNone,VncAuth,RA2, andRA2ne.UserPasswdVerifier: Sets the method to authenticate the users. Valid values areNone,VncAuth, andUnixAuth.AllowedUsersorAllowedGroups: Sets the Linux users or groups that are allowed to access.QueryConnect: Sets whether the user has to wait for confirmation before they can connect. Set it to1to enable this feature, or set it to0to disable it.
You can pass these parameters when manually starting your VNC server. For example:
# su - vncuser -c "/usr/bin/vncserver :9 -SecurityTypes="RA2"
       -UserPasswdVerifier="UnixAuth" -AllowedGroups=vncadmin:f,vncuser:v
       -QueryConnect=1"
You can also configure the parameters to take effect when the VNC server is automatically started during the reboot of your remote Linux database server, as discussed in recipe 16-4. To that end, add the following lines to your /etc/sysconfig/vncservers file:
VNCSERVERS="9:vncuser"
VNCSERVERARGS[9]=" -SecurityTypes=RA2 -UserPasswdVerifier=UnixAuth "
                   "-AllowedGroups=vncadmin:f,vncuser:v -QueryConnect=1"
The first argument you are passing in VNCSERVERARGS corresponds to the port number on which the VNC server is listening. In this example, the port number is 9.
Note
If the VNC server is already running, you can dynamically set parameters by running the Linux command /user/bin/vnconfig. For example, to dynamically set the SecurityTypes parameter, run the command as follows: /usr/bin/vncconfig -set SecurityTypes=RA2.
The syntax for the parameters AllowedUsers and AllowedGroups is name[:permission]. The name is a Linux user when setting AllowedUsers and a Linux group when specifying a value for the AllowedGroups parameter. The following are the valid permission values and their meanings:
v: The user can see the VNC display.p: The user has mouse access.k: The user has keyboard access.c: The user is allowed to copy/paste to and from the clipboard.q: This is similar toQueryConnect=0.d: This is like having the permissionsv,p,k, andc.f: The user has a full-access privilege, which is similar tov,p,k,c, andq.
We recommend you use the latest version of the VNC Server Enterprise Edition, since it employs 2048-bit RSA server authentication and 128-bit AES session encryption. If you use the VNC Server Free Edition, be aware that no security feature is available. However, you need to purchase a license key for the VNC Server Enterprise Edition.
Note
To secure the connection to the server when using the VNC Server Free Edition, forward the VNC connection through SSH, which is discussed in recipe 14-7.
As a security measure, we recommend you do not run the VNC server as root, because you don't want to allow users to have root access privilege once they are connected to the server. We recommend you create another Linux user with minimal privileges and run the VNC server under that new Linux user (see recipe 16-3 for details). Once a remote user is connected to the server, then they can su to oracle to perform any needed DBA tasks.
To encrypt a VNC connection, set the SecurityTypes parameter to RA2. For password encryption, set SecurityTypes to RA2ne. In that case, however, the VNC connection will not be encrypted. Thus, we recommend you set SecurityTypes to RA2 and not worry about the password, since the VNC connection is encrypted. In other words, all data traversing between the VNC server and the VNC viewer are encrypted, including the password.
Also, set UserPasswdVerifier to UnixAuth, instead of VncAuth. That way, the OS user's password is managed at the OS level, which requires less maintenance, because you don't have to maintain two passwords: one in the VNC and the other at the OS level.
We recommend you do not set SecurityTypes or UserPasswdVerifier to None, because you are basically then allowing any users to access the VNC server without providing a password. This is like having your main door at your home with no locks at all.
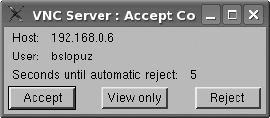
If the QueryConnect parameter is enabled and you don't have the q privilege, as assigned in the parameter AllowedUsers or AllowedGroups, then you have to wait for a confirmation whether you are accepted, rejected, or granted "view-only" privilege when accessing the VNC server, as shown in Figure 16-8. This is to avoid unauthorized access initiated from a specific host or user.
If you have several users who will be sharing access to the same VNC server and port number, we recommend you create at least two Linux groups. The first Linux group (you can call it vncadmin) has a full-access privilege when accessing the VNC server, while the other one (you can name it vncuser) has the viewing-only option and no access to the keyboard and mouse. So if you want to add users to access the VNC server later, then you just add the user to the corresponding Linux group, that is, vncadmin or vncuser, and you don't have to modify the VNC server configuration, such as AllowedUsers or AllowedGroups.
You can also dynamically change the permission of the user using vncconfig. If you run vncconfig without any parameters, the VNC Config dialog box appears, as shown in Figure 16-9. When you click the Connections button, the Active Connections dialog box appears. To change the permission of a particular connection, highlight the corresponding connection, and then click the Change button.

You want to use VNC to access a remote Linux database server that is outside your company's network, and all your Internet connections pass through a proxy server.
Perform the following steps to configure the proxy settings in your VNC viewer:
Start the VNC viewer (for details on starting the VNC viewer, check recipe 16-5).
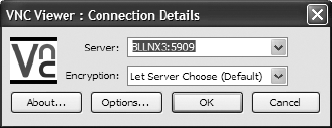
Provide the appropriate hostname or IP address of the remote Linux database server, as well as the corresponding port number where the VNC server is listening, as shown in Figure 16-10.
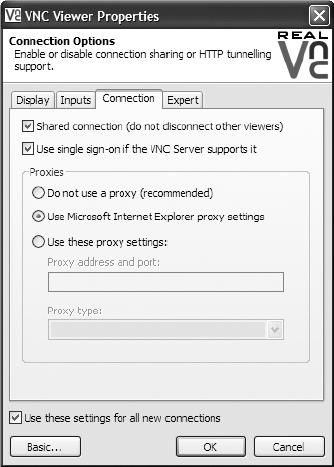
Click the Options button, and the VNC viewer Properties dialog box will appear, as shown in Figure 16-11.
Click the Connection tab.
In the Proxies section, select the Use These Proxy Settings radio button, and provide the appropriate hostname or IP address of the corresponding proxy server and its port number where the proxy server is listening, as well as the proxy type. If you have already configured a proxy setting in Microsoft Internet Explorer, then select Use Microsoft Internet Explorer Proxy Settings instead.
Click the OK button.
Finally, click Connect button.
Nowadays, the Internet connections of most companies that are going outside their network pass through a proxy server for security and performance reasons. These are usually common for IT shops where the DBAs are accessing the servers of their clients or at their home while working from their office. For details about the hostname or IP address of your proxy server, its port number, and the proxy type, you need to contact your company's system or network administrators.
To configure the proxy server setting using the VNC viewer, you must download and use the Personal Edition or Enterprise Edition, because the proxy server feature is not available in the Free Edition. The proxy server is a new feature included in the VNC viewer's version 4.4, which was released in May 2008. Prior to version 4.4, you can configure SSH tunneling and proxy server using PuTTY, as explained in recipe 1-1.
You want to run an X application at your remote Linux database server, such as the Oracle Database Configuration Assistant (DBCA) to create the Oracle database from your client computer.
First, you need to run the VNC viewer at your client computer. For details on how to run the VNC viewer, review recipe 16-5. Then, in the VNC viewer, open a terminal window, and log on to the Linux user who will be the owner of the Oracle database:
$ xhost localhost
localhost being added to access control list
$ su - oracle
Password:
$ dbca
You will see a screen similar to Figure 16-12.
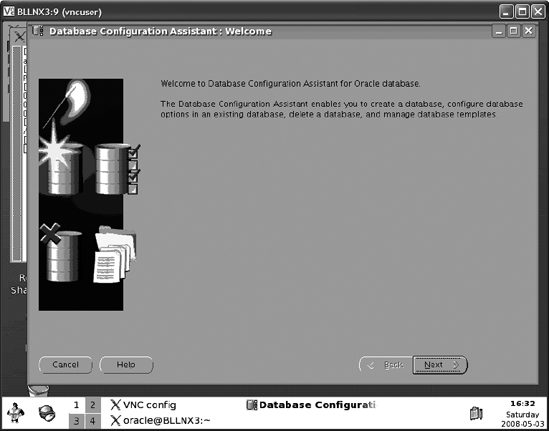
Once the VNC viewer display is available on your client machine and you have access to the mouse and keyboard, as granted by the VNC parameters AllowedUsers and AllowedGroups, you can then run any X application, such as Oracle's DBCA. Any X application that you run will look and feel just as if you were running it on the console of your remote Linux database server.
You cannot access the remote Linux database server. You are having problems running the VNC server or the VNC viewer.
When troubleshooting VNC, you may need to check the following areas to narrow down the cause of the problem.
Check that the VNC server is running on your remote Linux database server and is listening at the port number on which you are trying to connect. If the VNC server does not run at all, we recommend you check the parameters you are passing to the server. Check for errors such as spelling mistakes or invalid parameter values. If possible, try running the VNC server without any parameters except for the port number, and add your parameters one at a time until you determine the culprit parameter.
Note
To display the VNC server's options and parameters, run the Linux command /usr/bin/vncserver -list.
You can check the log file. That log file is at $HOME/.vnc/<hostname>:<port#>.log, where $HOME is the home directory of the Linux user under which the VNC server is running, <hostname> corresponds to the hostname of the VNC server, and <port#> represents the port on which the VNC server is listening.
By default, the VNC server's log parameter is set to *:stderr:30. To configure the VNC server's log file, specify the VNC parameter -log <logname>:<dest>:<level>, where <logname> is the name of the log writer, <dest> is either stderr or stdout, and <level> ranges from 0 to 100. To gather extra details in the VNC server's log file, you may set <level> to 100. For example, the following command starts the VNC server to listen on port 9 and logs extra details in the standard error file:
vncserver :9 -log *:stderr:100
We recommend you display the VNC server's log file while you monitor incoming VNC connections. Use the tail command with the -f option for that purpose, as shown in the following example:
[vncuser@BLLNX3 .vnc] $ tail -f $HOME/.vnc/BLLNX3:9.log
Mon May  5 17:19:27 2008
 TcpSocket:   connected to 127.0.0.1::21053
Warning: Tried to connect to session manager, networkIdsList argument is NULL
X Error of failed request:  86
  Major opcode of failed request:  51 (X_SetFontPath)
  Serial number of failed request:  8
  Current serial number in output stream:  10
startkde: Starting up...
kbuildsycoca running...
Klipper is already running!
To avoid any compatibility issues, ensure that the version of the VNC viewer you are using on your client computer matches the version of your VNC server on your remote Linux database server. For example, if the VNC server is Enterprise Edition version 4, then use VNC Viewer Enterprise Edition version 4 on your client computer.
If you still have issues with your VNC viewer on your client computer, we recommend you connect to the VNC server using your Internet browser. Most Internet browsers nowadays support Java applets, enabling you to connect. For additional information on how to start the VNC viewer, review recipe 16-5.
Verify that you can connect from your client computer to your remote Linux database server, and vice versa. Run the ping command from the OS command prompt of your client computer. In the following example, the IP address of the remote Linux database server is 192.168.0.13, while the client computer's IP address is 192.168.0.6:
C:>ipconfig

Windows IP Configuration
Ethernet adapter Local Area Connection:

        Connection-specific DNS Suffix  . :
        IP Address. . . . . . . . . . . . : 192.168.0.6
        Subnet Mask . . . . . . . . . . . : 255.255.255.0
        Default Gateway . . . . . . . . . : 192.168.0.1

C:>ping BLLNX3

Pinging BLLnx3 [192.168.0.13] with 32 bytes of data:

Reply from 192.168.0.13: bytes=32 time=15ms TTL=64
Reply from 192.168.0.13: bytes=32 time<1ms TTL=64
Reply from 192.168.0.13: bytes=32 time<1ms TTL=64
Reply from 192.168.0.13: bytes=32 time<1ms TTL=64

Ping statistics for 192.168.0.13:
    Packets: Sent = 4, Received = 4, Lost = 0 (0% loss),
Approximate round trip times in milli-seconds:
    Minimum = 0ms, Maximum = 15ms, Average = 3ms
Also, perform your tests the other way around. Try to ping the client computer from your remote Linux database server. For example:
[vncuser@BLLNX3 ˜]$ hostname
BLLNX3
[vncuser@BLLNX3 ˜]$ ping -c 3 192.168.0.6
PING 192.168.0.6 (192.168.0.6) 56(84) bytes of data.
64 bytes from 192.168.0.6: icmp_seq=1 ttl=128 time=0.625 ms
64 bytes from 192.168.0.6: icmp_seq=2 ttl=128 time=0.650 ms
64 bytes from 192.168.0.6: icmp_seq=3 ttl=128 time=0.676 ms

--- 192.168.0.6 ping statistics ---
3 packets transmitted, 3 received, 0% packet loss, time 2004ms
rtt min/avg/max/mdev = 0.625/0.650/0.676/0.029 ms
If you fail to make a connection using the ping command, then verify that you are using the correct hostname or IP address for the VNC server, and verify the correct port number on which the VNC server is supposed to listen. Also, check for a firewall that may be blocking your connections to the remote Linux database server from your client computer, and vice versa. If you need to connect to the remote Linux database server through a proxy server, then you need to set up your proxy server configuration. Configuring for a proxy server is discussed in recipe 16-8.
For the VNC software to work, you need the three components to function properly: the VNC server listening at the remote Linux database server, the VNC viewer running at the client computer, and connectivity between the two computers. First, you need to identify the problematic area and start troubleshooting from there.
For the VNC server, you need to review the first four recipes in this chapter to ensure that it is installed correctly and is listening on the designated port number on your remote Linux database server. You can also monitor the messages generated in the VNC server's log file while connections are coming to the VNC server.
On the client computer, you need to check that the VNC viewer is running. If the VNC viewer is not available or not running correctly, then we recommend you connect using your Java-capable Internet browser. This is to ensure that you are using the same versions between the VNC server and the VNC viewer.
Last but not least, you can use the ping command to verify connectivity between the remote Linux database server and the client computer. If you still cannot connect at this point, we recommend you contact your system or network administrators to help you troubleshoot the connectivity issue between the remote Linux database server and your client computer.