
Red Hat Linux provides a choice of two desktop environments: GNOME and KDE. This chapter explains how to configure and use the GNOME desktop environment and GNOME Office, GNOME’s desktop application suite. Chapter 6 explains how to configure and use the KDE desktop environment.
If you selected GNOME to be the default desktop during the installation process, you will see the GNOME desktop as shown in Figure 5-1 after logging in. The contents of your desktop may be different, of course. If you want to launch a GNOME session, but KDE is configured as the default desktop environment, select Gnome from the Session menu of the KDE login screen. Of course, GNOME must be installed in order for this to work.
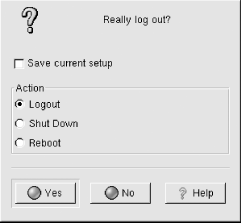
To log out of GNOME, left-click on the main menu, which resembles a foot, as shown in Figure 5-2. From the pop-up menu that appears, select the Log Out menu item. A Log Out dialog box, shown in Figure 5-3, appears and asks you to confirm your decision to log out. Clicking Yes terminates your GNOME session. If you enable the checkbox titled Save Current Setup, the GNOME session manager will save the state of your desktop and restore it when you log in again to GNOME. In addition to the Logout button, Halt and Reboot buttons appear on the Log Out dialog box. You can use the Halt button to shut down your system or the Reboot button to restart it.

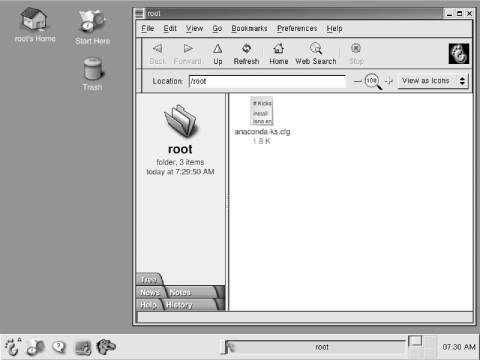
The term desktop can be used in either of two senses. It can refer to the entire GNOME display or to the empty area of the display where no windows or icons appear, as indicated in Figure 5-4. To keep straight these meanings, GNOME desktop will be used when referring to the entire display and desktop will be used when referring to the empty area of the display.
Clicking the desktop with the middle mouse button causes a pop-up menu to appear; the menu lets you conveniently launch popular applets and applications. Right-clicking the desktop causes a different pop-up menu to appear; this menu lets you arrange the desktop windows and icons. Figure 5-4 shows the elements of the GNOME desktop, which are described in the following sections.

The Home Directory icon, which resembles a house, is normally located in the upper-left corner of the display. The icon provides a convenient way to access the file manager: double-clicking the icon with the left mouse button launches Nautilus, GNOME’s browser and file manager, which displays the contents of the user’s home directory.
If you have permission to mount a CD-ROM or floppy drive, your desktop includes an icon representing the drive. Depending on the type of drive, the icon may resemble a CD-ROM or a floppy. If you right-click on the icon, a pop-up menu appears. The menu lets you mount the device, eject the device’s media, or open Nautilus to view the files residing on the device.
By double-clicking the Start Here icon, you can launch Nautilus to view a folder that contains several useful icons. Double-clicking any icon in the folder launches a window containing icons that provide convenient access to GNOME facilities:
- Favorites
The Favorites icon provides access to a folder in which you can place icons that provide access to GNOME facilities you want to be able to conveniently access.
- Preferences
The Preferences icon provides access to a folder containing icons that enable you to view and modify a variety of preferences, including those for the desktop, document handlers, user interface look and feel, multimedia, peripherals, sessions, and the Sawfish window manager.
- Programs
The Programs icon provides access to a folder containing icons that let you launch programs. Most likely, you’ll find it more convenient to use GNOME’s menu, described later in this chapter.
- Server Configurator
The Server Configurator icon provides access to tools for configuring servers, such as Apacheconf, a tool for configuring the Apache web server.
- System Settings
The System Settings icon provides access to tools for viewing and modifying the system configuration, including:
The system clock
Hardware devices
Internet (dial-up) configuration
Network configuration
Printer configuration
Service configuration
User accounts
The panel appears along the bottom edge of the display. However, if you prefer a different location, you can move the panel; to do so, click and drag the panel to the desired location. The panel functionally resembles the Windows 9x taskbar; you can use it to launch programs, switch from one program to another, and perform other tasks.
Tip
Moving the mouse cursor over an icon in the panel reveals a message informing you of the function of the icon.
The panel can also contain
applets, programs represented as panel icons.
Applets are typically small programs that display information or take
action when clicked. For example, a launcher applet
launches an application when its button in the panel is
clicked.
If you select Main Menu → Panel → Panel Manual, GNOME launches Nautilus to view the GNOME Panel Manual. The GNOME Panel Manual explains the function and operation of the GNOME panel in detail.
By default, the GNOME panel contains the following items:
- Main menu
The main menu icon resembles a big foot in the shape of a “G.” Left-clicking the main menu icon presents a menu from which you can choose a variety of programs. Several of the menu entries are submenus; selecting such an entry pops up a new menu to the side of the original entry.
- Start Here
The launcher icon for the Start Here folder resembles a compass superimposed on a map. Left-clicking the icon presents the same folder presented by left-clicking the Start Here icon on the GNOME desktop, described earlier in this chapter.
- Help viewer
The launcher icon for the GNOME help viewer resembles a question mark; clicking the icon launches Nautilus and points Nautilus to GNOME help documents. You can also launch the help viewer by selecting the Help menu item of a GNOME application or applet or by selecting the Programs → Help menu item from the main menu.
The default home page of the help viewer includes a hyperlink that takes you to the GNOME User’s Guide. The user’s guide will help you discover additional useful GNOME features and capabilities.
- GNOME Terminal
The GNOME terminal launcher icon resembles a video monitor. Clicking the icon launches GNOME Terminal, a terminal emulator for X, which you can use to enter shell commands. See Section 5.1.4.
- Mozilla
The Mozilla launcher icon resembles a red dinosaur. Click the icon launches the Mozilla web browser.
- Task list
The task list contains a button for each active task. Clicking a task’s button raises the task’s window to the front of the screen, so that you can view it.
- Pager
Depending on your X configuration, GNOME may provide a virtual desktop larger than your monitor can display. In this case, the Pager lets you switch between pages of the desktop. Figure 5-4 shows that GNOME has provided a virtual desktop with four pages, only one of which is visible at any given time. The highlighted icon shows the page you’re currently viewing as your desktop. To view a different page, simply click the icon that represents the desktop page you want to view.
- Clock
The clock displays your system’s current time. If the clock is not visible, select Panel → Add to Panel → Applet → Clock from the main menu. Once you’ve added the clock applet to the panel, it will appear automatically the next time you start GNOME. You can use this technique to add a variety of other applets to the panel, including the pager or task list, if either somehow disappears.
The new GNOME file manager is called Nautilus. To launch Nautilus, double-click a directory or drive icon or select Programs → Applications → Nautilus from the main menu. Nautilus has two main panes, as shown in Figure 5-5. The left pane may display information about the current directory or a hierarchical directory tree. To switch between these views, click the Tree tab. To select a directory in the left pane, simply left-click it.
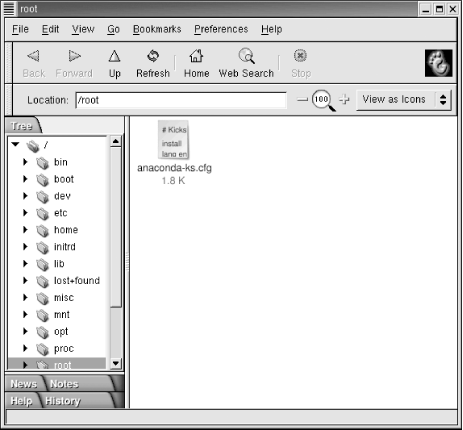
The right pane can show an icon for each file or detailed information about each file, as shown in Figure 5-6. To switch from icon to detailed mode, left-click the control labeled View as Icons or View as List. You can also select custom mode, which lets you tailor the display appearance according to your own taste.

To view the contents of a folder shown in the right pane, simply double-click the folder’s icon. To view the contents of the folder that contains the current folder, click the Up toolbar icon.
Nautilus can be used as a file manager to copy, move, rename, and delete files. To perform one of these operations, you must first select the file (or files) by left-clicking in the right pane. To select additional files, hold down the Ctrl key as you select them. The Edit menu includes a menu item that lets you click on all files that appear in the right pane.
To copy a file, hold down Ctrl while dragging it. Alternatively, you can right-click on a file and use the pop-up menu to specify the action you want to perform. Nautilus then displays a dialog box that lets you specify additional options.
To rename a file, right-click on the file’s icon and select Show Properties from the pop-up menu. Simply type the new name and click on the close icon in the upper right corner of the dialog box.
To delete a file, right-click on the file and select Move to Trash from the pop-up menu.
Nautilus lets you double-click on a file to launch the application associated with the file. Alternatively, you can right-click on the file and select Open With from the pop-up menu. Nautilus launches a dialog box that lets you specify the application that should be launched.
Many applications are GNOME-compliant, supporting drag-and-drop operations like those supported by Windows. For example, you can open two file manager windows and drag-and-drop files or directories between them.
The Nautilus menus provide additional functions, including the ability to configure the operation of Nautilus. If you’re familiar with the Windows Explorer, you’ll find most of these functions and capabilities familiar. To learn more about Nautilus, use the Nautilus Help menu to view the Nautilus Quick Reference or the GNOME User’s Manual.
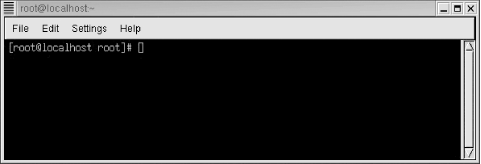
Similar to the MS-DOS Prompt window, the GNOME terminal, shown in Figure 5-7, provides a window in which you can type shell commands and view their output. To launch GNOME terminal, you can either click the GNOME Terminal icon on the Panel, or select Programs → System → GNOME Terminal from the main menu. You can open multiple GNOME terminal windows if you like.
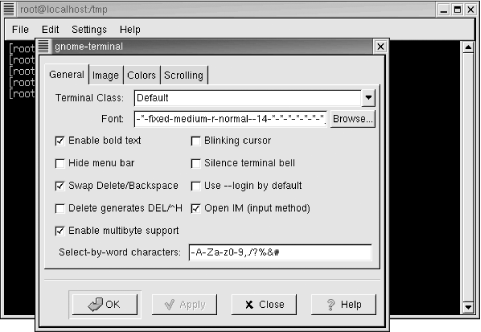
The Settings menu lets you configure the operation of GNOME Terminal, as shown in Figure 5-8. For example, you may find that the default font is too large or too small for your liking. If so, select Settings → Preferences from the GNOME terminal window. A dialog box pops up. Select the General tab and left-click the Browse button next to the Font field. A second dialog box pops up, from which you can select the font, font style, and font size you prefer.
To exit GNOME terminal, simply type exit on the command line and press Enter. Alternatively, select Close Terminal from the File menu.
Tip
You can find additional GNOME applets and applications by visiting the GNOME software map at http://www.gnome.org/applist.