
Like most GNOME applications, GNOME itself is highly configurable. You can configure GNOME’s panel, its main menu, and its overall appearance and function. The following sections briefly show you how.
You can add a launcher to the GNOME panel. Clicking on a launcher launches a predetermined application. To add a new launcher applet, right-click on the panel and select Panel → Add to Panel → Launcher from the pop-up menu. The Create Launcher Applet dialog box, as shown in Figure 5-9, appears.

You can specify a name for the launcher, a comment, and the command that GNOME executes to launch the application. GNOME automatically provides a default icon. If the program to be run is a text-based program, check the Run in Terminal checkbox.
If an application is already on the main menu, you can quickly create a launcher for it. Simply right-click on the application’s menu item and select “Add this launcher to panel” or “Add this applet as a launcher to panel” from the pop-up menu.
If your panel contains many launchers, it may become crowded and confusing. To remedy this, you can create one or more drawers, like that shown in Figure 5-10. Drawers act like menus; you click on a drawer to open it and view the launchers it contains. Clicking an open drawer closes it and hides its contents.
To add a drawer, right-click on the panel and select Panel → Add to Panel → Drawer from the pop-up menu. To move a launcher into the drawer, click on the drawer to open it, right-click on the launcher and select Move from the pop-up menu. Next, move the cursor over the open drawer and click the left mouse button.
If you add a launcher or drawer and later decide you don’t want it, you can remove it from the panel. Simply right-click on the unwanted applet and select Remove from Panel from the pop-up menu, as shown in Figure 5-11.

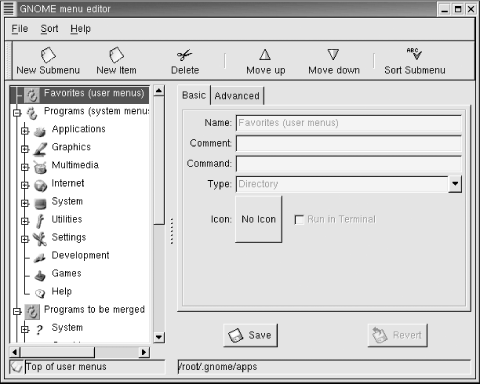
You can configure GNOME’s main menu by using the menu editor. To launch the menu editor, select Programs → Settings → Menu Editor from the main menu, as shown in Figure 5-12.

The menu editor window, shown in Figure 5-13, has two main panes. Its appearance and operation resemble that of the file manager. The left pane of the menu editor hierarchically displays the menu tree, whereas the right pane shows information pertaining to the currently selected menu item. You can use toolbar buttons to move the current menu item up or down the menu tree, add a new submenu or menu item, or delete the current menu item.
You can configure the appearance and operation of GNOME and GNOME-compliant applications by using the GNOME Start Here facility, shown in Figure 5-14. The Start Here facility resembles the Windows Control Panel, although it looks and works somewhat differently. To launch the Start Here facility, click the Start Here icon on the desktop or panel.

Like
the Windows Control Panel, which uses small programs called
applets to perform its functions, the GNOME
Start Here facility uses small programs called
capplets; however, the Start Here
facility’s user interface hides this detail from you. Nautilus
serves as the Start Here facility’s user interface. You can use
the Start Here facility to:
Select background properties
Configure a screensaver
Select a desktop theme
Select a window manager
Configure the default text editor
Specify MIME types that control the handling of multimedia files
Configure the keyboard bell and sounds
Configure keyboard and mouse properties
Specify applications that GNOME automatically launches when it starts
Specify a variety of options governing the appearance of GNOME-compliant applications
Simply select the configuration category by double-clicking the appropriate folder in the Start Here window. The resulting window may contain configuration capplets, folders, or both.
When you double-click on a capplet, a configuration dialog box appears. You can then revise the configuration parameters by specifying the desired values. Many dialog boxes include a Preview button, which lets you experiment without permanently altering the GNOME configuration. The Revert button, if present, lets you restore the original configuration. The Apply or OK button permanently updates the GNOME configuration, whereas the Cancel button discards your changes and leaves your settings as they were.
One favorite feature among Linux users is the use of desktop themes to control the way windows and interface elements (such as radio buttons, checkboxes, and buttons) are drawn. You can select from among a variety of themes developed by fellow Linux users by using the GNOME Control Center. If the standard choices aren’t adequate to satisfy you, you can visit http://www.themes.org, which hosts more than 5000 themes for various window managers, include GNOME. To see only GTK themes compatible with GNOME, go to http://gtk.themes.org.
When you find a theme you like, download the tarball and save it to
the /tmp directory.[4] Don’t unpack the
file. Instead, launch the Start Here facility and select Preferences
→ Desktop → Theme Selector. When the Theme Selector
appears, click Install New Theme and navigate to the file you
downloaded and saved in /tmp, then click OK. If
the theme is compatible, you’ll now see it listed in the
Available Themes box. To try it, click the theme name and click
Preview. If you like the new theme, click OK to adopt it.