
15 Performing your first advanced SQL Server instance migration, part 1
Within the SQL Server community, simplified migrations sparked wide adoption of not just dbatools but PowerShell as well. The videos showing instance-to-instance migrations, such as sqlps.io/instmigration, resonated with DBAs. This video revolved around our flagship command, Start-DbaMigration, which migrates one entire SQL Server instance to another and can be as straightforward as the code seen in the next listing.
Listing 15.1 Using Start-DbaMigration to migrate one instance to another
PS> Start-DbaMigration -Source sql01 -Destination sql02 -BackupRestore
➥ -SharedPath \nassqlmigration
This command wraps a bunch of other Copy-Dba* commands and simplifies a complex process that copies logins with all their properties and passwords; linked servers; and credentials with their passwords, Agent jobs, schedule, operators, and more. But we know that SQL Server migrations are often not as simple or as quick as the video shows.
Migrating large databases using the backup and restore method, or even detach and attach, can require long downtimes for the systems that rely on those databases, while all of the data is moved. SQL Server instances that have existed for a long time may have a large number of SQL Agent jobs, logins, linked servers, or other objects that are no longer in use, and migrating those is unnecessary.
Our book may not have an answer for all of these scenarios, but we aim to give you insight into what’s going on behind the scenes and enable you to plan, test, and execute your own complex migrations.
Warning If possible, we recommend thoroughly testing these complex tasks before implementing them on your systems. Scripting these scenarios with dbatools enables you to keep the scripts so that you can repeat the same tasks on your production instances by changing the values for instances.
Advanced migrations are a pretty big topic, so we’ve divided this topic into two chapters. The first will cover database migrations, and the second will cover everything else. In the database portion, we’ll cover the two most common scenarios: using backup/restore or detach/attach to migrate your databases. Then we’ll cover an option for migrating larger databases, by staging them ahead of the downtime.
15.1 Databases
When we begin to plan any migration, the most critical decision is probably going to be choosing the best method for migrating our databases. Most other objects can be scripted and recreated quickly, but our databases and the valuable data they include need to be moved carefully and in a way that best meets our requirements.
Table 15.1 shows most of the ways that Microsoft provides for migrating databases. This section alone could be an entire book, but we’ll do our best to keep it concise.
Table 15.1 Database migration methods and dbatools support
Luckily, we have many options available within dbatools, so we’ll highlight our options and the pros and cons associated with each.
15.1.1 Backup and restore
The first and simplest option is to back up the database from the source and then restore it to the destination. This is perfect for small databases where the amount of time to take and restore backups is short and well within our allocated downtime window. To accomplish this with dbatools, we can use the Copy-DbaDatabase command.
In the following listing, we have included the most straightforward options for using this command. Here, we specify a source SQL Server instance, a destination, and a shared path. The shared path must be somewhere the engine service accounts of both SQL Server instances can access.
Listing 15.2 Using Copy-DbaDatabase to back up and restore the source database
PS> $copySplat = @{
    Source        = "sql01"                   ①
    Destination   = "sql02"                   ②
    Database      = "WideWorldImporters"      ③
    SharedPath    = "\nassqlmigration"     ④
    BackupRestore = $true                     ⑤
}
PS> Copy-DbaDatabase @copySplat
① Specifies the source instance for your migration; this is a required parameter.
② Specifies the destination instance for your migration; this is also a required parameter.
③ You can specify one or more databases to migrate from source to destination.
④ Both source and destination instance service accounts need to have access to this path, because it’ll be used as the backup and restore location.
⑤ Setting this flag means we’ll take a backup of the source and then restore it to the destination.
When setting the -SharedPath, ensure both the source and destination SQL Server instance service accounts have the appropriate file/share permissions to the path. Although you can find the service account in services.msc or the SQL Server Configuration Manager, dbatools also provides this functionality in Get-DbaService, as shown here.
Listing 15.3 Finding the service account of a SQL Server instance
PS> Get-DbaService -ComputerName sql01 -Type Engine |
Select-Object ComputerName, InstanceName, StartName

ComputerName InstanceName StartName
------------ ------------ ---------
sql01        MSSQLSERVER  adsvc.sqlservice
sql01        SQLEXPRESS   NT ServiceMSSQLSERVER
Note that because Get-DbaService (and all of our service commands) uses SQL WMI, this command will work only on Windows. It’s important to highlight here that the NT ServiceMSSQLSERVER will likely make it harder for you to perform the migration using a shared network drive—setting permissions is a challenge because it is not a domain account. The other parameters we specified in listing 15.2 tell the command that we’ll be using the -BackupRestore method, and we’ve specified a single database to be migrated.
Try it out on our Docker containers In addition to the lab from chapter 3, we also have a quick and easy migration test scenario available on dbatools.io/docker. This chapter, like many others, will use hypothetical values in the examples, but you can replace sql01 and sql02 with your own lab servers.
When using the backup and restore method, the default is for the backup to be striped across three files. The team decided on this number after extensive testing determined that it helped to improve the speed of migrations across the board. You can control the number of backup files used with the -NumberFiles parameter.
If we’re looking to migrate multiple databases at once, we could list multiple databases for the -Database parameter used later in listing 15.5. However, if we’re looking to migrate all the user databases from our source, we can use the -AllDatabases switch as shown in the next code sample.
Listing 15.4 Using Copy-DbaDatabase and the -AllDatabases parameter
PS> $copySplat = @{
    Source        = "sql01"
    Destination   = "sql02"
    AllDatabases  = $true
    SharedPath    = "\nassqlmigration"
    BackupRestore = $true
}
PS> Copy-DbaDatabase @copySplat
We could also break our current code, which is using Copy-DbaDatabase, into two distinct steps, using Backup-DbaDatabase and then Restore-DbaDatabase. You’ll remember that to use the copy command, you need a shared path where both engine service accounts have access. Note that Copy-DbaDatabase does keep a few more properties intact than backup/restore, such as database ownership chaining, trustworthiness, broker enabled, and read-only status.
If you’d like to ensure that no connections can be made to your database on the source server once the migration has finalized, you can use -SetSourceOffline. This will place the source database offline on the primary instance when using the BackupRestore method, preventing your applications and users from accidentally reading and writing data on the wrong database.
If copying directly isn’t possible due to security restrictions or perhaps migrating to a new domain, you can break this into two steps and copy the files from the backup directory into a location they can be restored from. Chapters 10 and 11 go into all the details on these commands, so we recommend reviewing those if you do go this route.
15.1.2 Detach and attach
The next migration option available, detach and attach, is syntactically similar to the backup/restore method. In fact, the code from earlier requires only two small changes. It’s important to note that this method generally requires additional downtime to copy the files from source to destination, because it moves uncompressed .mdf, .ndf, and .ldf files. With this in mind, it is a solid option for small databases or situations where you have a large downtime window.
To alter the code from listing 15.4 for our second method, we will first replace the -BackupRestore switch with -DetachAttach. For this method, we don’t need a shared path, so we can remove that parameter all together.
The code in listing 15.5 shows how to migrate the WideWorldImporters database using this method. When the -DetachAttach switch is used, the source database is detached from the SQL Server instance. The files are then copied using an admin share (e.g., \ servernamed$SQLData) to the default data and log directories on the destination, before being attached to the destination SQL Server instance. If this command fails, it will reattach the source database. Also, like the backup/restore method, the source files are not removed, allowing for a quick rollback if needed.
Listing 15.5 Using Copy-DbaDatabase and the -DetachAttach parameter
PS> $copySplat = @{
    Source        = "sql01"               ①
    Destination   = "sql02"               ②
    Database      = "WideWorldImporters"  ③
    DetachAttach  = $true                 ④
}
PS> Copy-DbaDatabase @copySplat
① The database will be detached from this instance.
② Files will be moved to this destination instance by using an admin share.
③ The specified database(s) will be migrated.
④ The flag specifies the detach and attach method to migrate databases.
Note that the -DetachAttach method uses UNC network access to admin shares (\sql01d$mssql) on the destination servers. This means that this method is supported only in Windows, and you will have to set the appropriate permissions.
Many other parameters are available with the Copy-DbaDatabase command, and we recommend reviewing the comment-based help to discover all the options available to you, illustrated in the next code sample.
Listing 15.6 Read the built-in help in a separate window
If you perform the migration using the detach/attach method, you can use the -Reattach parameter when using -DetachAttach to reattach the database on the source server.
Reattaching the source database is useful when repeatedly testing your detach/attach migrations so that you don’t have to reattach manually.
15.1.3 Staging large databases for migration
The options we’ve laid out so far for migrating databases all presume that either our databases are small or we have an extensive downtime window that will allow us to take our databases offline for the entire time it takes to move the data. We know this isn’t often the case, so we’ll now look at a way to stage our databases to minimize the downtime window needed for the final cutover.
In this scenario, we have a database, or many databases, that would take too long to complete the full backup and restore. The time to do the migration won’t fit within our allowed downtime window, so we need to split this migration into two parts: first, a staging step that will move most of the data to the destination, and then, a final cutover step where the destination will be brought up to date with any changed data and then brought online, ready to use.
SQL Server backups are a complicated topic, so let’s have a quick recap on how they work so we understand how this plan will come together. Also, refer back to chapter 10, where we covered backups and dbatools, for more of a refresher.
With SQL Server, we have several types of backups available to us when we’re creating our strategy for keeping our data safe. We’re going to look at how the three described in table 15.2 can allow us to minimize that downtime window for migration.
At the end of the day, to complete our migration we need to copy all the data from our source instance to our destination. This will take time, no matter how you design your migration plan. The key here is that we can complete the majority of the heavy lifting before we reach the downtime window. Moving as much data as possible before we take the application down will allow us to keep our users and the business happy.
To do this we’ll combine a full backup, which will act as our base, and then either a differential backup, a transaction log backup, or some combination of those to migrate the data changed since the full backup was taken. The key is that when we stage that full backup on our destination instance, we don’t bring it fully online. Instead, we use the NORECOVERY option to eave it ready and waiting for more restores to take place.
The code in listing 15.7 should feel pretty familiar at this point. We’re again relying on the Copy-DbaDatabase command, with a couple of new parameters added into the mix. The -NoRecovery parameter means that this command takes a full backup of our WideWorldImporters databases to the shared path and then restores that full backup to the destination without fully bringing it online. The destination database is now primed for more restore activity.
The second new parameter we’ve added is -NoCopyOnly. This tells dbatools to take a backup without using the COPY_ONLY flag. A copy-only backup is the default option for this command because it doesn’t disrupt the regular backup chains on your system. However, to restore differential or log backups on top of the full backup, we need to restart the sequence.
Warning Taking a full backup without the COPY_ONLY flag will disrupt your regular recovery plan. It’s important to understand that if you need to recover the source database premigration, you’ll need the backup chain created from this new backup activity.
Another option here is to use the existing backup chain for your database. Instead of running the Copy-DbaDatabase command to stage the full backup, use Restore-DbaDatabase, and target your existing last full backup.
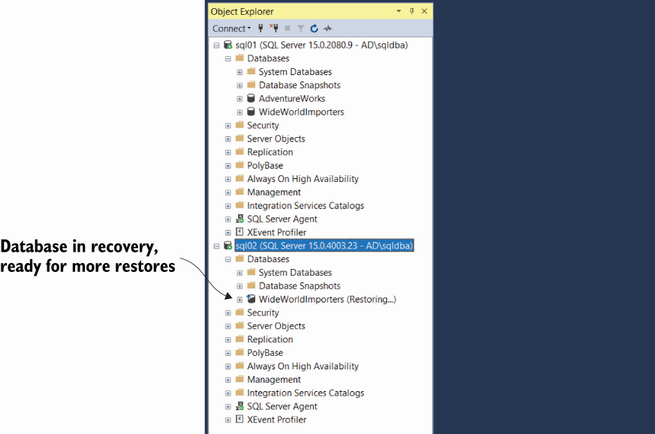
Once this code has run successfully, your environment should look similar to the screenshot seen in figure 15.1.
Listing 15.7 Staging a full backup
PS> $copySplat = @{
    Source          = "sql01"
    Destination     = "sql02"
    Database        = "WideWorldImporters"
    SharedPath      = "\nassqlmigration"
    BackupRestore   = $true
    NoRecovery      = $true
    NoCopyOnly      = $true
}
PS> Copy-DbaDatabase @copySplat
The database on our source instance is still online and hosting the application workload, but it has been copied to the destination instance—sql02, in this example—and left in recovery. You can see in figure 15.1, after the database name, it lists (Restoring...).
At this point, we’re ready for the actual migration window. The next part of the migration will be the final cutover and will result in downtime, so now we wait, leaving the full backup prestaged on our destination instance. One thing to note is the longer the timeframe between this full backup and the cutover date, the more changed data there is likely to be. Try to time the staging of the full backup as close as you can so that there isn’t too much data to move at cutover time.
Step 2: Apply the changes and bring the destination online
Once the downtime window rolls around, it’s time for the final cutover of our migration. We can now have the application taken down, collect the final changes made to the source database, and copy them to the destination. With the first step, we’ve already done the bulk of the work. The code in listing 15.8 will take a differential backup and restore it, with recovery to the destination. We’ll also leave the source database offline—this is a good practice because it ensures nothing is still connecting to the old database, but if you need to roll back you can quickly bring it back online.
Listing 15.8 Taking a differential backup and restoring the changes
# take a differential backup
PS> $diffSplat = @{
    SqlInstance = "sql01"
    Database    = "WideWorldImporters"
    Path        = "\nassqlmigration"
    Type        = "Differential"
}
PS> $diff = Backup-DbaDatabase @diffSplat

# Set the source database offline
PS> $offlineSplat = @{
    SqlInstance = "sql01"
    Database    = "WideWorldImporters"
    Offline     = $true
    Force       = $true
}
PS> Set-DbaDbState @offlineSplat

# restore the differential and bring the destination online
PS> $restoreSplat = @{
    SqlInstance = "sql02"
    Database    = "WideWorldImporters"
    Path        = $diff.Path
    Continue    = $true
}
PS> Restore-DbaDatabase @restoreSplat
Once the code in listing 15.8 has run, your SQL Server instances should look like figure 15.2. Your database has been successfully migrated to the destination SQL Server instance.

Figure 15.2 The database is now online on the destination SQL Server instance and offline on the source.
Now your users are no longer able to access the “old” database, and if a connection works, we are guaranteed it’s on the new server. Our redirection techniques to the new SQL Server instance generally depend on a number of factors. But DNS updates, load balancer updates, AG listener updates, SQL client aliases, host file updates, connection string updates, and application modifications have all been effective solutions.
15.1.4 Other database migration options
These are just a few of the possibilities available to migrate databases from one instance to another. The method you choose will be the one that fits your situation, and the best way to determine this is through testing. To determine what works best for you, you’ll need to weigh the pros and cons for each method as well as compare it to the amount of flexibility or downtime allowed for the databases or applications involved.
Several more complicated scenarios are available for migrating databases. These are perfect for when it would take you longer to backup/restore or detach/attach than you have available in your downtime window. This could be because either your databases are large and the copy time would be extensive, or the downtime allowed by the business is minimal due to the database supporting critical applications.
You could, for example, set up log shipping and then, at migration time, cut over to the secondary and tear down the log shipping setup. This can all be done with just two commands, as highlighted in the next code listing.
Listing 15.9 Using log shipping for nearly no downtime during migration cutovers
# Very Large Database Migration
PS> $params = @{
      Source      = "mssql1"
      Destination = "mssql2"
      Database    = "Northwind"
      SharedPath  = "\nassqlshipping"
}
PS> Invoke-DbaDbLogShipping @params

# Then cutover
Invoke-DbaDbLogShipRecovery -SqlInstance mssql2 -Database Northwind
You can also work with other infrastructure teams to accomplish the migration. One of our dbatools contributors, Andy Levy, has written a great blog post on how he worked with his storage team and dbatools, using Mount-DbaDatabase, to complete a huge migration. You can read all the details at dbatools.io/xlmigration.
You can also read about Chrissy’s experience with migrating an older application at dbatools.io/oldapp. This article even includes decrypting encrypted stored procedures for an application that was out of support and needed to be updated.
15.2 Hands-on lab
-
Migrate a database using a straightforward method, either backup/restore or detach/attach.
-
Migrate a database by staging a full backup; create a new table; then cut over, and make sure you can see the new table.