
Windows and Menus and Sheets
For the past several chapters, we’ve been focusing on what could be considered the “back end” of Cocoa programming, the model and controller classes that provide functionality to help take care of our application’s infrastructure. Now it’s time to turn our attention to the “front end” of Cocoa and pay more attention to the view part of the MVC architecture.
In this chapter, we’re going to focus on windows (not the Microsoft kind), menus (not the restaurant kind), panels (not the solar kind), and sheets (not the bed kind), all of which are high-level GUI objects that practically no Cocoa application can do without. Windows provide the foundation for view objects to do their drawing. In Cocoa, these are represented by NSWindow, its direct subclass NSPanel, and several specialized subclasses. Menus provide the familiar top-of-the-screen access to system-wide and application-specific user actions that most Mac applications have, and are represented by a hierarchy of NSMenu and NSMenuItem objects. Sheets provide an alternative to the classic free-floating modal window by letting us attach a modal window as an overlay on an existing window, giving the user a more coherent interface.
We’re going to explore each of these three areas in a “lab,” a toy application that has no real use and is only created for demonstrating some functionality and letting us see how these things work.
NSWindow and NSPanel
Start by creating a new Xcode project using the Cocoa Application template, and name it WindowLab. We’ll use this project as a testbed for demonstrating a variety of window features.
In Mac OS X, nearly everything seen on-screen is presented using windows. Many windows are easily recognizable, having the standard controls along the top and a drop-shadow behind.
But some windows aren’t so obvious. For example, if we launch a game that takes over the whole screen for its display, even if it’s presenting custom controls of its own that have nothing to do with Cocoa, that’s all occurring in a window. The Dock at the bottom of the screen is surely a window. And if we drag a file icon from one Finder window to another, the icon we’re dragging is actually being “carried” inside a small, transparent window!
In all of these cases, we’re seeing and interacting with instances of NSWindow and its subclasses. NSWindow is a very versatile class that lets us configure several behaviors right out of the box and lets us do even more by subclassing. In general, if we want to change the appearance of the window itself, either its “chrome” (the title bar and upper-left corner controls), its transparency, or its shape, we’ll probably need to subclass NSWindow, but otherwise, we almost never will. In this book, we’re going to stick to the kinds of windows that are ready to use directly and conform to Apple’s Human Interface Guidelines, and we won’t be subclassing NSWindow to change their appearance.
Tip The Human Interface Guidelines (often shortened to “HIG”) are a set of recommendations that Apple provides for application developers. The HIG acts as a sort of style guide that you can refer to when you’re concerned that your application looks a little “off.” It’s not a strict set of rules, and no one is going to stop you from violating the HIG. In fact, many applications, including Apple’s own, stray from the guidelines in all kinds of ways. However, it provides a good baseline, describing how the various components are meant to be used.
We mentioned the HIG in Chapter 2 already, but it’s worth pointing out again. You can find the HIG online at http://developer.apple.com/library/mac/#documentation/UserExperience/Conceptual/AppleHIGuidelines/Intro/Intro.html.
Figure 11-1 shows the main kinds of windows that are prevalent in most Cocoa applications today. There are two drawing styles included for NSWindow, the “normal” appearance and the “textured” appearance, which somewhat resembles a shiny piece of metal. Either style of NSWindow can be configured to support full-screen mode, which adds arrows to the right end of the title bar. NSPanels can be configured to be in utility mode (in which case they have a smaller title bar, cast a smaller shadow, and float above the application’s other windows) or to look like a normal window, and in either case the choice of normal vs. textured also applies, just like NSWindow. One additional option for NSPanel is to run in HUD (short for heads-up display) mode, in which case the panel’s color scheme is inverted, its title bar and bottom edge are modified, and the whole window is made slightly transparent. This mode (which has no textured option) is intended to allow the user to see through a part of the interface to what’s behind it and is put to good use in applications like iPhoto, where you can bring up a HUD panel containing adjustable color settings, through which the photo you’re looking at can still be seen.

Figure 11-1. A sampling of the main types of windows readily available in Cocoa
Unlike some other GUI toolkits, where one of the first things you do when creating a new application is to subclass some sort of Application class and some sort of Window class, Cocoa allows for true separation of the model, view, and controller portions of your application. The window only needs to know how to display itself and provide a graphics context for its views, so that’s all it does. Any code that deals with what happens to a window while the application is running (e.g., it gets loaded from a nib file, or gets dragged across the screen, or gets closed by the user) can typically be dealt with by the window’s delegate object (i.e., its controller).
In addition to providing a frame for views to display their stuff, NSWindow also handles user input from the mouse and keyboard. Any mousing action (clicking, dragging, moving, releasing, and so on) in an NSWindow will trigger a method in NSWindow that finds the appropriate view object in its contents and calls the same method in the view. This symmetry works because NSWindow and NSView both inherit from NSResponder, where the methods for handling these events are defined. Likewise, when the user presses or releases a key on the keyboard, the application calls a method in the application’s “key window” (i.e. the window that currently has keyboard focus; usually the last window the user clicked in), which in turn determines which view currently has keyboard focus and passes off responsibility, calling the same method in the focused view.
To Use a Panel, or Not to Use a Panel
Since we’re not going to modify the basic appearance of windows, we’ll be using either NSWindow or its subclass NSPanel to display the controls and other views in our application. The core elements of our application will usually be in an NSWindow, while NSPanel is used for auxiliary windows, such as the Show View Options panel in Finder. From a user’s standpoint, there are just a few critical differences between NSWindow and NSPanel:
- NSPanel instances normally become invisible when another application becomes the active application and reappears when its own application becomes active again.
- An NSPanel can be made to “float” in front of all the other windows in its application, including the main window.
- An NSPanel can be easily configured to not become the key window unnecessarily, so a user can click a button in an auxiliary panel and then continue typing in the main window.
In the WindowLab project in Xcode, navigate to the MainMenu.xib file and single-click to open it in an Interface Builder canvas. One of the objects included in the application nib file is, as always, a window. Click to select it in the main nib window, then open the Attributes Inspector so that we can explore it a bit (see Figure 11-2). In earlier chapters, we used this Inspector for setting a window’s title, but of course there’s more we can do here.
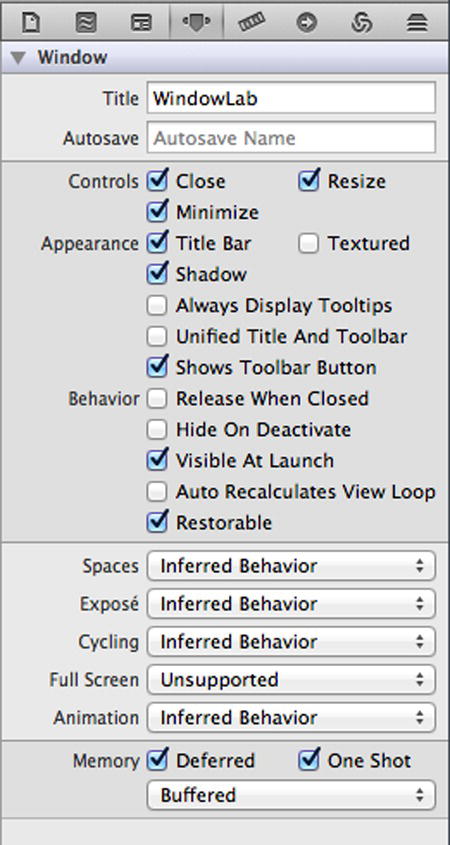
Figure 11-2. The Attributes Inspector for an NSWindow
We’re already familiar with the Title text field. Just below that is the Autosave field, which provides a very nice bit of functionality: enter a text string in this field, and the window will use that string as a key in the NSUserDefaults system, storing and retrieving its position and location based on that key. That means that as a user rearranges the windows in our application, the window positions are saved in the user’s preferences, and the windows will appear in the same locations the next time they run our app. And all we have to do to make it happen is fill in this text field for each window in our app, entering a unique value for each window.
Next, there are some checkboxes that let us turn off some of the standard window controls. Note that turning off these checkboxes won’t remove the corresponding buttons from the window’s title bar; it will just make them permanently grey and inactive while our app is running. Below that are some checkboxes that for tweaking a window’s appearance, including enabling textured mode, disabling the drop-shadow behind the window, and more. The options that mention Toolbar here are referring to the optional NSToolbar that can be attached to a window, which we’ll explain a little later in this chapter. We can also remove a window’s title bar. This is generally a bad idea, since the user won’t be able to reposition the window, but might be useful for an application like a game that takes over the whole screen.
The next chunk of checkboxes lets us fine-tune the window’s behavior in a number of ways, most of them self-explanatory. One exception is the Auto Recalculates View Loop checkbox, whose name is puzzling at best. Here’s the idea: each window maintains a list of all the view objects it contains, which the user can shuffle between by using the Tab key. If we turn this checkbox on, then any views that are added to the window while the app is running will automatically be inserted somewhere into this “loop.” Another exception is the Restorable checkbox. Turning on Restorable tells Cocoa that our window should attempt to be restored to the same state between application launches. With some help from us, our app can reopen the windows that were open when the user quit, and even restore them to the same scroll position and selections that were in place when the user quit.
Below that you’ll find a series of menus that deal with how the window interacts with the desktop. The Mac desktop environment has a feature called Mission Control (located in the System Preferences app) that allows users to have more than one desktop (or space) and move windows between them, and to reveal all the windows or all the windows for a single application. In prior versions of Mac OS/X, Mission Control was two separate features called Spaces and Exposé, and that’s still how they’re referred to in the Attributes Inspector.
In general, we’ll want to leave these as Inferred Behavior, which means that the window behaves normally. For Spaces, the other choices are Can Join All Spaces, which means that the window will always be visible, or Move To Active Space, which means that the window will move to the current space on becoming active rather than shifting the active desktop to the one where the window is. For Exposé, Inferred Behavior is the same as Managed Behavior, which means that the window responds normally to Exposé actions. The other choices are Transient, which causes the window to be hidden when Exposé is activated (which is the default for panels), and Stationary, which means that the window ignores Exposé entirely. The next option deals with whether this window should be included in the set of windows that the user can rotate through using the Window ![]() Cycle Through Windows (
Cycle Through Windows (![]() -`) command. Next up is whether the window supports a Full Screen option, where the window expands into its own space and takes up the whole display, like an iOS application, including hiding the menu bar. If this is set to Primary Window, a special control is shown in the right-hand side of the title bar to activate full screen mode.
-`) command. Next up is whether the window supports a Full Screen option, where the window expands into its own space and takes up the whole display, like an iOS application, including hiding the menu bar. If this is set to Primary Window, a special control is shown in the right-hand side of the title bar to activate full screen mode.
Finally, there are options related to a window’s memory usage. It’s best to leave Deferred on because this skips the allocation of some internal memory for the window until it’s about to actually display the window. Also, we should leave One Shot turned off. If it’s on, that same internal memory is freed as soon as the window is closed, so this should only be turned on in case the window in question is a temporary window that can only be shown once per session, such as a splash screen. Finally, a pop-up window offers us the ability to switch the window’s “backing store” from Buffered to Retained or Unretained. Never do that! The Retained and Unretained options are only there to support specific sorts of legacy code, and all new Cocoa applications should leave this set to Buffered for every window.
Now pull an NSPanel out from the Object Library window, and look again at the Attributes Inspector; note the Style pop-up menu and a couple of added checkboxes in addition to the options we saw when inspecting an NSWindow. The style options here are Utility, which if chosen gives the panel a distinctive appearance, as well as making it float above the application’s other windows; and HUD, which gives the window the even more distinctive “heads-up” appearance. Try out some of these styles and see how they affect the panel’s appearance. The behavior of a panel can vary from a window, as well. A panel can be marked as an Auxiliary Window in the Full Screen pull-down, which means that it will float over a window in Full Screen mode in the same space. This is useful for things like Find or Info panels that affect a document in another window. After exploring, delete the panel from the nib file.
In addition to the generic window classes that are meant for us to fill with our own views and controls, Cocoa includes some specialized window subclasses for use in our applications. These are meant to meet the needs of a wide variety of applications, so using them provides a lot of functionality for free, and at the same time provides our users with familiar interfaces that they’ve probably used in other applications.
First, let’s take a look at NSColorPanel. This panel provides an interface that allows the user to select a color. We’re going to use the color panel to set the color of a piece of on-screen text by implementing a method in our controller class that’s called whenever the user selects a color in the color panel.
Assuming the MainMenu.xib file is still open in the WindowLab project we created in Xcode, let’s look at the main Window object in the nib file. Drag out a Wrapping Label (a.k.a. a Multiline Label) from the Object Library, and drop it onto the window. Drag out a button as well, and position it below the label. Use “Show Color Panel” as the title. The layout should look like Figure 11-3.

Figure 11-3. A very simple window layout
Xcode will also have created an App Delegate class for us. If we used WL as the class prefix, then it will be named WLAppDelegate. In Xcode, open up an Assistant Editor pane next to the Interface Builder pane (we talked about the Assistant Editor panes back in Chapter 5; click the icon that looks like a butler’s vest and bowtie in the block of icons labeled Editor in the Xcode toolbar.) Odds are that the WLAppDelegate.h file will be pre-loaded when we open this pane, but if not, use the nav bar in the top of the pane to open it. We’re going to add an outlet called title and an action called showColorPanel:. To do so, Control-drag from the Multiline Label to the WLAppDelegate.h file, aiming for just below the existing @property declaration. Add a new Outlet and title it title. Then, Control-drag from the Show Color Panel Button to just below the newly-added outlet, and add an Action named showColorPanel: (we’ll need to change the Connection type to Action).
When done, the WLAppDelegate.h file should read like this:
#import <Cocoa/Cocoa.h>

@interface WLAppDelegate : NSObject <NSApplicationDelegate>

@property (assign) IBOutlet NSWindow *window;
@property (weak) IBOutlet NSTextField *title;
- (IBAction)showColorPanel:(id)sender;

@end
Now switch to the .m file, and add the following implementation for the showColorPanel: method, along with a method called changeColor:, like this:
#import "WLAppDelegate.h"

@implementation WLAppDelegate

- (void)applicationDidFinishLaunching:(NSNotification *)aNotification
{
    // Insert code here to initialize your application
}

- (IBAction)showColorPanel:(id)sender
{
    // create the color panel
    NSColorPanel *panel = [NSColorPanel sharedColorPanel];
    // bring the color panel to the front of the screen
    [panel orderFront:nil];
}

- (void)changeColor:(id)sender
{
    // in this method, the "sender" parameter is the NSColorPanel
    // itself.  We just ask it for its color, and pass it along to
    // the "title" object.
    [self.title setTextColor:[sender color]];
}

@end
Note Although we’ve seen it before, take a close look at the @property declarations inside the WLAppDelegate.h file. Most of the time, when adding a property connected to a user interface element, the property includes the annotation weak. But that’s not the case for the reference to the window. That one is marked assign. There’s a good reason for this: the annotations control how Automatic Reference Counting (ARC) deals with the references. A reference marked as strong indicates ownership of the object. A reference marked as weak does not indicate ownership, and a weak reference will be zeroed out when all of the strong references to an object are released and the object is deallocated. However, ARC doesn’t work with classes that override release and retain, which includes NSWindow. Since NSWindow doesn’t support ARC, the property gets an assign annotation. This effectively means the same thing as weak but for non-ARC-enabled classes. The app delegate doesn’t own the window, and so the app delegate’s connection to the window shouldn’t prevent the window from being released and deallocated when appropriate.
The showColorPanel: method will be called by a simple button click in our GUI, and Xcode already wired that up for us when we Control-dragged from the button. But the changeColor: method will be called whenever the user clicks on a color in the color panel, even though there won’t be any direct connection between the color panel and our code. This bit of “magic” works thanks to a Cocoa concept called the responder chain (see sidebar).
THE RESPONDER CHAIN
The responder chain is an ad hoc collection of objects, gathered on the fly when necessary during the life of an application, that can be queried to see if they implement a particular action. This lets certain actions be configured in a generic way, so that at runtime they will be invoked on the object that makes the most sense at the time. The chain is arranged in order of specificity, starting with the object that is “nearest” to the action and continuing along toward the most generic. Configuring an object to use the responder chain is done in Interface Builder by connecting to an action on the nib’s First Responder icon, which is nothing more than a proxy for the first object in the responder chain that says, at runtime, “Yes I can” when asked if it implements a particular method.
This is all made somewhat more confusing by the fact that each window has its own notion of a “first responder,” which is typically the control or view that the user last interacted with (thereby making it a likely candidate for receiving key-presses and the like).
Let’s try to clarify this with an example. Consider the case of a button whose target/action is configured to call a method called showThing: on the First Responder. When a user clicks the button, each of a list of objects will be asked, in order, if they implement a showThing: method, right up until one of them answers YES, at which point that object’s showThing: method is called, and the responder chain’s work is done. Here’s an example of what the responder chain can look like:
- The window’s “first responder” (the view that’s currently in focus and accepting keyboard input), its superview, the superview’s superview, and so on, all the way up the view hierarchy within the window
- The window itself
- The window’s delegate
- The application object, NSApp
- The application object’s delegate
The responder chain may contain additional objects as well, especially if we’re working on a document-based application, in which case open documents and their controller’s will have a spot in the chain as well. More on that in Chapter 12.
As soon as any one of those objects says it implements showThing:, then the method is called on that object, and the search is over.
Now save the work and hit Run. Our new app will appear, and clicking the button will bring up the color panel. Click around on some different colors, and the color of the selected text will immediately change to reflect the new selection.
So, considering that the color panel has no direct connection to our app delegate, it’s fair to wonder: how does that work? How does the changeColor: method in our app delegate get called? The key is the use of the responder chain, as described earlier. NSColorPanel uses the responder chain to find an object that implements the changeColor: method. As the application’s delegate, our little controller object is one of the last objects queried to see if it implements the method, and since it does, it gets called. Note that if the window implemented the method itself, or if it had a delegate that implemented the method, one of those methods would have been called instead.
Now we need to end this section with a reality check. In reality, what we just did can be more easily (and more handsomely) accomplished by using an NSColorWell, a special control that launches the NSColorPanel when clicked. We’d only need to write code to declare a property in a controller class to contain an NSColor, and then use Cocoa Bindings to bind the NSColorWell’s Value attribute and the NSTextField’s Text Color attribute to the property in our controller. This example is included here, as-is, mainly to show you how to use the color panel from your own code, as well as give you a first look at the responder chain concept.
The next special panel we’re going to look at is NSFontPanel. Unlike the color panel, the font panel does not have a matching control that launches it. However, it can be integrated fairly easily with the contents of the system’s Format menu, as we’ll see a little later.
What we’re going to do here is add a button to our WindowLab window that will trigger an action method that opens the font panel and another method that will update the text field. Start by making the WindowLab window a little taller. Then select the button that opens up the Color panel, and duplicate it. Title the new button Show Font Panel. Open up an Assistant Editor pane showing the WLAppDelegate.h file, and Control-drag from the button to the Assistant Editor pane, aiming just below the existing action methods. Insert a new action, and name it showFontPanel.
Adding the action will cause the following method declaration to be added inside the class’s @interface block, in the WLAppDelegate.h file:
- (IBAction)showFontPanel:(id)sender;
The following stub will be added to the @implementation in the WLAppDelegate.m file:
- (IBAction)showFontPanel:(id)sender {
}
Switch to the .m file and fill in the following code in the @implementation section
- (IBAction)showFontPanel:(id)sender
{
  NSFontPanel *panel = [NSFontPanel sharedFontPanel];
  NSFontManager *manager = [NSFontManager sharedFontManager];
  [manager setSelectedFont:[self.title font] isMultiple:NO];
  [panel orderFront:nil];
}

- (void)changeFont:(id)sender
{
  // here, 'sender' is the shared NSFontManager instance
  NSFont *oldFont = [self.title font];
  NSFont *newFont = [sender convertFont:oldFont];
  [self.title setFont:newFont];
}
This follows the same usage pattern as the color panel. When the user clicks on a font, the font panel uses the responder chain to look for an object that implements the changeFont: action method, and it manages to find it in our app delegate. Here, things are slightly more complicated because in both of these methods we make use of a shared instance of the NSFontManager class. A running application’s notion of the selected or current font is held within this shared instance, which we use first in showFontPanel: to indirectly tell the NSFontPanel which font it should begin displaying, and then again in changeFont: to get the new selected font. We get the new font by passing the old font to the font manager’s convertFont: method, which combines characteristics of the old font with the state of the user’s selection in the font panel (for example, if the old font is Lucida Grande/Bold/36, and the user selects Times New Roman, leaving the rest alone, the converted font will be Times New Roman/Bold/36).
Now, save the work, go back to Xcode, and hit Run. We can now change both the color and the font for the displayed text (see Figure 11-4).

Figure 11-4. Setting a label’s color and font
A Controller With a Nib of Its Own
Next, we’re going to demonstrate a simple pattern that occurs often in Cocoa development: making a controller class that loads its own nib file, becoming the “owner” of all the objects in the file. In every application we’ve created so far, all the GUI elements are contained inside the application’s single .xib file. This works well enough for simple applications, but it has its limits. For one thing, we only have one instance of each window and each controller in the nib. For another thing, the entire main nib file is loaded at once, when the application is starting up, and the more stuff you have in that nib, the slower and more memory-intensive the startup phase will be. Granted, on modern computers with several gigabytes of RAM, this may not be such a huge problem, but as a programmer it’s always good to try to not waste CPU and RAM recklessly. Finally, putting too many top-level objects (windows, controllers, and the like) into a single nib file makes life more difficult for you, the programmer, because it’s harder to see which controllers and windows belong together.
The solution to both of these problems is to distribute some of the GUI objects into other nib files, and mediate their use with controller classes that load the nibs. This technique is used by many Cocoa applications, which commonly split windows for preferences, documents, tools, and so on into separate nib files. The following sections will demonstrate two different ways of doing this, with increasing complexity.
Loading a Nib With NSWindowController
The first and easiest way is to use Cocoa’s NSWindowController class to load the nib file and be its owner. We’ll add a button to our main window to trigger loading a new nib file and an NSMutableArray to our WLAppDelegate to hold onto references to the newly-loaded nibs. Without something to hold a reference to the newly-loaded nib, the ARC system will cause them to be freed immediately.
Start by opening up the WLAppDelegate.h file, and add the following property (given in bold):
@interface WLAppDelegate : NSObject <NSApplicationDelegate>

@property (assign) IBOutlet NSWindow *window;
@property (weak) IBOutlet NSTextField *title;
@property (strong) NSMutableArray *subWindows;
Then add this line to the applicationDidFinishLaunching: method in the .m file:
- (void)applicationDidFinishLaunching:(NSNotification *)aNotification
{
    self.subWindows = [[NSMutableArray alloc] init];
}
Next, open up the MainMenu.xib file, and add a new button to the main window below the two that are already there. Label it “Load Easy Window.” Open up an Assistant Editor pane (if there isn’t one already open) and open the WLAppDelegate.h file there. Control-drag out from the new button to the .h file, and add a new action called loadEasyWindow. Then, fill out the stub in the .m file for WLAppDelegate with the following implementation:
- (IBAction)loadEasyWindow:(id)sender
{
  NSWindowController *easyController = [[NSWindowController alloc]
      initWithWindowNibName:@"EasyWindow"];
  // need to hold onto a reference to this object.
  [self.subWindows addObject:easyController];
  [easyController window];
}
In that method, we first initialize a new controller, telling it the name of the nib file to use. Then, we store a reference to that controller in the subWindows NSMutableArray that we created in the applicationDidFinishLaunching: method, so that the new controller doesn’t get released at the end of the method. If we didn’t keep a reference to it, it would be released when it went out of scope and the newly-loaded nib file would get released along with it. Of course, in a real application, we’d need to have a mechanism to remove objects from this list as appropriate, but we’ll ignore that for the moment. Then we call its window method, which is what actually loads the nib file and displays the window. Of course, we haven’t created the EasyWindow nib file yet, so we’ll do that now.
Make a brand new nib file in Xcode by selecting File ![]() New
New ![]() New File. Select User Interface under OS X in the template chooser, and then choose the Window template, which contains a single NSWindow ready for us to use. Give the new file the name EasyWindow, and select the WindowLab folder under the Group pop-up menu. The Group pop-up menu will show five items, the top three of which are WindowLab with an Xcode Project icon, WindowLab with a Folder icon, and Supporting Files with a Folder icon. These correspond to the file groups in the Xcode Navigator area. Select the WindowLab entry with the folder icon, and click Create.
New File. Select User Interface under OS X in the template chooser, and then choose the Window template, which contains a single NSWindow ready for us to use. Give the new file the name EasyWindow, and select the WindowLab folder under the Group pop-up menu. The Group pop-up menu will show five items, the top three of which are WindowLab with an Xcode Project icon, WindowLab with a Folder icon, and Supporting Files with a Folder icon. These correspond to the file groups in the Xcode Navigator area. Select the WindowLab entry with the folder icon, and click Create.
Our newly-created xib file will show up as a new file in the Navigator area in Xcode, so open the file from there. Select the Window in the nib file, and open the Attributes Inspector. Give the window the title “Easy Window.”
In previous chapters, every controller we’ve created has been added to a nib file as a top-level object, but when you’re loading a nib file yourself, you can specify an object to be its “owner,” which in Interface Builder is represented by the File’s Owner object in the main nib window. NSWindowController, our controller’s class, already sets itself up as the owner of the nib file when it loads the file, but we still have to manually configure that in Interface Builder so that we can make use of it. To do this, select the File’s Owner icon and open the Identity Inspector. At the top of this Inspector, we can set the class of the object that we want to be the file’s owner. By default it’s set to NSObject, but we’ll usually want it to be NSWindowController itself or a custom subclass of NSWindowController. For now, set its Custom Class to NSWindowController, as shown in Figure 11-5. Lastly, Control-drag from the File’s Owner icon to the window, and assign that to the window outlet of File’s Owner. We need to do this so that the NSWindowController knows which of potentially many NSWindow objects is the “main” window for the nib.

Figure 11-5. Setting the class for File’s Owner
Save and then click Run. The app’s new button will let us create new windows with each press of the button (see Figure 11-6).

Figure 11-6. Some easy windows
Each time it’s actually creating a new NSWindowController instance, which loads a fresh copy of the nib file, including all objects inside of it. In this case all we have is a window, but you can put anything you like inside those nib files, including for example controller objects for accessing Core Data.
Subclassing NSWindowController
Of course, often you’ll need a bit of your own code in your controller class. You can easily subclass NSWindowController to suit your needs here as well. Our next steps will be to create a subclass and create a new nib file for it to load, and set up a way to call it from our main window and controller.
In Xcode, make a new class in the WindowLab project called NotSoEasyWindowController by selecting File ![]() New File from the menu and choosing Cocoa from the OS X section in the template selector. Choose Objective-C class, and then specify that we want to make a subclass of NSWindowController. Xcode will suggest WLWindowController as the name, but you should change it to WLNotSoEasyWindowController. Check the With XIB for user interface checkbox, and Xcode will also generate a WLNotSoEasyWindowController.xib file for us, with the File’s Owner set to our new subclass, and with the window outlet pre-connected. Xcode will prompt you to save the nib file, and ask which group to add it to. Use the same group that we used with the Easy Window nib file above, the WindowLab folder. Xcode generates WLNotSoEasyWindowController.h and WLNotSoEasyWindowController.m files with some methods for us, but we’re going to need to do some work on these files.
New File from the menu and choosing Cocoa from the OS X section in the template selector. Choose Objective-C class, and then specify that we want to make a subclass of NSWindowController. Xcode will suggest WLWindowController as the name, but you should change it to WLNotSoEasyWindowController. Check the With XIB for user interface checkbox, and Xcode will also generate a WLNotSoEasyWindowController.xib file for us, with the File’s Owner set to our new subclass, and with the window outlet pre-connected. Xcode will prompt you to save the nib file, and ask which group to add it to. Use the same group that we used with the Easy Window nib file above, the WindowLab folder. Xcode generates WLNotSoEasyWindowController.h and WLNotSoEasyWindowController.m files with some methods for us, but we’re going to need to do some work on these files.
We’re making our own class here, and there’s only one nib file that it’s intended to manage. Accordingly, we can build in the name of the nib file so that anyone using this class only needs to know about the class, not the name of the nib file itself. We can also make things even easier for callers: assuming that anyone who creates an instance of this class wants to load the nib file, let’s build the call to window right into the init method. Do this by creating the following init method:
- init
{
  if ((self = [super initWithWindowNibName:@"WLNotSoEasyWindowController"]))  {
    [self window];
  }
  return self;
}
That’s the recommended form of the standard init method, in which we call another init method in the superclass, do work specific to our instance if it succeeds, and finish up by returning a pointer to self. While we’re in here, let’s remove the initWithWindow: method that Xcode generated for us because there’s no need for it to ever be called.
Now switch over to MainMenu.xib. Once again, make the window a bit taller, duplicate the last button, and name it “Not So Easy.” Then open WLAppDelegate.h in the Assistant Editor, and Control-drag from the button over to WLAppDelegate.h, and add a new action called loadNotSoEasyWindow. Open up the WLAppDelegate.m file, and add the following implementation for that action:
// add this to WLAppDelegate.m:
- (IBAction)loadNotSoEasyWindow:(id)sender
{
    WLNotSoEasyWindowController *notSoEasyController = [[WLNotSoEasyWindowController alloc] init];
    [self.subWindows addObject:notSoEasyController];
}
We’ll also need to add the following #import directive at the top of WLAppDelegate.m so that the compiler knows about the new class when it’s compiling the app delegate:
#import "WLNotSoEasyWindowController.h"
With that in place, let’s add a small bit of functionality to our window controller class, so that after our nib file is created, we can make sure that our window is connecting up with it as it should: a simple method that makes the computer beep when it’s called. Unfortunately, we’ll need to add it by hand, but that’s easy to do.
Add the following method declaration to WLNotSoEasyWindowController.h:
- (IBAction)beep:(id)sender;
The whole contents of WLNotSoEasyWindowController.m should look like this, with the new beep: action method added: #import "WLNotSoEasyWindowController.h"

@interface WLNotSoEasyWindowController ()
@end

@implementation WLNotSoEasyWindowController

- init
{
    if ((self = [super initWithWindowNibName:@"WLNotSoEasyWindowController"])) {
        [self window];
    }
    return self;
}

- (void)windowDidLoad
{
    [super windowDidLoad];

    // Implement this method to handle any initialization after your window controller's window has been loaded from its nib file.
}

- (IBAction)beep:(id)sender
{
    NSBeep();
}

@end
Open the WLNotSoEasyWindowController.nib file in an Interface Builder canvas, and drag out a button from the Object Library, and title it “Beep!” Control-drag from the Beep! button to the File’s Owner icon in the Object Dock, and select the beep: action that we just added. Xcode will automatically note that we’ve added a new action and make it available for use. Save the changes and select Run; the newest button will let us create windows that beep when we press their buttons, as seen in Figure 11-7.
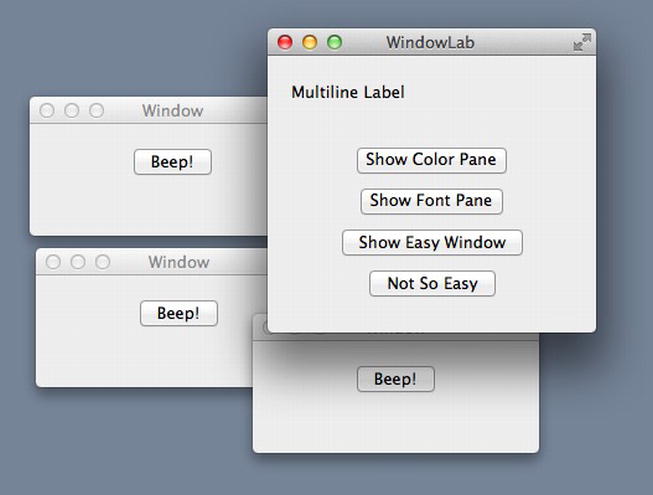
Figure 11-7. These windows’ buttons will beep at us
Modal Windows
Now we’re going to move on to a special kind of GUI item, the modal window. Everyone has used modal windows at one time or another, but if you’re new to desktop GUI programming, the term may be new to you. Basically, a modal window is one that puts our application in a particular “mode.” Specifically, a mode where it will only accept input through the controls on the modal window itself, and clicking anywhere else in the application will just make it beep at us. Because of their disruptive nature, modal windows should be used sparingly—in cases where the application can’t really move forward on its own without the user answering a question of some kinds (such as, “There are five open documents with unsaved changes. Are you sure you want to quit?”). In cases where the information the app needs from the user is related to just a single window or document, it’s better to use a sheet, described later in this chapter, which locks down a single window instead of the entire application.
The NSAlert Functions
The simplest modal windows available in Cocoa are the alert panels, which are created and run with a single function call. The function returns when the user clicks one of the buttons, and we can then check the return value to determine which of the buttons they clicked. Depending on how we call the function, there may be one, two, or three buttons presented for the user.
The most commonly used modal alert function is NSRunAlertPanel. It has a few variants called NSRunCriticalAlertPanel and NSRunInformationalAlertPanel, which are used for specific purposes outlined in Apple’s user interface guidelines, but we can safely stick with NSRunAlertPanel. Each of these functions takes five or more parameters: first the title that appears at the top of the panel, then the full text to display (which presents some information or asks the user a question), then three strings (which may be nil) containing the button titles. Button titles left as nil will simply won’t be displayed, except for the case where they’re all nil, in which case a single OK button is included on the panel.
To see some alert panels in action, open up MainMenu.xib in an Interface Builder pane, and then open WLAppDelegate.h in an Assistant Editor pane. Add a new button to the WindowLab window, and title it “Run Modal Alerts.” Control-drag from the new button to the Assistant Editor to add a new action. Call the new action runModalAlerts. Then, implement the following method in WLAppDelegate.m inside the stub generated by Xcode:
- (IBAction)runModalAlerts:(id)sender
{
  NSRunCriticalAlertPanel(@"Basic Usage", @"This is a plain alert panel.", nil, nil, nil);
  NSRunAlertPanel(@"Three Buttons", @"We can set button titles:",
    @"Really?", @"Oh, how delightful!", @"Whatever.");
  NSRunAlertPanel(@"Formatting Strings", @"We can also do some formatting, %@ %@",
    nil, nil, nil, @"putting values for insertion at the end,", @"after the three button values.");
  switch (NSRunAlertPanel(@"Noticing The Selection",
            @"And of course, we can detect which button is clicked.",
            @"Default", @"Alternate", @"Other")) {
    case NSAlertDefaultReturn:
      NSRunInformationalAlertPanel(@"Result:", @"You pressed the default button",
         nil, nil, nil);
      break;
    case NSAlertAlternateReturn:
      NSRunInformationalAlertPanel(@"Result:", @"You pressed the alternate button",
        nil, nil, nil);
      break;
    case NSAlertOtherReturn:
      NSRunInformationalAlertPanel(@"Result:", @"You pressed the other button",
        nil, nil, nil);
      break;
    default:
      break;
  }
}
Try these out! Save, click Run, and give it a whirl.
The other most commonly used modal panels in Cocoa are probably the ones for opening and saving files, NSOpenPanel and NSSavePanel. Using these panels is typically more than just a one-liner. We first need to configure various options on the panel (for instance, whether it should allow the user to select multiple files for opening, or just one), then run the panel, check the return value (which indicates whether the user eventually clicked the Open or Save button, or canceled out), and then grab the resulting filenames from the panel. Note that these panels don’t actually do any file I/O; they just prompt the user for filenames and return the results. Cocoa uses NSURLs for file paths instead of NSStrings, which allows Open and Save dialogs to refer to things beyond just on the local file system (such as iCloud).
To see an example of how this can work, consider the following method, which pretends to copy a file. This method uses an NSOpenPanel to prompt the user for the file to copy, and then uses an NSSavePanel to let the user specify where the file should go:
- (IBAction)copyFile:(id)sender
{
    NSOpenPanel *openPanel = [NSOpenPanel openPanel];
    [openPanel setTitle:@"Select file to copy:"];

    if ([openPanel runModal] == NSOKButton) {
        // get the first (and only) selected filename
        NSURL *openPath = [[openPanel URLs] objectAtIndex:0];
        // pull out just the filename, without directory path
        NSString *openFilename = [openPath lastPathComponent];

        NSSavePanel *savePanel = [NSSavePanel savePanel];

        [savePanel setTitle:@"Enter destination filename:"];
        [savePanel setNameFieldStringValue:openFilename];

        // run the save panel in its default directory, with the opened filename
        // as a suggestion.
        if ([savePanel runModal] == NSOKButton) {
            NSURL *savePath = [savePanel URL];
            NSString *message = [NSString stringWithFormat:
                                 @"You've opened this file:

%@

and saved it here:

%@

",
                                 openPath, savePath];
            NSRunAlertPanel(@"Copying file (not really)", message, nil, nil, nil);
        }
    }
}
As before, add a button to the main window (call this one “Copy File”) and then Control-drag to the WLAppDelegate.h file to add an action. Name the action copyFile. Then copy the code above into WLAppDelegate.m in place of the action stub generated by Xcode. Save the changes, click Run, and try out the new button. The standard Open panel will appear, followed by a standard Save panel. Note that the Save panel even has built-in functionality to warn us when we’re selecting an existing file and ask us if we really want to overwrite it (remember, it’s perfectly safe to confirm overwriting the file in this example, since we’re not actually copying anything).
It’s probably worth mentioning here the not-so-obvious fact that NSOpenPanel is actually a subclass of NSSavePanel. That means that if you can’t seem to find the functionality you’re expecting in NSOpenPanel’s documentation or header file, you may need to check out NSSavePanel as well.
System Menus
Now that we’ve seen some of the basics of how windows are used in Cocoa, let’s spend some time dealing with another ever-present feature of Mac OS X, the application menu. Unlike most other current operating systems, Mac OS X presents its menu at the top of the screen instead of at the top of each window. This arrangement has some nice upsides: screen real estate is saved because instead of a horizontal strip taking space at the top of every open window, there’s just a single horizontal strip at the top showing the menu for the active application. Also, the menu is easier and quicker to “hit” with the mouse because we can just flick the mouse upwards and we know we’ll hit the menu, leaving us with just fine-tuning left and right to find the top item we want to select.
This arrangement isn’t without complications, however. In a typical Windows application, there might be a number of different windows, each with its own menu, containing items that are only relevant to that window’s contents. While it’s technically possible to do something similar in a Mac OS X application, changing the structure of the menu as different windows are selected, this usage is frowned upon and will probably bother some users, who on the Mac are quite accustomed to applications that behave in a consistent manner. Instead, we can implement a behavior that is fully supported and recommended: enabling and disabling menu items based on the currently selected window (or, indeed, the currently selected object inside a window). In this section, we’re going to demonstrate how to do this, but first we’re going to talk a bit about the system menus that are included with Cocoa and standard across most applications.
Standard Application Menu Items
Apple’s guidelines define a set of menus and menu items that should appear in most applications. Create a new application in Xcode, and name it MenuLab, and use ML as the class prefix. This is where we’ll do some experimenting with menu items. Open the freshly created MainMenu.xib file, and the Interface Builder canvas will show the predefined set of menus at the top. This set contains top-level entries for the application itself, followed by File, Edit, Format, View, Window, and Help, each of which contains menu items of its own. Open up the Connections Inspector so that we can examine some of these items and see what they’re connected to. Just click around on each of the various menu items, and keep your eye on the Inspector after each click. There are a few exceptions, such as the Show Fonts menu item, but most of the items are connected to the First Responder proxy that we talked about earlier. Note that by connecting a menu item to the First Responder, not only will the item call its action method in the most relevant object, it will also be automatically enabled and disabled based on the contents of the responder chain.
The standard menus contain a lot of functionality; everything from bringing up the app’s About Box, to editing and formatting text, to dealing with windows is all set up. However, many applications need some extra functionality—something that doesn’t seem right to attach to a window, or just takes up too much space in a window. One common way to address this is to add one or more additional top-level menu items, usually between the View and Window menus. For instance, the Finder has a Go menu in there, and Xcode has three additional top-level menus: Navigate, Editor, and Product. In our application, we’ll get by with just one additional menu, which we’ll add to our MenuLab project.
Enabling/Disabling With Bindings
The first thing we’re going to do is set up a pair of menu items to control a Boolean attribute in our app delegate. We could use these to control some sort of switch that affects an application-wide setting. Here, we’ll create a property called turbo, which presumably makes everything happen faster (easy enough in MenuLab because it doesn’t actually do anything). We’ll have two menu items labeled “Turbo On” and “Turbo Off,” and connect each of them to an action method in our app delegate to do the actual toggling. Then we’ll use bindings to enable and disable them as appropriate, so that when turbo is YES, only the “Turbo Off” item is clickable, and when turbo is NO, only the “Turbo On” item is clickable.
Start off in Xcode by adding the turbo property to the app delegate, along with an action method to toggle the value of the property. The changes we need to make to both MLAppDelegate.h and MLAppDelegate.m are shown here, in a somewhat compacted form, with blank lines removed. All we need to add are the lines shown in bold.
#import <Cocoa/Cocoa.h>

@interface MLAppDelegate : NSObject <NSApplicationDelegate>

@property (assign) IBOutlet NSWindow *window;
@property (assign) BOOL turbo;
- (IBAction)toggleTurbo:(id)sender;

@end
And for MLAppDelegate.m:
#import "MLAppDelegate.h"

@implementation MLAppDelegate

- (void)applicationDidFinishLaunching:(NSNotification *)aNotification
{
    // Insert code here to initialize your application
}

- (IBAction)toggleTurbo:(id)sender {
    self.turbo = !self.turbo;
}

@end
Now switch back to MainMenu.xib in an Interface Builder canvas. Open up the nib file’s empty window, change its title to “Turbo Switch,” and drag in a checkbox from the Object Library, changing its title to “Turbo!” once it’s in place. We put this checkbox there to give us a direct view of the value stored in the app delegate’s turbo property, so we can easily check and see that our menu items are doing the right thing. Open the Bindings Inspector, and configure the checkbox’s Value binding, connecting it to MLAppDelegate using the turbo key path.
Next, it’s time to create some menu items (Figure 11-8 shows what it should look like when we’re done). To do this, first search for Menu in the Object Library, which will limit the contents. Drag a Submenu Menu Item up into the menu, placing it between the View and Window menus. Double-click the new top-level menu item that we just added, and change its title to “Tools.” Clicking it again will reveal that it already contains a single item (titled “Item”). Click to select it, then press ![]() -D to duplicate it, which places an identical item just below it.
-D to duplicate it, which places an identical item just below it.

Figure 11-8. Setting up menu items for toggling a Boolean attribute
At this point, the lower of the two new menu items should be selected. Double-click to select the title text, and rename it “Turbo Off.” Control-drag from it to the App Delegate icon in the main window, and connect to the toggleTurbo: action. Now bring up the Bindings Inspector, and configure the menu item’s Enabled binding, connecting to the App Delegate using the turbo key path. This ensures that the menu will only be enabled if the value of app delegate’s turbo property is YES.
Now go back to the upper menu item, renaming it “Turbo On,” and connecting it to the app delegate’s toggleTurbo: action just like you did for Turbo Off. Because the condition for whether this menu item should be enabled or disabled is the opposite of the condition for the Turbo Off menu item, the binding is going to be a little different. It should also have its Enabled binding configured with App Delegate and the turbo key path, but below that you also need to specify NSNegateBoolean as the Value Transformer.
Save the changes and click Run. The Turbo Switch window should appear, containing a checkbox. Our app should have a Tools menu containing Turbo On and Turbo Off items, only one of which should be enabled at a time; clicking the enabled item should toggle the checkbox and change the state of both menu items, so that now only the other item is enabled. Also, clicking the checkbox should affect the enabled/disabled state of each menu item appropriately.
This is a simple way to enable and disable menu items through the use of bindings, but we’d be remiss if we didn’t point out that this usage is sort of artificial and not really the way that you’d normally deal with application-wide Boolean values in a menu. In a case like this, instead of two menu items, one of which is always disabled, you’re more likely to use a single menu item showing a checkbox to indicate a state, just like the checkbox in our window does. As it turns out, that’s even easier to do than what we’ve already done. Go back to MainMenu.xib, open up the Tools menu in the Interface Builder Canvas, and drag out a new Menu Item from the Object Library onto the Tools menu. Name this new item “Turbo,” and configure its Value binding, connecting to App Delegate using the turbo key path. That’s it! We don’t need to Control-drag to set up the action for the menu item; Cocoa Bindings manages it all for us. Save, Run, and try it out. Note that this quick method doesn’t even need the toggleTurbo: method, so if we want, we can delete that method along with the Turbo On and Turbo Off items.
Enabling/Disabling With First Responder
Now we’re going to show a more common way of automatically enabling and disabling menu items, which gives us more fine-grained control so that the enabled state of each menu item can be updated automatically depending on which window is selected, which text field or other control in a window is selected, and so on. This method works using the responder chain, somewhat similar to how the color panel finds an object to pass a selected color to, as described earlier in this chapter. In this case, the method that’s searched for along the responder chain is validateUserInterfaceItem:, whose declaration looks like this:
- (BOOL)validateUserInterfaceItem:
          (id <NSValidatedUserInterfaceItem>)anItem;
If it’s implemented in the responder chain’s objects, this method is called at the appropriate time to see if the user interface item (in this case, a menu item) should be enabled or not. In implementing this method, we can use anItem to get some information about the object that’s going to be enabled or disabled; we can ask it for its action (so we can compare with one of our own methods) and for its tag (in case we’d rather compare against a control tag we’ve set on the object). Usually we’ll just want to use the action. We’ll demonstrate how this works in just a bit, but first we should probably clarify just when this method is called.
Here’s the basic idea: any time Cocoa is about to draw the menu, generally in response to the user clicking on the menu bar, some checks are made for each menu item to determine whether it should be enabled or disabled. The flowchart in Figure 11-9 gives a rough outline of the sequence of events.
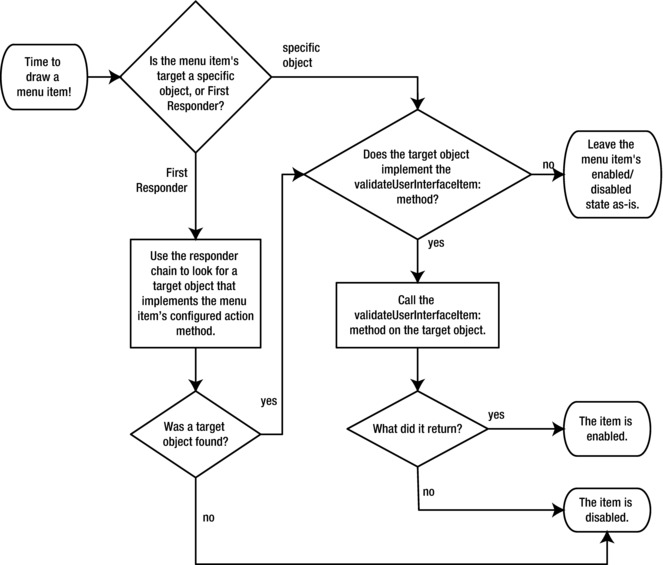
Figure 11-9. How the menu system decides whether a menu item should be enabled or not
The upshot of all this is that the menu item’s target object, whether configured explicitly or found in the responder chain, is the one that decides whether the menu item should be enabled (at the current time) or not. This means that we have complete dynamic control over each menu item. By implementing validateUserInterfaceItem: in each of our classes containing methods that are called by menu items, whether directly or through the responder chain, we can define some logic that the menu system calls at the right time, and automatically enables or disables each menu item based on what we return.
Let’s illustrate this with an example. We’ll create a new window in our nib file, matched by a new delegate class just for that window, which will implement validateUserInterfaceItem: to handle the state of a menu item. In a real application, you would probably base it on the content of a model object, but for simplicity’s sake, we’ll enable or disable a menu item based on what’s selected in the window.
Start by creating a new class in Xcode, just a plain NSObject subclass called MLListWindowDelegate. To do this, select File ![]() New
New ![]() File, and then select Cocoa under the OS X heading on the left. Select Objective-C Class. Set the name of the class to be MLListWindowDelegate, and set it as a Subclass of NSObject. In its header, add an #import <Cocoa/Cocoa.h> line at the top, and then define an integer property called selectedTag, which we’ll later bind to a GUI object (add the lines that are shown in bold):
File, and then select Cocoa under the OS X heading on the left. Select Objective-C Class. Set the name of the class to be MLListWindowDelegate, and set it as a Subclass of NSObject. In its header, add an #import <Cocoa/Cocoa.h> line at the top, and then define an integer property called selectedTag, which we’ll later bind to a GUI object (add the lines that are shown in bold):
// MLListWindowDelegate.h
#import <Foundation/Foundation.h>
#import <Cocoa/Cocoa.h>

@interface MLListWindowDelegate : NSObject
@property (assign) NSInteger selectedTag;
@end
In the matching MLListWindowDelegate.m file, we’re going to implement the specialAction: method that a menu item will be connected to with target/action via the First Responder proxy, and implement the validateUserInterfaceItem: method. Xcode will automatically synthesize getters and setters for the selectedTag property for us.
// MLListWindowDelegate.m
#import "MLListWindowDelegate.h"
@implementation MLListWindowDelegate
- (BOOL)validateUserInterfaceItem:
  (id <NSValidatedUserInterfaceItem>)anItem
{
    // set the default response to YES, in case it's not the action we care about
    BOOL result = YES;
    SEL theAction = [anItem action];
    if (theAction == @selector(specialAction:) ) {
        if (self.selectedTag != 13013) {
            result = NO;
        }
    }
    return result;
}

- (void)specialAction:(id)sender
{
    NSRunAlertPanel(@"Boy Howdy!",
                    @"That's some mighty special action you got there!",
                    nil, nil, nil);
}
@end
We should point out a thing or two about the validateUserInterfaceItem: method. First, note that we’re using the item’s action to determine what method it would call if clicked. In code, an action (or any kind of method for that matter) can be referred to by the Objective-C SEL type. Technically, a SEL is not a method, but a “selector,” which is a sort of hash of the method’s name, somewhat modified for performance considerations, that the Objective-C runtime can use to look up the method’s actual implementation. Besides looking up a method, a SEL can be compared to another SEL, such as that returned by the @selector(specialAction:) construct shown in the code. In our method, we test to see whether the menu item in question is targeted at the action method we care about, in which case we go deeper. If the actions match up, we then do a simple check against some internal state, in the form of the selectedTag property, to see if we want to allow this menu item to be enabled or not. If the selector doesn’t match, then we default to returning YES.
Now let’s create a GUI to put this code to work. Open the MainMenu.xib file into an Interface Builder canvas and drag a plain NSObject from the Object Library to the nib window (search for NSObject in the Object Library Search box). It will appear in the Object Dock along the left side of the screen. Use the Identity Inspector to change its class to MLListWindowDelegate. Then drag out a new window from the Object Library, and connect its delegate outlet to the MLListWindowDelegate object we just set up. Now find a Radio Group in the Object Library, and drag it into the new window. Including this in the window gives us a rudimentary way to provide a sort of selection for the window and its delegate. Bind the group’s Selected Tag to the ListWindowDelegate's selectedTag property. That way, the delegate is informed whenever someone clicks one of the radio buttons. Now expand the radio group to contain more radio buttons by option-dragging the lower resize handle until there are seven or eight buttons. Then, click one of the buttons near the middle, and use the Attributes Inspector to change its title to “Special Selection,” and its tag to 13013, the “magic number” that we’ll look for in the code.
All that’s left is configuring a new menu item to call the specialAction: method via the First Responder. Start by selecting the First Responder item in the nib window and bringing up the Attributes Inspector. Here is where we can manually add any action methods that we want this proxy object to know about. We’ll see a list of user-defined actions, which starts out empty. Add one of our own by clicking the + button, and changing its name to specialAction: (don’t forget the colon!). Now for the menu item: find a plain Menu Item in the Object Library, and drag it into the Tools menu we created earlier. Set its title to “Special Action,” and configure its target/action by Control-dragging to the First Responder item in the nib window and selecting specialAction: from the resulting list.
Now it’s time to see this in action. Save the work and click Run. The app now has a new window where we can select one of the radio buttons. Click around on some of the radio buttons, each time clicking the Tools top-level menu item to see if the Special Action item is enabled. It should only be enabled if the Special Selection button is selected. If another radio button is selected, or if the app’s other window (the old window with the Turbo checkbox) is selected, the menu item should be disabled.
This basic concept can be extended as far as you want. The point is that enabling and disabling menu items is really quite simple. You never have to manually enable or disable individual menu items as things happen in your app; you just write code that is called automatically when a menu item is about to be displayed, and deal with it then.
The final topic we’re going to cover in this chapter is the concept of sheets. A sheet is simply a window that is temporarily attached to another window and run in a semi-modal way, such that the “other window” doesn’t receive any events. The idea is that an application can have several windows that aren’t impacted by each other’s demands for user attention. For example, in the TextEdit application included with Mac OS X, you can have the Save As panel appearing as a sheet on one document, the Print panel appearing as a sheet on another, and continue typing in a third.
Chances are you won’t use sheets in every Cocoa app you ever build, but they are useful in situations where your application needs some sort of user input related to a particular window, and you’d rather not use a modal panel that stops input to the rest of your application. In the example just shown, for instance, without the use of sheets, that Save panel would probably run in a modal fashion, blocking input to all other windows until the user dismissed it. With the use of sheets, the user can temporarily leave the ongoing Save operation and do some other interaction with the application before committing the Save.
Sheets aren’t represented by a particular class in Cocoa. Rather, they are normal windows used in a special way. Every NSWindow can have a sheet attached to it, and every window or panel that’s normally used in a modal way can be used as a sheet as well.
Let’s see the basics of how to use a sheet by attaching an NSOpenPanel to a normal window in a new application that we’ll call SheetLab. Create a new Cocoa application project in Xcode, using SL as the class prefix, and save it as SheetLab. Now, edit SLAppDelegate.h, adding an openDocument: action method:
#import <Cocoa/Cocoa.h>
@interface SLAppDelegate : NSObject <NSApplicationDelegate>
@property (assign) IBOutlet NSWindow *window;
- (IBAction)openDocument:(id)sender;
@end
Then edit SLAppDelegate.m, adding the following method implementations:
#import "SLAppDelegate.h"
@implementation SLAppDelegate
- (IBAction)openDocument:(id)sender {
  NSOpenPanel *panel = [NSOpenPanel openPanel];

  [panel setCanChooseDirectories:NO];
  [panel setAllowsMultipleSelection:NO];
  [panel setMessage:@"Please pick one file to import."];

    // Display the panel attached to the document's window.
    [panel beginSheetModalForWindow:self.window completionHandler:^(NSInteger result){
        if (result == NSFileHandlingPanelOKButton) {
            // Set the window title to the filename of the selected file.
            NSArray* urls = [panel URLs];
            NSString *selectedFile = [[urls lastObject] lastPathComponent];
            [self.window setTitle:selectedFile];
        }
    }];
}

@end
We declare a method called openDocument: in this class. openDocument: is the action used by the File ![]() Open menu item. When the user hits File
Open menu item. When the user hits File ![]() Open (or
Open (or ![]() -O), the responder chain gets followed until an object is found that responds to openDocument:. Since the App Delegate is in the responder chain and there’s nothing else in the app that responds to openDocument:, our code will get called. The openDocument: method grabs the standard open panel, sets it to only allow selection of one file (not directories, and not multiple files), and adds a message to the panel. It then tells it to run modally attached to a window (using the window property), using the beginSheetModalForWindow:completionHandler: method. The second argument to this method is an Objective-C block, a new concept that we haven’t seen before. It specifies the actions that should be taken when the panel is finished running. In this case, if the user has selected a file and hit OK, we get the URL of the selected file, and then set the title of the window to the last part of the path, which should be the filename itself.
-O), the responder chain gets followed until an object is found that responds to openDocument:. Since the App Delegate is in the responder chain and there’s nothing else in the app that responds to openDocument:, our code will get called. The openDocument: method grabs the standard open panel, sets it to only allow selection of one file (not directories, and not multiple files), and adds a message to the panel. It then tells it to run modally attached to a window (using the window property), using the beginSheetModalForWindow:completionHandler: method. The second argument to this method is an Objective-C block, a new concept that we haven’t seen before. It specifies the actions that should be taken when the panel is finished running. In this case, if the user has selected a file and hit OK, we get the URL of the selected file, and then set the title of the window to the last part of the path, which should be the filename itself.
Note A block represents a piece of code that (among other things) can be passed as an argument to a method. In other languages, it’s called a closure or a lambda. The use of blocks is becoming more prevalent in Cocoa, rather than passing pointers to callback functions. A block has access to all of the variables that are in-scope at the point of declaration and has the benefit of being declared at the point of use. Blocks were introduced in OS X 10.6 and iOS 4. You can read much more about blocks in the Apple Developer Documentation in Xcode, or at https://developer.apple.com/library/mac/#documentation/Cocoa/Conceptual/Blocks/Articles/00_Introduction.html#//apple_ref/doc/uid/TP40007502.
Save the changes, click Run, and the app will launch. Hitting ![]() -O brings up the modal open panel, attached as a sheet on top of the app’s window. When we select a file, the name of the window gets set to the name of the file!
-O brings up the modal open panel, attached as a sheet on top of the app’s window. When we select a file, the name of the window gets set to the name of the file!
Wrap Up
This chapter provided an introduction to several key parts of the Cocoa GUI experience, as well as a few examples of how the responder chain is used. These features are crucial to making a professional-quality Mac application. Mac users tend to be pretty unforgiving when applications use non-standard behaviors without a good reason, so it’s important to know how to deal with windows and menus in ways that users will recognize. In the next chapter, we’ll build on this knowledge as we explore Cocoa’s classes for dealing with documents and their associated windows.