Chapter 24. Elastic Scale
The Elastic Scale pattern covers application scaling in multiple dimensions: horizontal scaling by adapting the number of Pod replicas, vertical scaling by adapting resource requirements for Pods, and scaling the cluster itself by changing the number of cluster nodes. While all of these actions can be performed manually, in this chapter we explore how Kubernetes can perform scaling based on load automatically.
Problem
Kubernetes automates the orchestration and management of distributed applications composed of a large number of immutable containers by maintaining their declaratively expressed desired state. However, with the seasonal nature of many workloads that often change over time, it is not an easy task to figure out how the desired state should look. Identifying accurately how many resources a container will require, and how many replicas a service will need at a given time to meet service-level agreements takes time and effort. Luckily, Kubernetes makes it easy to alter the resources of a container, the desired replicas for a service, or the number of nodes in the cluster. Such changes can happen either manually, or given specific rules, can be performed in a fully automated manner.
Kubernetes not only can preserve a fixed Pod and cluster setup, but also can monitor external load and capacity-related events, analyze the current state, and scale itself for the desired performance. This kind of observation is a way for Kubernetes to adapt and gain antifragile traits based on actual usage metrics rather than anticipated factors. Let’s explore the different ways we can achieve such behavior, and how to combine the various scaling methods for an even greater experience.
Solution
There are two main approaches to scaling any application: horizontal and vertical. Horizontally in the Kubernetes world equates to creating more replicas of a Pod. Vertically scaling implies giving more resources to running containers managed by Pods. While it may seem straightforward on paper, creating an application configuration for autoscaling on a shared cloud platform without affecting other services and the cluster itself requires significant trial and error. As always, Kubernetes provides a variety of features and techniques to find the best setup for our applications, and we explore them briefly here.
Manual Horizontal Scaling
The manual scaling approach, as the name suggests, is based on a human operator issuing commands to Kubernetes. This approach can be used in the absence of autoscaling, or for gradual discovery and tuning of the optimal configuration of an application matching the slow-changing load over long periods. An advantage of the manual approach is that it also allows anticipatory rather than reactive-only changes: knowing the seasonality and the expected application load, you can scale it out in advance, rather than reacting to already increased load through autoscaling, for example. We can perform manual scaling in two styles.
Imperative scaling
A controller such as ReplicaSet is responsible for making sure a specific number of Pod instances are always up and running. Thus, scaling a Pod is as trivially simple as changing the number of desired replicas. Given a Deployment named random-generator, scaling it to four instances can be done in one command, as shown in Example 24-1.
Example 24-1. Scaling a Deployment’s replicas on the command line
kubectl scale random-generator --replicas=4After such a change, the ReplicaSet could either create additional Pods to scale up, or if there are more Pods than desired, delete them to scale down.
Declarative scaling
While using the scale command is trivially simple and good for quick reactions to emergencies, it does not preserve this configuration outside the cluster. Typically, all Kubernetes applications would have their resource definitions stored in a source control system that also includes the number of replicas. Recreating the ReplicaSet from its original definition would change the number of replicas back to its previous number. To avoid such a configuration drift and to introduce operational processes for backporting changes, it is a better practice to change the desired number of replicas declaratively in the ReplicaSet or some other definition and apply the changes to Kubernetes as shown in Example 24-2.
Example 24-2. Using a Deployment for declaratively setting the number of replicas
kubectl apply -f random-generator-deployment.yaml
We can scale resources managing multiple Pods such as ReplicaSets, Deployments, and StatefulSets. Notice the asymmetric behavior in scaling a StatefulSet with persistent storage. As described in Chapter 11, Stateful Service, if the StatefulSet has a .spec.volumeClaimTemplates element, it will create PVCs while scaling, but it won’t delete them when scaling down to preserve the storage from deletion.
Another Kubernetes resource that can be scaled but follows a different naming convention is the Job resource, which we described in Chapter 7, Batch Job. A Job can be scaled to execute multiple instances of the same Pod at the same time by changing the .spec.parallelism field rather than .spec.replicas. However, the semantic effect is the same: increased capacity with more processing units that act as a single logical unit.
Note
For describing resource fields we use a JSON path notation. For example, .spec.replicas points to the replicas field of the resource’s spec section.
Both manual scaling styles (imperative and declarative) expect a human to observe or anticipate a change in the application load, make a decision on how much to scale, and apply it to the cluster. They have the same effect, but they are not suitable for dynamic workload patterns that change often and require continuous adaptation. Next, let’s see how we can automate scaling decisions themselves.
Horizontal Pod Autoscaling
Many workloads have a dynamic nature that varies over time and makes it hard to have a fixed scaling configuration. But cloud-native technologies such as Kubernetes enable creating applications that adapt to changing loads. Autoscaling in Kubernetes allows us to define a varying application capacity that is not fixed but instead ensures just enough capacity to handle a different load. The most straightforward approach to achieving such behavior is by using a HorizontalPodAutoscaler (HPA) to horizontally scale the number of pods.
An HPA for the random-generator Deployment can be created with the command in Example 24-3. For the HPA to have any effect, it is important that the Deployment declare a .spec.resources.requests limit for the CPU as described in Chapter 2, Predictable Demands. Another requirement is that you have the metrics server enabled, which is a cluster-wide aggregator of resource usage data.
Example 24-3. Create HPA definition on the command line
kubectl autoscale deployment random-generator --cpu-percent=50--min=1--max=5
The preceding command will create the HPA definition shown in Example 24-4.
Example 24-4. HPA definition
apiVersion:autoscaling/v2beta2kind:HorizontalPodAutoscalermetadata:name:random-generatorspec:minReplicas:1maxReplicas:5scaleTargetRef:apiVersion:extensions/v1beta1kind:Deploymentname:random-generatormetrics:-resource:name:cputarget:averageUtilization:50type:Utilizationtype:Resource

Minimum number of Pods that should always run

Maximum number of Pods until the HPA can scale up

Reference to the object that should be associated with this HPA

Desired CPU usage as a percentage of the Pods, requested CPU resource. For example, when the Pods have a
.spec.resources.requests.cpuof 200m, a scale-up happens when on average more than 100m CPU (= 50%) is utilized.
Note
In Example 24-4 we use the API version v2beta2 of the resource to configure the HPA. This version is in active development and is feature-wise a superset of version v1. Version v2 allows for much more criteria than the CPU usage, like memory consumption or application-specific custom metrics. By using kubectl get hpa.v2beta2.autoscaling -o yaml, you can easily convert a v1 HPA resource created by kubectl autoscale to a v2 resource.
This definition instructs the HPA controller to keep between one and five Pod instances to retain an average Pod CPU usage of around 50% of the specified CPU resource limit in the Pod’s .spec.resources.requests declaration. While it is possible to apply such an HPA to any resource that supports the scale subresource such as Deployments, ReplicaSets, and StatefulSets, you must consider the side effects. Deployments create new ReplicaSets during updates but without copying over any HPA definitions. If you apply an HPA to a ReplicaSet managed by a Deployment, it is not copied over to new ReplicaSets and will be lost. A better technique is to apply the HPA to the higher-level Deployment abstraction, which preserves and applies the HPA to the new ReplicaSet versions.
Now, let’s see how an HPA can replace a human operator to ensure autoscaling. At a high level, the HPA controller performs the following steps continuously:
-
Retrieves metrics about the Pods that are subject to scaling according to the HPA definition. Metrics are not read directly from the Pods but from the Kubernetes Metrics APIs that serve aggregated metrics (and even custom and external metrics if configured to do so). Pod-level resource metrics are obtained from the Metrics API, and all other metrics are retrieved from the Custom Metrics API of Kubernetes.
-
Calculates the required number of replicas based on the current metric value and targeting the desired metric value. Here is a simplified version of the formula:
For example, if there is a single Pod with a current CPU usage metric value of 90% of the specified CPU resource request value,1 and the desired value is 50%, the number of replicas will be doubled, as . The actual implementation is more complicated as it has to consider multiple running Pod instances, cover multiple metric types, and account for many corner cases and fluctuating values as well. If multiple metrics are specified, for example, then HPA evaluates each metric separately and proposes a value that is the largest of all. After all the calculations, the final output is a single integer number representing the number of desired replicas that keep the measured value below the desired threshold value.
The replicas field of the autoscaled resource will be updated with this calculated number and other controllers do their bit of work in achieving and keeping the new desired state.
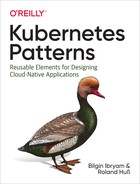
Figure 24-1 shows how the HPA works: monitoring metrics and changing declared replicas accordingly.

Figure 24-1. Horizontal Pod autoscaling mechanism
Autoscaling is an area of Kubernetes with many low-level details that are still evolving rapidly, and each one can have a significant impact on the overall behavior of autoscaling. As such, it is beyond the scope of this book to cover all the details, but “More Information” provides the latest up-to-date information on the subject.
Broadly, there are the following metric types:
- Standard metrics
-
These metrics are declared with
.spec.metrics.resource[:].typeequals toResourceand represent resource usage metrics such as CPU and memory. They are generic and available for any container on any cluster under the same name. You can specify them as a percentage as we did in the preceding example, or as an absolute value. In both cases, the values are based on the guaranteed resource amount, which is the container resourcerequestsvalues and not thelimitsvalues. These are the easiest-to-use metric types generally provided by the metrics server or Heapster components, which can be launched as cluster addons. - Custom metrics
-
These metrics with
.spec.metrics.resource[*].typeequals toObjectorPodrequire a more advanced cluster monitoring setup, which can vary from cluster to cluster. A custom metric with the Pod type, as the name suggests, describes a Pod-specific metric, whereas the Object type can describe any other object. The custom metrics are served in an aggregated API Server undercustom.metrics.k8s.ioAPI path and are provided by different metrics adapters such as Prometheus, Datadog, Microsoft Azure, or Google Stackdriver. - External metrics
-
This category is for metrics that describe resources that are not a part of the Kubernetes cluster. For example, you may have a Pod that consumes messages from a cloud-based queueing service. Very often in such a scenario, you may want to scale the number of consumer Pods based on the queue depth. Such a metric would be populated by an external metrics plugin similar to custom metrics.
Getting autoscaling right is not easy and involves a little bit of experimenting and tuning. The following are a few of the main areas to consider when setting up an HPA:
- Metric selection
-
Probably one of the most critical decisions around autoscaling is which metrics to use. For an HPA to be useful, there must be a direct correlation between the metric value and the number of Pod replicas. For example, if the chosen metric is of Queries-per-Second (such as HTTP requests per second) kind, increasing the number of Pods causes the average number of queries to go down as the queries are dispatched to more Pods. The same is true if the metric is CPU usage, as there is a direct correlation between the query rate and CPU usage (an increased number of queries would result in increased CPU usage). For other metrics such as memory consumption that is not the case. The issue with memory is that if a service consumes a certain amount of memory, starting more Pod instances most likely will not result in a memory decrease unless the application is clustered and aware of the other instances and has mechanisms to distribute and release its memory. If the memory is not released and reflected in the metrics, the HPA would create more and more Pods in an effort to decrease it, until it reaches the upper replica threshold, which is probably not the desired behavior. So choose a metric directly (preferably linearly) correlated to the number of Pods.
- Preventing thrashing
-
The HPA applies various techniques to avoid rapid execution of conflicting decisions that can lead to a fluctuating number of replicas when the load is not stable. For example, during scale-up, the HPA disregards high CPU usage samples when a Pod is initializing, ensuring a smoothing reaction to increasing load. During scale-down, to avoid scaling down in response to a short dip in usage, the controller considers all scale recommendations during a configurable time window and chooses the highest recommendation from within the window. All this makes HPA more stable to random metric fluctuations.
- Delayed reaction
-
Triggering a scaling action based on a metric value is a multistep process involving multiple Kubernetes components. First, it is the cAdvisor (container advisor) agent that collects metrics at regular intervals for the Kubelet. Then the metrics server collects metrics from the Kubelet at regular intervals. The HPA controller loop also runs periodically and analyzes the collected metrics. The HPA scaling formula introduces some delayed reaction to prevent fluctuations/thrashing (as explained in the previous point). All this activity accumulates into a delay between the cause and the scaling reaction. Tuning these parameters by introducing more delay makes the HPA less responsive, but reducing the delays increases the load on the platform and increases thrashing. Configuring Kubernetes to balance resources and performance is an ongoing learning process.
Vertical Pod Autoscaling
Horizontal scaling is preferred over vertical scaling because it is less disruptive, especially for stateless services. That is not the case for stateful services where vertical scaling may be preferred. Other scenarios where vertical scaling is useful is for tuning the actual resource needs of a service based on actual load patterns. We have discussed why identifying the correct number of replicas of a Pod might be difficult and even impossible when load changes over time. Vertical scaling also has these kinds of challenges in identifying the correct requests and limits for a container. The Kubernetes Vertical Pod Autoscaler (VPA) aims to address these challenges by automating the process of adjusting and allocating resources based on real-world usage feedback.
As we saw in Chapter 2, Predictable Demands, every container in a Pod can specify its CPU and memory requests, which influences where the managing Pods will be scheduled. In a sense, the resource requests and limits of a Pod form a contract between the Pod and the scheduler, which causes a certain amount of resources to be guaranteed or prevents the Pod from being scheduled. Setting the memory requests too low can cause nodes to be more tightly packed which in turn can lead to out-of-memory errors or workload eviction due to memory pressure. If the CPU limits are too low, CPU starvation and underperforming workloads can occur. On the other hand, specifying resource requests that are too high allocates unnecessary capacity leading to wasted resources. It is important to get resource requests as accurately as possible since they impact the cluster utilization and the effectiveness of horizontal scaling. Let’s see how VPA helps address this.
On a cluster with VPA and the metrics server installed, we can use a VPA definition to demonstrate vertical autoscaling of Pods, as in Example 24-5.
Example 24-5. VPA
apiVersion:poc.autoscaling.k8s.io/v1alpha1kind:VerticalPodAutoscalermetadata:name:random-generator-vpaspec:selector:matchLabels:app:random-generatorupdatePolicy:updateMode:"Off"
Label selector to identify the Pods to manage
The update policy for how VPA will apply changes
A VPA definition has the following main parts:
- Label selector
-
Specifies what to scale by identifying the Pods it should handle.
- Update policy
-
Controls how VPA applies changes. The
Initialmode allows assigning resource requests only during Pod creation time but not later. The defaultAutomode allows resource assignment to Pods at creation time, but additionally, it can update Pods during their lifetimes, by evicting and rescheduling the Pod. The valueOffdisables automatic changes to Pods, but allows suggesting resource values. This is a kind of dry run for discovering the right size of a container, but without applying it directly.
A VPA definition can also have a resource policy that influences how VPA computes the recommended resources (e.g., by setting per container lower and upper resource boundaries).
Depending on which .spec.updatePolicy.updateMode is configured, the VPA involves different system components. All three VPA components—recommender, admission plugin, and updater—are decoupled, independent, and can be replaced with alternative implementations. The module with the intelligence to produce recommendations is the recommender, which is inspired by Google’s Borg system. The current implementation analyzes the actual resource usage of a container under load for a certain period (by default, eight days), produces a histogram, and chooses a high percentile value for that period. In addition to metrics, it also considers resource and specifically memory-related Pod events such as evictions and OutOfMemory events.
In our example we chose .spec.updatePolicy.updateMode equals Off, but there are two other options to choose from, each with a different level of potential disruption on the scaled Pods. Let’s see how different values for updateMode work, starting from nondisruptive to a more disruptive order:
updateMode: Off-
The VPA recommender gathers Pod metrics and events and then produces recommendations. The VPA recommendations are always stored in the
statussection of the VPA resource. However, this is how far theOffmode goes. It analyzes and produces recommendations, but it does not apply them to the Pods. This mode is useful for getting insight on the Pod resource consumption without introducing any changes and causing disruption. That decision is left for the user to make if desired. updateMode: Initial-
In this mode, the VPA goes one step further. In addition to the activities performed by the recommender component, it also activates the VPA admission plugin, which applies the recommendations to newly created Pods only. For example, if a Pod is scaled manually through an HPA, updated by a Deployment, or evicted and restarted for whatever reason, the Pod’s resource request values are updated by the VPA Admission Controller.
This controller is a mutating admission plugin that overrides the
requestsof new Pods matching the VPA label selector. This mode does not restart a running Pod, but it is still partially disruptive because it changes the resource request of newly created Pods. This in turn can affect where a new Pod is scheduled. What’s more, it is possible that after applying the recommended resource requests, the Pod is scheduled to a different node, which can have unexpected consequences. Or worse, the Pod might not be scheduled to any node if there is not enough capacity on the cluster. updateMode: Auto-
In addition to the recommendation creation and its application for newly created Pods as described previously, in this mode the VPA also activates its updated component. This component evicts running Pods matching its label selector. After the eviction, the Pods get recreated by the VPA admission plugin component, which updates their resource requests. So this approach is the most disruptive as it restarts all Pods to forcefully apply the recommendations and can lead to unexpected scheduling issues as described earlier.
Kubernetes is designed to manage immutable containers with immutable Pod spec definitions as seen in Figure 24-2. While this simplifies horizontal scaling, it introduces challenges for vertical scaling such as requiring Pod deletion and recreation, which can impact scheduling and cause service disruptions. This is true even when the Pod is scaling down and wants to release already allocated resources with no disruption.
Another concern is around the VPA and HPA coexistence because these autoscalers are not currently aware of each other, which can lead to unwanted behavior. For example, if an HPA is using resource metrics such as CPU and memory and the VPA is also influencing the same values, you may end up with horizontally scaled Pods that are also vertically scaled (hence double scaling).
We don’t go into more detail here because the VPA is still in beta and may change after it’s in active use. But it is a feature that has the potential to improve resource consumption significantly.

Figure 24-2. Vertical Pod autoscaling mechanism
Cluster Autoscaling
The patterns in this book primarily use Kubernetes primitives and resources targeted at developers using a Kubernetes cluster that’s already set up, which is usually an operational task. Since it is a topic related to elasticity and scaling of workloads, we will cover the Kubernetes Cluster Autoscaler (CA) here briefly.
One of the tenets of cloud computing is pay-as-you-go resource consumption. We can consume cloud services when needed, and only as much as needed. CA can interact with cloud providers where Kubernetes is running, and request additional nodes during peak times or shut down idle nodes during other times, reducing infrastructure costs. While HPA and VPA perform Pod-level scaling and ensure service capacity elasticity within a cluster, CA provides node scalability to ensure cluster capacity elasticity.
CA is a Kubernetes addon that has to be turned on and configured with a minimum and maximum number of nodes. It can function only when the Kubernetes cluster is running on a cloud-computing infrastructure where nodes can be provisioned and decommissioned on demand and that has support for Kubernetes CA, such as AWS, Microsoft Azure, or Google Compute Engine.
A CA performs primarily two operations: add new nodes to a cluster or remove nodes from a cluster. Let’s see how these actions are performed:
- Adding a new node (scale-up)
-
If you have an application with a variable load (busy times during the day, weekend, or holiday season, and much less load during other times), you need varying capacity to meet these demands. You could buy fixed capacity from a cloud provider to cover the peak times, but paying for it during less busy periods reduces the benefits of cloud computing. This is where CA becomes truly useful.
When a Pod is scaled horizontally or vertically, either manually or through HPA or VPA, the replicas have to be assigned to nodes with enough capacity to satisfy the requested CPU and memory. If there is no node in the cluster with enough capacity to satisfy all of the Pod’s requirements, the Pod is marked as unschedulable and remains in the waiting state until such a node is found. CA monitors for such Pods to see whether adding a new node would satisfy the needs of the Pods. If the answer is yes, it resizes the cluster and accommodates the waiting Pods.
CA cannot expand the cluster by a random node—it has to choose a node from the available node groups the cluster is running on. It assumes that all the machines in a node group have the same capacity and the same labels, and that they run the same Pods specified by local manifest files or DaemonSets. This assumption is necessary for CA to estimate how much extra Pod capacity a new node will add to the cluster.
If multiple node groups are satisfying the needs of the waiting Pods, then CA can be configured to choose a node group by different strategies called expanders. An expander can expand a node group with an additional node by prioritizing least cost, least resource waste, accommodating most Pods, or just randomly. At the end of a successful node selection, a new machine should be provisioned by the cloud provider in a few minutes and registered in the API Server as a new Kubernetes node ready to host the waiting Pods.
- Removing a node (scale-down)
-
Scaling down Pods or nodes without service disruption is always more involved and requires many checks. CA performs scale-down if there is no need to scale up and a node is identified as unneeded. A node is qualified for scale-down if it satisfies the following main conditions:
-
More than half of its capacity is unused—that is, the sum of all requested CPU and memory of all Pods on the node is less than 50% of the node allocatable resource capacity.
-
All movable Pods on the node (Pods that are not run locally by manifest files or Pods created by DaemonSets) can be placed on other nodes. To prove that, CA performs a scheduling simulation and identifies the future location of every Pod that would be evicted. The final location of the Pods still is determined by the scheduler and can be different, but the simulation ensures there is spare capacity for the Pods.
-
There are no other reasons to prevent node deletion, such as a node being excluded from scaling down through annotations.
-
There are no Pods that cannot be moved, such as Pods with PodDisruptionBudget that cannot be satisfied, Pods with local storage, Pods with annotations preventing eviction, Pods created without a controller, or system Pods.
All of these checks are performed to ensure no Pod is deleted that cannot be started on a different node. If all of the preceding conditions are true for a while (the default is 10 minutes), the node qualifies for deletion. The node is deleted by marking it as unschedulable and moving all Pods from it to other nodes.
-
Figure 24-3 summarizes how the CA interacts with cloud providers and Kubernetes for scaling out cluster nodes.

Figure 24-3. Cluster autoscaling mechanism
As you probably figured out by now, scaling Pods and nodes are decoupled but complementary procedures. An HPA or VPA can analyze usage metrics, events, and scale Pods. If the cluster capacity is insufficient, the CA kicks in and increases the capacity. The CA is also helpful when there are irregularities in the cluster load due to batch Jobs, recurring tasks, continuous integration tests, or other peak tasks that require a temporary increase in the capacity. It can increase and reduce capacity and provide significant savings on cloud infrastructure costs.
Scaling Levels
In this chapter, we explored various techniques for scaling deployed workloads to meet their changing resource needs. While a human operator can manually perform most of the activities listed here, that doesn’t align with the cloud-native mindset. In order to enable large-scale distributed system management, the automation of repetitive activities is a must. The preferred approach is to automate scaling and enable human operators to focus on tasks that a Kubernetes operator cannot automate yet.
Let’s review all of the scaling techniques, from the more granular to the more coarse-grained order as shown in Figure 24-4.

Figure 24-4. Application-scaling levels
Application Tuning
At the most granular level, there is an application tuning technique we didn’t cover in this chapter, as it is not a Kubernetes-related activity. However, the very first action you can take is to tune the application running in the container to best use allocated resources. This activity is not performed every time a service is scaled, but it must be performed initially before hitting production. For example, for Java runtimes, that is right-sizing thread pools for best use of the available CPU shares the container is getting. Then tuning the different memory regions such as heap, nonheap, and thread stack sizes. Adjusting these values is typically performed through configuration changes rather than code changes.
Container-native applications use start scripts that can calculate good default values for thread counts, and memory sizes for the application based on the allocated container resources rather than the shared full node capacity. Using such scripts is an excellent first step. You can also go one step further and use techniques and libraries such as Netflix’s Adaptive Concurrency Limits library, where the application can dynamically calculate its concurrency limits by self-profiling and adapting. This is a kind of in-app autoscaling that removes the need for manually tuning services.
Tuning applications can cause regressions similar to a code change and must be followed by a degree of testing. For example, changing the heap size of an application can cause it to be killed with an OutOfMemory error and horizontal scaling won’t be able to help. On the other hand, scaling Pods vertically or horizontally, or provisioning more nodes will not be as effective if your application is not consuming the resources allocated for the container properly. So tuning for scale at this level can impact all other scaling methods and can be disruptive, but it must be performed at least once to get optimal application behavior.
Vertical Pod Autoscaling
Assuming the application is consuming the container resources effectively, the next step is setting the right resource requests and limits in the containers. Earlier we explored how VPA can automate the process of discovering and applying optimal values driven by real consumption. A significant concern here is that Kubernetes requires Pods to be deleted and created from scratch, which leaves the potential for short or unexpected periods of service disruption. Allocating more resources to a resource starved container may make the Pod unschedulable and increase the load on other instances even more. Increasing container resources may also require application tuning to best use the increased resources.
Horizontal Pod Autoscaling
The preceding two techniques are a form of vertical scaling; we hope to get better performance from existing Pods by tuning them but without changing their count. The following two techniques are a form of horizontal scaling: we don’t touch the Pod specification, but we change the Pod and node count. This approach reduces the chances for the introduction of any regression and disruption and allows more straightforward automation. HPA is currently the most popular form of scaling. While initially, it provided minimal functionality through CPU and memory metrics support only, now using custom and external metrics allow more advanced scaling use cases.
Assuming that you have performed the preceding two methods once for identifying good values for the application setup itself and determined the resource consumption of the container, from there on, you can enable HPA and have the application adapt to shifting resource needs.
Cluster Autoscaling
The scaling techniques described in HPA and VPA provide elasticity within the boundary of the cluster capacity only. You can apply them, only if there is enough room within the Kubernetes cluster. CA introduces flexibility at the cluster capacity level. CA is complementary to the other scaling methods, but also completely decoupled. It doesn’t care about the reason for extra capacity demand or why there is unused capacity, or whether it is a human operator, or an autoscaler that is changing the workload profiles. It can extend the cluster to ensure demanded capacity, or shrink it to spare some resources.
Discussion
Elasticity and the different scaling techniques are an area of Kubernetes that are still actively evolving. HPA recently added proper metric support, and VPA is still experimental. Also, with the popularization of the serverless programming model, scaling to zero and quick scaling has become a priority. Knative serving is a Kubernetes addon that exactly addresses this need to provide the foundation for scale-to-zero as we briefly describe in “Knative Serving” and “Knative Build”. Knative and the underlying service meshes are progressing quickly and introduce very exciting new cloud-native primitives. We are watching this space closely and recommend you to have an eye on Knative too.
Given a desired state specification of a distributed system, Kubernetes can create and maintain it. It also makes it reliable and resilient to failures, by continuously monitoring and self-healing and ensuring its current state matches the desired one. While a resilient and reliable system is good enough for many applications today, Kubernetes goes a step further. A small but properly configured Kubernetes system would not break under heavy load, but instead would scale the Pods and nodes. So in the face of these external stressors, the system would get bigger and stronger rather than weaker and brittle, giving Kubernetes antifragile capabilities.
More Information
1 For multiple running Pods, the average CPU utilization is used as currentMetricValue.