
13
Customize Everything with Overrides
In the previous chapter, we explored Joomla templates, the options to customize them, and the differences between template styles.
We’ll now look at overrides, a feature that enhances the level of flexibility of Joomla, increasing the number of ways you can customize your website.
After reading this chapter, you will be able to do the following:
- Understand what overrides are
- Create an override for a module view
- Create an override for a component view
- Create a language override
Note
Creating overrides requires HTML, PHP, and CSS knowledge.
What is an override?
As we saw in the previous chapter, the appearance of your website highly relates to how the template is structured and styled. Sometimes you may want to customize how a specific part of the website looks, going beyond the options offered by the template style in use. Overrides help with that, allowing you to completely customize the appearance of your website through PHP, to make your website fit your styling requirements. Furthermore, overrides make you work on a copy of system files, without altering the original files, ensuring you have the opportunity to start from scratch in case of issues or when you change the template and, more importantly, preventing software updates from overwriting your changes.
Basically, with overrides, it’s possible to completely rewrite all the views in Joomla, tailoring the appearance of any component or module output for your website.
What is a view?
A view is the PHP file that defines the appearance of the output of a component or a module. The view file includes the layout definition and all the page elements, such as tables, lists, and much more.
Overrides are heavily connected with templates, as for each template, it’s possible to create specific overrides. When you create an override for a template, the original Joomla file for the specific view is copied to the /html folder under the template folder structure. The copy of the file under the template override folder is the one you need to edit at your convenience.
When loading a page, Joomla checks whether there is an override file for the specific layout in use and, if one exists, the override takes precedence over the standard layout.
The override system is heavily used in Joomla, in fact, most template producers distribute overrides for system standard views in their template packages so that they can provide customized layouts for core components such as articles, contacts, and categories.
In the next section, we’ll discover where to use overrides and when they can be extremely helpful.
Where to use overrides
As displayed in Figure 13.1, Joomla provides the ability to create overrides for all elements that include a view:
- Modules
- Components
- Plugins
- Layouts

Figure 13.1 – Overridable items
This grants a high degree of flexibility, as each part visible on the public website is completely customizable.
Based on the item selected, there could be one or more views that can be customized; each view resides in a specific PHP file that will be added in the /html folder under the template in which you are creating the override.
If, on one hand, overrides increase the level of customization of your website’s appearance; on the other, they can cause some files to not be up to date, as they were duplicated. To prevent missing updates, Joomla includes an interesting feature that checks automatically whether the original files of any of the overridden files have been updated, so that you can check and eventually apply changes to your files to ensure security and compatibility with the latest version of the CMS.
To check whether the files you have changed have been updated or not, on the template management screen, there is the Updated Files tab, as displayed in Figure 13.2.

Figure 13.2 – Overrides | Updated Files
When a core or extension update involves any of the overridden files, then on the Updated Files screen, you can see the list of changed files. For each file, you can see the file path, the date when it was added to the list, the date the latest change occurred through updates, and the source of the update, as shown in Figure 13.3.
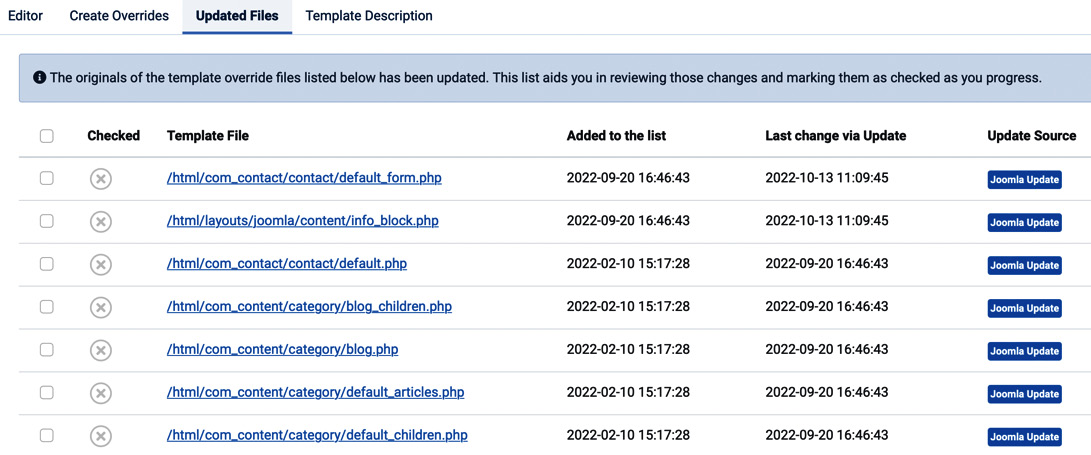
Figure 13.3 – Overrides | Updated Files – List of changed files
You can check each file in the list by clicking on the file name.
If you enable the Show Difference toggle in the editing screen, you can see, in addition to the regular code editing box, a new box in which the changes to the file are highlighted. Removed content is highlighted in red, and added content is highlighted in green, as shown in Figure 13.4.
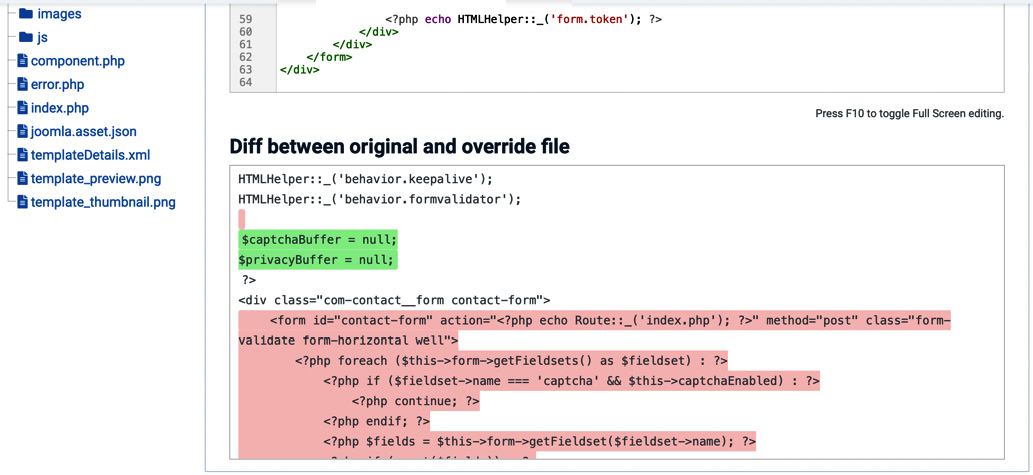
Figure 13.4 – Overrides | Updated Files | Show Difference
You can then verify each modified file to ensure it includes all the required code. After completing the operation, you can mark the file as checked by clicking on the symbol in the Checked column in the list of updated files. The file will be then marked as checked, as shown in Figure 13.5.
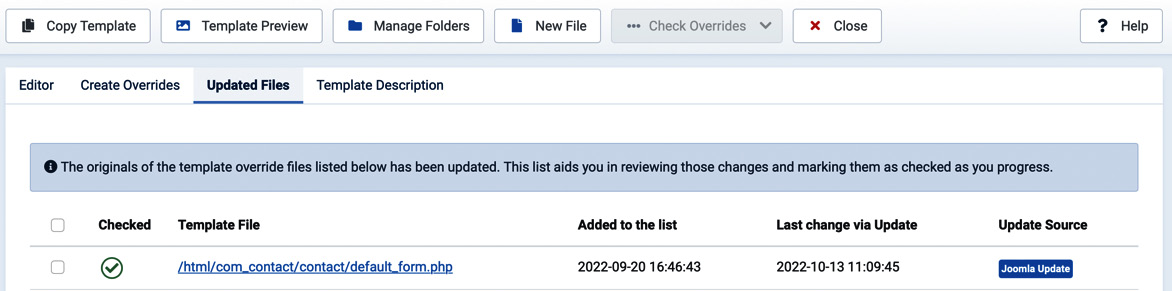
Figure 13.5 – Overrides | Updated Files | Checked file
In this way, your overrides are always up to date and kept in sync with the core updates. In the next section, we will create an override as an example.
Example – overriding the appearance of a single article
In this example, we will see overrides in action. We want to change the appearance of a single article, making our article titles rendered as an H2 header instead of H1.
Let’s start creating our override:
- From System Dashboard, open Site Templates.
- Since our website is using the Cassiopeia template, let’s click on Cassiopeia Details and Files.
- Open the Create Overrides tab – as shown in Figure 13.1.
- In the Components group, click on the com_content folder. The list of overridable items in the group opens, as shown in Figure 13.6.

Figure 13.6 – Overrides | Create Overrides | com_content
- From the list of overridable items in com_content, let’s click on article. This represents the single article view in the frontend.
- By clicking on article, the system confirms the creation of the override, displaying the path of the override files created, as in Figure 13.7.

Figure 13.7 – Overrides | Create Overrides – Override creation confirmation
- In fact, if we look at the /html/com_content/article folder of the Cassiopeia template in the Editor tab, we can see two files: default.php and default_links.php, as shown in Figure 13.8.

Figure 13.8 – Overrides | Override files
- Let’s open the default.php file by clicking on its name. The file opens in the code editor within the Template Manager. The code we want to edit resides in row 41 of the file, as highlighted in Figure 13.9.

Figure 13.9 – Overrides | File editing
- At row 41, we replace the HTML <h1> tag with <h2> and click on the Save & Close button. We have created our first override – a very easy one – but that can be meaningful for SEO purposes, in certain cases.
- Now open the website and check that the appearance of single article titles have changed to use H2 headers.
Overrides can also be used to add custom CSS class markers to page items in the template structure or to simplify the page view, removing non desired items.
Removing an override
If we have messed up the structure of the file or if we simply want to remove an override, we just need to delete the folder or the override file that is placed under the html folder of the template in use. For example, if we want to remove the override created in this tutorial, we can either remove the /html/com_content folder or the /html/com_content/article/default.php file.
In the next example, we will create an override of a module.
Example – overriding the style of a module
In this example, we want to override a module standard view. Let’s work on the mod_footer module:
- On the Create Override page (seen previously in Figure 13.1), let’s click on mod_footer displayed in the Modules group.
- The system will confirm the creation of the override, showing its path, as in Figure 13.10.
=
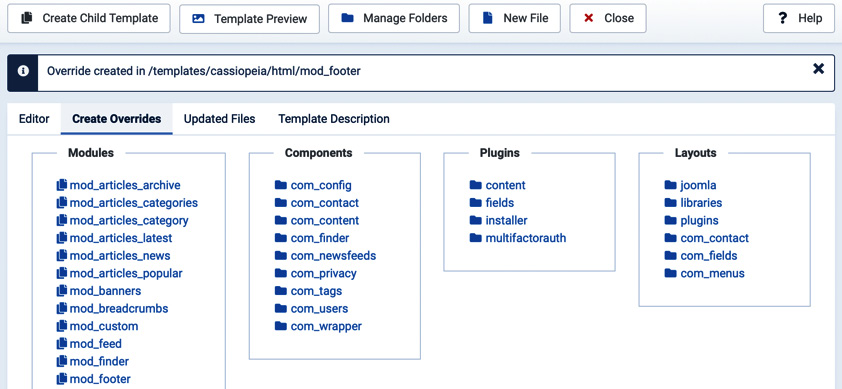
Figure 13.10 – Overrides | mod_footer override creation confirmation
- Let’s move to the Editor tab and navigate to the /html/mod_footer folder.
- The only file in this folder is default.php, which we open by clicking on its name.
- The file opens in the Editor tab, as shown in Figure 13.11.

Figure 13.11 – Overrides | mod_footer override
- Let’s change the CSS class that is used to display the first line of the footer. Currently, by default, the CSS class used is footer1. We can change it to myfooter at row 17.
- Click on Save & Close to save your override.
- We now need to define our custom CSS class. To do so, in the template structure tree shown in the Editor tab, let’s navigate to the css folder, as highlighted in Figure 13.12.

Figure 13.12 – Overrides | Template CSS folder
- Click on the New File button in the toolbar. In the popup, select the css folder, type custom for File Name and select .css as File Type, as shown in Figure 13.13.

Figure 13.13 – Overrides | Creating a custom.css file
- Click on Create and the file will be created in the /css folder. The system will open the custom.css file for editing right after its creation, as shown in Figure 13.14.
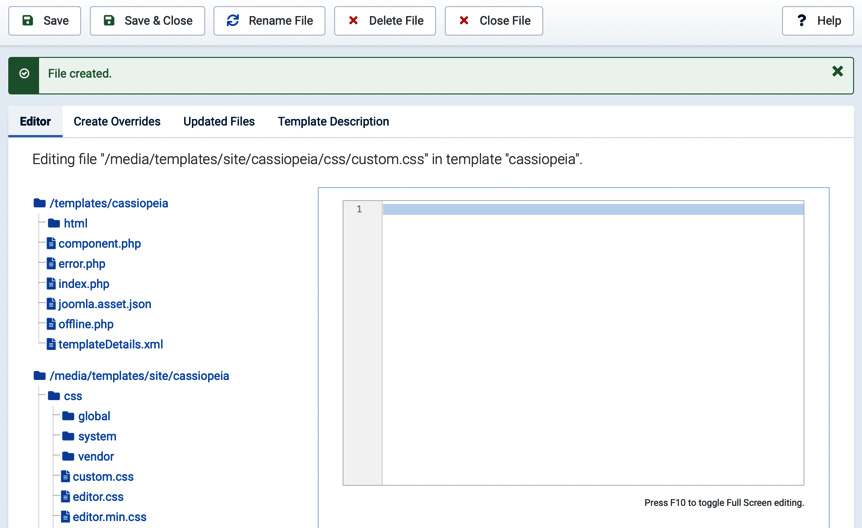
Figure 13.14 – Overrides | custom.css file editing window
- Let’s type the following rule in the custom.css file:
.myfooter {font-size: 13px;
font-weight: 600;
color: #1c77ba;
}
- The CSS code will render the footer line that uses the myfooter CSS class in bold, 13-pixel font size and in blue. Click on Save & Close to apply changes and save the code.
- Now open the website and check whether the footer is displayed with the style that we just defined. If the changes are not visible, clear your browser’s cache.
Overriding your template CSS
In Joomla, there is a simple way to override the CSS of a template. Simply create a new file under the /css folder of your template called custom.css. Such a file can contain your customized CSS rules or completely new classes that you can recall from overrides and other Joomla items. Joomla automatically checks whether or not a custom.css file exists in the css folder of your template. If it exists, rules specified in it take priority over those of the standard template CSS files. The use of the custom.css file prevents your changes being lost while updating your templates.
In the previous examples, we explored the procedure to override a component output (single article view) and the style applied to a module (mod_footer), completing our basic overview on overrides. In the next section, we will explore another type of override that is applied to language strings: language overrides.
Language overrides
To complete this part about overrides, we should discuss language overrides. Sometimes you want to change some language strings to better fit your website needs. Language overrides help us with that, without the need to operate directly on original language pack files, preventing us from losing our changes while updating Joomla language files.
Language overrides allow us to modify a language string in the desired language simply from the Joomla backend.
Let’s start creating our first language override:
- From System Dashboard, click on the Languages Overrides link. The screen looks like Figure 13.15.

Figure 13.15 – Languages: Overrides
- The Languages: Overrides page will look empty since there are no overrides that are applied generally to all languages and clients. To check active language overrides, we need to select the Select Language & Client option from the drop-down menu, as shown in Figure 13.16.

Figure 13.16 – Languages: Overrides | Select Language & Client
- In this example, we want to change the word Hits, which is the visits counter shown for each article on the website frontend, as highlighted in Figure 13.17.

Figure 13.17 – Languages: Overrides | String to be overridden
- To do so, let’s click on English (United Kingdom) – Site in the Select Language & Client selection dropdown. Then click on the New button.
- The edit override screen appears and looks like Figure 13.18.
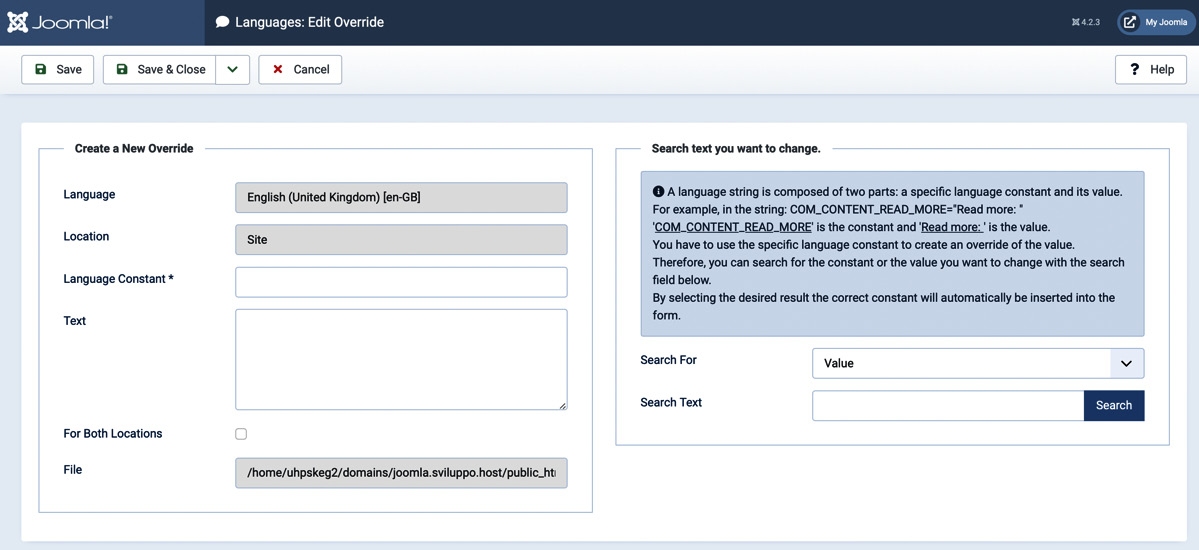
Figure 13.18 – Languages: Overrides | Edit Override
- In the Search Text field, type Hits and click on the Search button. Results appear under the right column, as shown in Figure 13.19.

Figure 13.19 – Languages: Overrides | String search results
- As you can see in the preceding screenshot, every language string is composed of text (that is the one shown on the website) and a constant. The constant is the unique string identifier in the system. You can search language strings either by Value (the visible text) or by Constant (the unique identifier). In this case, we select the first result, so the string identified by the constant COM_CONTENT_ARTICLE_HITS, by clicking on the result.
- The left box is populated automatically with the corresponding Language Constant and the actual string Text.
- Let’s change Text from Hits: %s to Page Views: %s, as shown in Figure 13.20.
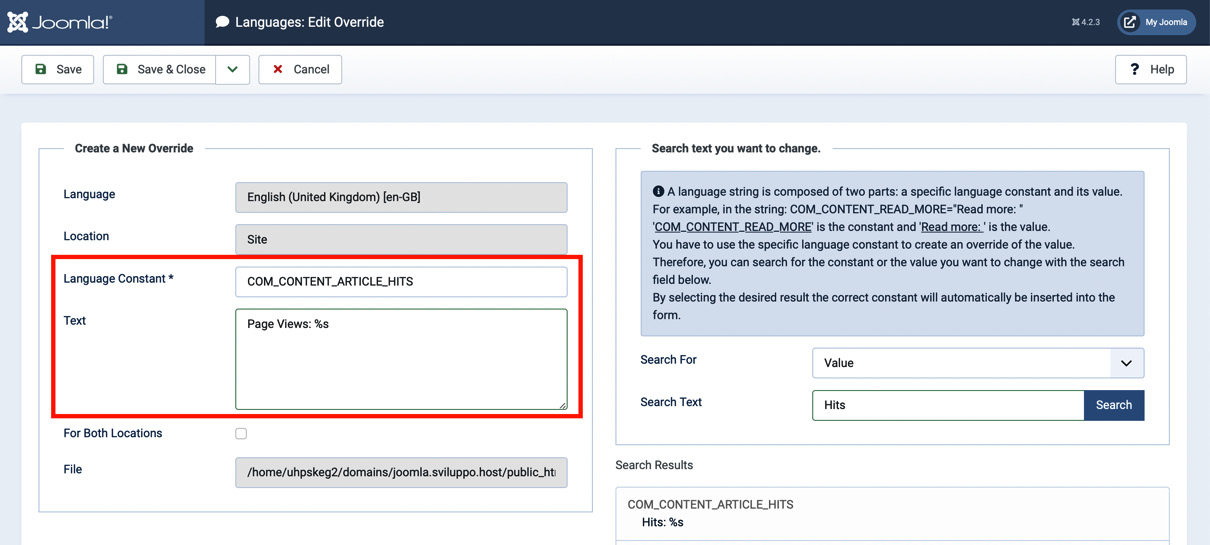
Figure 13.20 – Languages: Overrides | Create an override
- Once done, click on the Save & Close button to create our override.
- Now check the public website to see if the override is applied. Results should look like Figure 13.21.
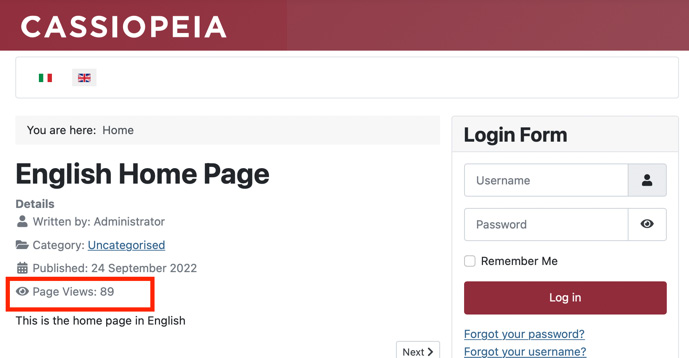
Figure 13.21 – Language Overrides | A language override in action
Creating language overrides is simple and may be useful to customize how some of the strings are displayed in our website.
Special symbols and characters in strings
Some language strings may include special symbols and characters, such as the one we changed in the example above. The %s marker in a language string is replaced automatically on the website by a variable, in fact the original string was Hits: %s and on the website, we can see the number of hits. Be careful while creating overrides to keep all the special characters that represent variables or calculated values.
With language overrides we completed the exploration of overrides. Test your knowledge with the exercises proposed in the next section.
Exercises
It’s time to apply the knowledge about overrides acquired in this chapter through the proposed exercises.
Exercise 1 – Create a module override
In this exercise, you are going to create a new override for the login module. We want to inject text into the login module once the users are logged in to warn them about the session expiration:
- In the Cassiopeia template, create a new override for mod_login. In /html/mod_login, we can find two new files, named default.php and default_logout.php, respectively.
- Since we want to edit the view of the module once users are logged in, we are going to edit only the default_logout.php file.
- Delete the default.php file through the Delete File button.
- Open the default_logout.php file and add the following code prior to line 36 of the file:
<p class="text-center">
Please note that your session will expire 15 minutes after your last action.
</p>
- Click on the Save & Close button to save your override, then open your website frontend and log in to see if your override works properly.
Exercise 2 – Create a language override
In this exercise, you are required to create a new language override.
In Languages: Overrides, create a new override for the English (United Kingdom) – Site language, changing the Written by: %s string to Author: %s on the website. To do so, you need to create an override for the string identified by the constant COM_CONTENT_WRITTEN_BY. Follow the steps seen in the preceding example to change the language string. Once done, save the override and check the results on the website frontend.
Summary
In this chapter, we have explored the override features of Joomla and understood how to create overrides for a component or a module view. We have also discovered a different type of override related to language files.
In the next chapter, we’ll complete the presentation of the template-related features, introducing child templates.
Further reading
- Template Overrides – Joomla Documentation: https://docs.joomla.org/J4.x:Template_Overrides
- Case Study: A simplified version of Cassiopeia: https://docs.joomla.org/J4.x:Cassiopeia_Template_Simplified_-_A_Case_Study