
Starting with JSF 2.0 we have access to a standard mechanism for defining and accessing resources. We must place our resources under a top-level directory named resources, and use the dedicated JSF 2 tags to access those resources in our views.
We have developed this recipe with NetBeans 6.8, JSF 2.0, and GlassFish v3. The JSF 2.0 classes were obtained from the NetBeans JSF 2.0 bundled library.
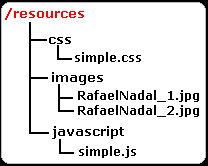
First, we create the top-level folder, named resources, and, under it, we create a set of sub-folders that reflect their content by suggestive names. For example, the following figure is our resources folder tree:
Going further, we can access resources with a set of dedicated tags, as follows:
- Accessing images can be accomplished with
h:graphicImage, shown next:<h:graphicImage library="images" name="RafaelNadal_1.jpg"/> <h:graphicImage library="images" name="RafaelNadal_2.jpg"/>
- Accessing CSS documents can be accomplished with
h:outputStylesheet, shown next:<h:outputStylesheet library="css" name="simple.css"/>
- Accessing JS documents can be accomplished with
h:outputScript, shown next:<h:outputScript library="javascript" name="simple.js" target="head"/>
Notice that in all tags we have a common attribute, named library. Its value corresponds to the name of a sub-directory of the resources directory—the name of the directory in which the resource resides. The name attribute indicates the resource name and the target attribute indicates where the resource should be placed (as you can see, we placed the JavaScript resource under the <head> tag—remember that if you put JavaScript in the <body> of a page, the browser will execute the JavaScript when the page loads. On the other hand, if you place JavaScript in the <head> of a page, that JavaScript will only be executed when called.).
Working with this new mechanism is very simple and intuitive since JSF will automatically search for our resources under the resources folder. All we need to do is to use the corresponding tag as you just saw. The most important thing is to correctly indicate the sub-folder of the resources folder and the resource's name and JSF will take care of the rest.
Sometimes you'll need to access a resource using the JSF expression language. For example, you can access an image with h:graphicImage, like this:
<h:graphicImage value="#{resource['images:RafaelNadal_1.jpg']}"/>